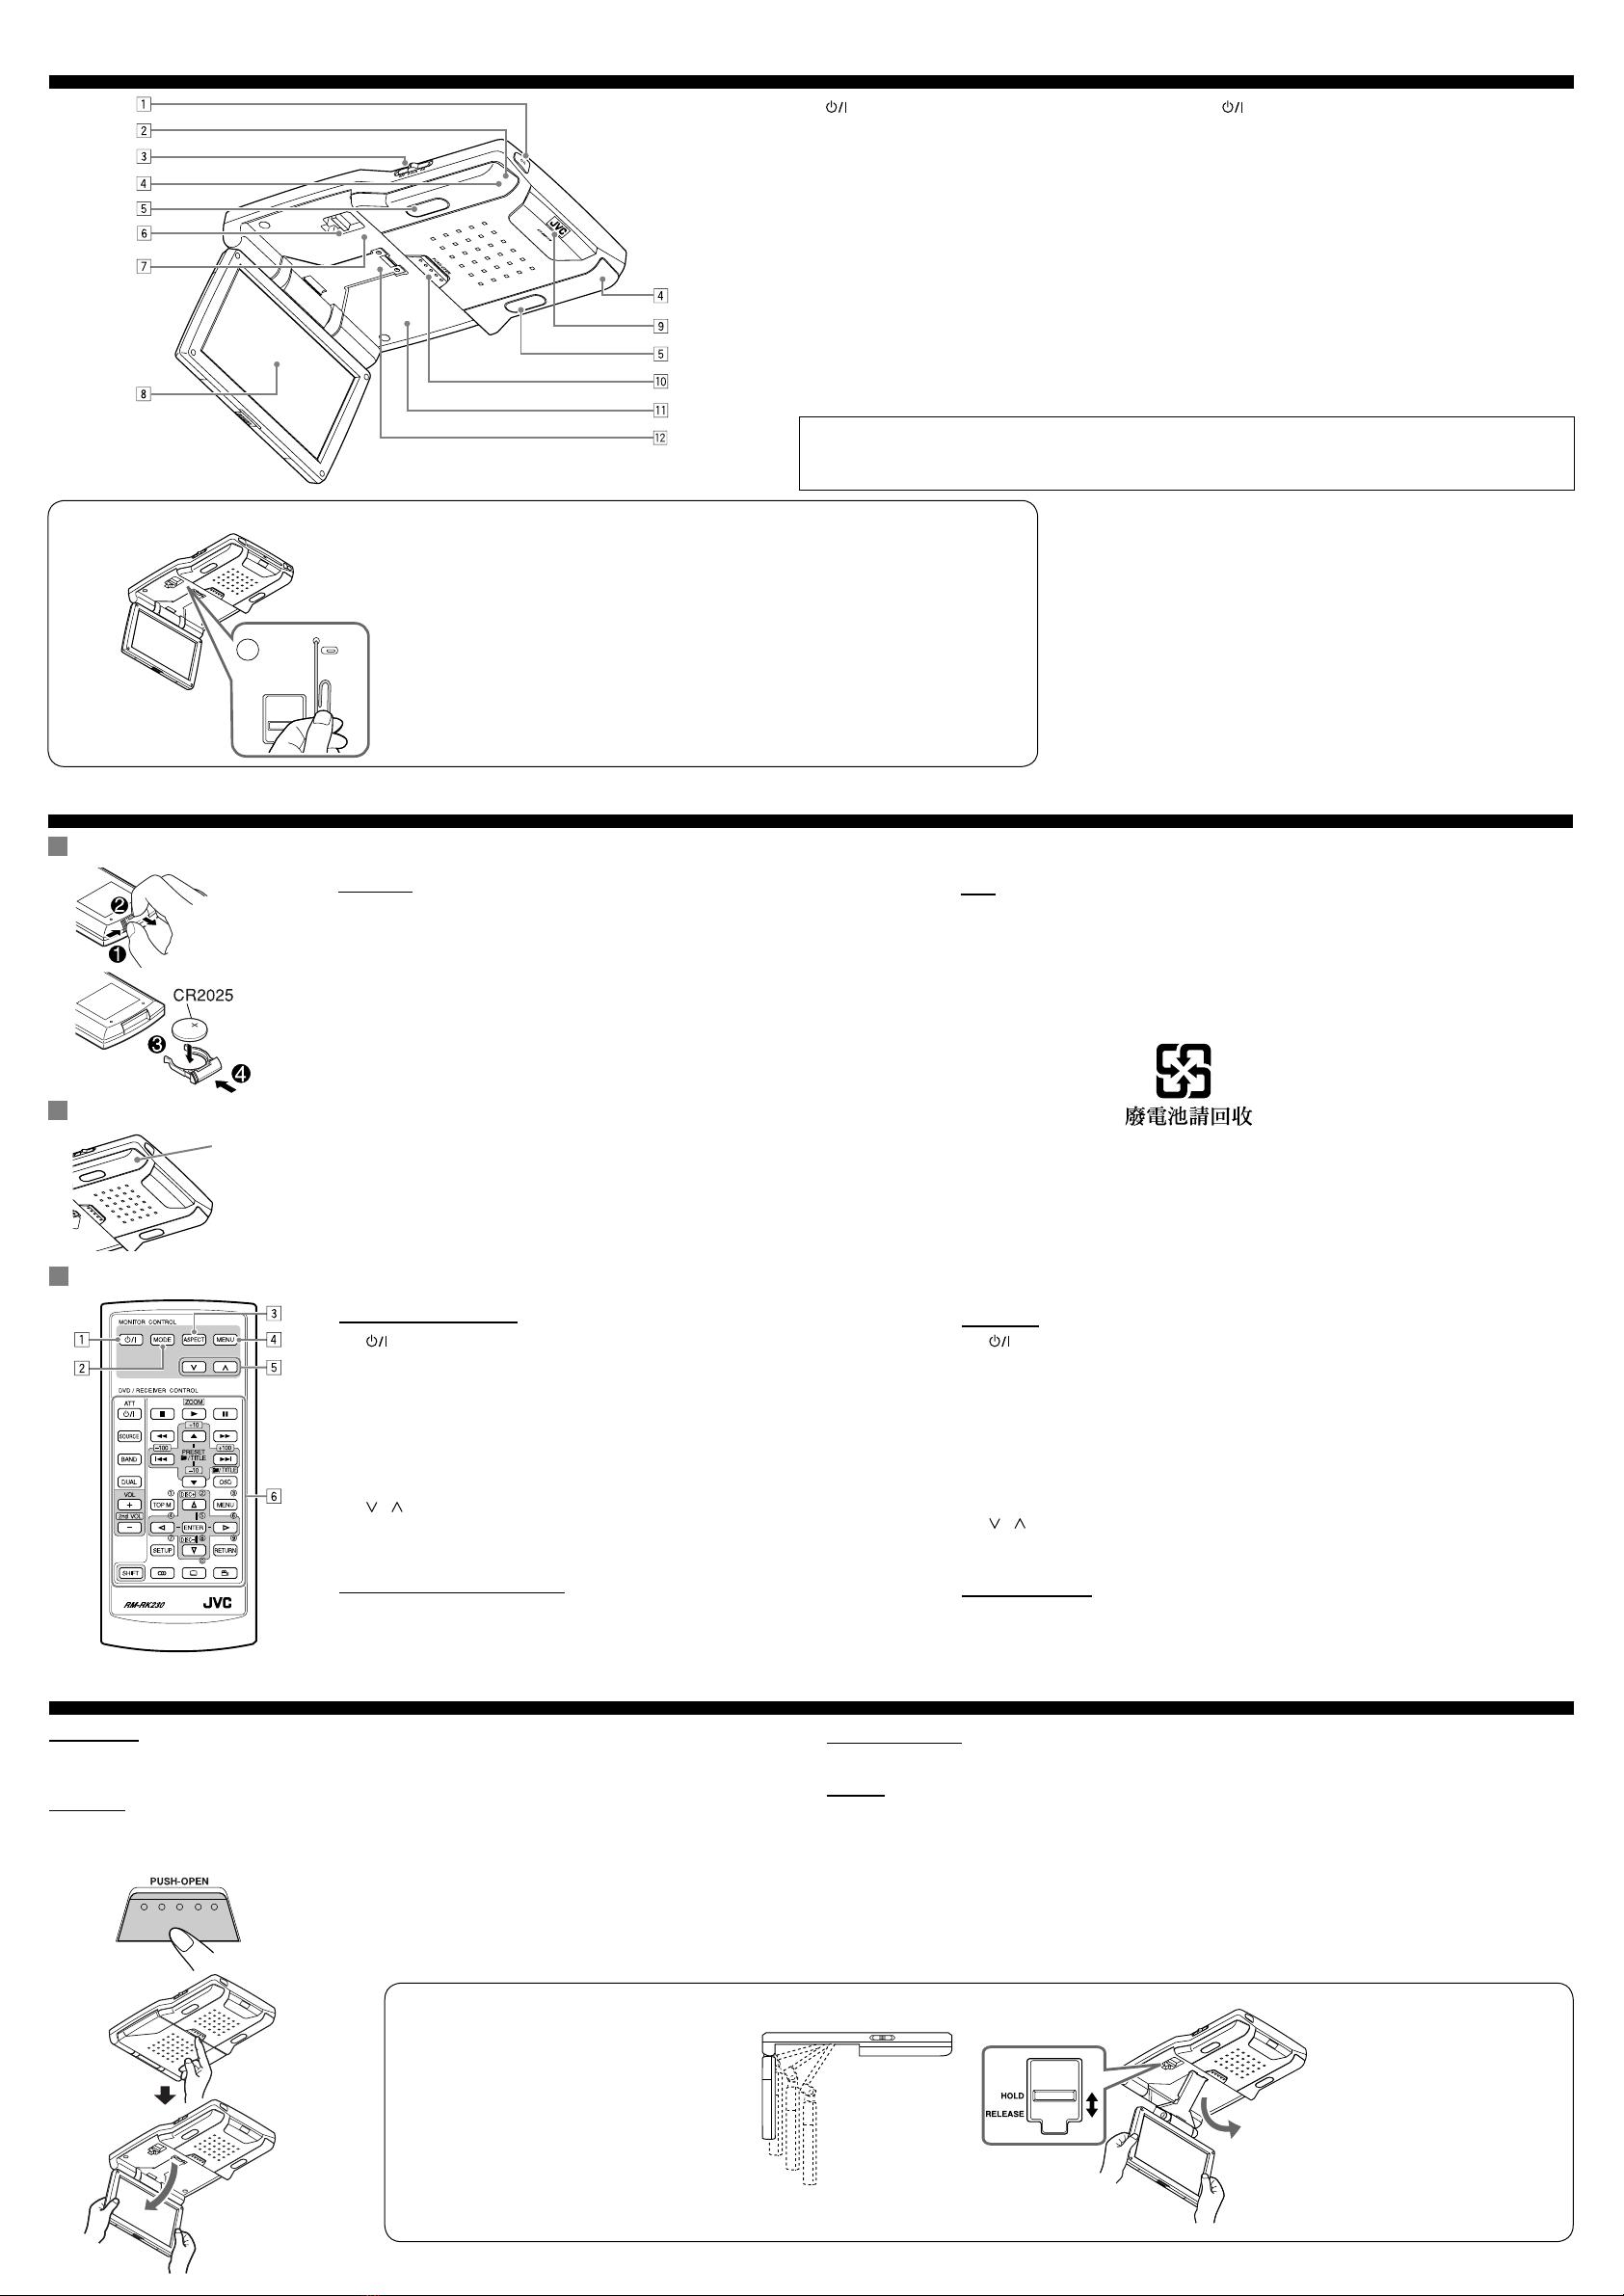
manuals.online logo
Brands
  1. Home
  2. •
  3. Brands
  4. •
  5. JVC
  6. •
  7. Car Video System
  8. •
  9. JVC KV-MR9010 User manual

JVC KV-MR9010 User manual

1
KV-MR9010
9-INCH WIDESCREEN MONITOR : INSTRUCTIONS
9-英吋寬頻顯示器:使用說明書
LVT1328-006B
[UT]
0305MNMMDWJEIN
EN, CT
© 2005 Victor Company of Japan, Limited
ENGLISH
WARNINGS
• DO NOT INSTALL THE MONITOR IN A LOCATION WHICH OBSTRUCTS DRIVING,
VISIBILITY, SAFETY DEVICE FUNCTION SUCH AS AIR BAGS OR WHICH IS
PROHIBITED BY APPLICABLE LAWS AND REGULATIONS.
• There may be legal regulations defining the permissible installation locations for the
monitor which differ by country or by state. Be sure to install the monitor in a correct
location according to such laws.
• The driver must not operate the monitor while driving.
* Stop your vehicle in a safe location when operating the monitor.
• The driver must not watch the television or playback pictures while driving.
If the driver does it while driving, it may lead to carelessness and cause an accident.
•Keep the monitor at an appropriate sound level while driving.
Driving with the sound at a level that prevents you from hearing sounds outside of and
around the vehicle may cause an accident.
•Be sure not to let the monitor fall or be strongly impacted since this may cause a
malfunction or fire.
•Do not use the monitor with the engine off.
Doing so with the engine off will consume battery power and may prevent the engine
from starting.
•When not in use, close the liquid crystal panel and store it into the compartment.
•Do not touch the surface of the liquid crystal panel directly.
•Do not hang any object on the monitor or hang down, as this may damage the monitor.
CAUTION:
This monitor should be used on DC 12 V only. To prevent electric shocks and fire hazards, DO
NOT use any other power source.
Installation requires some special knowledge.
Do not install the monitor yourself. Consult a dealer having special knowledge of this
kind for safe and reliable installation.
Thank you for purchasing a JVC product. Please read all instructions carefully before operation,
to ensure your complete understanding and to obtain the best possible performance from the
unit.
• For installation and connections, refer to the separate manual.
•This system cannot receive television broadcasts and is primarily designed for use with a VCR or a DVD player. Use the separately sold TV tuner unit
KV-C1000 for optional television broadcast reception.
•本系統無法接收電視廣播,是為使用錄像機和 DVD 視盤機而進行的特殊設計,當要接收電視廣播時,請使用另購的 KV-C1000 型電視機調諧器。
For installation and connections, refer to the separate manual.
有關安裝和連接方法,分別參閱操作手冊。
For safety....
•Do not raise the volume level too much, as this will block outside sounds, making driving
dangerous.
•Stop the car before performing any complicated operations.
Temperature inside the car....
If you have parked the car for a long time in hot or cold weather, wait until the temperature in the
car becomes normal before operating the unit.
中文
警告
•請勿將顯示器安裝在妨礙駕駛,影響視線,妨礙操作安全設備如安全气袋或違反相關法規之處。
•不同的國家或政府可能對顯示屏裝置制定了法定容許的安裝位置。因此請遵從相關法律將顯示屏裝置安裝在
正確位置。
•司機在駕駛車輛時禁止操作顯示器系統。
* 在操作顯示器時請將車輛停靠在安全場所。
•司機在駕駛車輛時禁止收看電視或錄像節目。
如果司機在駕駛時收看電視或錄像節目可能會導致注意力不集中而引發交通事故。
•在駕駛時請保持顯示器處於適當的音量等級。
在駕駛車輛時,由於音量過高妨礙您聽清汽車周圍的聲音可能導致事故發生。
•勿讓顯示器摔落或受到劇烈的撞擊是因為如此可能會引起故障或火災。
•在汽車發動機停火後請勿使用顯示器。
在汽車發動機停火後觀看顯示器可能耗盡蓄電池以及妨礙發動機起動。
•不使用時,請關上液晶面板並保存在收藏櫥內。
• 切勿直接觸摸液晶顯示面板表面。
• 切勿在顯示器上懸掛任何物品,否則將會損壞顯示器。
注意:
本顯示器系統僅限使用 12 V 直流電。為防止電擊事故或火災的發生,請勿使用任何其他種類的電源。
本機的安裝要求特種技能。
切勿自己安裝本顯示器系統。為了保障安裝的安全性與可靠性,請委託持有特種技能的經銷商為您安裝。
多謝您惠購 JVC 的產品。在使用之前,請詳讀全部說明書,以確保完全理解本機使用方法,並獲
得較長的使用壽命。
•有關安裝和連接方法,分別參閱操作手冊。
基於安全事項....
•切勿將音量設定得太高,因為這會妨礙聽到外界的聲音,給駕駛帶來危險。
•在進行任何複雜的操作之前請先將車停下。
關於車內溫度....
若長時間將車停在炎熱或寒冷的氣候裡,在操作主機前請等待一段時間,直到車內的溫度恢復到正常。
Precautions∕使用前注意事項
The red spots, blue spots and green spots on the panel surface
are a normal characteristic of liquid crystal panels, and not a
problem.
面板表面有紅色,藍色和綠色斑點。此為液晶面板的特性而非故障。
Note:
The liquid crystal panel is built with very high precision technology and has at least 99.99% effective
image pixels. Be aware that on 0.01% of the panel there may be missing or constantly lit pixels.
注意:
本液晶面板採用高度精密技術製成,有效像素達到
99.99%
以上。但發現在
0.01%
的面板上仍存在持續不亮
像素或斷續閃亮像素。
When the temperature is very cold or very hot, the image may not appear clearly or may move
slowly.
The image may not be synchronized with the sound or the image quality may decline in such
environments. Note that this is not a malfunction or problem.
•Usage temperature range: 0°C to +40°C
當溫度過低或過高時,影像可能顯示不清晰或移動緩慢。
在這樣的環境中影像移動與聲音可能不同步,或者影像的質量會降低。請放心此非故障或問題。
•操作溫度範圍:0°C 至+40°C
0°C or colder
0°C 或更冷時
40°C or hotter
40°C 或更熱時
When the liquid crystal panel reaches high temperatures or low temperatures, chemical changes
occur within the liquid crystal panel which may cause it to malfunction.
液晶面板處於高溫或低溫時,其內部發生化學變化可能因而導致故障。
Do not expose the liquid crystal panel to direct sunlight.
•Storage temperature range: –20°C to +80°C
切勿將液晶面板暴露於陽光直射之處。
•放置溫度範圍:–20°C 至+80°C
Do not drop the liquid crystal panel or strike it sharply.
請勿摔落或強力撞擊液晶面板。
Spots
斑點
Cautions for handling the liquid crystal panel∕關於液晶面板的注意事項
During the summer,
temperatures can reach as high
as 100°C
夏季裡,溫度可高達 100°C
+80°C
–20°C
–20°C to +80°C
–20°C 至+80°C
CT_01-02_KV-MRD9010[UT].indd 1CT_01-02_KV-MRD9010[UT].indd 1 2005.05.12 9:44:22 AM2005.05.12 9:44:22 AM
2
Widescreen monitor∕寬屏顯示器
When you watch the screen at an angle, the picture might not be clear. This is not a malfunction. The finest
picture can be seen when you watch the screen straight-on.
當您以某個角度觀看螢幕時,圖像可能不清晰。此非故障。正面觀看螢幕時可看到最佳圖像。
1(待機∕開機)鍵
•若短暫地按則啟動電源。
•若按住則關閉電源。
2遙感器
3圓頂燈開關
參閱第 3頁的“如何啟動門禁感應器”。
4紅外線發射器
5圓頂燈
6支撐臂鎖桿
7重設鍵
8螢幕(液晶面板)
9白色 LED
pPUSH-OPEN
鍵
q螢幕收藏櫥
w螢幕支撐臂
Installing the lithium coin battery (CR2025)∕安裝鈕扣型鋰電池(CR2025)
Warning:
•Do not install any battery other than CR2025 or its equivalent; otherwise, it
may explode.
•Store the battery in a place where children cannot reach to avoid risk of
accident.
•To prevent the battery from over-heating, cracking, or starting a fire:
–Do not recharge, short, disassemble, or heat the battery or dispose of it in
a fire.
–Do not leave the battery with other metallic materials.
–Do not poke the battery with tweezers or similar tools.
–Wrap the battery with tape and insulate when throwing away or saving it.
警告
•切勿安裝 CR2025 或同種類型以外的電池,否則將引起炸裂。
•請將電池存放在兒童無法拿到的地方,以避免事故發生的危險。
•為防止電池過熱,炸裂或引起火災:
–切勿為電池充電,使電池短路,分解電池或加熱電池或將其扔置於火中。
–切勿將電池與其它金屬物質放在一起。
–切勿用鑷子或類似的工具穿刺電池。
–要廢棄或保存電池時,請用膠帶纏繞並使其處於絕緣狀態。
Remote controller — RM-RK230∕遙控器 — RM-RK230
Before using the remote controller∕在使用遙控器之前
•Aim the remote controller directly at the remote sensor on the monitor. Make
sure there is no obstacle in between.
•Do not expose the remote sensor to strong light (direct sunlight or artificial
lighting).
•將遙控器直接對準本機上的遙感器。確保兩者之間沒有障礙物。
•切勿將遙感器暴露於強光照射處(直射的陽光或人工光線)。
Remote sensor
遙感器
Main elements and features∕主要組成部分及作用
MONITOR CONTROL
1(standby/on) button
•Turns on the power if pressed.
•Turns off the power if pressed and held.
2MODE button
•Selects the playback source.
3ASPECT button
•Changes the aspect ratio of the screen.
4MENU button
•Calls up the menu, then selects the adjustable menu items.
5/ buttons
•Adjust the level of the selected item or select an appropriate setting for
selected item.
DVD/RECEIVER CONTROL
6Receiver control buttons
Controllable only if your car receiver which is connected to this monitor is
one of the JVC receivers.
顯示器控制
1(待機∕開機)鍵
•若短暫地按則啟動電源。
•若按住則關閉電源。
2MODE 鍵
•選擇播放源。
3ASPECT 鍵
•切換螢幕的縱橫比。
4MENU 鍵
•調出菜單,然後選擇可調整菜單項目。
5/ 鍵
•調整所選項目水平或為所選項目選擇適當的設定。
DVD∕接收機控制
6接收機控制鍵
僅在與顯示器相連接的汽車接收機為 JVC 接收機時才可如此操作。
Basic operations∕基本操作
11Open the liquid crystal panel.
Press PUSH-OPEN button until the liquid crystal panel is unlocked, then
open the liquid crystal panel by both hands.
When closing the liquid crystal panel, store it in the screen compartment until it
is locked.
1打開液晶面板。
按PUSH-OPEN 鍵直到打開液晶面板鎖,然後用雙手將液晶面板拉開。
關閉液晶面板時,將其保存在螢幕收藏櫥內直到鎖定液晶面板。
Preparation
Before operating the unit, make sure that all external components are correctly connected and
installed.
CAUTION:
•When not in use, close the liquid crystal panel and store it into the compartment; otherwise it may obstruct
the visibility through the rearview mirror.
•Do not touch the surface of the liquid crystal panel directly.
操作前注意事項
在操作顯示器系統之前,確保所有外接設備已正確連接和安裝完畢。
注意:
• 不使用時,請關上液晶面板並保存在收藏櫥內;否則會妨礙後視鏡的視野。
• 切勿直接觸摸液晶顯示面板表面。
To be continued....
續
....
1(standby/on) button
•Turns on the power if pressed.
•Turns off the power if pressed and held.
2Remote sensor
3Dome light switch
See “To activate the door sensor”on page 3.
4IR transmitters
5Dome lights
6Arm lock lever
7Reset button
8Screen (Liquid crystal panel)
9White LED
pPUSH-OPEN button
qScreen compartment
wScreen arm
You can select four positions from the three
positions.
1Slide the arm lock lever to RELEASE, then
pull down or push up the monitor.
2Slide the arm lock lever to HOLD, then
remove the screen arm to the nearest
locked position.
您可以從以下四個位置中選擇一個適當的顯示器位置。
1將支撐臂鎖鎖桿滑至 RELEASE,然後拉下或推
起顯示器。
2將支撐臂鎖鎖桿滑至 HOLD,然後將螢幕支撐臂
移至最近的鎖定位置。
When closing the liquid
crystal panel, push up
the monitor to the highest
position.
關閉液晶面板時,將顯示器推至
最高位置。
To change the monitor position∕如何切換顯示器位置
How to reset your monitor∕如何重設顯示器
This will reset the microcomputer. Your preset adjustments will also be erased.
此操作將會重設微處理器。您所做的預設調整也會被清除。
CT_01-02_KV-MRD9010[UT].indd 2CT_01-02_KV-MRD9010[UT].indd 2 2005.03.23 3:51:06 PM2005.03.23 3:51:06 PM
3
Basic procedure∕基本步驟
11Call up the menu.
Menu selection goes off if other operations are done or no operation is done for about 5
seconds.
1調出菜單。
若已完成其他操作或者
5
秒鐘左右沒有進行任何操作,菜單選項消失。
22Select an item you want to adjust. 2選擇想要調整之項目。
33Adjust the level of the selected item (or select an appropriate
setting for the selected item).
3調整所選項目的水平(或為所選項目選擇合適的設定)。
44Exit from the menu.
Press the button repeatedly until the menu is erased. 4退出菜單。
重複按鍵直到菜單消失。
Adjustments∕調整
Using the monitor menu
You can make your own display adjustments using the menu.
• For the adjustable items, see table below.
使用顯示器菜單
您可以使用本菜單進行個人顯示調整。
•關於可調整之項目,請參閱下頁。
Using optional cordless headphones
You can use JVC’s optional cordless headphones KS-HP2 to listen to the playback sounds of the external
component.
Playback sounds are transmitted through IR transmitters to the cordless headphones.
When using the headphones, set to the monitor menu item “IR” to “ON.” (For details, see next section.)
使用選購的無線耳機
您可以選購 JVC 的KS-HP2 型無線耳機收聽外接組件播出的聲音。
播出的聲音從紅外線發射器傳送至無線耳機。
使用耳機時,將顯示器菜單項目“IR”設定為“ON”。(詳情請參閱下一部分。)
Other basic operations∕其他基本操作
To activate the door sensor∕如何啟動門禁感應器
• OFF: Turns off the dome lights.
• DOOR: Activates the door sensor which turns on the dome lights when a door is
open.
•ON: Turns on the dome lights.
•OFF :關閉圓頂燈。
•DOOR :打開車門時啟動門禁感應器以打開圓頂燈。
•ON :打開圓頂燈。
22Turn on the power. 2啟動電源。
33Select the playback source.
Each time you press the button, the playback source changes. 3選擇播放源。
您每次按該鍵,播放源會進行切換。
4Operate the playback source you selected.
To operate the external components, refer to the manuals for the connected
components.
4操作所選播放源。
關於外接設備之操作,請參閱所接設備之使用手冊。
5Adjust the volume on the car receiver. 5在汽車接收機上調整音量。
AV 1 AV 2
To turn off the power∕如何關閉電源
Press and hold button. 按住 鍵。
Monitor
顯示器
MODE
MENU
MENU
MENU
BRIGHT
CONTRAST
TINT
COLOR
IR ON
DIMMER
WHITE LED ON
Current menu item
當前菜單項目s
Adjustable items on the monitor menu∕顯示器菜單之可調整項目
BRIGHT: Adjust this if the picture is too bright or too dark.
•Adjustable range: –10 to +11
•Initial level: 0 (center)
圖像太亮或太暗時調整此項。
•可調整範圍:–10 至+11
•初始水平:0(中心位置)
CONTRAST: Control the degree of difference between the lightest and darkest parts of the picture.
•Adjustable range: –10 to +11
•Initial level: 0 (center)
控制圖像最亮及最暗部分的不同程度。
•可調整範圍:–10 至+11
•初始水平:0(中心位置)
TINT: Adjust this if the human skin color is unnatural.
•Adjustable range: –10 to +11
•Initial level: 0 (center)
膚色不自然調整此項。
•可調整範圍:–10 至+11
•初始水平:0(中心位置)
COLOR: Adjust the color of the picture—lighter or darker.
•Adjustable range: –10 to +11
•Initial level: 0 (center)
調整圖像色彩—較淡或較濃。
•可調整範圍:–10 至+11
•初始水平:0(中心位置)
IR*:Set to “ON”when you listen to the playback sounds using JVC’s optional cordless
headphones KS-HP2.
•Selectable settings: ON, OFF
•Initial setting: ON
使用 JVC 選購的 KS-HP2 型無線耳機收聽播放源聲音時,將此項設為“ON”。
•可選設定:ON,OFF
•初始設定:ON
DIMMER: Adjust the light of the screen and the white LED when you turn on the headlights.
•Adjustable range: –5 to +5
•Initial level: 0 (center)
當您打開前車燈時,調整螢幕亮度及白色 LED 。
•可調整範圍:–5 至+5
•初始水平:0(中心位置)
WHITE LED: Light on or off the white LED when you turn on the monitor.
•Selectable settings: ON, OFF
•Initial setting: ON
當您啟動顯示器時,白色 LED 點亮或熄滅。
•可選設定:ON,OFF
•初始設定:ON
Remote controller
遙控器
Monitor
顯示器
Remote controller
遙控器
ENGLISH 中文
*
更改“
IR
”設定之前,請先關閉耳機。
* Turn off the headphones before changing the “IR” setting.
CT_03-04_KV-MRD9010[UT].indd 3CT_03-04_KV-MRD9010[UT].indd 3 2005.05.12 9:43:34 AM2005.05.12 9:43:34 AM
4
Specifications∕規格
WIDESCREEN MONITOR
Screen:
9 inch liquid crystal panel
Number of pixel:
336 960 pixels (480 vertical ×234 horizontal ×3)
Drive method:
TFT (Thin Film Transistor) active matrix format
Cordless Audio:
Infrared audio transmitter (Support IR receiver
stereo headphones)
L-channel: 2.3 MHz
R-channel: 2.8 MHz
Effective listening angle: 30˚
Effective range: 2 m
Color system: NTSC/PAL
Input:
Video: RCA pin ×2 circuits 1 V(p-p), 75 Ω
Audio: RCA pin ×2 circuits 1.5 V(rms)
Output:
Video: RCA pin ×1 circuit 1 V(p-p), 75 Ω
Audio: RCA pin ×1 circuit 1.5 V(rms)
寬屏顯示器
螢幕:
9 英吋液晶面板
像素數:
336 960 像素(480 垂直 × 234 水平 ×3)
驅動方法:
TFT(薄膜發射器)有效矩陣電路制式
無繩音頻:
紅外線音頻發射器(支持紅外線接收機立體聲耳機)
左聲道:2.3 MHz
右聲道:2.8 MHz
有效視聽角度:30˚
有效範圍:2 m
顏色制式: NTSC/PAL
輸入:
視頻: RCA 針型 × 2 電路 1 V(p-p), 75 Ω
音頻: RCA 針型 × 2 電路 1.5 V(rms)
輸出:
視頻: RCA 針型 × 1電路 1 V(p-p), 75 Ω
音頻: RCA 針型 × 1電路 1.5 V(rms)
Troubleshooting∕故障排除
Symptoms∕症狀 Causes∕原因 Remedies∕解決辦法
• Colored spots (red, blue and green) appear on the screen.
•帶顏色的斑點(紅色、藍色和綠色)在螢幕上出現。
This is a characteristic of liquid crystal panels and is not a malfunction.
此為液晶面板之特徵而非故障。
See “Note” on page 1.
請參閱第 1頁上的“注意”。
• No picture appears and sound is not heard.
•不出圖像亦聽不到聲音。
The cord is not connected correctly.
未正確連接導線。
Connect the cord correctly.
正確連接導線。
Correct input mode is not selected.
未選擇正確的輸入模式。
Select the correct input mode.
選擇正確的輸入模式。
• The unit does not work at all.
•本機完全不工作。
The built-in microcomputer may have functioned incorrectly due to
noise, etc.
可能由於噪音等原因導致內置微處理器功能失常。
Reset the unit (see page 2).
重設本機(參閱第 2頁)。
• Remote controller does not work.
•遙控器失靈。
• Cordless headphones (not supplied) do not work.
•無繩頭戴耳機(另購)失靈。
The battery has lost its charge.
電池電量已耗盡。
Install a new battery.
安裝新電池。
The sensor is exposed to strong light.
感應器暴曬於強光下。
Do not expose the sensor to strong light.
勿讓感應器暴曬於強光下。
• Howling occurs from the speakers or the headphones.
•揚聲器或耳機出現異常聲音。
It may be caused by a camcorder connected to the monitor.
可能是由於連接至顯示器的可攜式攝像機引起的。
Camcorder is now in recording mode. Deactivate the recording mode.
可攜式攝像機處於錄製模式。關閉錄製模式。
To prevent damage to the exterior
• Do not apply pesticides, benzine, thinner or other volatile substances to the monitor.
The cabinet surface primarily consists of plastic materials.
• Do not wipe with benzine, thinner or similar substances because this will results in discoloration or removal
of the paint.
• When a cloth with a cleansing chemical is used, follow the caution points.
– Do not leave the unit in contact with rubber or vinyl products for long periods of time.
– Do not use cleansers which have polishing granules because this could damage the cabinet.
Clean off dirt by wiping lightly with a soft cloth
When the cabinet is very dirty, wipe with a well-wrung cloth dipped in a kitchen cleanser (neutral) thinned by
water and then go over the same surface with a dry cloth.
(Since there is the possibility of water drops getting inside of the unit, do not directly apply cleanser to the
surface.)
Maintenance∕保養
如何避免損傷外表
•切勿讓殺蟲劑,苯,稀釋劑或其他揮發性物質濺落到機器上。
機殼表面主要由塑料製成。
•切勿以苯,稀釋劑或類似物擦拭機器,因為這些物質將導致機殼退色或掉漆。
•當使用布沾上清潔劑擦拭機殼時,請注意以下幾點。
–切勿讓機器長時間接觸橡膠或塑料製品。
–切勿使用含有拋光顆粒的清潔濟,否則將損壞機殼。
請用軟布輕柔地擦去污垢
當機器髒污時,請用一軟布沾上以水稀釋過的廚房用清潔劑(中性)擦拭,然後再用乾布擦乾。
(因為水滴有可能會進入機體,所以請勿將清潔劑直接抹到機體表面。)
GENERAL
Power requirement:
Operating voltage:
DC 14.4 V (11 V to 16 V allowance)
Grounding system: Negative ground
Allowable operating temperature:
0°C to +40°C
Allowable storage temperature:
–20°C to +80°C
Dimensions (W ×H ×D):
Installation Size (approx.):
250 mm ×49 mm ×374 mm
Mass (approx.):
2.4 kg(excluding accessories)
Design and specifications are subject to change
without notice.
一般資訊
電源要求:
操作電壓:
直流 14.4 V(11 V 至16 V 容限)
接地系統:負極接地
允許操作溫度:
0°C 至+40°C
允許保存溫度:
–20°C 至+80°C
體積(寬 × 高× 深)
安裝尺寸(大約):
250 mm × 49 mm × 374 mm
重量(大約):
2.4 kg(不包括附件)
設計和規格若有變更恕不另行通知。
Changeable aspect ratio∕可切換之縱橫比
When incoming 16:9 video signal∕當輸入 16:9 視頻信號時 When incoming 4:3 video signal∕當輸入 4:3 視頻信號時
FULL: Pictures are fully shown on the
screen.
• In some cases, the black bars
may be shown at the top and
bottom sides of the screen.
圖像占滿螢幕。
•在某些情況下可能會有黑欄出現
在螢幕頂部和底部。
FULL: Pictures are enlarged horizontally
and are fully shown on the screen.
圖像被橫向放大並占滿螢幕。
NORMAL: Pictures are reduced horizontally.
• The black bars will be shown
at the left and right sides of the
screen.
• In some cases, the black bars
may be shown also at the top and
bottom sides of the screen.
圖像被橫向縮減。
•黑欄將會出現在螢幕左部和右
部。
•在某些情況下可能會有黑欄出現
在螢幕頂部和底部。
NORMAL: Pictures are shown at the center of
the screen.
• The black bars will be shown
at the left and right sides of the
screen.
圖像顯示在螢幕的中央。
•黑欄將會出現在螢幕左部和右
部。
JUST: The middle of pictures are reduced
horizontally and the left and
right side of the picture enlarged
horizontally.
• In some cases, the black bars
may be shown at the top and
bottom sides of the screen.
圖像的中部被橫向縮減,圖像的左
部和右部被橫向放大。
•在某些情況下可能會有黑欄出現
在螢幕頂部和底部。
JUST: Pictures are enlarged horizontally.
The extensioni ratio increases
toward the both sides of the screen.
圖像被橫向放大並占滿螢幕。其拉
伸比向螢幕兩邊擴展。
ZOOM: Pictures are enlarged on the screen
so that no black bars will be shown
on the screen. (The entire picture
cannot be shown on the screen.)
螢幕上的圖像被放大,因而不出現
黑欄。(圖像在螢幕上可能顯示不
全。)
ZOOM: Pictures are enlarged on the screen
so that no black bars will be shown
on the screen. (The entire picture
cannot be shown on the screen.)
螢幕上的圖像被放大,因而不出現
黑欄。(圖像在螢幕上可能顯示不
全。)
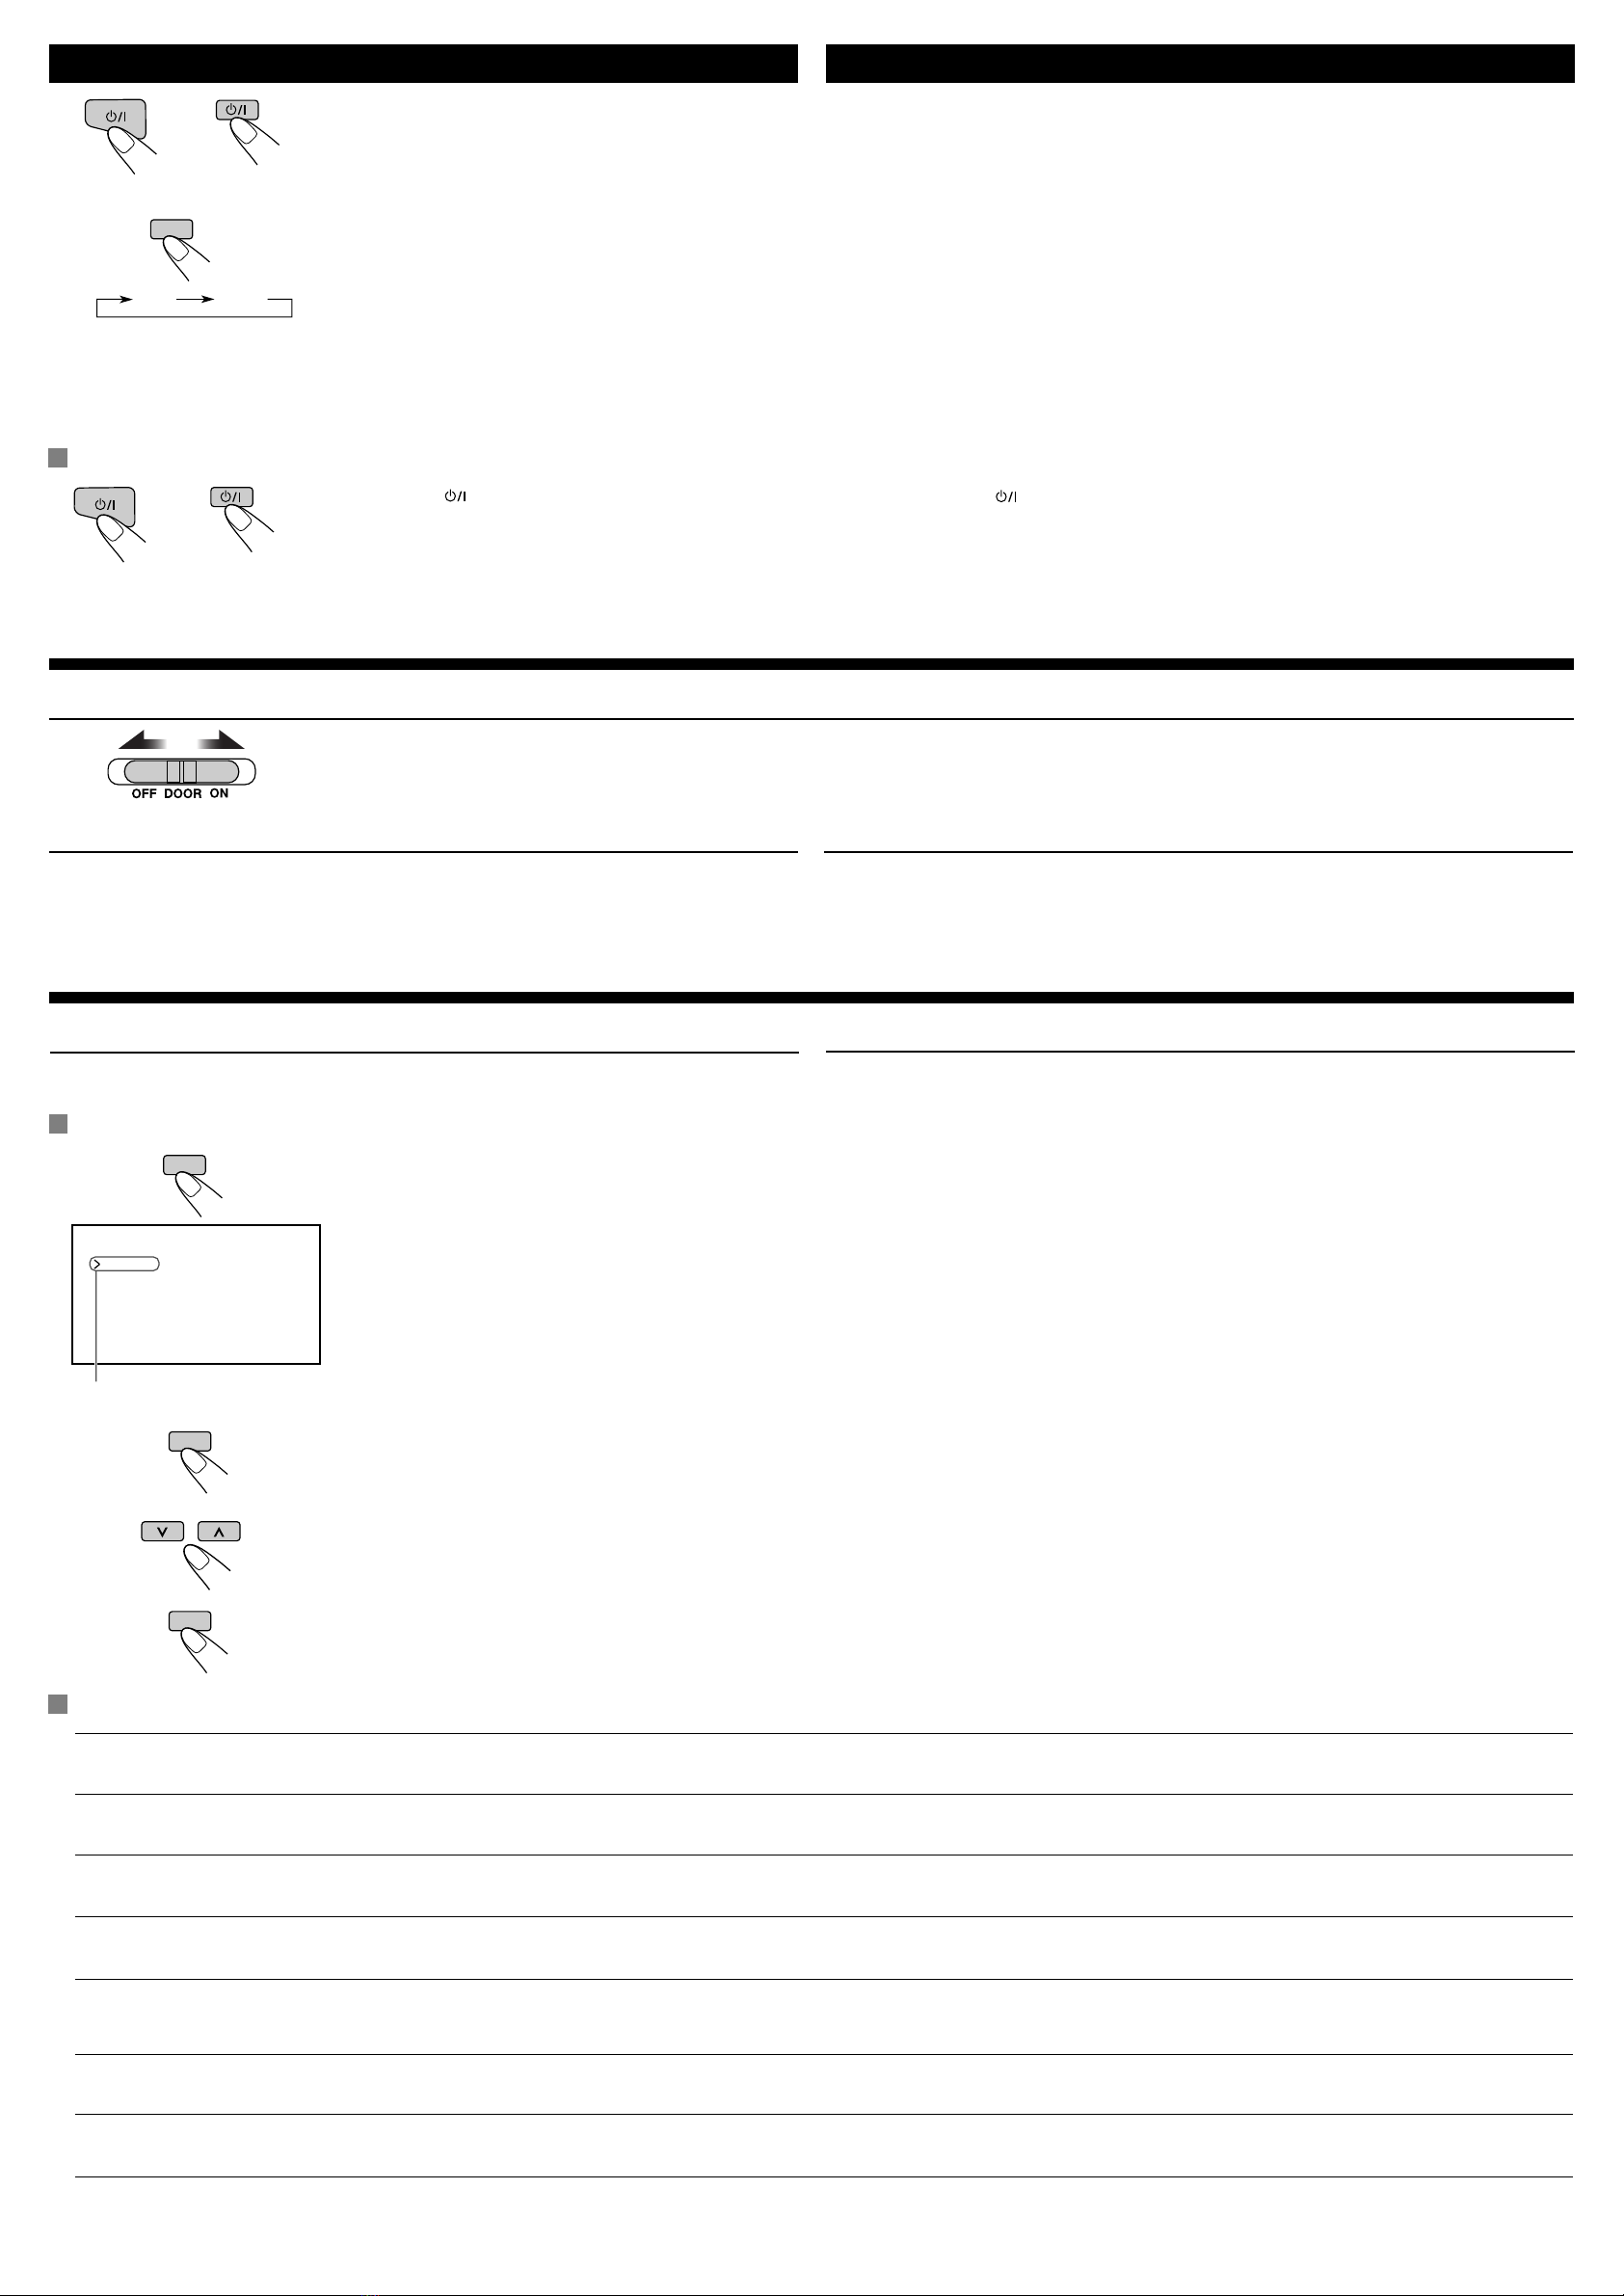
Changing the aspect ratio
You can select an appropriate aspect ratio for the playback video signals.
切換縱橫比
您可以為播放視頻信號選擇合適的縱橫比。
Basic procedure∕基本步驟
Each time you press the button, aspect ratio change. 您每次按該鍵縱橫比會依次切換。
ASPECT
What appears to be trouble is not always serious. Check the following points before calling a service center.
所出現的故障並非總是嚴重問題。在向維修中心求助之前請先檢查以下幾點。
CT_03-04_KV-MRD9010[UT].indd 4CT_03-04_KV-MRD9010[UT].indd 4 2005.05.12 9:43:38 AM2005.05.12 9:43:38 AM

Other JVC Car Video System manuals

JVC KW-M150BT User manual

JVC

JVC KW-M150BT User manual

JVC KW-ADV794J User manual

JVC

JVC KW-ADV794J User manual

JVC 0305MNMMDWJEIN User manual

JVC

JVC 0305MNMMDWJEIN User manual

JVC KW-M25BT User manual

JVC

JVC KW-M25BT User manual

JVC MRD900 - KV - DVD Player Guide

JVC

JVC MRD900 - KV - DVD Player Guide

JVC KD-R726 Guide

JVC

JVC KD-R726 Guide

JVC KW-M788BH User manual

JVC

JVC KW-M788BH User manual

JVC KW-V230BT User manual

JVC

JVC KW-V230BT User manual

JVC KW-NT500HDT User manual

JVC

JVC KW-NT500HDT User manual

JVC KV-M700J Guide

JVC

JVC KV-M700J Guide

JVC KW-AV60 User manual

JVC

JVC KW-AV60 User manual

JVC Car LCD Monitor KV-M70 User manual

JVC

JVC Car LCD Monitor KV-M70 User manual

JVC KW-AV58 User manual

JVC

JVC KW-AV58 User manual

JVC KS-JA0502-3 Guide

JVC

JVC KS-JA0502-3 Guide

JVC KW-AVX830 User manual

JVC

JVC KW-AVX830 User manual

JVC KW-NSX700 User manual

JVC

JVC KW-NSX700 User manual

JVC KW-V50BT User manual

JVC

JVC KW-V50BT User manual

JVC KV-M700J User manual

JVC

JVC KV-M700J User manual

JVC KW-V950BW User manual

JVC

JVC KW-V950BW User manual

JVC KD-R330 User manual

JVC

JVC KD-R330 User manual

JVC KW-V85BT User manual

JVC

JVC KW-V85BT User manual

JVC DMX125DAB User manual

JVC

JVC DMX125DAB User manual

JVC KW-AV50 User manual

JVC

JVC KW-AV50 User manual

JVC KW-AVX800J User manual

JVC

JVC KW-AVX800J User manual

Popular Car Video System manuals by other brands

auna multimedia MVD-420 manual

auna multimedia

auna multimedia MVD-420 manual

Bravo SOS-102 user manual

Bravo

Bravo SOS-102 user manual

Mopar Journey installation guide

Mopar

Mopar Journey installation guide

Audiovox VME 9312 TS datasheet

Audiovox

Audiovox VME 9312 TS datasheet

Rosen AV7950H quick start guide

Rosen

Rosen AV7950H quick start guide

Blaupunkt 640 SERIES operating instructions

Blaupunkt

Blaupunkt 640 SERIES operating instructions

Brigade Electronics BN360-200 Backeye 360 Quick user guide

Brigade Electronics

Brigade Electronics BN360-200 Backeye 360 Quick user guide

ESX VN830 installation guide

ESX

ESX VN830 installation guide

Renault EASY CONNECT instructions

Renault

Renault EASY CONNECT instructions

JVCKENWOOD DMX125BT instruction manual

JVCKENWOOD

JVCKENWOOD DMX125BT instruction manual

PowerAcoustik PT-92CM owner's manual

PowerAcoustik

PowerAcoustik PT-92CM owner's manual

Concept2 CFD-105 owner's manual

Concept2

Concept2 CFD-105 owner's manual

PowerAcoustik PT-91CM owner's manual

PowerAcoustik

PowerAcoustik PT-91CM owner's manual

NavLinkz RL4-MBMRT manual

NavLinkz

NavLinkz RL4-MBMRT manual

Venturer PVS1680 owner's manual

Venturer

Venturer PVS1680 owner's manual

Soundstream VCM-108 owner's manual

Soundstream

Soundstream VCM-108 owner's manual

Buick Verano IntelliLink user manual

Buick

Buick Verano IntelliLink user manual

Panasonic CXDVP292U - CAR DVD PLAYER operating instructions

Panasonic

Panasonic CXDVP292U - CAR DVD PLAYER operating instructions

manuals.online logo
manuals.online logoBrands
  • About & Mission
  • Contact us
  • Privacy Policy
  • Terms and Conditions

Copyright 2025 Manuals.Online. All Rights Reserved.