KDDI SH011 User manual


e00_1_c276_9e.fm
[0/1] ~~~~
Thank you for purchasing the SH011. Before using your SH011, be sure to read the SH011 Basic Manual (this PDF manual) to
ensure correct usage. After you have finished reading this manual, store this PDF manual and the printed manuals in safe
places so you can retrieve them whenever you need them.
Manuals for the SH011
There are three manuals for the SH011: the Basic Manual, printed Instruction Manual (Japanese) and full Instruction Manual
(Japanese).
●For learning the basics:
Read the SH011 Basic Manual (this manual) or printed SH011 Instruction Manual (Japanese).
●For learning details on using each function:
The full Instruction Manual (Japanese) gives detailed instructions on using each function and can be downloaded from the
au homepage:
http://www.au.kddi.com/torisetsu/index.html
To ensure proper usage of the SH011, be sure to read the Safety Precautions “安全上のご注意” in the Instruction Manual.
The keyword searchable au Online Manual is also available on the au homepage:
http://www.au.kddi.com/manual/index.html
• To access from EZweb (Packet communication charges do not apply.):
R⇒Top Menu/Search ⇒(au Customer Support) ⇒(Online Manual)
Scan this QR code to access the au Online Manual. z
Introduction
auお客さまサポート オンラインマニュアル
C276_e_basic.book 0 ページ 2011年2月23日 水曜日 午前8時38分

1
e00_1_c276_9e.fm
[1/1]
Illustrations and Screenshots in This Manual
■Note on Illustrations
The illustrations in this manual may look different from the actual cell phone in shape, color and typeface. The key illustrations
are also simplified as shown below.
■Note on Screenshots
The screenshots in this manual are simplified and may look different from the actual cell phone screens.
Illustrations and Screenshots in This Manual
Key Illustration Key Illustration
A&G%
BLHR
CNIC
D
123
456
789
*0#
JF
KT
L(
Ew
Fcajs
udlr
• The display design themes of the SH011 vary by model color. The screenshots for the Fuchsia Pink model are used in
this manual.
D
C
EK
J
G
H
F
I
B
A
L
C276_e_basic.book 1 ページ 2011年2月23日 水曜日 午前8時38分

2
e00_2_c276_9e.fm
[2/4]
Notes on Cell Phone Use
Cell Phone Etiquette
The cell phone always emits weak radio waves when power
is on.
Use the cell phone in an enjoyable and safe manner without
forgetting to be considerate of others around you.
Do Not Use the Cell Phone While Driving!
Turn off your cell phone or put it in Drive Mode while
driving.
Notes on Cell Phone Use
●Use of cell phones is not allowed in some places.
• Do not use the cell phone while you are driving. Doing
so is both dangerous and prohibited by law.
• Using a cell phone in an aircraft is prohibited by law. Set
Airplane Mode to ON and turn the cell phone power off.
●Radio waves from cell phones may interfere with
medical electrical equipment.
• Some people close to you in crowded places such as
packed trains may be using a cardiac pacemaker.
Turn the cell phone off in such places.
• Abide by the rules of hospitals and other medical
institutions where it is forbidden to use or carry cell
phones.
●Be considerate of where you use the cell phone and how
loudly you talk.
• Do not make calls in theaters, museums, libraries, and
other similar places. Turn power off or turn on manner
mode not to disturb others around you by ring tones.
• Do not use the cell phone on a street where you might
interrupt the flow of pedestrians.
• Move to areas where you will not inconvenience others
on trains or in hotel lobbies.
• Refrain from talking in a loud voice.
• Obtain the permission of other people before you take
their photos with the cell phone’s camera.
• Do not record information with the cell phone’s camera
in bookstores and other locations where taking photos is
not permitted.
Do not use the cell phone while driving a car/motorcycle
or riding a bicycle. It may result in a traffic accident. Using
a cell phone while driving is prohibited by law. Using a
cell phone while riding a bicycle may also be punishable
by law.
Drive Mode
In Drive Mode, a Japanese message meaning “I’m driving
now, so I can’t answer your call.” is played when a call is
received, and asks the caller to leave a message on the
answer memo.
When the standby screen is displayed, press cc⇒
TOOLS ⇒Manner Mode ⇒Drive.
Prohibited!
• Looking at a cell phone display
• Talking on a cell phone while holding it
C276_e_basic.book 2 ページ 2011年2月23日 水曜日 午前8時38分

3
e00_2_c276_9e.fm
[3/4]
Notes on Cell Phone Use
Disaster Message Board Service
When a large scale disaster occurs, you can register your
safety information from EZweb. The registered information
can be referred from anywhere in Japan from EZweb or
Internet.
• When a large scale disaster occurs,
from an au phone, you can register your
safety information (i.e. your condition
and comments) to the 災害用伝言板
(Disaster Message Board) created on
the EZweb.
• After registration of your safety
information, e-mail is sent to your family
or acquaintances you have previously
designated to notify that your safety
information has been uploaded to the 災
害用伝言板(Disaster Message Board).
Registering
safety
information
• You can inquire for safety information of
a person by entering his/her phone
number from EZweb or Internet.*
* To inquire from other carriers’ cell
phone, a PHS or PC, access
“http://dengon.ezweb.ne.jp/”.
• Registered information is stored until the service set up
for the disaster ends.
• The maximum available number of registrations is ten
per phone number. When the number of registrations
exceeds ten, the oldest one is overwritten.
• The demonstration of this service can be referred to
anytime by pressing RR⇒Top Menu/Search ⇒
(au Customer Support) ⇒
(Search) ⇒(Disaster
Message Board (Demo Version)).
• To view the Disaster Message Board in English, select
English from the top menu of the Disaster Message
Board.
Inquiring
for safety
information
Access
R⇒Top Menu/Search ⇒…
(Disaster Message Board…, etc.) ⇒
(Disaster Message Board)
http://dengon.ezweb.ne.jp/
災害用伝言板災害用伝言板 他
災害用伝言板災害用伝言板
auお客さまサポート
調べる
災害用伝言板(デモ版)
C276_e_basic.book 3 ページ 2011年2月23日 水曜日 午前8時38分

4
e00_2_c276_9e.fm
[4/4]
Notes on Cell Phone Use
Water Resistance
The SH011 complies with IPX5*1and IPX7*2water
protection standards (JIS C 0920).
*1 IPX5 compliant means that this cell phone continues
to function as a phone after being subjected to a
water jet (approximately 12.5 liters/min.) discharged
from a nozzle (inner diameter: 6.3 mm), from all
directions (approximately three meters from the cell
phone) for three minutes or more.
*2 IPX7 compliant means that this cell phone continues
to function as a phone and no water seeps inside
after being gently lowered into a tank filled with still
tap water (at normal temperature) to the depth of one
meter, and immersed at the bottom for approximately
30 minutes.
• The SH011 is resistant to fresh or tap water at normal
temperature (5°C - 35°C) only.
• The SH011 is resistant to water when the external
connection jack cover and battery pack cover are
closed firmly.
• Malfunction resulting from misuse is not covered by the
warranty.
C276_e_basic.book 4 ページ 2011年2月23日 水曜日 午前8時38分

5
e00_3_c276_9e.fm
[5/6]
Contents
Cell Phone Etiquette ....................................................... 2
Do Not Use the Cell Phone While Driving! ..................... 2
Disaster Message Board Service ................................... 3
Water Resistance ........................................................... 4
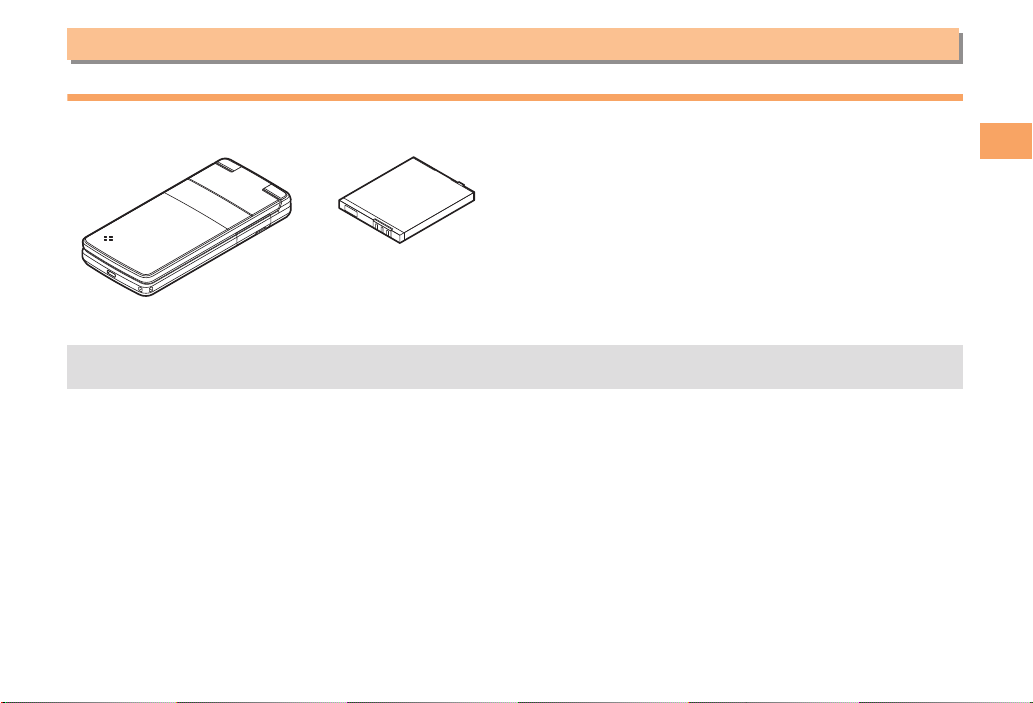
Checking the Contents of the Box .................................. 7
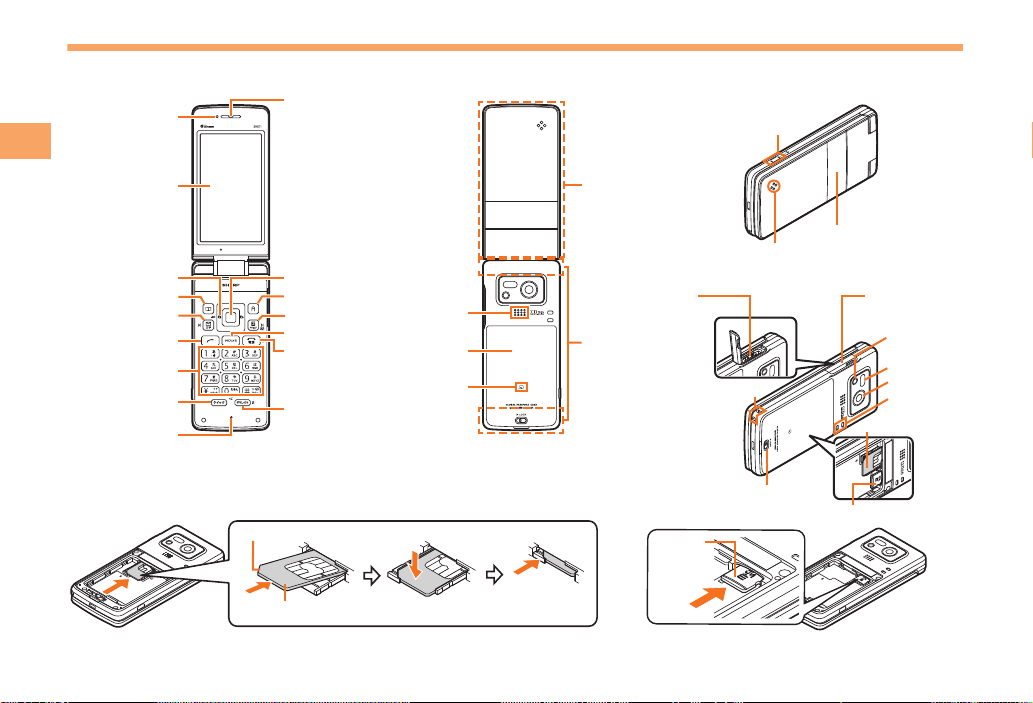
Names of Parts ............................................................... 8
Replacing the Battery Pack ............................................ 9
Charging the Battery Pack ............................................ 10
Learning the Basics ...................................................... 11
Turning On Power ........................................................ 12
Switching the Display Language to English .................. 12
Initial Setup of E-mail and EZweb ................................ 12
Checking Your Phone Number and E-mail Address .... 12
Display Indicators ......................................................... 13
Using Main Menu .......................................................... 14
Changing Your E-mail Address .................................... 16
Security Code and Passwords ..................................... 17
Making a Call ................................................................ 18
Making an International Call ......................................... 18
Answering a Call .......................................................... 19
Returning a Call (Outgoing History/Incoming History) ......
19
One-ring Calls .............................................................. 19
Adjusting the Earpiece Volume during a Call ............... 20
Turning On Manner Mode ............................................ 20
Changing the Incoming Ring Tone ............................... 20
Adjusting the Incoming Ring Tone Volume .................. 21
Turning On the Answer Memo ..................................... 21
Setting the Area ............................................................ 23
Obtaining the Latest PRL (Preferred Roaming List) ..... 23
Calling Japan from Overseas ....................................... 24
Character Entry Modes ................................................ 25
Entering Alphanumeric Characters .............................. 25
Entering E-mail Addresses ........................................... 26
Entering Pictograms ..................................................... 27
Saving a Phone Book Entry ......................................... 28
Dialing from the Phone Book ........................................ 28
Editing Phone Book Entries .......................................... 28
Saving a Phone Number from the Incoming
or Outgoing History ...................................................... 29
Contents
Introduction
Illustrations and Screenshots in This Manual
1
Notes on Cell Phone Use 2
Contents 5
Getting Ready 7
Making and Answering Calls 18
Global Function 23
Character Input 25
Phone Book 28
C276_e_basic.book 5 ページ 2011年2月23日 水曜日 午前8時38分

6
e00_3_c276_9e.fm
[6/6]
Contents
Using E-mail ................................................................. 30
Creating and Sending E-mail Messages ...................... 30
Reading Received E-mail Messages ............................ 31
Reading an E-mail Message
with an Attached Photo or Movie .................................. 31
Replying to Received E-mail Messages ....................... 31
Rejecting Spam ............................................................ 32
Using C-mail ................................................................. 32
Creating and Sending C-mail Messages ...................... 33
Reading Received C-mail Messages ........................... 33
Photo Taking Tips ......................................................... 34
About Photo Modes ...................................................... 35
Taking a Photo ............................................................. 35
Viewing Photos ............................................................. 36
Accessing Sites ............................................................ 38
Bookmarking Frequently Accessed Pages ................... 39
Viewing Bookmarked Pages ......................................... 39
Checking Charges ........................................................ 40
Downloading Chaku-Uta-Full-Plus®/
Chaku-Uta-Full®/Chaku-Uta®....................................... 40
Basic Operations .......................................................... 41
Setting EZ News EX ..................................................... 41
Passenger Seat Navi for People
in the Passenger Seat to Check the Route .................. 43
Security Navi to Check Where Your Kids Are .............. 43
EZ Navi Walk for When You Go Out ............................ 44
Evacuate Navi to Guide You Home or to Nearby
Evacuation Areas during Disasters .............................. 45
Initial Setup of au Media Tuner .................................... 47
Watching TV (1Seg) ..................................................... 47
Basic Operations .......................................................... 48
Exiting the au Media Tuner .......................................... 48
Setting Teens Mode ..................................................... 49
Setting Conditions for Activating
the Remote Ctrl Lock .................................................... 50
Remotely Activating the Remote Ctrl Lock
on Your SH011 ............................................................. 50
Activating the Remote Ctrl Lock
by the Security Lock Service ........................................ 51
Mail 30
Camera 34
EZweb 37
EZ News EX 41
EZ Navi 43
TV (1Seg) 46
Teens Mode 49
In Case of Loss of Your SH011 50
Troubleshooting 52
Index 54
C276_e_basic.book 6 ページ 2011年2月23日 水曜日 午前8時38分

7
e01_c276_9e.fm
[7/17]
Getting Ready
Checking the Contents of the Box
The box contains the cell phone and accessories.
• Cell Phone • Battery Pack • Instruction Manual (Japanese)
• Warranty (Japanese)
• Safety Precautions (Japanese)
• Global Passport CDMA Owner’s Guide (Japanese)
• Osaifu-Keitai®Guide (Japanese)
• JIBUN BANK Launcher Operation Guide (Japanese)
• Notice Sheet (Japanese)
• au International Call Guide (Japanese)
• Teens Mode Setup Guide (Japanese)
Getting Ready
• An AC adapter, desktop holder, earphone plug adapter, USB cable, earphone, and microSD memory card are not
included with your cell phone. Purchase these items separately.
C276_e_basic.book 7 ページ 2011年2月23日 水曜日 午前8時38分

8
e01_c276_9e.fm
[8/17]
Getting Ready
Names of Parts
Earpiece
Direct/Veil View key
Address book key
Power/End key
Microphone
Application key
Center key
Light sensor
EZ key
Clear/Memo key
Mail/Character key
Talk key
Quick key
Main-display
Cursor key
Number keys
FeliCa mark
Speaker
Battery pack/
cover
Internal
antennas
TV antenna
Cutout
au IC-Card*
* Do not remove this card unnecessarily as your phone number is recorded on it.
au IC-Card
microSD memory card slot
Lock slider
Mobile light/
flash
External
connection
jack cover
External
connection
jack
Camera len
s
Strap eyelet Charging
terminals
Infrared port
■From Front ■From Back ■
Diagonally from Front
Sub-display
Charging
/
Incoming indicator
Side key
■
Diagonally from Back
microSD
memory
card*
* Insert this card with the microSD logo side up.
C276_e_basic.book 8 ページ 2011年2月23日 水曜日 午前8時38分

9
e01_c276_9e.fm
[9/17]
Getting Ready
Replacing the Battery Pack
■Removing the Battery Pack
>
Move the lock slider in the direction of the arrow.
>Remove the battery pack cover by hooking a
fingertip (nail) on the concave portion and lifting
it up in the direction of the arrow.
>Remove the battery pack by pulling up on the
protruding edge.
■Attaching the Battery Pack
>With the protruding edge of the battery pack
facing up, align the contacts on the battery pack
with those of the cell phone and then insert the
battery pack securely.
>Insert the tab of the battery pack cover into the
groove of the cell phone (A), and then close the
battery pack cover properly (B).
>
Press along the battery pack cover in the direction of
the arrows, and make sure that it is closed properly.
>Move the lock slider to the “LOCK” position in
the direction of the arrow.
Protruding
edge
Battery pack
Lock slider
Concave portion
1
3
2
•
When removing the battery pack, always pull up on the
protruding edge. Doing otherwise may result in damage
to the contacts.
• When removing the battery pack, turn the cell phone
power off.
• Before attaching the battery pack, make sure that the au
IC-Card is inserted.
• When attaching the battery pack, make sure that the
battery pack cover is closed properly so that it does not
open so as to maintain water resistance.
• Failure to follow the correct procedure when removing
or attaching the battery pack may result in damage to
the battery pack or the battery pack cover.
Protruding
edge
Contacts
12
B
A
3
Lock slider
4
C276_e_basic.book 9 ページ 2011年2月23日 水曜日 午前8時38分

10
e01_c276_9e.fm
[10/17]
Getting Ready
Charging the Battery Pack
The battery pack is not fully charged at the time of purchase.
Be sure to charge the battery pack before using the cell
phone for the first time.
• An AC adapter is not included with your cell phone.
Purchase a specified AC adapter (sold separately).
>Connect a specified AC adapter to the cell
phone with the battery pack attached.
• Open the cover of the external connection jack. Check
the shape of the connector of the AC adapter, and plug
it straight into the external connection jack.
>Unfold the power plug of the AC adapter and
plug it into a 100 V AC power outlet.
>Confirm that the charging/incoming indicator
lights.
• Charging: The charging/incoming indicator lights.
• Charging finished: The charging/incoming indicator
goes out.
100 V AC
power outlet
Power plug
AC adapter
2
Charging/Incoming indicator
3
1
Connector
External
connection jack
• Be sure to close the cover of the external connection
jack when charging is finished.
• Do not pull or twist the cover of the external connection
jack forcibly.
• Be sure to use the common AC adapter 02 (sold
separately) when charging overseas.
C276_e_basic.book 10 ページ 2011年2月23日 水曜日 午前8時38分

11
e01_c276_9e.fm
[11/17]
Getting Ready
Learning the Basics
■Key Assignments
■Side Key Assignment
• If you lose track of where you are or if you make a mistake, press CCto return to the previous screen. Return to the
standby screen by holding down FFfor at least one second.
d: Display the Notification
window and Shortcut menu.
N: Make/answer calls.
C: Set/cancel Answer memo.
Delete characters.
Cancel operation.
l: Display Incoming History. Turn
on the mobile light (long press
for at least two seconds).
u: Display the ticker field, search window
and info pane.
T: Activate EZ Navi Walk, and set/cancel
Veil View (long press).
w: Display Quick access menu.
c: Display Main menu.
R: Display EZ Service menu.
F: Turn power on/off (long press).
End call/communication.
Cancel operation.
0〜9*#:
Input phone numbers and characters.
r: Display Outgoing History.
%: Display EZapps menu.
• Customization is available.
&: Use Phone Book.
L: Display E-mail/C-mail menu.
( : Activate the function set in Side
Key Setup (M551).
C276_e_basic.book 11 ページ 2011年2月23日 水曜日 午前8時38分

12
e01_c276_9e.fm
[12/17]
Getting Ready
■Hiding/Redisplaying the
Notification Window
When the notification window is
displayed on the standby screen, you
can temporarily hide it by pressing
&(Back), and then display the Main
menu by pressing c. To redisplay the
hidden notification window, press d
when the standby screen is displayed.
Turning On Power
Hold down Ffor at least one second.
• You cannot receive or make calls if (out of range
indicator) is displayed.
■Turning Off Power
When the standby screen is displayed, hold down Ffor at
least one second.
Switching the Display Language
to English
You can switch the display language for function names and
other items to English.
When the standby screen is displayed, press c.
>Use jto select (Settings) and then press
c(選択 [Select]).
>Use jto select (Screen Display) and
then press c(選択 [Select]).
>Use jto select Set Language and then press
c(選択 [Select]).
>Use jto select English and then press c(Set).
Initial Setup of E-mail and EZweb
To use e-mail and EZweb, you need to apply for an EZweb
subscription. If you did not apply for an EZweb subscription
at the time of purchase, contact an au shop or the Customer
Service Center.
Also, before use, you need to configure initial settings. Your
e-mail address is assigned automatically in the initial setup.
When the standby screen is displayed, press L.
>Press c(OK).
After a short while, your e-mail address is displayed.
>Press c(OK).
The initial settings are complete.
Checking Your Phone Number
and E-mail Address
When the standby screen is displayed, press c
and then 0.
Notification window
設定
• You can also configure initial settings by pressing RR.
画面表示
C276_e_basic.book 12 ページ 2011年2月23日 水曜日 午前8時38分

13
e01_c276_9e.fm
[13/17]
Getting Ready
Display Indicators
Display indicators inform you of mail arrival, current settings, etc.
■Main-display
ACBD FEGHIKJ
L
M
N
O
P
QS
R
Indicator Description
ASignal strength
BBattery level
C
Information about current
overseas area
Current area (e.g.
USA)
Calling is available
Packet
communication is
available
D
A microSD memory card
(commercially available)
inserted
E
During a call
GPS Logger activated
au Media Tuner activated
FEZapps activated
GConnecting to EZweb
H
Receiving EZ News EX
information
Veil View set
IMissed calls
JNew or unread e-mail/
C-mail
K—Current date and time
L—Ticker field
M—Search window
N—Info pane
O—Notification icons
P—Shortcut menu
QAuto Lock activated
RManner mode set
SAnswer memo or manner
mode set
Indicator Description
C276_e_basic.book 13 ページ 2011年2月23日 水曜日 午前8時38分

14
e01_c276_9e.fm
[14/17]
Getting Ready
■Sub-display Using Main Menu
You can access various functions from the Main menu. The
default Main menu patterns vary by model color. The
screenshots for the Fuchsia Pink model are used in this
manual.
Indicator Description
ASignal strength
BBattery level
CMissed calls
DNew or unread e-mail/C-mail
EManner mode set
FAnswer memo or manner mode set
GGPS Logger activated
H—Current date and time/Missed calls/
Pedometer/other information
• You can change the appearance of the sub-display by
pressing ((.
AC
BD
EF G
H
Model Color Main Menu Pattern
Fuchsia Pink Fuchsia-P
Camellia White Camellia-W
Lavender Purple Lavender-P
C276_e_basic.book 14 ページ 2011年2月23日 水曜日 午前8時38分

15
e01_c276_9e.fm
[15/17]
Getting Ready
Fuchsia-P/Camellia-W/Lavender-P Standard Simple LL Char
INFRARED INFRARED Data Folder
LISMO! LISMO! Camera
microSD microSD Sports
CAMERA CAMERA Music & TV
DATA FOLDER DATA FOLDER Dictionary
SPORTS SPORTS Alarm
TOOLS TOOLS Tools
TV/RADIO TV/RADIO Settings
Bluetooth Bluetooth
GLOBAL FUNCTION GLOBAL FUNCTION
SETTINGS SETTINGS
PC SITE VIEWER PC SITE VIEWER
C276_e_basic.book 15 ページ 2011年2月23日 水曜日 午前8時38分

16
e01_c276_9e.fm
[16/17]
Getting Ready
Changing Your E-mail Address
You can change the account
name of your e-mail address.
When the standby screen is displayed, press L.
>Use jto select E-mail Setup and then press
c(Select).
>Use jto select Change adrs/Other and then
press c(Select).
The cell phone connects to the server.
>Use jto select (Change
E-mail Address) and then press c(Select).
>
Use
j
to select the entry box, press
c
(Input),
enter your security code, and then press
c
(OK).
• Your security code is the four-digit number you wrote on
your subscription form.
• If the security code is incorrectly entered three times
consecutively during a single day, the e-mail address
change operation will be disabled until the next day.
>Use jto select (Send) and then press
c(Select).
>Use jto select (Accept) and then
press c(Select).
>Use jto select the entry box, press c(Input),
enter an e-mail address using single-byte
alphanumeric characters, and then press
c(OK).
• For details on entering e-mail addresses, see page 26.
>Use jto select (Send) and then press
c(Select).
>Use jto select OK, press c(Select) and then
c(OK).
• Check that the e-mail address has been updated before
pressing c(OK).
△△△@ezweb.ne.jp
Account name Domain name
E-mail address
Eメールアドレスの変更
送信
承諾する
• Your e-mail address cannot be changed if the new
address you enter in the above procedure is already
being used. In this case, enter a different e-mail
address.
送信
C276_e_basic.book 16 ページ 2011年2月23日 水曜日 午前8時38分

17
e01_c276_9e.fm
[17/17]
Getting Ready
Security Code and Passwords
You can use a security code and other passwords described
below.
Take care not to forget your security code and passwords,
because they are required for performing various operations
and using subscription services.
■Security Code
■Lock No.
■EZ Password
■Premium EZ Password
Usage
Example
①Using the Answering Service (Voice
Mail) and Call Transfer remotely from a
fixed-line phone
②Making inquiries, applications, and
changes while using Customer Service
Center voice guidance, au web pages,
and EZweb
③Changing the settings of Change adrs/
Other under E-mail Setup
Initial Setting The four-digit number you wrote on your
subscription form
Usage
Example
Changing various settings of the cell
phone
Initial Setting 1234
Usage
Example
Subscribing or canceling subscriptions to
EZweb fee-based contents
Initial Setting The four-digit number you wrote on your
subscription form
Usage
Example
①Subscribing or canceling subscriptions
to EZweb fee-based contents paid by
(au Collective
Payment Service)
②Purchasing products from EZweb sites
using (au Collective
Payment Service)
Initial Setting The four-digit number you wrote on your
subscription form
まとめて 支払い
au
まとめて 支払い
au
C276_e_basic.book 17 ページ 2011年2月23日 水曜日 午前8時38分

18
e02_c276_9e.fm
[18/22]
Making and Answering Calls
Making a Call
When the standby screen is displayed, use 0to
9to enter a phone number.
• When calling to a fixed-line phone, you also need to enter
the area code.
>Press N.
• To end the call, press F.
Making an International Call
■001 International Call Service
Available without any additional application
Example: To call 212-123-△△△△ in the USA
Enter the access code, a country code, area code
and phone number, and then press N.
Making and Answering Calls
• After you enter a phone number, you can add 184 or
186 to the phone number as follows:
>Press cc(Call).
>Use jjto select Add Special No. and then press
cc(OK).
>Use jjto select 184 or 186 and then press cc(Add).
184: When you do not want to inform the other party of
your phone number.
186: When you want to inform the other party of your
phone number.
• International call charges are billed together with
monthly local call charges.
• For more information on 001 International Call Service,
dial either of the following numbers:
From au cell phones (toll-free):
157 (area code not required)
From fixed-line phones (toll-free):
0077-7-111
(Open 9:00 to 20:00 everyday)
001
↑
KDDIInternational
accesscode
↑
Country
code
(USA)
↑
Areacode
↑
Phonenumber
010 212 123
-
XXXX1
C276_e_basic.book 18 ページ 2011年2月23日 水曜日 午前8時38分
Table of contents
Other KDDI Cell Phone manuals

KDDI
KDDI T001 User manual

KDDI
KDDI SH001 User manual

KDDI
KDDI aquos shl25 User manual

KDDI
KDDI ARROWS Z ISW11F Installation guide

KDDI
KDDI NS02 User manual

KDDI
KDDI au S007 Installation guide

KDDI
KDDI K007 User manual

KDDI
KDDI SA002 User manual

KDDI
KDDI AQUOS SHOT SH008 User manual

KDDI
KDDI W51H Installation guide

KDDI
KDDI sportio water beat User manual

KDDI
KDDI A1305SA Assembly instructions

KDDI
KDDI ARROWS ES IS12F Installation guide

KDDI
KDDI S002 User manual

KDDI
KDDI CA001 User manual

KDDI
KDDI au EIS01PT Specification sheet

KDDI
KDDI W62K Installation guide

KDDI
KDDI cyber-shot S006 User manual

KDDI
KDDI T005 User manual

KDDI
KDDI Au TSX04 Installation guide