manuals.online logo
Brands
  1. Home
  2. •
  3. Brands
  4. •
  5. KDK
  6. •
  7. Fan
  8. •
  9. KDK 25GSC User manual

KDK 25GSC User manual

This manual suits for next models

8

Other KDK Fan manuals

KDK M48SG User manual

KDK

KDK M48SG User manual

KDK KB304 User manual

KDK

KDK KB304 User manual

KDK M56PR User manual

KDK

KDK M56PR User manual

KDK SC30X User manual

KDK

KDK SC30X User manual

KDK W56WV User manual

KDK

KDK W56WV User manual

KDK R56SV User manual

KDK

KDK R56SV User manual

KDK K15Z5 User manual

KDK

KDK K15Z5 User manual

KDK 24CFM User manual

KDK

KDK 24CFM User manual

KDK M11SU User manual

KDK

KDK M11SU User manual

KDK K14QF User manual

KDK

KDK K14QF User manual

KDK X48XG /  X48XGMN User manual

KDK

KDK X48XG / X48XGMN User manual

KDK 20WHC 07 User manual

KDK

KDK 20WHC 07 User manual

KDK M48WG User manual

KDK

KDK M48WG User manual

KDK M56XR User manual

KDK

KDK M56XR User manual

KDK SD30H User manual

KDK

KDK SD30H User manual

KDK P30KH User manual

KDK

KDK P30KH User manual

KDK U56PR User manual

KDK

KDK U56PR User manual

KDK P40V User manual

KDK

KDK P40V User manual

KDK 30BGCH User manual

KDK

KDK 30BGCH User manual

KDK 17CUH User manual

KDK

KDK 17CUH User manual

KDK U60FW User manual

KDK

KDK U60FW User manual

KDK K15UW User manual

KDK

KDK K15UW User manual

KDK K18NY User manual

KDK

KDK K18NY User manual

KDK U48FP User manual

KDK

KDK U48FP User manual

Popular Fan manuals by other brands

Minka Group minkaAire Wave F843 instruction manual

Minka Group

Minka Group minkaAire Wave F843 instruction manual

Airflow Adroit DV50 instruction manual

Airflow

Airflow Adroit DV50 instruction manual

Vornado 270 Series owner's guide

Vornado

Vornado 270 Series owner's guide

comfort air TH-10D instruction manual

comfort air

comfort air TH-10D instruction manual

Livoo DOM386 instruction manual

Livoo

Livoo DOM386 instruction manual

Holmes BLIZZARD HAOF-90 owner's guide

Holmes

Holmes BLIZZARD HAOF-90 owner's guide

Taurus GRECO 16 ELEGANCE manual

Taurus

Taurus GRECO 16 ELEGANCE manual

Quorum PINNACLE installation instructions

Quorum

Quorum PINNACLE installation instructions

Monte Carlo Fan Company 3DIR58RBD-V1 Owner's guide and installation manual

Monte Carlo Fan Company

Monte Carlo Fan Company 3DIR58RBD-V1 Owner's guide and installation manual

Craftmade UH52 installation guide

Craftmade

Craftmade UH52 installation guide

Jocel JVA030658 instruction manual

Jocel

Jocel JVA030658 instruction manual

MIKA MFB1211/GR user manual

MIKA

MIKA MFB1211/GR user manual

Harbor Breeze RLG52NWZ5L manual

Harbor Breeze

Harbor Breeze RLG52NWZ5L manual

Allen + Roth L1405 instruction manual

Allen + Roth

Allen + Roth L1405 instruction manual

ViM KUBAIR F400 ECOWATT Technical manual

ViM

ViM KUBAIR F400 ECOWATT Technical manual

HIDRIA R10R-56LPS-ES50B-04C10 user guide

HIDRIA

HIDRIA R10R-56LPS-ES50B-04C10 user guide

BLAUBERG Ventilatoren CENTRO-M 100 L user manual

BLAUBERG Ventilatoren

BLAUBERG Ventilatoren CENTRO-M 100 L user manual

Triangle Engineering HEAT BUSTER SPL Series owner's manual

Triangle Engineering

Triangle Engineering HEAT BUSTER SPL Series owner's manual

manuals.online logo
manuals.online logoBrands
  • About & Mission
  • Contact us
  • Privacy Policy
  • Terms and Conditions

Copyright 2025 Manuals.Online. All Rights Reserved.

Operating Instructions
Instruksi Pengoperasian
Instrucciones de operacion
Ventilating Fan
Exhaust Fan
Extractor de aire
25GSC 30GSC 35GSC 40GSC 45GSC
50GSC 60GSC 45GTC 50GTC 60GTC
Before operating this set, please read these instructions completely.
Bacalah buku petunjuk ini secara lengkap sebelum mengoperasikannya
Antes de hacer funcionar el extractor, rogamos leer detenidamente todas las presentes
Instrucciones.
PRECAUCIONES A TOMARSE AL HACER LA INSTALACION
INSTALLATION CAUTIONS
HATI-HATI DALAM HAL PEMASANGAN
1. Do not install this fan in a place where there is explosive gas or corrosive gas.
2. Do not install this fan in a place there is a great amount of humidity (such as the bathroom, kitchen, etc.).
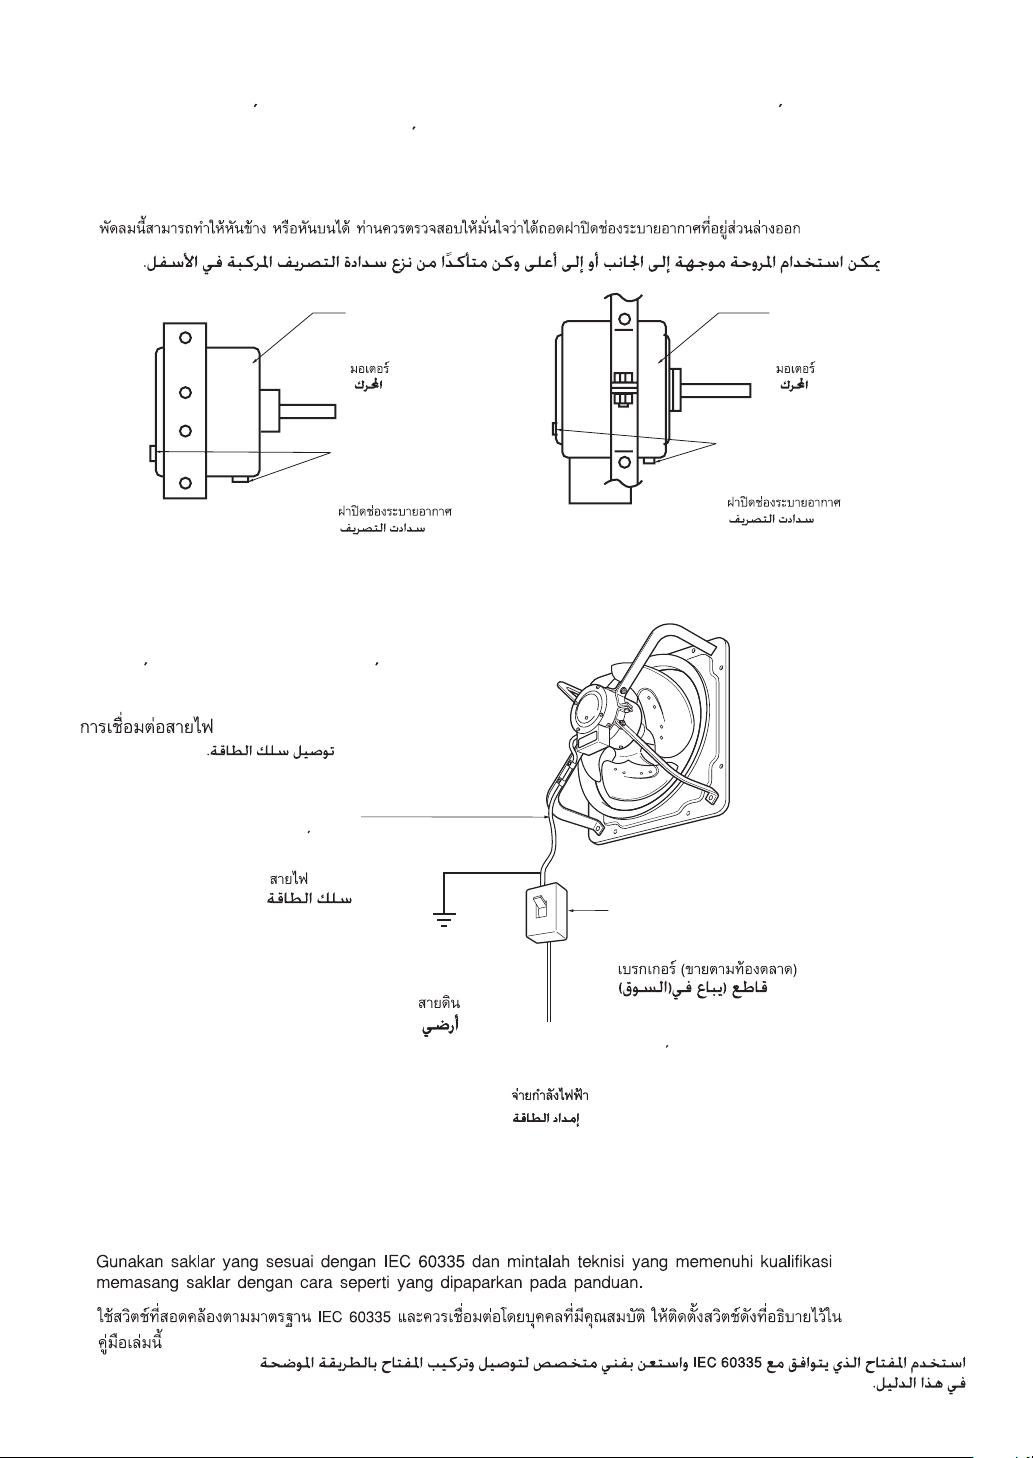
3. After installation, remove the drain caps on the bottom side.
4. Use the equipment at the rated voltage and frequency indicated in the name plate.
5. Do not install the ventilating fan outside of the window or the wall.
6. This fan should be installed so that the blades are more than 2.3m above the floor.
Malayis market:This fan should be installed so that the blades are more than 2.5m above the floor.
7. For this fan,precautions must be taken to avoid the back-flow of gases into the room from the
open-flue of gas or other fuel-burning appliances.
8.This fan is not intended for use by persons (including children) with reduced physical,sensory or
mental capabilities, or lack of experience and knowledge, unless they have been given supervision
or instruction concerning use of the appliance by a person responsible for their safety.
Children should be supervised to ensure that they do not play with the fan.
1. Janganlah memasang kipas ini di area yang mengadung gas yang mudah terbakar atau gas yang
dapat menyebabkan karat pada unit ini.
2. Janganlah memasang kipas ini di area yang memiliki tingkat kelembaban tinggi
(seperti di kamar mandi atau di dapur).
3. Bila pemasangan telah selesai, lepaskan penutup bagian bawah (motor).
4. Gunakan unit ini pada tingkat voltase dan frekwensi yang disarankan, seperti tertulis pada name plate
(plat petunjuk dimotor).
5. Janganlah memasang unit ini diluar jendela atau dinding.
6. Pasanglah unit ini pada ketinggian minimum 2,3 meter dari lantai.
7. Hati-hatilah terhadap gas berbahaya yang menendang balik masuk ke ruangan, karena kebocoran
dari alat lainnya yang ada diruangan lain.
8. Unit ini tidak dimaksudkan untuk dioperasikan oleh mereka yang mengalami cacat fisik, atau anak-anak
atau mereka yang tidak memiliki pengalaman yang cukup, kecuali mendapatkan supervisi yang secukupnya
dari mereka yang berpengalaman. Jauhkan anak-anak dari unit ini karena dapat membahayakan diri mereka.
1.
2.
3.
4.
5.
6.
7.
8.
1. No instalar el ventilador en locales en que haya gas explosivo o corrosive.
2. No instale la unidad donde exista una gran humedad (por ejemplo, en el cuarto de baño, la cocina, etc.).
3. Terminada la instalacion, quitar la llave de purga del lado de abajo.
4. Utilice el equipo con el voltaje y la frecuencia indicados en la placa del nombre.
5. No instale el ventilador fuera de la ventana o la pared.
6. Este ventilador debe instalarse de manera tal que las cuchillas estén 2,3 m por encima del piso.
Mercado malayo: Este ventilador debe instalarse de manera tal que las cuchillas estén 2,5 m
por encima del piso.
7. En el caso de este ventilador, se deben tomar precauciones para evitar el reflujo de gases,
provenientes del conducto de gases abierto o de otros aparatos que queman combustible,
hacia el interior de la habitación.
8.Este ventilador no debe ser operado por personas f sica o ps quicamente incapacitadas
(incluyendo ninos), o sin experiencia o conocimiento, a menos que sean supervisados o informados
sobre el uso del aparato por la persona responsable de su seguridad.
Los ninos deberan ser supervisados para asegurarse de que no jueguen con el ventilador.
2
IDENTIFICATION OF PARTS ; MEASUREMENTS
BAGIAN SUKU CADANG ; UKURANNYA
LOCALIZACION DE LAZ PIEZAS ; MEDIDAS
【25GSC, 30GSC, 35GSC】
1Frame
Blade setscrew
Motor
Motor support
Blade
Power cord
Fitting hole 8
Rangka
Sekrup
baling-baling
Motor
Dudukan motor
Baling-baling
Kabel unit
Lobang untuk
ke dinding 8
Tornillo de sujecion
de cuchilla
Motor
Soporte de motor
Cuchilla
Cordon de la corriente
Agujero de montaje 8
2
3
4
5
6
7
A
B
C
A
B
C
E
φH
F⑦
④
⑤
⑥
②
①③
Model
Model
Modelo
AB CDEF GH
25GSC
30GSC
35GSC
327
378
467
298
349
434
165
210
250
-
-
-
171
200
236
10 dia.
10 dia.
12 dia.
-
-
-
250 dia.
300 dia.
350 dia.
Dimensions: mm Dimensi: mmDimensions: mm
Armazon
3
1Frame
Hexagonal nut
Motor
Motor support
Blade
Power cord
Fitting hole 8
2
3
4
5
6
7
Fitting hole 4
Rangka
Baut segi enam
Motor
Dudukan motor
Baling-baling
Kabel unit
Lobang untuk
ke dinding 8
Lobang untuk
ke dinding 4
Tuerca hexagonal
Motor
8
【 】
40GSC, 45GSC, 50GSC, 60GSC
45GTC, 50GTC, 60GTC
Model
Model
Modelo
AB CDEFGH
40GSC
45GSC
50GSC
60GSC
45GTC
50GTC
60GTC
518
570
659
760
570
659
760
485
540
620
720
540
620
720
280
320
355
400
320
355
400
460
-
560
650
-
560
650
274
297
315
320
297
304
320
12 dia.
12dia.
15 dia.
15 dia.
12 dia.
15 dia.
15 dia.
12 dia.
-
15 dia.
15 dia.
-
15 dia.
15 dia.
400 dia.
450 dia.
500 dia.
620 dia.
450 dia.
500 dia.
620 dia.
E
A
B
C
A
B
C
D
D
φH
F⑦
G⑧⑥
②
①③
⑤④
Armazon
Soporte de motor
Cuchilla
Cordon de la corriente
Agujero de montaje 88
Agujero de montaje
Pin pengencang
Gancho
4
Dimensions: mm Dimensi: mmDimensions: mm
⑨
Snap pin
9
4
Stud bolt
Baut khusus beton
Perno prisionero
Motor
Motor
Motor
Concrete wall
Dinding beton
Pared de hormigon Plain washer
Pelapis baut
Arandela lisa
W
Screw
Sekrup
Tornillo
W
A
A
Motor
Motor
Motor
Wooden frame
Rangka kayu
Armazon de madera
Plain washer
Pelapis baut
Arandela lisa
Spring washer
Per
Arandela elastica
Spring washer
Per
Arandela elastica
Hexagonal nut
Baut segi enam
Tuerca hexagonal
HOW TO INSTALL
CARA MEMASANG
MANERA DE HACER LA INSTALACION
During installation and carrying work, take special care not to deform the blade. If the blade is
deformed, troubles such as unbalance or vibration may occur.
Selama proses pemasangan, jangan sampai merubah bentuk baling-baling (tertekuk),
karena bila itu terjadi, akan menyebabkan kipas menjadi tidak balance, dan perputaran kipaspun
menjadi tidak sebagaimana mestinya.
Durante el trabajo de instalacion y de tranporte tenga cuidado de no deformar la cuchilla.
Si la cuchilla se deforma,peuden ocurrir problemas tales como sequilibrio o vibracion.
Installation on concrete wall
Pemasangna di Dinding Beton
Installation on wooden frame
Pemasangan di Dengan Rangka Kayu
Instalacion en pared de hormigon Instalacion en armazon de madera
25GSC 275 sq.
325 sq.
395 sq.
445 sq.
500 sq.
555 sq.
675 sq.
30GSC
35GSC
40GSC
45GSC
45GTC
50GSC
50GTC
60GSC
60GTC
W
25GSC 275 sq.
325 sq.
395 sq.
445 sq.
500 sq.
555 sq.
675 sq.
30GSC
35GSC
40GSC
45GSC
45GTC
50GSC
50GTC
60GSC
60GTC
W
25
25
35
40
40
55
55
A
Model
Modelo
Model
Model Model
Modelo
Dimensions: mm Dimensi: mmDimensions: mm 5
【 】
■The fan can be used facing to the side or up and be sure to remove the drain cap which is
installed at the bottom.
■Unit ini dapat dipasang menghadap ke samping atau ke atas selama penutup motor dibagian
bawah motor dilepas.
■
■
25GSC, 30GSC
35GSC
40GSC, 45GSC, 50GSC
60GSC, 45GTC, 50GTC
60GTC
【 】
Power cord
Kabel
Cordon de la corriente
Switch (dibeli terpisah)
Ground
Tanah (Ground)
Toma de tierra
■El ventilador podra utilizarse encarado lateralmente o hacia arriba.Pero tendra que
cerciorarse de haber extraido el tapon de drenaje instalado en la parte inferior.
Motor
Motor
Motor
Motor
Motor
Motor
Tapa de vaciado
Drain caps
Penutup motor (bagian bawah motor)
Tapa de vaciado
Drain caps
Penutup motor (bagian bawah motor)
Power supply
Sambungan kabel ke listrik utama
Fuente de alimentacion
Connecting the power cord.
Sambungan kabel
Conexion del cable de alimentacion.
■Use the switch that complies with IEC 60335 and have qualified personal connect install
the switch in the manner describet in this manual.
■Utilice el interruptor que cumple con IEC 60335 y disponga de personal calificado para instalarlo
como indica el manual.
■
■
■
Switch (sold on the market)
Cambiar de (se vende en el mercado)
6
①T
②S
③R
Switch (dibeli terpisah)
(Exhaust)
(Exhaust)
(Evacucion)
①
②
③
④
④
⑤⑤
⑤
①
⑥
Motor
Motor
Motor
Motor
Motor
Motor
Power supply
Sambungan kabel ke listrik utama
Fuente de alimentacion
(Exhaust)
(Exhaust)
(Evacucion)
Power supply
Sambungan kabel ke listrik utama
Fuente de alimentacion
Switch (dibeli terpisah)
Switch
Cambiar de
Switch
Cambiar de
HOW TO REVERSE AIR FLOW
CARA MEMBALIKKAN PUTARAN ANGIN
MANERA DE INVERTIR EL FLUJO DEL AIRE
1. Loosen the blade setscrew to remove the blade.
1. Longgarkan baut pengencang balik-baling dan lepaskan baling-baling tersebut.
1. Afloje el tornillo de sujecion de cuchilla para remover la cuchilla.
2. Remove the wiring cover setscrew and exchange
the yellow and red wires according to the wiring diagram.
2.Bukalah penutup kabel dan tukarkan posisi kabel kuning dan merah sesuai dengan
petunjuk diagram.
2. Remueva el tornillo de la cubierta de alambrado y efectue el intercambio de los
alambres amarillo y rojo de acuerdo con el diagrama de alambrado.
Después de esto,vuelva a instalar la cubierta de alambrado en la posicion original.
2.
1.
【25GSC,30GSC, 35GSC】
【45GTC, 50GTC, 60GTC】
【25GSC, 30GSC, 35GSC, 40GSC, 45GSC, 50GSC, 60GSC】
Wiring Diagram (Exhaust)
Gambar Diagram Listrik (Exhaust)
White
Yellow
Red
Blue
Black
①
②
③
④
⑤
Brown
Putih
Putih
Kuning
Merah
Biru
Hitam
Coklat
Biru
Coklat
Blanco
Amarillo
Rojo
Azul
Negro
Marrón
⑥
Diagrama de alambrado (Evacucion)
Blue
Brown
White
①
②
③Blanco
Azul
Marrón
7
3. Mount the blade in reverse position, and completely secure it in the air intake blade position.
3. Cabut dan pasang kembali baling-baling dengan posis terbalik dan kencangkan kembali bautnya.
3.
Blade setscrew
Sekrup baling-baling
Tornillo de sujecion de cuchilla
Exhaust blade position
Posisi baling-baling exhaust
Air intake blade position
Posisi baling-baling hembusan angin ke dalam
Posicion de cuchilla de evacuacion
Posicion de cuchilla de admision de aire
Blade
Baling-baling
Cuchilla Wiring cover setscrew (2 pcs.)
Sekrup Penutup Kotak Kabel (2 pcs.)
Tornillo de sujecion de cubierta de alambrado (2 pzas.)
Wiring cover
Penutp Kotak Kabel
Cubierta de alambrado
④
⑥
(Admision de aire)
(Air intake)
(Posisi Hembusan angin
ke dalam - Menyedot ke dalam)
①
②
③
④⑤
⑤
⑤
①
Wiring Diagram (Air intake)
Diagram Kabel (Posisi Hembusan angin ke dalam - Menyedot ke dalam)
Diagrama de alambrado (Admision aire)
3. Instale la cuchilla en la posicion inverse y asegurela completamente en la posicion
de admision de aire.
Motor
Motor
Motor
White
Yellow
Red
Blue
Black
①
②
③
④
⑤
Brown
Blanco
Amarillo
Rojo
Azul
Negro
Marrón
⑥
Power supply
Sambungan kabel
ke listrik utama
Fuente de alimentacion
Putih
Kuning
Merah
Biru
Hitam
Coklat
Switch (dibeli terpisah)
Switch
Cambiar de
8
Blade setscrew
Sekrup baling-baling
Tornillo de sujecion de cuchilla
【40GSC,45GSC, 50GSC, 60GSC】
1. Loosen the hexagonal nut to remove the blade. (For 40GSC. Loosen the blade setscrew)
1. Longgarkan baut segi enam untuk melepaskan baling-baling tersebut. (Untuk tipe 40GSC –
Longgarkan sekrup pada baling-baling)
1.
3.
1. Afloje la tuerca hexagonal para remover la cuchilla.(Para 40GSC,afloje el tornillo de sujecion
de la cuchilla)
2. Remove the two (2) wiring box setscrews and exchange the yellow and red wires according to the
wiring diagram. After exchanging, re-install the wiring box in its original position.
2. Bukalah (2) sekrup penutup kotak kabel dan tukarkan posisi kabel kuning dan merah sesuai
dengan petunjuk diagram. Setelah kabelnya ditukar (pindah tempat), kencangkan kembali kotak
kabel sebagaimana semestinya.
2. Remueva los dos (2) tornillos de la caja de alambrado y cambia los alambres amarillo y rojo uno
con el otro de acuerdo con el diagrama de alambrado.
Después de esto,vuelva a instalar la caji de alambrado en la posicion original.
3. Mount the blade in reverse position and tighten securely with the hexagonal nut.
3. Cabut dan pasang kembali baling-baling dengan posis terbalik dan kencangkan kembali baut
segi enam.
3. Instale la cuchilla en la posicion inversa y aprlétela completamente con la tuerca hexagonal.
Hexagonal nut
Baut segi enam
Tuerca hexagonal Blade
Baling-baling
Cuchilla
Wiring box
Kotakkabel
Two(2) setscrew for the wiring box
2 set lobang sekrup pada kotak kabel
Caja de alambrado
Dos(2) tornllios da ta caja de alambrado
2.
40GSC
40GSC
Snap pin
Pin pengencang
Gancho
9
【45GTC,50GTC, 60GTC】
1. Reverse two of the three wires for the power supply.
1. Tukarkan posisi 2 dari 3 kabel yang menuju pada sambungan ke aliran listrik.
1.
2.
3.
1. Invierta dos de los tres alambres de la fuente de alimentación
2. Loosen the hexagonal nut and remove the blade.
2. Lepaskan baut segi enam dan lepaskan baling-baling.
2. Afloje la tuerca hexagonal y quite la cuchilla.
3. Mount the blade in reverse position and tighten securely
with the hexagonal nut.
3. Pasang kembali baling-baling dengan posisi yang terbalik dan kemudian kencangkan kembali
baust segi enam.
3. Instale la cuchilla en la posición inversa y aprlétela completamente con la tuerca hexagonal.
④
⑥
①
②
③
④⑤
⑤
⑤
①
Wiring Diagram (Air intake)
Diagram Kabel (Posisi Hembusan angin ke dalam – Menyedot ke dalam)
Diagrama de alambrado (Admision de aire)
Motor
Motor
Motor
Blade
Cuchilla
(Admision de aire)
(Air intake)
(Posisi Hembusan angin
ke dalam - Menyedot ke dalam)
Power supply
Sambungan kabel
ke listrik utama
Fuente de alimentacion
White
Yellow
Red
Blue
Black
①
②
③
④
⑤
Brown
Blanco
Amarillo
Rojo
Azul
Negro
Marrón
⑥
Putih
Kuning
Merah
Biru
Hitam
Coklat
Baling-baling
Hexagonal nut
Baut segi enam
Tuerca hexagonal
Switch (dibeli terpisah)
Switch
Cambiar de
Snap pin
Pin pengencang
Gancho
10