manuals.online logo
Brands
  1. Home
  2. •
  3. Brands
  4. •
  5. Kimball
  6. •
  7. Indoor Furnishing
  8. •
  9. Kimball Canopy 28F113018BEBFP User manual

Kimball Canopy 28F113018BEBFP User manual

Canopy® 1
Proper product installation, in accordance with these instructions, is the responsibility of the installing agent. If you have
any questions concerning these instructions, please call Kimball Customer Care.
Part 3033333, Revision A
Assembly Instructions
Media Booth Assembly
Tools Required
• Box Cutter/Utility Knife
• Cordless Drill w/#2 Phillips head bit drive
• M4 & M5 Allen wrench drive (optional, supplied w/base)
• 1/16” Allen wrench hex drive
• Bubble level
Hardware Required
1 - Bench base (28FBFBSEP501)
2 - Media Booth static legs (28F113018BEBFP)
1 - H-Frame w/L-support & crossrails (28F45HW2C*P)
2 - Media Booth Canopy (28F3042CAS*)
2 - Canopy insert flat plates
1 - 72” Bench Canopy (28F7243CAS*)
1 - Tray (*optional, pre-attached*)
1 - Rectangular worksurface (28W2872RT*)
1 - Round worksurface (28W28RD*)
2 - Seat Platform (28F1830SHLD2)
2 - Seat Cushions (28F1830BC)
1 - End Cap (provided)
28 - #10 X .75 Flat Head Wood Screws
32 - M6 X 12 Button Head machine screws
8 - Flat Head Phillips M6 X 16 machine screws
52 - Pan Head Phillips #10 X 5/8” sheet metal screws
8 - Pan Head Phillips #8 X 1.5 Flat Wood Screws (seat assy)
Installation
1. Refer to bench base assembly instruction for attachment of
bench base.
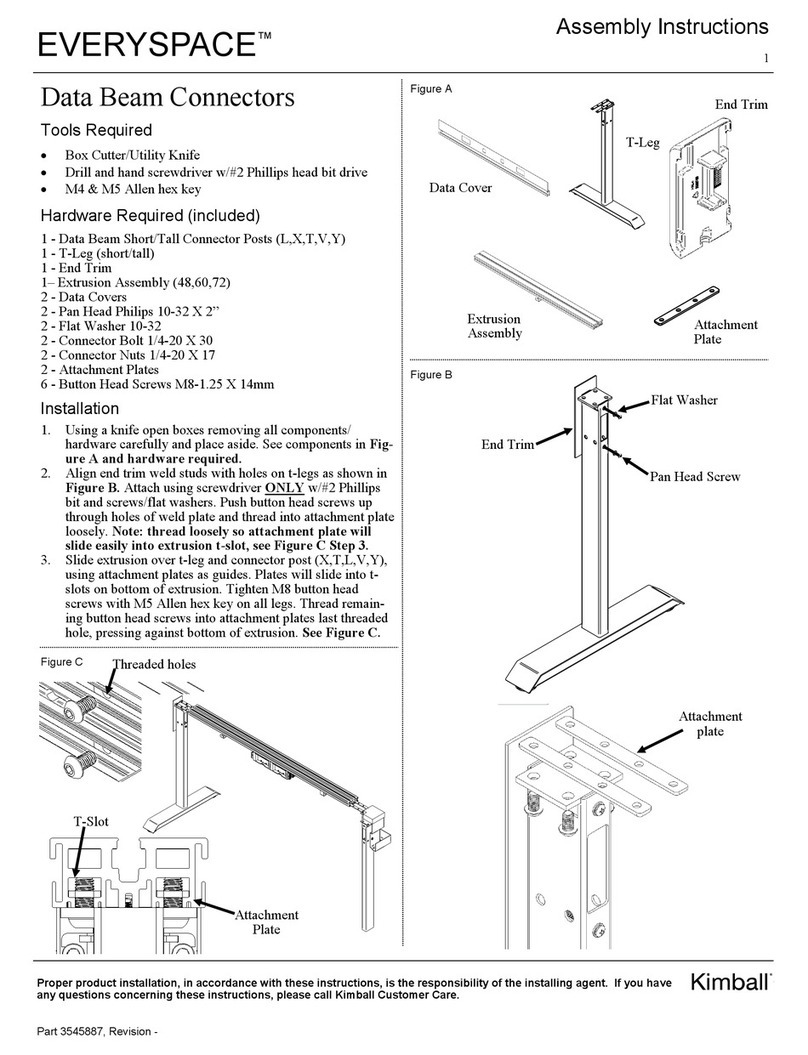
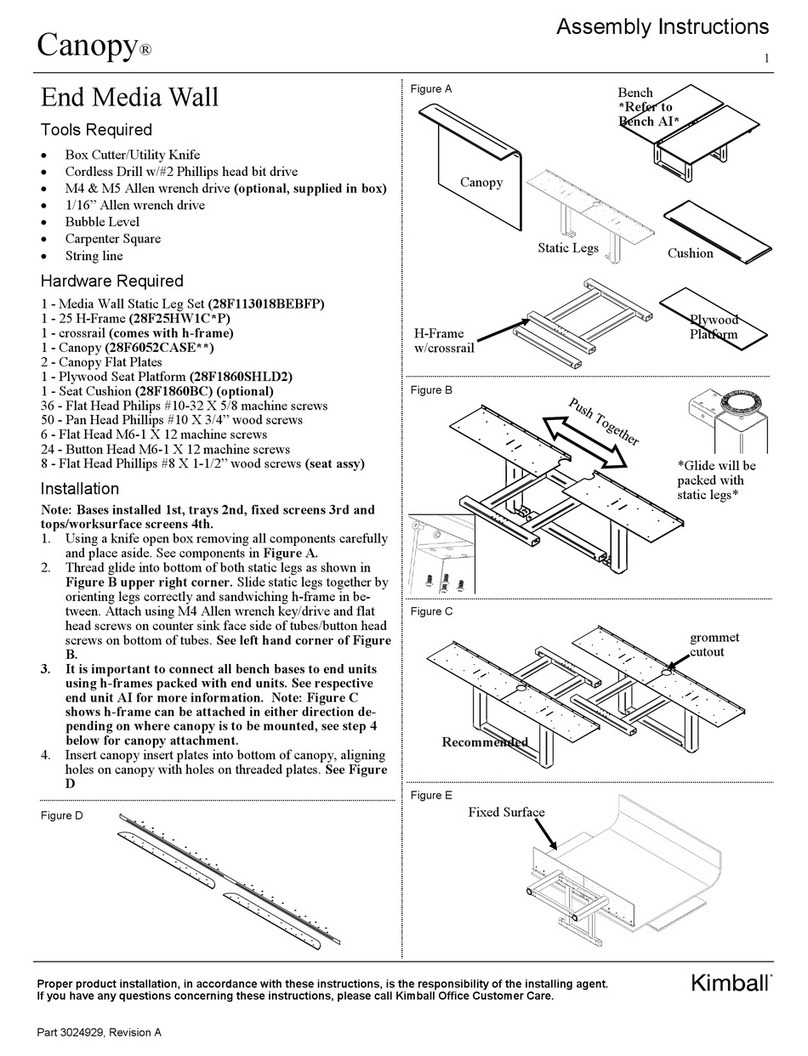
2. Using a knife safely open boxes removing static legs, h-
frames, platforms, tops, seats, canopies and parts bags from
their respective boxes. See Figure A (package contents).
3. Locate glides from parts bag in static leg boxes, removing
blue plastic cover and thread into the bottom plate of each
leg. See Figure B.
4. Lay both 30” width canopies on a non-marring surface,
face up. Slide flat plates into bottom of canopies aligning
holes. Place static legs on face of canopy as shown in Fig-
ure B. Attach legs to canopy using drill/Phillips bit and
#10-32 X 3/4” flat head machine screws.
5. Locate (4) l-brackets and (12 of 28) #10 X 5/8 sheet metal
screws, and line up with pre-drilled holes on L-support
tube. Attach using drill/Phillips bit. See Figure C.
Figure A (package contents)
Figure B
Bench Base
*Refer to
bench base AI*
6. With canopies and static legs supported, stand static legs up
onto glides and hold in place. Slide H-frame with L-support
over u-brackets welded on bench base and static legs. Attach
using M4 Allen wrench key and M6X12 flat head/button
head screws. Note: button head screws go on bottom of h-
frame and flat head screws go on the side of h-frame. See
Figure C left hand corner.
H-Frame w/
crossrails
Static
Legs
Figure C
Bench
Canopy
Media
Booth
Canopy
(2) Media
Booth
Cushion
(2) Seat
Platforms
7. Refer to center
screen AI for
attaching screen
to H-frame. See
Figure D to the
right for com-
pletion of this
step.
Figure D
Canopy® 2
Proper product installation, in accordance with these instructions, is the responsibility of the installing agent. If you have
any questions concerning these instructions, please call Kimball Customer Care.
Part 3033333, Revision A
Assembly Instructions
Figure I
8. Check vertical alignment of canopy from right side. If can-
opy is leaning, loosen machine screws on correct side with
Phillips bit. If canopy is leaning towards base, loosen set
screws. If canopy is leaning away from base, tighten set
screws. When desired alignment is achieved, carefully
tighten machine screws back into threaded flat plate.
9. Lay plywood platforms on static legs. Note: radius edge
sets away from canopy as shown in Figure E top right
corner. Push to back edge and center left to right between
plates. Attach using drill/Phillips bit and (48) #10 X 5/8”
wood screws up through the plate into platform. See Figure
E.
10. If cushion is attached, lay cushion on top of plywood plat-
form, center cushion on platform. Remove #10 X 5/8”
wood screws and attach cushion using drill/Phillips bit and
(4) #8 X 1-1/2” flat head wood screws on both sides. See
Figure F for location of screws
11. Push end cap over L-support as shown in Figure G.
12. Plug up/down or programmable switch into ethernet port
and run cord to wire management groove cut in tube. At-
tach up/down switch to worksurface in next step with (2)
screws provided in base box with drill/Phillips bit in de-
sired location
13. Lay rectangular and round worksurfaces in their respective
places centered left to right and using dimensions shown in
Figure I. Attach using drill/Phillips bit and remaining
worksurface screws. Note: rectangular worksurface
screws are packed with bench base, and wood screws
for round top are packed with H-frame.
12. Using bubble level, place on top of plywood shelf on both
sides to check base is level to floor. If either side isn’t level,
adjust glides accordingly to help with alignment of base
and vertical alignment of canopy.
13. See Figure J for completed base.
Figure E
Figure F
Figure G
Use (4) outside holes
for flat head #8 X 1.5”
wood screws
Figure H
Up/Down
Switch cord
groove
UP/DOW N
SWITCH
PORT
ACTUATOR
PORT 1 ACTUATOR
PORT 2
Figure J
6-1/16"4-3/4"

Other Kimball Indoor Furnishing manuals

Kimball Kore User manual

Kimball

Kimball Kore User manual

Kimball Fluent Series User manual

Kimball

Kimball Fluent Series User manual

Kimball XSEDE Height Adjust User manual

Kimball

Kimball XSEDE Height Adjust User manual

Kimball President Installation guide

Kimball

Kimball President Installation guide

Kimball Senator User manual

Kimball

Kimball Senator User manual

Kimball Xsede 48 User manual

Kimball

Kimball Xsede 48 User manual

Kimball Canopy User manual

Kimball

Kimball Canopy User manual

Kimball Narrate User manual

Kimball

Kimball Narrate User manual

Kimball National 2126815 User manual

Kimball

Kimball National 2126815 User manual

Kimball Alterna User manual

Kimball

Kimball Alterna User manual

Kimball EVERYSPACE User manual

Kimball

Kimball EVERYSPACE User manual

Kimball Fluent User manual

Kimball

Kimball Fluent User manual

Kimball Footprint Radius Profile User manual

Kimball

Kimball Footprint Radius Profile User manual

Kimball EVERYSPACE User manual

Kimball

Kimball EVERYSPACE User manual

Kimball EVERYSPACE User manual

Kimball

Kimball EVERYSPACE User manual

Kimball Kore User manual

Kimball

Kimball Kore User manual

Kimball Canopy User manual

Kimball

Kimball Canopy User manual

Kimball XSEDE User manual

Kimball

Kimball XSEDE User manual

Kimball Canopy 28FBFBSEP Series User manual

Kimball

Kimball Canopy 28FBFBSEP Series User manual

Kimball Grin Occasional User manual

Kimball

Kimball Grin Occasional User manual

Kimball Cetra User manual

Kimball

Kimball Cetra User manual

Kimball Innsbruck User manual

Kimball

Kimball Innsbruck User manual

Kimball WISH Guide

Kimball

Kimball WISH Guide

Kimball XSEDE User manual

Kimball

Kimball XSEDE User manual

Popular Indoor Furnishing manuals by other brands

American Standard 1340 installation instructions

American Standard

American Standard 1340 installation instructions

J.Burrows JBPROSITLG Assembly instructions

J.Burrows

J.Burrows JBPROSITLG Assembly instructions

Julian Bowen HUD002 Assembly instructions

Julian Bowen

Julian Bowen HUD002 Assembly instructions

Walker Edison W58OWN2D Assembly instructions

Walker Edison

Walker Edison W58OWN2D Assembly instructions

Baxton Studio 0019 Assembly instructions

Baxton Studio

Baxton Studio 0019 Assembly instructions

Baumax HVNK341 Assembling Instruction

Baumax

Baumax HVNK341 Assembling Instruction

Habitat Macao 817620 manual

Habitat

Habitat Macao 817620 manual

Steelcase AMQ Currency Enhanced manual

Steelcase

Steelcase AMQ Currency Enhanced manual

Coaster 609142P Assembly instructions

Coaster

Coaster 609142P Assembly instructions

Cooper Lighting MCGRAW-EDISON 70 - 200W Specification sheet

Cooper Lighting

Cooper Lighting MCGRAW-EDISON 70 - 200W Specification sheet

Furniture of America CM-BK601 Assembly instructions

Furniture of America

Furniture of America CM-BK601 Assembly instructions

Vinsetto 921-609V00 manual

Vinsetto

Vinsetto 921-609V00 manual

miseno ARIES DL-50 installation manual

miseno

miseno ARIES DL-50 installation manual

Pineapple RYNO WALL SHELF installation instructions

Pineapple

Pineapple RYNO WALL SHELF installation instructions

Southern Enterprises Elements CK727200TX Assembly instructions

Southern Enterprises

Southern Enterprises Elements CK727200TX Assembly instructions

Forte Patras PBLK37 Assembling Instruction

Forte

Forte Patras PBLK37 Assembling Instruction

BOBOCHIC YUGO Assembly instructions

BOBOCHIC

BOBOCHIC YUGO Assembly instructions

Furniture of America CM3310BN Assembly instructions

Furniture of America

Furniture of America CM3310BN Assembly instructions

manuals.online logo
manuals.online logoBrands
  • About & Mission
  • Contact us
  • Privacy Policy
  • Terms and Conditions

Copyright 2025 Manuals.Online. All Rights Reserved.