PAGE
2
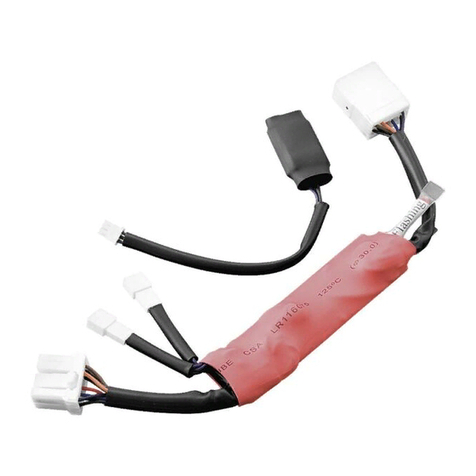
STEP 3 Locate the stock wiring plugs, (unplug either the blue or red plugs) and insert the
supplied wiring harness in between the stock plugs. PIC 2 One of the two small
connectors shown in PIC 3 is where you will be plugging in the light. If you have
already installed additional lights in the rear, you may already have an extra
connection available to use so you will not need to install the wire harness.
ATTENTION!
Küryakyn recommends the use of dielectric grease on electrical
connections.
ATTENTION!
Thoroughly clean the area of grease, oil, dirt, or other debris to ensure
proper adhesion. Küryakyn WILL NOT warranty any parts lost due to
improper installation.
ATTENTION!
The adhesive may not correctly bond if applied at temperatures less than
50°F. Do not attempt this installation in temperatures less than 50°F.
STEP 4 Test fit the Fender Accent. Mark the fender panel along the top with a piece of
masking tape or non-permanent marker when the bottom edge of the trim is
lined up with the bottom edge of the fender. Make sure when test fitting the trim
that the wire exits from the bottom of the trim and is not pinched between the
trim and the fender.
STEP 5 Remove any grease or debris from the installation area with soapy water and a
clean rag; allow the area to dry completely. Clean the rear fender base with the
included alcohol cleaning pad to remove any residue and allow the area to dry
completely.
STEP 6 Rub the backing on the adhesive strip to activate the adhesive before applying.
Remove the adhesive backing. Press the fender trim into place and hold for 1
minute to ensure proper adhesion. Full bond strength will occur within 24 hours.
ATTENTION!
Secure all wiring away from any moving parts, pinch points or extreme
heat. Küryakyn WILL NOT issue a warranty on any electrical component
that fails due to pinched, crimped, broken, abraded, melted or frayed
wires.
STEP 7 Route the wire harness up the inside of the rear fender panel, keeping it away
from pinch points. Make sure to check placement of cord keepers so they do not
interfere with the frame of the motorcycle when replacing the panel. Clean the
fender panel thoroughly where you need to put the included cord keepers and
attach them to the inside of the fender panel. Lift the tab on the cord keepers
and insert the wire harness. PIC 4
STEP 8 Plug in the harness to the wiring adapter installed in Step 3. Reinstall the rear
fender panel to the bike.
STEP 9 Reconnect the battery and test the lights for correct operation.
ATTENTION!
It is the installer’s responsibility to ensure that all of the fasteners
(including pre-assembled) are tightened before operation of the
motorcycle. Küryakyn will not issue a warranty on components lost due
to improper installation. Periodic maintenance may be required.
Ride On!
LED RUN/BRAKE FENDER TRIM INSTALLATION
PIC 1
PIC 2
REMOVE THESE FASTENERS
PIC 4
PIC 3
