manuals.online logo
Brands
  1. Home
  2. •
  3. Brands
  4. •
  5. Lampo
  6. •
  7. Lighting Equipment
  8. •
  9. Lampo LSDIMMCC010 User manual

Lampo LSDIMMCC010 User manual

180~295VAC input only
Built-in active PFC
Output current level selectable by DIP switch
Built-in DALI interface and push dimming function (DA version)
Built-in 0~10Vdc and PWM signal dimming function (Non-DA vers.)
Power supply synchronization function up to 10 units
Temperature compensation function by external NTC
Input 180~295V AC
PFC attivo integrato
Livello di corrente di uscita selezionabile tramite DIP switch
Interfaccia DALI integrata e funzione push dimming (versione DA)
Funzione 0~10V DC e PWM incorporata (vers. Non DA)
Funzione di sincronizzazione dell'alimentazione no a 10 unità
Funzione di compensazione della temperatura tramite NTC esterno
Built-in 12V/50mA auxiliary output
No load power consumption <1W (1.2W for DA version)
Protections: Short circuit / Over voltage / Over temperature
Suitable for intelligent LED lighting
Uscita ausiliaria 12V / 50mA incorporata
Consumo energetico in assenza di carico <1 W (1,2 W per la
versione DA)
Protezioni: Cortocircuito / Sovratensione / Sovratemperatura
Adatto per illuminazione LED intelligente
Caratteristiche Features
F M
110 M
Wiring
Settings and connections
1. Output Current Level Settings
Impostazioni e connessioni
1. Impostazioni del livello di corrente di uscita (Output)
Cautions
Environmental limitations
This unit must be installed by a qualified electrician
Maximum ambient temperature must not exceed 60°C
Always allow adequate ventilation clearances, 50mm, around
the unit in use to prevent it from overheating
Only install the unit in interior environments
Housing with cable clamp for remote installation
Use wires with an adequate cross-section
Use suitable mounting tools to do the wiring and mounting
Use a MCB (miniature circuit breaker) with an adequate current
rating to protect the lighting system (see 5)
The LSDIMMCC serie can provide various output currents by
setting the DIP switch. The settings of the DIP switch are
shown in the tables below.
La serie LSDIMMCC può fornire varie correnti di uscita impostando i
jumper. Le impostazioni sono mostrate nella seguente tabella:
LSDIMMCC010 - LSDIMMCCDA
Note : 1.Factory default setting is 700mA.
2.Output voltage and output wattage must not exceed the rated
values.
3. LSDIMMCCDA is suitable for DALI and DALI 2.0 systems
4. LSDIMMCC010: the 0-10V DC signal connected to it must be
active
Note : 1.L'impostazione predefinita in fabbrica è 700mA.
2.La tensione di uscita e la potenza di uscita non devono
superare i valori nominali.
3. LSDIMMCCDA è adatto per sistemi DALI e DALI 2.0
4. LSDIMMCC010: il segnale 0-10V DC ad esso collegato deve
essere attivo
Voltage
range 123456
Selectable
Current
2-100V
ON
ON ON
ON ON ON ON
ON ON ON ON ON
ON ON ON ON ON ON
350mA
2-80V 500mA
2-67V 600mA
2-57V 700mA*
2-46V 900mA
2-40V 1050mA
Cablaggio
Custodia con pressacavo per installazione remota
Utilizzare fili con una sezione adeguata
Utilizzare strumenti di montaggio adeguati per eseguire il
cablaggio e il montaggio
Utilizzare un MCB (interruttore automatico miniaturizzato) con
una corrente nominale adeguata per proteggere il sistema di
illuminazione (vedere punto 5)
Limitazioni ambientali
La temperatura ambiente massima non deve superare i 60°C
Lasciare sempre una distanza di ventilazione adeguata, 50mm,
intorno all'unità in uso per evitare che si surriscaldi
Installare l'unità solo in ambienti interni
Precauzioni
Questa unità deve essere installata da un elettricista qualificato
LSDIMMCC010 - LSDIMMCCDA
Manuale d'installazione - Installation manual
LAMPO
P. 1 LAMPO LIGHTING TECHNOLOGY S.R.L. Via dell’Industria, 6 - 47832 San Clemente (RN) - Italia
TEL: +39 0541 857022 r.a. - FAX: +39 0541 853520 - [email protected] - www.lampolighting.com
654321
SYN.
+
+
81.5mm
Disegno tecnico - Technical design
ON
-Vo
+Vo
-NTC
+DIM
-DIM
+NTC
-FAN
+FAN
DA-
DA+
PUSH
AC/N
AC/L
23mm123.5mm
Il presente foglio istruzioni deve essere conservato per future consultazioni.
Assicurarsi di leggere e comprendere le istruzioni prima dell'installazione.
This instruc�on sheet should be kept for future reference.
Be sure to read and understand all instruc�ons before installa�on.
3. Collegamento per le funzioni di dimmerazione
a. 0-10Vdc o 10V PWM (solo per LSDIMMCC010)
c. Push dim (solo per LSDIMMCDA)
Avvertenza: rischio di cortocircuito. Il pulsante può essere
collegato solo tra PUSH e AC / L (marrone o nero).
NON collegare il pulsante all'AC/N (blu o Bianco).
Note: ONLY use open push button without indicator light.
Warning: Risk of short circuit. The push button can only be
linked between the PUSH and the AC/L (brown or black).
DO NOT connect the push button to the AC/N
(blue or white).
b. DALI (solo per LSDIMMCDA)
Nota: la lunghezza massima del cavo DALI è 300 mt
(basato su un cavo da 1,5 mm2 o 14 AWG)
DA+
DA- DALI
controller
Dimming control mechanism
Function
Turn ON/OFF
Dim UP/DOWN
Reset
None
Pushing time
0.1 ~ 1 sec
1.5 ~ 10 sec
> 11 sec
< 0.05 sec
Every long pushing action will change the dimming direction
Factory dimming setting: 100%
Ogni azione prolungata di pressione del pulsante cambierà la
direzione del dimmeraggio (aumento - diminuzione)
Impostazione dimmerazione di fabbrica: 100%
Meccanismo di controllo della luminosità
Funzione
ON/OFF
Dim UP/DOWN
Reset
Nessuna
Pushing time
0.1 ~ 1 sec
1.5 ~ 10 sec
> 11 sec
< 0.05 sec
DIM-
DIM+ 0~10VDC
+
-
AC/L
AC/N
Push ButtonPUSH
LIVE (Brown or black)
NEUTRAL (Blue or white)
3. Connection of Dimming Functions
a. 0-10Vdc or 10V PWM (non-DA version only)
c. Push dim (DA version only)
b. DALI (DA version only)
Note : Maximum DALI cable length is 300 mt
(based on a 1.5mm2or 14AWG cable)
DA+
DA- DALI
controller
DIM-
DIM+ 0~10VDC
+
-
AC/L
AC/N
Push ButtonPUSH
LIVE (Brown or black)
NEUTRAL (Blue or white)
2. Collegamento di lampade a LED
Premere il "pulsante" con un cacciavite a taglio per inserire
o rimuovere il cavo.
2. Connection of LED Lamps
Press down the "push button" by a slotted screw driver to
insert or remove the cable.
Vo-
Vo+
AC/N
AC/L
NEUTRAL (Blue or white)
LIVE (Brown or black)
LAMPO
P. 2 LAMPO LIGHTING TECHNOLOGY S.R.L. Via dell’Industria, 6 - 47832 San Clemente (RN) - Italia
TEL: +39 0541 857022 r.a. - FAX: +39 0541 853520 - [email protected] - www.lampolighting.com
4. Connessione NTC
5. Numero massimo suggerito di moduli LSDIMMCC che
possono essere collegati a un MCB (interruttore automatico
miniaturizzato) a 230V AC
5. Suggested Maximum Number of the LSDIMMCC Units that
can be Connected to a MCB (miniature circuit breaker) at
230V ac
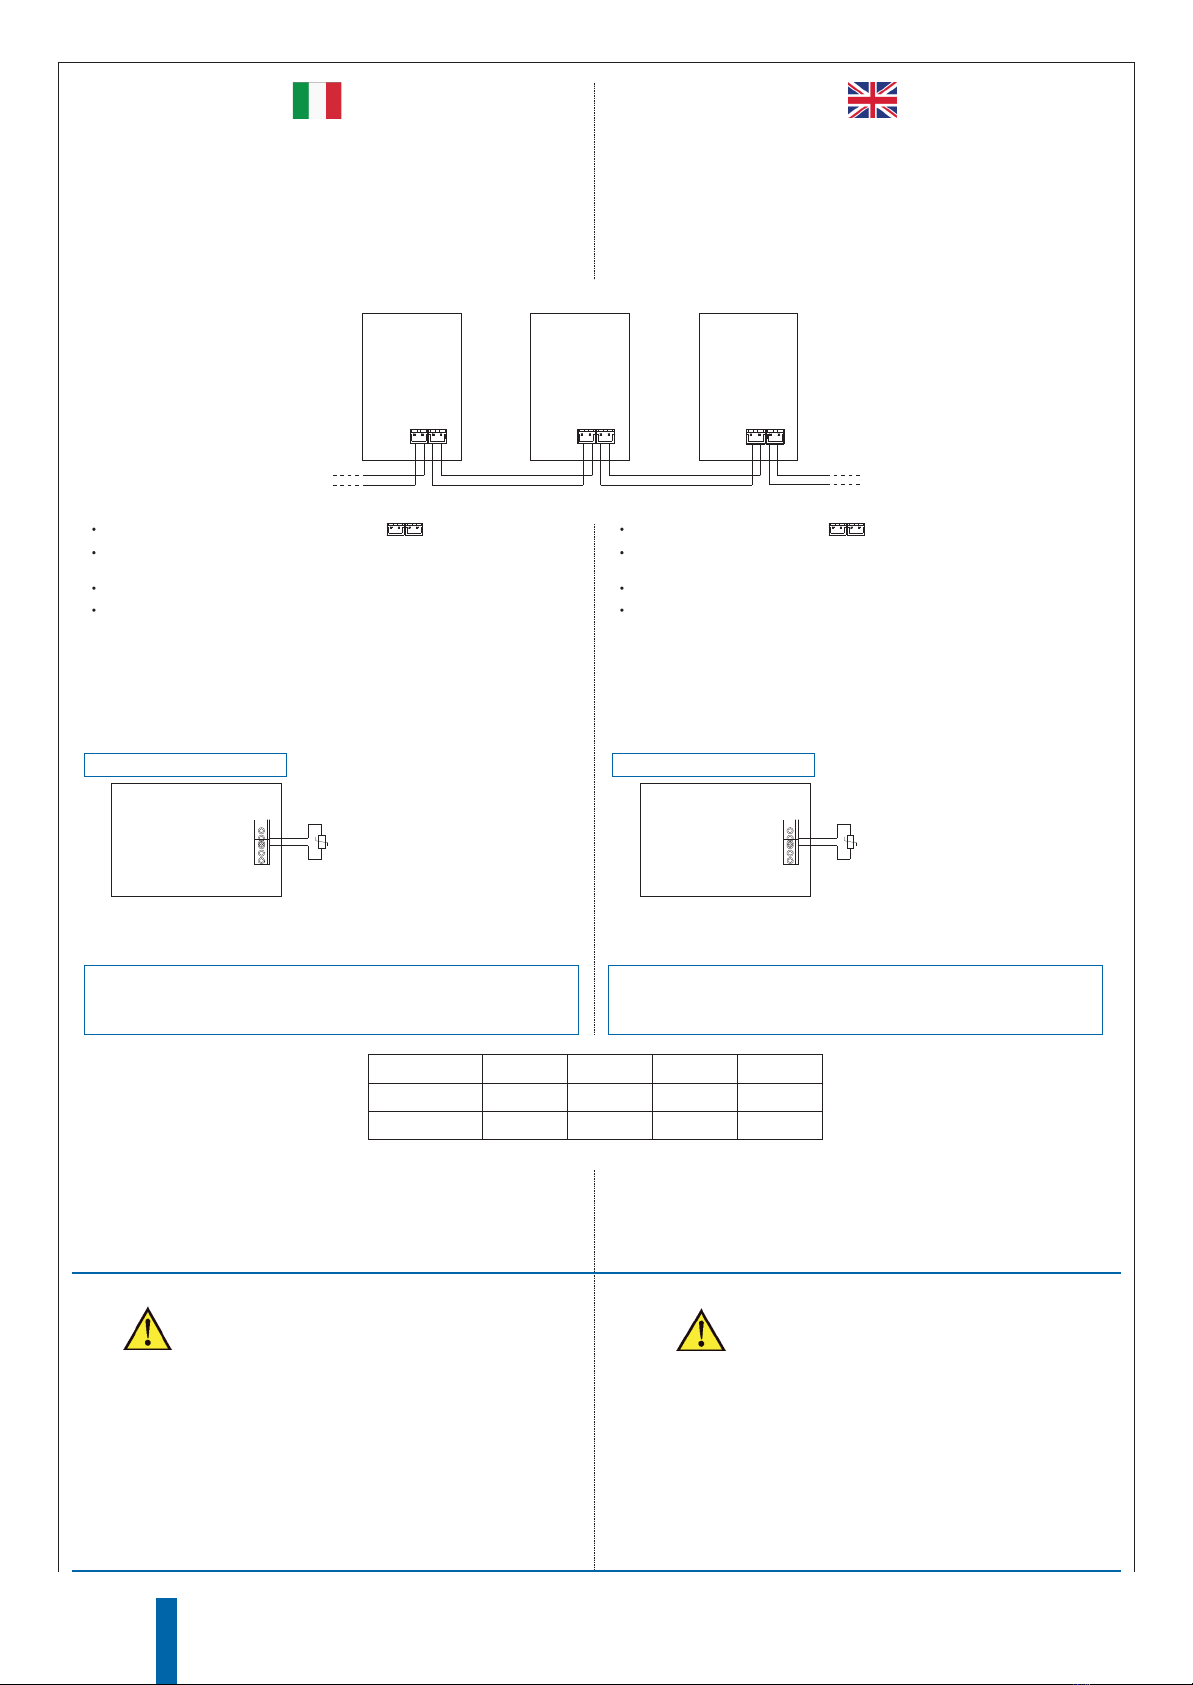
d. Synchronization operation
The lights driven by LSDIMMCC units (B) can be dimmed
synchronously through a LSDIMMCC unit (A) directly controlled via
0-10Vdc, 10V PWM, DALI or push dim dimming function.
The wiring is shown as below:
d. Operazione di sincronizzazione
Le luci controllate dalle unità LSDIMMCC (B) possono essere
dimmerate in modo sincrono tramite un'unità LSDIMMCC (A)
controllata direttamente tramite 0-10Vdc, 10V PWM, DALI o
funzione dimmer push dimming.
Il cablaggio è mostrato di seguito:
SYN.
-+-+
SYN.
-+-+
SYN.
-+-+
B A B
LSDIMMCC LSDIMMCC LSDIMMCC
Mating housing for SYN. ( )
Connectors : - CAVOJSTMM300 wire 3 mt.
- PROLJST extension cord 1,5 mt
Maximum number of the LSDIMMCC units : 10 (1 A + 9 B )
Maximum cable length (from the master unit to each end of the last
slave units) : 15 mt.
Note: DO NOT connect dimming circuitry to B.
Alloggio di accoppiamento per SYN. ( )
Connettori: - CAVOJSTMM300 cavo 3 mt.
- PROLJST prolunga da 1,5 mt
Numero massimo di LSDIMMCC: 10 (1 A + 9 B)
Lunghezza massima del cavo (dall'unità A a ciascuna
estremità delle ultime unità B): 15 mt.
Nota: NON collegare i circuiti di regolazione della luminosità
alle unità B.
Note: These calculated values are based on MCB S201 series
manufactured by ABB.
Nota: questi valori calcolati si basano sulla serie MCB S201
prodotta da ABB.
Model B10 B16 C10 C16
LSDIMMCC010 10 16 17 28
LSDIMMCCDA 10 16 17 28
NTC-
NTC+
4. NTC Connection
NTC-
NTC+
SAFETY
• Always switch o the power before installing or
servicing
• Installa�on and maintenance must only be carried out
by qualied personnel
• Place the product in a place suitable for the IP20 degree
protec�on
• Do not disassemble or tamper the product to avoid
shock electric
• Do not install near surface subject to high temperature
SICUREZZA
• Togliere sempre la tensione prima di eseguire
l’installazione o la manutenzione
• L’installazione e la manutenzione devono essere
eseguite solo da personale qualicato
• Collocare il prodotto in un luogo idoneo al grado di
protezione IP20
• Non smontare o manomettere il prodotto per evitare
shock elettrici
• Non installare vicino superci soggette ad alte
temperature
LAMPO
P. 3 LAMPO LIGHTING TECHNOLOGY S.R.L. Via dell’Industria, 6 - 47832 San Clemente (RN) - Italia
TEL: +39 0541 857022 r.a. - FAX: +39 0541 853520 - [email protected] - www.lampolighting.com
Nota: utilizzare SOLO il pulsante di apertura senza spia.
LAMPO
P. 4 LAMPO LIGHTING TECHNOLOGY S.R.L. Via dell’Industria, 6 - 47832 San Clemente (RN) - Italia
TEL: +39 0541 857022 r.a. - FAX: +39 0541 853520 - [email protected] - www.lampolighting.com
EFFICIENCY(%)
EFFICIENCY(%)
LCM-40DA series possess superior working efficiency that up to 91% can be reached in field applications.
EFFICIENZAvsCARICO -EFFICIENCY vsLOAD
PF
PF
LOAD
(230Vac Input)
LOAD
(277Vac Input)
Constant Current Mode Constant Current Mode
(40W) (40W)
LOAD
(230Vac Input)
LOAD
(277Vac Input)
Caratteristica del fattore di potenza - PowerFactor Characteristic
0.63
0.66
0.69
0.72
0.75
0.78
0.81
0.84
0.87
0.9
0.93
0.96
0.99
10% 20% 30% 40% 50% 60% 70% 80% 90% 100%
350
500
600
700
900
1050
45.0%
50.0%
55.0%
60.0%
65.0%
70.0%
75.0%
80.0%
85.0%
90.0%
95.0%
10% 20% 30% 40% 50% 60% 70% 80% 90% 100%
350
500
600
700
900
1050
0.45
0.48
0.51
0.54
0.57
0.6
0.63
0.66
0.69
0.72
0.75
0.78
0.81
0.84
0.87
0.9
0.93
0.96
0.99
10% 20% 30% 40% 50% 60% 70% 80% 90% 100%
350
500
600
700
900
1050
45.0%
50.0%
55.0%
60.0%
65.0%
70.0%
75.0%
80.0%
85.0%
90.0%
95.0%
10% 20% 30% 40% 50% 60% 70% 80% 90% 100%
350
500
600
700
900
1050
(40W) (40W)
Diagramma a blocchi - Block Diagram
DIM+
DIM-
DETECTION
CIRCUIT
EMI FILTER
RECTIFIERS
POWER
SWITCHING
FILTER
&
RECTIFIERS
RECTIFIERS
+V
+12Vaux
-V
I/P
CONTROL
O.V.P.
&
O.L.P. MCU
PFC
CIRCUIT
PFC
CONTROL
O.L.P.
O.T.P.
PWM
Others
1050mA
20
40
60
80
100
(HORIZONTAL)
-15 0 15 300 40 45 50-30 60 70
LOAD(%)
INPUTVOLTAGE (V) 60Hz
180 190 200 210 220 230 240 250 260 270 280 295
100
90
80
70
60
50
40
LOAD(%)
LOAD(%)
Curva di declassamento - Derating Curve Caratteristiche statiche - Static Characteristics
AMBIENTTEMPERATURE( )
LOAD(%)
LOAD(%)
LAMPO
P. 5 LAMPO LIGHTING TECHNOLOGY S.R.L. Via dell’Industria, 6 - 47832 San Clemente (RN) - Italia
TEL: +39 0541 857022 r.a. - FAX: +39 0541 853520 - [email protected] - www.lampolighting.com
65
70
75
80
85
90
95
100
105
55 60 65 70 75 80 85 90 95
220KO
330KO
470KO
Curva di declassamento NTC - NTC derating curve
220K
330K
470K
Temperatura rilevata (gradi) - SensedTemperature(degree)
Output Io (%)
FUNZIONAMENTO DI COMPENSAZIONE DELLA
TEMPERATURA
TEMPERATURE COMPENSATION OPERATION
LSDIMMCC have the built-intemperaturecompensation function(T ,Io ).By
connecting a temperaturesensor(NTC resistor) betweenthe NTC+/- terminal of
LSDIMMCC and the detecting point on the lighting system or the surrounding
environment, output current of LSDIMMCC could be correspondingly changed
to ensure the long life of LED.
LSDIMMCC ha la funzione di compensazione della temperatura incorporata
(T , Io ). Collegando un sensore di temperatura (resistenza NTC) tra il
terminale NTC +/- di LSDIMMCC e il punto di rilevamento sul sistema di
illuminazione o l'ambiente circostante, la corrente di uscita di LSDIMMCC
potrebbe essere modificata di conseguenza per garantire la lunga durata del
LED .
2.
NTC resistance
220K
330K
470K
Output Current
< 60 , 100% of the rated current (corresponds to the setting current level)
< 70 , 100% of the rated current (corresponds to the setting current level)
< 80 , 100% of the rated current (corresponds to the setting current level)
> 60 , output current begin to reduce, details please refer to the curve.
> 70 , output current begin to reduce, details please refer to the curve.
> 80 , output current begin to reduce, details please refer to the curve.
Notes:
1. LAMPO does not offer the NTC resistor and all the data above are
measured by using THINKING TTC03 series.
2. If other brands of NTC resistor is applied,please check the temperature
curve first.
3. Synchronization function of the power supply will be invalid when the
"temperature compensation" function is in use.
Note:
1. LAMPO non offre la resistenza NTC e tutti i dati di cui sopra sono
misurati utilizzando la serie THINKING TTC03.
2. Se vengono applicate altre marche di resistori NTC, controllare
prima la curva della temperatura.
3. La funzione di sincronizzazione dell'alimentatore non sarà valida
quando è in uso la funzione di "compensazione della temperatura".
1.LCM-40DA can still be operated well when the NTC resistor is not connected
and the value of output current will be the current level that you set through the
DIP switch.
1.LSDIMMCC può ancora funzionare bene quando il resistore NTC non è
collegato e il valore della corrente di uscita sarà il livello di corrente impostato
tramite l'interruttore DIP.

This manual suits for next models

1

Other Lampo Lighting Equipment manuals

Lampo DIODE ONE Full Colour User manual

Lampo

Lampo DIODE ONE Full Colour User manual

Lampo IP40 Led Colour User manual

Lampo

Lampo IP40 Led Colour User manual

Lampo SQLED Series User manual

Lampo

Lampo SQLED Series User manual

Lampo IP66 User manual

Lampo

Lampo IP66 User manual

Lampo SHOP 150 User manual

Lampo

Lampo SHOP 150 User manual

Lampo KITRGBWR4 User manual

Lampo

Lampo KITRGBWR4 User manual

Lampo SENSCRP15A User manual

Lampo

Lampo SENSCRP15A User manual

Lampo HYPERCOLOR 575 User manual

Lampo

Lampo HYPERCOLOR 575 User manual

Lampo SYDNEY Series User manual

Lampo

Lampo SYDNEY Series User manual

Lampo Fari Solar LED Series User manual

Lampo

Lampo Fari Solar LED Series User manual

Lampo LED300IP20RGBW24 User manual

Lampo

Lampo LED300IP20RGBW24 User manual

Lampo PT5LEDMC User manual

Lampo

Lampo PT5LEDMC User manual

Lampo SPF1LED/BN User manual

Lampo

Lampo SPF1LED/BN User manual

Lampo DIKLED4WBTBC User manual

Lampo

Lampo DIKLED4WBTBC User manual

Lampo Fari Solar LED Series User manual

Lampo

Lampo Fari Solar LED Series User manual

Lampo SYUGR20W User manual

Lampo

Lampo SYUGR20W User manual

Lampo Vogue 575 W User manual

Lampo

Lampo Vogue 575 W User manual

Lampo SENSMICRO User manual

Lampo

Lampo SENSMICRO User manual

Lampo TB Series User manual

Lampo

Lampo TB Series User manual

Lampo IP66 User manual

Lampo

Lampo IP66 User manual

Lampo CARR/3W User manual

Lampo

Lampo CARR/3W User manual

Lampo IP66 User manual

Lampo

Lampo IP66 User manual

Lampo PROLUM D3 User manual

Lampo

Lampo PROLUM D3 User manual

Lampo SPLED503MC User manual

Lampo

Lampo SPLED503MC User manual

Popular Lighting Equipment manuals by other brands

Yeelight GU10 user manual

Yeelight

Yeelight GU10 user manual

Genaray Accushine user manual

Genaray

Genaray Accushine user manual

FROG Leap Twin manual

FROG Leap

FROG Leap Twin manual

Feniex L-4910 instruction manual

Feniex

Feniex L-4910 instruction manual

emaux LED-P100 series Operating procedures

emaux

emaux LED-P100 series Operating procedures

Hornbach MAL 2048-030 Mounting instructions

Hornbach

Hornbach MAL 2048-030 Mounting instructions

Magneti Marelli 007935030040 owner's manual

Magneti Marelli

Magneti Marelli 007935030040 owner's manual

Lena Lighting UP LED Installation instruction

Lena Lighting

Lena Lighting UP LED Installation instruction

Akurat lighting hp3a manual

Akurat lighting

Akurat lighting hp3a manual

ProLights DISPLAYCOBTRWDWW user manual

ProLights

ProLights DISPLAYCOBTRWDWW user manual

Vision & Control DL30x90-IR850/24V Instructions for use

Vision & Control

Vision & Control DL30x90-IR850/24V Instructions for use

DTS PROFILO 500 user manual

DTS

DTS PROFILO 500 user manual

PacLights FSLN Series installation guide

PacLights

PacLights FSLN Series installation guide

Zylight Z50 user guide

Zylight

Zylight Z50 user guide

FIJA DEL INITIAL manual

FIJA

FIJA DEL INITIAL manual

Beghelli Fortezza Combo RM instructions

Beghelli

Beghelli Fortezza Combo RM instructions

Whelen Engineering Company WAT GSE JUNIOR INCURSION FLJILB installation guide

Whelen Engineering Company

Whelen Engineering Company WAT GSE JUNIOR INCURSION FLJILB installation guide

Sunbather Downunder installation guide

Sunbather

Sunbather Downunder installation guide

manuals.online logo
manuals.online logoBrands
  • About & Mission
  • Contact us
  • Privacy Policy
  • Terms and Conditions

Copyright 2025 Manuals.Online. All Rights Reserved.