mabe RMI1851XSAB0 User manual

1、尺寸:16K。36P
2、油墨颜色为黑色:黑白印刷,印刷应清晰,不能有印刷缺陷。
3、切边应成直角,不能歪斜。
4、样板需送设计部门认可方可生产。
(g) scale
1:1
KE
1
RMI1851XSAB0
RMI1851XSAX0
SO-BCD510WE-UT
黄志胜
曾磊
王智姝
2018.02.27
80g双胶纸
16131000A29437

1
use & care manual
refrigerator
models
RMI1851XSAB0
RMI1851XSAX0
read this instruction manual before installing your new
refrigerator
PM01
Importer’s name and address as below.
A.M.A. Al Swailem Est.
OLAYA Street
P.O. Box 544
Riyadh, 11421
Kingdom of Saudi Arabia
0006

2

3
contents
1. SAFETY WARNINGS ........................................................................... 4
2. INSTALLATION .................................................................................... 5
2.1 Location ............................................................................................ 5
2.2 Door Handle Install Illumination .................................................... 5
2.3 Door Space Requirements ............................................................... 6
2.4 Levelling the Unit ............................................................................. 6
2.5 Cleaning Before Use ........................................................................ 6
2.6 Before Using Your Unit .................................................................... 7
2.7 Interior Accessories .......................................................................... 7
3. PRODUCT OVERVIEW ......................................................................... 8
4. OPERATION ......................................................................................... 8
4.1 Key .................................................................................................... 9
4.2 Display screen ................................................................................... 9
4.3 Display .............................................................................................. 9
4.4 Shift setting ...................................................................................... 9
4.5 The standby control function .......................................................... 9
4.6 Fault indication .............................................................................. 10
4.7 Temperature control operation .................................................... 10
5. CLEANING ......................................................................................... 11
5.1 Defrosting ....................................................................................... 11
5.2 Cleaning the Interior and the Exterior of the Unit ..................... 11
5.3 Cleaning Tips .................................................................................. 11
6. MAINTENANCE ................................................................................. 11
6.1 Changing the Internal Light .......................................................... 11
6.2 Care When Handling/Moving Your Unit ...................................... 11
6.3 Servicing ......................................................................................... 12
6.4 Switching Off for Long Periods of Time ........................................12
7. Troubleshooting .............................................................................. 12
7.1 These things are normal ................................................................ 13
8. Energy Saving Tips ........................................................................... 13
9. DISPOSAL .......................................................................................... 14
10. reversing the doors swing ............................................................. 15
Technical Data ..................................................................................... 20

4
1. safety warnings
• WARNING: Keep ventilation openings, in the appliance en-
closure or in the built-in structure, clear of obstructions.
• WARNING: Do not use mechanical devices or other means to
accelerate the defrosting process, other than those recommended
by the manufacturer.
• WARNING: Do not damage the refrigerant circuit.
• WARNING: Do not use electrical appliances inside the food
storage compartments of the appliance, unless they are of the
type recommended by the manufacturer.
• The appliance has to be unplugged after use and before carrying
out user maintenance on the appliance.
• This appliance is not intended for use by persons (including chil-
dren) with reduced physical, sensory or mental capabilities, or lack
of experience and knowledge, unless they have been given super-
vision or instruction concerning use of the appliance by a person
responsible for their safety.
• Children should be supervised to ensure that they do not play with
the appliance.
• If the supply cord is damaged, it must be replaced by the manufac-
turer, its service agent or similarly qualified persons in order to
avoid a hazard.
• Please abandon the refrigerator according to local regulators for it
use flammable blowing gas and refrigerant.
• Please according to local regulations regarding disposal of the ap-
pliance for its flammable refrigerant and blowing gas. Before you
scrap the appliance, please take off the doors to prevent children
from getting trapped.
• This appliance is intended to be used in household and similar ap-
plications such as:
• Staff kitchen areas in shops, offices and other working environ-
ments;
• Farm houses and by clients in hotels, motels and other residential
type environments;
• Bed and breakfast type environments;
• Catering and similar non-retail applications.
• Do not store explosive substances such as aerosol cans with a flam-
mable propellant in this appliance.
IT IS HAZARDOUS FOR ANYONE OTHER THAN AU-
THORIZED SERVICE PERSONNEL TO CARRY OUT RE-
PAIR JOBS WHICH INVOLVE THE REMOVAL OF COV-
ERS.

5
TO AVOID THE RISK OF AN ELECTRICAL SHOCK DO
NOT ATTEMPT TO REPAIR THIS APPLIANCE BY
YOURSELF.
2. installation
2.1 location
When selecting a position for your unit you should make sure the
floor is flat and firm, and the room is well ventilated. Avoid locating
your unit near a heat source, e.g. cooker, boiler or radiator. Also
avoid direct sunlight as it may increase the electrical consumption.
Extreme cold ambient temperatures may also cause the unit not to
perform properly. This unit is not designed for use in a garage or
outdoor installation. Do not drape the unit with any covering.
When installing the unit, ensure that 3 inch of free space is left at
both sides, 1 inch at the rear and 1 inch at the top of the unit. This
will allow cold air to circulate around the refrigerator and improve
the efficiency of the cooling process.
2.2 door handle install illumination
Note: Figures in the user manual are for reference only. The actual
product may differ slightly. The refrigerator must be disconnected
from the source of electrical supply before attempting the installa-
tion of any accessories.
(Pictures and objects are not consistent, in order to prevail in kind)

6
1. Take out the two crisscross screws, and install them into the door
holes; turn the screws till to the bottom.
2. Aim at screws to install the handle
3. The screws in the hole at the side of the handle and turn the
screws till them very tight.
4. Screw cap should be put on the screw.
2.3 door space requirements
The unit’s door must be able to open fully as shown.
W × D > 50.8 inch × 58.5 inch
2.4 levelling the unit
To do this, adjust the two levelling feet at the front of the unit. If
the unit is not level, the door and magnetic seal alignments will not
be covered properly. Look down from the top, clockwise and coun-
terclockwise loosening, tightening.
2.5 cleaning before use
Wipe the inside of the unit with a weak solution of bicarbonate
soda. Then rinse with warm water using a Wrung-out sponge or
cloth. Wash the shelves and salad bin in warm soapy water and dry
completely before replacing the unit. Clean the exterior of the unit
with a damp cloth. If you require more information refer to the
Cleaning section.

7
2.6 before using your unit
The refrigerator adopts 230V/60Hz AC power, voltage fluctuations
over the range of 196 ~ 264V will cause malfunction or even dam-
age, so a 750 W automatic voltage regulator must be installed in
concert with the AC power.
Do not damage the power cord under any condition so as to ensure
safety use, do not use when the power cord is damaged or the plug
is worn.
Do not place flammable, explosive, volatile and highly corrosive
items in the refrigerator to prevent damages to the product or fire
accidents.
Do not place flammable items near the refrigerator to avoid fires.
This product is a household refrigerator and shall be only suitable
for the storage of foods. According to national standards, house-
hold refrigerators shall not be used for other purposes, such as stor-
age of blood, drugs or biological products.
Do not place items such as bottled or sealed containers of fluid such
as bottled beers and beverages in the freezer to prevent bursts and
other losses.
Before placing any food in your unit, turn it on and wait for 24
hours, to make sure it is working properly and to allow time to cool
down to the correct temperature. Your unit should not be overfilled.
• Before plugging in the appliance, check that you have an out-
let which is compatible with the plug supplied with the unit.
• Before turning on the refrigerator: Do not turn on until two
hours after moving the unit.
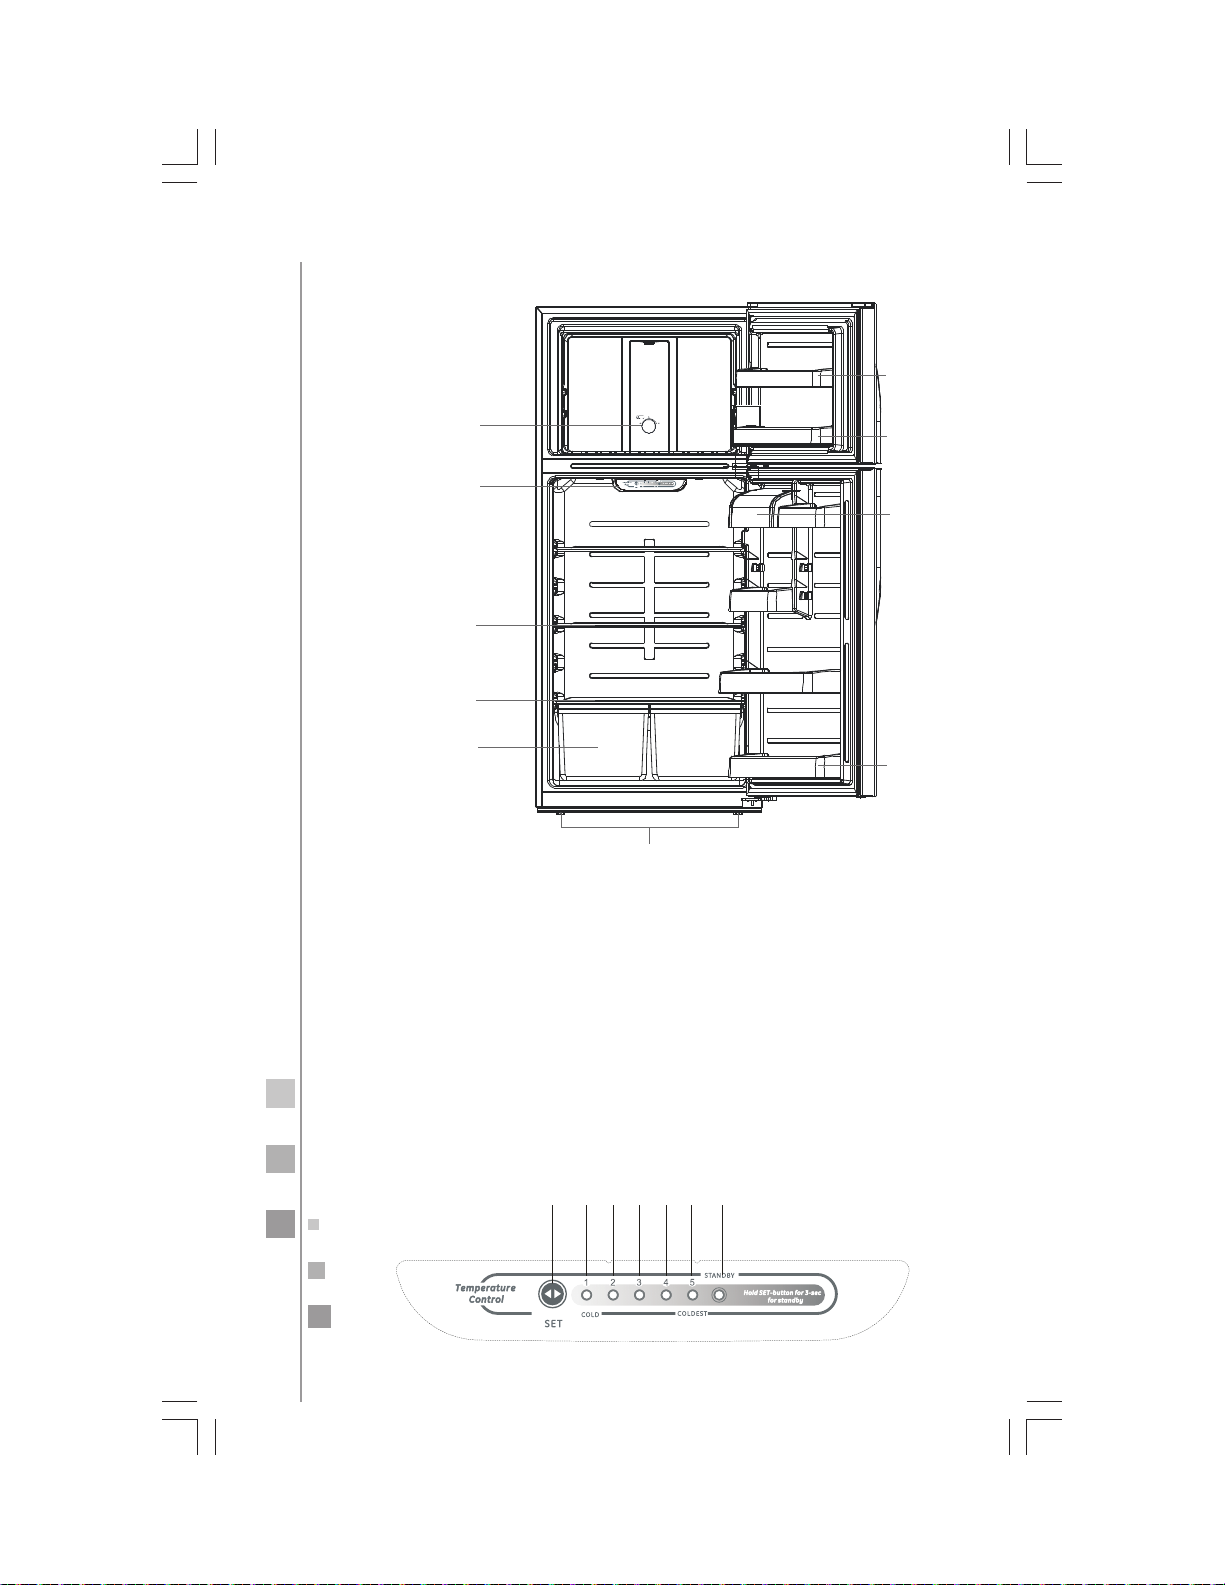
2.7 interior accessories
Various glass or plastic storage shelves are included with your appli-
ance — different models have different combinations. You should
always slide one of the full size glass storage shelves into the lowest
set of guides, above the fruit and vegetable containers, and keep it
in this position. To do this, pull the storage shelf forward until it can
be swivelled upwards or downwards and removed. Please do the
same in reverse to insert the shelf at a different height.
In order to make the full use of the volume of the fresh food
storage compartment and freezer compartment, the user can
remove one or more shelves, drawers, out of the appliance, ac-
cording to your daily use.

8
3. product overview
*All illustrations in this instruction manual are for indication only; please refer to your in-
dividual unit for details.
4. operation
HMI and pads operation.
The pads in HMI and display layout are referred in the following il-
lustration:
Levelling Feet
Door Shelf
Salad Bin
Salad Bin
Cover
Adjustable
Glass Shelves
Temperature control panel
Control Dial
Door Shelf
Door Shelf
Oil Box
① ② ③ ④ ⑤ ⑥A

9
4.1 Keypad
A. SET position set key
4.2 Display screen
1. Shift 1
2. Shift 2
3. Shift 3
4. Shift 4
5. Shift 5
6. Standby indicator
4.3 display
• Once initially powered on, the display screen (including the light
pad) is on full display for 3s, and then operates as the displayed
middle shift.
• Normal operation display.
In case of a failure, the appropriate LED light shows in combination
the failure code (in recycling display).
In case of no failures, the actual operation position of refrigerator
will be on display.
4.5 the standby control function
When the refrigerator work, push the gear SET long SET 3 s (effec-
tive keys to loosen), refrigerator into standby function mode,
standby indicator lights lit, all loads stop work; When freezer in
standby, short press gear SET button SET, refrigerator into the nor-
mal working state, standby indicator lights put out, return to nor-
mal working condition.
4.4 shift setting
Each time the shift setting pad A is pressed once, the shift position
changes one time. After the shift setting has been completed, the
refrigerator will operate according to the set value after 5s. From
left to right, the temperature is lower.
The shift regulation is:

10
4.6 fault indication
Display
Refrigerator temperature sensor circuit.
Freezer defrost sensor.
Ambient temperature sensor.
LED1 and LED2 are on
LED1 and LED3 are on
LED1 and LED4 are on
Malfunction
4.7 temperature control operation
1. Initial setting of fresh compartment control panel is shift 3, for
freezer compartment air shutter, the initial setting is Mid position.
2. If the ambient temperature is lower than 10 °C in a long time,
fresh compartment control panel shall be placed in 4 or 5 posi-
tion, freezer compartment air shutter shall be placed in COLDER
position.
3. If the ambient temperature is higher than 43 °C in a long time,
fresh compartment control panel shall be placed in 4 or 5 posi-
tion, freezer compartment air shutter shall be placed in
Mid~COLDER position.
Tips: When the freezer compartment air shutter is placed in the
COLD position, the fresh compartment can be rapid cooled down,
but if being placed in COLD position for a long time, the tempera-
ture inside fresh compartment may be reduced to below 0.

11
5. cleaning
5.1 defrosting
Auto-defrost for Frost-free Refrigerator.
5.2 cleaning the interior and exterior of the unit
1. Remove all the shelves and the salad bin. To remove the salad bin
first remove the lower door shelf.
2. Wipe the inside of the unit with a weak solution of bicarbonate
soda and then rinse with warm water using a wrung-out sponge
or cloth. Wipe completely dry before replacing the shelves and
salad bin.
3. Use a damp cloth to clean the exterior, and then wipe with a stan-
dard furniture polish. Make sure that the door is closed to avoid
the polish getting on the magnetic door seal or inside the unit.
5.3 cleaning tips
Condensation may appear on the outside of the unit. This may be
due to a change in room temperature. Wipe of any moisture resi-
due. If the problem continues, please contact a qualified technician
for assistance.
6. maintenance
Illuminating lamp specifications: MAX 40 W
1. Unplug the refrigerator from the power supply.
2. The bulb is located at the top of the compartment near the open-
ing.
3. Replace with an appliance bulb of the same or lower wattage.
4. Plug the refrigerator back in.
CAUTION: LIGHT BULB MAY BE HOT.
6.1 changing the interior light
Setting the refrigerator control to off does not remove power to the
light circuit.
6.2 care when handling/moving the unit
Hold the unit around its sides or base when moving it. Under no cir-
cumstances should it be lifted by holding the edges of the top sur-
face. Confirm whether there before leveling feet before moving.

12
6.3 servicing
The unit should be serviced by an authorized engineer and only
genuine spare parts should be used. Under no circumstances should
you attempt to repair the unit yourself. Repairs carried out by inex-
perienced persons may cause injury or serious malfunction. Contact
a qualified technician.
6.4 switching OFF for long periods of time
When the unit will not be in use for a long period of time, discon-
nect it from the mains supply, empty all food and clean the appli-
ance, leaving the door ajar to prevent the formation of unpleasant
odors.
7. troubleshooting
The following simple issues can be handled by the user. Please call
the after-sales service department if the issues are not solved.
No operation • Make sure that the refrigerator is plugged and
connected to the power supply.
• Low voltage.
• Power failure or tripped circuit breaker.
Odor • Odorous foods should be closely wrapped.
• Rotten food items.
• The interior of the refrigerator should be
cleaned.
Long-term op-
eration of com-
pressor
• It is normal that refrigerator operates for long
time during summer when the ambient tem-
perature is higher.
• Do not place too much food inside the freezer
at one time.
• Do not place foods until they are cooled.
• Frequent opening of refrigerator door.
Problem Possible Solution
Illuminating
light does not
turn on
• Make sure the refrigerator is plugged in to the
power supply.
• The illuminating light is damaged.

13
The refrigerator
door can not be
properly closed.
Problem Possible Solution
• Make sure the refrigerator is levelled.
• Make sure the refrigerator parts are properly
placed.
Loud noises
• The freezer door is stuck by food packages.
• Too much food.
• Tilted refrigerator.
7.1 these things are normal
• The refrigerator enclosure may emit heat during operation spe-
cially in summer, this is caused by the radiation of the condenser,
and it is a normal phenomenon.
• Condensation: This phenomenon will be detected on the exterior
surface and door seals of the freezer when the ambient humidity
is high, this is a normal phenomenon, and the condensation can be
wiped away with a dry towel.
• Buzz: Buzz will be generated by running compressor specially
when starting up or shutting down.
For more information, please contact the local service center or your
retailer where you purchased the product.
8. energy saving tips
• Try not to open the door too often, especially when the weather is
wet and hot. Once you open the door, close it as soon as possible.
• Every now and then check that the appliance is sufficiently venti-
lated (adequate air circulation behind the appliance).
• During normal temperature conditions, please place the thermo-
stat at the middle setting.
• Before loading the appliance with packages of fresh food, make
sure they cool down to ambient temperature.
• Ice and frost layer increase energy consumption, so clean the appli-
ance as soon as the layer is 3-5 mm thick.
• If it is the outer condenser, the rear wall should be always clean
free of dust or any impurities.
• Always consider instructions stated in the "Positioning and Energy
Saving Tips" sections, otherwise the energy consumption might be
substantially higher.
• The appliance should be located in the coldest area of the room,
away from heat producing appliances or heating ducts, and out of
reach of direct sun light.

14
• Let hot foods cool down to room temperature before placing
them into the appliance. Overloading the appliance forces the
compressor to run longer. Foods that freeze too slowly may lose
quality, or spoil.
• Be sure to wrap foods properly, and wipe containers dry before
placing them in the appliance. This cuts down on frost buildup in-
side the appliance.
• Appliance storage bin should not be lined with aluminum foil, wax
paper, or paper toweling. Liners interfere with cold air circulation,
making the appliance less efficient.
• Organize and label food to reduce door openings and extended
searches. Remove as many items as needed at one time, and close
the door as soon as possible.
9. disposal
Old units still have some residual value. An environmentally friendly
method of disposal will ensure that valuable raw materials can be
recovered and used again. The refrigerant used in your unit and in-
sulation materials require special disposal procedures. Ensure that
none of the pipes on the back of the unit are damaged prior to dis-
posal.
Up to date information concerning options of disposing of your old
unit and packaging from the new one can be obtained from your lo-
cal council office.
When disposing of an old unit, break of any old locks or latches and
remove the door as a safeguard.
correct disposal of this product
This marking indicates that this product should not be dis-
posed with other household wastes throughout the EU. To
prevent possible harm to the environment or human health
from uncontrolled waste disposal, recycle it responsibly to
promote the sustainable reuse of material resources.
To return your used device, please use the return and collection sys-
tems or contact the retailer where the product was purchased. They
can take this product for environmental safe recycling.
For more information, please contact the local authority or your re-
tailer where you purchased the product.

15
Freezer
compart-
ment door
Middle hinge
subassembly
10. reversing the doors swing
1. Prepare a cross screwdriver
and a socket head wrench.
2. Disengage the top hinge,
hinge stopple, top hinge sub-
assembly and fixed hinge
screws for later use.
3. Disengage the freezer com-
partment door.
4. Disengage the middle hinge
subassembly with the cross
screwdriver and fixed hinge
screws for later use.
Disengage the top hinge,
hinge stopple, top hinge.

16
5. Disengage the fresh food compartment door.
6. Disengage the bottom hinge from the left side of the chamber
with the cross screwdriver, install it on the left side of the cham-
ber, and screw off the hinge screw bolt to install into the left
stopple of the hinge.
Fresh food
compartment
door
Hinge screw bolt.
Bottom hinge

17
8. Install the fresh food compartment door onto the chamber, keep
the axle center of bushing aligned to the center of screw bolt of
bottom hinge, and then put down the door naturally. Install the
middle hinge on the left side of chamber and fasten it with three
screws.
7. Disengage the bushing and limit stop from the right side of the
fresh food compartment door respectively, and install them on
the left side of the door (use two screws to fasten the door limit
stop).
Bushing
Door limit stop
Middle hinge subassembly
Fresh food
compartment
door

18
9. Take off the top and bottom
bushing from the freezer com-
partment door, and install
them into the axle holes
aligned to the axle center on
the left side of the door.
10. Align and install the center of
left top hinge onto the axle
center on the left side of the
door, and fasten the left top
hinge with 3 screws after the
freezer compartment door is
fastened.
11. Install the left hinge guard
and hinge stopple cover onto
the chamber.
12. Take off the handle caps and
handle stopples.
Left top hinge
Freezer
compart-
ment door
Top hinge
bushing
Left hinge guard
Hinge
stopple
cover
Handle
cap
Handle
stopple

19
13. Disengage 2 handles with the
socket head wrench.
16. Finally, install the handle
stopple and handle cap and
stopple in the opening posi-
tions.
15. Install 2 handles onto the
right side of the door with
the socket head wrench.
14. Use the cross screwdriver to
move the handle fastening
screw bolts from the left side
to the right side by way of
piercing.
4 stopples
Socket
head
wrench
Handle
fastening
screw
bolts
Handle
stopple
Handle cap
This manual suits for next models
1
Table of contents
Other mabe Refrigerator manuals

mabe
mabe RMB32YLCS0 User manual

mabe
mabe serviplus SEDNA ESTILO User manual

mabe
mabe MTV085ICER User manual

mabe
mabe MSC504SORBS0 User manual

mabe
mabe ITV085ICER User manual

mabe
mabe RMS1540Z User manual

mabe
mabe RMC275PURS0 User manual

mabe
mabe RMF0411PYMN0 User manual

mabe
mabe RMI2160XSAB0 User manual

mabe
mabe MTM482SENSS0 User manual

mabe
mabe ESTILO User manual

mabe
mabe RMF0411YINB0 User manual

mabe
mabe MAV060IAERWW User manual

mabe
mabe RM04Y04RM43U User manual

mabe
mabe PSS21 Series User manual

mabe
mabe RMV21WIM User manual

mabe
mabe RMC090NESY0 User manual

mabe
mabe RM62W04EX User manual

mabe
mabe MTV085ICER User manual

mabe
mabe RMV21WI User manual