/ EN
USER MANUAL
SPECIFICATION
Light Source Cree™ XML
Runtime and
Operation Modes
2 x CR123A 1 x 18650 3400mAh
BOOST 1 min 1 min
100% 1 h 30 min 2 h
50% 3 h 11 min 3 h 11 min
20% 5 h 24 min 6 h 30 min
2% 49 h 50 min 62 h 50 min
Power Supply 2 x CR123A lithium
1 x Li-ion battery 3400 mAh 18650
Dimensions 155 x 45 mm
Weight 231 g
Shock-Resistance 1.2 m
Beam Distance 391 m
Waterproof IPX7
Thank you for choosing the aluminum flashlight from Mactronic®.
Similarly to other high quality devices, proper operation and maintenance
will ensure high durability and reliability of the product. Please read the
following instruction and save it for future reference as it contains essen-
tial information on safe operation and use.
SAFETY
1. In order to reduce risk of fire or electric shock charger must not be
used for charging batteries in other products. Similarly batteries of
THH0123 and THH0132 must not be charged using other chargers.
2. Never use the electric wires to carry the charger or to pull it out of the
wall socket.
3. Connect the 230V AC power pack of the charger directly to the electric
socket without the use of an extension cord.
4. Do not use the charger if damaged. Damaged power pack or leads must
be immediately replaced.
5. Never attempt to repair the flashlight or charging leads on your own.
The repair must be carried out by a qualified serviceman.
6. Use only original battery packs recommended by the manufacturer.
7. The battery must not be disposed of in fire, even if damaged or com-
pletely drained, as it may explode when thrown into fire. Operate the bat-
tery pack with care, never allow short circuit to occur.
8. Minor electrolyte leakages from the battery cells may occur if the bat-
tery is used under extreme load or at extreme temperatures. Such leak-
age does not indicate a damage to the batteries. However, should the cells
become no longer leak-proof, please avoid any direct skin contact with the
leakage. Please wash your contaminated skin immediately with soap wa-
ter should such contact occur.
BATTERY REPLACEMENT
1. Unscrew the end cap and remove it from the unit.:
2. Remove old batteries and replace 2 new 3V CR123A lithium batteries,
and then replace the end cap back on.
CHARGING
The flashlight must be fully charged before the first use. In order to en-
sure full battery pack capacity it may be necessary to perform several
charge/discharge cycles.
230V AC charging
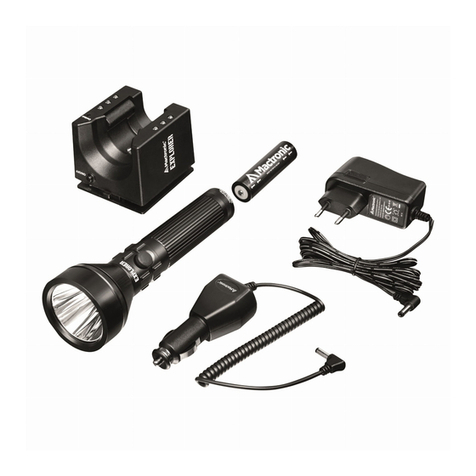
Connect the 230V AC lead to the battery charger and plug the other end of
the 230V AC lead to the electric socket. Next place the flashlight in the
docking cradle. Correct insertion of the flashlight to the handle is indicat-
ed by lighting the red LED “Contact”. Full battery charging time: 4-6
hours, indicated by change of LED’s color from red to green on 230V char-
ger. Upon completion of the charging first disconnect the power pack
from the socket and remove the connector from the respective socket.
12V DC charging
Connect the 12V DC lead end to the charging socket on the battery char-
ger and plug the other end to the car lighter. Next place the flashlight in
the docking cradle. Correct insertion of the flashlight to the handle is in-
dicated by lighting the red LED “Contact”. Full battery charging time: 4-6
hours, indicated by change of LED’s color from red to green on 230V char-
ger. Upon completion of the charging first disconnect the power pack
from the socket and remove the connector from the respective socket.
TORCH OPERATION
Press the back switch to activate the flashlight temporarily or perma-
nently (press completely). Pressing the switch repeatedly changes the
modes in the following sequence: BOOST, 100%, 50%, 20%, 2%.
CAUTION!
Modifications and repairs:
Unless authorized by Mactronic in writing, any modifications and user attempts
at home repairs will automatically void the warranty.
Mactronic warranty:
Mactronic covers the camping lantern with a 2-year warranty for any manufac-
tured defects in material and/or workmanship. The warranty does not cover
normal use, rust, unauthorized modifications, improper storage, damage from
falls, improper handling, corrosion from leaking batteries and use of the lan-
tern contrary to its intended purpose.
GENERAL INFORMATION:
Do not disassemble the c. The CREE LED offers an estimated life exceeding 50,000
hours. Disassembly, or other unauthorized modifications, will automatically void
the warranty.
In the event that the flashlight is not functioning:
Check that the batteries are not depleted.
Check battery polarity. Insert the batteries as indicated on the battery compart-
ment. Make sure the contacts in the battery compartment are not corroded. Clean
if necessary, taking special care as not to bend the contacts.
If the flashlight still does not function: contact the Mactronic® service department.
Care and maintenance:
After using the flashlight in a humid environment, remove and dry the batteries.
Periodically clean the flashlight using a soft cloth dampened in lukewarm water
with mild soap.Do not clean with sharp, abrasive objects. Make sure not to scratch
the lens.
Storage:
Prior to long-term storage, remove the batteries. Keep away from UV radiation,
humidity and chemical substances.
/ DE
BEDIENUNGSANLEITUNG
SPEZIFIKATION
Lightquelle Cree™ XML
Zeiten und Modi
2 x CR123A 1 x 18650 3400mAh
BOOST 1 min 1 min
100% 1 h 30 min 2 h
50% 3 h 11 min 3 h 11 min
20% 5 h 24 min 6 h 30 min
2% 49 h 50 min 62 h 50 min
Stromversorgung 2 x CR123A lithium
1 x Li-ion battery 3400 mAh 18650
Abmessungen 155 x 45 mm
Gewicht 231 g
Stoßfestigkeit 1.2 m
Reichweite des Lichtes 391 m
Wasserbeständigkeit IPX7
Wir freuen uns, dass Sie sich für die Taschenlampe Mactronic® entschie-
den haben. Eine entsprechende Bedienung und Pflege garantieren lange
Lebensdauer und Zuverlässigkeit. Lesen Sie folgende Gebrauchsanwei-
sung und bewahren Sie diese auf, da sie wichtige Informationen über die
sichere Bedienung und Nutzung enthält.
SICHERHEIT
1. Um das Risiko eines Brandes, eines elektrischen Schlages oder einer
Verletzung zu verringern, verwenden Sie das Ladegerät nicht zum Au-
fladen von Batterien in anderen Produkten. Ebenso dürfen die Akkus der
Modelle THH0123 und THH0132 nicht mit anderen Ladegeräten aufgelad-
en werden.
2. Verwenden Sie niemals elektrische Kabel, um ein Ladegerät zu tragen
oder ein Ladegerät aus einer Steckdose zu entfernen.
3. Stecken Sie den 230V-Netzadapter des Ladegeräts direkt in eine Steck-
dose, verwenden Sie kein Verlängerungskabel.
4. Verwenden Sie kein beschädigtes Ladegerät. Ersetzen Sie beschädigte
Netzteile oder Kabel sofort.
5. Versuchen Sie nicht, die Taschenlampe oder die Ladekabel selbst zu
reparieren. Lassen Sie die Reparatur von einem qualifizierten Dienstleis-
ter durchführen.
6. Verwenden Sie nur vom Hersteller empfohlene Original-Akkupacks.
7. Die Batterie darf nicht ins Feuer geworfen werden, selbst wenn sie bes-
chädigt oder abgenutzt ist, da sie explodieren kann. Behandeln Sie den
Akkupack vorsichtig, lassen Sie niemals einen Kurzschluss zu.
8. Kleine Elektrolytleckagen aus den Batteriezellen können beim Einsatz
unter extremen Belastungen oder Temperaturen auftreten. Dieses Aus-
laufen ist nicht unbedingt ein Hinweis auf eine Beschädigung der Batter-
ien. Wenn die Zellen jedoch ihre Dichtigkeit verlieren und das Leck die
Haut kontaminiert, muss die kontaminierte Hautpartie sofort mit Wasser
und Seife gewaschen werden.
AUSTAUSCH DER BATTERIE
1. Drehen Sie die Batterieabdeckung gegen den Uhrzeigersinn.
2. Entfernen Sie die Batterieabdeckung, nehmen Sie die alten Batterien
heraus und ersetzen Sie sie durch 2 neue 3V CR123A Lithiumbatterien
entsprechend der Polarität (zuerst +). Setzen Sie dann die Batterieabde-
ckung wieder auf.
3. Drehen Sie die Batterieabdeckung im Uhrzeigersinn zu.
AUFLADUNG DER BATTERIE
Die Taschenlampe sollte vor dem ersten Gebrauch vollständig aufgeladen
werden. Um die volle Kapazität des Akkupacks zu gewährleisten, können
mehrere Lade- und Entladezyklen erforderlich sein.
230V AC Aufladen
Schließen Sie das Ladegerät an eine 230V AC-Steckdose an. Stecken Sie
den Stecker des Ladegerätes in die Ladehalterung. Setzen Sie dann die
Taschenlampe in die Ladehalterung ein. Wenn die Taschenlampe korrekt
in die Halterung eingesetzt ist, leuchtet die rote LED „Kontakt“ auf. Die
Zeit der vollständigen Akkuaufladung beträgt 4-6 Stunden und wird durch
einen Wechsel der LED Farbe von rot zu grün am 230V-Ladegerät ange-
zeigt. Sobald der Ladevorgang abgeschlossen ist, entfernen Sie die Ta-
schenlampe aus der Ladehalterung.
12V DC Aufladen
Schließen Sie das 12V DC-Ladegerät an den Zigarettenanzünder an. Ste-
cken Sie den Stecker des Ladegerätes in die Ladehalterung. Setzen Sie
dann die Taschenlampe in die Ladehalterung ein. Wenn die Taschenlam-
pe korrekt in die Halterung eingesetzt ist, leuchtet die rote LED „Kontakt“
auf. Die Zeit der vollständigen Akkuaufladung beträgt 4-6 Stunden und
wird durch einen Wechsel der LED Farbe von rot zu grün am 12V DC-La-
degerät angezeigt. Sobald der Ladevorgang abgeschlossen ist, entfernen
Sie die Taschenlampe aus der Ladehalterung.
BEDIENUNG DER TASCHENLAMPE
Drücken sie den hinteren knopf, um die taschenlampe vorübergehend
oder dauerhaft zu starten (volles drücken). Durch erneutes drücken
desknopfes werden die lichtmodi in der folgenden reihenfolge geändert:
BOOST, 100%, 50%, 20%, 2%.
ACHTUNG!
Modifikationen und Reparaturen:
Andere als die von Mactronic® autorisierten Modifikationen und Repara-
turen sind nicht zulässig.
Mactronic®-Garantie:
Die Taschenlampe hat eine 2-Jahresgarantie auf alle Material- und Her-
stellungsfehler. Unter die Garantie fallen nicht: Produkte mit normalem
Verschleiß, rostig, verändert und modifiziert, unsachgemäß gelagert,
durch Stürze, Fahrlässigkeit, auslaufende Batterien und Missbrauch be-
schädigt.
ALLGEMEINE INFORMATIONEN:
Die Taschenlampe darf nicht demontiert werden. LEDs haben eine Lebens-
dauer von Zehntausenden von Stunden. Die Garantie erstreckt sich nicht auf
demontierte Taschenlampen.
Wenn die Taschenlampe nicht leuchtet, sollte sie es sein:
Überprüfen Sie die Batterien und ihre Polarität. Prüfen Sie die Kontakte auf
Korrosion und reinigen Sie sie gegebenenfalls (vorsichtig, ohne die Kontakte
zu verformen). Wenn die Taschenlampe immer noch nicht leuchtet, wenden
Sie sich an den Mactronic®-Service.
Wartung und Reinigung:
Nach jedem Gebrauch der Taschenlampe in einer feuchten Umgebung
sollten die Batterien entfernt und getrocknet werden. Verwenden Sie zur
Reinigung ein weiches, mit lauwarmer Seifenlauge getränktes Tuch. Ver-
wenden Sie keine scharfen Gegenstände. Achten Sie darauf, die Linse nicht
zu zerkratzen.
Lagerung:
Bei langer Lagerung die Batterien aus der Taschenlampe entfernen. Halten
Sie die Taschenlampe von UV-Licht, Feuchtigkeit und Chemikalien fern.
THH0231 mactronic.co
NIGHT HUNTER 03
