Mingda MD-A128 User manual

Shenzhen MINGDA Technology Co., Ltd.
V1.3
User Manual
MD-A128
LED Letter 3D Printer

Contents
1. Equipment Information ------------------------------------------------------------------------------------------------------- 02
2. Equipment Parameters -------------------------------------------------------------------------------------------------------- 03
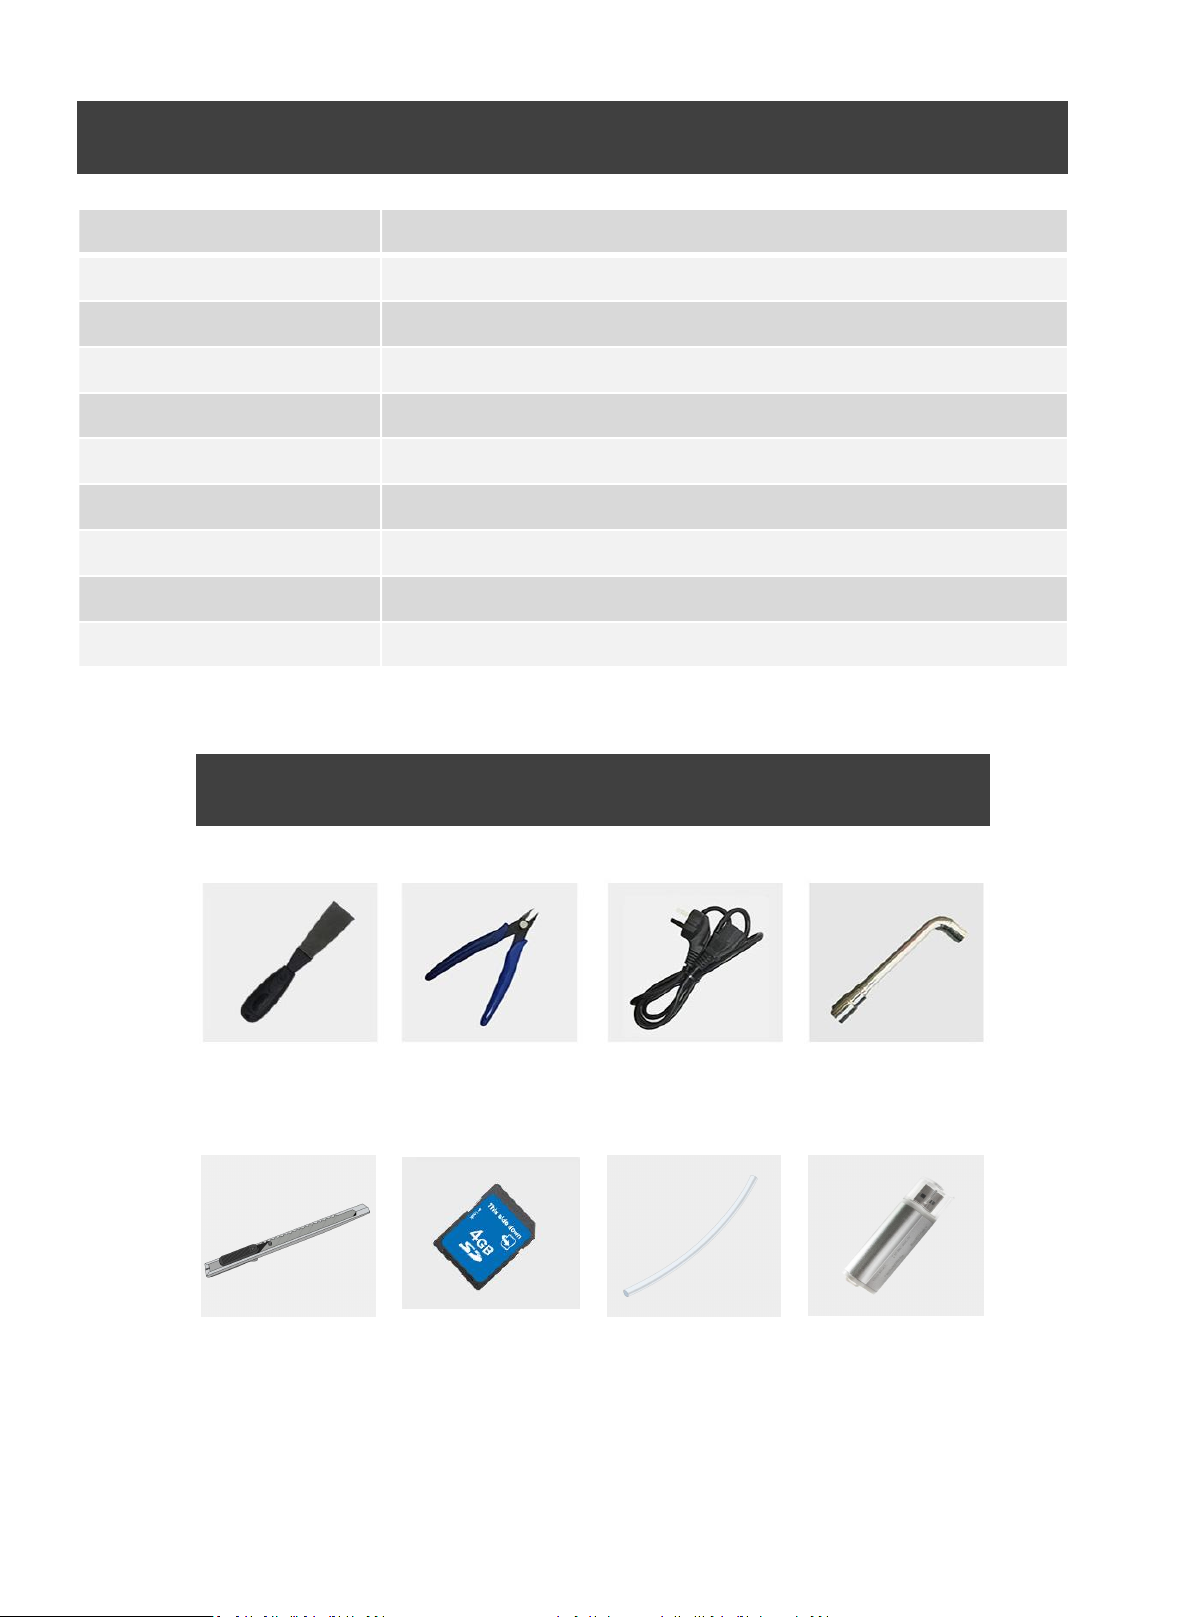
3. Package Contents ---------------------------------------------------------------------------------------------------------------- 03
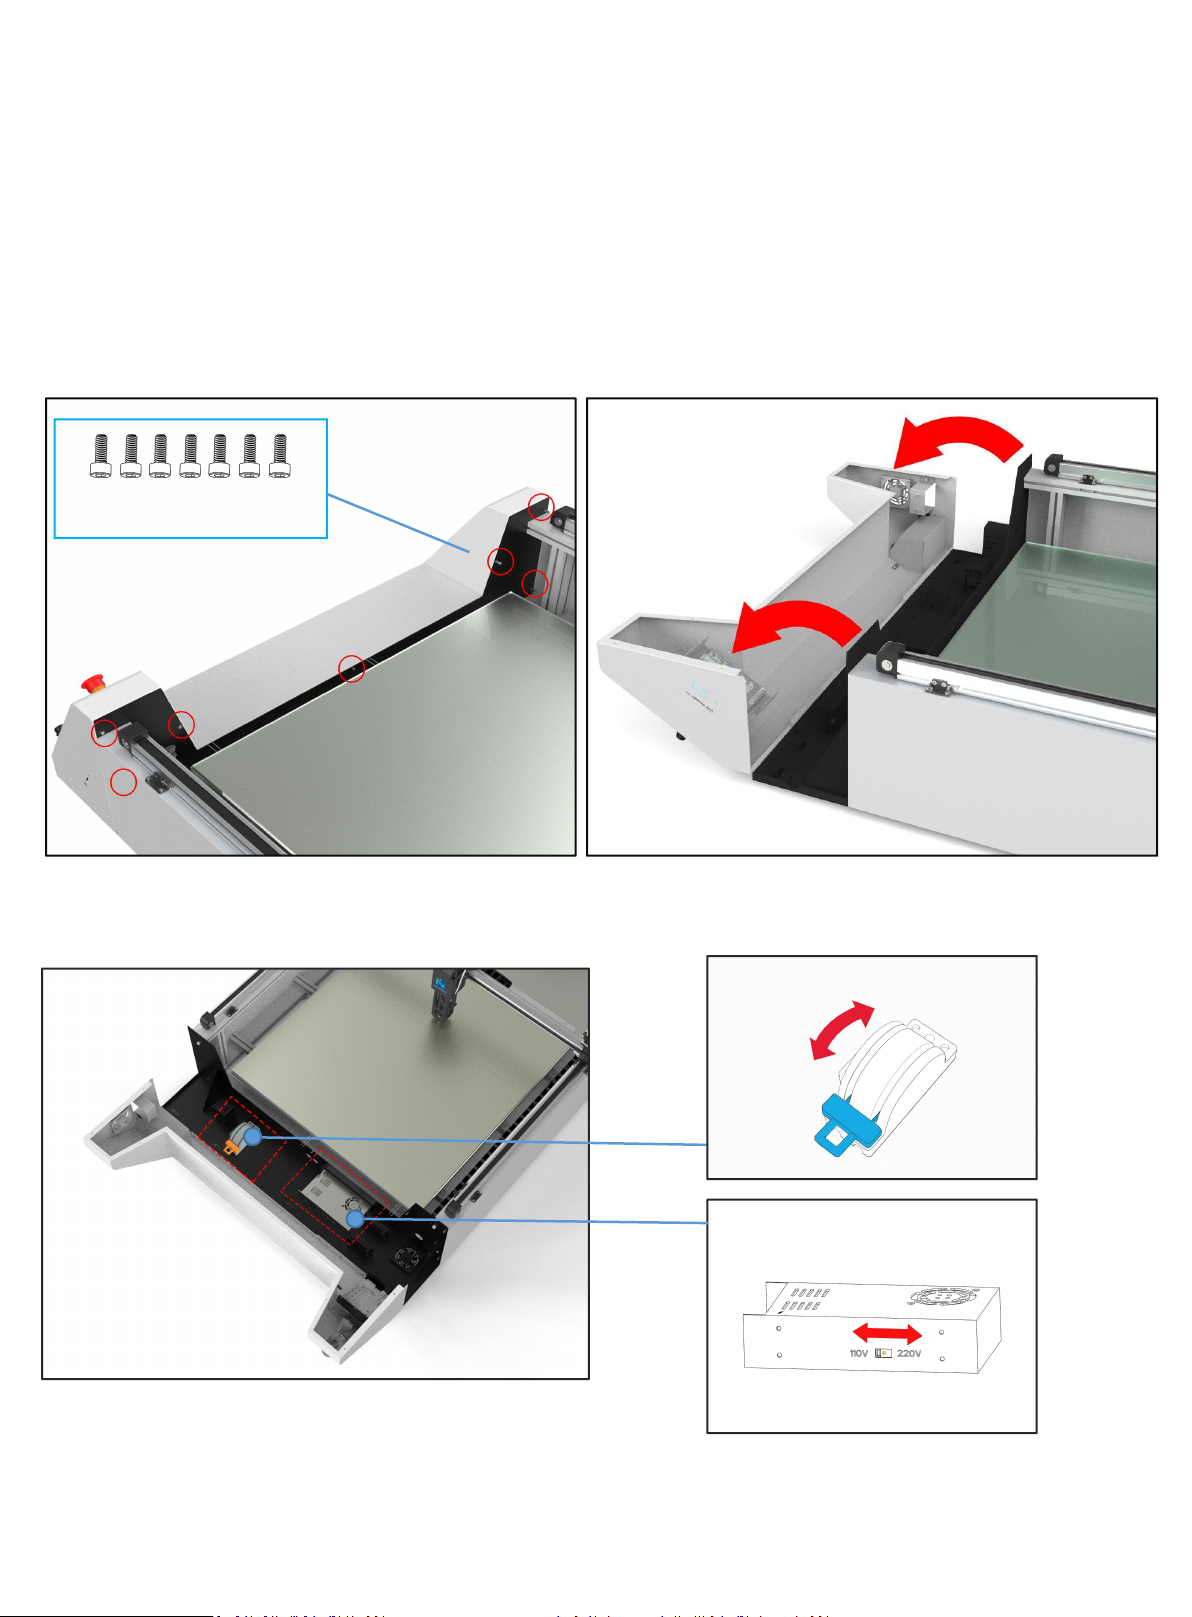
4. Adjust the Voltage ---------------------------------------------------------------------------------------------------------- 04
5. Assemble ------------------------------------------------------------------------------------------------------------------------- 05
6. Install the filement ------------------------------------------------------------------------------------------------------------ 09
7. Printing the Test Files --------------------------------------------------------------------------------------------------------- 10
8. Support --------------------------------------------------------------------------------------------------------------------------- 11
9. Quality Assurance -------------------------------------------------------------------------------------------------------------- 12
Instructions:
1. After receiving your 3D Printer, if any accessories are missing, please contact customer service in time to replace.
2. Do not try to use this 3D Printer in any method not described in the manual, so as to avoid accidental personal injury or
property damage.
3. It is strictly forbidden to disassemble or modify this 3D printer without authorization.
4. Please use this 3D printer in a spacious, flat and well-ventilated environment.
5. To avoid affecting the print quality,It is better to use the filament recommended by the manufacturer.
6. Use the specified power supply voltage. Do not connect multiple devices to the printer's power outlet to avoid overload.
7. Make sure the printer is properly grounded, Or it may cause electric shock, fire or electromagnetic interference.
8. Contact your after-sales or local service before disassembling or repairing the printer by yourself. Check the "Support" section
in the User Guide.
9. Please do product maintenance regularly to clean the machine from dust, foreign matter on the guide rail, etc.
10.It is recommended to use the power cord that came with the printer. Do not damage, cut or repair the power cord. Damaged
power cords present a risk of fire or electric shock. Please replace the damaged power cord with a quality-certified power cord.
Do not allow metal or liquid to come into the printer and contact with the internal parts of the printer. It may cause fire, electric
shock or other serious accident.
11. Children under 10 years old are not recommended to use this 3D printer.
1

Dear MINGDA 3D printer users:
Thanks for your choosing and using our products. For your better use, we recommend
that you read this manual carefully before use, and strictly follow the instructions of the
manual.
In order to better start the 3D printing journey, you can learn the following information:
MINGDA Official website: www.3dmingda.com
The official website of MINGDA contains MD-A128 machine software, assembly and
Teaching video on assembling and using, multilingual instructions, model download and
FAQ manual. In the process of using the machine, if you encounter any questions or
problems not included in this manual, you can fill in the after-sales list on the official
website of MINGDA, and we will try our best to solve the problems.
http://www.3dmingda.cc/single/request_after_sales_service.html
Official website
Youtube Channel
1

Equipment Information
1
2
3
4
5
6
10
11
12
13
Printing head
Left extruder
Right extruder Platform
Filament house
Touching screen
Cooling fan
Air switch
Power Socket
7
8
9
Emergency stop button
Power switch
SD card port
1
23
6
4
7
12
13
8
9
10
11
2
5
3D Touch

Model name
MD-A128
Technology
FDM two in one out
Machine size
1054*1613*490mm
Printing size
800*1200*100mm
Printing speed
Recommend 60~100mm/s
Layer height
Recommend 0.2-0.3mm
Printing accuracy
±0.2mm
Nozzle size
Standard 0.8mm nozzle
Connection method
SD Card,U Disk,Type-C
Printing filament
Advertisement filament
Package Contents
Scraper knife Diagonal pliers Power cable Sleeve
SD card
Knife Teflon tube Card Reader
Equipment Parameters
3

Note: The power supply has been adjusted according to the local voltage. If you need to
adjust the voltage, please follow the picture to operate it.
Adjust the Voltage
110V 220V
7pcs
110V
220V
4

5
Assemble
1 Installed the filament house
Hang on the filament house and tight the screws
Connect the cables

2 Power on
Plug in the power cord Push air switch
Turn on the emergency stop switch,
press the green button to start
6

3 Click the heating button , set the nozzle temperature to 220 °C and bed
temperature to 60 °C.
4 Click Back-Leveling-start, Wait for the machine to complete the leveling procedure,
save the data.
(Note that if there is a collision during the leveling process, please press the emergency stop switch
immediately; During the reset and leveling process, please do not put your hand into the chassis to
avoid pinching.)
7

Install the filement
1. Place two rolls of filament and insert through the filament detector
2. Insert the two rolls of filament into the feed port of the left and right extruder
8

9
3. Click Meny-Extrude-Load. Keep clicking Load until the filament come out
E0 to the left extruder, E1 to the right extruder . Click nozzle to exchange left and right extruder.
Please Home the printer before switching the Nozzle. Because of two-in-one-out structure, when one filament
needs to be load, the other material needs to be unload first. If not home, the original filament will not be unload,
and the filament cannot be feed at this time, please home first.

4. Click the nozzle icon to switch to E1, and the right extruder is working at this time. Keep clicking Load until
the filament come out.
Printing the Test Files
Click on the Print icon, choose a gcode file which you want to print.
Tip: You can adjust the babystep according to the adhesion of the first layer of filament. After the
adjustment is completed, click Save, then you can print directly next time without any adjustments.
If the distance between the nozzle and the platform is too high, the
filament will not easy to stick to the platform. Should click "Decrease"
until the distance is proper.
Keep a proper distance between the nozzle and the hot bed, so that
the filament stick to the hot bed evenly.
If the distance between the nozzle and the platform is too low, the
filament will be not easy to feed out smoothly . Should click
"Increase" until the distance is proper.
10

Support
Customer Support
http://www.3dmingda.cc/single/request_after_sales_service.html
Working Computer Specifications
Operation system: MicrosoftWindowsXP、MicrosoftWindowsVista or MicrosoftWindows7
Processor minimum value : 2.4 GHz, faster processor could shorten the processing time
RAM minimum value: 1GB (WindowsVista or Windows7 is 2 GB)Recommendation:2 GB
(WindowsVista or Windows7 is 3 GB)
Hardware installation: 90 MB monitor graphics resolution minimum value: 1024x768
Recommendation: 1280x1024 ( can use the wide-screen )
Necessary video card: In line with OpenGL accelerated graphics card Recommendation: OpenGL
hardware support to recommend 128 MB graphics card memory
MINGDA Limited Warranty Statement
Besides limited warranty, within the maximum range allowed by law. MINGDA or any
authorized dealer have not made any other statements or implied guarantee, including
marketability and special-purpose applicability of implied warranties. MINGDA has not
supplied, undertake or provide, authorized to assume responsibility for it or any other
guarantee, including any authorized dealer or other express or implied warranties to the
independent third party.
11

Quality Assurance
1. We provide a 12-month warranty on 3D printers (excluding the nozzle
assembly,glass platform) purchased on or after June 1, 2019 and a 3-month
warranty on the nozzle assembly.
2. The warranty period of each product starts from the date of
production. Any product with renewed warranty period is subject to the
renewed warranty terms.
3. Within the warranty period, we will provide free accessories to replace
those damaged during the operation in accordance with the instructions for
use which are not caused by user negligence (determined by our professional
assessment).
4. We will continue to provide warranty services for any product having
been repaired as long as its warranty period has not expired.
5. In case of any problem, you may find the solutions in the instructions
f o r u s e o r s e a r c h f o r t h e s o l u t i o n s o n o u r o f f i c i a l w e b s i t e
(www.3dmingda.com) or contact us via phone or email.
12

6. We provide free remote technical support for every consumer during the
service life of the product. You may request solutions from our after-sales team
via phone or email within working hours. For any request submitted beyond the
normal working hours, we will reply as soon as possible.
7. Please provide completed after-sales service card or S/N number when
applying or the warranty service. Otherwise, warranty services may be refused.
8. We are entitled to refuse warranty claims for any fault or damage due to
failure to follow instructions for use, including but not limited to (i) unauthorized
modification; (ii) incorrect installation or use; (iii) use of any third-party
component; (iv) use of any non-specified software;(v) use of low-quality
filament; (vi) use under non-specified environment; and (vii) misuse (overload)
or improper maintenance (corrosion or oxidation).
9. We are entitled to refuse to provide warranty services for any fault or
damage due to force majeure
13

Tel: 0086-13530306290
Email: suppo[email protected]om
www.3dmingda.com
Address: 3 / F, No. 20, Dahe Industrial Zone, Longhua District,
Shenzhen, 518110, Guangdong Province, China.
Shenzhen MINGDA Technology Co., Ltd
Table of contents
Other Mingda 3D Printer manuals

Mingda
Mingda MD-400D User manual

Mingda
Mingda MD-600D User manual

Mingda
Mingda Magician X User manual

Mingda
Mingda MD-D01 User manual

Mingda
Mingda Glitar 4 User manual

Mingda
Mingda Magician X Assembly instructions

Mingda
Mingda Rock 3 Pro User manual

Mingda
Mingda Magician X2 User manual

Mingda
Mingda Goldfish X User manual

Mingda
Mingda Rock 3 User manual