NEC E616V User manual

Published by Hutchison 3G UK Limited. All rights in this publication are reserved and no part may be
reproduced without the prior written permission of the publisher. © 2004 Hutchison 3G UK Limited.
A Hutchison Whampoa company. Registered office: 9 Queen Street, Mayfair, London W1J 5PE.
Hutchison 3G UK Limited trading as 3is a service provider and has provided the information in this user
guide concerning what you might expect from 3services. NEC Corporation Ltd is the manufacturer of the
NEC e616V handset and has provided the information on its features and use set out in this user guide.
The contents are believed to be correct at the time of going to press, but any information, products or
services mentioned may be modified, supplemented or withdrawn. The provision of any products and
services by Hutchison 3G UK Limited is subject to 3’s customer terms (available at three.co.uk).
The customer terms will take precedence if there is any discrepancy with this publication.
‘3’ and related images, logos and names referred to in this publication are trademarks of the Hutchison
Whampoa group of companies.
Designed and produced by Dutton Merrifield Ltd, Bristol.
This publication is printed on fully recyclable paper.
DM04151 April04 v1.0 99538
3Customer Services
Hutchison 3G UK Ltd
PO Box 333
Hemel Hempstead
HP2 7YW
United Kingdom
three.co.uk
3services user guide for your e616V
e616V
This way.
3 services user guide.

Welcome to 3.
User guides can be daunting things, can’t they?
But don’t worry, we’ve made this one as
simple as possible.
Your guide is designed to do two things.
First there’s an explanation of how to use
your new NEC e616V, so finding
your way around the handset will soon
become second nature. Then there’s
an introduction to the wide range of
services offered by 3, to make sure
you get the best from them.
If all you want to do is power up and
get going, that’s fine. But if you want
to know more about what you can
do with 3, you’ll find it here.

The sections in blue all relate
to your new NEC e616V.
Those in red describe 3services.
Check three.co.uk for the latest updates
to this user guide.
1. Get ready to go
2. Your handset explained
3. Getting going
4. Making and receiving calls
5. Contacts and media centre
6. Today on 3
7 Messaging
8. Appointments and Synchronisation
9. Security
10. NEC’s Health and General Safety information
11. Troubleshooting, Index and Useful numbers
Contents
e616V

inside back cover

1
Get ready
to go.
First things first.
There are a couple of things you need to
do before you can use your new handset –
installing your SIM and battery, and charging
your handset up. This section tells you how.
1.1 – 2 >Installing the SIM
1.3 >Installing and charging the battery
1.4 >Charging the battery
1.5 >Battery use
1.6 >Installing a memory card

2 Remove the battery.
1 Pull out the release lock at
the top of the battery.
1.2
Get ready to go e616V
Get ready to go
1.1 e616V
Installing the SIM
Your SIM (Subscriber Identity
Module) contains your phone
number, service details and
contacts, and must be inserted
into your handset.
If the SIM is removed, your
handset becomes unusable
until a valid one is inserted.
The holder for your SIM is
located underneath the battery.
Always disconnect the charger
and other accessories from
your handset before inserting
and removing your SIM.
Your 3SIM may only be used
in handsets which are enabled
for 3services. Any attempt to
use the SIM in other handsets
may result in serious damage
to the handset and may
prevent you from being able
to use it, including making
emergency calls. In these
instances, we are not
responsible for any such
damage or usage problems.
5 Replace the battery by
placing the ridge at the
side into the side of your
handset. Push the battery
down into position and
snap it into place.
3 Insert your SIM into the
holder, ensuring the gold
plate is facing down and the
card is positioned as shown.
SIM
4 Slide the SIM securely
into its SIM holder before
replacing the battery.

1.4
Get ready to go e616V
Get ready to go
1.3 e616V
The battery is not fully charged
when you buy your handset
but there may be enough
power in the battery to turn
the handset on. Before you can
use your handset properly, you
need to install and charge the
battery as shown here.
Your handset is designed
to be used only with the
manufacturer’s battery and
battery charger.
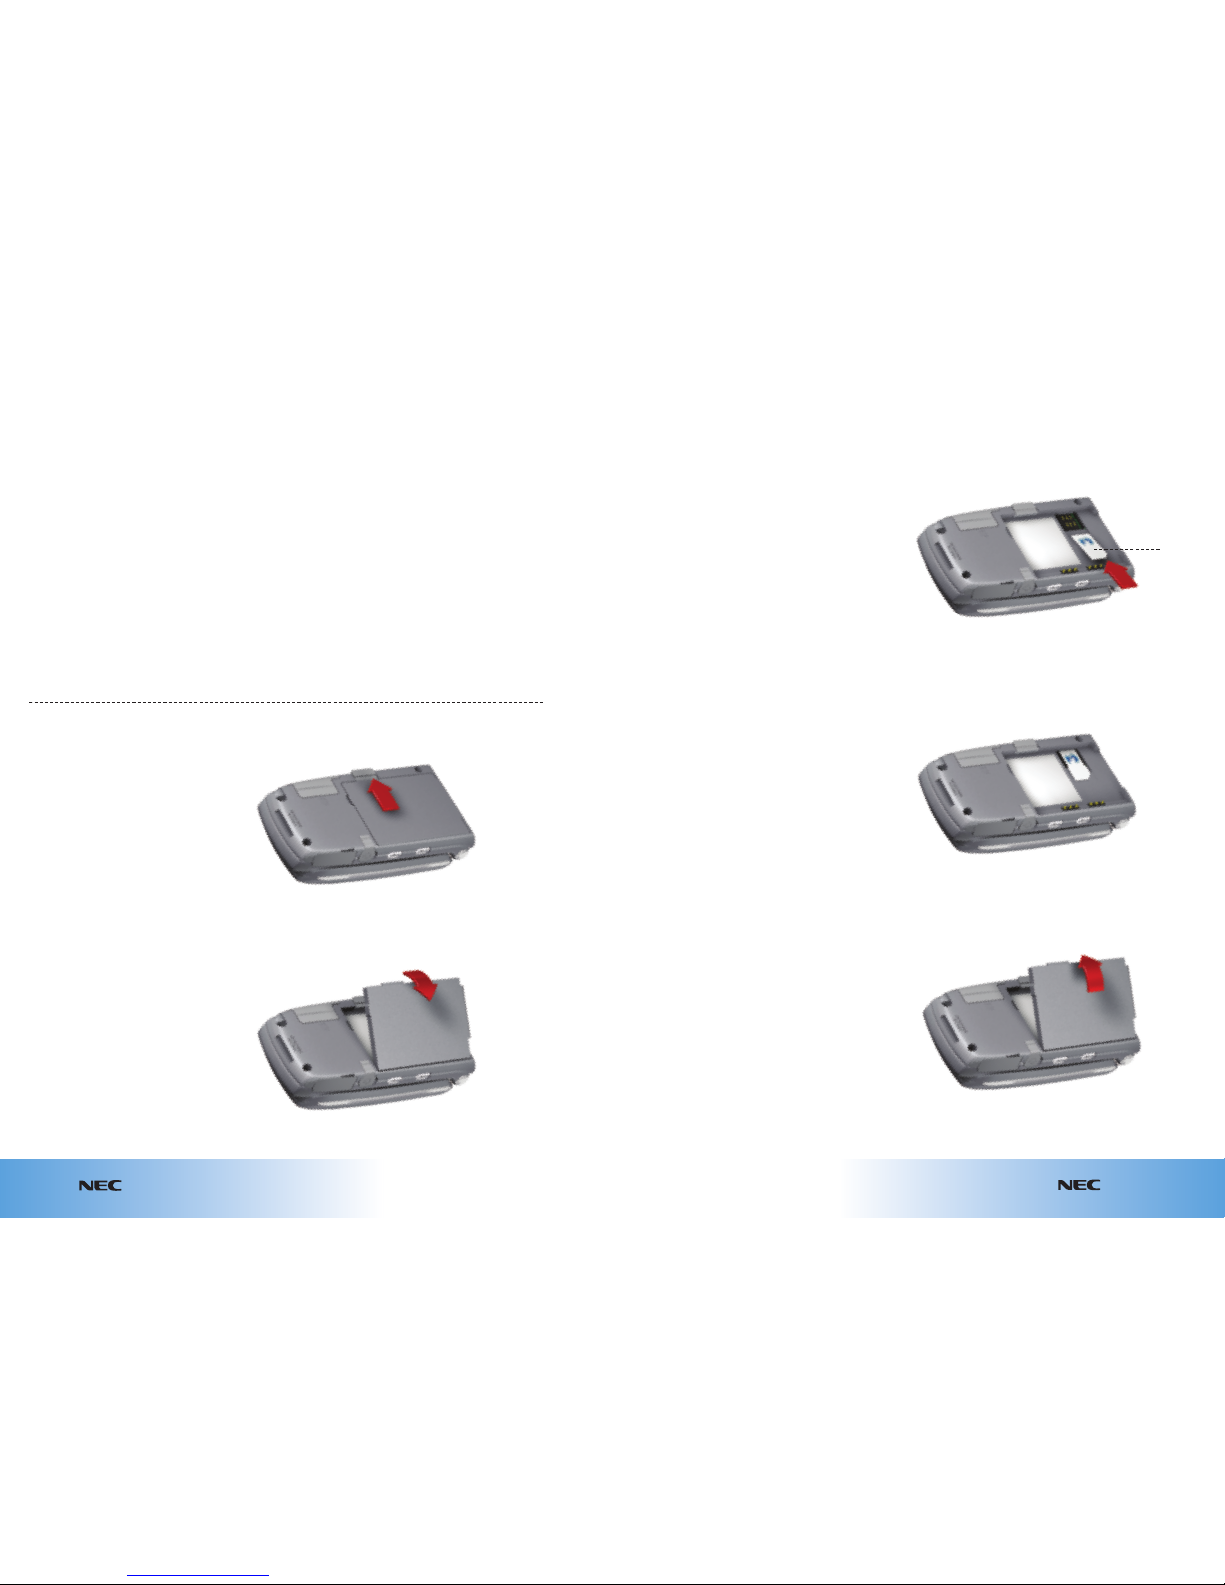
How to install the battery
1 Ensure the handset is
switched off.
2 Insert battery by placing the
ridge at the side into the side
of your handset.
3 Push the battery down
into position and snap it
into place.
How to remove the battery
Pull out the release lock at
the top of the battery and
lift the battery away from
your handset.
1.3
Installing the battery Charging the battery
Low battery alarm
The battery’s power levels
(4 levels) are indicated by
the following icons:
When the battery runs out,
the following image will blink
on the handset’s screen:
A warning alarm will sound
for approximately 10 seconds.
Press to turn off the
alarm. After approximately
1 minute the power will turn
off automatically.
If low power occurs during a
call, you will see the warning
image and hear an intermittent
alarm, and your call will
be disconnected after
approximately 60 seconds.
The volume level of the low-
power warning alarm depends
on the ringtune volume level
on standby and the ear piece
volume during a call.
Your handset will automatically
switch off if the battery power
is too low.
When charging the battery,
always close the handset.
Make sure the battery is
installed and charge it using
the NEC charger supplied.
The recommended battery
charge time is approximately
two hours. Stop charging if not
completed within five hours.
Battery power may decrease
when the handset is in use,
even if the handset remains
connected to the charger.
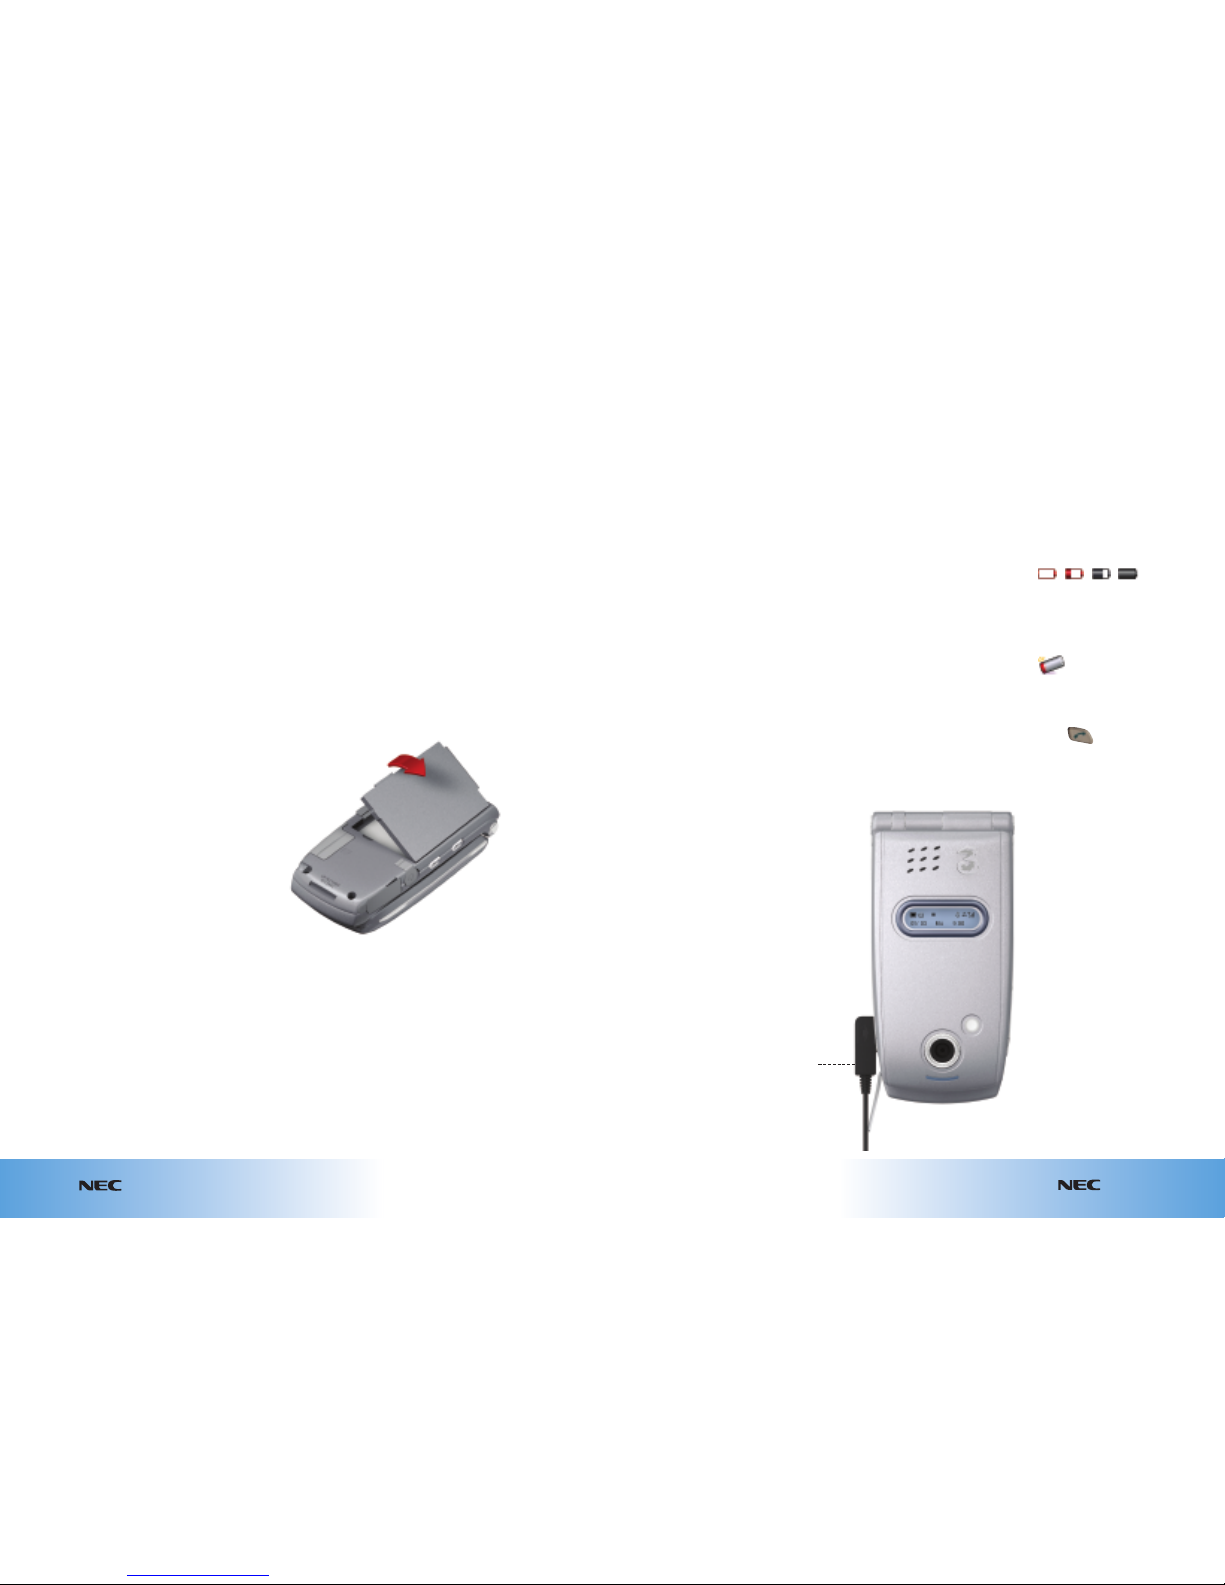
How to charge the battery
The battery must be charged at
room temperature between
0°C (32°F) and 45°C (113°F).
1 First rotate the rubber
protective cover, then
connect the charger plug to
the handset I/O connector.
2 Plug the charger into an
electrical outlet. The red
LED indicator on the outside
of the handset will light up
when charging is in progress
and go off when charging
is complete.
3 To remove the charger, tilt
the plug upward and pull
it away from the handset
I/0 connector.
A battery that has not been
used for a long period of time
needs to be completely
discharged by leaving the
handset turned on. Then
recharge it 2 or 3 times
before reaching full capacity.
The battery can be charged
whenever you wish without
affecting the performance
of the handset.
I/O connector
For USB cable
or charger

1.6
Get ready to go e616V
Get ready to go
1.5 e616V
Battery use
Battery performance depends
on many factors, including
signal strength, the features
and / or settings you select
and use, and your voice,
data and other application
usage patterns.
Battery care
To prevent injuries or burns,
do not allow metal objects to
contact or short-circuit the
battery terminals.
To maximise your
battery’s performance
Always use NEC Original™
batteries and battery chargers.
NEC’s handset warranty does
not cover damage caused from
using non-NEC batteries and /
or battery chargers.
New batteries or batteries that
have been stored for long
periods of time may require
a longer charge time.
Maintain the battery at or
near room temperature
when charging.
If you don’t intend to use the
battery for a long period of
time, remove it from the
handset and store it in a
place with low humidity
and low temperature.
Over extended periods of time,
batteries gradually degrade
and require longer charging
times. This is normal. If you
charge your battery regularly
and notice a decrease in talk
time or an increase in charging
time, then it’s probably time to
buy a new battery.
The rechargeable batteries that
power your handset must be
disposed of properly and may
need to be recycled. Refer to
your battery’s label for battery
type. Contact your local
recycling centre for proper
disposal methods. Never
dispose of batteries in a fire
because they may explode.
Extending battery life
●Turn off your handset
screen’s backlight
The backlight uses power.
To turn it off, see page 3.6.
●Avoid the Vibrate
ring setting
Your handset’s Vibrate
setting uses more power
than a standard ring sound
or the Silent setting.
To change alert profiles,
see page 3.7.
Installing a memory card
Your handset can support a Memory Stick Duo™ (memory card) with up to 128MB.
You can use this memory
card to store photos, videos
or audio, calendars, To Do
entries and contact entries
(as vCard files).
Please read important
instructions on the memory
card in Section 10 – NEC’s
health and general safety
information.
How to install
the memory card
Always switch off the handset
before inserting or removing
the memory card.
Push the memory card fully
into the Memory Stick Duo™ slot
on the side of your handset,
as shown below.
How to remove
the memory card
1 Push the memory card into
the slot. This will release the
card from the slot.
2 Carefully pull the memory
card out of the slot.
How to format
the memory card
Before you can use the
memory card, you need
to format it:
1 Press
2 Scroll to
3 Scroll to Memory Card Tool
4 At Format mem. card
press
5 Press Yes
Formatting the memory card
will erase all previously
stored data.

2
handset
explained.
Your
There’s tons of stuff you can do on your handset
– if you know how.
This section helps you to get to know your
handset. It shows you how to navigate around
functions, which keys do what, and what each
of the symbols and icons mean.
2.1 – 2 >Getting to know your NEC e616
2.3 – 4 >Your handset’s start screen
2.5 – 6 >Your handset’s keys and navigation

Your handset explained
e616
2.1 Your handset explained e616 2.2
Your handset explained
Memory
Stick Duo
card slot
Camera (back)
Camera light
Menu key
takes you to the task menu
from any screen.
Getting to know your NEC e616
Send key
to make voice calls and
view outgoing calls
Clear key
End key (On / Off power)
to end calls and services.
Keypad
Earpiece
Right soft key
activates the prompts
displayed on screen
in the right soft box.
Triangle key
opens the browser to
3services, connecting
you to a world of
communications,
information and
entertainment.
Left soft key
activates the prompts
displayed on screen
in the left soft box.
Screen
Internal antenna
Options menu key
Right soft box
displays a variety
of prompts.
Left soft box
displays a variety
of prompts.
Microphone
Familiarise yourself with its features.
Front display
screen
LED indicator
I/O connector
for USB cable or charger.
Headset
connector
Volume
keys
Camera (front) Speaker

e616
2.3 Your handset explained Your handset explained e616 2.4
Your handset explained
Your handset’s start screen
Your handset’s screen is divided into four basic displays: the icon
indicator bar; a central window that includes the start screen; the prompt
bar; and the shortcut icons display. Each of these is described below:
1 The icon indicator bar
The icon indicator bar shows
what operations are taking
place and reminds you of
battery and signal strength.
This appears through all
activity. The table opposite
gives a brief explanation of
the icons and their functions.
2 The start screen
The central window of your
start screen displays an
image of your choice.
When in use, this screen
will display all of your
functions and services.
3 The prompt bar
The prompt bar displays
various prompts in the soft
boxes. These are activated
by pressing the appropriate
soft key under each one.
Icon Description
Battery level – indicates the amount of power in your battery.
Weak Strong
Message – indicates when you have a new text, multimedia or video message.
Signal strength – indicates the strength of your handset’s connection with
the network. You cannot make or receive calls when the ’no signal’
indicator is displayed.
3G network – indicates whether you are in the 3video service area. When outside
the 3video service area, your handset roams onto the voice and picture
network or another network when abroad.
3 services connection – indicates connection available for 3services, including
multimedia messages.
USB is connected – indicates whether you are connected via USB cable to a PC.
Memory card – indicates a memory card has been inserted into handset.
Bluetooth connection – indicates the Bluetooth connection has been activated.
Global Positioning Service Connected Connection failed
Multitasking – indicates the number of tasks you are carrying out simultaneously,
depending on the amount of simultaneous tasks being performed on your handset.
Handset profile Meeting profile Outdoor profile Car profile.
Vibrate on – indicates whether the vibrate function is on or off.
Alarm clock – indicates whether an alarm has been set.
Calls diverted
4 Shortcut icons
Shortcuts to applications from the start
screen. Your handset comes with eight
shortcuts already in place which can be
changed. See page 3.8.

e616
2.5 Your handset explained
2.5 e616 2.6
Your handset explained
3
7 89
1
1010 5
4
2
6
Your handset’s keys and navigation
2 The Navigation key
This key acts like a joystick, it
allows you to scroll through
the screen menus to names,
numbers, features and
services. It also becomes your
directional control for games.
3 The Menu key
This key takes you to the main
menu from any screen.
5 4-way Navigation
indicator
This group of icons indicates
what navigational movements
are available at the start screen
when using the Navigation key.
Press the Triangle key to access
3services, scroll through the
menus by pressing up or down
on the Navigation key (services
will be highlighted row by
row). When you are within a
service, you can move between
pages by pressing left and right
on the Navigation key.
This key is used to take and
save pictures and videos.
7 The Send key
This key is used to make
and answer calls and view
outgoing calls.
8 The End key (On / Off power)
This key is used to turn your
handset on and off (press for
2 secs) and to end calls and
close down applications.
10 Soft keys
The left and right soft keys
activate the prompts that
appear in the soft boxes
directly above them on the
screen. These prompts change
according to the screen content.
9 The Clear key
This key has two functions. It will
take you back to your previous
screen (not while in 3Services)
and when in a text entry screen,
it acts as a delete key.
1 The Triangle key
This key is your one-touch
access to Today on 3and a
world of communications,
information and entertainment.
(See Section 6.)
Shortcuts
In the majority of menu screens there will be a number, to ,to the right of each option.
Pressing the corresponding number on your keypad takes you straight to your desired screen, and
saves you from having to scroll and select that option. See pages 3.1 and 3.2.
4 The Option key
This key is a link to an additional
function or operation. You can
use this when you see three
dots on the bottom screen.
6 The Enter key
Once you have scrolled to your
desired choice, use the Enter
key to select it. This function
can be used in the majority
of screens.

Getting going.
Now you know your way around your handset,
we’ll show you how to do things like setting the
time and date, adjusting settings, choosing
your personal profiles – and turning your
handset on and off!
It starts with a quick explanation of how to
follow the detailed instructions so you can get
going right away.
And there are some nifty shortcuts too.
3.1 – 2 >How to use this guide
3.3 >Turning your handset on and off
3.4 >Setting the time and date
3.5 >Copying contacts from your SIM to your handset
3.6 >Setting the handset screen’s backlight timeout
3.7 >Choosing ringtunes and alert profiles
3.8 >Creating your own shortcuts
3.9 >Displaying your handset number
3.10 >Choosing a text entry method
3.11 >Text entry shortcuts
3.12 >General shortcuts
3

Calendar
Toolbox
From the start screen
●Press
●Scroll to and press
●At Handset settings press
●At Handset profile press
●Scroll to your preferred profile: Standard /
Meeting / Outdoor / Car
●Scroll to Ring volume / Ringtunes / Illumination /
Vibration pattern and press
●Select your preferred profile and press
●Press OK
To change profiles:
●Press
●At Handset profile press
●Scroll to your preferred profile: Standard /
Meeting / Outdoor / Car
Turning off the keypad tone:
●Press
●Scroll to and press
●At Handset settings press
●At Handset profile press
●Scroll to Standard profile and press
●Scroll to Other settings and press
●At Key tones scroll to Off and press
Choosing ringtunes and alert profiles
Your handset rings or vibrates to notify you of an incoming call, message or event.
You can set different profiles, ringtunes and vibrations. Your profile is displayed above
the prompt bar at the start screen.
e616
3.7 Getting going
From the start screen
Handset settings
Handset profile
Standard profile
Settings
or ( )
...8...1...1...2...
e616 3.2
Getting going
e616
3.1 Getting going
The steps required to
arrive at a destination
Some steps start with the
4-way arrow symbol .
This represents scrolling with
the Navigation key to a
function (menu items and
services are shown as a name
and / or an icon).
The hand icon indicates what buttons / keys you press en route to a
destination screen for the service you require.
The brain icon indicates a written explanation of the entire function.
The text under the brain icon is split into two sections. First, an explanation of the steps needed to get to
the service or function. Then, below the arrow icon, a description of how to use that service or function.
The eye icon indicates what you will see at the destination screen.
Confirming or
performing an action
You will be prompted on
your handset's screen by
options such as Add,
Cancel, Link this, New,
OK etc. These indicate
which entry to scroll to
or the soft keys required
to complete the action.
How to use this guide
This guide gives you a visual shorthand, a written explanation, and an
example of what you see every time you do something.
Example page
or ( )
...9...1...
Shortcuts
An alternative way to get straight to a chosen destination is to press the menu key followed by a
selection of numbers. Next to most menu items there are numbered options. Using the keypad to
key in the shortcut number sequence ( to ) saves you from having to scroll to the service
or function by showing you exactly what you need to press to reach your desired screen.

e616 3.4
Getting going
e616
3.3 Getting going e616
Getting going
Turning your handset on and off
Ensure that your SIM is in your handset and the battery is charged.
To turn your handset on:
Press and hold the End key
(On / Off power) until the
power is on.
The term ‘press and hold’ is
equivalent to a key press time
of approximately 2 seconds.
To turn your handset off:
Press and hold the End key
(On / Off power) until the
power is off. There may be
some delay while the handset
powers down. Do no re-power
the handset during this time.
(2 seconds)
From the start screen
After turning your handset’s power on for the first time, you will be asked to set your
home (local) time. You need to set the date and time before you can use your Calendar
and other functions. Once set, this will also help the speed of 3services.
From the start screen
●Press
●Your handset screen displays Do you wish to
set the home time?
●Press Yes
●At enter the date (day / month / year)
●Scroll to and enter the current time
(24 hour clock)
If you are in the summer time zone:
●Scroll to and press
●Press OK
To change the time:
●Press
●Scroll to and press
●Scroll to Date and time and press
Setting the date and time
Yes

e616
3.5 Getting going e616 3.6
Getting going e616
●Press
●At press
●Press
●Scroll to Folder and press
●Scroll to USIM contacts and press
●Press
●Scroll to Copy and press
To copy the current contact:
●Scroll to This contact and press
To copy all the contacts from SIM
to handset:
●Scroll to All contacts and press
●Scroll to Handset contacts and press
Note: Copying contacts from your SIM card
to your handset will take about 60 seconds.
You cannot copy your contacts onto the SIM
card from your handset.
Copy contacts from your SIM to your handset
If you have any contacts stored on your SIM card, we recommend you first copy them
to your handset. Doing this makes it easier for you to access your contacts.
Contacts
Folder
USIM contacts
From the start screen
●Press
●Scroll to and press
●At Handset settings press
●At Handset profile press
●Scroll to Standard profile press
●Scroll to Backlight and press
●Scroll to Backlight time and press
to delete current settings
●Enter your preferred backlight time out
eg 10 (secs)
●Press OK
Setting your handset screen’s backlight timeout
From the start screen
Handset settings
Handset profile
Standard profile
Settings
This is a power saving feature that turns off your handset screen’s backlight when it
is inactive for a selected idle time. Your screen reactivates if you press a key or receive
a call. The default setting is 15 seconds.
or ( )
...8...1...1...2...

e616
3.7 Getting going e616 3.8
Getting going e616
From the start screen
●Press
●At Handset profile press
●Scroll to your preferred profile: Standard /
Meeting / Outdoor / Car
Turning off the keypad tone:
●Press
●Scroll to and press
●At Handset settings press
●At Handset profile press
●Scroll to Standard profile and press
●Scroll to Other settings and press
●At Key tones scroll to Off and press
To change ringtune profile:
●Press
●Scroll to and press
●At Handset settings press
●At Handset profile press
●Scroll to your preferred profile: Standard /
Meeting / Outdoor / Car
●Scroll to Ring volume / Ringtunes / Illumination /
Vibration pattern and press
●Select your preferred profile and press
●Press OK
Choosing ringtunes and alert profiles
Handset profile
From the start screen
Your handset rings or vibrates to notify you of an incoming call, message or event.
You can set different profiles, ringtunes and vibrations. Your profile is displayed above
the prompt bar at the start screen.
●Press
●Scroll to and press
●At Calendar press Link this
●At Add to Home press
To use your shortcuts from the start screen:
●Press
●Scroll to your preferred shortcut
●Press
To change the order of your shortcuts:
●Press
●Scroll to your preferred shortcut
●Press Move
●Scroll left or right and press Place
To add to Quick Menu:
●Scroll to Add to Quick Menu
Creating your own shortcuts
You can create shortcuts to your most frequently used services, eg Calendar, which will
then feature on your screen’s desktop or the Quick Menu link.
Calendar
Link this
Toolbox
or ( )
...9...

e616
3.9 Getting going e616 3.10
Getting going e616
Displaying your handset number
A shortcut to display your 3phone number.
●Press
●At press
●Press
●Scroll to Folder and press
●Scroll to Own number and press
3 phone number:
●At Own no. (1)
Contacts
Choosing a text entry method
While writing a message, entering contact details, and appointments etc, you will need
to select an appropriate text entry method.
Entry Method
Multitap Text
Input
T9® Text
Input
Numeric
Input
Symbol Input
Text entry rules
There are four types of
text entry:
• Multitap Text (ABC) Input
• T9® Text Input
• Numeric Input
• Symbol Input
The multitap, T9® and numeric
input modes can be changed
by pressing Mode when within
a text box. The symbol input
mode is activated by pressing
the key.
Using ABC mode
Use the keypad to enter
letters, numbers, symbols,
and other characters with the
mode. Press the same key
repeatedly to cycle through
available characters.
If you do not press a key for
two seconds, the character in
the block cursor is accepted,
and the cursor moves to the
next position.
Description
You press each key as many times as needed to display the character
you want to enter.
You press each key only once, even if the character you want is not the
first character on the key.
If you want to input a series of numbers, you need to change to NUM
mode or press and hold the particular key for three secs.
By pressing the key in the or mode, the Symbol Input
mode will be turned on. Select the symbol by using the Navigation key
to scroll up, down, left or right and select the corresponding number on
your keypad.
or ( )
...5...

e616 3.12
Getting going
e616
3.11 Getting going
General shortcuts
Use the chart below as a guide for general navigation shortcuts and key functions.
Key Function
Z–A list of your contacts – from the start screen
A–Z list of your contacts – from the start screen
Missed calls list – from the start screen
(5 secs)
1
Today on 3. Also returns you to Today on 3from any browser page
Calls received list (including missed calls)
Volume setting (on the left side of your handset)
Switches task when multitask activated
Sets the profile (Standard, Meeting, Outdoor and Car)
Option key is a link to an additional function or operation.
You can use this when you see three dots on the bottom screen
Back to previous screen (not on Today on 3)
To access your video clips, press and scroll to
To access your audio files, eg songs, press and scroll to
Text entry shortcuts
Use the chart below as a guide for entering numbers, letters, symbols, spaces
and other characters.
Key Function
Deletes 1 character
Deletes entire text
(3 secs)
(3 secs)
(3 secs)
When editing text, switches between ABC (multitap) ,
NUM (numeric) and T9 (predictive text) .
Moves the cursor left or right, up or down
Inserts a space
Enters 0–9
Switches between shift and caps
Switches to the symbol mode
New line
Enters 0–9 (when in T9 and ABC mode)
To copy, cut and paste text
To create messages

This finished artwork has been checked and approved for production by
on behalf of Dutton Merrifield Date
on behalf of Client Date
IMPORTANT – PLEASE NOTE THAT FINAL APPROVAL IS THE
RESPONSIBILITY OF THE CLIENT.
Client
Job Name
Job Number
Contact Name
Finished Size/Format
No of Pages
Colours
Special Requirements
T +44 (0)117 317 9293
F +44 (0)117 317 9294
INTERNAL SIGN-OFF
Any new/retouched imagery? ■■(Y/N) Cromalin? ■■(Y/N)
This finished artwork has been checked and approved for production by
Account Director/Client Services Director Date
Designer/Creative Director Date
Copywriter Date
Artworker Date
Artworker 2 Date
Account Handler Date
T +44 (0)117 317 9293
F +44 (0)117 317 9294
Table of contents
Other NEC Cell Phone manuals