NEC Univerge SV8100 Setup guide

© Jerry W. Sharp 2008-2009, Revised 08/05/2009
Page 1 of 8
N C SV8100
Quick Start Users Guide
For
DTL-36D, 24D and 12D
Multiline Telephones
and
VM8000 InMail
Certified Alarm Co.
(256) 383-1225
For Customers of Certified Alarm Company only, you may copy or print PDF for your use only.

© Jerry W. Sharp 2008-2009, Revised 08/05/2009
Page 2 of 8
Making Calls
To place internal calls
• Press the DSS* button of the person you wish to
call, talk hands free after the tone, or lift handset.
• Or, Lift the Handset or Press Speaker and dial the
3-Digit Extension Number.
• oftkeys allow options to, Ring/Voice (Toggles
from Handsfree to Ringing) MW (turn callback
message waiting lamp on), or Vmsg (leave Voice
mail Message)
To lace External Calls
• Lift the Handset or press Speaker, dial “9” and
the Telephone Number.
• Or ress the idle CO line key and dial the
Telephone Number, lift the Handset or talk hands
free.
Answering Calls
To answer Internal calls
• When phone beeps, answer hands free or if
phone ring lift the handset or press speaker.
• The Mic lamp must be on for callers to hear you
hands free. (Press the button to toggle on/off)
To Answer External calls
• When phone rings, lift the handset or press the
peaker button to answer hands free.
• The Mic lamp must be on for callers to hear you
hands free. (Press the button to toggle on/off)
Transferring Calls
To transfer a call to another extension
• With the call in progress, press the DSS* button.
(you can transfer to a busy extension) If no D
button, press the Trf oftkey or Transfer button
then dial the 3-digit Extension Number.
• The caller is placed on Hold.
• You may announce the caller, to cancel and get
the caller back press the blinking green button.
• or
• Press the Trf oftkey or Transfer button then
Hang-up the handset to complete the transfer.
To transfer directly to Voicemail
• With the call in progress, press the DSS* button.
(you can transfer to a busy extension) if no D
button press the Trf oftkey or Transfer button
then dial the 3-digit Extension Number.
• Dial 8 and Hang-up the handset to complete the
transfer to Voicemail.
* D (Direct Station Select) = A programmable button to call another
extension and see busy status.
Placing Callers on Hold
To lace a caller on Hold
• With the call in progress, press Hold
• To return to the call at your extension, or any other
extension. Press the blinking Green button on your
phone, Blinking red on all others.
• Calls will recall to your extension if not answered
within the preprogrammed time limit.
To place caller on Exclusive Hold
• With the call in progress, press Feature + Hold
• To return to the call at your extension only. Press
the blinking Green button on your phone, teady
red on all others.
• Calls will recall to your extension if not answered
within the preprogrammed time limit.
Call Park
To ark or Retrieve arked callers.
• To place a caller in park, use the ark Keys. Or
press the Transfer key, dial #6XX (XX=00-64)
• To retrieve a parked caller, use the ark Keys or
dial
*
6XX (XX=number used to park call)
• Example: While talking to a caller, press transfer,
dial #601, then page and instruct the recipient of
the call to dial
*
601 to retrieve the parked call.
Paging (page only, no talk back)
aging to hones or External aging Speakers
Lift the handset press the age Key or:
To page the internal phones (Digital phones only)
• Lift the Handset, Press the In g oftkey, Dial 1
(the Group Number for all phones. ask
administrator for additional zone areas)
• After the Beep-Beep, peak into the handset.
• Hang-up the handset.
Or for External aging
• Lift the Handset, Press the Ex g oftkey to
page the external speakers. Dial 0 (the Zone
Number for the all page zone, ask administrator
for additional zone areas)
• After the Beep-Beep, peak into the handset.
• Hang-up the handset

© Jerry W. Sharp 2008-2009, Revised 08/05/2009
Page 3 of 8
oftkeys
Each display telephone provides interactive oftkeys for
intuitive feature access. It is no longer necessary to
remember feature codes to access the telephone
advanced features because the function of the oftkeys
change as the user processes calls.
The 4- oftkeys are located below the display
Exit/Help Key
Exit Key
(Top Left)
and Help Key
(top right)
• Exit Key= Cancel and returns to main screen
• Help Key= Press Help then press phone key(s) to
display current key programming.
Conference Calls
To make a conference call
• With the first call in progress (internal or external),
press the Conf oftkey.
• Press the DSS key or Dial the second party
(internal or external)
• Press the Add oftkey (after they answer)
• Press the Begin oftkey to connect all parties
together.
• You may add more (internal or external) parties
by pressing the Conf oftkey again.
Redial/Caller ID Buffer
Last number redial
• Press the Redial Cursor key, last number dialed is
displayed. (use the scroll key to see more)
• Press the # key, lift the Handset, or press
Speaker to dial the number.
List of the last 10 Dialed Numbers or Caller ID
Numbers to your phone (Phone must ring to store the
caller ID info)
• Press the List oftkey.
• elect the Redial or CID (Caller ID) oftkey.
• Use the up or down arrow oftkey or cursor Up
or down key to scroll through the stored numbers.
• From the Dialed list, Press the # key, lift the
Handset, or press Speaker to dial the displayed
number.
DND
To set DND
• Press the down arrow, then the rog oftkey.
• Press the DND oftkey.
• Press the Set oftkey.
• elect the Ext oftkey for External calls, Icm for
internal calls, or All for both external and internal
calls.
• With DND set, the selected calls will be answered
by voicemail.
To Cancel DND
• Press the down arrow, then the rog oftkey.
• Press the DND oftkey.
• Press the Cncl oftkey to cancel DND.
Call Forward
To set Call Forwarding
• Press the down arrow, then the rog oftkey.
• Press the Cfwd oftkey.
• elect All, Both, Busy, NA
(No Answer),
B/NA
(Busy/No Answer)
or Flw
(Follow Me)
oftkey.
• elect the Set oftkey.
• Dial the Extension or 9+off premise number to
forward to and press Speaker.
To Cancel Call Forwarding
• Press the down arrow, then the rog oftkey.
• Press the Cfwd oftkey.
• elect All, Both, Busy, NA, B/NA or Flw oftkey
elect the CNCL oftkey to cancel.
Directed Call Pickup
To answer a ringing co-workers phone
• Lift the handset or press Speaker.
• Dial
* *.
• Dial the 3-Digit Extension Number of the co-
workers phone you want to answer.
Missed Calls
(Icon located in uper left of display)
To see a list of callers to your phone
• elect the Enter Cursor Key (Center key).
• elect Option 1 Missed Calls.
• Use the Up or Down Cursor key to scroll through
the missed call list, Icon will turn off.
Call Waiting (while on a call)
To answer a second caller (you hear camp on tones)
• press Answer, and talk to the 2
nd
caller (first caller
placed on hold, press the Conf key to return)
• If not answered 2
nd
caller goes to Voice Mail..

© Jerry W. Sharp 2008-2009, Revised 08/05/2009
Page 4 of 8
To tore/Dial ystem peed Dial
Numbers
(Available ystem wide)
To Store System Speed Dial Numbers
• Press the rog oftkey.
• Press the down arrow oftkey.
• Press the S D oftkey.
• Dial the bin number (001-999) to program.
• Dial the hone Number .
• Press the Hold button
• Enter the Name using the keypad*.
• Press the Hold button to save (hear
beep/beep/beep tone)
• Press the Speaker button to quit.
To dial the System Speed Dial Numbers
• Press the Dir oftkey.
• Press the S D oftkey.
• Use the up or down arrow oftkeys to scroll
through the numbers.
• Or enter the first letters of the name and use the
up or down arrow oftkeys to scroll through the
numbers.
• Press the Dial oftkey to dial the displayed
number.
etting the Clock
To set the Clock, for Daylight Saving Time Changes
• Press the Speaker button (from Administrators
hone only)
• Dial 728 + Time, (4-Digits in 24hr. format
0830=8:30 AM, 1645=4:45PM)
• Press the Speaker button to quit.
To Program D /One Touch Keys
DSS (Direct Station Select) or One Touch Dial Keys
• Press the Speaker button.
• Dial 751.
• Press the Key to be programmed (shows current
programming, if programmed dial 00 to erase,
then press Key again)
• Dial
01 plus the 3-Digit Extension number or 9 +
the outside number to dial, press Hold to save
(hear beep/beep/beep tone)
• Press another Key or Speaker button to quit.
• DE I lite software (Free) and DE I labels are
available from Certified to re-label your phone.
To tore/Dial the tation peed Dial
Numbers
(Available at the individual station only)
To Store Station Speed Dial Numbers
• Press the rog oftkey.
• Press the STA oftkey.
• Dial the bin number (0-9) to program.
• Dial the hone Number.
• Press the Hold button
• Enter the Name using the keypad.*
• Press the Hold button to save (hear
beep/beep/beep tone)
• Press the Speaker button to quit.
To dial the Station Speed Dial Numbers
• Press the Dir oftkey.
• Press the STA oftkey..
• Use the up or down arrow oftkeys to scroll
through the numbers.
• Or enter the first letters of the name and use the
up or down arrow oftkeys to scroll through the
numbers.
• Press the Dial oftkey to dial the displayed
number.
Program tation Names
To change the phone users name
• Press the Speaker button.
• Dial 700.
• Dial the 3-digit Extension Number to change.
• Enter the Name using the keypad *.
• Press the Hold button to save.
(hear beep/beep/beep tone)
• Press the Speaker button to quit.
To Program CO Line Keys
To rogram the outside line Keys
• Press the Speaker button .
• Dial 752.
• Press the Key to be programmed (shows current
programming, if programmed dial 000 to erase,
then press Key again) .
• Dial
*
01 plus the CO Line Number 01-99
(hear beep/beep/beep tone).
• Press another Key or Speaker button to quit.
• DE I lite software (Free) and DE I labels are
available from Certified to re-label your phone.
*
#= pace, <>=Move Cursor, Feature key=Delete

© Jerry W. Sharp 2008-2009, Revised 08/05/2009
Page 5 of 8
TELBK, Telephone Book:
(Available at the individual station only)
Name Groups 1-4: (Optional)
• Press Menu key.
• elect option 2 “Directory” by using Cursor Key.
• elect option 3 “ etting” by using Cursor Key.
• elect the GrpName oftkey.
• elect the group 1-4 to change the name .
• Enter a Name for the Group using the keypad *.
• Press Hold.
• elect another group to name or exit.
To program hone Numbers in the Telephone Book
• Press Menu key.
• elect option 2 “Directory” by using Cursor Key.
• elect option 1 “REGI T” by using Cursor Key.
• Enter a Name for the number using the keypad*.
• Press Hold .
• elect the Group (1-4) to save in .
• Dial the hone number to call (9+number).
• Press Hold.
• Enter the memory location 0-299 .
• Press Hold to save and add another number.
To dial phone numbers from the Telephone Book
• elect the Telephone Book icon, on the right
cursor key.
• Use the up or down keys to scroll through all of
the names.
• or
• Enter the first few letters of the name. (the more
letters entered the easier to find).
• Press the up or down cursor key.
• Use the up or down key to scroll through the
names and select the correct one.
• Press the desired oftkey, CHG=Change,
DEL=Delete or Dial to dial the number.
• You may also press the Menu key and search by
Name= tored Name, GR =Group, NUM=Number
or MEM=Memory Location (0-299).
E911 Emergency Calls.
Emergency calls requiring outside assistance.
• Lift the handset or press Speaker.
• Dial 911, Describe the nature and location of
the emergency. (it is very important to give the
correct address, Building Number etc., The phones
lines may have a different address listed)
• The Attendant will by notified by an audible alarm,
displaying the extension name/number that placed
the emergency call.
*
#= pace, <>=Move Cursor, Feature key=Delete
To turn Background Music on or off:
To Hear Music from your phone (if equipped)
• Press the Speaker button.
• Dial 725 (toggles On or Off)
• Press the Speaker button to quit.
Changing tation Ring Tones
To change the Internal/External Ring Tone
• Press the Speaker button.
• Dial 720.
• Dial 1 for internal or 2 for external ring tones.
• Dial 1-8 to select the desired tone.
• Press the Speaker button to exit and set.
Callback Request notification:
If you call an busy/unanswered extension and press 0
or the MW softkey, it will turn on (Blinks) the message
waiting lamps on both extensions requesting a callback.
To Call back and reset the callback message
notification.
• The called extension can press the MW softkey
and select Call to return your call or CNCL to
Cancel the call and turn the lamps off.
Or to cancel from your phone
• Press Exit (left of the oftkeys).
• Press the MW oftkey.
• Press the All oftkey.
Volume/Contrast Adjustments
To adjust Ring Volume
• While the phone is ringing. (internal or external)
• Press up or down Cursor key to adjust ring volume.
• Or press the Menu key.
• elect option 3 “ ettings”
• elect option 1 “Ring Volume”
• Adjust the volume with the Up or Down cursor key.
• ave with the OK oftkey
To adjust Handset or Speakerphone Volume
• While on a call using either the Handset or
peakerphone.
• Press the up or down Cursor key to adjust caller’s
volume.
To Adjust the Display Contrast levels
• With phone idle. (not in use)
• Press up or down Cursor key to adjust the LCD
display contrast from light to dark.

© Jerry W. Sharp 2008-2009, Revised 08/05/2009
Page 6 of 8
Voice Mail and Auto Attendant
Voice Mail answers your phone and gives the caller the
option to leave you a message or dial another extension.
Automated Attendant automatically answers the
incoming outside calls. After listening to a customized
message (Day, Night or Holiday), an outside caller can
dial directly to a extension or department.
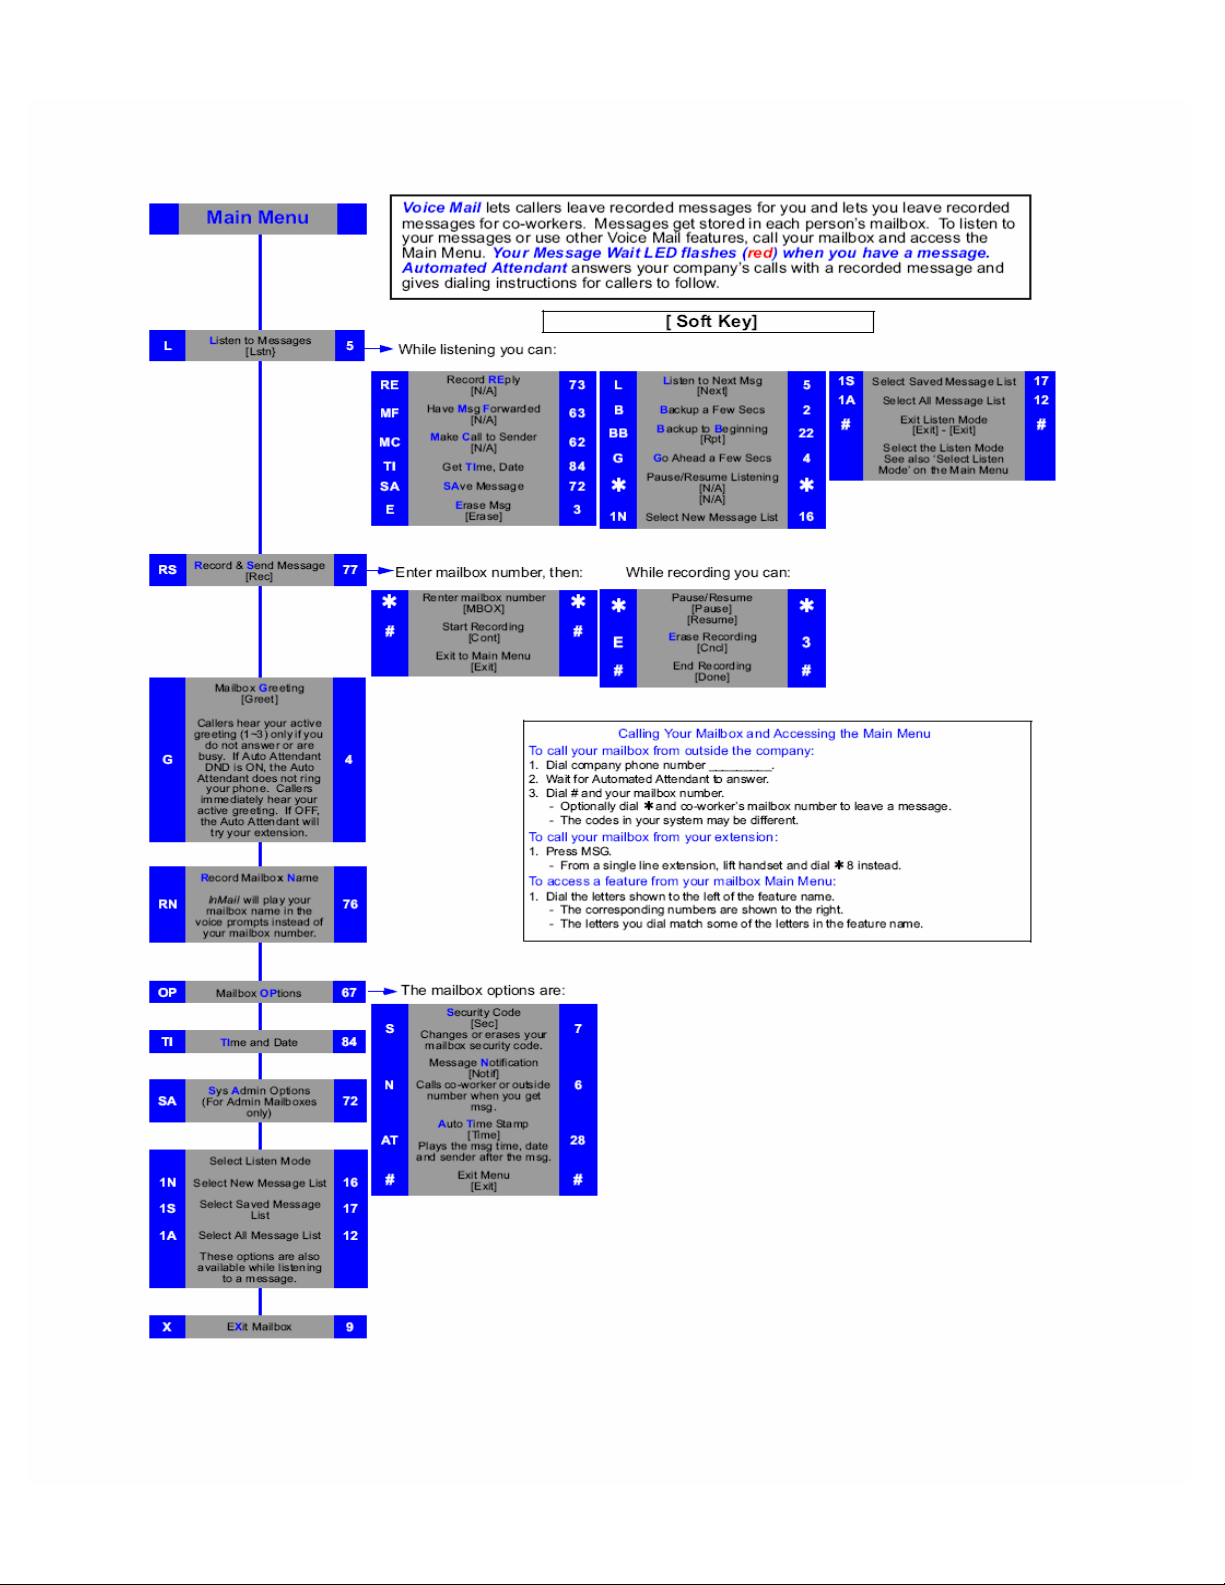
Set Up your Voice Mail
(Must complete all 3 steps)
1. Record your Greeting
• Press the VMsg oftkey
• Press the Greet oftkey .
• Press the Gr1 (greeting 1) oftkey. (you may
record the other greetings later)
• Press the Rec oftkey.
• Follow the prompts to record your greeting.
• Press LSTN (Listen), REC (Record over) Del
(Delete) Back (Previous Menu) or # to exit.
2. Record Your Name
• Press the VMsg oftkey
• Press R N (7 6) to record your name.
• Press the Rec oftkey.
• Follow the prompts to record your name.
• Press LSTN (Listen), REC (Record over) Del
(Delete) Back (Previous Menu) or # to exit.
3. Enter your assword* (Security Code)
• Press the VMsg oftkey
• Press O (6 7) for Mail Box Options.
• Press the Code oftkey.
• Follow the prompts, enter your 4 digit Password.
(you must use this each time you access your mail box,
do not forget it!. There is no way to retrive it.)
• Press OK to save or Clear to start over.
*
Without a password callers may be able to listen and delete
your voice mail messages.
To check Voice Mail Messages
From your hone:
• When VM lamp blinks and display indicates
number of messages, Press the VMsg oftkey
• Follow prompts to listen to messages, you may
press T I (8 4) for time and date stamp, Save S A
(7 2), or Erase E (3) to get next message. Press
X (9) to Hang Up.
From outside the Building:
• Dial a Line answered by AutoAttendent or main
number and ask attendent to transfer to ext#3999
• When Auto Attendent answers, Dial # + your Mail
Box Number (3-Digit extension number).
• Follow prompts to listen to messages. ave, Erase
and Exit the same as if you were in the office.
Auto Attendant Greetings*
(All recordings or mode changes must be from the
ystem Administrators phone)
Recording the Day/Night/Override Greeting
• Press the VMsg oftkey
• Press 72 (SA) for the System Administrator menu.
• Press the Instr oftkey, for the Instruction Menu
Messages.
• Enter mailbox number for the Day Greeting 001*,
Night Greeting 002*, Lunch/Out of Office 003* or
the Override Mailbox 004*.
• Follow the prompts to Lstn (Listen), Rec (Record)
or Erase the greeting.
• To record or change the greeting press the Rec.
oftkey.
• Press the Done oftkey or the # Key when
finished recording.
• Press the Lstn oftkey to review,
• Press Rec softkey to re-record, or press the Exit
oftkey and Hang Up.
Activating the Override Greeting (used for Holiday
Greetings or unexpected Weather Closings)
• Press the VMsg oftkey
• Press 726 (SAO) for the System Administrator,
Answering chedule Override menu.
• Enter the Table Number 1 .
• The Display/Prompts gives the information about
the Answering chedule Override, you may turn
the mailbox On/OFF or change the Mail box
number (MBOX, usually 004*) .
• To turn On, press the On oftkey. (be sure the
greeting for the override mailbox is recorded)
• Press the Exit oftkey and Hang Up.
• This Override greeting will answer until you renter
the ystem Administrator Override menu and
press the Off oftkey.
*When recording the Day/Night greeting, it will be easier to
change the greetings if you use extension numbers (Press
102 for ales) instead of menu numbers (Press 1 for ales).
Any valid extension number, Mailbox number or Group
number can be used, see your installer for a list of numbers.
Having your greetings written down before you start will
help. Remember KI (Keep it Short and Simple)
*
Default Mailbox Numbers, Note any changes or additions.
Day MB 001 MB 005
Night MB 002 MB 006
Lunch/Out MB 003 MB 007
Override MB 004 MB 008

© Jerry W. Sharp 2008-2009, Revised 08/05/2009
Page 7 of 8
Chart from the NEC VM8000 Users Guide

© Jerry W. Sharp 2008-2009, Revised 08/05/2009
Page 8 of 8
Notes:
________________________________________________________________________
________________________________________________________________________
________________________________________________________________________
________________________________________________________________________
________________________________________________________________________
________________________________________________________________________
________________________________________________________________________
________________________________________________________________________
________________________________________________________________________
________________________________________________________________________
________________________________________________________________________
________________________________________________________________________
________________________________________________________________________
________________________________________________________________________
________________________________________________________________________
________________________________________________________________________
________________________________________________________________________
________________________________________________________________________
________________________________________________________________________
________________________________________________________________________
________________________________________________________________________
________________________________________________________________________
________________________________________________________________________
________________________________________________________________________
________________________________________________________________________
________________________________________________________________________
________________________________________________________________________
________________________________________________________________________
________________________________________________________________________
For ervice or Questions Call:
Certified Alarm Co.
(256) 383-1225
Jerry / Russell
“We never Close”
For Customers of Certified Alarm Company only, you may copy or print PDF for your use only.
Other manuals for Univerge SV8100
89
This manual suits for next models
5
Table of contents
Other NEC Telephone manuals

NEC
NEC DS1000 User manual

NEC
NEC Dterm Series i User manual

NEC
NEC NEAX 2400 IPX User manual

NEC
NEC SV8300 User manual

NEC
NEC Mobile Handset 110 User manual

NEC
NEC DSX User manual

NEC
NEC NEC Dterm Series E User manual

NEC
NEC DT310 User manual

NEC
NEC NEAX 2400 IPX User manual

NEC
NEC UNIVERGE SV9100 DT750 User manual