manuals.online logo
Brands
  1. Home
  2. •
  3. Brands
  4. •
  5. Nortel
  6. •
  7. IP Phone
  8. •
  9. Nortel 1535 Reference guide

Nortel 1535 Reference guide

page 1
Nortel IP Phone 1535 Quick Reference Card
Nortel IP Phone 1535
Use the Nortel IP Phone 1535 to make video or voice calls, send e-mail, or browse the internet. The IP Phone 1535 is a SIP-based
phone and therefore, must be registered to a communications server. You can access a LAN through an Ethernet connection or a
WLAN through a WiFi connection. The following table describes the videophone keys and their functions.
For feature descriptions and provisioning information regarding the use of your IP Phone 1535, refer to the Nortel IP Phone 1535
User Guide (NN43160-101) and the Nortel IP Phone 1535 Installation and Configuration (NN43160-103).
To obtain the latest documentation for the IP Phone 1535, go to the Nortel support Web site: www.nortel.com/support
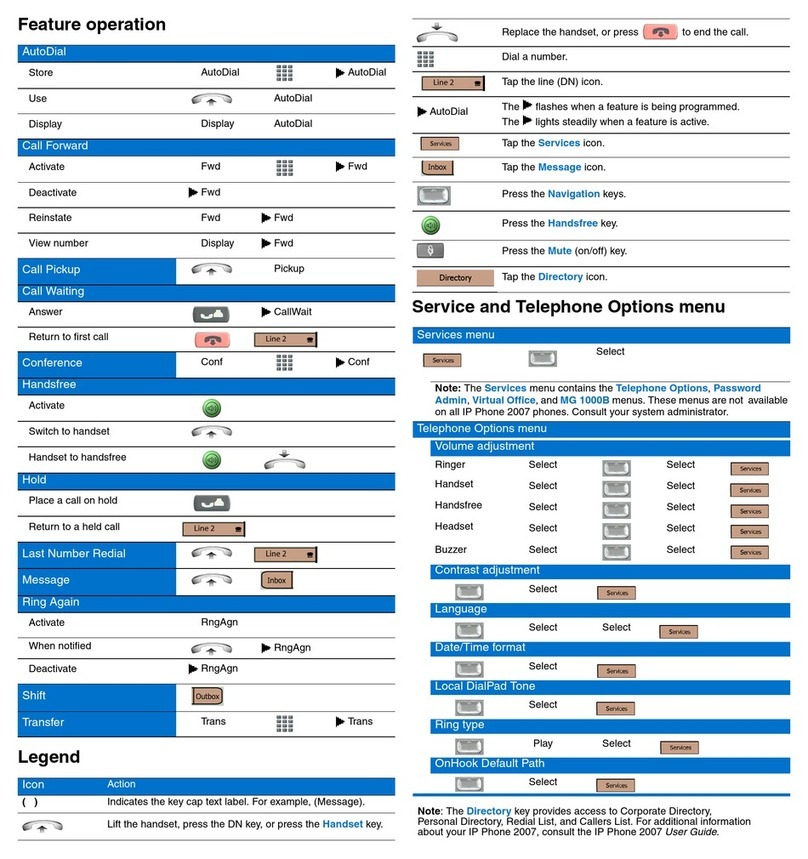
Key Function
Soft key—press to access the variable soft key features. Onscreen labels display the currently defined
feature. For example, on the idle screen the left soft key appears as MENU, the right as PHONEBOOK.
Send key—after dialing digits, press to send the call after dialing. From idle, press to activate the
speakerphone and open the Dial window.
Release key—press to terminate a call (voice or video). Press to return to the previous screen when navigat-
ing menus or browsing the Web.
Navigation keys—when Web browsing, press the Right-click key to access browsing options and the Left-
click key to confirm a selection. Use the Up and Down arrow keys to increase or decrease volume or ringing.
From idle, press the Up arrow to access a list of dialed calls; press the Down arrow to search for a contact.
When writing text, use the four directional arrow keys to move between menu items or to move the cursor.
Video start key—press to start or accept a video conversation.
Video stop key—during a video conversation, press to stop sending video (video privacy). Press again to
restart sending video.
Record key—from idle, press to access the audio recorder, video recorder, or photo camera. During a video
call, press to capture the remote image.
Video mode key—during a video call, press to change the size and layout of your video window.
Favorites key—press to access your list of favorite Web sites.
Messages key—press to access your voice mailbox.
page 2
Nortel IP Phone 1535 Quick Reference Card
Placing a voice call Placing a video call
Place a voice call in one of four ways:
•Pre-dial—dial the number from the dialpad without taking
the phone off the hook. Use DELETE to modify a charac-
ter during pre-dial mode.
•Recall dialing—pick up the handset and select REDIAL.
Select the last number called to automatically dial in either
normal or pre-dial mode.
•Phone book dialing—press the PHONEBOOK soft key
and select List. Press OK to view a list of Phone book
entries. Select the entry and then pick up the handset.
Activate the speakerphone by pressing Send.
•Call Logs dialing—from the main menu, select Call His-
tory and select a number from a list of Missed calls,
Received calls, or Dialed calls. After you select the num-
ber, pick up the handset or press Send to activate the
speakerphone.
You can make two types of video calls:
• a direct video call
• an indirect video call (an active voice call switched to a
video call)
To place a direct video call:
1. Press Video start or Send.
2. Dial the number for the outgoing call.
Note: Place a direct video call by reversing these steps. In
addition, place a video call using Recall dialing, Phone
book dialing, or Call Logs dialing.
To place an indirect video call:
1. On an active voice call, press Video start.
A message appears to let you know that the request is being
processed and the person you are calling has received a
request to accept or reject the video call. The receiving party
must accept the call to establish it.
Receiving a voice call
When a call is incoming, the IP Phone 1535 alerts you with a
normal ring. If the caller is identified in the Phone book as a
VIP caller and the VIP filter is enabled, you hear the ring signal
assigned to that VIP caller.
Note: For more information, see Nortel IP Phone 1535 User
Guide (NN43160-001).
To answer a voice call:
• pick up the handset or
• press Send to activate the speakerphone.
The caller’s ID or their name and picture, if available, appears.
Note: For a caller’s name and picture to appear, they must
be entered and stored in the Phonebook.
Receiving a video call
Accept a video call in one of two ways:
•PressSend to use the speakerphone, or pick up the hand-
set. The Video call is established. However, you must
press Video start to transmit video to the caller.
•PressVideo start. The video is received and transmitted
to the caller simultaneously.
Note: On an active call, press Video stop to stop sending
the video image to the remote party. Press Video stop
again to restart it. The change only applies to the
current call.
Placing a voice call on hold Setting the date and time
Place an active call on hold with menu options and soft keys.
To place an active call on hold:
1. Select OPTIONS > Call Hold and press OK.
The Call Holding icon appears to indicate that a call is on hold.
To return to the call on hold:
1. Select the RESUME soft key.
The call on hold is connected.
Note: Toggle between an active call and a call on hold by
pressing Call Hold and Resume.
To set or modify the date and time from the main menu:
1. Select Settings > System settings > Date and time and
press OK.
2. Enter the date in the format mm/dd/yyyy and press OK.
3. Enter the time in the format hh:mm and press OK.
4. Press Release on the dialpad to return to the idle screen.
The date and time is displayed on the idle screen.
page 3
Nortel IP Phone 1535 Quick Reference Card
Transferring a voice call Browsing the Web
Use a Blind transfer to send an active call to a third party
without speaking to them first.
To Blind transfer an active call:
1. Select OPTIONS > Blind Transfer and press OK.
2. Dial the third party number and press DIAL.
A “Call transfer complete” message appears, and the phone
returns to an idle state.
Use a Consultation transfer to send an active call to a third
party after speaking to them.
To Consultation transfer an active call:
1. Select OPTIONS > Consultation Transfer and press OK.
2. Dial the third party number and press DIAL.
3. When the call is connected, select TRANSFER and speak
to the person receiving the transfer
4. Hang up to complete the transfer, and the phone returns to
an idle state.
You can use the IP Phone 1535 to browse the Internet and
store up to 4 favorite Web sites. Access the browser from the
Web browser menu or by pressing Favorites on the key pad.
To access the browser from the menu:
1. From the main menu, select Services > Web browser
and press OK.
2. Select Web menu > write URL, pressing OK after each
selection.
3. Use the dial pad to enter the URL and press OK to display
the Web site.
To access the browser with the key pad:
1. Press Favorites and select one of the four favorite Web
sites.
Note: A LAN connection and a connection profile is required
for Web browsing. For more information, see Nortel IP
Phone 1535 Installation and Configuration (NN43160-
103).
Adding a contact to the Phone book Managing the contacts
The IP Phone 1535 can store up to 300 contact entries. To add
a contact to your Phone book from the main menu:
1. Select Organizer > Phonebook > Add new, pressing OK
after each selection.
2. Enter the contact name and select Next.
3. Enter the telephone number and select Next.
4. Enter the mobile number, e-mail address, and fax number,
selecting Next after each entry.
5. Select Save to store the contact entry.
Note: To assign a gallery image to the contact entry, select
Assign image before saving it.
To modify a contact in the Phone book from the menu:
1. From the main menu, select Organizer > Phonebook >
Search, pressing OK after each selection.
2. Enter the name of the contact (or the first letter in the
name) you want to modify and select Options > Modify.
3. Modify the contact information and press OK.
To delete a contact in the Phone book from the main menu:
1. Select Organizer > Phonebook > Search, pressing OK
after each selection.
2. Enter the name (or first letter) of a contact, select Delete
and press OK.
3. Select Yes to confirm the deletion or No to cancel it.
Adding a contact to the VIP list Deleting a VIP contact
Set the IP Phone 1535 to filter calls and ring only when an
incoming call is from a contact in the VIP list.
Note: To access this feature, you must enable the VIP filter
on the IP Phone 1535. For more information, see
Nortel IP Phone 1535 User Guide (NN43160-101).
To add a contact to the VIP list:
1. Select Organizer > Phonebook > VIP list, pressing OK
after each selection.
2. Select Add VIP and highlight a Phone book contact to add
to the VIP list.
3. Press Add to see a VIP added message.
VIP list is not an available option when the Phone book is
empty.
To delete a contact in the VIP list:
1. Select Organizer > Phonebook > Modify > VIP, pressing
OK after each selection.
2. Highlight a Phone book contact to remove it from the VIP
list and select Delete.
3. Press OK to delete the contact.
4. Press Release on the dialpad to return to a previous menu
or back to the idle screen.
page 4
Nortel IP Phone 1535 Quick Reference Card
Managing e-mail Sending an e-mail
Access the options available to manage your email by opening
a new email (Read) or saved email (Draft).
The available options are:
•Delete—delete the selected email.
•Forward—forward the selected email to another recipient.
•Edit—edit the text of a selected email.
•Details—view detailed information about the selected
email, such as the email address of the sender and
receiver, the time, and the date.
Send an e-mail from the main menu:
1. Select Messages > Email > Write, pressing OK after
each selection.
2. Select Subject and enter the text for the subject line.
3. Use the dial pad to enter text in the body of the e-mail and
the navigation keys to move your curser up, down, left, or
right to insert a new word.
4. Use Delete to remove unwanted text.
5. From the Options menu, select Send.
Note: In the Options menu, you can select Attachment to
send e-mail attachments, and Save to save an e-mail
in the Draft box.
Setting up Voice mail
Before using Voice mail, set up a Voice mailbox by creating a
Voicemail number, Mailbox ID, and Mailbox Password.
Note: You must be subscribed to a Voice mail service to use
the Voice mail features. For more information, see
Nortel IP Phone 1535 Installation and Configuration
(NN43160-103).
To create a Voice mailbox number from the main menu:
1. Select Settings > Voip settings > Voicemail Number,
pressing OK after each selection.
2. Enter the telephone number associated with your Voice
mailbox and press OK.
To create a Voice mailbox ID from the main menu:
1. Select Settings > Voip settings > Mailbox ID, pressing
OK after each selection.
2. Enter the ID associated with your Voice mailbox and press
OK.
To create a Voice mailbox password from the main menu:
1. Select Settings > Voip settings > Mailbox Password,
pressing OK after each selection.
2. Enter the password associated with your Voice mailbox
and press OK.
3. Press Release on the dialpad to return to a previous menu
or back to the idle screen.
Creating an e-mail profile
Create an e-mail profile on the IP Phone 1535 before you start
to use the e-mail options.
To create an e-mail profile from the main menu:
1. Select Messages > Account > Add new, pressing OK
after each selection.
2. Enter the data for the following fields:
a. user name and e-mail address
b. incoming POP or IMAP server address
c. outgoing SMTP server address
3. Press OK to confirm the profile data.
4. Press Back to return to the main menu.
Note: Obtain the POP, IMAP, and SMTP server addresses
from your Administrator.
Copyright © 2006 Nortel Networks. All Rights Reserved.
The information in this document is subject to change without notice.
The statements, configurations, technical data, and recommendations in
this document are believed to be accurate and reliable, but are presented
without express or implied warranty. Users must take full responsibility
for their applications of any products specified in this document. The
information in this document is proprietary to Nortel Networks.
Nortel, Nortel (logo), and the Globemark are trademarks of Nortel
Networks.
Nortel IP Phone 1535
Standard 01.02
Publication: NN43160-102
November 2006
Accessing Voice mail
After set up, access your Voice mailbox to listen to, save, or
delete your voice mail messages.
To access your Voice mailbox directly, press the Messages
key.
To access your Voice mailbox from the main menu, select
Services > Voicemail, pressing OK after each selection.
Press Release on the dialpad to return to a previous menu or
back to the idle screen.
Other manuals for 1535

6

Other Nortel IP Phone manuals

Nortel i2050 User manual

Nortel

Nortel i2050 User manual

Nortel Nortel IP Phone 1120E User manual

Nortel

Nortel Nortel IP Phone 1120E User manual

Nortel IP Phone 2007 Instruction Manual

Nortel

Nortel IP Phone 2007 Instruction Manual

Nortel Meridian M2000 Series User manual

Nortel

Nortel Meridian M2000 Series User manual

Nortel IP Phone 2004 User manual

Nortel

Nortel IP Phone 2004 User manual

Nortel 1140E User manual

Nortel

Nortel 1140E User manual

Nortel 1210 User manual

Nortel

Nortel 1210 User manual

Nortel 2001 User manual

Nortel

Nortel 2001 User manual

Nortel Nortel IP Phone 1120E User manual

Nortel

Nortel Nortel IP Phone 1120E User manual

Nortel IP Phone 2210 User manual

Nortel

Nortel IP Phone 2210 User manual

Nortel 2001 User guide

Nortel

Nortel 2001 User guide

Nortel 1210 User manual

Nortel

Nortel 1210 User manual

Nortel Meridian M3902 Reference guide

Nortel

Nortel Meridian M3902 Reference guide

Nortel 1140E User manual

Nortel

Nortel 1140E User manual

Nortel Nortel IP Phone 1120E User manual

Nortel

Nortel Nortel IP Phone 1120E User manual

Nortel i2004 User manual

Nortel

Nortel i2004 User manual

Nortel IP Phone 2007 User manual

Nortel

Nortel IP Phone 2007 User manual

Nortel Networks IP Phone 2002 User manual

Nortel

Nortel Networks IP Phone 2002 User manual

Nortel 1140E User manual

Nortel

Nortel 1140E User manual

Nortel Nortel IP Phone 1120E User manual

Nortel

Nortel Nortel IP Phone 1120E User manual

Nortel Nortel IP Phone 1120E User manual

Nortel

Nortel Nortel IP Phone 1120E User manual

Nortel Nortel IP Phone 1210 User manual

Nortel

Nortel Nortel IP Phone 1210 User manual

Nortel IP Phone 2007 User manual

Nortel

Nortel IP Phone 2007 User manual

Nortel Phase 0 User manual

Nortel

Nortel Phase 0 User manual

Popular IP Phone manuals by other brands

Unify OpenScape CP600 user guide

Unify

Unify OpenScape CP600 user guide

ATCOM Rainbow4(s) user manual

ATCOM

ATCOM Rainbow4(s) user manual

Aastra 55I Technical specifications

Aastra

Aastra 55I Technical specifications

iiNet BOB2 quick start guide

iiNet

iiNet BOB2 quick start guide

Dartel LJ-120 user guide

Dartel

Dartel LJ-120 user guide

Yealink T58A Teams Quick reference guide

Yealink

Yealink T58A Teams Quick reference guide

Aastra 5361 user guide

Aastra

Aastra 5361 user guide

ZyXEL Communications V300 Series Specifications

ZyXEL Communications

ZyXEL Communications V300 Series Specifications

Mitel OfficeConnect 5212 user guide

Mitel

Mitel OfficeConnect 5212 user guide

Mitel 6867i Premium installation guide

Mitel

Mitel 6867i Premium installation guide

Medion s63012 instruction manual

Medion

Medion s63012 instruction manual

Samsung DS-5014D user guide

Samsung

Samsung DS-5014D user guide

Akuvox SP-R5xP Administrator's guide

Akuvox

Akuvox SP-R5xP Administrator's guide

Grandstream Networks Grandstream GXP-2000 user manual

Grandstream Networks

Grandstream Networks Grandstream GXP-2000 user manual

Aastra 6753I installation guide

Aastra

Aastra 6753I installation guide

Yealink Yealink SIP-T28P quick start guide

Yealink

Yealink Yealink SIP-T28P quick start guide

LG IPLDK 20 user guide

LG

LG IPLDK 20 user guide

Allworkx Verge user guide

Allworkx

Allworkx Verge user guide

manuals.online logo
manuals.online logoBrands
  • About & Mission
  • Contact us
  • Privacy Policy
  • Terms and Conditions

Copyright 2025 Manuals.Online. All Rights Reserved.