manuals.online logo
Brands
  1. Home
  2. •
  3. Brands
  4. •
  5. NuAire
  6. •
  7. Accessories
  8. •
  9. NuAire ES-PIR2 User manual

NuAire ES-PIR2 User manual

ES-PIR2 Sensor
Installation Guide
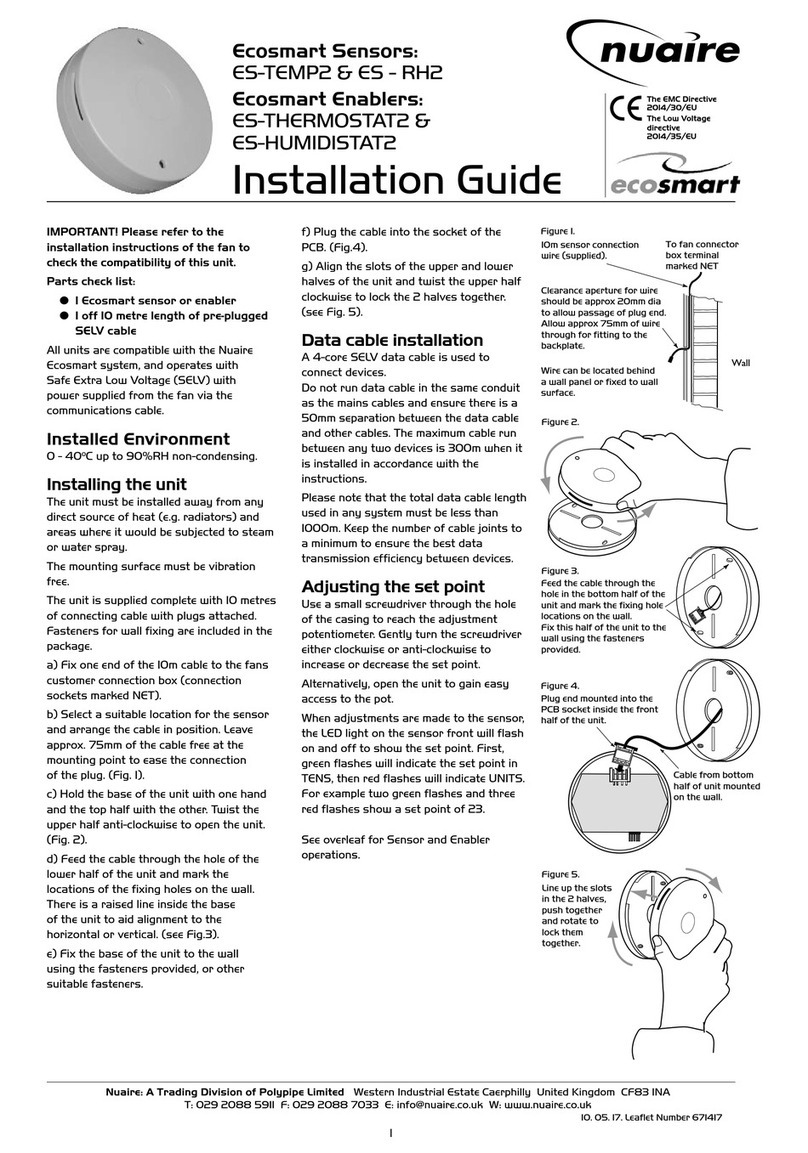
10m sensor connection
wire (supplied).
Clearance aperture for wire
should be approx 20mm dia
to allow passage of plug end.
Allow approx 75mm of wire
through for fitting to the
backplate.
Wire can be located behind
a wall panel or fixed to wall
surface.
Wall
To fan connector
box terminal
marked NET
Cable from bottom
half of unit mounted
on the wall.
Plug end mounted into the
PCB socket inside the front
half of the unit.
Feed the cable through the
hole in the bottom half of the
unit and mark the fixing hole
locations on the wall.
Fix this half of the unit to the
wall using the fasteners
provided.
Figure 1.
Figure 2.
Figure 3.
Figure 4.
Figure 5.
Line up the slots
in the 2 halves,
push together
and rotate to
lock them
together.
11. 05. 17. Leaflet Number 671416
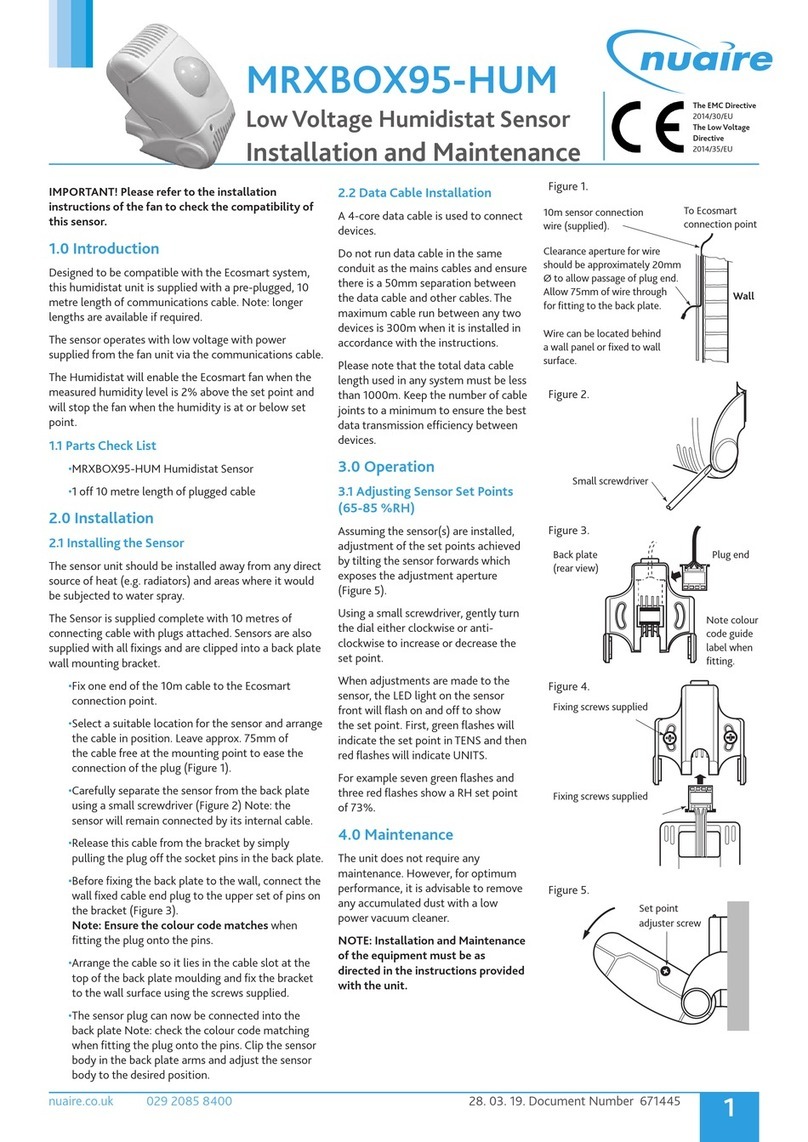
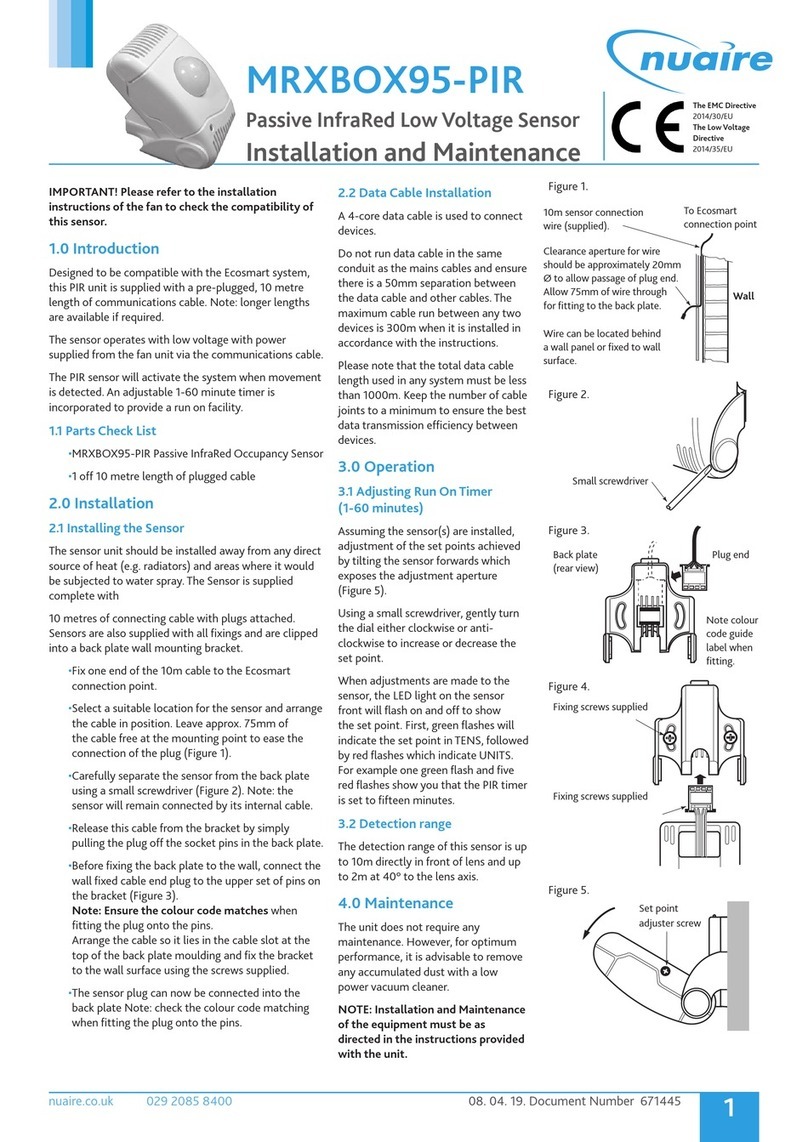
IMPORTANT! Please refer to the
installation instructions of the fan to
check the compatibility of this sensor.
Parts check list:
●ES-PIR2 Passive Infra red detector
●1 off 10 metre length of plugged
SELV cable
ES-PIR2 Occupancy
Sensor
Designed to be compatible with the
Ecosmart system, this PIR unit is supplied
with a pre-plugged, 10 metre length of
communications cable. Note: longer lengths
are available if required.
The sensor operates with Safe Extra Low
Voltage (SELV) with power supplied from
the fan unit via the communications cable.
The ES-PIR sensor will activate the system
when movement is detected. An adjustable
1-60 minute timer is incorporated to provide
a run on facility.
Installed Environment
0 - 400C up to 90%RH non-condensing.
Fault indication
The LED will change from green to red if
any fan connected in that zone has failed.
Multiple Sensors
Multiple sensors can be connected to the
network. Please refer to the actual fan
installation instructions for exact
quantities.
Installing the Sensor
The unit must be installed away from any
direct source of heat (e.g. radiators) and
areas where it would be subjected to steam
or water spray.
The mounting surface must be vibration
free.
The unit is supplied complete with 10 metres
of connecting cable with plugs attached.
Fasteners for wall fixing are included in the
package.
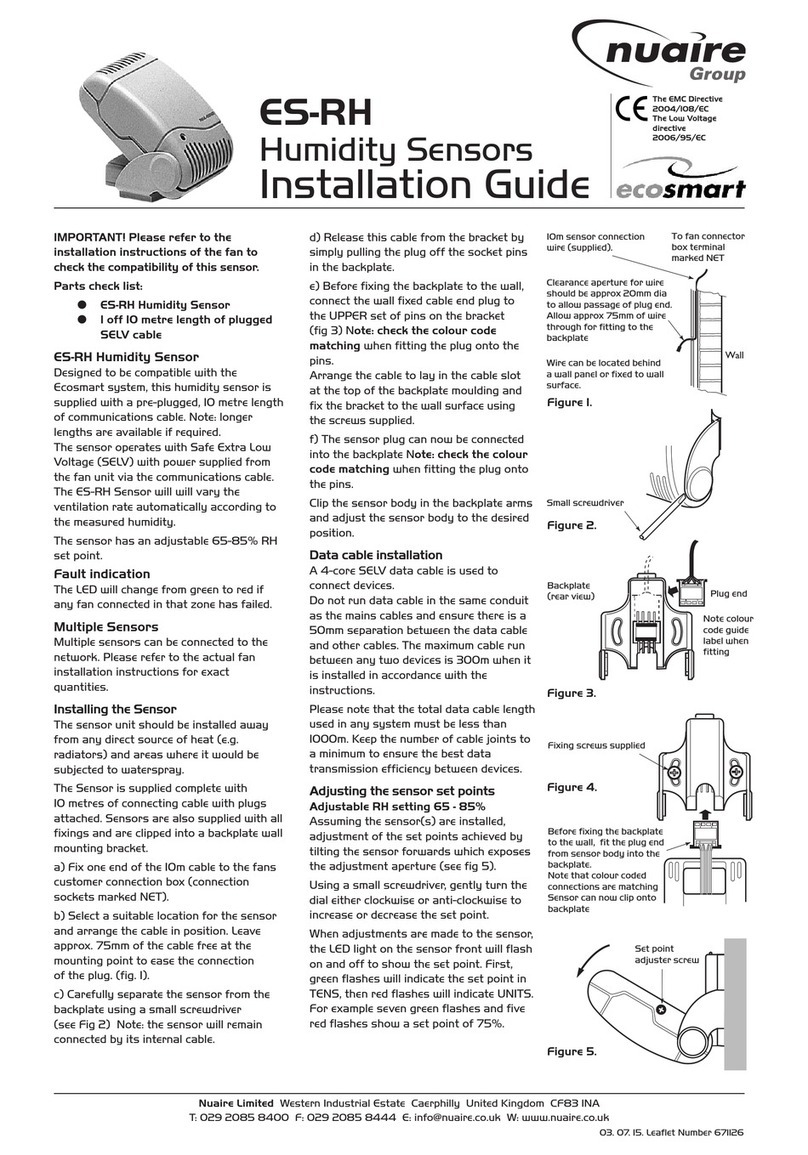
a) Fix one end of the 10m cable to the fans
customer connection box (connection
sockets marked NET).
b) Select a suitable location for the sensor
and arrange the cable in position. Leave
approx. 75mm of the cable free at the
mounting point to ease the connection
of the plug. (Fig. 1).
c) Hold the base of the unit with one hand
and the top half with the other. Twist the
upper half anti-clockwise to open the unit.
(Fig. 2).
d) Feed the cable through the hole of the
lower half of the unit and mark the
locations of the fixing holes on the wall.
There is a raised line inside the base of the
unit to aid alignment to the horizontal or
vertical. (see Fig.3).
e) Fix the base of the unit to the wall using
the fasteners provided, or other suitable
fasteners.
f) Plug the cable into the socket of the PCB.
(Fig.4).
g) Align the slots of the upper and lower
halves of the unit and twist the upper half
clockwise to lock the 2 halves together.
(see Fig. 5).
Data cable installation
A 4-core SELV data cable is used to
connect devices.
Do not run data cable in the same conduit
as the mains cables and ensure there is a
50mm separation between the data cable
and other cables. The maximum cable run
between any two devices is 300m when it
is installed in accordance with the
instructions.
Please note that the total data cable length
used in any system must be less than
1000m. Keep the number of cable joints to
a minimum to ensure the best data
transmission efficiency between devices.
Adjusting the run on timer
ES-PIR2 Run on timer
(1-60 minutes)
Use a small screwdriver through the hole
in the casing to reach the adjustment
potentiometer. Gently turn the screwdriver
either clockwise or anti-clockwise to
increase or decrease the set point.
Alternatively, open the unit to gain easy
access to the potentiometer.
When adjustments are made to the sensor,
the LED light on the sensor front will flash
on and off to show the set point. First,
green flashes will indicate the set point in
The EMC Directive
2014/30/EU
The Low Voltage
directive
2014/35/EU
Nuaire: A Trading Division of Polypipe Limited Western Industrial Estate Caerphilly United Kingdom CF83 1NA
T: 029 2088 5911 F: 029 2088 7033 E: [email protected] W: www.nuaire.co.uk
1
Installation and Maintenance ECOSMART PIR2 Sensor
Technical or commercial considerations may, from time to time, make it necessary to alter the design, performance and
dimensions of equipment and the right is reserved to make such changes without prior notice.
TENS, then red flashes will indicate UNITS. For example one
green flash and five red flashes show you that the PIR timer is
set to fifteen minutes.
Detection range
Up to 10m directly in front of lens and up to 2m at 40oto the
lens axis.
Maintenance
The unit does not require any routine maintenance. However,
for optimum performance, it is advisable to remove any
accumulated dust with a low power vacuum cleaner.
NOTE: Installation and Maintenance of the equipment must
be as directed in the instructions provided with the unit.
Warranty
The 3 year warranty starts from the day of delivery and
includes parts and labour for the first year.
The remaining 2 years covers replacement parts only.
This warranty is void if the equipment is modified without
authorisation, is incorrectly applied, misused, disassembled,
or not installed, commissioned and maintained in accordance
with the details contained in this manual and general good
practice.
The product warranty applies to the UK mainland and in
accordance with Clause 14 of our Conditions of Sale.
Customers purchasing from outside of the UK should
contact Nuaire International Sales office for further details.
Telephone 02920 858 400
11. 05. 17. Leaflet Number 671416
25.50mm 11mm 86mm dia.
Plan view
Side view
Dimensions
After Sales Enquiries
For technical assistance or further product information,
including spare parts and replacement components, please
contact the After Sales Department.

Other NuAire Accessories manuals

NuAire DRI-ECO-RH User manual

NuAire

NuAire DRI-ECO-RH User manual

NuAire NU-5510 User manual

NuAire

NuAire NU-5510 User manual

NuAire CM-XBOX-INLINE Instruction Manual

NuAire

NuAire CM-XBOX-INLINE Instruction Manual

NuAire 3 Series User manual

NuAire

NuAire 3 Series User manual

NuAire 5 Series User manual

NuAire

NuAire 5 Series User manual

NuAire NU-5810 User manual

NuAire

NuAire NU-5810 User manual

NuAire DRI-ECO-CO2 User manual

NuAire

NuAire DRI-ECO-CO2 User manual

NuAire NU-8600 User manual

NuAire

NuAire NU-8600 User manual

NuAire NU-5710 User manual

NuAire

NuAire NU-5710 User manual

NuAire NU 4500 User manual

NuAire

NuAire NU 4500 User manual

NuAire MRXBOX95-PIR Instruction Manual

NuAire

NuAire MRXBOX95-PIR Instruction Manual

NuAire ES-TEMP2 User manual

NuAire

NuAire ES-TEMP2 User manual

NuAire NU-1000 User manual

NuAire

NuAire NU-1000 User manual

NuAire 1 Series User manual

NuAire

NuAire 1 Series User manual

NuAire NU-5500 User manual

NuAire

NuAire NU-5500 User manual

NuAire 7 Series User manual

NuAire

NuAire 7 Series User manual

NuAire NU-8625 User manual

NuAire

NuAire NU-8625 User manual

NuAire 12 Series User manual

NuAire

NuAire 12 Series User manual

NuAire MRXBOX95-HUM Instruction Manual

NuAire

NuAire MRXBOX95-HUM Instruction Manual

NuAire Ecosmart Connect ESCO-CO2D Instruction Manual

NuAire

NuAire Ecosmart Connect ESCO-CO2D Instruction Manual

NuAire ES-RH User manual

NuAire

NuAire ES-RH User manual

NuAire ESCO-CO2D User manual

NuAire

NuAire ESCO-CO2D User manual

Popular Accessories manuals by other brands

Quincy lab 140AE-1 operating manual

Quincy lab

Quincy lab 140AE-1 operating manual

HomePro ZIR000 user manual

HomePro

HomePro ZIR000 user manual

DOL 20SCR Technical user guide

DOL

DOL 20SCR Technical user guide

RAB Smart Task installation manual

RAB

RAB Smart Task installation manual

Kemppi KMS 300 quick guide

Kemppi

Kemppi KMS 300 quick guide

Stearns 57,500 Series Installation and service instructions

Stearns

Stearns 57,500 Series Installation and service instructions

iGuzzini TWILIGHT COPENAGHEN manual

iGuzzini

iGuzzini TWILIGHT COPENAGHEN manual

Adelaide Annexe & Canvas Avan Deluxe installation guide

Adelaide Annexe & Canvas

Adelaide Annexe & Canvas Avan Deluxe installation guide

OHAUS 5000 instruction manual

OHAUS

OHAUS 5000 instruction manual

HOME8 WLS1300 quick start guide

HOME8

HOME8 WLS1300 quick start guide

MAXBOTIX MaxSonar quick start guide

MAXBOTIX

MAXBOTIX MaxSonar quick start guide

ioSmart iSmart56 Installation and user guide

ioSmart

ioSmart iSmart56 Installation and user guide

Focusrite Scarlett 18i8 user guide

Focusrite

Focusrite Scarlett 18i8 user guide

Velleman ED38105 user manual

Velleman

Velleman ED38105 user manual

JumpSport SkyBounce user manual

JumpSport

JumpSport SkyBounce user manual

Prima-Temp PRIYA Instructions for use

Prima-Temp

Prima-Temp PRIYA Instructions for use

Tefcold BC85I-BC85I W user manual

Tefcold

Tefcold BC85I-BC85I W user manual

Vaisala WMS302 user guide

Vaisala

Vaisala WMS302 user guide

manuals.online logo
manuals.online logoBrands
  • About & Mission
  • Contact us
  • Privacy Policy
  • Terms and Conditions

Copyright 2025 Manuals.Online. All Rights Reserved.