Nuna Norr User manual


Designed
around your life

1
2
1
2 3
1
2 3
A
I
R
B
A
G
1 2
3
4
5
12
2
6
1
3
7
8
9
2
2
1
12

14
15
17
1610
12
11
1
2
13
2
1
18
19
20
21
1

23
28
22
26 29
27
24
25
30
31

2
NORR instructions
EN
Contents
Product information
Product Registration 3
Warranty 3
Contact 4
Child Usage Requirements 4
For Use with Base 5
Parts List 7
Warnings 8
Product Use 13
Cleaning and Maintenance 19
French (FR) 21
Dutch (NL) 41
German (DE) 61
Italian (IT) 81
Spanish (ES) 101
Polish (PL) 121
Portuguese (PT) 141
Czech (CZ) 163
Slovak (SK) 183
IMPORTANT!
KEEP THESE
INSTRUCTIONS FOR
FUTURE REFERENCE:
READ CAREFULLY

43 NORR instructions NORR instructions
EN
EN
Product Information
Model Number:_______________________________________________________
Manufactured Date: ________________________________________________
Product Registration
Please fill in the above information. The model
number and the manufactured in date are located on
the bottom of the NORR.
To register your product please visit:
www.nunababy.com/register-gear
Warranty
We have purposely designed our high-quality
products so that they can grow with both your child
and your family. Because we stand by our product,
our gear is covered by a custom warranty per product,
starting from the day it was purchased. Please
have the proof of purchase, model number and
manufactured in date available when you contact us.
For warranty information please visit:
www.nunababy.com/warranty
Installation
Mode InstallationRecline
Position
1-7
Baby
mode
Child height 40cm–105cm/
Child weight≤18.5kg
Contact
For replacement parts, service, or additional warranty
questions, please contact our customer service
department.
info@nunababy.com
www.nunababy.com
In the United Kingdom
infouk@nunababy.com
www.nunababy.com
NUNA International B.V.
Van der Valk Boumanweg 178 C
2352JD Leiderdorp
The Netherlands
Child Usage Requirements
This product is suitable for use with children who
meet the following requirements:
Rearward Facing:
Child height 40cm-105cm / Child weight<=18.5kg

65 NORR instructions NORR instructions
EN
EN
For use with base
1 According to the Regulation No.129/02, the
enhanced child restraint with base is a Universal
ISOFIX Class D Enhanced Child Restraint and
should be fitted using the ISOFIX connections.
2 This is an "i-Size" Enhanced child restraint
System. It is approved to Regulation No.129/02,
for use in, "i-Size compatible" vehicle seating
positions as indicated by vehicle manufacturers in
the vehicle users’ manual.
3 If in doubt, please consult the enhanced child
restraint manufacturer or the retailer.
i-Size UNIVERSAL
ISOFIX
Rearward facing
40cm-105cm
≤18.5kg
020509
Regulation
No.129/02
This is an i-Size ISOFIX Enhanced Child Restraint
SYSTEM. It is approved to Regulation No.129/02
series of amendments, not all vehicle manufacture's
handbooks list i-Size compatibility yet. This enhanced
child restraint and base is also approved for use
in ISOFIX compatible vehicles. Please refer to the
vehicle manufacturer's website or consult your dealer.
It will fit vehicles with positions approved as
i-Size ISOFIX positions (as detailed in the vehicle
handbook), depending on the category of the
enhanced child restraint and of the fixture. If in
doubt, consult either the enhanced child restraint
manufacturer or vehicle manufacturer.

87 NORR instructions NORR instructions
EN
EN
1 Head Support
2 Infant Insert
3 Seat Pad
4 Adjustment Webbing
5 Rotating Button
6 ISOFIX Releasing
Button
7 Load Leg Adjustment
Button
8 Load Leg
9 Load Leg Adjustment
Button
10 Recline Adjustment
Button
11 Shoulder Strap
12 Rebound Bar
13 ISOFIX Connector
14 Head Support
Adjustment Lever
15 Load Leg Indicator
16 ISOFIX Guides
17 2nd Seat Pad
18 Buckle holder
Parts List WARNING
NO enhanced child restraint can guarantee
full protection from injury in an accident.
However, proper use of this enhanced child
restraint will reduce the risk of serious injury
or death to your child.
To use this enhanced child restraint with
the ISOFIX connections according to the
Regulation No.129/02, your child must meet
the following requirements.
Rearward Facing: Child height 40cm–
105cm/ Child weight≤18.5kg;
Any straps of enhanced child restraint
should be tightened and not twisted.
The soft goods should not be replaced with
any besides the ones recommended by the
manufacturer. The soft goods constitute an
integral part of the enhanced child restraint
performance.
Be sure that the enhanced child restraint
is installed in such a way that no part of
it interferes with movable seats or in the
operation of vehicle doors.
Remove this enhanced child restraint from
the vehicle seat when it is not in regular use.
16
17
1
2
3
4
10
9
8
7
6
5
11
18
12
15
14
13

109NORR instructions NORR instructions
EN
EN
Consult the distributor for issues concerning
maintenance, repair and part replacement.
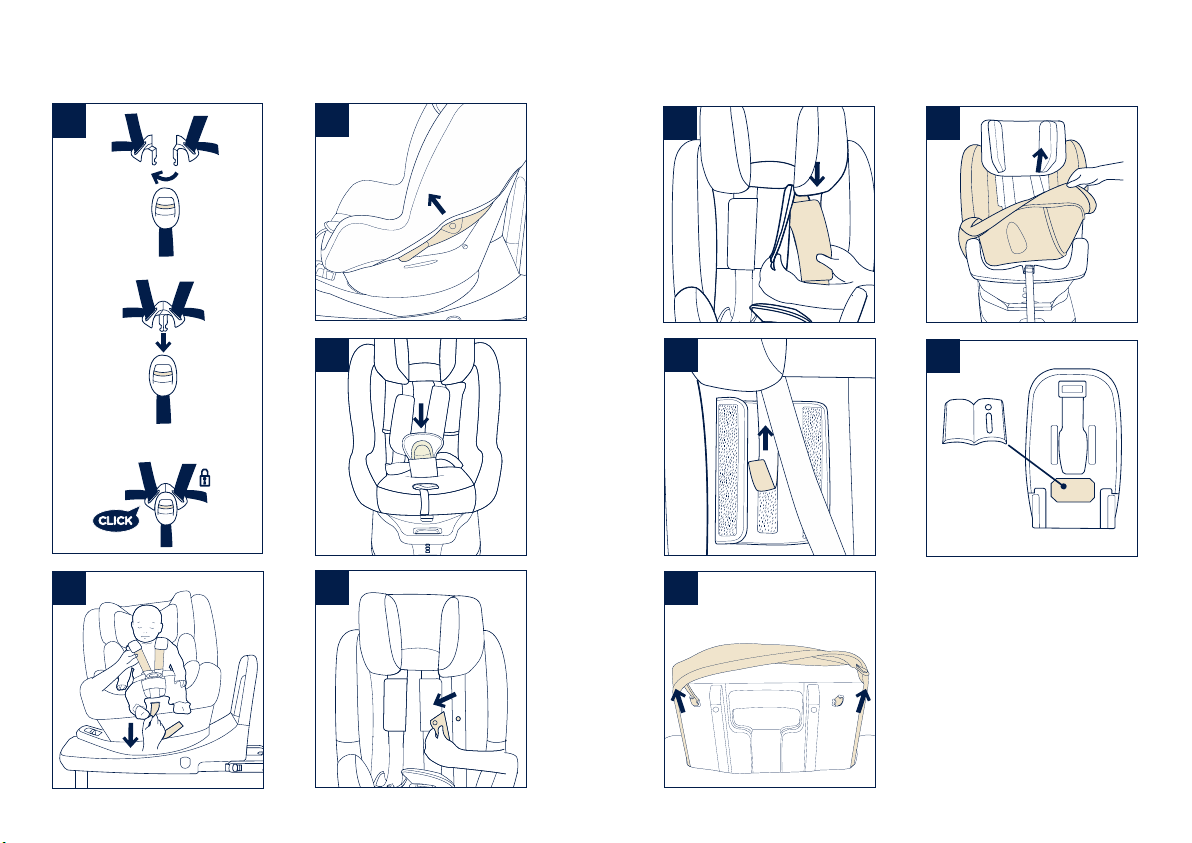
To avoid the risk of falling out, always secure
the child using the safety harness when the
child is placed in enhanced child restraint,
even when the enhanced child restraint is
not in the vehicle.
Before carrying the enhanced child restraint
by hand, ensure that the child is fastened
with the safety harness, and that the handle
is correctly locked in a vertical position.
To avoid serious injury or death, NEVER
place enhanced child restraint on elevated
surface seat with child in it.
The parts of this enhanced child restraint
should not be lubricated in any way.
Always secure child in enhanced child
restraint, even on short trips, as this is when
most accidents occur.
Please keep this enhanced child restraint
away from sunlight, otherwise it may be
too hot for child’s skin. Always touch the
enhanced child restraint before placing child
in it.
Frequently check the ISOFIX guides for dirt
and clean them if necessary. Reliability can
be effected by ingress of dirt, dust, food
particles etc.
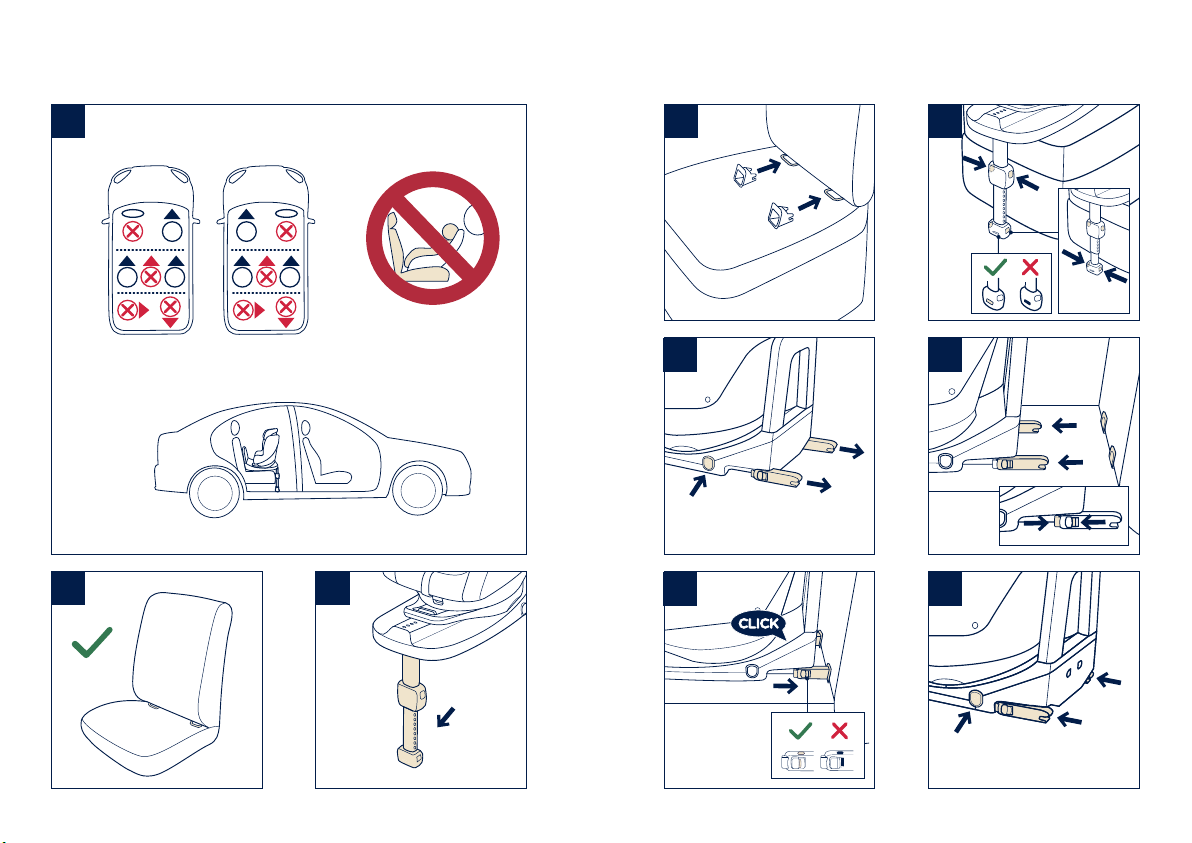
Correct Installation is only permitted by use
of the ISOFIX connectors.
After your child is placed in this enhanced
child restraint, the child harness must be
used correctly, and ensure that any lap strap
is worn low down, so that the pelvis is firmly
engaged.
Must use the rebound bar.
The child restraint may not fit in all approved
vehicles when used in one of these positions.
NEVER use a second-hand enhanced child
restraint or an enhanced child restraint
whose history you do not know because they
may have structural damage that endangers
your child’s safety.
NEVER use ropes or any other substitutes to
secure enhanced child restraint in vehicle or
to secure child into enhanced child restraint.
NEVER leave your child unattended with this
enhanced child restraint.
DO NOT place any objects in the load leg
area in front of your enhanced child restraint.

1211 NORR instructions NORR instructions
EN
EN
DO NOT use any load bearing contact
points other than those described in the
instructions and marked on the enhanced
child restraint.
DO NOT install this enhanced child restraint
without following the instructions in this
manual or you may put your child at serious
risk of injury or death.
DO NOT make any modification to this
enhanced child restraint or use it along with
component parts from other manufacturers.
DO NOT use this enhanced child restraint if
it has damaged or missing parts.
DO NOT have your child in large/oversized
clothes because this may prevent your child
from being properly and securely fastened
by the shoulder harness straps and the
crotch strap between the legs.
DO NOT leave this enhanced child restraint
or other items unbelted or unsecured in your
vehicle because an unsecured enhanced
child restraint can be thrown around and
may injure occupants in a sharp turn, sudden
stop, or collision.
DO NOT place rear-facing enhanced child
restraint on frontal seat with air bag. Death
or serious injury may occur. Please reference
vehicle owner’s manual for more information.
DO NOT use this enhanced child restraint
without the soft goods.
DO NOT put anything other than the
recommended inner cushions in this
enhanced child restraint.
DO NOT continue to use this enhanced
child restraint after it has suffered any
type of crash, even a minor one. Replace
immediately as there may be invisible,
structural damage from the crash.

1413 NORR instructions NORR instructions
EN
EN
Product Use
DO NOT install this enhanced child restraint on
vehicle seats that face sideways (1) or rearward (1)
with respect to the moving direction of the vehicle.
DO NOT place rear-facing enhanced child restraint
on front seat with air bag. Death or serious injury may
occur. (1) Please reference vehicle owner’s manual for
more information.
It is recommended to install this enhanced child
restraint on the rear vehicle seat. (1)
This enhanced child restraint is suitable for vehicle
seats with i-Size ISOFIX anchor points. (2)
DO NOT install this enhanced child restraint on
vehicle seats unstable during installation.
Installation
1 - Unfold the load leg from the storage
compartment. (3)
2 - Fit the ISOFIX guides into the ISOFIX anchor
points. (4) The ISOFIX guides can protect the
surface of the vehicle seat from being torn. They
will also guide the ISOFIX connectors.
3 - Press the ISOFIX release button on either side of
the base, then pull out the ISOFIX connectors. (5)
4 - Line up the ISOFIX connectors with the ISOFIX
guides, and then click both ISOFIX connectors
into the ISOFIX anchor points. (6)
Make sure that both ISOFIX connectors are securely
attached to their ISOFIX anchor points. There should
be two audible clicks and the colors of the indicators
on the both ISOFIX connectors should be completely
green. (6)-1
Check to make sure the enhanced child restraint
is securely installed by pulling on the both ISOFIX
connectors.
5 - There are 9 adjustable positions for ISOFIX. Press
the ISOFIX release button and push the base back
against the vehicle seat until tight.
6 - After placing the enhanced child restraint on the
vehicle seat, extend the load leg to floor. (7) The
load leg indicator will show green when installed
correctly, red means it is installed incorrectly. (7)
The load leg has 24 positions. When the load leg
indicator shows red this means the load leg is in the
wrong position.
Make sure the load leg is secure by pressing
down on the front of the enhanced child restraint.
To shorten the load leg, squeeze the load leg
release button and pull the load leg upwards.
7 - To remove the enhanced child restraint, press
the ISOFIX release button (5)-1 and pull the
base away from the seat, then while squeezing
the button and secondary lock on the ISOFIX
connectors remove from the vehicle. (8)

1615 NORR instructions NORR instructions
EN
EN
8 - Press the ISOFIX release button to store the
ISOFIX. (9)
The completely assembled enhanced child restraint is
shown as (10).
Recline Adjustment
Squeeze the recline adjustment button (11)-1, to adjust
the enhanced child restraint to the proper position.
The recline angles are shown as (11).
Please recheck the load leg position after reclining.
There are 7 recline angles for baby mode.
Rearward Facing Mode Only
Rearward Facing Child height 40cm-105cm/
Child weight≤18.5kg
Recline position Position 1-7
1 - Press the rotating button to rotate the seat facing
the rear of the vehicle. (12) (13)
Please recline the seat to be in positions 3
through 7 for ease of rotation.
2 - Rearward facing mode assembled as (13).
The ISOFIX connectors must be attached and
locked onto the ISOFIX anchor points. (13)-1
The load leg must be installed correctly with
green indicator. (13)-2
Height Adjustment
for Head Support and Shoulder Harnesses
Check that Shoulder Harness Straps are set at the
proper height.
Shoulder Harness Straps must be at a height nearest
to your childs shoulders (14), but not above the
shoulder line. (15)
If the Shoulder Harness Straps are not at the proper
height, the child might be ejected the enhanced child
restraint if there is a crash.
Squeeze the head support adjustment lever (16),
while pulling up or down on the head support until it
snaps into one of the 8 positions. The head support
positions are shown as (17).
Securing Child
Rotate the seat to the side to make it easier to put in
or carry out the baby. (23) After the child is placed
into the seat, check whether the Shoulder Harness
Straps are at proper height. Please rotate the seat
backwards and lock it after fixing the baby.
1 - While pressing the adjustment button located at
the front of the enhanced child restraint, pull the
two Shoulder Harness Straps of the enhanced
child restraint. (18)
2 - Unlock the buckle of the harnesses by pressing
the red button. (19)

1817 NORR instructions NORR instructions
EN
EN
3 - Fix the buckles on the both sides of seat to make
placing the baby more convenient. (20)
4 - Use Infant Insert.
Infant insert is for children’s protection. (21)
5 - Place the child into the enhanced child restraint
and lock the buckle. Please refer to (22).
6 - Tighten the shoulder harness straps by pulling the
adjustment webbing. (23)
Make sure the space between the child and the
Shoulder Harness Straps is about the thickness of
one hand.
1
2
Detach Soft Goods
1 - Open the buckle, then remove the infant insert.
2 - Open the snaps. (24)
3 - Push the crotch strap through the crotch strap
opening. (25)
4 - Detach the snaps on the main seat pad behind
shoulder harnesses. (26) Place the shoulder
harnesses behind the flap below the headrest.
(27)
5 - Detach the hook and loop fasteners to remove the
shoulder belt cover. (28)
6 - Unfasten the elastic on the back of headrest to
remove the head support soft goods. (29)
7 - Remove the soft goods. (30)
To assemble winter and summer soft goods
according to reversed steps above.
Please keep the instruction manual in the storage
compartment at the bottom of the enhanced child
restraint (31).
Remove the head
support portion of the
infant insert when the
child’s head no longer
fits comfortably.
We recommend
using the full infant
insert while the baby
is under 60 cm or
until they outgrow
the insert. The infant
insert increases side
impact protection.
Detach the snaps
on the head support
to remove the head
portion of the insert.
Remove wedge by
detaching the snaps to
allow more space when
the infant does not fit
comfortably.
Remove the body portion
of the infant insert when
the infant’s shoulders no
longer fit comfortably.
The wedge can be
used separately
without being
attached to the
insert to bolster the
infant’s back for more
comfort.

2019 NORR instructions NORR instructions
EN
EN
Cleaning and Maintenance
After removing the wedge from the insert, please
store it somewhere that the child cannot access it.
Please wash the bottom seat pad and the top seat
cover with cold water under 30°C.
Do not iron the soft goods.
Do not bleach or dry clean the soft goods.
Do not use undiluted detergents, gasoline or other
organic solvents to wash the enhanced child restraint.
It may cause damage to the product.
Use only mild detergent, water and a soft cloth to
clean the enhanced child restraint shell, handle and
harness straps.
Do not twist the soft goods to dry with great force. It
may leave the soft goods with wrinkles.
Please hang dry the soft goods in the shade.
Please remove the enhanced child restraint from the
vehicle seat if not in use for a long period of time. Put
the enhanced child restraint in a cool, dry place and
somewhere your child can not access it.
©2019 NUNA International B.V. Nuna and all associated logos are trademarks.

2221 Instructions NORR Instructions NORR
FR
FR
Table des matières
Informations sur le produit
Enregistrement du produit 23
Garantie 23
Contact 24
Exigences d'utilisation avec un enfant 24
Utilisation avec la base 25
Liste des pièces 27
Avertissements 28
Utilisation du produit 33
Nettoyage et entretien 39
IMPORTANT !
CONSERVEZ CES
INSTRUCTIONS POUR
CONSULTATION
ULTÉRIEURE !
LIRE ATTENTIVEMENT

2423 Instructions NORR Instructions NORR
FR
FR
Informations sur le produit
Numéro de modèle :________________________________________________
Date de Fabrication : _______________________________________________
Enregistrement du produit
Veuillez indiquer les informations ci-dessus. Le
numéro de modèle et la date de fabrication se situent
sur la partie inférieure du NORR.
Pour enregistrer votre produit, veuillez vous rendre sur
le site suivant :
www.nunababy.com/register-gear
Garantie
Nous avons conçu spécialement nos produits de
haute qualité afin qu'ils puissent accompagner le
développement de votre enfant et de votre famille.
Nous soutenons notre produit en couvrant notre
matériel par une garantie personnalisée, commençant
le jour de son achat. Veuillez disposer de la preuve
d'achat, du numéro de modèle et de la date de
fabrication lorsque vous nous contactez.
Pour des informations sur la garantie, veuillez vous
rendre sur le site suivant :
www.nunababy.com/warranty
Contact
Pour des demandes de pièces de rechange, de
service ou des questions supplémentaires sur la
garantie, veuillez contacter notre service client.
info@nunababy.com
www.nunababy.com
Exigences d’utilisation
avec un enfant
Ce produit convient aux enfants répondant aux
exigences suivantes :
Dos à la route :
Taille entre 40 cm-105 cm / Poids ≤ 18,5 kg
Mode
d'installation
Mode
bébé Taille entre 40 cm-105 cm /
Poids ≤18,5 kg
Installation Position
inclinée
1-7

2625 Instructions NORR Instructions NORR
FR
FR
Utilisation avec la base
1Conformément à la réglementation No. 129/02, le
siège bébé amélioré avec base est un siège bébé
amélioré ISOFIX universel de classe D et doit être
installé avec des connexions ISOFIX.
2Il s'agit d'un système de siège bébé amélioré
« i-Size ». Son utilisation est approuvée par la
réglementation No. 129/02, pour des positions de
sièges de véhicules « compatibles i-Size » comme
indiqué dans le manuel de l'utilisateur du véhicule
fourni par le constructeur.
3En cas de doute, veuillez consulter le fabricant ou
revendeur du siège bébé amélioré.
i-Size UNIVERSEL
ISOFIX
Orientation dos à la
route
40 cm-105 cm
≤ 18,5 kg
020509
Réglementation
No. 129/02
Il s'agit d'un SYSTÈME de siège bébé amélioré ISOFIX
i-Size. Il est approuvé selon la série d'amendements
de la réglementation No. 129/02, tous les manuels
des constructeurs automobiles ne mentionnent
pas encore une compatibilité i-Size. Ce siège bébé
amélioré et cette base sont également approuvés
pour une utilisation dans des véhicules compatibles
ISOFIX. Veuillez vous reporter au site Web du
constructeur de votre voiture ou consulter votre
revendeur.
Il convient aux véhicules avec des positions
approuvées en tant que positions ISOFIX i-Size (telles
que détaillées dans le manuel du véhicule), selon la
catégorie du siège bébé amélioré et de la fixation. En
cas de doute, veuillez consulter le fabricant du siège
bébé amélioré ou le constructeur du véhicule.

2827 Instructions NORR Instructions NORR
FR
FR
1 Support de tête
2 Insert pour bébé
3 Coussin de siège
4 Sangle de réglage
5 Bouton de rotation
6 Bouton de
déverrouillage ISOFIX
7 Bouton de réglage du
piètement de charge
8 Piètement de charge
9 Bouton de réglage du
piètement de charge
10 Bouton de réglage de
l'inclinaison
11 Sangle pour épaules
12 Barre de rebond
13 Connecteur ISOFIX
14 Levier de réglage du
support de tête
15 Indicateur du
piètement de charge
16 Guides ISOFIX
17 2ème coussin de siège
18 Support de boucle
Liste des pièces AVERTISSEMENT
AUCUN siège bébé amélioré ne peut
garantir une protection complète contre les
blessures en cas d'accident. Cependant, une
bonne utilisation de ce siège bébé amélioré
réduira les risques de blessures sérieuses ou
de mort pour votre enfant.
Pour utiliser ce siège bébé amélioré avec
les connexions ISOFIX conformément à la
réglementation No. 129/02, votre enfant doit
respecter les exigences suivantes.
Dos à la route : Taille entre 40 cm-105 cm /
Poids ≤ 18,5 kg ;
Les sangles du siège bébé amélioré doivent
être serrées sans torsion.
Les pièces souples ne doivent pas être
remplacées par d'autres que celles
recommandées par le fabricant. Les
pièces souples font entièrement partie des
performances du siège bébé amélioré.
Assurez-vous que le siège bébé amélioré est
installé de sorte qu'aucune partie ne gêne
les sièges amovibles ou le fonctionnement
des portes du véhicule.
16
17
1
2
3
4
10
9
8
7
6
5
11
18
12
15
14
13

3029 Instructions NORR Instructions NORR
FR
FR
Retirez ce siège bébé amélioré du siège
du véhicule si vous ne l'utilisez pas
régulièrement.
Consultez le distributeur pour tout ce qui est
maintenance, réparation et remplacement de
pièces.
Pour éviter les risques de chute, attachez
toujours l'enfant avec le harnais de sécurité
lorsque l'enfant est placé dans le siège
bébé amélioré, même lorsque le siège bébé
amélioré n'est pas dans le véhicule.
Avant de transporter le siège bébé amélioré
à la main, vérifiez que l'enfant est attaché
avec le harnais de sécurité et que la poignée
est bien verrouillée en position verticale.
Pour éviter tout risque de blessures graves
ou de mort, ne placez JAMAIS le siège bébé
amélioré sur une surface élevée avec l'enfant
dedans.
Les pièces de ce siège bébé amélioré ne
doivent en aucun cas être lubrifiées.
Attachez toujours l'enfant dans le siège bébé
amélioré, même pour de courts trajets, car
il s'agit du moment où le plus d'accidents
surviennent.
Veuillez conserver ce siège bébé amélioré à
l'écart de la lumière du soleil, car il pourrait
devenir trop chaud pour la peau de l'enfant.
Touchez toujours le siège bébé amélioré
avant de placer l'enfant dedans.
Vérifiez régulièrement la présence de
poussière sur les guides ISOFIX et nettoyez-
les si nécessaire. La fiabilité peut être
affectée par l'infiltration de poussière,
saletés, particules de nourriture, etc.
Une bonne installation n'est permise qu'avec
des connecteurs ISOFIX.
Une fois votre enfant placé dans ce siège
bébé amélioré, le harnais pour enfant doit
être utilisé correctement, en vérifiant que les
sangles de taille sont bien placées en bas,
afin que le bassin soit bien engagé.
La barre de rebond doit être utilisée.
Le dispositif de retenue pour enfants
ne s’adapte peut être pas dans tous les
véhicules homologués s’il est utilisé dans
l’une de ces positions.
N'utilisez JAMAIS un siège bébé amélioré
d'occasion ou dont vous ne connaissez pas
l'historique, car de tels sièges pourraient
présenter des dommages structurels
mettant la sécurité de votre enfant en
danger.
Table of contents
Languages:
Other Nuna Car Seat manuals