Nuna PIPA next User manual

IMPORTANT!
THIS SHORT
INSTRUCTION IS FOR
OVERVIEW ONLY.
FOR MAXIMUM
PROTECTION
AND COMPLETE
INFORMATION IT
IS ESSENTIAL TO
READ AND FOLLOW
THE INSTRUCTION
MANUAL OF THE CAR
SEAT CAREFULLY.

2
2
1
click
click
1
5
2
3
4
1
2 3
1
2 3
1
1
6
1
2
7
12
8
2

2
PIPA next base instructions
EN
Designed
around your life
Product Information
Model Number:_______________________________________________________
Manufactured Date: ________________________________________________
Product Registration
Please fill in the above information. The model number and the
manufactured in date are located on the bottom of PIPA next base.
To register your product please visit:
www.nunababy.com/register-gear
Warranty
We have purposely designed our high-quality products so that they
can grow with both your child and your family. Because we stand by
our product, our gear is covered by a custom warranty per product,
starting from the day it was purchased. Please have the proof of
purchase, model number and manufactured in date available when
you contact us.
For warranty information please visit:
www.nunababy.com/warranty
Contact
For replacement parts, service, or additional warranty questions,
please contact our customer service department.
info@nunababy.com
www.nunababy.com
In the United Kingdom:
infouk@nunababy.com
www.nunababy.com
NUNA International B.V.
Van der Valk Boumanweg 178 C
2352JD Leiderdorp
The Netherlands

43 PIPA next base instructions PIPA next base instructions
EN
EN
1 “i-Size” (Integral Universal ISOFIX Enhanced
Child Restraint Systems) is a category of
Enhanced Child Restraint System primarily
designed for use in all i-Size seating position of a
vehicle.
2 According to the UN Regulation No. 129, the
Enhanced Child Restraint with base is a Universal
ISOFIX ISO/R2 Enhanced Child Restraint and
should be fitted using the ISOFIX connections.
3 This is an "i-Size" Enhanced Child Restraint
System. It is approved according to UN
Regulation No. 129, for use in, i-Size compatible
vehicle seating positions as indicated by vehicle
manufacturers in the vehicle users’ manual.
4 If in doubt, consult either the Enhanced Child
Restraint System manufacturer or the retailer.
R129-030526
UN Regulation
No.129/03
i-Size
universal
ISOFIX
PIPA next
40cm-83cm / ≤13kg
PIPA next + Base
R129-030526
For Use with Base WARNING
Failure to follow these warnings and
instructions could result in serious injury or
death.
For proper protection of your child, it is
important to use and install PIPA next base
according to the instructions given in this
manual.
This short instruction is for overview only.
For maximum protection and complete
information it is essential to read and follow
the instruction manual of PIPA next carefully.
PIPA next base is only compatible with PIPA
next car seat.

65 PIPA next base instructions PIPA next base instructions
EN
EN
Parts List
Make sure all parts are available before assembly. The
infant carrier module and base can be sold separately.
If any part is missing, please contact Nuna (see page
2 for information). No tools are required for assembly.
1ISOFIX Connector
2ISOFIX Guides
3Load Leg Adjust
Button
4Side Impact Shield
5ISOFIX Adjust Button
6Infant Carrier Module
Release Button
7Load Leg Indicator
8Instruction
Manual Storage
Compartment
46
8
7
1
3
2
5
Product Use
Installation Concerns
DO NOT install this enhanced child restraint on vehicle
seats that face sideways or rearward with respect to
the moving direction of the vehicle. (1)
Installation
1Unfold the load leg from storage compartment.
(2)
2Fit the ISOFIX guides with the ISOFIX anchor
points. (3) The ISOFIX guides can protect the
surface of the vehicle seat from being torn. They
can also guide the ISOFIX connectors.
3Press the ISOFIX Adjust Button to adjust the
ISOFIX connectors. (4)
4Line up the ISOFIX connectors with the ISOFIX
guides, and then click both ISOFIX connectors
into the ISOFIX anchor points. (5)
Make sure that both ISOFIX connectors are
securely attached to their ISOFIX anchor points.
There should be two audible clicks and the colors
of the indicators on the both ISOFIX connectors
should be completely green. (5)-1
Check to make sure the base is securely installed
by pulling on the both ISOFIX connectors.

7PIPA next base instructions
EN
5After placing the base on the vehicle seat,
extend the load leg to floor (6). When the load
leg indicator shows green means it is installed
correctly, red means it is installed incorrectly.
(6)-2
The load leg has 19 positions. When the load leg
indicator shows red this means the load leg is in
the wrong position.
Make sure the load leg is in full contact with the
vehicle floor pan.
To shorten the load leg, squeeze the load leg
release button and pull the load leg upwards.
(6)-1
The completely assembled base is shown as (7).
The ISOFIX connectors must be attached and
locked onto the ISOFIX anchor points. (7)-1
The load leg must be installed correctly with
green indicator. (7)-2
6To remove the base, press the secondary lock
button (8)-1 first and then the button (8)-2 on the
latch connectors before removing the base from
the vehicle seat.
7Press the ISOFIX adjust button to fold the ISOFIX.
NUNA International B.V. Nuna and all associated logos are trademarks.
IMPORTANT !
CES INSTRUCTIONS
COURTES SERVENT
UNIQUEMENT DE
VUE D’ENSEMBLE.
POUR UNE
PROTECTION
MAXIMALE ET UNE
INFORMATION
COMPLÈTE, IL EST
ESSENTIEL DE LIRE
ET DE RESPECTER
SCRUPULEUSEMENT
LE MANUEL
D’INSTRUCTIONS
DU SIÈGE AUTO.

Informations sur le produit
Numéro de modèle :________________________________________________
Date de fabrication :________________________________________________
Enregistrement du produit
Veuillez fournir les informations ci-dessus. Le numéro de modèle et
la date de fabrication se situent en bas du base PIPA next.
Pour enregistrer votre produit, veuillez vous rendre sur le site
suivant :
www.nunababy.com/register-gear
Garantie
Nous avons conçu spécialement nos produits de haute qualité afin
qu'ils puissent accompagner le développement de votre enfant et
de votre famille. Nous soutenons notre produit en couvrant notre
matériel par une garantie personnalisée, commençant le jour de
son achat. Ayez la preuve d'achat, le numéro de modèle et la date
de fabrication à disposition lorsque vous nous contactez.
Pour des informations sur la garantie, veuillez visiter :
www.nunababy.com/warranty
Contact
Pour des informations sur les pièces de rechange, le service ou des
questions supplémentaires sur la garantie, veuillez contacter notre
service client.
info@nunababy.com
www.nunababy.com
1 « i-Size » (Systèmes de retenue pour enfants
améliorés ISOFIX universels intégrés) est une
catégorie de systèmes de retenue pour enfants
améliorés principalement conçus pour être
utilisés dans toutes les positions d'assise i-Size
d'un véhicule.
2 Conformément à la réglementation UN n°129, le
dispositif de retenue pour enfants amélioré avec
base est un dispositif de retenue pour enfants
amélioré ISOFIX ISO/R2 universel et doit être
installé avec des connexions ISOFIX.
R129-030526
UN Regulation
No.129/03
i-Size
universal
ISOFIX
PIPA next
40cm-83cm / ≤13kg
PIPA next + Base
R129-030526
Pour une utilisation avec la
base
109Instructions pour la base PIPA next Instructions pour la base PIPA next
FR
FR

3 Il s'agit d'un dispositif de retenue pour enfants
amélioré "i-Size". Il est approuvé conformément
à la réglementation UN n°129 pour une utilisation
dans des positions de sièges de véhicules
compatibles i-Size comme indiqué par le
constructeur dans le manuel de l'utilisateur du
véhicule.
4 En cas de doute, consultez le fabricant du
dispositif de retenue pour enfants amélioré ou le
distributeur.
AVERTISSEMENT
Ne pas suivre ces avertissements et
instructions peut conduire à de sérieuses
blessures ou la mort.
Pour une protection appropriée de votre
enfant, il est important d’utiliser et d’installer
la base PIPA next conformément aux
instructions fournies dans ce manuel.
Ces instructions courtes servent uniquement
de vue d’ensemble. Pour une protection
maximale et une information complète,
il est essentiel de lire et de respecter
scrupuleusement le manuel d’instructions de
PIPA next.
La base PIPA next est compatible
uniquement avec le siège auto PIPA next.
Liste des pièces
Assurez-vous que toutes les pièces sont présentes
avant le montage. Le module de transport bébé et la
base peuvent être vendus séparément. Si une pièce
est manquante, veuillez contacter Nuna (voir la page
9 pour plus d'informations). Le montage ne nécessite
aucun outil.
1Connecteur ISOFIX
2Guides ISOFIX
3Bouton de réglage du
piètement de charge
4Dispositif de
protection contre les
chocs latéraux
5Bouton de réglage
ISOFIX
6Bouton de
déverrouillage du
module de transport
bébé
7Indicateur de
piètement de charge
8Compartiment de
rangement du manuel
d’instructions
46
8
7
1
3
2
5
1211 Instructions pour la base PIPA next Instructions pour la base PIPA next
FR
FR

Utilisation du produit
Problèmes liés à l'installation
N'installez PAS ce dispositif de retenue pour enfants
amélioré sur des sièges de véhicules orientés
latéralement ou dos à la route par rapport à la
direction de déplacement du véhicule. (1)
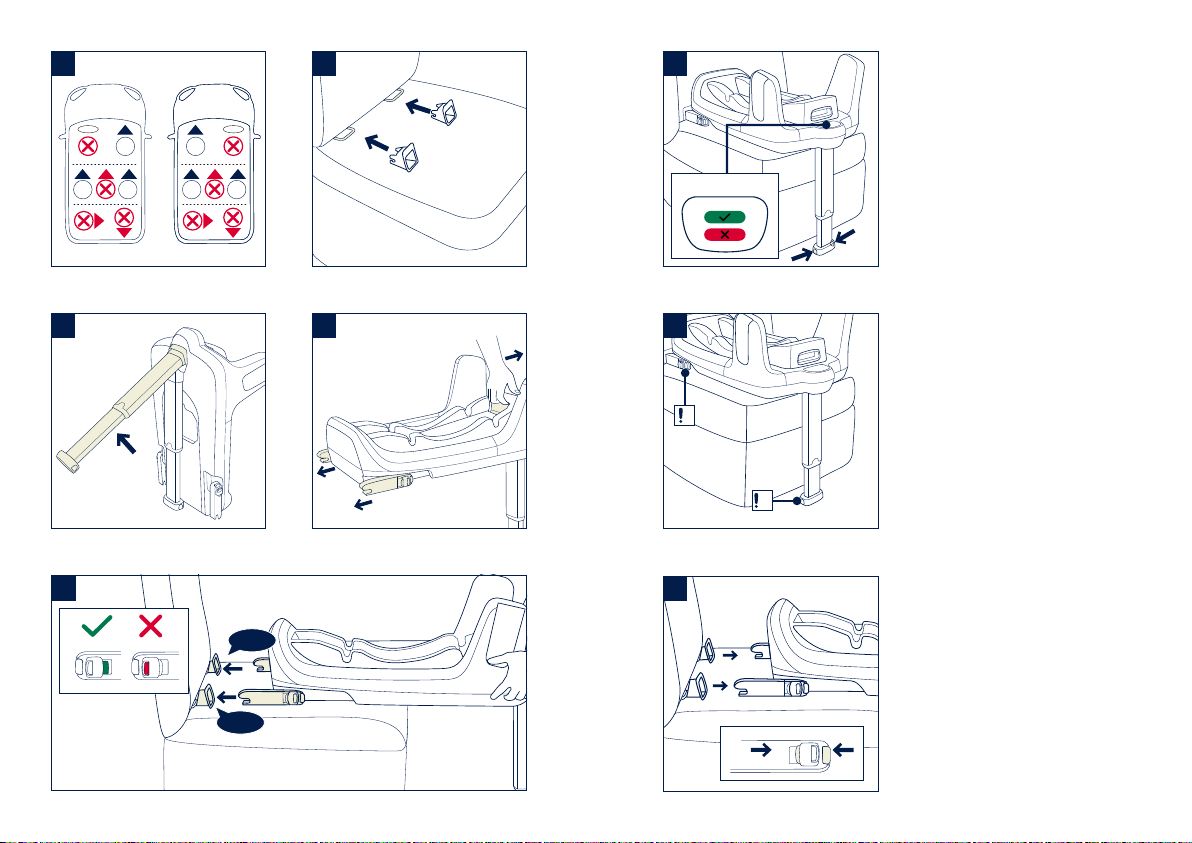
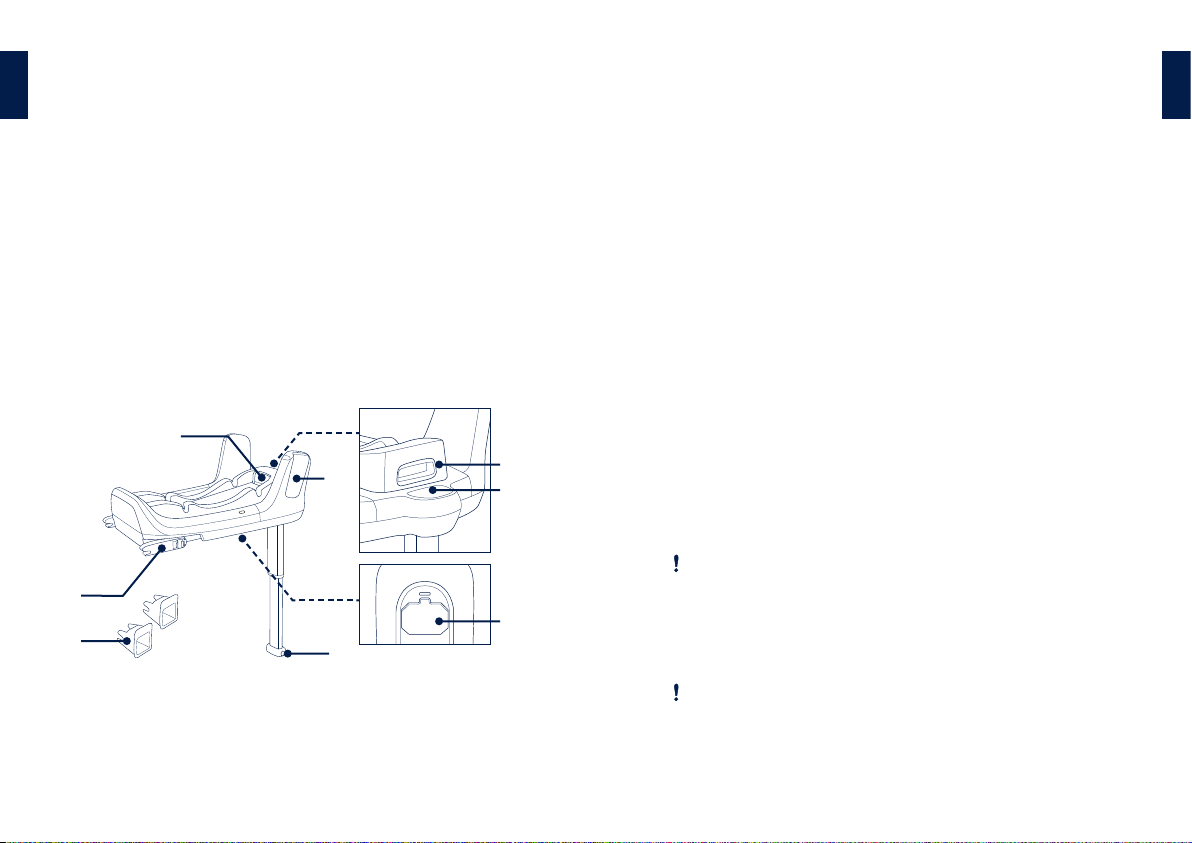
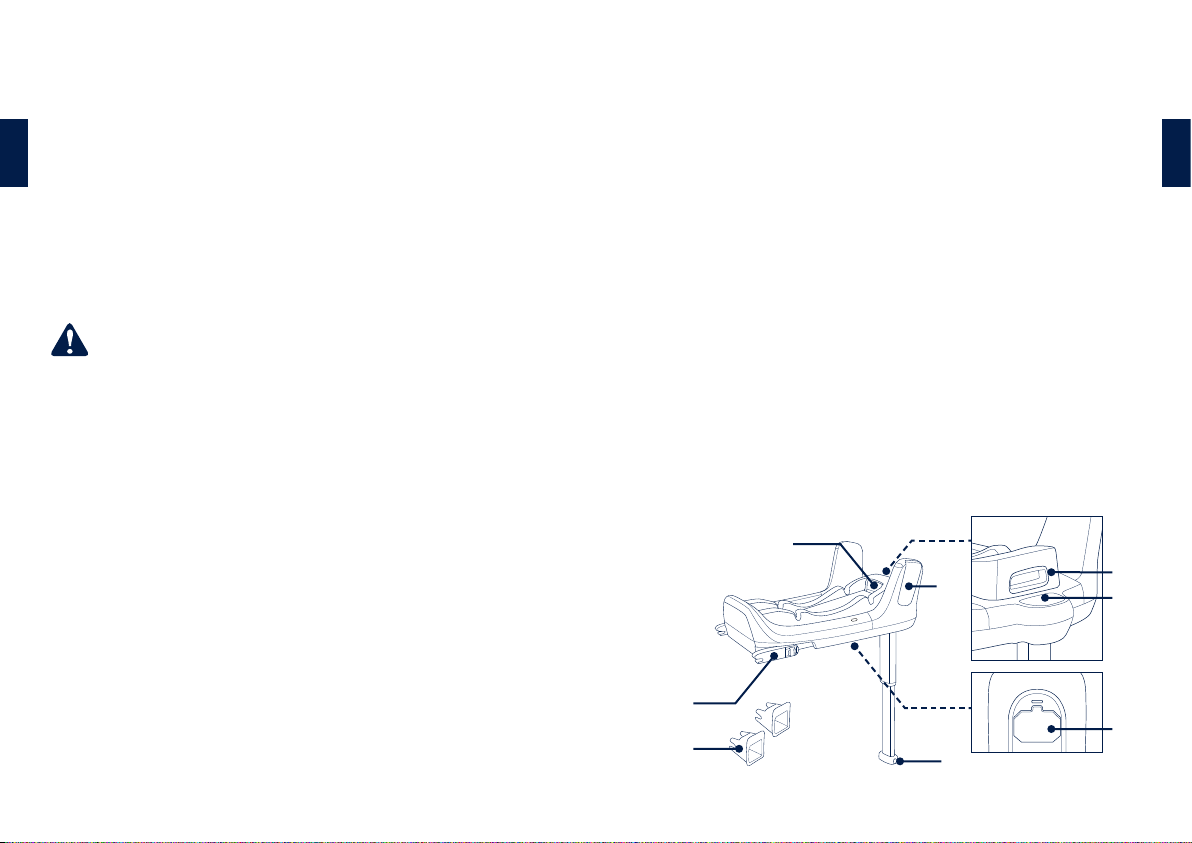
Installation
1Dépliez le piètement de charge du compartiment
de rangement. (2)
2Ajustez les guides ISOFIX sur les points
d'ancrage ISOFIX. (3) Les guides ISOFIX peuvent
protéger la surface du siège du véhicule contre
les déchirements. Ils peuvent aussi guider les
connecteurs ISOFIX.
3Appuyez sur le bouton de réglage ISOFIX pour
ajuster les connecteurs ISOFIX. (4)
4Alignez les connecteurs avec les guides ISOFIX,
puis enclenchez les deux connecteurs ISOFIX
dans les points d'ancrage ISOFIX. (5)
Vérifiez que les deux connecteurs ISOFIX sont
bien attachés aux points d'ancrage ISOFIX.
Vous devriez entendre deux clics audibles, et les
indicateurs des deux connecteurs ISOFIX doivent
être complètement verts. (5)-1
Vérifiez que la base est bien installée en tirant sur
les deux connecteurs ISOFIX.
5Après avoir placé la base sur le siège du véhicule,
étendez le piètement de charge jusqu'au plancher
(6). Si l'indicateur de piètement de charge est
vert, cela signifie qu'il est installé correctement.
L'indicateur rouge signifie qu'il est installé
incorrectement. (6)-2
Le piètement de charge propose 19 positions.
Lorsque l'indicateur de piètement de charge est
rouge, cela signifie que le piètement de charge
est dans une mauvaise position.
Vérifiez que le piètement de charge est
complètement en contact avec le plancher du
véhicule.
Pour raccourcir le piètement de charge, appuyez
sur le bouton de déverrouillage du piètement
de charge et tirez le piètement de charge vers le
haut. (6)-1
La base complètement assemblée est illustrée en
(7).
Les connecteurs ISOFIX doivent être attachés et
verrouillés sur les points d'ancrage ISOFIX. (7)-1
Le piètement de charge doit être installé
correctement avec l'indicateur vert. (7)-2
6Pour retirer la base, appuyez d'abord sur le
bouton de verrouillage secondaire (8)-1 puis sur le
bouton (8)-2 sur les connecteurs d’attache avant
de retirer la base du siège du véhicule.
7Appuyez sur le bouton de réglage ISOFIX pour
plier l'ISOFIX.
NUNA International B.V.
Nuna et tous les logos associés sont des marques déposées.
1413 Instructions pour la base PIPA next Instructions pour la base PIPA next
FR
FR

Wichtig!
Diese kurze Anleitung
dient nur als Übersicht.
Für maximalen Schutz
und alle Informationen
ist es wichtig, die
Bedienungsanleitung
von PIPA next
aufmerksam zu lesen
und zu befolgen.
Produktdaten
Modellnummer: ______________________________________________________
Fertigungsdatum: ___________________________________________________
Produktregistrierung
Bitte füllen Sie die obigen Informationen aus. Modellnummer und
Fertigungsdatum befinden sich auf der Unterseite der Basis des
PIPA next.
Bitte registrieren Sie Ihr Produkt unter:
www.nunababy.com/register-gear
Garantie
Wir haben unsere hochwertigen Produkte so entwickelt, dass Sie
mit Ihrem Kind und Ihrer Familie wachsen. Da wir uns durch unsere
Produkte hervorheben, ist unser Sortiment je nach Produkt durch
eine angepasste Garantie ab Kaufdatum abgedeckt. Bitte halten
Sie bei Kontaktaufnahme mit uns Kaufbeleg, Modellnummer und
Fertigungsdatum bereit.
Garantieinformationen finden Sie unter:
www.nunababy.com/warranty
Kontakt
Wenden Sie sich für Ersatzteile, Service und weitere
Garantiefragen an unseren Kundendienst.
info@nunababy.com
www.nunababy.com
16
Anweisungen zur Basis von PIPA next
DE

1 „i-Size“ (fortschrittliche Kinderrückhaltesysteme
mit integraler Universal-ISOFIX-Verankerung)
ist eine Kategorie fortschrittlicher
Kinderrückhaltesysteme primär entwickelt für
den Einsatz in allen i-Size-Sitzpositionen eines
Fahrzeugs.
2 Entsprechend der UN-Richtlinie Nr.129 ist
das fortschrittliche Kinderrückhaltesystem
mit Basis ein Universal-ISOFIX-ISO/R2-
Kinderrückhaltesystem und sollte mittels ISOFIX-
Verbindungen befestigt werden.
3 Dies ist ein fortschrittliches „i-Size“-
Kinderrückhaltesystem. Es ist gemäß UN-
Richtlinie Nr. 129 für die Verwendung in „i-Size“-
kompatiblen Fahrzeugsitzpositionen zugelassen,
wie vom Fahrzeughersteller im Handbuch Ihres
Fahrzeugs aufgeführt ist.
R129-030526
UN Regulation
No.129/03
i-Size
universal
ISOFIX
PIPA next
40cm-83cm / ≤13kg
PIPA next + Base
R129-030526
Für Verwendung mit der
Basis
4 Bitte wenden Sie sich im Zweifelsfall an
den Hersteller oder Händler des verstärkten
Kinderrückhaltesystems.
WARNUNG
Nichtbeachtung dieser Warnungen
und Anweisungen könnte zu schweren
Verletzungen oder zum Tode führen.
Für angemessenen Schutz Ihres Kindes
ist es wichtig, die Basis von PIPA next
entsprechend den Anweisungen in dieser
Anleitung zu verwenden und zu installieren.
Diese kurze Anleitung dient nur als
Übersicht. Für maximalen Schutz und
alle Informationen ist es wichtig, die
Bedienungsanleitung von PIPA next
aufmerksam zu lesen und zu befolgen.
Die Basis von PIPA next ist nur mit dem
Autositz von PIPA next kompatibel.
1817 Anweisungen zur Basis von PIPA next Anweisungen zur Basis von PIPA next
DE
DE

Teileliste
Überprüfen Sie vor der Montage, ob alle Teile
vorhanden sind. Babyschalenmodul und Basis können
separat erworben werden. Wenden Sie sich an Nuna,
falls etwas fehlen sollte (Informationen finden Sie auf
Seite 16). Für die Montage werden keine Werkzeuge
benötigt.
1ISOFIX-Verbinder
2ISOFIX-Führungen
3Standbein-
Einstellknopf
4Seitlicher
Aufprallschutz
5ISOFIX-Einstellknopf
6Babyschalenmodul-
Freigabeknopf
7Standbeinanzeige
8Fach für
Bedienungsanleitung
46
8
7
1
3
2
5
Produkt verwenden
Hinweise zur Installation
Befestigen Sie dieses verstärkte
Kinderrückhaltesystem
NICHT an Fahrzeugsitzen,
die in Bezug auf die Fahrtrichtung zur Seite oder nach
hinten weisen. (1)
Installation
1Klappen Sie das Standbein aus dem
Aufbewahrungsfach auf. (2)
2Befestigen Sie die ISOFIX-Führungen an
den ISOFIX-Verankerungspunkten. (3) Die
ISOFIX-Führungen können die Oberfläche des
Fahrzeugsitzes vor Verschleiß schützen. Sie sind
auch eine Führung für die ISOFIX-Befestigungen.
3Drücken Sie zum Anpassen der ISOFIX-Verbinder
den ISOFIX-Einstellknopf. (4)
4Richten Sie die ISOFIX-Befestigungen mit
den ISOFIX-Führungen aus und rasten Sie
beide ISOFIX-Befestigungen in den ISOFIX-
Verankerungspunkten ein. (5)
Achten Sie darauf, dass beide ISOFIX-
Befestigungen gut an ihren ISOFIX-
Verankerungspunkten befestigt sind. Sie sollten
zwei Klickgeräusche hören und die Anzeigen an
beiden ISOFIX-Verbindungen sollten vollständig
grün sein. (5)-1
Vergewissern Sie sich, dass die Basis sachgemäß
installiert ist, indem Sie an beiden ISOFIX-
Befestigungen ziehen.
2019 Anweisungen zur Basis von PIPA next Anweisungen zur Basis von PIPA next
DE
DE

5Ziehen Sie das Standbein bis zum Boden aus,
nachdem Sie die Basis auf dem Fahrzeugsitz
platziert haben (6). Wenn die Anzeige des
Standbeins grün wird, weist dies auf eine
sachgemäße Installation hin. Rot zeigt an, dass
die Installation nicht richtig ausgeführt wurde.
(6)-2
Das Standbein hat 19 Positionen. Wenn die
Standbeinanzeige rot ist, befindet sich das
Standbein in der falschen Position.
Vergewissern Sie sich, dass das Standbein
komplett auf dem Fahrzeugboden aufliegt.
Verkürzen Sie das Standbein, indem Sie den
Standbeinfreigabeknopf drücken und das
Standbein nach oben ziehen. (6)-1
Die vollständig montierte Basis wird in (7) gezeigt.
Die ISOFIX-Befestigungen müssen mit den
ISOFIX-Verankerungspunkten verbunden und
dort eingerastet sein. (7)-1
Das Standbein muss richtig installiert sein, was
durch eine grüne Anzeige überprüft werden kann.
(7)-2
6Drücken Sie zum Entfernen der Basis zunächst
den zweiten Verschlussknopf (8)-1 und dann den
Knopf (8)-2 an den Riegel-Verbindern, bevor Sie
die Basis vom Autositz abnehmen.
7Drücken Sie zum Klappen des ISOFIX den
ISOFIX-Einstellknopf.
NUNA International B.V. Nuna und alle zugehörigen Logos sind Marken.
BELANGRIJK!
DEZE KORTE
INSTRUCTIE IS
ALLEEN BEDOELD
ALS OVERZICHT.
VOOR MAXIMALE
BESCHERMING
EN VOLLEDIGE
INFORMATIE IS HET
VAN ESSENTIEEL
BELANG OM DE
HANDLEIDING VAN
HET AUTOZITJE
ZORGVULDIG TE LEZEN
EN OP TE VOLGEN.
21 Anweisungen zur Basis von PIPA next
DE

Productinformatie
Modelnummer: _______________________________________________________
Fabricagedatum:_____________________________________________________
Productregistratie
Vul de bovenstaande informatie in. Het modelnummer en de
fabricagedatum bevinden zich op de onderkant van de PIPA
next-voet.
Ga voor het registreren van uw product naar:
www.nunababy.com/register-gear
Garantie
Wij hebben onze hoogwaardige producten opzettelijk zo
ontworpen dat ze kunnen mee kunnen groeien met zowel uw
kind als uw familie. Omdat wij achter ons product staan, wordt
onze uitrusting gedekt door een aangepaste garantie per product,
beginnend op de dag van aanschaf. Houd het aankoopbewijs, het
modelnummer en de fabricagedatum klaar als u contact met ons
opneemt.
Ga voor garantie-informatie naar:
www.nunababy.com/warranty
Contact
Neem contact op met onze klantenservice-afdelingen voor
vervangende onderdelen, service of aanvullende vragen over de
garantie.
info@nunababy.com
www.nunababy.com
1 “i-Size” (Integral Universal ISOFIX Enhanced
Child Restraint Systems) is een categorie van
het kinderzitsysteem dat in de eerste plaats
is ontworpen voor gebruik bij alle i-Size-
stoelposities van een voertuig.
2 Volgens de VN-verordening nr. 129 is het
verbeterde kinderzitje met voet een Universeel
ISOFIX-ISO/R2 verbeterd kinderzitje en
moet dit worden gemonteerd met de ISOFIX-
aansluitingen.
3 Dit is een “i-Size” verbeterd kinderzitsysteem. Het
is goedgekeurd volgens VN-verordening nr. 129
voor gebruik in voor "i-Size geschikte" standen
van autostoelen zoals is aangegeven door de
fabrikant van de auto in de handleiding.
4 Neem in geval van twijfel contact op met de
fabrikant van het verbeterde kinderzitsysteem of
de verkoper.
R129-030526
UN Regulation
No.129/03
i-Size
universal
ISOFIX
PIPA next
40cm-83cm / ≤13kg
PIPA next + Base
R129-030526
Voor gebruik met voet
2423 Instructies PIPA next-voet Instructies PIPA next-voet
NL
NL

WAARSCHUWING
Niet-naleving van de waarschuwingen en
de instructies kan ernstig letsel of de dood
veroorzaken.
Voor de juiste bescherming van uw kind,
is het belangrijk dat u de PIPA next-voet
gebruikt en installeert volgens de instructies
in deze handleiding.
Deze korte instructie is alleen bedoeld als
overzicht. Voor maximale bescherming en
volledige informatie is het van essentieel
belang om de instructiehandleiding van PIPA
next zorgvuldig te lezen en op te volgen.
PIPA next-voet is alleen compatibel met PIPA
next-autozitje
Onderdelenlijst
Zorg dat alle onderdelen voor het opslaan droog
zijn. De babydraagmodule en de voet kunnen apart
worden verkocht. Neem contact op met Nuna als een
onderdeel ontbreekt (zie pagina 23 voor informatie).
Voor de montage is geen gereedschap nodig.
1ISOFIX-aansluiting
2ISOFIX-geleiders
3Instelknop steunvoet
4Afscherming voor
inslag opzij
5ISOFIX-instelknop
6Ontgrendelknop
babydraagmodule
7Steunvoetindicator
8Opslagvak
instructiehandleiding
46
8
7
1
3
2
5
2625 Instructies PIPA next-voet Instructies PIPA next-voet
NL
NL

Gebruik product
Opletten bij installatie
Installeer dit verbeterde kinderzitje
NIET op stoelen
die opzij of naar achteren kijken ten opzichte van de
rijrichting van het voertuig. (1)
Installatie
1Vouw de steunvoet uit het opslagvak. (2)
2Voorzie de ISOFIX-geleiders van de ISOFIX-
ankerpunten. (3) De ISOFIX-geleiders voorkomen
dat het oppervlak van de autostoel gescheurd
wordt. Ze kunnen tevens de ISOFIX-aansluitingen
geleiden.
3Druk op de ISOFIX-instelknop om de ISOFIX-
aansluitingen in te stellen. (4)
4Lijn de ISOFIX-aansluitingen uit met de ISOFIX-
ankerpunten en klik beide ISOFIX-aansluitingen in
de ISOFIX-ankerpunten. (5)
Controleer of beide ISOFIX-aansluitingen stevig
vast zitten aan hun ISOFIX-ankerpunten. U
moet twee klikken horen en de kleuren van
de indicatoren op beide ISOFIX-aansluitingen
moeten groen zijn. (5)-1
Controleer of de voet goed vast zit door aan beide
ISOFIX-connectoren te trekken.
5Nadat de voet op de autostoel is geplaatst,
moet u de steunvoet tot de vloer verlengen (6).
Wanneer de indicator van de steunvoet groen is,
betekent dit dat de voet correct is geïnstalleerd.
Rood wijst op een onjuiste installatie. (6)-2
De steunvoet heeft 19 standen. Als de
steunvoetindicator rood is, betekent dit dat de
steunvoet in de verkeerde stand staat.
Zorg ervoor dat de steunvoet volledig in contact
is met de vloer van het voertuig.
Om de steunvoet in te korten, knijpt u de
ontgrendelingsknop van de steunvoet in en trekt
u deze omhoog. (6)-1
De volledig gemonteerde voet is afgebeeld als (7).
De ISOFIX-aansluitingen moeten worden
aangesloten en vergrendeld in de ISOFIX-
ankerpunten. (7)-1
De steunvoet moet goed zijn geplaatst en de
indicator moet groen zijn. (7)-2
6Om de voet te verwijderen, drukt u eerst op de
tweede vergrendelingsknop (8)-1 en daarna op de
knop (8)-2 op de vergrendelaansluitingen voordat
u de voet van de autostoel verwijdert.
7Druk op de ISOFIX-instelknop om de ISOFIX op te
vouwen.
NUNA International B.V. Nuna en alle bijbehorende logo's zijn handelsmerken.
2827 Instructies PIPA next-voet Instructies PIPA next-voet
NL
NL

IMPORTANTE!
QUESTE BREVI
ISTRUZIONI SONO
SOLO DESCRITTIVE.
PER LA MASSIMA
PROTEZIONE
E INFORMAZIONI
COMPLETE, È
ESSENZIALE LEGGERE
ATTENTAMENTE
E OSSERVARE
IL MANUALE DI
ISTRUZIONI DEL
SEGGIOLINO PER AUTO.
Informazioni sul prodotto
Numero modello:____________________________________________________
Prodotto in data:_____________________________________________________
Registrazione del prodotto
Inserire le precedenti informazioni. Numero modello e Prodotto in
(data) si trovano sulla parte inferiore della base PIPA next.
Per registrare il prodotto, visitare il sito:
www.nunababy.com/register-gear
Garanzia
Abbiamo progettato appositamente i nostri prodotti di alta qualità
in modo che crescano con il bambino e con la famiglia. Poiché
crediamo nel nostro prodotto, i meccanismi sono coperti da una
garanzia personalizzata per prodotto che comincia dal giorno
dell'acquisto. Al momento di contattarci, sono necessari la prova
d'acquisto, il numero di modello e la data di produzione.
Per informazioni sulla garanzia, visitare il sito:
www.nunababy.com/warranty
Contatto
Per la sostituzione di parti, manutenzione o domande sulla
garanzia, contattare il dipartimento di assistenza al cliente.
info@nunababy.com
www.nunababy.com
30
Istruzioni di base di PIPA next
IT

1 "i-Size" (sistemi universali di ritenuta integrale
per bambini migliorato ISOFIX) è una categoria
di sistema di ritenuta per bambini migliorato
progettato particolarmente per l’uso in tutte le
posizioni di seduta i-Size di un veicolo.
2 In conformità alla Normativa UN N. 129, il sistema
di ritenuta per bambini migliorato con base è un
sistema universale ISOFIX ISO/R2 e deve essere
montato con attacchi ISOFIX.
3 È un sistema di ritenuta per bambini migliorato
"i-Size". È omologato in conformità alla
normativa UN N. 129, per l'uso a bordo dei
veicoli compatibili i-Size nelle posizioni di seduta
indicate dal produttore nel manuale dell'utente
del veicolo.
4 In caso di dubbi, consultare il produttore o il
rivenditore del sistema di ritenuta per bambini
migliorato.
R129-030526
UN Regulation
No.129/03
i-Size
universal
ISOFIX
PIPA next
40cm-83cm / ≤13kg
PIPA next + Base
R129-030526
Uso con la base AVVERTENZA
La mancata osservanza delle seguenti
avvertenze e istruzioni potrebbe causare
lesioni gravi o decesso.
Per una protezione adeguata del bambino,
è importante utilizzare e installare la base
di PIPA next secondo le istruzioni fornite in
questo manuale.
Queste brevi istruzioni sono solo descrittive.
Per la massima protezione e informazioni
complete, è essenziale leggere attentamente
e osservare il manuale di istruzioni di PIPA
next.
La base di PIPA next è compatibile solo con il
seggiolino per auto PIPA next.
3231 Istruzioni di base di PIPA next Istruzioni di base di PIPA next
IT
IT

Elenco parti
Assicurarsi che tutti i pezzi siano disponibili prima
dell'assemblaggio. Il modulo culla portatile e la base
possono essere venduti separatamente. Se manca
qualche pezzo, contattare Nuna (per informazioni,
vedere pagina 30). Per l'assemblaggio non è
necessario nessun attrezzo.
1Attacco ISOFIX
2Guide ISOFIX
3Pulsante di
regolazione supporto
4Protezione da impatto
laterale
5Pulsante di
regolazione ISOFIX
6Pulsante di rilascio
del sistema di ritenuta
per bambini
7Indicatore supporto
8Vano di
conservazione del
manuale di istruzioni
46
8
7
1
3
2
5
Uso del prodotto
Dubbi sull'installazione
NON installare questo sistema di ritenuta per bambini
migliorato su sedili dei veicoli rivolti lateralmente o
verso la parte posteriore rispetto al senso di marcia
del veicolo. (1)
Installazione
1Aprire il supporto dal vano. (2)
2Montare le guide ISOFIX con i punti di ancoraggio
ISOFIX. (3) Le guide ISOFIX possono proteggere
la superficie del sedile del veicolo dalla torsione.
Possono anche guidare gli attacchi ISOFIX.
3Premere il pulsante di regolazione ISOFIX per
regolare gli attacchi ISOFIX. (4)
4Allineare gli attacchi ISOFIX con le guide ISOFIX,
quindi fare clic su entrambi gli attacchi ISOFIX nei
punti di ancoraggio ISOFIX. (5)
Assicurarsi che entrambi gli attacchi ISOFIX siano
saldamente fissati ai relativi punti di ancoraggio
ISOFIX. Si devono avvertire due clic e il colore
degli indicatori su entrambi gli attacchi ISOFIX
deve essere completamente verde. (5)-1
Assicurarsi che la base sia installata saldamente
tirando entrambi gli attacchi ISOFIX.
3433 Istruzioni di base di PIPA next Istruzioni di base di PIPA next
IT
IT

5Dopo aver posizionato la base sul sedile del
veicolo, aprire il supporto sul pianale (6). Se
l'indicatore del supporto è verde significa che è
installato correttamente; se è rosso significa che
è installato in modo non corretto. (6)-2
Il supporto presenta 19 posizioni. Se l'indicatore
del supporto è rosso significa che il supporto è in
una posizione non corretta.
Assicurarsi che il supporto sia a contatto con il
pianale del veicolo.
Per accorciare il supporto, premere il pulsante
di rilascio del supporto, quindi tirare il supporto
verso l'alto. (6)-1
La base completamente montata viene mostrata
in (7).
Gli attacchi ISOFIX devono essere fissati e
bloccati sui punti di ancoraggio ISOFIX. (7)-1
Il supporto deve essere installato correttamente
con l'indicatore verde. (7)-2
6Per rimuovere la base, premere il pulsante di
bloccaggio secondario (8)-1, quindi il pulsante
(8)-2 sui connettori di fermo prima di rimuovere la
base dal sedile del veicolo.
7Premere il pulsante di regolazione ISOFIX per
piegare gli attacchi ISOFIX.
NUNA International B.V. Nuna e tutti i logo associati sono marchi di fabbrica.
¡IMPORTANTE!
ESTA VERSIÓN
CORTA DE LAS
INSTRUCCIONES
SOLO SE TRATA DE
UN RESUMEN.
PARA UNA MÁXIMA
PROTECCIÓN E
INFORMACIÓN
COMPLETA ES
ESENCIAL LEER Y
SEGUIR EL MANUAL
DE INSTRUCCIONES
DEL ASIENTO DEL
COCHE CON CUIDADO.
35 Istruzioni di base di PIPA next
IT
This manual suits for next models
1
Table of contents
Languages:
Other Nuna Car Seat manuals