Nuna Exec User manual


Easy Installation
Our products are designed to make your life easier,
so installing this child restraint doesn't require
outside assistance. While we encourage the use
of Certified Child Passenger Safety Technicians
to ensure you have installed the seat correctly,
you can install the child restraint in your vehicle
without these professionals by carefully reading
and following these instructions.
Designed
around your life

Contents
Important Information
Product Information/Registration 4
Child Usage Requirements 6
Safety Warnings 8
Vehicle Compatibility 12
Car Seat Use after a Crash 18
Aircraft Installation 18
Child Restraint Overview
Parts List 19–21
Features Usage 22
Rear Facing Installation 42
Forward Facing Installation 50
Booster Installation 58
Securing Child
With Built-in Harness 66
Without Built-in Harness 68
Cleaning and Maintenance 70
IMPORTANT!
KEEP THESE
INSTRUCTIONS FOR
FUTURE REFERENCE:
READ CAREFULLY
WARNING: Read and understand ALL
warning labels affixed to the child restraint and all
written instructions. Failure to do so can result in
serious injury or death. Store instructions in the
slot on the bottom of the leg rest for future use.
2EXEC™instructions 3EXEC™instructions

Product Information/
Registration
Model Number:_____________________________________________________________________________________________
Manufactured in (date):______________________________________________________________________
Product Registration
Please fill in the above information. The model
number and the manufactured in date are located
on a label on the bottom of your child restraint. Fill
out the prepaid registration postcard attached to
the seat cover and mail it today.
Child restraints could be recalled for safety
reasons. You must register this restraint to be
reached in a recall. Send your name, address,
e-mail address if available and the restraint’s model
number and manufacturing date to:
Nuna Baby Essentials Inc.
70 Thousand Oaks Blvd.
Morgantown, PA 19543
or call 1.855.NUNA.USA
For recall information, call the U.S. Government’s
Vehicle Safety Hotline at: 1.888.327.4236
(TTY: 1.800.424.9153) or go to
http://www.NHTSA.gov
Register online at:
www.nunababy.com
Click the “Register Car Seat” link on the homepage.
Warranty
We have purposely designed our high-quality
products so that they can grow with both your child
and your family. Because we stand by our product,
our gear is covered by a custom warranty per
product, starting from the day it was purchased.
Please have the proof of purchase, model number
and manufactured in date available when you
contact us.
For warranty information please visit:
www.nunababy.com/usa/warranty
Contact
For replacement parts, service, or additional
warranty questions, please contact our customer
service department.
In the USA:
infousa@nunababy.com
www.nunababy.com
1.855.NUNA.USA
4EXEC™instructions 5EXEC™instructions

Child Usage Requirements
To use this child restraint, your child must meet
BOTH the weight and height requirements below:
Weight: 5–120 lb (2.3–54 kg)
Height: 57 in. (145 cm) or less
The infant insert (p.24) is recommended for use
with infants who weigh between 5–11 lb (2.3–5 kg).
DO NOT use the insert for a child who weighs more
than 11 lb.
In booster mode, child must be able to sit relatively
still in the same position with the shoulder and lap
belt properly positioned on their body throughout
the car ride.
Which mode is best for my child?
Consult the chart on the next page to determine
the proper mode based on your child's weight/
height. Throughout these instructions and
on the product labels, the three modes are
identified by color as indicated below.
Instruction Color Key
MODE
& installation
WEIGHT
(pounds)
MAX. HEIGHT
(inches)
5
2.3 kg
11
5 kg
25
11.3 kg
35
15.8 kg
40
18.1 kg
50
22.6 kg
65
29.4 kg
120
54 kg
Infant Insert
with lower anchor belt
with lower anchor belt & tether
Forward Facing
with vehicle belt & tether
Booster
with lower anchor belt
511
550
535
25 65
25 40
40 120
Rear Facing
with vehicle belt
DO NOT install
using BOTH the
vehicle belt and
lower anchor
belt/LATCH.
Secure the booster
even when it is
unoccupied.
57
(145 cm)
49
(124 cm)
American Academy of Pediatrics
Recommendation
The AAP recommends children should ride
rear facing for as long as possible, until they
reach the maximum weight or height allowed
by their seat.
For this seat, that maximum is 50 lb (22.6 kg)
or 49 in. (124 cm).
Rear facing Forward facing Booster
6EXEC™instructions 7EXEC™instructions

General Warnings
Child Restraint Use
When used with built-in harness, use
ONLY with children who weigh 5–65 lb
(2.3–29.4 kg) and whose height is 49
inches (124 cm) or less.
When used without built-in harness as a
belt positioning booster, use ONLY with
children who weigh between 40–120 lb
(18–54 kg) and whose height is 38 to 57
inches (96 to 145 cm).
DO NOT use in any configuration not
shown in the instructions. Please refer to
vehicle owner’s manual for recommended
or suggested installation positions.
DO NOT use the child restraint if it is more
than 10 years old. Check the label or
stamped “do not use after” date on the
bottom of the child restraint.
DO NOT use another manufacturer’s
cover, padding, fabric, or other soft
materials with this child restraint, as these
constitute an integral part of the child
restraint performance.
DO NOT modify your child restraint or use
any accessories or parts supplied by other
manufacturers unless they are approved
by Nuna for use with this child restraint.
Doing so may be unsafe and may void the
warranty.
DO NOT use a cut, frayed or damaged
vehicle seat belt. NEVER use the child
restraint if it has frayed or cut harness
straps, any damaged or missing parts,
or has been in a damaging crash. To find
out if damaged parts are replaceable, call
1-855-NUNA-USA.
NEVER use a car seat that has been
involved in a moderate to severe crash.
See page 18 to learn the difference
between a minor and moderate to severe
crash.
Child Restraint Safety
DO NOT allow anyone who has not read
the instructions to install or use this child
restraint. NEVER give this child restraint to
another person without also giving them
these instructions.
NEVER leave child unattended in this child
restraint.
WARNING
DEATH OR SERIOUS INJURY CAN OCCUR,
8EXEC™instructions 9EXEC™instructions

To avoid strangulation, do not allow
children to play with vehicle or child
restraint belts or straps. If possible, move
unused belts out of reach.
Cover the child restraint when your vehicle
is parked in sunlight. Parts of a child
restraint can become very hot if left in the
sun, and can burn a child’s skin. Check for
hot parts before putting your child in the
child restraint.
NEVER leave child restraint unsecured in
your vehicle even when it is unoccupied. In
a crash, it could become a projectile and
injure other vehicle occupants.
NEVER leave luggage or other objects
unsecured in a vehicle, as they are liable to
cause injuries in the event of a collision.
Additional Booster Warnings
Booster Installation
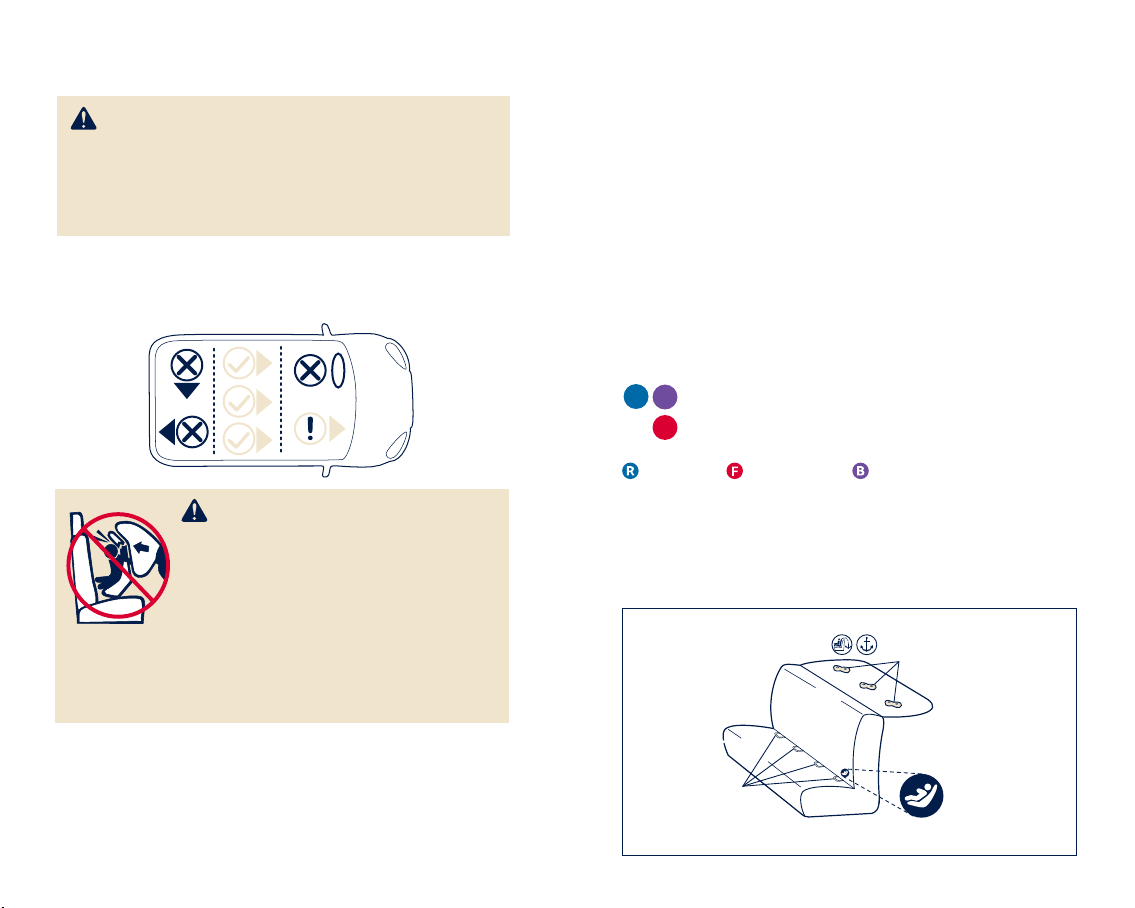
DO NOT install on a rear facing or side
facing vehicle seat.
This booster should be installed in the rear
vehicle seat so that it can be installed with
the vehicle lower anchors.
DO NOT install in the front passenger seat
with an active airbag, unless the air bag
can be turned OFF.
The child restraint is NOT certified for
aircraft use when used as a booster.
Aircraft belts are lap belts only, and a child
cannot be secured in the booster with only
a lap belt.
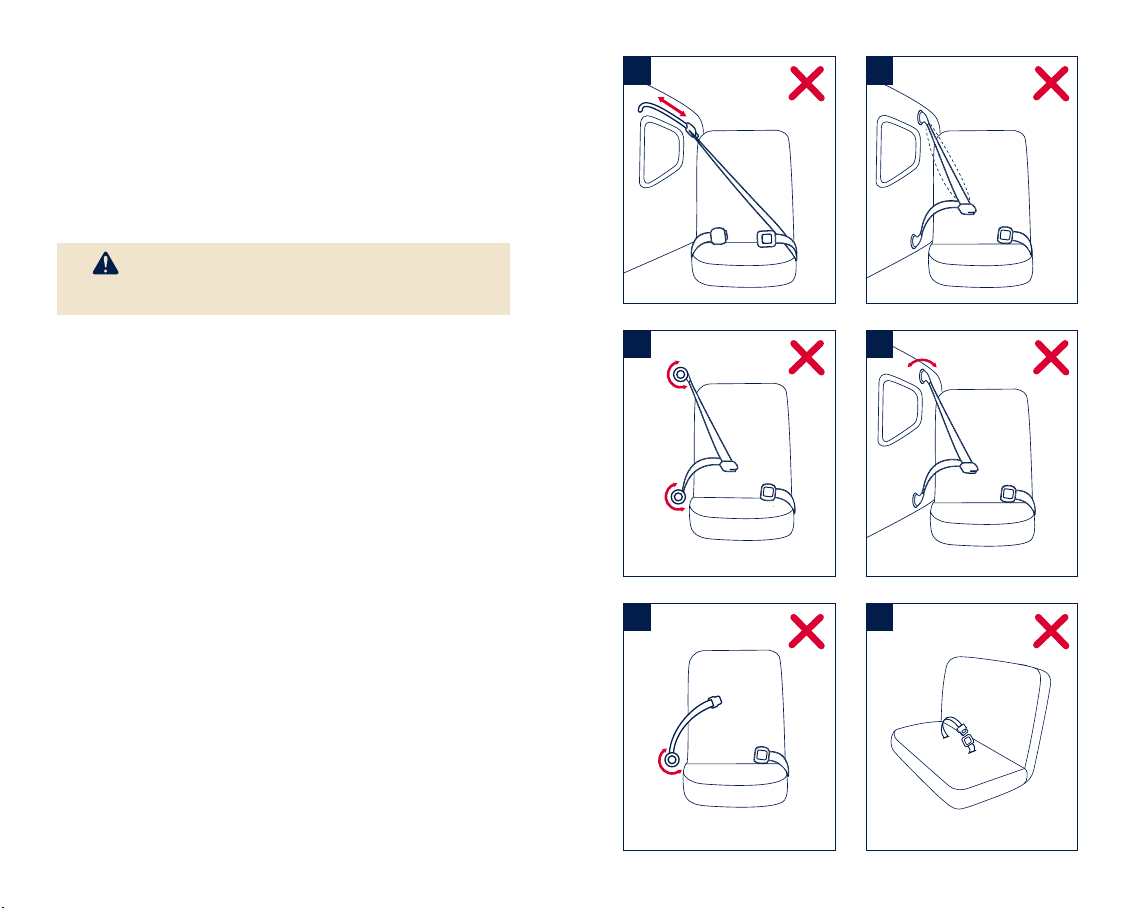
Vehicle Belt Positioning
WARNING! Use ONLY the vehicle’s lap
and shoulder belt system when restraining
the child in this booster seat. Use of any
other method of securement will not
properly secure the child, which could
result in serious injury or death. DO NOT
use the built-in harness when using the
booster seat.
Properly position the vehicle lap and
shoulder belt on your child. Make sure the
vehicle lap and shoulder belt are not loose.
A loose or improperly positioned vehicle
lap and shoulder belt could cause the child
to be ejected in a sudden stop, turn or
crash and cause serious injury or death.
The vehicle shoulder belt should rest on
the child’s shoulder and across the center
of the chest.
The vehicle lap belt must remain snug
across the child’s thighs.
10 EXEC™instructions 11EXEC™instructions

Rear facing Forward facing Booster
12 EXEC™instructions 13EXEC™instructions
Using LATCH
LATCH (Lower Anchors and Tether for CHildren) is
a system for installing a child restraint in a vehicle
without using the vehicle belts. This child restraint
can be installed without vehicle belts by connecting
the child restraint’s lower anchor belt to the lower
anchorages in your vehicle.
Refer to your vehicle owner’s manual to determine
if your vehicle is equipped with LATCH, and how to
correctly use LATCH to install this child restraint in
your vehicle.
LATCH use is based on mode, as specified below:
Lower anchors only
Lower anchors and tether
LATCH Location
Common locations of LATCH in a vehicle are shown
below (consult your vehicle owner’s manual). Other
locations of the tether are shown on the next page.
Vehicle Compatibility
This child restraint can ONLY be installed on
vehicle seats that face forward. DO NOT install in
seats that face to the sides or rear of the vehicle.
IMPORTANT: According to accident statistics,
children are safer when properly restrained in the
rear seating positions than in the front seating
positions.
WARNING: You MUST read and understand
ALL child restraint related instructions and
warnings in your vehicle owner’s manual to
correctly and safely use this child restraint in
your vehicle.
Vehicle Tether
Anchor Points
Vehicle Lower
Anchor Points
WARNING: SERIOUS INJURY
OR DEATH MAY OCCUR.
NEVER install this child restraint
rear facing in a vehicle seating
position with a frontal air bag unless
it is turned off. If your vehicle is
equipped with front passenger air bags, check
your vehicle owner's manual for child restraint
installation instructions.
RB
F

Rear facing Forward facing Booster14 EXEC™instructions 15EXEC™instructions
LATCH without Built-in Harness (Booster)
Non-standard spacing of the lower anchors is
allowed in booster mode ONLY IF the vehicle
manufacturer allows it; consult your vehicle
owner’s manual.
An example of non-standard spacing is installing
the booster in the center seating position of your
vehicle where there are no lower anchors and
using the closest lower anchors from the outboard
positions instead.
When using non-standard spacing, lower anchors
MUST NOT interfere with the vehicle seat belt.
DO NOT use tether in booster mode.
Using Vehicle Belts
Vehicle belt type is based on mode, as specified
below:
Lap/Shoulder Belt (A)
Lap Belt Only (B)
Belts MUST be able to be locked. Refer to your
vehicle owner’s manual to determine if the belts
in your vehicle lock by: A) switching the seat belt’s
retractor by pulling the belt all the way out, or
B) a locking latch plate that locks the vehicle’s seat
belts so they will not move freely.
If the belt cannot be locked using one of these
methods, contact Nuna Customer Service for a
locking clip.
LATCH with Built-in Harness
When installed rear facing or forward facing, this
child restraint is designed to be used with lower
LATCH anchors at the standard spacing of 11 inches
(28 cm). LATCH lower vehicle anchor points are
defined as 11 inches (28 cm) from the center of
one LATCH anchor to the center of another LATCH
anchor.
WARNING: DO NOT USE the LATCH lower
anchor belt to attach this child restraint
rear facing when restraining a child weighing
over 35 lb (15.8 kg) or forward facing with built-
in harness when restraining a child weighing
over 40 lb (18.1 kg). Check your vehicle owner’s
manual for tether anchor weight limits (use
tether forward facing ONLY).
Tether
The child restraint’s tether strap should be used
for ALL forward facing installations (except booster
mode) as it provides a more secure installation and
is proven to be safer. In a crash, the tether limits a
child’s forward movement, protecting their head and
neck and reducing the risk of injury.
Common locations (consult your vehicle manual):
Rear Shelf
Back Wall
Back of Seat
Vehicle Floor
F
F
R
R
B
AB

16 EXEC™instructions 17EXEC™instructions
Vehicle Belts that CANNOT Be Used
The following types of vehicle belts MUST NOT
be used to install this child restraint. They will not
provide a secure, safe installation. Refer to your
vehicle owner’s manual for which seating positions
in your vehicle can be used to install this child
restraint using vehicle belts or LATCH.
1 - Motorized Belts (Automatic)
These should not be used unless the shoulder
belt can be removed, the lap belt is locked and
use is allowed by the vehicle manufacturer.
2 - Dual Retractor Lap/Shoulder Belts
If allowed by the vehicle manufacturer, the
lap belt only may be used to secure the child
restraint if it can be locked in accordance with
this manual and the vehicle’s manual.
3 - Non-Locking (ELR) Lap Belts
This belt locks only in a crash or sudden stop and
should only be used with a belt shortening clip.
Contact your vehicle manufacturer if needed.
4 - Airbag/Inflatable Belts
This belt is only allowable in booster mode.
5 - Door Mounted Belts
6 -Lap Belts forward of Seat Bight (where the seat
bottom and back meet)
1
2
3
4
5
6
In booster mode, child must be secured
by a lap/shoulder belt, NEVER a lap belt only.

Car Seat Use after a Crash
The National Highway Traffic Safety Administration
(NHTSA) recommends that car seats be replaced
following a moderate or severe crash. Car seats
do not automatically need to be replaced following
a minor crash.
A minor crash is one in which ALL of these apply:
• The vehicle was able to be driven away from
the crash site.
• The vehicle door nearest to the car seat was
not damaged.
• None of the passengers in the vehicle
sustained any injuries in the crash.
• If the vehicle has air bags, none of the air bags
deployed during the crash; and
• There is no visible damage to the car seat.
Any crash that does not meet all of the above
criteria for a minor crash is considered a moderate
to severe crash. NEVER use a car seat that has
been involved in a moderate to severe crash.
Information from nhtsa.gov
Aircraft Installation
Install child restraint rear or forward facing in a
forward facing aircraft seat following Vehicle Lap Belt
instructions (p.48 or p.56), but install aircraft belt on
top of closed True Tension™door, under seat cover.
18 EXEC™instructions 19EXEC™instructions
Front View
1 Head Support
Button
2 Head Support
3 Head Insert
4 Shoulder Harness
Pad (x2)
5 Infant Insert
6 Hip Harness Pad (x2)
7 Crotch Pad
8 Leg Rest Button
9Leg Rest
10 Harness Release
Button
11 Harness Adjustment
Strap
12 Seat Cover
13 Harness Buckle
14 Cup Holder (x2)
15 Harness Strap
16 Chest Clip
17 Slip Cover
18 Slip Cover Snap
Parts List
4
3
5
7
6
14
1
2
4
3
516
15
6
7
8
9
13
12
10 11
14 17
18
The FAA recommends that children up to 40 lb
(18.1 kg) use a child restraint while traveling on
an aircraft. When used with the harness system:
This restraint is certified for use in aircraft.
When used without the harness system as a
belt-positioning booster: This restraint is NOT
certified for use in aircraft, since aircraft belts
are lap belts only. Contact your airline about
their policies prior to travel.

20 EXEC™instructions 21EXEC™instructions
Interior View
19 Harness Storage Compartment
20 Forward Facing True Tension™Door
21 Forward Facing True Tension™Door
Release Button
22 Lower Anchor Attachment Strap
23 Rear Facing True Tension™Door
Release Button
24 Rear Facing True Tension™Door
25 Lower Anchor and Harness Buckle
Storage Compartment (under Rear Facing
True Tension™Door)
19
23
22
20
24
21
25
Side View
26 Booster Shoulder
Belt Guide
27 Side Impact
Protection Pod
28 Forward Facing
Belt Path
29 Magnetic Buckle
Tongue Holder
30 Booster Lap
Belt Path
31 Recline Position
Indicator
32 Recline Button
33 Rear Facing Belt
Path (under
Cup Holder)
34 Instruction
Storage
Back View
35 Tether Strap Cover
36 Tether Strap
37 Tether Strap
Adjuster
38 Tether Hook
39 Lower Anchor Belt
40 Lower Anchor
Connectors
41 Lower Anchor
Adjuster
26
27
28
29
30
31
32
33 34
35
36
37
38
39
40
41

Features Usage
Harness Use
1 - To Loosen Harness
Press on harness release button (1) while
pulling forward on the harness straps (2).
2 - To Open Chest Clip
Press button on front of clip (1) and pull clip
apart (2).
3 - To Open Harness Buckle
Press red button on front of buckle (1) and pull
out buckle tongues (2).
4 - To Use Magnetic Buckle Tongue Holders
Loosen and unbuckle harness. Place the buckle
tongues against the magnetic area on the side
of the child restraint so that the tongues are
held in place.
5 - To Fasten Chest Clip
Push chest clip halves together until they click.
(1) Pull to check.
To Fasten Buckle
Insert buckle tongues firmly into buckle until
they click. (2) Pull up on tongues to ensure they
are locked.
6 - To Tighten Harness
Pull on harness adjustment strap. (1) Place
chest clip at child's armpit level after
tightening. (2)
1
1
1
1
1
1
2
2
2
2
2
1
2
3
4
5
6
22 EXEC™instructions 23EXEC™instructions

Head Insert Use
1 - The head insert may be used or removed for
improved comfort or fit of any child. To use,
attach the snaps on the head insert to the
snaps on the head support.
2 - When the head insert is not in use, tuck the
snaps on the head support behind the head
support fabric.
Infant Insert Use
The infant insert MUST be used for a child
weighing between 5–11 lb and must NOT be used
otherwise. The insert can improve the harness fit
and recline angle for smaller infants.
When rear facing, the harness MUST be positioned
AT or JUST BELOW the child's shoulders. If the
harness straps are positioned ABOVE the child's
shoulders, use the infant insert to adjust the fit.
3 - Pull harness buckle up through slot in bottom
of insert.
4 - Route harness straps through sides of insert.
5 - Attach snaps on insert to keep harness straps
in place.
6 - Push insert firmly into child restraint.
When properly installed, the infant insert will
not interfere with harness straps or harness
buckle. Harness buckle must be used in inner
position when infant insert is used (p.28).
6
24 EXEC™instructions
1
2
25
EXEC™instructions
3
4
5

26 EXEC™instructions
1
2
3
4
27EXEC™instructions
Slip Cover Use
The slip cover can be used to keep the seat cover
clean. It can easily be removed and washed.
Unbutton the seat cover.
1 - Slide the bottom of the slip cover over the
leg rest.
2 - Unbutton the seat cover and slide it through
the two straps on the back of the slip cover
until the bottom strap lines up with the bottom
of the seat cover. Button the seat cover back
into place.
3 - Attach the snaps on the sides of the slip cover
to the bottom of the slip cover to secure it over
the leg rest.
4 - Route the harness adjustment strap and harness
buckle through the holes in the slip cover.
To remove the slip cover, reverse these steps.
Shoulder, Hip, and Crotch Pad Use
5 - ALWAYS use the shoulder, hip, and crotch
pads in rear facing mode.
In forward facing mode, the pads are a comfort
feature that may be used or removed for any child.
To use the shoulder and hip pads, fold each pad in
half over the harness strap and attach the snaps.
To use the crotch pad, slide the harness buckle
through the loop on the pad.
5

Harness Buckle Adjustment
The harness buckle has two positions. Use the
position that is closest to (but not under) your child.
Remove infant insert (p.24) and loosen and
unbuckle harness (p.22).
1 - Unsnap seat cover (1) and pull forward while
pulling harness buckle backwards through slot
in seat cover (2).
2 - Route harness buckle strap through either slot (1
or 2) on the rear facing True Tension™door. Pull
buckle through corresponding slot in seat cover
and replace seat cover and inserts (if using).
Cup Holder Use
3 - Pivot cup holder up and lock in use position.
4 - Push center of cup holder down to extend to
opened position.
5 - While in the opened position, pull up on the
cup holder to remove for washing.
6 - To store, collapse cup holder and pivot down.
Press to lock in position.
5
6
3
4
28 EXEC™instructions
1
2
29EXEC™instructions
1
1
2
2
Cup holders MUST be opened to access belt
path during rear facing installation of child
restraint. Cup holders may be collapsed down
against vehicle belt after belt installation.
DO NOT place glass or metal containers or hard
or sharp objects in cup holder. In a crash they
could cause serious injury.

Head Support Adjustment
There are 12 head support positions.
1 - With harness loose (p.22), squeeze head
support button and move head support up or
down to desired position.
Release head support button and slide head
support slightly up or down until locked into
position. The head support will click when it locks.
CHECK that head support is locked on both
sides by pulling firmly up and down.
Recline Use
There are 8 recline positions.
2 - Positions 1–4 (BLUE) are for rear facing use with
children 5–50 lb (2.3–22.6 kg).
3 - Positions 1–4 (RED/PURPLE) are for forward
facing use with children 25–65 lb (11.3–29.4 kg),
and for booster use with children 40–120 lb
(18–54 kg).
4 - Press recline button (1) on either side of the
child restraint and tilt seat to desired recline
position (2).
Release recline button, and check that child
restraint is locked in desired recline position.
To change recline position after installation,
you MUST uninstall child restraint, select new
recline position, and then reinstall child restraint.
If infant's head falls forward, child restraint must
be reclined more. Use infant insert with infants
5–11 lb (2.3–5 kg) to improve recline angle. 43 2 1
12341
2
4
5
30 EXEC™instructions
1
31EXEC™instructions
2
4
32
11
2
3
4
3

Leg Rest Use
The fully adjustable leg rest can be used in all three
modes of the child restraint, and it serves as both
a safety and a comfort feature. The leg rest can be
angled to achieve proper leg support and extended
for longer legs.
Rear Facing
In this mode, the leg rest not only provides increased
leg room, but also serves as an anti-rebound panel,
which aids in achieving proper installation tightness.
1 -In rear facing mode, the leg rest MUST be
in the upright position. The angle of the leg rest
should match the angle of the vehicle seat back.
Forward Facing or as a Booster
In these modes, the leg rest provides leg support
and protects your vehicle seat from dirty shoes.
To Adjust Leg Rest:
2 - Push and hold the buttons on both sides of the
leg rest. You can now angle and extend the leg
rest simultaneously.
3 - Adjust the leg rest to the desired position by
tilting to rotate the angle (1) and pulling forward
to extend for a child with longer legs (2).
Once you reach the desired position, release the
buttons. You will hear them click as they spring
back into place, locking the leg rest.
If the buttons do not spring back right away, gently
tilt the leg rest until it locks into place. Angle must
be locked before extension can be locked.
2
1
2
3
32 EXEC™instructions 33EXEC™instructions
1

True Tension™Door Use
This child restraint has two True Tension™doors
that aid in a simple and secure installation of the
child restraint in your vehicle. They are located
underneath the seat cover. The upper door (RED) is
for forward facing and booster use, and the lower
door (BLUE) is for rear facing use.
Remove infant insert, loosen and unbuckle harness,
and retain with magnetic buckle tongue holders (p.22).
1 - Adjust head support to highest position,
unsnap seat cover and pull to front of seat.
2 - Lift door release button for the appropriate
True Tension™door.
3 - Lift open True Tension™door. Follow instructions
for belt routing: Rear facing, p.42, Forward
facing, p.50, Booster, p.58
4 - Close True Tension™door by pressing down
firmly on door until it latches in place. Replace
seat cover and inserts (if used) (p.24).
34 EXEC™instructions
1
2
3
4
35EXEC™instructions

Lower Anchor Use
The lower anchor belt can be used instead of a
vehicle belt to install this child restraint. The lower
anchor belt MUST NOT be used rear facing if your
child weighs more than 35 lb (15.8 kg), or forward
facing if your child weighs more than 40 lb (18.1 kg).
The lower anchor belt can and SHOULD be used
with the booster from 40–120 lb (18–54 kg).
The lower anchor belt and connectors are stored
under the rear facing True Tension™door.
Remove infant insert, loosen and unbuckle harness
(p.22), and unsnap seat cover.
1 - Lift rear facing True Tension™door release button.
2 - Take out the lower anchor belt and connectors.
3 - Lengthen lower anchor belt for use by pressing
adjuster button while pulling on belt.
4 - For belt routing, see p.46, p.54, or p.62. To
connect lower anchor belt to lower anchors
in vehicle, press connector firmly onto lower
anchor and pull to check. Lower anchor belt
MUST NOT interfere with the vehicle seat belt.
5 - Remove all slack from lower anchor belt by
pulling loop at end of belt.
6 - To release lower anchor belt, press red button
on end of connector while pulling on belt.
Store lower anchors when not in use. Place
one lower anchor connector in each half of
the storage compartment. Fold excess belt
webbing into compartment. Belt MUST NOT
interfere with latching of True Tension™door.
DO NOT cut the lower anchor attachment
strap. It permanently secures the lower anchors
to the child restraint.
36 EXEC™instructions 37
EXEC™instructions
2
4
3
5
6
1
Other manuals for Exec
1
Table of contents
Other Nuna Car Seat manuals