Nuna PIPA rx User manual

Easy Installation
Our products are designed
to make your life easier,
so installing this child restraint
doesn't require outside assistance.
While we encourage the use of
Certified Child Passenger Safety
Technicians to ensure you have
installed the seat correctly,
you can install the restraint
in your vehicle without these
professionals by carefully reading
and following these instructions.
Designed
around your life

2PIPA rx instructions 3PIPA rx instructions
Contents
About PIPA™rx
Product Information
Product Registration
Recall Information
Warranty
Contact
Child Usage Requirements
Warnings
Car Seat Use after a Crash
Vehicle Compatibility
PIPA™rx Parts List
RELX™Base Parts List
Product Overview
Using PIPA™rx
Product Use
Installation
With RELX™base
Child Restraint Only Install
In an Aircraft
On a Stroller
Accessories
Cleaning and Maintenance
4
4
5
5
5
6
6
11
12
16
18
20
32
42
42
56
62
62
64
66
IMPORTANT!
KEEP THESE
INSTRUCTIONS
FOR FUTURE
REFERENCE:
READ CAREFULLY

4PIPA rx instructions 5PIPA rx instructions
Product
Information
Model Number:
Manufactured in (date):
Product Registration
Please fill in the above information.
The model number and the
manufactured in date are located
on a label on the bottom of your
child restraint. Fill out the prepaid
registration postcard attached to
the seat pad and mail it today.
Child restraints could be recalled
for safety reasons. You must register
this restraint to be reached in a
recall. Send your name, address,
e-mail address if available and
the restraint’s model number and
manufacturing date to:
Nuna Baby Essentials Inc.
70 Thousand Oaks Blvd.
Morgantown, PA 19543
or call 1.855.NUNA.USA
or register online at:
www.nunababy.com
Click on the “Register Car Seat” link
on the homepage.
Recall Information
For recall information, call the
U.S. Government’s Vehicle Safety
Hotline at: 1.888.327.4236
(TTY: 1.800.424.9153) or go to
http://www.NHTSA.gov
Warranty
We have purposely designed
our high-quality products so that
they can grow with both your
child and your family. Because we
stand by our product, our gear is
covered by a custom warranty per
product, starting from the day it
was purchased. Please have the
proof of purchase, model number
and manufactured in date available
when you contact us.
For warranty information, please
visit: www.nunababy.com/warranty
Contact
For replacement parts, service,
or additional warranty questions,
please contact our customer
service department.
In the USA:
infousa@nunababy.com
www.nunababy.com
1.855.NUNA.USA

6PIPA rx instructions 7PIPA rx instructions
Child Usage
Requirements
This child restraint is suitable for
use with children who meet the
following requirements:
Weight: 4 to 32 lb (2 to 14.5 kg)
Height: less than 32 inches (81 cm)
It is recommended to keep your
child rear facing as long as possible,
until at least 2 years old.
WARNING
DEATH OR SERIOUS INJURY
can occur if you fail to follow
the warnings, instructions and
labels on the child restraint.
A child’s safety is your
responsibility. NEVER leave
your child unattended.
Read all instructions before
use of this child restraint
or installation in a vehicle.
In addition, read the
vehicle owner’s manual for
information on child restraint
installation.
Use the bottom of the base for
instruction manual storage.
Register your child restraint
with the manufacturer.
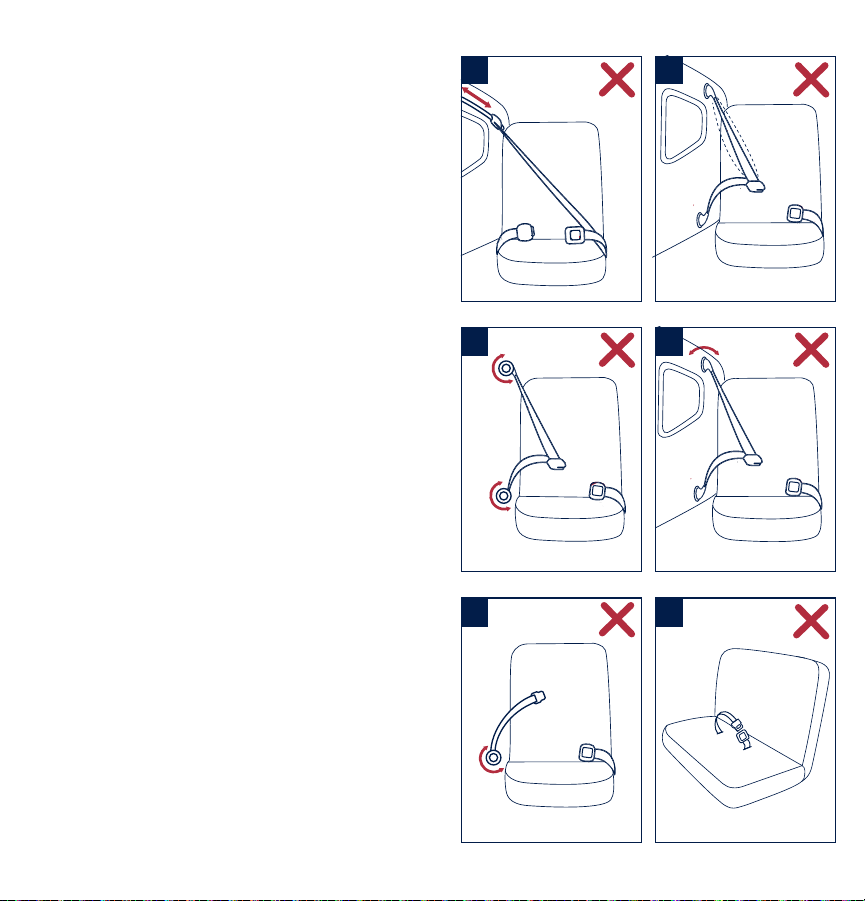
Secure this child restraint with
the vehicle’s child restraint
anchorage system if available,
or with a vehicle belt.
This child restraint can ONLY
be used in a rear facing
position when using in a
vehicle. The child restraint
cannot be properly secured in
a forward facing position, and
will be unsafe. Use only with
children who weigh between 4
and 32 pounds (2 and 14.5 kg)
and whose height is 32 inches
(81 cm) or less. Exceeding
these height and weight limits
is unsafe.
Cover the child restraint
when your vehicle is parked
in sunlight. Parts of a child
restraint can become very hot
if left in the sun, and can burn
a child’s skin. Check for hot
parts before putting your child
in the child restraint.
NEVER use a car seat that has
been involved in a moderate
to severe crash. See page 11
to learn what is classified as a
moderate to severe crash.

8PIPA rx instructions 9PIPA rx instructions
Snugly adjust the belts
provided with this child
restraint around your child.
If straps are not snugly adjusted,
child may be ejected from seat
in the event of an accident.
A snug strap should not allow
any slack. It lies in a relatively
straight line without sagging.
It does not press on the child’s
flesh or push the child’s body
into an unnatural position.
EXPIRATION DATE Check
the label on the underside of
the base or child restraint for
expiration date information.
FALL HAZARD Child’s activity
can move carrier. NEVER
place carrier on counter tops,
tables, or any other elevated
surface. Always stay within
arm’s reach whenever carrier
is not on floor/ground. Be sure
handle locks into position
before lifting carrier.
The carrier
can fall from a
shopping cart.
DO NOT use on
a shopping cart.
STRANGULATION HAZARD
Children have strangled in
loose or partially buckled
harness straps. Fully restrain
the child at all times even
when carrier is used outside
the vehicle.
SUFFOCATION HAZARD
Infant carrier can roll over on soft
surfaces and suffocate child.
NEVER place carrier on beds,
sofas, or other soft surfaces.
ALWAYS check child restraint
to base connection.
DO NOT allow anyone who
has not read the instruction
manual to install or use this
child restraint.
DO NOT allow child restraint
or handle to contact the
vehicle interior (side of car
door or seat in front) when
installed on base.
DO NOT use child restraint
if it has frayed or cut harness
straps, or is damaged in any
way. To find out if damaged
parts are replaceable, call
1-855-NUNA-USA.
NEVER modify any part of the
child restraint.

10 PIPA rx instructions 11PIPA rx instructions
Car Seat Use after
a Crash
The National Highway Traffic
Safety Administration (NHTSA)
recommends that car seats be
replaced following a moderate
or severe crash. Car seats do not
automatically need to be replaced
following a minor crash.
What defines a minor crash?
A minor crash is one in which ALL of
the following apply:
• The vehicle was able to be
driven away from the crash site.
• The vehicle door nearest the car
seat was not damaged.
• None of the passengers in the
vehicle sustained any injuries in
the crash.
• If the vehicle has air bags, none
of the air bags deployed during
the crash; and
• There is no visible damage to
the car seat.
NEVER use a car seat that has been
involved in a moderate to severe
crash. Contact Nuna with questions
or concerns about your seat.
Information from nhtsa.gov
DO NOT use any products
or accessories with this child
restraint unless they are
approved by Nuna for use with
this child restraint. Doing so
may be unsafe and may void
the warranty.
DO NOT leave child restraint
and base in vehicle when
uninstalled, even when
unoccupied. In a crash, it
could become a projectile and
injure other vehicle occupants.
NEVER use clothing or
blankets that interfere with
providing a properly tightened
harness. An unsecured or
improperly harnessed child
can come out of the restraint
during a crash. Place blankets
over child AFTER harness has
been properly tightened.
Only use with Nuna strollers
or appropriate Nuna adapters
designed for use with other
strollers.

PIPA rx instructions12 PIPA rx instructions 13
If your vehicle is equipped with
passenger side air bags, check your
vehicle owner’s manual for child
restraint installation instructions.
According to accident statistics,
children are safer when properly
restrained in the rear seating
positions than in the front seating
positions.
Vehicle Belt Use
Refer to your vehicle owner’s manual
to determine if the belts in your vehicle
lock by switching the seat belt’s
retractor OR if they have a locking
latch plate that locks the vehicle’s seat
belt so they will hold the child restraint
tightly without loosening.
(Vehicle Belt Use continued on the
next page)
Vehicle
Compatibility
You MUST read and understand
ALL child restraint related
instructions and warnings in your
vehicle owner’s manual to correctly
and safely use this child restraint in
your vehicle.
This child restraint can ONLY be
installed on vehicle seats that face
forward. DO NOT install in seats
that face to the sides or rear of the
vehicle.
NEVER install this
child restraint rear
facing in a vehicle
seating position
with a frontal air bag
unless it is turned off.
Airbags inflate with
great force and can cause severe
injury to a child’s neck and spine.

1
2
3
4
5
6
14 15PIPA rx instructions PIPA rx instructions
These vehicle belts CANNOT BE
USED with your child restraint.
Install with lower anchors instead.
1 - Motorized Belts (Automatic)
These should not be used
unless the shoulder belt can be
removed, the lap belt is locked
and use is allowed by the
vehicle manufacturer.
2 - Dual Retractor Belts
If allowed by the manufacturer,
the lap belt only may be used
to secure the child restraint in
accordance with this manual
and the vehicle owner’s manual.
3 - Non-Locking (ELR) Lap Belts
This belt locks in a crash or
sudden stop and should only be
used with a belt shortening clip.
Contact your vehicle
manufacturer if needed.
4 - Airbag/Inflatable Belts
This belt cannot be used to
install this child restraint.
5 - Door Mounted Belts
This belt cannot be used to
install this child restraint.
6 - Lap Belts forward of Seat Bight
This belt (Where the seat
bottom and seat back meet)
should not be used to install
this child restraint.

16 PIPA rx instructions 17PIPA rx instructions
PIPA™rx
Parts List
1 Canopy
2 Head Support
3 Body Support
4 Chest Clip
5 Buckle and Crotch Belt
6 Harness Adjustment Button
7 Harness Adjustment Strap
8 Lap Belt Guides
9 Buckle Holder
10 Handle Button
11 Stroller Release Button
12 Shoulder Pads
13 Dream drape™Zipper
14 Canopy Window
15 Seat Cover
16 Handle
17 Shoulder Belt Guide
18 Stroller Release Handle
19 Harness Slots
20 Base Attachment Bars
21 Harness Straps
22 Splitter Plate
116
15
13
14
12
11
10
9
8
18
19
20
21
22
2
4
3
5
6
7
17

18 PIPA rx instructions 19PIPA rx instructions
RELX™Base
Parts List
Make sure all parts are available
before assembly. If any part is
missing, please contact Nuna
(see page 5 for information).
No tools are required for assembly. 3
2
5
4
6
8
7
11
10
9
11
13
10
14
15
1
1 Rigid Latch Guides
2 Vehicle Belt Lock Off
3 Lock Off Release Button
4 Belt Positioner
5 Rigid Latch (Lower Anchors)
6 Rigid Latch Release Button
7 Recline Indicator Window
8 Recline Adjustment Button
9 Child Restraint Release Button
10 Stability Leg
11 Stability Leg Adjustment Button
12 Stability Leg Indicator
13 Stability Leg Storage Release
Button
14 Stability Leg Storage
15 Instruction Manual Storage
(under Stability Leg)

Product Overview
Dream Drape™
1 - Unzip the zipper behind the
front canopy bow.
2 - Pull the Dream drape™out of
the compartment and attach
the Dream drape™to the
magnets on each corner to the
front of the carrier.
Canopy
3 - To remove the canopy, undo
the snap on the canopy fabric.
Press the button in the canopy
mount. Pull the canopy bow out.
Shoulder Pads
4 - Shoulder pads are removable.
Buckle Holders
5 - Loosen and unfasten harness.
Place buckle tongues in buckle
holders.
21PIPA rx instructions
1
2
3
4
5
20 PIPA rx instructions

1
2
3
Head and Body Support
The head and body supports can
be used as necessary, to provide a
snug fit for small babies.
The head support straps cannot
go through the same slots as the
harness and should only be used in
the top two harness slot positions.
1 - To remove the head support,
unfasten the hook and loop
ends behind the seat fabric.
2 - Pull the head support straps
through the harness slots.
3 - To remove the body support,
unbuckle the harness and route
the buckle and crotch belt
through the bottom slot of the
body support.
The body support can be used
for smaller babies, but MUST
be removed once a snug fit
can be achieved without it, at
approximately 11 pounds.
22 PIPA rx instructions 23PIPA rx instructions

Handle Adjustment
1 - The carrier handle can be
adjusted to 3 positions.
2 - To adjust the handle position,
squeeze handle buttons on
both sides.
3 - Rotate handle until it clicks into
any of the 3 positions. Handle
can be used in vehicle in any
locked position.
Be sure handle is locked in the
carry position before lifting
child restraint by handle. An
unlocked handle could move
unexpectedly, causing injury to
child.
Handle MUST NOT contact the
vehicle interior (side of car or
seat in front) when installed.
25PIPA rx instructions
12
3
24 PIPA rx instructions

Seat Pad
1 - Pull out the fastening pieces
under the edge of the seat.
The best way to work this area
(as some seat pads feel more
tight in this area than others) is
to pull the fabric towards the
front of the seat at one corner.
Once you have one corner out,
you can easily work the other
side out.
2 - Remove the harness from the
splitter plate.
3 - Remove the seat pad from the
stroller release buttons* as
shown.
*Feature used only with infant car seat
adapters. Infant car seat adapters for
strollers sold separately.
4 - Grasp the seat pad and pull
it out from under one edge of
the adjustment button. Work
around the adjustment button
to release the remainder of the
seat pad.
27PIPA rx instructions
1
2
3
4
26 PIPA rx instructions

Shoulder Belts
1 - Tighten harness to fit snugly on
child’s shoulders. It is snug if
you cannot pinch a fold in the
strap horizontally.
2 - Harness straps must be at or
just below shoulders.
3 - To adjust shoulder harness
height, first loosen harness by
pressing on adjustment button
while pulling on the harness
straps.
4 - Then turn child restraint over
and remove one harness loop
from metal splitter plate.
5 - Pull loose ends of harness
out through slots and place in
correct slot.
28 29PIPA rx instructions PIPA rx instructions
1
2
3
4
5

1 - Re-attach harness loops to
splitter plate.
2 - Do not allow harness to
pass over bars.
Repeat process for second shoulder
harness strap.
Crotch Belt
3 - Identify crotch belt slot that will
achieve a snug fit for your child.
Three crotch belt positions are
provided to achieve a snug fit
as your baby grows. Change
crotch belt slot as necessary.
4 - The position shown provides
the smallest fit. Crotch belt is
threaded through rear slot and
up through front slot as shown.
5 - This position provides a
medium fit. Crotch belt is
threaded into rear slot as
shown.
6 - This position provides the
largest fit. Crotch belt is
threaded through front slot as
shown.
1
2
3
4
5
6
31PIPA rx instructions30 PIPA rx instructions

Product Use
1 - Top of child’s head is at least 1”
below top of child restraint.
Securing Child in
Child Restraint
2 - Loosen harness by pressing on
adjustment button while pulling
on the harness straps.
3 - Press button to release the
halves of the chest clip. (1)
Separate chest clip and spread
harness straps apart. (2) Press
buckle button. (3)
4 - Place child in child restraint in
seated position.
5 - The child should be seated
against both the back and
bottom of the seat with no gap
behind the child. Do not allow
child to slouch.
Gently guide child’s arms
through harness loops.
6 - Insert buckle tongues into
buckle.
(continued on the next page)
1
3
2
2
1
2
3
4
5
6
33PIPA rx instructions32 PIPA rx instructions
1 inch
(25 mm)

Securing Child in Child
Restraint (continued)
1 - Listen for clicks. Pull on buckle
to verify it is latched.
2 - Snap the chest clip together
and temporarily slide towards
buckle for tightening of harness.
3 - Tighten harness by pulling
on the adjustment strap. Pull
any excess harness webbing
through the buckle towards the
child’s shoulders and pull on
the adjustment strap. This may
need to be repeated several
times for proper fit.
Verify that the harness is snug
around the child’s waist and
shoulders.
4 - Position the chest clip at child’s
armpit level.
Check that Child is Secure
Buckle is fastened.
Harness straps are not twisted.
Harness is snug – A snug
harness cannot be pinched
horizontally, and should not
allow any slack.
Chest clip is level with armpits.
(continued on the next page)
click
34 35PIPA rx instructions PIPA rx instructions
1
2
3
4
click

Securing Child in Child
Restraint (continued)
1- Harness straps must be at
or just below child’s shoulders
to avoid injury. If harness
slots need to be moved, see
Shoulder Belts section.
Make sure that nothing
interferes with the harness.
Make sure harness is snug
around child and lays flat.
Serious injury or death could
occur to a child that is not
secured properly.
If child is not secured properly,
child could be ejected in a
sudden stop or crash, resulting
in serious injury or death.
36 PIPA rx instructions PIPA rx instructions 37
1

38 PIPA rx instructions PIPA rx instructions 39
RELX™Base Stability Leg
Refer to vehicle owner’s manual
to determine if stability leg can
be used. See page 40 for base
installation instructions.
1 - Press release button on bottom
of base to release the stability
leg from storage.
2 - Let the stability leg hang over
the edge of the vehicle seat.
After correctly installing the
base on the vehicle seat, press
the stability leg adjustment
button and extend the stability
leg perpendicular to the floor.
3 - Extend stability leg far enough
that it contacts the floor, the
stability leg indicator turns
green, and the leg locks into
position. Make sure the stability
leg is firmly planted on the floor
of the vehicle and does not easily
slide around.
4 - Indicators should show green,
meaning the stability leg is
properly contacting the floor.
If the stability leg indicator
shows red, the stability leg is
not making firm contact with
the vehicle floor. Adjust as
needed. Stability leg should be
perpendicular to the floor.
(continued on the next page)
1
2
3
4
Table of contents
Other Nuna Car Seat manuals