Nuna arra User manual


IMPORTANT﹗
READ THESE
INSTRUCTIONS
CAREFULLY BEFORE
USE AND KEEP
THEM FOR FUTURE
REFERENCE.

71
2
10
9 12
1
2
11
click
1
1
82
41
1
32 4
65 7
1
32 4
65 7
3
A
I
R
B
A
G
25
2
6
1

2118
2 1
14
2
1
17
1
16
2
15
13
1
2
23
2219
20

31
30 33
3532
24
34
27
26 29
28
click
25

41
39
4037
38
36
44
42
43

2
ARRA instruction
EN
Contents
Product information
Product Registration 3
Warranty 3
Contact 4
Child Usage Requirements 4
Warnings 6
Parts List 11
Product Use 13
Cleaning and Maintenance 19
French (FR) 21
German (DE) 41
Dutch (NL) 61
Italian (IT) 81
Spanish (ES) 101
Portuguese (PT) 121
Polish (PL) 141
Czech (CZ) 161
Slovak (SK) 181
Croatian (HR) 201
Slovenain (SL) 221
Russian (RU) 241
Swedish (SV) 261
Finnish (FI) 281
Romanian (RO) 301
Greek (EL) 321
Turkish (TR) 341
Arabic (AR) 361
Designed
around your life

43 ARRA instruction ARRA instruction
EN
EN
Product Information
Model Number:_______________________________________________________
Manufactured Date: ________________________________________________
Product Registration
Please fill in the above information. The model
number and the manufactured in date are located on
the back and bottom of the Enhanced Child Restraint
and base.
To register your product please visit:
www.nunababy.com
Click the “Register Gear” link on the homepage.
Warranty
We have purposely designed our high-quality
products so that they can grow with both your child
and your family. Because we stand by our product,
our gear is covered by a custom warranty per product,
starting from the day it was purchased. Please
have the proof of purchase, model number and
manufactured in date available when you contact us.
For warranty information please visit:
www.nunababy.com
Click the “Warranty” link on the homepage.
Contact
For replacement parts, service, or additional warranty
questions, please contact our customer service
department.
info@nunababy.com
www.nunababy.com
NUNA International B.V.
Van der Valk Boumanweg 178 C
2352JD Leiderdorp
The Netherlands
Child Usage Requirements
This product is suitable for use with children who
meet the following requirements:
Figure for Installation Suitable for
Child height 40cm-85cm/
Child weight≤13kg
(approximately 1.5 years
old or under)
In the United Kingdom:
infouk@nunababy.com
www.nunababy.com

65 ARRA instruction ARRA instruction
EN
EN
1 “i-Size” (Integral Universal ISOFIX Enhanced
Child Restraint Systems) is a category of
Enhanced Child Restraint System primarily
designed for use in all i-Size seating position of a
vehicle.
2 According to the UN Regulation No. 129, the
Enhanced Child Restraint with base is a Universal
ISOFIX Enhanced Child Restraint and should be
fitted using the ISOFIX connections.
3 This is an "i-Size" Enhanced Child Restraint
System. It is approved according to UN
Regulation No. 129, for use in, i-Size compatible
vehicle seating positions as indicated by vehicle
manufacturers in the vehicle users’ manual.
4 If in doubt, consult either the Enhanced Child
Restraint System manufacturer or the retailer.
WARNING
Failure to follow these warnings and instructions
could result in serious injury or death.
After your child is placed in this enhanced child
restraint, the safety belt must be used correctly.
Any luggage or other objects liable to cause
injuries in the event of a collision shall be
properly secured.
Be sure that the enhanced child restraint
is installed in such a way that no part of it
interferes with movable seats or in the operation
of vehicle doors.
Before carrying the enhanced child restraint by
hand, ensure that the child is fastened with the
child harness, and that the handle is correctly
locked in a vertical position.
Consult the distributor for issues concerning
maintenance, repair and part replacement.
Correct Installation is only permitted by use of
the ISOFIX connectors.
Frequently check the ISOFIX guides for dirt
and clean them if necessary. Reliability can be
effected by ingress of dirt, dust, food particles
etc.
030527
UN Regulation
No.129/03
i-Size
universal
ISOFIX
40cm-85cm/
≤13kg

87 ARRA instruction ARRA instruction
EN
EN
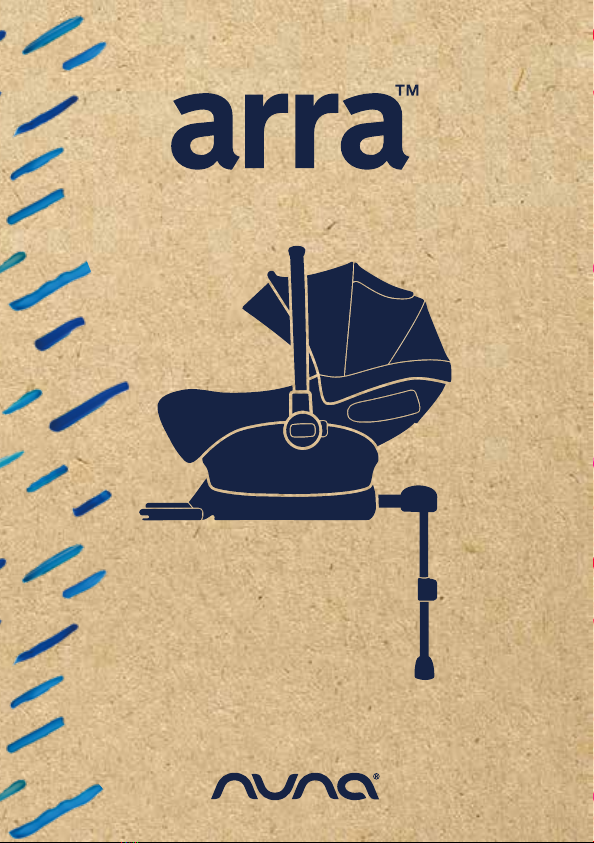
Please check before you purchase this enhanced
child restraint to make sure it can be installed
properly in your vehicle.
Please keep the enhanced child restraint away
from sunlight, because it may be too hot for
child’s skin. Always touch the enhanced child
restraint before placing child in it.
Remove this enhanced child restraint from the
vehicle seat when it is not in regular use.
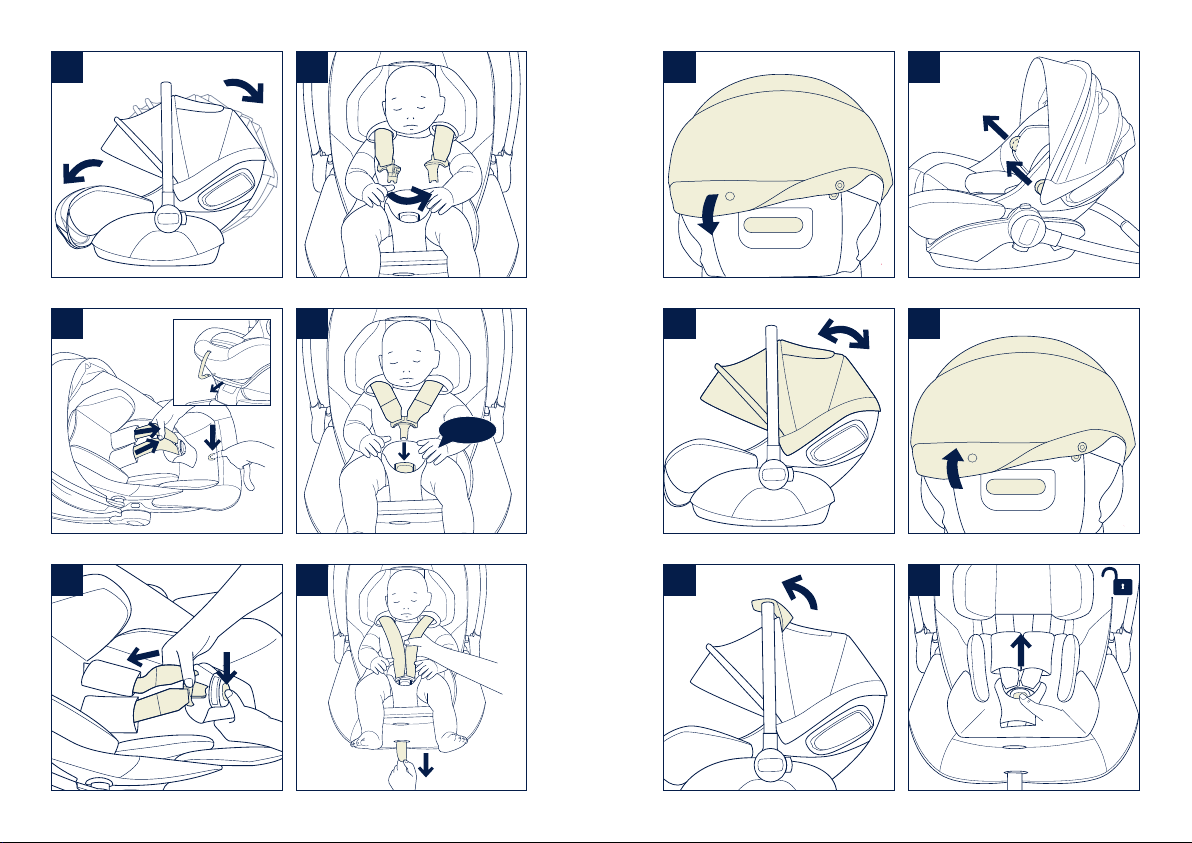
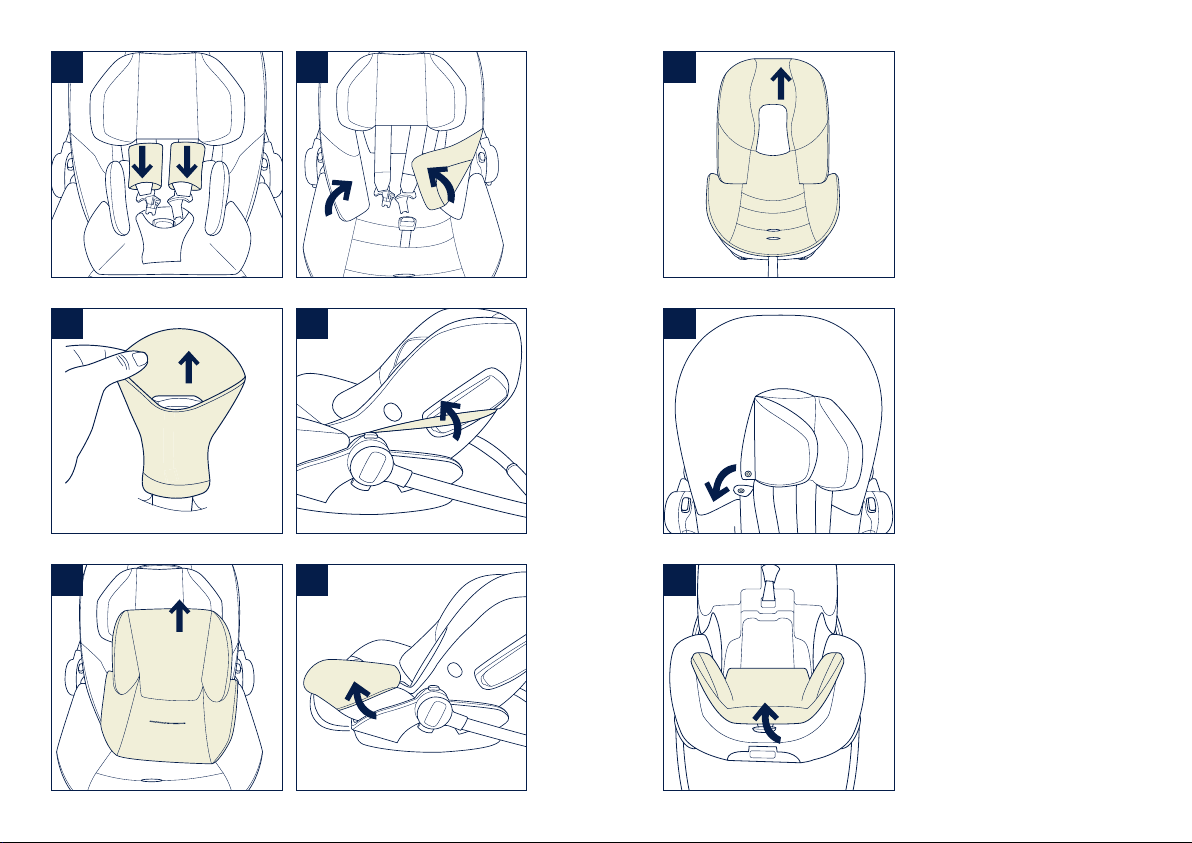
The enhanced child restraint system soft goods
should not be replaced with any other than
the one recommended by the manufacturer,
because the soft goods constitutes an integral
part of the restraint performance.
The parts of the enhanced child restraint should
not be lubricated in any way.
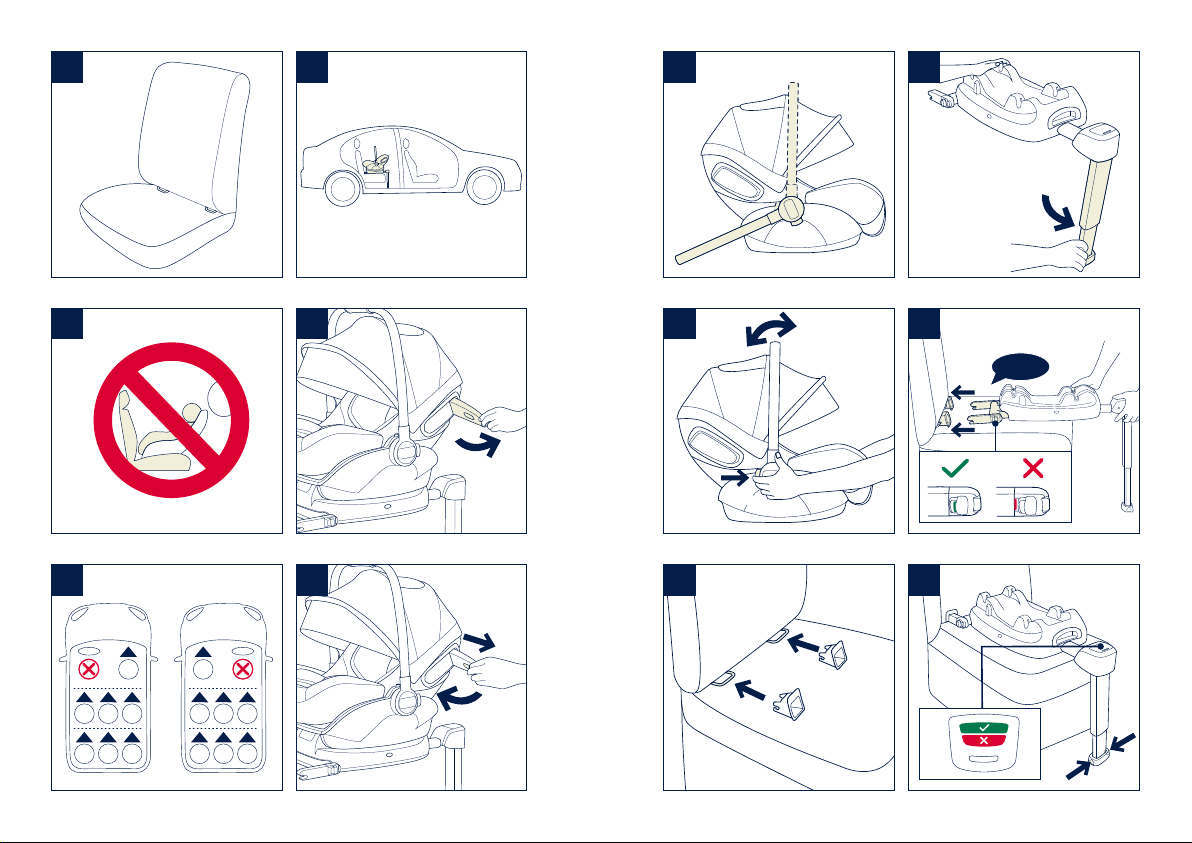
The load leg should be in contact with the
vehicle floor and the straps restraining the child
should be adjusted to the child’s body. The
straps should not be twisted.
To avoid serious injury or death, NEVER place
enhanced child restraint on elevated surface
seat with child in it.
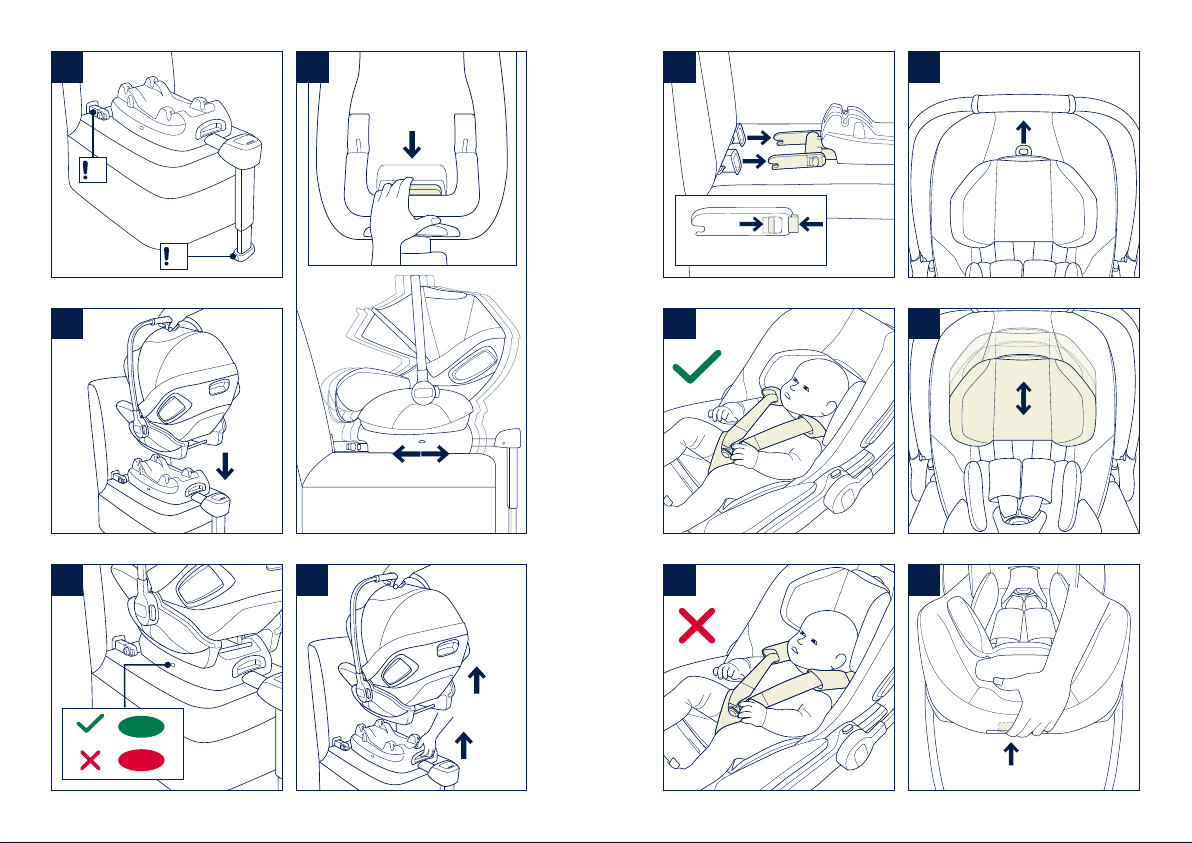
To avoid the risk of falling out, always secure
the child using the child harness when the child
is placed in the enhanced child restraint, even
when the enhanced child restraint is not in the
vehicle.
To use this enhanced child restraint with the
ISOFIX connections according to UN Regulation
No. 129, your child must meet the following
requirements. Child height 40cm-85cm/ Child
weight≤13kg (approximately 1.5 years old or
under).
NEVER leave your child unattended with their
enhanced child restraint.
NEVER use a second-hand enhanced child
restraint or an enhanced child restraint whose
history you do not know because it may have
structural damage that compromises your child’s
safety.
NEVER use ropes or any other substitutes to
secure enhanced child restraint in vehicle or to
secure child into enhanced child restraint.
NO enhanced child restraint can guarantee full
protection from injury in an accident. However,
proper use of this enhanced child restraint will
reduce the risk of serious injury or death to your
child.
DO NOT continue to use this enhanced child
restraint after it has suffered any type of crash,
even a minor one. Replace immediately as there
may be invisible, structural damage from the
crash.

109ARRA instruction ARRA instruction
EN
EN
DO NOT have your child in large/oversized
clothes because this may prevent your child
from being properly and securely fastened by
the shoulder harness straps and the crotch strap
between the legs.
DO NOT install this enhanced child restraint
without following the instructions in this manual
or you may put your child at serious risk of injury
or death.
DO NOT leave this enhanced child restraint
or other items unbelted or unsecured in your
vehicle because an unsecured enhanced child
restraint can be thrown around and may injure
occupants in a sharp turn, sudden stop, or
collision.
DO NOT make any modification to this enhanced
child restraint or use it along with component
parts from other manufacturers.
DO NOT place any objects in the load leg area in
front of your base.
DO NOT put anything other than the
recommended inner cushions in this enhanced
child restraint.
DO NOT use any load bearing contact points
other than those described in the instructions
and marked on the enhanced child restraint.
DO NOT use the enhanced child restraint
without the soft goods.
DO NOT use the rearward facing enhanced child
restraint systems in seating positions where
there is an active frontal airbag installed. Death
or serious injury may occur. Please reference
vehicle owner’s manual for more information.
DO NOT use this enhanced child restraint if it
has damaged or missing parts.

1211 ARRA instruction ARRA instruction
EN
EN
Parts List
Make sure all parts are available before assembly.
If any part is missing, please contact Nuna (see page
3 & 4 for information). No tools are required for
assembly.
1 Handle
2 Canopy
3 Instruction
Manual Storage
Compartment
4 Seat Pad
5 Infant Insert
6 Webbing Adjustment
Button
7 Adjustment Webbing
8 Shoulder Harness
Covers
9 Stroller Fix Releasing
Button
10 Crotch Harness Cover
11 Harness Connector
12 Harness Buckle
13 Side Impact Shield
14 Handle Adjustment
Button
15 Backrest Adjustment
Button
16 ISOFIX Connector
17 Shell Indicator
18 Load Leg
19 Load Leg Adjustment
Button
20 ISOFIX Adjustment
Button
21 Enhanced Child
Restraint Releasing
Button
22 Load Leg Indicator
23 ISOFIX Guides
23
20
17
18
19
16
22
21
14
13
15
38
9
4
10
1
7
6
5
2
11
12

1413 ARRA instruction ARRA instruction
EN
EN
Product Use
Installation Concerns
This enhanced child restraint is suitable for vehicle
seats with i-Size ISOFIX anchor points with the Base.
(1)
DO NOT use the rearward facing enhanced child
restraint systems in seating positions where there is
an active frontal airbag installed. (2) Death or serious
injury may occur. Please reference vehicle owner’s
manual for more information.
DO NOT install this enhanced child restraint on vehicle
seats that face sideways or rearward with respect to
the moving direction of the vehicle.
Please refer to your vehicle owner’s manual for
recommended or suggested installation positions.
(3)
It is recommended to install this enhanced child
restraint on the rear vehicle seat. (4)
DO NOT install this enhanced child restraint on
vehicle seats movable during installation.
Side Impact Shield
Ensure the side impact shield is locked in the open
position for maximum side impact safety.
IMPORTANT: Please note that unfolding the side
impact shield does NOT mean that the child is
already restrained tight enough.
1The side impact shield can be manually opened
as shown on (5).
2The side impact shield opposite the vehicle
door can be closed to allow more seating space,
if needed. (6) The side closest to the vehicle
exterior should always be in the open position.
Handle Adjustment
1The handle of the enhanced child restraint can be
adjusted to 2 positions. (7)
Position for car, hand or stroller transportation.
(7)-1
Baby chair position. (7)-2
2To adjust the handle, squeeze handle adjustment
buttons on both sides to release it (8)-1, and then
rotate the handle until it clicks into any of the 2
positions. (8)-2
Installation with Base
1Fit the ISOFIX guides with the ISOFIX anchor
points. (9) The ISOFIX guides can protect the
surface of the vehicle seat from being torn. They
can also guide the ISOFIX connectors.
2Unfold the load leg from storage compartment.
(10)

1615 ARRA instruction ARRA instruction
EN
EN
3Press the ISOFIX adjustment button to adjust
the ISOFIX connectors. Line up the ISOFIX
connectors with the ISOFIX guides, and then click
both ISOFIX connectors into the ISOFIX anchor
points. (11)
Make sure that both ISOFIX connectors are
securely attached to their ISOFIX anchor points.
There should be two audible clicks and the colors
of the indicators on the both ISOFIX connectors
should be completely green. (11)-1
Check to make sure the base is securely installed
by pulling on the both ISOFIX connectors.
4After placing the base on the vehicle seat,
extend the load leg to floor (12). When the load
leg indicator shows green means it is installed
correctly, red means it is installed incorrectly.
(12)-2
The load leg has multiple positions. When the
load leg indicator shows red this means the load
leg is in the wrong position.
Make sure the load leg is in full contact with the
vehicle floor pan.
Squeeze the load leg adjustment button, then
shorten the load leg upwards. (12)-1
The completely assembled base is shown as (13).
The ISOFIX connectors must be attached and
locked onto the ISOFIX anchor points. (13)-1
The load leg must be installed correctly with
green indicator. (13)-2
5Push the enhanced child restraint down into the
base (14), if the enhanced child restraint is secure,
the shell indicator shows green. (15)
Pull up on the enhanced child restraint to be sure
it is securely latched into the base.
6Press the ISOFIX adjustment button (16)-1, and
push the base back against the vehicle seat until
tight. (16)-2
7To remove the enhanced child restraint, lift the
enhanced child restraint off (17)-2 while pressing
the enhanced child restraint adjustment button.
(17)-1
8To remove the base, press the secondary lock
button (18)-1 first and then the button (18)-2 on
the ISOFIX connectors before removing the base
from the vehicle seat. (18)
Height Adjustment
for Head Support and Shoulder Harnesses
Check that shoulder harness straps are set at the
proper height. Please choose the proper pair of
shoulder harness according to the child’s height.

1817 ARRA instruction ARRA instruction
EN
EN
Shoulder harness straps must be nearest to your
childs shoulders (19), but not above the shoulder
line. (20)
If the Shoulder harness straps are not at proper
height, the child might be ejected from the
enhanced child restraint if there is a crash.
Pull the head support adjustment lever (21),
meanwhile pull up or down the head support until it
snaps into one of the 10 positions. The head support
positions are shown as (22).
Backrest Adjustment
There are 3 angles for the backrest.
Please press backrest adjustment button to heighten
or lower the backrest. (23)(24)
Securing Child
Use Infant Insert
After the child is placed in the enhanced child
restraint, check whether the shoulder harness straps
are set to the proper height.
1While pressing the webbing adjustment button,
pull completely the two shoulder harness straps
of the enhanced child restraint. (25)
2Unlock the buckle of the harnesses by pressing
the red button. (26)
3Place child into the enhanced child restraint and
lock the buckle. (27)(28)
4Tighten the shoulder harness straps by pulling the
adjustment webbing. (29)
Make sure the space between the child and the
shoulder harness straps is about the thickness of
one hand.
Canopy
1 To assemble the canopy, snap the canopy to the
rear of seat. (30)
2To open the canopy, pull the canopy toward, and
to close the canopy, push it back. (31)
3The canopy window can be opened for
ventilation. (32)
Detach & Assemble Soft Goods
see images (33)-(44)
To re-assemble the soft goods, reverse the
aforementioned steps.
We recommend
using the infant
insert while the
baby is under
60cm or until they
outgrow the insert.

2019 ARRA instruction ARRA instruction
EN
EN
Cleaning and Maintenance
Clean the frame, plastic parts, and fabric with a damp
cloth, but do not use abrasives or bleach. Do not use
silicon lubricants as they will attract dirt and grime.
To ensure long-lasting use, wipe this product off with
a soft, absorbent cloth after using it in rainy weather.
Refer to the care labels attached to the soft goods for
washing and drying instructions.
It is normal for fabric to color from sunlight and to
show wear and tear after a long period of use, even
when used normally.
For reasons of safety, only use original Nuna parts.
Check regularly if everything functions properly. If
any parts are torn, broken, or missing, stop using this
product.
NUNA International B.V.
Nuna and all associated logos are trademarks.

2221 Instructions ARRA Instructions ARRA
FR
FR
Sommaire
Informations sur le produit
Enregistrement du produit 23
Garantie 23
Contact 24
Conditions d'utilisation avec un enfant 24
Avertissement 26
Liste des pieces 31
Utilisation du produit 33
Nettoyage et entretien 39
IMPORTANT ﹗
LISEZ
ATTENTIVEMENT
CES INSTRUCTIONS
AVANT LA PREMIÈRE
UTILISATION ET
CONSERVEZ-LES.

2423 Instructions ARRA Instructions ARRA
FR
FR
Informations sur le produit
Numéro de modèle :________________________________________________
Date de fabrication :________________________________________________
Enregistrement du produit
Veuillez fournir les informations ci-dessus. Le numéro
de modèle et la date de fabrication se situent à
l'arrière et en bas du dispositif de retenue pour
enfants amélioré et de la base.
Pour enregistrer votre produit, veuillez vous rendre sur
le site suivant :
www.nunababy.com
Cliquez sur le lien « Enregistrement du matériel »
dans la page d’accueil.
Garantie
Nous avons conçu spécialement nos produits de
haute qualité afin qu'ils puissent accompagner le
développement de votre enfant et de votre famille.
Nous soutenons notre produit en couvrant notre
matériel par une garantie personnalisée, commençant
le jour de son achat. Ayez la preuve d'achat, le
numéro de modèle et la date de fabrication à
disposition lorsque vous nous contactez.
Pour des informations sur la garantie, veuillez visiter :
www.nunababy.com
Cliquez sur le lien « Garantie » dans la page d’accueil.
Contact
Pour des informations sur les pièces de rechange,
le service ou des questions supplémentaires sur la
garantie, veuillez contacter notre service client.
info@nunababy.com
www.nunababy.com
Conditions d'utilisation avec
un enfant
Ce produit est adapté aux enfants répondant aux
exigences suivantes :
Illustration pour
l'installation Convient à
Taille de l'enfant 40 cm à
85 cm / Poids de l'enfant
≤ 13 kg
(environ 1,5 ans ou moins)

2625 Instructions ARRA Instructions ARRA
FR
FR
1 « i-Size » (Systèmes de retenue pour enfants
améliorés ISOFIX universels intégrés) est une
catégorie de systèmes de retenue pour enfants
améliorés principalement conçus pour être
utilisés dans toutes les positions d'assise i-Size
d'un véhicule.
2 Conformément à la réglementation UN No.129,
ce siège de bébé avec base est un dispositif de
retenue pour enfants amélioré ISOFIX universel et
doit être installé avec des connexions ISOFIX.
3 Il s’agit d’un dispositif de retenue pour enfants
amélioré “i-Size”. Il est approuvé conformément
à la réglementation UN No.129 pour une
utilisation dans des positions de sièges de
véhicules compatibles i-Size comme indiqué par
le constructeur dans le manuel de l’utilisateur du
véhicule.
4 En cas de doute, consultez le fabricant du
dispositif de retenue pour enfants amélioré ou le
distributeur.
AVERTISSEMENT
Ne pas suivre ces avertissements et instructions
peut conduire à de sérieuses blessures ou la
mort.
Une fois votre enfant placé dans ce dispositif
de retenue pour enfants amélioré, la ceinture de
sécurité doit être utilisée correctement.
Tout bagage et autres objets susceptibles de
causer des blessures en cas de collision doivent
être correctement sécurisés.
Assurez-vous que le dispositif de retenue pour
enfants amélioré est installé de sorte qu'aucune
partie n'interfère avec les sièges amovibles ou le
fonctionnement des portes du véhicule.
Avant de transporter le dispositif de retenue
pour enfants amélioré à la main, assurez-vous
que l'enfant est attaché avec le harnais pour
enfant et que la poignée est correctement
verrouillée en position verticale.
Consultez le distributeur pour tout ce qui est
maintenance, réparation et remplacement de
pièces.
Une bonne installation n'est permise qu'avec des
connecteurs ISOFIX.
Vérifiez régulièrement la présence de saleté sur
les guides ISOFIX et nettoyez-les si nécessaire.
La fiabilité peut être affectée par l'infiltration de
030527
UN Regulation
No.129/03
i-Size
universal
ISOFIX
40cm-85cm/
≤13kg

2827 Instructions ARRA Instructions ARRA
FR
FR
poussière, saletés, particules de nourriture, etc.
Avant d'acheter ce dispositif de retenue pour
enfants amélioré, veuillez vous assurer qu'il peut
être installé correctement dans votre véhicule.
Veuillez conserver le dispositif de retenue pour
enfants amélioré à l'écart de la lumière du soleil,
car il pourrait devenir trop chaud pour la peau
de l'enfant. Touchez toujours le dispositif de
retenue pour enfants amélioré avant de placer
l'enfant dedans.
Retirez ce dispositif de retenue pour enfants
amélioré du véhicule si vous ne prévoyez pas de
l'utiliser pendant une longue période.
Les pièces souples du dispositif de retenue pour
enfants amélioré ne doivent pas être remplacées
par des pièces autres que celles recommandées
par le fabricant, car les pièces souples font
partie intégrante des performances du dispositif
de retenue.
Les pièces du dispositif de retenue pour enfants
amélioré ne peuvent en aucune façon être
lubrifiées.
Le piètement de charge doit être en contact
avec le plancher du véhicule et les sangles qui
retiennent l'enfant doivent être ajustées au corps
de l'enfant. Les sangles ne doivent pas être
entortillées.
Pour éviter les blessures graves ou la mort, ne
placez JAMAIS le dispositif de retenue pour
enfants amélioré sur une surface élevée avec
l'enfant dedans.
Pour éviter les risques de chute, attachez
toujours l'enfant avec le harnais pour enfant
lorsque l'enfant est placé dans le dispositif de
retenue pour enfants amélioré, même lorsque le
dispositif de retenue pour enfants amélioré n'est
pas dans le véhicule.
Pour utiliser ce dispositif de retenue pour
enfants amélioré avec les connexions ISOFIX
conformément à la réglementation UN No.129,
votre enfant doit respecter les conditions
suivantes. Taille de l'enfant 40 à 85 cm / Poids
de l'enfant ≤ 13 kg (environ 1 an et demi ou
moins).
Ne laissez JAMAIS votre enfant sans
surveillance avec ce dispositif de retenue pour
enfants amélioré.
N'utilisez JAMAIS un dispositif de retenue
pour enfants amélioré d'occasion ou dont
vous ne connaissez pas l'historique, car il
pourrait présenter des dommages structurels
compromettant la sécurité de votre enfant.
N'utilisez JAMAIS de cordes ou d'autres
substituts pour fixer le dispositif de retenue
pour enfants amélioré dans le véhicule ou pour
attacher l'enfant dans le dispositif de retenue
pour enfants amélioré.
Table of contents
Languages:
Other Nuna Car Seat manuals
Popular Car Seat manuals by other brands

MaxiCosi
MaxiCosi TOBI DRU0632 Instructions for use

Babyauto
Babyauto biro fix Instructions for use

Babyauto
Babyauto ZARAUZCON FIX 123 Instructions for use

MaxiCosi
MaxiCosi Rodi Instructions for use & warranty

MaxiCosi
MaxiCosi FAMILYFIX Instructions for use

Babyauto
Babyauto multimax savile V8A Instructions for use