NuWave OXYPURE 47001 User manual

Owner’s Manual
Model 47001 - 47009
Rev.01
Questions or Concerns?
help@nuwavenow.com
OXYPURE® SMART AIR PURIFIER

2 | OxyPure Smart
THANK YOU!
Register Today!
1. Scan the QR code or visit
www.nuwavenow.com/QR to Register.
2. Have your proof of purchase! You will need it to register
your product.
3. Locate your serial and model numbers to have ready.
Note: You can locate the model and serial numbers, as well
as the QR code, on the label on the back of the unit.
help@nuwavenow.com
Scan to Email
nuwavenow.com/qr
Scan to Register
Congratulations on your NuWave® purchase. We know there are many options
available and sincerely appreciate the trust you have placed in us.
For the last 30 years, we have committed to introducing products that promote
healthy living at affordable prices. By combining the highest quality designs with
cutting edge technology, we have always strived to blend feature, function, and
innovation in every product we make. We hope you will agree.
We would love to hear from you. Please feel free to reach
out with any feedback or comments that could improve
your experience. We would also enjoy hearing about your
successes. The best way to reach us is by email:
help@nuwavenow.com
Connect with Us!
#nuwavenow
Visit nuwavenow.com to see other
great products and accessories.

nuwavenow.com | 3
TABLE OF CONTENTS
U.S Environmental
Protection Agency
Meets California ozone
emissions limit.
CARB certied
Para la versión en español de este manual, visita www.nuwavenow.com
This equipment has been tested and found to comply with the limits for a Class B digital
device, pursuant to part 15 of the FCC Rules. These limits are designed to provide
reasonable protection against harmful interference in a residential installation. This
equipment generates, uses and can radiate radio frequency energy and, if not installed
and used in accordance with the instructions, may cause harmful interference to radio
communications. However, there is no guarantee that interference will not occur in a
particular installation. If this equipment does cause harmful interference to radio or televi-
sion reception, which can be determined by turning the equipment off and on, the user is
encouraged to try to correct the interference by one or more of the following measures:
• Reorient or relocate the receiving antenna.
• Increase the separation between the equipment and receiver.
• Connect the equipment into an outlet on a circuit different from that to which the
receiver is connected.
• Consult the dealer or an experienced radio/TV technician for help.
OWNER’S MANUAL
Important Safeguards ....................................................4-5
Parts & Accessories.......................................................... 6
Assembly ..........................................................................7
WiFi Connection.............................................................8-9
Operation .....................................................................9-12
Cleaning & Maintenance.............................................12-15
Troubleshoot Guide.......................................................... 16
Limited Warranty .........................................................17-19

4 | OxyPure Smart
1. ONLY use the OxyPure for its intended
purpose.
2. To protect against the risk of electrical
shock, DO NOT immerse the cord,
plug, or any part of the OxyPure in
water or any other liquid.
3. Close supervision is necessary when
the OxyPure is used by or near chil-
dren. The OxyPure is not intended for
use by children, persons with reduced
physical, sensory, or mental capabil-
ities, or those who lack expertise or
knowledge of this device.
4. DO NOT operate the OxyPure with a
damaged cord, plug, after any malfunc-
tion, or if the unit has been dropped or
damaged in any way. Contact Custom-
er Service by emailing
help@nuwavenow.com for more
information.
5. Discard the protective plastic cov-
ering the power plug before use.
6. DO NOT run the cord under carpeting,
throw rugs, runners or other coverings.
7. DO NOT route the cord under furniture
or appliances. Arrange the cord away
from high-trafc areas where it will not
pose a tripping hazard.
8. DO NOT plug the OxyPure into an
outlet or power strip that is being used
by other appliances.
9. Remove any dust or water from the
plug, if needed.
IMPORTANT SAFEGUARDS
HOUSEHOLD USE ONLY • READ ALL INSTRUCTIONS BEFORE USE
10. ALWAYS set up the OxyPure on a at,
stable surface.
11. DO NOT set up the OxyPure where
it could be pushed, kicked, or tripped
over.
12. Leave at least 2-3 feet of space be-
tween the OxyPure’s vents and any
walls.
13. DO NOT install the OxyPure near a
heating device, ammable or com-
bustible gases or vapors, or in areas
exposed to moisture or water.
14. DO NOT operate the OxyPure on its
side.
15. DO NOT place objects on top of the
OxyPure.
16. DO NOT sit or stand on, or lean
against, the OxyPure.
17. Alteration or modication of any part of
the OxyPure, or the use of attachments
not recommended by the manufacturer,
may cause re, injury, or damage to
property.
18. As with most electrical units, electrical
parts are live even when the OxyPure
is off. Be sure the OxyPure is un-
plugged when assembling.
19. DO NOT use the OxyPure in a factory
or industrial setting where machine oil
may be present in the air.
20. Turn the power OFF on the OxyPure
before unplugging it.
21. Unplug the OxyPure from outlet when
the unit is not in use or will be left unat-
ALWAYS KEEP THIS MANUAL HANDY FOR FUTURE REFERENCE.
READ ALL INSTRUCTIONS and WARNINGS: The failure to follow any of the important safe-
guards, warnings, or instructions for safe use is a misuse of the OxyPure that can void your warranty
and create the risk of serious injury. When using the OxyPure, basic safety precautions should always
be followed.

nuwavenow.com | 5
FILTER CHANGING PRECAUTIONS
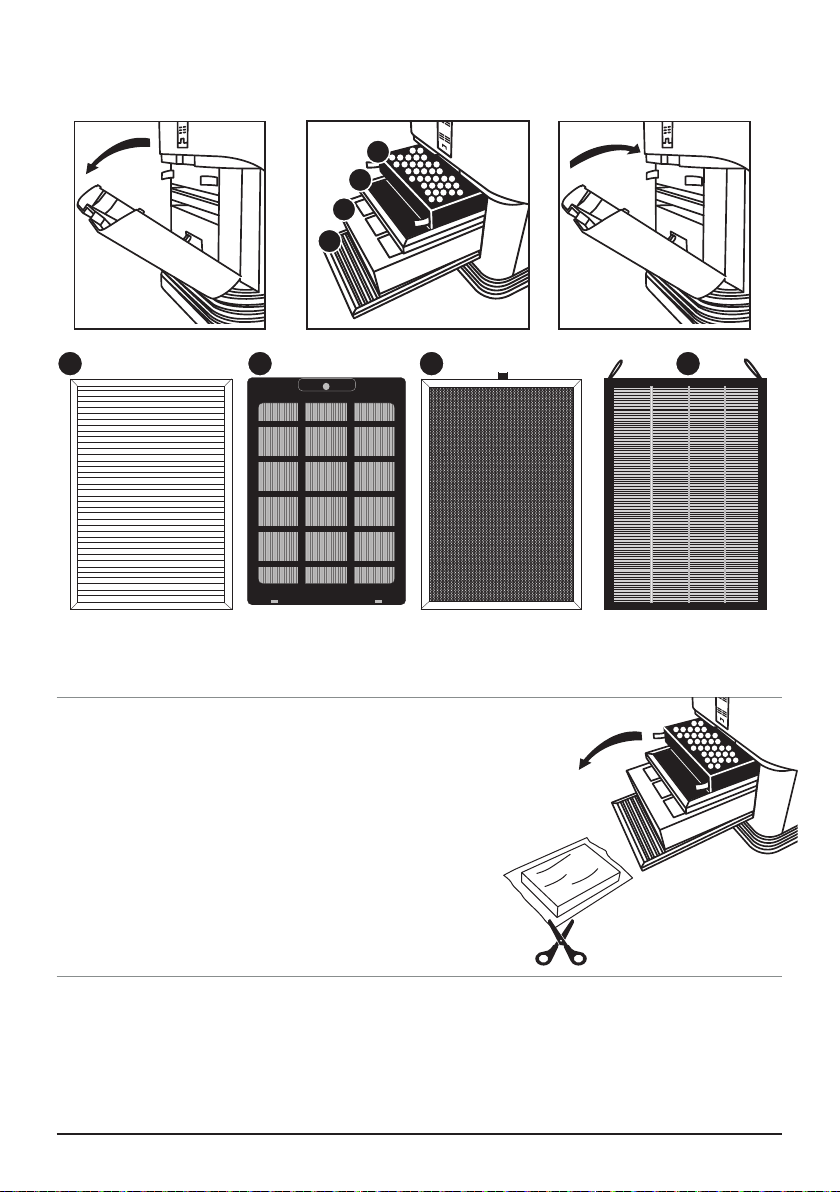
1. Once all lters have been removed, the
body of the OxyPure can be washed
with warm, soapy water. Dry thoroughly
before replacing the lters.
2. ALWAYS use rubber gloves when han-
dling the lters.
3. When removing dirty lters, ALWAYS do
so outside or in a well ventilated area.
4. ALWAYS replace your lters with
NuWave lters made for your model of
air purier.
tended for an extended period of time;
before putting on or taking off parts;
when removing or replacing the lters;
and before cleaning.
22. DO NOT operate the OxyPure if an
abnormal sound or motion is detected.
23. If a hard or foreign object comes into
contact with the fan, do not operate.
Turn off and unplug the OxyPure.
24. Inspect the OxyPure for any loose or
missing parts before and after each
use. If parts are loose, damaged, or
missing, contact Customer Service by
emailinghelp@nuwavenow.com.
25. DO NOT pull, lift, drag, pick up, or carry
the OxyPure by its cord.
26. DO NOT block the air inlet or outlet
vents.
27. DO NOT operate the OxyPure without
lters or the Filter Access Panel in
place.
28. DO NOT place anything with a strong
odor or chemical on or close to the
odor sensor.
WARNING
RISK OF ELECTRIC SHOCK: To reduce the
risk of electric shock, this equipment has a
polarized plug (one blade is wider than the
other). This plug will t in a polarized outlet
only one way. If the plug does not t fully in the
outlet, reverse the plug. If it still does not t,
contact qualied personnel to install the proper
outlet. Do not alter the plug in any way.
These servicing instructions are for use by
qualied personnel only. To reduce the risk of
electric shock, do not perform any servicing other
than that contained in the operating instructions
unless you are qualied to do so.
IMPORTANT SAFEGUARDS
HOUSEHOLD USE ONLY • READ ALL INSTRUCTIONS BEFORE USE
ELECTRICAL INFORMATION
These servicing instructions are for use
by qualied personnel only. To reduce the
risk of electric shock, do not perform any
servicing other than that contained in the
operating instructions unless you are quali-
ed to do so.
Power-Supply Cords
A short, detachable power-supply cord is
provided to reduce the risk of becoming
entangled in, or tripping over, a longer cord.
Longer detachable power-supply cords or
extension cords are available and may be
used if care is exercised in their use. If a
longer, detachable power-supply cord or
extension cord is used:
1. The marked electrical rating of the ex-
tension cord should be at least as great
as the electrical rating of the appliance.
2. The longer cord should be arranged so
that it will not drape over any countertop
or tabletop where it could be pulled on or
tripped over unintentionally.
3. The OxyPure should be operated on
a separate electrical outlet from other
operating appliances due to wattage
limitations.

6 | OxyPure Smart
PARTS
Keeping your OxyPure up and running with new lters is a breeze.
1. Locate the part number on the above images, then
2. Contact NuWave Customer Service by emailing h
elp@nuwavenow.com
, or order
online at www.nuwavenow.com.
ORDERING PARTS
Sensor Cover
Part #: OXP3
Filter Sensor
Part #: OXP7
HEPA/Carbon Filter
Part #: OXA5
Ozone Emission
Removal Filter
Part #: OXA6
Bio-Guard™Filter
Part #: OXA7
Stainless Steel Pre-Filter
Part #: OXA8
9a
9b
10
11
12
13
Air Vent
Part #: OXA1
Front Display
Touchpad Panel
Part #: OXA2
Handles
Part #: OXA3
Odor Sensor
Part #: OXP8
Base
Part #: OXA4
Inflow Vent
Part #: OXA10
Filter Slot Cover
Part #: OXP6
Wheels
Part #: OXP9
1
2
3
4
5
6
7
8
1
2
Front
Back
5
9a
9b
7
68
10
11
12
13
3
4

nuwavenow.com | 7
Air Filter Assembly
The OxyPure®comes with four different preassembled filters inside the unit (see diagram
on the right). Each filter is labeled with a number. Match these with the slot numbers
when installing the filters. When the filters require cleaning, please refer to Cleaning &
Maintenance.
ASSEMBLY
Open Close
Access to Filters
Stainless Steel
Pre-Filter
Bio-Guard™Filter Ozone Emission
Removal Filter
HEPA/Carbon
Filter
Before Use:
1. Make sure the OxyPure®is unplugged. Open the
panel on the back to expose the lters.
2. Pull the lters from their slots.
3. Remove the plastic wrapping from the lters.
4. Fully reinsert the lters into the Oxypure and close
the panel.
5. Remove the sticker from the control panel.
4
3
2
1
4321

8 | OxyPure Smart
THE NUWAVE CONNECT APP
MONITOR AND CONTROL THE OXYPURE REMOTELY
Wi-Fi
1
2
Scan the QR code below.
It will take you to the App’s download
page on either the Google™Play Store or
the Apple AppStore, then just follow the
download and installation instructions.
If your phone does not have that
capability built-in, download a 3rd-Party
QR Scanning App or you can download
the App from the Google™ Play Store or
the Apple AppStore.
1. Download the NuWave® Connect app via
the Apple Store or Google™ Play Store
on your smartphone or device and open
the app.
2. Plug in the unit and be sure your phone
is connected to your network. will only
connect to a 2.4GHz* network.
3. Open the app and follow the instructions
for the verification process.
4. Activate the Wi-Fi Pairing Mode by
pressing and hold POWER until the light
next to the Wi-Fi symbol begins to blink
rapidly.
Using the built-in QR reader in your
Camera App:
For Android Users:
1. Begin adding the device, tap “+” then
select the “OxyPure” to be added. You
can look at the label at the back of the unit
for the correct name.
2. If the device appeared, press “Go to add”.
3. If selected by the device name, confirm
“the Wi-Fi indicator is blinking rapidly”.
4. Then press “Next” to confirm the Wi-Fi
password.
5. Once added successfully, press “Next” if
appears, then tap “Done”.
For iPhone users:
1. Once the NuWave Connect App and tap
the”+” sign in the top right corner.
2. Tap on Auto Scan and wait a few seconds
for your OxyPure to appear on the screen.
3. Then verify the Wi-Fi network and
password.
4. Tap “Next” to begin pairing!
5. Once added successfully, a green √will
appear, then press “Next”.
6. Will show the unit “Added”, press “Done”
in the upper right corner.
Pairing with AP Mode:
If your device cannot connect to your Wi-Fi
network, you can pair your OxyPure with your
phone using AP Mode.
• When selecting your device to pair with,
tap EZ Mode in the top right and switch
to AP Mode. Then you simply follow the
instructions on the screen.
Note:
To either connect to or change networks,
depending on your cellular service, you
may need to remove the app and reinstall
it to complete the connection before
continuing with the setup process.
When the OxyPure is connected to the Wi-
Fi, the light next to “Wi-Fi” will stop flashing
and stay continuously lit.
If the OxyPure did not connect to your
network, the Wi-Fi light will turn off. Repeat
the steps for pairing. Make sure to select
the proper Wi-Fi network and type the
correct password.
The OxyPure, as with most IoT devices
(computing devices), will only connect to a
2.4GHz* network.

nuwavenow.com | 9
Wi-Fi LED Status
Pairing Mode & AP Mode
Solid Light
The OxyPure®is paired with the Wi-Fi and ready
to be used.
Rapid Blinking Light
The OxyPure is in Pairing Mode. The OxyPure will
remain in Pairing Mode for up to 3 minutes, or until
your device is paired.
Slow Blinking Light
The OxyPure is in AP Pairing Mode.
No Light
The OxyPure’s Wi-Fi is off.
SAVE THESE INSTRUCTIONS
To reset the OxyPure Wi-Fi, press
and hold POWER until the light
blinks rapidly.Start the process of
pairing.
If the light on your OxyPure is blinking
slower, the OxyPure is in Wi-Fi AP Pairing
Mode. To exit AP Mode and initiate the
Pairing Mode, press and hold ULTIMATE
CLEAN or until the Wi-Fi light begins
blinking rapidly.
Most routers will broadcast in 2.4GHz. If
you need help activating 2.4GHz, contact
your ISP (Internet Service Provider).
OPERATING THE OXYPURE
CONTROL PANEL •POWER •MODES & FUNCTIONS
Operating the OxyPure
The OxyPure’s control panel allows you to turn the unit on and off, choose an operating
mode or function (see below), and monitor your lter health.
Air/Odor Quality - Detects particles as small as 2.5/1000mm
Low PM Level High PM Level
Particulate Matter (PM) with a diameter of 2.5 microns or less
0~5 5~10 10~20 20~30 30~50 Over 50
Fan Speeds
1 2 3 4 5 6
Air and Odor LEDs
The OxyPure will display the Air/Odor quality based on the particulate matter in the air
from low to high as represented below. If the PM level in the air exceeds the upper limit of
the range, a warning is triggered with a beeping sound and a ashing LED. To turn off this
warning, press AUTO and Fan Speed at the same time. Press the same buttons to turn the
warning feature back on.
Low PM Level High PM Level
ODOR
NO
ODOR
STRONG
ODOR
REPLACE
FILTER 4
CLEAN
FILTER 2
WIFI
SLEEP MODE
AUTO ULTIMATE
CLEAN
FAN
SPEED TIMER TURBO
HR CLEAN DIRTY
POWER
HRHIGHLOW
ECO-FRIENDLY MODE
RESET FILTER 2
HOLD FOR 2 SECONDS
RESET FILTER 4
HOLD FOR 2 SECONDS
AIR

10 | OxyPure Smart
OPERATING THE OXYPURE
AUTO
SLEEP MODE
Filter Functions
Air purifiers operate more efficiently when
all windows and doors are closed. The
OxyPure can purify the air in extra-large
rooms (up to 2,671sq.ft.).
Stainless Steel Pre-Filter
Washable and reusable for up to 20
years.
Captures and collects large particles and
allergens including pet hair, dander, and
pollen.
Bio-Guard™Filter:
Washable and reusable for up to 20
years.
8,000V, positive and negative charges
capture particles as small as 0.1
microns, as well as smoke, pollen, and
allergens.
Ozone Emission Removal Filter
Reusable for up to 20 years. Not
washable.
Eliminates ozone emissions and other
harmful airborne chemicals.
HEPA/Carbon Filter
Lifespan, 6 months to 1 year. Not
Washable.
Captures and traps pollen, allergens,
industrial emissions, VOCs including
formaldehydes, household fumes, odors
and nitrogen dioxides from gas stoves and
car exhausts.
Power ON/OFF
1. Plug your OxyPure into an outlet.
POWER will be lit in red and OxyPure
will be in standby mode.
2. Press POWER. The OxyPure will turn
on and POWER will be lit green.
• Bars next to AIR and ODOR will
illuminate, measuring current air
quality.
• The fan will start.
3. Press POWER again to turn the
OxyPure off.
• When you select a different mode
other than the default AUTO before
turning off, the OxyPure will run the
previously selected mode when it is
powered back on.
AUTO
When the AUTO function is used, your
OxyPure will adjust the fan speed
automatically (no time limit).
1. Press AUTO. The AUTO light will be lit.
ULTIMATE
CLEAN
ULTIMATE CLEAN
When in ULTIMATE CLEAN mode, the
OxyPure will automatically adjust to the
highest fan speed based on your air quality
(no time limit).
1. Press ULTIMATE CLEAN. ULTIMATE
CLEAN will be lit green.
2. Press ULTIMATE CLEAN again to
turn it off.
SLEEP MODE
When in Sleep Mode the LED lights will be
off but the fan will still be active. Adjust the
fan speed to your preference prior to going
into Sleep Mode.
1. Manually adjust FAN SPEED.
2. Press and hold FAN SPEED for 2
seconds to activate Sleep Mode.
• The OxyPure will run at the fan
speed that was previously selected.
3. To turn off Sleep Mode, press any
button.
Note: ULTIMATE CLEAN and TURBO will
work while the OxyPure is in Sleep Mode.

nuwavenow.com | 11
OPERATING THE OXYPURE
FAN
SPEED
HIGHLOW
FAN SPEED
You can adjust from 6 different speeds
(LOW to HIGH).
1. Press FAN SPEED to adjust.
2. To go back to the lowest fan speed,
continue to press FAN SPEED until the
first bar is lit.
TIMER
Use the Timer function to choose the
duration of operation.
1. Press TIMER. The bar next to ½ hour
will be lit.
• There are 6 preset times to choose
from.
2. Press TIMER to increase time.
• Choose from ½ hour, 1, 2, 4, 8, or
12 hours.
• After pressing “TIMER” six times,
all bars will be lit.
3. Press TIMER once more to turn the
Timer off.
TURBO
The Turbo function cleans your air using
the highest fan speed at selected times.
1. Press TURBO to adjust from the
working time from ½ hour, 1, to 2
hours.
• When the selected time has
finished, Turbo will shut off
automatically.
2. Press TURBO 4 times to exit Turbo
mode.
AIR QUALITY INDICATOR
The OxyPure will automatically measure
and display the current air quality in the
room.
TIMER
HR
TURBO
HR
CLEAN DIRT
AIR
• The bars will illuminate around AIR and
ODOR, indicating the current air quality.
They will increase and decrease, and are
color coded, according to air quality.
CLEAN AND REPLACE FILTER
INDICATORS
• The lights next to CLEAN FILTER
2 and REPLACE FILTER 4 will
illuminate, indicating that your filters
will need to be cleaned or replaced.
• To reset the indicators, see “Resetting
the Filter and Air Quality Indicators” in
Cleaning & Maintenance.
2 BUTTONS FUNCTIONS
Eco-Friendly Mode allows you to save
energy by turning the OxyPure fan and
lights off when the unit is not needed. While
in Eco Mode, the fan will automatically run
when the PM level is high and remain off
when the PM level is low.
1. Press POWER and ULTIMATE CLEAN
at the same time POWER will be backlit
yellow.
2. Press POWER and ULTIMATE CLEAN
again to turn off Eco-Friendly Mode.
TURBO with TIMER
When using Turbo with Timer the default
time is set to 2 hours.
1. Press TURBO to set the running time.
2. Press TIMER and set the running
time.
ULTIMATE
CLEAN
+
TURBO
HR
+TIMER
HR
ODOR
NO
ODOR
STRONG
ODOR

12 | OxyPure Smart
OPERATING THE OXYPURE
CLEANING & MAINTENANCE
TURBO with AUTO
Use the Turbo mode to set a time limit.
Once the time is up, the OxyPure will switch
to Auto Mode.
1. Press TURBO to adjust the running
time from ½ hour, 1, or 2 hours.
2. Press AUTO to begin.
Your OxyPure can easily be moved from
one location to another. Just hold the
OxyPure by the handles on each side and
roll the OxyPure to the chosen location. The
wheels underneath provide extra
maneuverability and mobility whenever it’s
needed.
Before First Use
Wipe the Top Vent and In Flow Vent with
a slightly damp cloth or paper towel. Dry
thoroughly before use.
TURBO
HR
ULTIMATE
CLEAN +
TURBO
HR
+AUTO
Handles Wheels
ULTIMATE CLEAN with TURBO
Cleans at the highest fan speed for The
OxyPure runs Turbo mode for the set time,
then switches to Ultimate Clean mode.
1. Press ULTIMATE CLEAN. The
ULTIMATE CLEAN light will be lit
green.
2. Press TURBO. The default is ½ hour,
which can be adjusted from 1 to 2
hours.
3. Press TURBO a fourth time to turn it
off.
After Use
Your OxyPure should be cleaned
periodically and after excessive use to
ensure proper performance and function.
To clean the outsides of the OxyPure,
use a cloth, paper towel or vacuum brush
attachment to remove dust and other
particles from the vents. Clean tougher
buildup with a damp cloth or paper towel,
then dry thoroughly.
Cleaning the Top Vent and In Flow Vent
1. Turn off and unplug the OxyPure.
2. Use a vacuum with a brush attachment
to remove any dust and debris.
3. If needed, use a slightly wet paper
towel or damp cloth to remove
heavier buildup. Do not use any
harsh abrasives or cleaning pads on
the Top Vent or any other part of the
OxyPure.

nuwavenow.com | 13
CLEANING & MAINTENANCE
Odor Sensor
Top Vent
TOP
BOTTOM
Inow Vent
Cleaning the Odor Sensor Opening
The Odor Sensor is located on the upper
right side corner of the OxyPure underneath
the small grill opening.
• Keep the Odor
Sensor clear of
dust and debris
by cleaning with
a vacuum brush
attachment.
• DO NOT
tamper or spray
inside or near
the odor sensor. this may cause
the sensor to malfunction and void
the warranty.
The CLEAN FILTER 2 light will turn green
in about 3 months to alert you that the Bio-
Guard Filter SHOULD be cleaned to maintain
optimal performance. When the light turns red
(after about 6 months), the Bio-Guard Filter
MUST be cleaned.
1. Remove the Filter Slot Cover in the rear
of the OxyPure using its built-in handle.
2. Slide out the filters that need cleaning or
replacement.
3. Allow the
washable filters
to dry completely
before you reinstall
them.
• Never place a
wet filter into
the OxyPure.
• Ensure the
Filter Slot
Cover is properly aligned and secure
when reattaching.
2
4
Bio-Guard™Filter
HEPA/Carbon
Filter
4
3
2
1
The REPLACE FILTER 4 light will turn
green after 6 months to alert you that you
SHOULD consider changing the HEPA/
Carbon filter. When the light turns red (after
about 12 months), you MUST replace
the filter. Depending on your operating
environment, you may wish to replace the
Filter more frequently.
Changing the Filters
The filters inside the Filter Slot need to
be changed or cleaned on schedule to
help your OxyPure maintain optimum
performance.
ON THE CONTROL PANEL:
Filter Replacement
Indicator
ODOR
NO
ODOR
STRONG
ODOR
REPLACE
FILTER 4
CLEAN
FILTER 2
DIRTY
AIR
ON THE CONTROL PANEL:
Filter Replacement
Indicator

14 | OxyPure Smart
CLEANING & MAINTENANCE
The Pre-Filter collects large particles
and will need to be cleaned at least once
every two months depending on use.
1. Use a vacuum with a brush
attachment.
2. Clean the Filter with warm soapy water.
3. Rinse the Filter thoroughly and
remove any soap particles.
4. Allow the Filter to dry completely
BEFORE placing it back into the
• DO NOT WASH the Ozone
Emission Removal Filter or the
HEPA/Carbon Filter. The Ozone
Emission Removal Filter should
be replaced every 20 years. The
HEPA/Carbon Filter should be
replaced at least annually, and
possibly more depending on how
often the OxyPure is running and
the environment in which it is
operating.
Cleaning the Filters
To clean the Bio-Guard™Filter:
1. Remove the Filter.
2. Spray the Filter with a mild degreaser
and let it sit for 2-3 minutes.
3. Submerge the Filter in warm water,
shake, and remove.
4. Repeat this process until the Filter is
clean.
5. Rinse the Filter with warm water.
6. Dry the Filter completely before use.
To clean the Ozone Emission Removal
Filter:
1. Remove the Filter.
2. Throughly clean the Filter using a
handheld gently brush using a non-
abrasive brush or soft, clean, dry cloth.
3. Repeat this process on the other side.
DO NOT WASH OR DRY WITH A
BLOW DRYER OR OTHER HEAT
SOURCE.
• Clean this Filter outside your home
if possible.
OxyPure (up to 12-24 hours to dry.
Resetting the Filter and Air Quality
Indicators
5. To reset the Air Quality Indicator for
Filter 2, press and hold down TIMER
for 2 seconds until a beep is heard.
• After the filter is cleaned or replaced
and the indicator is reset, the first
green bar around AIR will be lit.
6. To reset the Air Quality Indicator for
Filter 4, press and hold down TURBO
for 2 seconds until a beep is heard.
• After the filter is cleaned or replaced
and the indicator is reset, the first
green bar around ODOR will be lit.
Cleaning the Filter Sensor
The Filter Sensor is located on the back,
above the Filter Slot Cover.
1. Open the panel
(Sensor Cover).
2. Using a dry cotton
swab or small,
soft brush, gently
remove any dirt
or dust from the
Sensor.
3. For heavier
buildup on the
Sensor, wipe it
with a slightly wet
cotton swab.
4. Remove any
moisture with a dry cotton swab.
• The Filter Sensor requires regular
cleaning (approx. every 3 months)
for the OxyPure to operate
efficiently.
• If your OxyPure is set up in an
area with high dust accumulation,
more frequent cleaning of the Filter
Sensor is needed.
• Do not use the cotton swab on any
part or area other than the Filter
Sensor.
Sensor Cover

nuwavenow.com | 15
CLEANING & MAINTENANCE
To clean the surface underneath and
Inner Vent Screen.
1. Turn the OxyPure off and unplug it from
the wall outlet.
2. Lift the Top Vent using the built-in tab.
3. Using a Using a vacuum with brush
attachment or duster, clean any dust or
accumulated particles from the surface
an Inner Vent Screen.
To clean the inner wall opposite of the
fan or to remove an object that has fallen
through the Inner Vent Screen.
1. After removing the Top Vent, locate the
two screws
2. Use a Phillips screwdriver to loosen the
two screws (only).
3. Lift up the Inner Vent Screen.
4. After cleaning the inner wall with
a soft cloth or paper towel, or
duster. Reassemble the Inner Vent,
retightening the two screws, and
replace the Top Vent.
• Make sure all parts are secure
before plugging in the OxyPure and
turning it on again.
Note: DO NOT unscrew the four outer screws located toward the corners. Doing so will
void your warranty.
Do not immerse the OxyPure in water. Clean with a damp sponge or cloth and wipe
dry.
Make sure all parts and covers are securely attached.
Cleaning the Top Vent
The Top Vent of your OxyPure can be removed to clean with mild soapy water and dried
thoroughly.
ODOR
NO
ODOR
STRONG
ODOR
REPLACE
FILTER4
CLEAN
FILTER2
WIFI
SLEEPMODE
AUTO
ULTIMATE
CLEAN
FAN
SPEED TIMER TURBO
HR CLEAN DIRTY
POWER
HRHIGHLOW
ECO-FRIENDLYMODE
RESETFILTER 2
HOLDFOR 2 SECONDS
RESETFILTER 4
HOLDFOR 2 SECONDS
AIR
ODOR
NO
ODOR
STRONG
ODOR
REPLACE
FILTER4
CLEAN
FILTER2
WIFI
SLEEPMODE
AUTO
ULTIMATE
CLEAN
FAN
SPEED TIMER TURBO
HR CLEAN DIRTY
POWER
HRHIGHLOW
ECO-FRIENDLYMODE
RESETFILTER 2
HOLDFOR2 SECONDS
RESETFILTER 4
HOLDFOR2 SECONDS
AIR

16 | OxyPure Smart
TROUBLESHOOTING GUIDE
CLEAN and REPLACE FILTER Indicators have not reset after the filter(s) have
been cleaned or changed.
1. The Filter Sensor is not reading the new filter. Turn the OxyPure off then on again. Press and
hold down TIMER for 2 seconds until a beep is heard.
2. Turn the OxyPure off, unplug and adjust the filter(s). Plug in and turn the OxyPure ON again.
3. The Filter Slot Cover in back rear is not securely in place. Make sure Filter Slot Cover is on
securely.
4. The Filter Sensor is dirty. Clean the Filter Sensor.
ULTIMATE CLEAN does not come on when pressed.
The OxyPure is not reading the function selected. Turn the OxyPure on and off by pressing POWER
twice.
Power is blinking red.
1. The Bio-Guard™ filter is not properly installed or is loose. Turn off and unplug the OxyPure.
Check that the filters are properly installed and are not loose. Plug in the OxyPure and press
POWER to turn it on.
2. When the Filter Slot Cover is removed, POWER will be backlit solid red. Pressing POWER will
make it blink. However, as a safety measure, the OxyPure will not operate when the Filter Slot
Cover is removed. Ensure that Filter Slot Cover is installed securely.
The Odor Sensor is not resetting itself and not clearing all bars. All bars on the control
panel are flashing.
Run the OxyPure manually for 8 hours or overnight. If the problem persists, contact Customer
Service by emailing help@nuwavenow.com.
The OxyPure does not turn on.
1. The plug is not in the wall outlet. Plug into wall outlet.
2. POWER on the touchpad panel is not on. Press POWER.
3. The Filter Slot Cover in the back rear is off or loose. Make sure Filter Slot Cover is on
securely.
TIMER does not work when pressed.
The OxyPure is not reading the function selected.
Press FAN SPEED or AUTO, then press TIMER.
The fans are not blowing.
1. An appropriate outlet is not being used. Make sure outlet has appropriate voltage for use.
2. The Filter Slot Cover in back rear is not properly in place. Make sure Filter Slot Cover is on
securely.
3. Check the Air Vent for obstructions.
Speed of the airflow is not changing when FAN SPEED is pressed.
The OxyPure may be in AUTO mode. Set the OxyPure to another operating mode on the touchpad
then press “FAN SPEED”.
Airflow from the Top Vent is weak.
The air filter(s) are dirty. Change or clean the air filters.
The OxyPure is producing smoke or odor.
The air filter(s) are dirty. Change or clean the air filters. If the problem continues, contact Customer
Service by emailing help@nuwavenow.com.

nuwavenow.com | 17
LIMITED WARRANTY
THE MANUFACTURER WARRANTS
NuWave, LLC warrants that OxyPure Smart Air Purier will be free from manufacturer de-
fects for 5 years from the date of purchase, under normal household use, and when operated
in accordance with the Manufacturer’s written instructions. The Limited Warranty covers the
Original Purchaser only. The Manufacturer will provide the necessary parts and labor to re-
pair the product at the NuWave LLC Service Department. After the expiration of the warranty,
the cost of the parts and labor will be the responsibility of the owner.
THE WARRANTY DOES NOT COVER
The Limited Warranty is voided if repairs are made by an unauthorized dealer, or the serial
number data plate is removed or defaced. Normal deterioration of nish due to use or expo-
sure is not covered by this Warranty. This Limited Warranty does not cover failure, damages,
or inadequate performance due to accident, acts of God (such as lightning), uctuations
in electric power, alterations, abuse, misuse, misapplications, corrosive-type atmospheres,
improper installation, failure to operate and maintain the OxyPure in accordance with the
Manufacturer’s written instructions, failure to regularly clean and maintain the reusable lters
and regularly replace the HEPA/Carbon Filter in accordance with the Manufacturer’s written
instructions, abnormal use, commercial or rental uses, or resold units. NuWave LLC re-
serves the right to void the Limited Warranty, where allowable by law, for products purchased
from an unauthorized dealer.
TO OBTAIN SERVICE
The owner shall have the obligation and responsibility to pay for all services and parts not
covered by the warranty; prepay the freight to and from Service Department for any part
or system returned under this warranty; and carefully package the product using adequate
padding material to prevent damage in transit. The original container is ideal for this purpose.
Include in the package the owner’s name, address, daytime telephone number, a detailed
description of the problem, and your Return Goods Authorization (RGA) number. by email-
ing help@nuwavenow.com to obtain the RGA number. Provide the cooking system model
& serial number and proof of date of purchase (a copy of the receipt) when making claims
under this warranty.
MANUFACTURER’S OBLIGATION
The Manufacturer’s obligation under this Limited Warranty is limited, to the extent allowable
by law, to repairing or replacing any part covered by this Limited Warranty which upon exam-
ination is found to be defective under normal use. The Limited Warranty is applicable only
within the continental United States and only to the original purchaser of the manufacturer’s
authorized channels of distribution. THE LIMITED WARRANTY MAY NOT BE ALTERED,
VARIED OR EXTENDED EXCEPT BY A WRITTEN INSTRUMENT EXECUTED BY THE
MANUFACTURER. THE REMEDY OF REPAIR OR REPLACEMENT AS PROVIDED
UNDER THIS LIMITED WARRANTY IS EXCLUSIVE. IN NO EVENT SHALL THE MANU-
FACTURER BE LIABLE FOR ANY CONSEQUENTIAL OR INCIDENTAL DAMAGES TO
ANY PERSON, WHETHER OR NOT OCCASIONED BY NEGLIGENCE OF THE
MANUFACTURER, INCLUDING WITHOUT LIMITATION, DAMAGES FOR LOSS OF USE,
COSTS OF SUBSTITUTION, PROPERTY DAMAGE, OR OTHER MONEY LOSS.

18 | OxyPure Smart
LIMITED WARRANTY
Some states do not allow the exclusion or limitation of incidental or consequential damag-
es, so the above limitation exclusions may not apply. This Limited Warranty gives specic
legal rights, and there may also be other rights which vary from state to state. EXCEPT
AS OTHERWISE EXPRESSLY PROVIDED ABOVE, THE MANUFACTURER MAKES
NO WARRANTIES EXPRESSED OR IMPLIED ARISING BY LAW OR OTHERWISE, IN-
CLUDING WITHOUT LIMITATION, THE IMPLIED WARRANTIES OF MERCHANTABILITY
AND FITNESS FOR A PARTICULAR PURPOSE TO ANY OTHER PERSON. READ YOUR
OWNER’S MANUAL. IF YOU STILL HAVE ANY QUESTIONS ABOUT OPERATION OR
WARRANTY OF THE PRODUCT, PLEASE CONTACT NUWAVE LLC.
DISPUTE RESOLUTION PROCEDURE
For disputes relating to use of the website or use or purchase of a NuWave product or ser-
vice (collectively “Disputes”), you agree to rst contact NuWave LLC, by emailing
legal@nuwavenow.com. If we cannot resolve your dispute informally, any and all disputes
shall be submitted to nal and binding arbitration. You may start the arbitration process by
submitting in writing a demand to the American Arbitration Association (“AAA”) and sending
a copy to NuWave. NuWave will pay all ling costs. A single arbitrator of the AAA will conduct
the arbitration in a location convenient to you or by phone. The arbitrator’s award will be
binding and may be entered as a judgment in a court of competent jurisdiction. The arbi-
tration will be conducted in accordance with the provisions of AAA’s Commercial Arbitration
Rules and Mediation Procedures in effect at the time of submission of your demand for ar-
bitration. See https://www.adr.org/sites/default/les/CommercialRules_Web.pdf. Except as
may be required by law as determined by an arbitrator, no party or arbitrator may disclose
the existence, content, or results of any arbitration hereunder without prior written consent
of both parties.
A. WAIVER OF RIGHT TO SUE. By agreeing to arbitration, you understand that, to the max-
imum extent permitted by law, you are agreeing to waive your right to le suit in any
court, to a court hearing, a judge trial, or a jury trial.
B. CLASS ACTION WAIVER. To the maximum extent permitted by law, you expressly agree
to refrain from bringing or joining any claims in any representative or class-wide capacity,
including but not limited to, bringing or joining any claims in any class action or class-wide
arbitration.
C. OPT OUT PROCEDURE. To request to opt out of arbitration you must contact NuWave
LLC by emailing help@nuwavenow.com. You will have 30 days from the date of product
delivery to opt out of arbitration with respect to any dispute arising out of or relating to use
or purchase of any NuWave product. If more than 30 days have passed, you are not eligible
to opt out of arbitration and will have waived your right to sue or participate in a class action
with respect to the dispute arising out of your purchase or use of a NuWave product. For
any dispute arising out of your use of NuWave’s website, you have 30 days from the date
you provided information to the website to opt out of arbitration. If more than 30 days have
passed, you are not eligible to opt out of arbitration and you will have waived your right to
sue and participate in a class action with respect to the dispute arising out of your use of
NuWave’s website.

nuwavenow.com | 19
LIMITED WARRANTY
READ YOUR OWNER’S MANUAL
If you still have any questions about operation or warranty of this product, please contact
NuWave LLC by emailing help@nuwavenow.com.
STATE OF CALIFORNIA PROPOSITION 65
This product can expose you to chemicals including lead and Bisphenol A (BPA), which are
known to the State of California to cause cancer, birth defects and other reproductive harm.
For more information go to: www.P65Warnings.ca.gov.
Este producto puede exponerle a químicos, incluídos el plomo y Bisfenol A (BPA), los cuales son
conocidos en el Estado de California por causar cáncer, defectos de nacimiento u otros daños
reproductivos.
Para mayor información, visite: www.P65Warnings.ca.gov.
WARNING
ADVERTENCIA
D. SOME MATTERS ARE NOT SUBJECT TO ARBITRATION. Notwithstanding the forego-
ing, the following shall not be subject to arbitration and may be adjudicated only in the state
and federal courts of Illinois: (i) any dispute, controversy, or claim relating to or contesting the
validity of our intellectual property rights and proprietary rights, including without limitation,
patents, trademarks, service marks, copyrights, or trade secrets; (ii) an action by a party for
temporary, preliminary, or permanent injunctive relief, whether prohibitive or mandatory, or
other provisional relief; or (iii) interactions with governmental and regulatory authorities. You
expressly agree to refrain from bringing or joining any claims in any representative or class-
wide capacity, including but not limited to, bringing or joining any claims in any class action
or any class-wide arbitration.

FOR HOUSEHOLD USE ONLY
120VAC / 60 Hz / 120W
Model: 47001 - 47009
Rev. 01
Para la versión en español de este manual,
visita www.nuwavenow.com.
For patent information please go to:
www.nuwavenow.com/legal/patent
Designed & Developed in USA
NuWave LLC
560 Bunker Ct.
Vernon Hills, IL 60061, U.S.A.
Email: help@nuwavenow.com
Made in China
©2023 • NuWave, NuWaveNow, and OxyPure are registered
trademarks of NuWave LLC • All Rights Reserved.
Item: BM47001- 47009
Rev.1-V4-CB
06-05-23
OXYPURE® SMART AIR PURIFIER
EPA Establishment Number: 101594-CHN-1
Other manuals for OXYPURE 47001
1
This manual suits for next models
8
Table of contents
Other NuWave Air Cleaner manuals

NuWave
NuWave OxyPure HEPA 300 User manual

NuWave
NuWave OXYPURE ZERO 47251 User manual

NuWave
NuWave OXYPURE 47001 User manual

NuWave
NuWave OXYPURE 47501 User manual

NuWave
NuWave OxyPure User manual

NuWave
NuWave OXYPURE ZERO E1000 User manual

NuWave
NuWave 47401 User manual

NuWave
NuWave OXYPURE 47501 User manual

NuWave
NuWave OxyPure User manual

NuWave
NuWave OXYPURE ZERO E1000 User manual