NuWave OxyPure Zero E500 User manual

Owner’s Manual
Model 47351 / 47361
Questions or Concerns?
For Amazon Purchases: support@nuwavenow.com
For All Other Purchases: help@nuwavenow.com
E500

2| nuwavenow.com
THANK YOU!
Register Today!
Protecting your investment is easy and rewarding. Simply
scan the QR code or visit nuwavenow.com/register to
register. When you register, simply opt in for an additional
year of warranty. Don’t worry. There is no catch. We are
extending it absolutely FREE to show our appreciation!
nuwavenow.com/register
support@nuwavenow.com help@nuwavenow.com
For Amazon Purchases For All Other Purchases
Scan to Register
Congratulations on your NuWave® purchase. We know there are many options
available and sincerely appreciate the trust you have placed in us.
For the last 30 years, we have committed to introducing products that promote
healthy living at affordable prices. By combining the highest quality designs with
cutting edge technology, we have always strived to blend feature, function, and
innovation into every product we make. We hope you will agree.
We would love to hear from you. Please feel free to reach out with any feedback
or comments that could improve your experience. We would also enjoy hearing
about your successes.
The best way to reach us is by email:
For Amazon Purchases: support@nuwavenow.com
For All Other Purchases: help@nuwavenow.com
Connect with Us!
#nuwavenow
Visit nuwavenow.com to see other
great products and accessories.

nuwavenow.com | 3
Para la versión en español de este manual, visita www.nuwavenow.com
CONTENTS
Important Safeguards.....................................................................4-5
Electrical Information......................................................................5
Parts & Accessories........................................................................6
WiFi Connectivity............................................................................7-8
Getting Started ...............................................................................8-9
Instructions .....................................................................................10-12
Maintenance...................................................................................13
Troubleshooting..............................................................................14
Limited Warranty ............................................................................15-17
U.S Environmental
Protection Agency
Meets California ozone
emissions limit.
CARB certied
This equipment has been tested and found to comply with the limits for a Class B digital
device, pursuant to part 15 of the FCC Rules. These limits are designed to provide
reasonable protection against harmful interference in a residential installation. This
equipment generates, uses and can radiate radio frequency energy and, if not installed
and used in accordance with the instructions, may cause harmful interference to radio
communications. However, there is no guarantee that interference will not occur in a
particular installation. If this equipment does cause harmful interference to radio or
television reception, which can be determined by turning the equipment off and on, the
user is encouraged to try to correct the interference by one or more of the following
measures:
• Reorient or relocate the receiving antenna.
• Increase the separation between the equipment and receiver.
• Connect the equipment into an outlet on a circuit different from that to which the
receiver is connected.
• Consult the dealer or an experienced radio/TV technician for help.

4| nuwavenow.com
IMPORTANT SAFEGUARDS
HOUSEHOLD USE ONLY • READ ALL INSTRUCTIONS BEFORE USE
ALWAYS KEEP THIS MANUAL HANDY FOR FUTURE REFERENCE.
READ ALL INSTRUCTIONS and WARNINGS: The failure to follow any of the important safe-
guards, warnings, or instructions for safe use is a misuse of the OxyPure that can void your warranty
and create the risk of serious injury. When using the OxyPure, basic safety precautions should always
be followed.
1. ONLY use the OxyPure for its intended purpose.
2. To protect against the risk of electrical shock, DO NOT immerse the cord, plug, or any part of the
OxyPure in water or any other liquid.
3. Close supervision is necessary when the OxyPure is used by or near children. The OxyPure is
not intended for use by children, persons with reduced physical, sensory, or mental capabilities,
or those who lack expertise or knowledge of this device.
4. DO NOT operate the OxyPure with a damaged cord, plug, after any malfunction, or if the unit has
been dropped or damaged in any way. Contact Customer Service at email
For Amazon Purchases: support@nuwavenow.com
For All Other Purchases: help@nuwavenow.com
5. Discard the protective plastic covering the power plug before use.
6. DO NOT run the cord under carpeting. DO NOT cover the cord with throw rugs, runners, or other
coverings.
7. DO NOT route the cord under furniture or appliances. Arrange the cord away from high-trafc
areas where it will not be tripped over.
8. DO NOT plug the OxyPure into an outlet or power strip that is being used by other appliances.
9. Remove any dust or water from the plug, if needed.
10. ALWAYS set up the OxyPure on a at, stable surface.
11. DO NOT set up the OxyPure where it could be pushed, kicked, or tripped over.
12. Leave at least 2-3 feet of space between the OxyPure’s vents and any walls.
13. DO NOT install the OxyPure near a heating device, ammable or combustible gases or vapors,
or in areas exposed to moisture or water.
14. DO NOT operate the OxyPure on its side.
15. DO NOT place objects on top of the OxyPure.
16. DO NOT sit or stand on, or lean against, the OxyPure.
17. Alteration or modication of any part of the OxyPure, or the use of attachments not recommend-
ed by the manufacturer, may cause re, injury, or damage to property.
18. As with most electrical units, electrical parts are live even when the OxyPure is off. Be sure the
OxyPure is unplugged when assembling.
19. DO NOT use the OxyPure in a factory or industrial setting where machine oil may be present in
the air.

nuwavenow.com | 5
IMPORTANT SAFEGUARDS
HOUSEHOLD USE ONLY • READ ALL INSTRUCTIONS BEFORE USE
20.Turn the power OFF before unplugging the OxyPure.
21.Unplug the OxyPure from outlet when the unit is not in use or will be left unattended for an extend-
ed period of time; before putting on or taking off parts; when removing or replacing the lters; and
before cleaning.
22.DO NOT operate the OxyPure if abnormal sounds or motion are detected.
23.If a hard or foreign object comes into contact with the fan, do not operate. Turn off and unplug the
OxyPure.
24.Inspect the OxyPure for any loose or missing parts before and after each use. If parts are loose,
damaged, or missing, contact Customer Service at email
For Amazon Purchases: support@nuwavenow.com
For All Other Purchases: help@nuwavenow.com.
25.DO NOT pull, lift, drag, pick up, or carry the OxyPure by its cord.
26.DO NOT block the air inlet or outlet vents.
27.DO NOT operate the OxyPure without lters.
FILTER CHANGING PRECAUTIONS
1. DO NOT throw away the Bio-Guard lters or the Stainless-Steel Prelters. They are washable and
have a useful lifespan of 20 years.
2. ALWAYS wear a mask and rubber gloves when handling dirty lters.
3. When removing dirty lters, ALWAYS do so outside or in a well ventilated area.
4. ALWAYS clean your lters according to the directions in this manual. If water is used for cleaning,
immerse your lter. DO NOT attempt to clean with a hose.
5. If necessary, replace your lters ONLY with NuWave lters made for your model of air purier.
ELECTRICAL INFORMATION
These servicing instructions are for qualied personnel only. To reduce the risk of electric shock, do
not perform any servicing other than that within these operating instructions unless you are fully qual-
ied.
Power-Supply Cords
A short, detachable power-supply cord is provided to reduce the risk of becoming entangled in, or trip-
ping over, a longer cord. Longer detachable power-supply cords or extension cords are available and
may be used if care is exercised in their use. If a longer, detachable power-supply cord or extension
cord is used:
1. The marked electrical rating of the extension cord should be at least as great as the electrical
rating of the appliance.
2. The longer cord should be arranged so that it will not drape over any countertop or tabletop where
it could be pulled on or tripped over unintentionally.
3. The OxyPure should be operated on a separate electrical outlet from other operating appliances
due to wattage limitations.

6| nuwavenow.com
PARTS & ACCESSORIES
PART & ORDER INFORMATION • ASSEMBLY
Ordering Parts
To order new Bio-Guard Filters and other replaceable parts, nd the part number then
order online at www.nuwavenow.com.
Filter Access Panel
Part #: OFP3
FRONT
OxyPure ZERO E500 Air Purier
Model #: 47351
Grid
Part #: OFP1
Rubber Feet
Part #: OFP4
Left: Filter Chamber with all 5
lters and their locations. From
the outside in, they are the
Stainless-Steel Prelters (1), the
Bio-Guard Filters (2) and the
Cylindrical Bio-Guard Filter (3).
Right: The Filter Access
Panel was removed revealing the
Stainless-Steel Prelters (1) and
the Bio-Guard Filters (2) on each
side with the cylindrical
Bio-Guard Filter (3) at the center.
Stainless-Steel
Prelter (2)
Part #: OFA3
Bio-Guard
Filter (2)
Part #: OFA2
Cylindrical
Bio-Guard Filter
Part #: OBA1
Note
Each lter is numbered. Match
the lter number with the slot
number when installing the
lters.
1. Open the Filter Access Panel on
the back of the OxyPure.
2. Remove the wrapped lters from their slots.
3. Remove the plastic wrapping from the lters.*
4. Fully insert the unwrapped lters into their slots.
5. Replace the Filter Access Panel, making sure that it is secure.
6. Remove the sticker from the control panel.*
*When using the OxyPure for the rst time.
Assembling the OxyPure
Before using your OxyPure, you need to make sure that the lters
are properly installed. With the OxyPure unplugged:
FILTERS
11
1
22
2
3
3
SIDE
Left Left
Right
Center
Right
TOP
BACK
Air Quality Sensor Cover
Part #: OFP2

nuwavenow.com | 7
Download the NuWave Connect
App
This is an optional feature that is not required
to operate your OxyPure.
Using the QR reader in your Camera App:
1. Scan the QR code below.
2. It will take you to the App’s download page
on either the Google Play Store or the
Apple AppStore, then just follow the down-
load and installation instructions.
Downloading a QR reader App:
If your phone doesn’t have that capability
built-in, simply download a 3rd-Party QR
Scanning App before scanning the NuWave
QR Codes and you are ready to go.
1. Open your device’ mobile app store (Apple
App Store or the Google Play Store).
2. Search for “QR code readers.”
3. Simply download the QR code reader to
your phone, open it, scan the code and you
are ready to go.
The OxyPure is equipped to operate using WI-FI. This allows you to conveniently operate your new air
purier from nearly any location, whether at home or while you are out and about, as long as you have
a reliable Internet connection.
WiFi LED Status Light
Pairing Mode & Standby Mode
Solid Light.
The OxyPure is paired with the wi
network and ready to be used.
Rapid Blinking Light.
The OxyPure is in Pairing Mode. The OxyPure
will stay in Pairing Mode for up to 3 minutes or
until your device is paired.
Slowly Blinking Light.
The OxyPure is in AP Pairing Mode.
No Light. The OxyPure’s WiFi is off.
Wi-Fi
THE NUWAVE CONNECT APP
MONITOR AND CONTROL THE OXYPURE REMOTELY
Auto Scan Mode
1. Once you download the NuWave® Connect
app, ensure your phone is connected to
your home Wi-Fi network on the 2.4GHz
frequency and that your phone’s Bluetooth
is on.
2. Turn on the OxyPure and activate Wi-Fi
Pairing Mode by pressing and holding UL-
TIMATE CLEAN until the light next to the
Wi-Fi symbol begins to blink rapidly.
3. In the NuWave® Connect app, tap the +
symbol, then tap Auto Scan and select
your device.
4. Enter your Wi-Fi network’s password and
tap Conrm. If the connection is successful,
the app will display “Added Successfully”
on the screen.

8| nuwavenow.com
GETTING STARTED
MEASURING AIR QUALITY
Measuring Air Quality: The OxyPure Sensors
The NuWave OxyPure has two sensors to monitor the state of your air, one for air quality and the other
for odor.
Air and Odor LEDs
The OxyPure will display the Air/Odor quality based on the particulate matter in the air from low to high
as represented below. If the PM level in the air exceeds the upper limit of the range, a warning is trig-
gered with a beeping sound and a ashing LED. To turn off this warning, press AUTO and Fan Speed
at the same time. Press the same buttons to turn the warning feature back on.
Particulate Matter (PM) with a diameter of 2.5 microns or less
0~5 5~10 10~20 20~30 30~50 Over 50
EZ Mode
1. Tap the +symbol, then select the Oxy-
Pure unit you want to add to the network.
2. Enter and conrm your Wi-Fi network
password.
3. Tap AP Mode in the top right of your
screen, then select EZ Mode to switch
pairing modes.
4. Conrm that the Wi-Fi light on your Oxy-
Pure is blinking rapidly.
5. Once the OxyPure is connected, tap
Done.
If the OxyPure did not connect to your
network, the Wi-Fi light will turn off. Repeat
the steps for pairing. Make sure to select the
proper Wi-Fi network and type the correct
password.
Note: If your home network doesn’t broad-
cast in a 2.4GHz or a dual band broadcast
frequency, contact your ISP to inquire about
setting up a 2.4GHz network.
THE NUWAVE CONNECT APP
MONITOR AND CONTROL THE OXYPURE REMOTELY
AP Mode
1. If you can’t connect your OxyPure using
Auto Scan, follow the instructions in the
app to reset the connection process.
2. Press and hold ULTIMATE CLEAN until
the Wi-Fi light begins blinking slowly to
enable AP Mode.
3. Tap the +symbol, then select the Oxy-
Pure unit you want to add to the network.
4. Conrm that the Wi-Fi light on your Oxy-
Pure is blinking slowly and tap AP Mode
on your phone screen.
5. Connect your phone to the available
hotspot following the instructions on the
screen.
6. Once connected, return to the NuWave
Connect app and the unit will begin con-
necting automatically.
7. Once your OxyPure is successfully con-
nected, tap Done.
If you’re unable to pair your OxyPure using Auto Scan, you can alternatively try one
of the following pairing methods.

nuwavenow.com | 9
GETTING STARTED
CONTROL PANEL • BASIC FUNCTIONS
CONTROLS
ICON NAME FUNCTION
POWER
When the OxyPure is plugged in, the POWER button will be red, indicat-
ing that the unit is in Standby Mode. Press it once, the LED turns green
and the unit activates, either with the last settings used, or in Manual Fan
Speed Mode at Fan Speed 1 if the unit is being activated for the rst time.
AUTO
ECO
AUTO will put the unit into either AUTO Mode or ECO Mode. Press it once
for AUTO Mode, running the unit based on air quality. Press and hold it for
1 second for ECO Mode, where the unit stays off until air quality issues are
detected. To quit ECO Mode, press and hold the AUTO for 1 second.
ULTIMATE
CLEAN
WIFI
The OxyPure, while in ULTIMATE CLEAN Mode, automatically adjusts to
the highest or lowest fan speed based on the air quality at its
location, running as long as is necessary to clean the air. To turn it on or
off, simply press ULTIMATE CLEAN.
To activate WiFi, press and hold ULTIMATE CLEAN. Once the WiFi light
is rapidly blinking you can release the button and begin pairing.
FAN
SPEED
FAN SPEED controls the fan speed level, from 1 to 6, and also activates
Sleep Mode. Simply press it until you reach the fan speed you want. Press-
ing it a 7th time returns you to Fan Speed 1. Regardless of what mode the
unit is in, the OxyPure will always display the current fan speed.
To activate Sleep Mode, press and hold FAN SPEED for 1 second.
TIMER
Pressing TIMER lets you decide how long the OxyPure remains on the set
mode, pressing the button once for each of the following: 1hr, 2hrs, 4hrs,
6hrs, 8hrs, and 12hrs. Pushing it a seventh time will turn off the Timer but
not the unit. TIMER can be used with AUTO, FAN SPEED, and TURBO.
TURBO
Press TURBO to run the OxyPure at the highest fan speed for up to 2
hours. Press it once for 30 minutes, twice for 1 hour, and 3 times for 2
hours. Pressing TURBO four times turns it off. Once the time is up, the unit
will run at Fan Speed 1.
Particulate Matter Level
Low PM High PM

10 | nuwavenow.com
INSTRUCTIONS
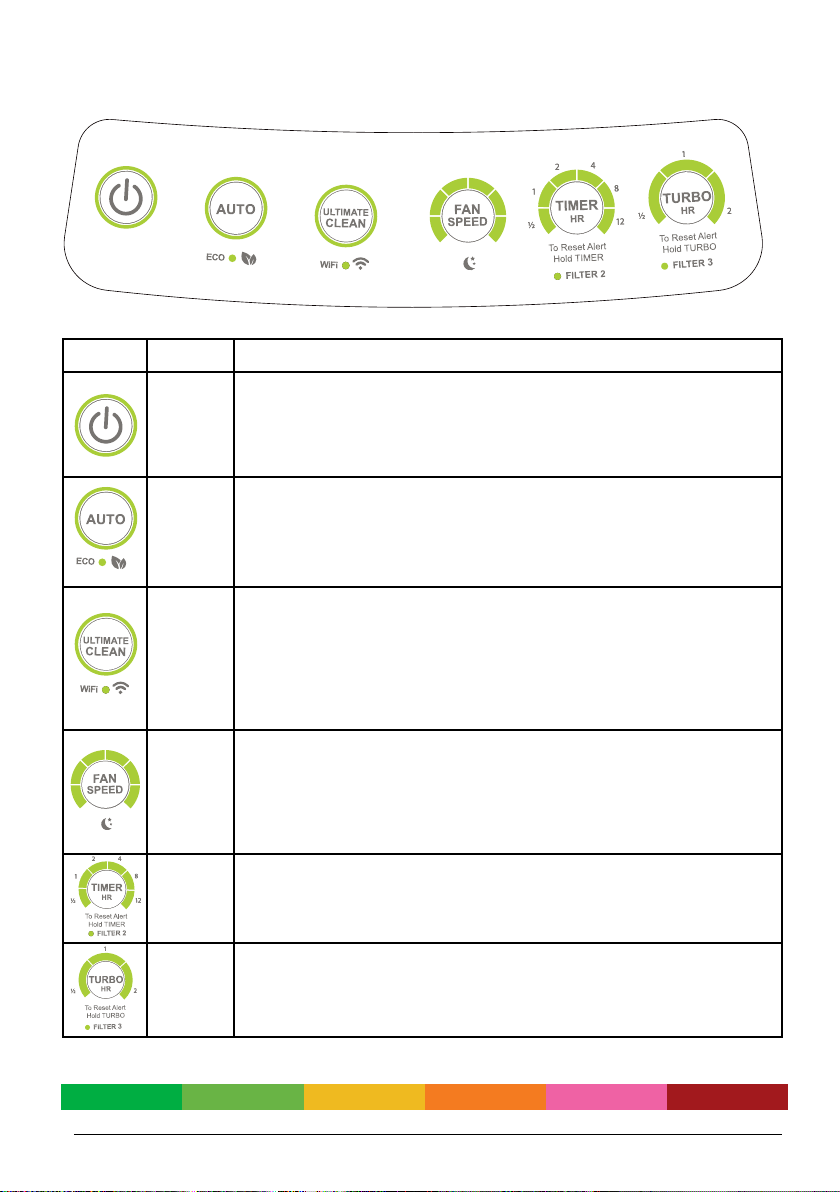
AUTO MODE • ECO MODE • ULTIMATE CLEAN
AUTO Mode
AUTO Mode runs the unit without a time
limit, automatically adjusting the fan
speed based on the current air quality.
To use it:
1. Press POWER. Then press AUTO. The
backlights will turn on and the unit will go into
AUTO Mode.
• There is no time limit on AUTO Mode.
• Fan Speed increases as air quality
declines.
2. When you wish to deactivate AUTO Mode,
simply press AUTO. The OxyPure will revert
to MANUAL FAN SPEED Mode and run at the
lowest fan speed.
Note
AUTO and FAN SPEED cannot work together
While in AUTO Mode. If you press FAN SPEED,
AUTO Mode will turn off, replaced by MANUAL
FAN SPEED Mode.
While the unit is running in AUTO Mode, the user
can adjust the working time by pressing TIMER.
While in MANUAL FAN SPEED Mode, pressing
AUTO will engage AUTO Mode. The unit will
remain in AUTO Mode until changed.
You can use AUTO Mode and TURBO Mode
together, running in TURBO Mode for a time and
then switching to AUTO Mode. See the following
page for more information.
ECO Mode
ECO Mode also responds to
changes in Air Quality. However,
because it does not run the fan continuously, ECO
Mode is a real energy- and money-saver.
To use it:
1. Press and hold AUTO. The OxyPure will beep
and the green LED above ECO MODE will light.
2. When the air quality is bad, the OxyPure will
automatically run until air quality improves.
3. When the air quality is good (PM2.5 level under
5), the OxyPure fan will automatically turn off.
4. To deactivate ECO Mode, press and hold AUTO.
Once ECO Mode is off, the OxyPure will return to
its previous setting.
ECO Mode and Ultimate Clean
Press ULTIMATE CLEAN, then set the timer for
the length of time to run. Press and hold AUTO for
ECO mode to engage. Once the time for ULTIMATE
CLEAN has ended, the unit will go into ECO Mode
until switched.
ULTIMATE CLEAN
Mode
When in ULTIMATE CLEAN Mode, the
OxyPure will automatically adjust to the highest or lowest
fan speed based on your air quality, and run as long as
is necessary to clean the air.
1. Press ULTIMATE CLEAN. The LEDs around the
ULTIMATE CLEAN button will be lit green.
2. Press ULTIMATE CLEAN again, or the next mode
you wish to use, to turn it off.
Note
• Pressing FAN SPEED while in ULTIMATE CLEAN
will put the unit into MANUAL FAN SPEED Mode.
• In ULTIMATE CLEAN Mode, adjust the working time
by pressing TIMER.
• Pressing ULTIMATE CLEAN while in MANUAL
FAN SPEED Mode, will put the unit into ULTIMATE
CLEAN Mode.
• Press ULTIMATE CLEAN then select the time for
TURBO. Once TURBO nishes, the unit will enter
ULTIMATE CLEAN.
Function Key
ECO Mode Press & Hold AUTO
SLEEP Mode Press & Hold FAN SPEED
Wi-Fi Pairing Press & Hold ULTIMATE CLEAN
Reset Filter 2 Press & Hold TIMER
Reset Filter 3 Press & Hold TURBO
Reset Odor Alarm Press AUTO + FAN SPEED
Press & Hold Key Functions
Questions about your OxyPure?
Contact our friendly customer service staff via
email anytime:
For Amazon Purchases:
support@nuwavenow.com
For All Other Purchases:
help@nuwavenow.com.

nuwavenow.com | 11
INSTRUCTIONS
MANUAL FAN SPEED • SLEEP MODE • TIMER
MANUAL FAN SPEED
This is the basic operating mode for
the OxyPure, allowing you to manually
operate the Fan Speed without worrying
about the automatic modes or settings.
There are 6 Fan Speeds:
FAN SPEED LEVEL FAN SPEED (RPM)
1 350
2 800
3 1250
4 1700
5 2150
6 2280
Operating the Fan
Note
No matter what mode the OxyPure is in, it will
always display the current Fan Speed Level.
SLEEP Mode
Ideal for light sleepers, SLEEP Mode
turns off the LED lights on the control
panel while keeping the fan active.
Using SLEEP Mode
1. Manually adjust the Fan Speed to the setting
most comfortable for you.
2. Press and hold FAN SPEED for 2 seconds to
activate Sleep mode. The control panel will go
dark, but the fan will continue to work.
To turn off SLEEP Mode, press any button.
TIMER
You can run the OxyPure for a set
period of time with the TIMER button.
There are 6 different timer selections:
30min, 1hr, 2hrs, 4hrs, 8hrs, 12hrs.
Using the Timer
Using Timer with Other Modes
TIMER can be used with AUTO, FAN SPEED,
TURBO and ULTIMATE CLEAN.
1. Press the mode to be used,
2. Then press TIMER to the amount of time the
selected mode is to run.
Using TIMER with TURBO and other modes.
1. Press TURBO.
2. Select the next mode and then select the
amount of time for that mode to run.
Number of
Presses
Fan Speed
Level
Number of Bars
on Panel
1 1 1
2 2 2
3 3 3
4 4 4
5 5 5
6 6 6
7 1 1
Number of
Presses
Running
Time
Number of Bars
on Panel
1 30 Minutes 1
2 1 Hour 2
3 2 Hours 3
4 4 Hours 4
5 8 Hours 5
6 12 Hours 6
7 OFF 0

12 | nuwavenow.com
TURBO Mode
To quickly clear the air, choose the
TURBO Mode to run the OxyPure at
Fan Speed Level 6 (the highest) for
30 minutes, 1 hour, or 2 hours, after
which the unit will run at Fan Speed 1 if no other
buttons were pressed. If TURBO Mode is used
with other modes, it has priority. To use it:
• Press TURBO and keep pressing the button
until the time you want is reached.
• Once the selected time has nished the
OxyPure will run with last function selected.
TURBO + ULTIMATE CLEAN
Set the time you want for TURBO. Then, once
that time is reached, the unit will run under
ULTIMATE CLEAN until changed.
TURBO + AUTO
Press TURBO to the time desired and then
AUTO. The OxyPure will run in TURBO Mode
for selected time period, and then in AUTO Mode
until changed.
TURBO Mode + TIMER
When TURBO Mode is running, the user may set
the running time up to an additional 12 hours by
pressing TIMER.
• The OxyPure will operate under TURBO Mode
rst for the selected time. It will then continue
to run for the time specied on the Timer.
• After the Timer runs out, the unit will go on the
next mode or function.
Note
TURBO Mode and FAN SPEED do not work
together. Pressing FAN SPEED while TURBO
Mode is active will simply turn off TURBO Mode
and set the Fan Speed Level to 1.
INSTRUCTIONS
TURBO MODE • FILTER INDICATORS
Filter Indicators
To alert you to the need to clean your Bio-Guard
Filters, there are LED Filter Indicators beneath
the TIMER and TURBO buttons. These will light
up based on the length of operation as follows:
• The Clean Filter 2 light will turn green after
about 3 months to alert you that the Bio-Guard
Filter(s) SHOULD be cleaned to maintain
optimal performance (NuWave Recommen-
dation). When the light turns red (after about
6 months), the Bio-Guard Filter(s) MUST be
cleaned.
• Once cleaned, press and hold TIMER for 2
seconds until a beep is heard to reset the
Filter Indicator for Filter 2.
• The Clean Filter 3 light will turn green in about
3 months to alert you that the Central Bio-
Guard Filter SHOULD be cleaned to maintain
optimal performance (NuWave Recommenda-
tion). When the light turns red (after about 6
months), the Central Bio-Guard Filter MUST
be cleaned.
• Once cleaned, press and hold down TURBO
for 2 seconds until a beep is heard to reset the
Filter Indicator for Filter 3
Depending on your operating environment, you
may wish to clean the lters more frequently.
Remember...
ALWAYS remove the plastic wrapping from
new lters BEFORE using them in the
OxyPure.
Failing to do so may damage the motor and
other parts of the OxyPure and may void your
warranty

nuwavenow.com | 13
MAINTENANCE
FILTER MAINTENANCE • SENSOR MAINTENANCE
Filter Maintenance
When maintaining the lters, unplug the unit and
open the Filter Access Panel. You will see that the
order of the lters, from the outside in, is as
follows:
1. 2 Stainless Steel Pre-Filters (washable)
2. 2 Bio-Guard Filters (washable)
3. 1 Cylindrical Bio-Guard Filter (washable)
Do not immerse the OxyPure in water. Clean the
outside of the unit with a damp sponge or cloth and
wipe it dry. Make sure all lters and the Filter Ac-
cess Panel are secured properly. If they are not, the
POWER button backlight will blink red and the unit
will not power on.
Filter Cleaning
The lters need to be cleaned regularly to help the
unit maintain optimum performance. The two Pre-
lters need to be cleaned at least once every three
months, depending on use, while the Bio-Guard
Filters should be cleaned, at minimum, once every
six months.
Stainless-Steel Prelters
1. Use a dry cloth or soft brush to remove any dust
or lint.
2. Clean the lter with warm soapy water.
3. Rinse the lter thoroughly, removing any soap
particles.
4. Allow the lter to dry completely (up to 24
hours).
Bio-Guard Filters
1. Spray the lter with a mild detergent and let it sit
for 2–3 minutes.
2. Submerge the lter in warm water, shake, re-
move. Repeat until the lter is clean.
3. Rinse the lter with warm water.
4. Dry the lter completely before use. Never
place a wet lter in the OxyPure.
Note
• Do not dry the lters with a hot blow dryer or in
direct sunlight.
• Be careful not to damage the tabs when secur-
ing the Filter Access Panel.
• The Filter Access Panel and Grid may be
cleaned with warm, soapy water. Dry thoroughly
before reattaching.
Sensor Maintenance
The Air Quality and Odor Sensors are located on
the right-hand side of the unit, just over the intake
vent. The Air Quality Sensor is accessible by re-
moving the Sensor Cover. The Odor Sensor is not
accessible. Do not insert anything into the Odor
Sensor vent. Doing so may damage the Sensor.
Cleaning the Air Quality Sensor
1. Using a dry cotton swab or small, soft brush,
gently remove any dirt or dust from the Sensor.
2. For more buildup on the Sensor, wipe it with a
cotton swab dipped in alcohol.
3. Remove any moisture with a dry cotton swab.
4. Dispose of the used cotton swab(s) and close
the Sensor Cover.
Cleaning the Odor Sensor
Because the Odor Sensor is not accessible, and
you may damage the sensor if anything is inserted
into the Odor Sensor vent, it may be cleaned as
follows:
1. Use a clean, dry cloth or duster to surface
clean the vent grooves.
2. Use a vacuum with a wand attachment to clear
anything that is in the vent grooves.
Odor Sensor & Alarm Reset
If the Odor Sensor detects an odor level higher
than Red, it usually indicates sensor contamina-
tion. The unit will alarm continuously and the lights
will blink in repeated series of 5.
1. Try to clear the contamination with a vacuum
cleaner and wand.
2. Turn off the alarm by pressing AUTO + FAN
and check the sensor for contamination.
3. If necessary, repeat Steps 1 and 2 in 1 hour.
4. Steps 1 and 2 can be repeated 4 times until
the sensor is cleared.
5. If the sensor is not clear after that, it cannot
be reset. Contact Customer Service
For Amazon Purchases:
support@nuwavenow.com
For All Other Purchases:
help@nuwavenow.com
Note
• The Air Quality Sensor requires regular clean-
ing (every 3 months) for the unit to operate
efciently.
• If the OxyPure is set up in an area with high
dust accumulation, more frequent cleaning is
needed.
• Do not use the cotton swab on any part or area
other than the Sensor.

14 | nuwavenow.com
MAINTENANCE
TROUBLESHOOTING GUIDE
The OxyPure Will Not Turn On
The unit is not plugged into a wall outlet.
• Plug the power cord into the socket of a wall
outlet.
The unit is plugged in but still not powering
on.
• Press the POWER icon to turn the unit on.
• Try a different outlet.
• Check that the Filter Access Cover is rmly
closed.
• Check that all lters are properly placed and
that the sensor tabs, located at the bottom of
the lter chamber (will be raised), and at the
bottom of each of the Bio-Guard Filters, are
in place and engaged.
The Timer Doesn’t Work if Pressed
The unit is not reading the function selected.
• Press Fan Speed or Auto, then Timer.
The Fan is Not Blowing
The unit is not plugged into an appropriate
outlet.
• Make sure the outlet has the appropriate
voltage for use.
The Filter Access panel is not properly in
place.
• Check that the Filter Access Cover is secure
and completely closed.
Pressing Fan Speed Doesn’t
Change the Air Flow Speed
The unit may be in AUTO Mode.
• Press another operating mode, then press
FAN.
ULTIMATE CLEAN Doesn’t
Turn On When Pressed
The unit is not reading the function Ultimate
Clean as selected.
• Turn the unit off and back on by quickly
pressing Power twice.
The Air Flow From the
Top Vent is Weak
The lter(s) may be dirty. The stainless-steel
Prelters should be cleaned every 2 months.
The Bio-Guard Filters at least every 3- 6
months.
• Clean any dirty lters, then follow the reset
lter instructions.
The OxyPure is Producing Smoke or Odor
The lters are dirty.
• Wash the lters according to the directions.
The Filters Were Cleaned but the
Clean Filter Alert Won’t Reset
The Filter Sensor is not reading the rein-
stalled clean lter.
• Turn the unit off and on again. Press and
hold Timer and/or Turbo (for the clean lter)
for 2 seconds until the unit beeps and the
rst bar on the indicator lights up.
• Turn the unit off, unplug then re-adjust the
lters.
• Turn the unit OFF then ON again.
• Make sure the Bio-Guard Filter sensors
connect with the sensors at the bottom of the
unit itself.
• Make sure the Filter Access Panel is secure
and closed.
• Clean the Air and Odor sensors.
The Power LED is Blinking Red
The Filter Access Cover is off.
• Be sure the Filter Access Cover is secure
and in place.
The lters are improperly placed.
• Be sure all lters are in the unit and placed in
their correct position within the unit.
The Air Quality and/or Odor Sensor(s) are
Not Resetting Themselves. The Indicator
Lights Remain Red
There is an issue with the room’s
atmosphere.
• Move the OxyPure into a closed-off room for
a few hours.
• Clean the sensors and Grid as directed.
• Check for any changes in the original room
that could have affected the unit, such as: an
open window, a new pet, current or recent
use of heating or cooling equipment.
The unit is too close to an object or a wall.
• Move the unit so it has at least 2–3 feet
clearance on all sides.
Questions and Issues?
If you still have questions and issues after
trying these troubleshooting steps, contact
Customer Service via email anytime
For Amazon Purchases:
support@nuwavenow.com
For All Other Purchases:
help@nuwavenow.com

nuwavenow.com | 15
LIMITED WARRANTY
THE MANUFACTURER WARRANTS
NuWave, LLC warrants that OxyPure Zero Air Purier will be free from manufacturer defects
for 3 years from the date of purchase, under normal household use, and when operated in
accordance with the Manufacturer’s written instructions. The Limited Warranty covers the
Original Purchaser only. The Manufacturer will provide the necessary parts and labor to re-
pair the product at the NuWave LLC Service Department. After the expiration of the warranty,
the cost of the parts and labor will be the responsibility of the owner.
THE WARRANTY DOES NOT COVER
The Limited Warranty is voided if repairs are made by an unauthorized dealer, or the serial
number data plate is removed or defaced. Normal deterioration of nish due to use or expo-
sure is not covered by this Warranty. This Limited Warranty does not cover failure, damages,
or inadequate performance due to accident, acts of God (such as lightning), uctuations in
electric power, alterations, abuse, misuse, misapplications, corrosive-type atmospheres, im-
proper installation, failure to operate and maintain the OxyPure in accordance with the Man-
ufacturer’s written instructions, failure to regularly clean and maintain the reusable lters in
accordance with the Manufacturer’s written instructions, abnormal use, commercial or rental
uses, or resold units. NuWave LLC reserves the right to void the Limited Warranty, where
allowable by law, for products purchased from an unauthorized dealer.
TO OBTAIN SERVICE
The owner shall have the obligation and responsibility to pay for all services and parts not
covered by the warranty; prepay the freight to and from Service Department for any part
or system returned under this warranty; and carefully package the product using adequate
padding material to prevent damage in transit. The original container is ideal for this purpose.
Include in the package the owner’s name, address, daytime telephone number, a detailed
description of the problem, and your Return Goods Authorization (RGA) number. by emailing
to obtain the RGA number. Provide the cooking system model & serial number and proof of
date of purchase (a copy of the receipt) when making claims under this warranty.
MANUFACTURER’S OBLIGATION
The Manufacturer’s obligation under this Limited Warranty is limited, to the extent allowable
by law, to repairing or replacing any part covered by this Limited Warranty which upon exam-
ination is found to be defective under normal use. The Limited Warranty is applicable only
within the continental United States and only to the original purchaser of the manufacturer’s
authorized channels of distribution. THE LIMITED WARRANTY MAY NOT BE ALTERED,
VARIED OR EXTENDED EXCEPT BY A WRITTEN INSTRUMENT EXECUTED BY THE
MANUFACTURER. THE REMEDY OF REPAIR OR REPLACEMENT AS PROVIDED
UNDER THIS LIMITED WARRANTY IS EXCLUSIVE. IN NO EVENT SHALL THE MANU-
FACTURER BE LIABLE FOR ANY CONSEQUENTIAL OR INCIDENTAL DAMAGES TO
ANY PERSON, WHETHER OR NOT OCCASIONED BY NEGLIGENCE OF THE
MANUFACTURER, INCLUDING WITHOUT LIMITATION, DAMAGES FOR LOSS OF USE,
COSTS OF SUBSTITUTION, PROPERTY DAMAGE, OR OTHER MONEY LOSS.

16 | nuwavenow.com
LIMITED WARRANTY
Some states do not allow the exclusion or limitation of incidental or consequential damag-
es, so the above limitation exclusions may not apply. This Limited Warranty gives specic
legal rights, and there may also be other rights which vary from state to state. EXCEPT
AS OTHERWISE EXPRESSLY PROVIDED ABOVE, THE MANUFACTURER MAKES
NO WARRANTIES EXPRESSED OR IMPLIED ARISING BY LAW OR OTHERWISE, IN-
CLUDING WITHOUT LIMITATION, THE IMPLIED WARRANTIES OF MERCHANTABILITY
AND FITNESS FOR A PARTICULAR PURPOSE TO ANY OTHER PERSON. READ YOUR
OWNER’S MANUAL. IF YOU STILL HAVE ANY QUESTIONS ABOUT OPERATION OR
WARRANTY OF THE PRODUCT, PLEASE CONTACT NUWAVE LLC.
DISPUTE RESOLUTION PROCEDURE
For disputes relating to use of the website or use or purchase of a NuWave product or ser-
vice (collectively “Disputes”), you agree to rst contact NuWave LLC, by emailing
legal@nuwavenow.com. If we cannot resolve your dispute informally, any and all disputes
shall be submitted to nal and binding arbitration. You may start the arbitration process by
submitting in writing a demand to the American Arbitration Association (“AAA”) and sending
a copy to NuWave. NuWave will pay all ling costs. A single arbitrator of the AAA will conduct
the arbitration in a location convenient to you or by phone. The arbitrator’s award will be
binding and may be entered as a judgment in a court of competent jurisdiction. The arbi-
tration will be conducted in accordance with the provisions of AAA’s Commercial Arbitration
Rules and Mediation Procedures in effect at the time of submission of your demand for ar-
bitration. See https://www.adr.org/sites/default/les/CommercialRules_Web.pdf. Except as
may be required by law as determined by an arbitrator, no party or arbitrator may disclose
the existence, content, or results of any arbitration hereunder without prior written consent
of both parties.
A. WAIVER OF RIGHT TO SUE. By agreeing to arbitration, you understand that, to the max-
imum extent permitted by law, you are agreeing to waive your right to le suit in any
court, to a court hearing, a judge trial, or a jury trial.
B. CLASS ACTION WAIVER. To the maximum extent permitted by law, you expressly agree
to refrain from bringing or joining any claims in any representative or class-wide capacity,
including but not limited to, bringing or joining any claims in any class action or class-wide
arbitration.
C. OPT OUT PROCEDURE. To request to opt out of arbitration you must contact NuWave
LLC by emailing For Amazon Purchases: support@nuwavenow.com For All Other Pur-
chases: help@nuwavenow.com. You will have 30 days from the date of product delivery to
opt out of arbitration with respect to any dispute arising out of or relating to use or purchase
of any NuWave product. If more than 30 days have passed, you are not eligible to opt out of
arbitration and will have waived your right to sue or participate in a class action with respect
to the dispute arising out of your purchase or use of a NuWave product. For any dispute
arising out of your use of NuWave’s website, you have 30 days from the date you provided
information to the website to opt out of arbitration. If more than 30 days have passed, you are
not eligible to opt out of arbitration and you will have waived your right to sue and participate
in a class action with respect to the dispute arising out of your use of NuWave’s website.

nuwavenow.com | 17
READ YOUR OWNER’S MANUAL
If you still have any questions about operation or warranty of this product, please contact NuWave
LLC at email
For Amazon Purchases: support@nuwavenow.com
For All Other Purchases: help@nuwavenow.com.
STATE OF CALIFORNIA PROPOSITION 65
This product can expose you to chemicals including lead and Bisphenol A (BPA), which are known
to the State of California to cause cancer, birth defects and other reproductive harm.
For more information go to: www.P65Warnings.ca.gov.
Este producto puede exponerle a químicos, incluídos el plomo y Bisfenol A (BPA), los cuales son
conocidos en el Estado de California por causar cáncer, defectos de nacimiento u otros daños
reproductivos.
Para mayor información, visite: www.P65Warnings.ca.gov.
WARNING
ADVERTENCIA
WARNING
WARNING
To reduce the risk of electric shock, DO NOT perform any service or maintenance on this appliance
except for that which is contained in these instructions.
D. SOME MATTERS ARE NOT SUBJECT TO ARBITRATION. Notwithstanding the forego-
ing, the following shall not be subject to arbitration and may be adjudicated only in the state
and federal courts of Illinois: (i) any dispute, controversy, or claim relating to or contesting the
validity of our intellectual property rights and proprietary rights, including without limitation,
patents, trademarks, service marks, copyrights, or trade secrets; (ii) an action by a party for
temporary, preliminary, or permanent injunctive relief, whether prohibitive or mandatory, or
other provisional relief; or (iii) interactions with governmental and regulatory authorities. You
expressly agree to refrain from bringing or joining any claims in any representative or class-
wide capacity, including but not limited to, bringing or joining any claims in any class action
or any class-wide arbitration.
LIMITED WARRANTY

FOR HOUSEHOLD USE ONLY
120VAC, 60Hz, 48 Watts
Model: 47351 / 47361
Para la versión en español de este manual,
visita www.nuwavenow.com.
For patent information please go to:
www.nuwavenow.com/legal/patent
Designed in France & Developed in USA
NuWave LLC
560 Bunker Ct.
Vernon Hills, IL 60061, U.S.A.
Email:
For Amazon Purchases: support@nuwavenow.com
For All Other Purchases: help@nuwavenow.com
Made in China
©2023 NuWave LLC • All Rights Reserved.Item: BM47351 / BM47361
Rev1-V5-CB
07-28-23
E500
EPA Establishment Number: 101594-CHN-1
Other manuals for OxyPure Zero E500
1
This manual suits for next models
2
Table of contents
Other NuWave Air Cleaner manuals

NuWave
NuWave OxyPure Zero E500 User manual

NuWave
NuWave OXYPURE ZERO E1000 User manual

NuWave
NuWave OXYPURE 47501 User manual

NuWave
NuWave OXYPURE 47001 User manual

NuWave
NuWave OXYPURE ZERO 47251 User manual

NuWave
NuWave OXYPURE ZERO E1000 User manual

NuWave
NuWave 47401 User manual

NuWave
NuWave OxyPure HEPA 300 User manual

NuWave
NuWave OxyPure User manual

NuWave
NuWave OXYPURE ZERO E1000 User manual