NuWave OxyPure Zero E500 User manual

Customer Service:
For Amazon Purchases: support@nuwavenow.com ● For All Other Purchases: help@nuwavenow.com
Quick Start Guide
E500
Refer to the Owner’s Manual for more details
Model No:
47351 / 47361
Getting Started
ICON NAME FUNCTION
POWER
When the OxyPure is plugged in, the Power button will be red, indicating that the unit is in Standby Mode. Press it once, the LED turns
green and the unit activates, either with the last settings used, or in Manual Fan Speed Mode at Fan Speed 1 if the unit is being
activated for the rst time.
AUTO
ECO
AUTO will put the unit into either Auto Mode or ECO Mode. Press it once for Auto Mode, running the unit based on air
quality. Press and hold it for 1 second for ECO Mode, where the unit stays off until air quality issues are detected.
To quit ECO Mode, press and hold the AUTO for 1 second.
ULTIMATE
CLEAN
WIFI
The OxyPure, while in Ultimate Clean Mode, automatically adjusts to the highest or lowest fan speed based on the air quality at its
location, running as long as is necessary to clean the air. To turn it on or off, simply press ULTIMATE CLEAN.
To activate Wi-Fi, press and hold ULTIMATE CLEAN. Once the Wi-Fi light is rapidly blinking you can release the button and begin
pairing.
FAN
SPEED
FAN SPEED controls the fan speed level, from 1 to 6, and also activates Sleep Mode. Simply press it until you reach the fan speed you
want. Pressing it a 7th time returns you to Fan Speed 1. Regardless of what mode the unit is in, the OxyPure will always display the
current fan speed. To activate Sleep Mode, press and hold FAN SPEED for 1 second.
TIMER
Pressing TIMER lets you decide how long the OxyPure remains on, pressing the button once for each of the following: 1hr, 2hrs, 4hrs,
6hrs, 8hrs, and 12hrs. Pushing it a seventh time will turn off the Timer but not the unit. TIMER can be used with AUTO, FAN SPEED,
and TURBO.
TURBO Press TURBO to run the OxyPure at the highest fan speed for up to 2 hours. Press it once for 30 minutes, twice for 1 hour, and 3 times
for 2 hours. Pressing TURBO four times turns it off. Once the time is up, the unit will run at Fan Speed 1.
Air/Odor Quality – Detects particles as small as 2.5µ
Clean Dirty

Customer Service:
For Amazon Purchases: support@nuwavenow.com ● For All Other Purchases: help@nuwavenow.com
Connection (Optional)
Connect the OxyPure to your home Wi-Fi network and pair it with your
smart device:
1. Download the NuWave® Connect app via the Apple Store or
Google™ Play Store on your smartphone or device and open the
app.
2. Once you download the NuWave® Connect app, ensure your
phone is connected to your home Wi-Fi network on the 2.4GHz
frequency and that your phone’s Bluetooth is on.
3. Turn on the OxyPure and activate Wi-Fi Pairing Mode by pressing
and holding ULTIMATE CLEAN until the light next to the Wi-Fi
symbol begins to blink rapidly.
4. In the NuWave® Connect app, tap the +symbol, then tap Auto
Scan and select your device.
5. Enter your Wi-Fi network’s password and tap Confirm. If the
connection is successful, the app will display “Added Successfully”
on the screen.
If you’re unable to pair your OxyPure using Auto Scan, follow the
instructions for AP Mode or EZ Mode on page 8 of the owner’s
manual.
Wi-Fi LED Status
Solid Light The OxyPure®is paired with the Wi-Fi and ready.
Rapid Blinking
Light
The OxyPure is in Pairing Mode.
Slow Blinking Light The OxyPure is in Standby Mode.
No Light The OxyPure’s Wi-Fi is off.
If the OxyPure is in Standby Mode, Initiate Pairing Mode by pressing &
holding ULTIMATE CLEAN until the Wi-Fi light blinks rapidly.
Notes
To reset the OxyPure’s Wi-Fi, hold down ULTIMATE CLEAN for 2
seconds. Follow step 4.
• To connect to or change networks, depending on your cellular
service, you may need to remove the app and reinstall it to
complete the connection before continuing with the setup
process.
The OxyPure will only connect to a 2.4GHz network (standard
for most routers). If you need help activating 2.4GHz on your
network, contact your Internet Service Provider.
Filters
Bio-Guard®Filters (Lifespan up to 20 years)
• 8,000-volt electrostatic filter kills 99.99% of mold, bacteria, and
viruses.
• Captures 100% of particles and pollutants as small as 0.1µ in
120 minutes.
Stainless-Steel Prefilter (Lifespan up to 20 years)
• Made from rust-free 18/8 stainless-steel.
• The durable, washable, and reusable Prefilter captures and
collects large particles, pollutants, and allergens including pet
hair, dander, and pollen.
Before Use
1. Make sure the OxyPure® is unplugged. Open the panel on the back to
expose the lters.
2. Pull the lters from their slots.
3. Remove the plastic wrapping from the lters.
4. Fully reinsert the lters into the Oxypure and close the panel.
5. Remove the sticker from the control panel.
Wi-Fi

Customer Service:
For Amazon Purchases: support@nuwavenow.com ● For All Other Purchases: help@nuwavenow.com
Air Filter Assembly
When maintaining the lters, unplug the unit and
open the Filter Access Panel. You will see that the
order of the lters, from the outside in, is as follows:
Stainless-Steel Prefilters
Bio-Guard® filters
Bio-Guard®360 filter
3
2
1
Cleaning and Maintenance
The OxyPure®is easily movable. Before moving your OxyPure, turn it off and unplug it from the outlet. Your settings will be saved and will
automatically activate next time the unit is turned on.
Filter Maintenance Indicators
To alert you to the need to clean your Bio-Guard lters, there are LED Filter Indicators beneath the TIMER and
TURBO buttons. These will light up based on the length of operation as follows:
• The Clean Filter 2 light will turn green in about 3 months to alert you that the Bio-Guard lter SHOULD be
cleaned to maintain optimal performance (NuWave Recommendation). When the light turns red (after about
6 months), the Bio-Guard lter MUST be cleaned and thoroughly dried. Once cleaned and thoroughly dried,
press and hold TIMER for 2 seconds until a beep is heard to reset the Filter Indicator for Filter 2.
• The Clean Filter 3 light will turn green in about 3 months to alert you that the Bio-Guard 360 lter SHOULD be
cleaned to maintain optimal performance (NuWave Recommendation). When the light turns red (after about 6
months), the Bio-Guard 360 lter MUST be cleaned. Once cleaned and thoroughly dried, press and hold
TURBO for 2 seconds until a beep is heard to reset the Filter Indicator for Filter 3.
Maintaining the Filters
The lters need to be cleaned on schedule to help the unit maintain optimum performance.
1. Remove the Filter Access Panel in the rear of the OxyPure®using its built-in handle.
2. Slide out the lters that need cleaning.
3. Always allow the washable lters to dry completely, out of direct sunlight, before you reinstall them. Never place a wet lter into the
OxyPure.
4. Close the Filter Access Panel. If the panel is not properly closed, the POWER button will blink red and the unit will not power on.
11
1
22
2
3
3
Customer Service:
For Amazon Purchases: support@nuwavenow.com ● For All Other Purchases: help@nuwavenow.com
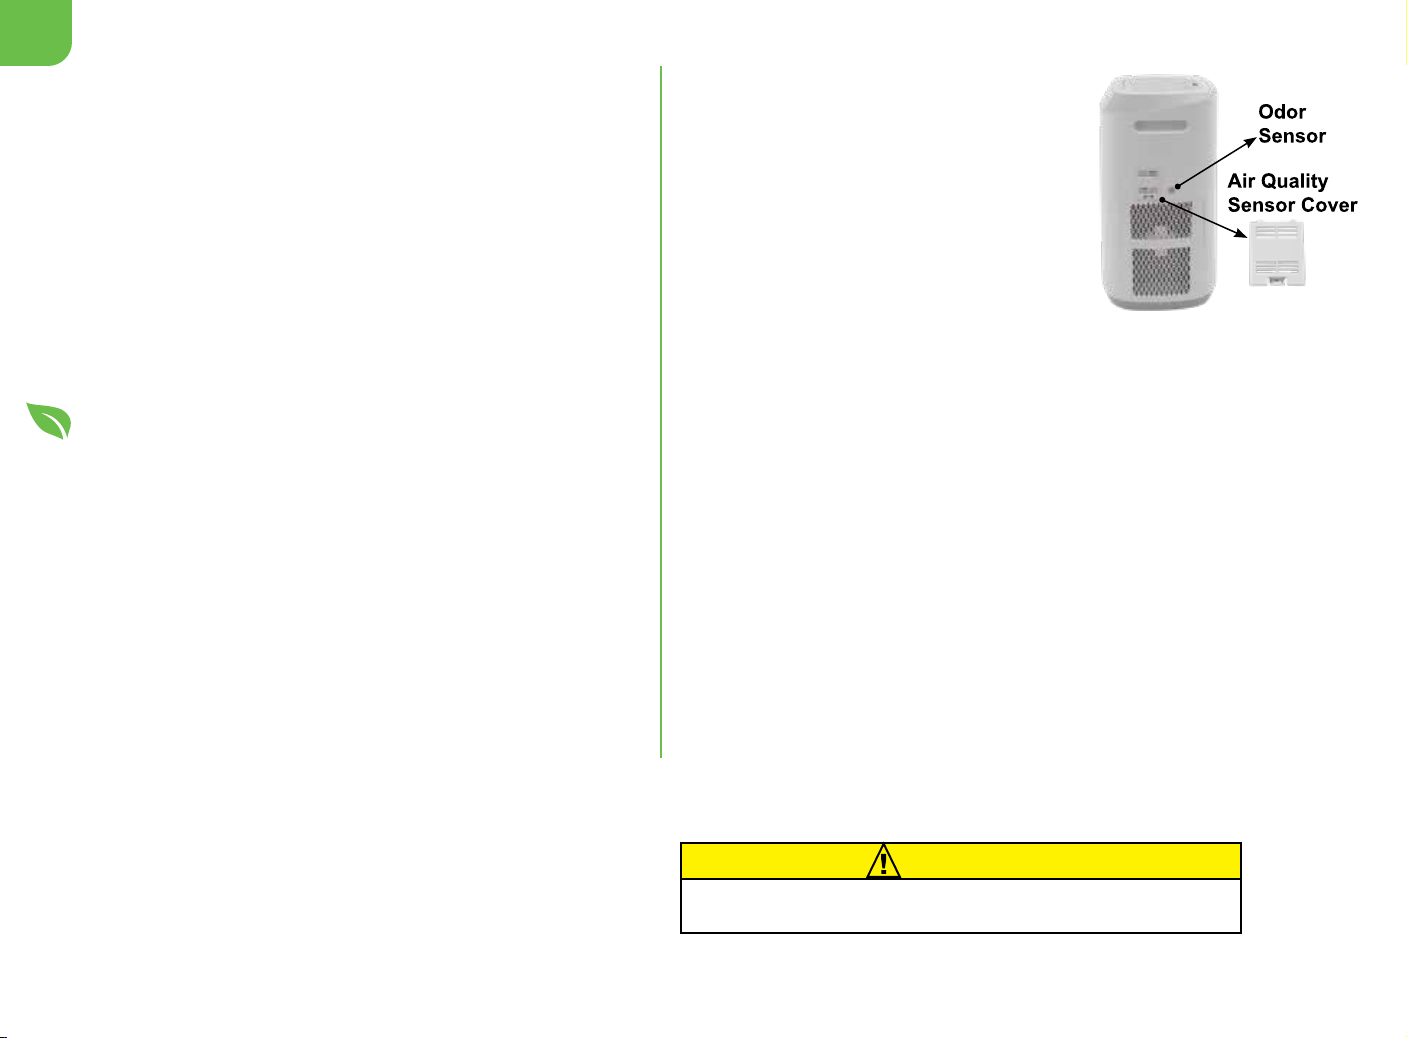
Cleaning the Sensors
The Air Quality Sensor is located at the side
of the unit. Next to that is the Odor Sensor.
1. Open the Air Quality Sensor Cover.
2. Using a dry cotton swab or small, soft
brush, gently remove any dirt or dust from
the Air Quality Sensor.
3. For more buildup on the Sensor, wipe it
with a slightly wet cotton swab.
4. Remove any moisture with a dry cotton
swab.
•The Air Quality Sensor requires regular
cleaning (approximately every 3 months) for the unit to operate
efficiently.
•If your OxyPure is set up in an area with high dust accumulation,
more frequent cleaning of the Sensor is needed.
•Do not use the cotton swab on any part or area other than the Air
Quality Sensor.
5. To clean the Odor Sensor, use a clean cloth or duster, or a vacuum
hose attachment to clear the vents. Do not insert anything into the
vents.
Do not dry the lters in direct sunlight or with any heat source. Do not
use a vacuum cleaner or too stiff a brush to clean the Bio-Guard lters or
Prelters.
Note: If you are unable to close the Filter Access Panel for any reason,
the OxyPure will not operate and you will need to contact NuWave
Customer Service:
For Amazon Purchases: support@nuwavenow.com
For All Other Purchases: help@nuwavenow.com.
Exercise caution to ensure the tabs are not damaged when securing the
Filter Access Panel.
General Filter Cleaning Tips
1. Always Wear a Mask and Rubber Gloves
Prevents accidental inhalation of, and contact with, any
contaminants when cleaning your lters.
2. Move the OxyPure, Not the Filters Minimizes lter shaking.
3. Handle the Filters Carefully
Be careful not to agitate the lters to avoid releasing trapped
contaminants.
4. Air Dry the Filters Completely (up to 24 hours)
Dry the lters in a well-ventilated area away from direct
sunlight. Do not use an external heat source, like a blow
dryer, to speed the drying process.
5. Never install a wet or damp lter into your OxyPure.
Bio-Guard Filters
Remove the Filter Access Panel in the rear of the OxyPure and
remove the lters to be cleaned..
1. Spray the lter with a mild detergent and let it sit 2–3 min.
2. Submerge the lter in warm water, shake, remove. Repeat
until the lter is clean.
3. Rinse the lter with warm water until the water is clean.
4. Dry the lter completely before reinstallation.
Cleaning the Stainless-Steel Prelters
The Prelters need to be cleaned at least once every two
months, depending on use.
1. Use a dry cloth or soft brush to remove any dust or lint.
2. Clean the lters with warm soapy water.
3. Rinse the lters thoroughly and remove any soap particles.
4. Dry the lter completely before use. Keep away from direct
sunlight or any heat source. CAUTION
Never dry Oxypure lters with any heat source
©2023 NuWave®LLC • All Rights Reserved.
Item: BQ47351- 47361 • Rev.1-V4-CB • 07-28-23 EPA Establishment Number: 101594-CHN-1
Other manuals for OxyPure Zero E500
1
This manual suits for next models
2
Other NuWave Air Cleaner manuals

NuWave
NuWave OXYPURE 47001 User manual

NuWave
NuWave OXYPURE ZERO 47251 User manual

NuWave
NuWave OXYPURE ZERO 47251 User manual

NuWave
NuWave OXYPURE 47501 User manual

NuWave
NuWave OxyPure User manual

NuWave
NuWave OXYPURE ZERO E1000 User manual

NuWave
NuWave OXYPURE 47501 User manual

NuWave
NuWave OXYPURE ZERO E1000 User manual

NuWave
NuWave OXYPURE 47001 User manual

NuWave
NuWave OxyPure HEPA 300 User manual


