Oakley CRANKCASE User manual

®
Crankcase Manual_ENG 10/1/07 11:56 AM Page 1

CRANKCASE INSTRUCTION MANUAL 03
SETTING THE TIME
Your Oakley timepiece features a screw-down crown for added protection against
moisture. After it is unscrewed from the case, the crown can be pulled out to two click
positions for setting the date and time.To set the date and time the
first time
(or to
reset the date and time after the battery is changed), do the following:
CRANKCASE™
This Swiss Made chronograph measures split time and added time with sport-
inspired performance for lives that refuse to stand still. Impact forged stainless
steel puts an edge of distinction on the art of Oakley, and precision is honed with
13 jewel movement. Carbon reinforced impact bumpers are matched with a pure
sapphire crystal and case shielding that can withstand water pressure equivalent
to a depth of 330 feet (100 meters). This is rugged durability, honed with
sophistication and ready for life in motion.
02 CRANKCASE INSTRUCTION MANUAL
TO SET THE TIME
1. Pull the crown out to the first click position (a).
2. Turn the crown clockwise until yesterday’s
date appears.
3. Pull the crown out to the second click
position (b).
4. Turn the hands forward until today’s date
appears, then continue forward until the
current time is reached. If the current time is
in the afternoon or evening, move the hour
hand all the way around the dial to pass 12
o’clock noon.
5. Push the crown back in. Gently turn the
crown clockwise until it screws back into the
case. To set the exact second, wait until the
hand in the second-counting sub dial (at the
right of the main dial face) reaches “60”
before you pull out the crown to the second
click position (b). Set the time then wait until
the exact second is reached before pushing
the crown back in.
ab
Button A
Button B
Date
Crown
Crankcase Manual_ENG 10/1/07 11:56 AM Page 2

CRANKCASE INSTRUCTION MANUAL 05
USING THE CHRONOGRAPH
The chronograph includes three separate hands:
• The narrow hand on the main dial face counts seconds. One full rotation is
60 seconds.
• The hand on the sub dial at the left counts minutes. One full rotation is
30 minutes.
• The hand on the sub dial at the bottom counts 1/10 seconds. One full rotation
is 1 second. After 30 minutes, this hand works as an hour counter.
The chronograph is controlled with two push buttons:
• Button “A” stops and starts the timer.
• Button “B” has several functions. In addition to pausing the display at the
current split time (intermediate time), it makes the chronograph hands move
forward to the ongoing time being measured, and it resets the chronograph
hands to the zero position.
Before using the chronograph functions, make sure the crown is fully against the
case and not at one of the click positions used for setting time and date. The
three chronograph hands should align precisely at the zero position. If they do
not, see the section on
Adjusting the Chronograph Hands
.
TO ADJUST THE TIME AND DATE FOR SUBSEQUENT SETTINGS,
USE THESE SHORT PROCEDURES
TO SET THE TIME
1. Pull the crown out to the second click position (b).
2. Turn the crown clockwise until you reach the correct time.
3. Push the crown back in. Gently turn the crown clockwise
until it screws back into the case.
TO SET THE DATE
1. Pull the crown out to the first click
position (a).
2. Turn the crown clockwise until you reach
the correct date. If the current time is
between 9 PM and midnight, set the date
to the following day. (This is necessary to
ensure the date display will normally
change at midnight instead of 12 noon.)
3. Push the crown back in. Gently turn the
crown clockwise until it screws back into
the case.
04 CRANKCASE INSTRUCTION MANUAL
ab
Button A
Chronograph
Second Hand
Chronograph
Minutes
Seconds
Chronograph
1/10 Second
Button B
Date
Crown
Crankcase Manual_ENG 10/1/07 11:56 AM Page 4

TO MEASURE SPLIT TIME
Split time (intermediate time) is a measure of the current time total that is
taken without stopping the timing circuit. The hands pause so you can read
them, then catch up to the ongoing time total.
Start timing
Press button “A”.
PAUSE HANDS BUT CONTINUE TIMING
Press button “B” to pause the chronograph hands and read the current time total.
Although the hands are no longer moving, time is still being measured.
Press button “B” again to move the hands to the currently running time total.
Continue to use button “B” to pause the hands when desired. Time continues to
be measured.
STOP TIMING AND DISPLAY THE FINAL TIME TOTAL
While the hands are moving, press button “A” to fully stop timing and display the
total time measured.
RESET
While timing is stopped, press button “B”.
TO MEASURE ADDED TIME
Added time (cumulative time) is a measure of how much time has passed
without including pauses. This feature lets you exclude the time intervals
you do not want to measure.
START TIMING
Press button “A”.
STOP TIMING TEMPORARILY
Press button “A” to stop timing temporarily.
Press button “A” again to restart timing.
Continue to use button “A” to add
additional time intervals to the total
measure of time. When using button “A”
only, the time that occurs while the
chronograph hands are not moving IS NOT
ADDED to the total measure of time. See
below if you wish to include this “split
time” in the total measure of time.
RESET
While timing is stopped, press button “B”.
CRANKCASE INSTRUCTION MANUAL 07
06 CRANKCASE INSTRUCTION MANUAL
Button A
Button B
Crankcase Manual_ENG 10/1/07 11:56 AM Page 6

CRANKCASE INSTRUCTION MANUAL 09
USING THE TACHYMETER
The number scale around the rim of the dial face can be used to compute speed
based on travel time. Speed can be measured in miles per hour, kilometers per hour,
or another unit of measure per hour, but only speeds above “60” can be measured.
TO MEASURE SPEED
START TIMING AT MARKER
When you reach a distance marker
(such as a mile or kilometer marker),
press button “A”.
STOP TIMING AT NEXT MARKER
When you reach the next distance marker
(after traveling 1 mile or 1 kilometer),
press button “A” to stop timing.
The hand that counts seconds now
points to your speed on the tachymeter
scale. (Example: If mile markers were
used and the hand now points to “65,”
your speed is 65 mph.)
RESET
While timing is stopped, press button “B”.
08 CRANKCASE INSTRUCTION MANUAL
USING THE ROTATING BEZEL
The top bezel can be rotated for an additional measure of time intervals. Rotate
the bezel counterclockwise to align the “60” mark (which is also the zero mark)
with the minute hand on the main dial face. After a time interval, use the
numbers on the bezel to read the elapsed time in minutes. Note that the bezel
rotates in only one direction.
POWER SAVING MODE
When the timepiece is not in use, the battery life can be prolonged by pulling the
crown out to the second click position (b). This will stop the hands and reduce
power consumption.
Button A
Tachymeter
Chronograph
Second Hand
Button B
Crankcase Manual_ENG 10/1/07 11:56 AM Page 8

CRANKCASE INSTRUCTION MANUAL 11
10 CRANKCASE INSTRUCTION MANUAL
ADJUSTING THE CHRONOGRAPH HANDS
When the chronograph is reset with button “B,” the three chronograph hands return
to the zero position. If these hands do not align precisely with the zero position
(such as after a battery change), use the following procedure to adjust them.
TO ADJUST THE CHRONOGRAPH HANDS
1. If the chronograph hands currently
show a measured time, use button “B”
to reset them near the zero position.
Note that the hands must be stopped
before using button “B” to reset them.
If necessary, use button “A” to stop
the hands.
2. Pull the crown out to the second click
position (b). Push button “A” and
button “B” simultaneously and keep
them pressed for at least 2 seconds.
Press button “A” to adjust the
chronograph hand that counts
seconds. (Press and hold the button
for continuous movement.)
ADJUSTING THE CHRONOGRAPH HANDS CONTI.
Press button “B” to set this hand and move on to the next hand.
Press button “A” to adjust the chronograph hand that counts 1/10 seconds.
(Press and hold the button for continuous movement.)
Press button “B” to set this hand and move on to the next hand.
Press button “A” to adjust the chronograph hand that counts minutes. (Press
and hold the button for continuous movement.)
3. Push the crown back in to set this hand and complete the adjustment of the
chronograph hands.
ab
Button A
Chronograph
Second Hand
Chronograph
Minutes
Seconds
Chronograph
1/10 Second
Button B
Date
Crown
Crankcase Manual_ENG 10/1/07 11:56 AM Page 10

BATTERY REPLACEMENT
The miniature battery that powers the timepiece is designed to last approximately
48 months. However, because the battery is inserted at the factory for extensive
performance checks, its actual life, once in your possession, may be less.
Battery replacement may be performed only by an Authorized Oakley Service
Center. Any attempt to open the watch case by persons other than Authorized
Oakley Service Professionals will void the product warranty.
Within the United States, call Oakley global headquarters at 1-800-403-7449 to
find an Authorized Oakley Timepiece Service Professional near you. Customers
outside the United States should contact their local Authorized Oakley Timepiece
Dealer or visit the Oakley website at www.oakley.com for the number of the
nearest Oakley distributor.
12 CRANKCASE INSTRUCTION MANUAL CRANKCASE INSTRUCTION MANUAL 13
BAND ADJUSTMENT
METAL BRACELET MODEL
If links need to be added or removed from the band, the adjustment should be
done by an Authorized Oakley Timepiece Dealer. Do not attempt to shorten the
band by removing links yourself, as this may result in damage to the bracelet.
CLEANING
Failure to keep the case and band clean may result in a skin rash. Use a soft,
clean cloth to wipe off any moisture that adheres to the case or band.
Crankcase Manual_ENG 10/1/07 11:56 AM Page 12

CRANKCASE INSTRUCTION MANUAL 15
SPECIFICATIONS
MOVEMENT .............................................................................. Swiss Made, 13-jewel
TYPE OF OSCILLATOR ........................................................................ Quartz tuning fork
FREQUENCY OF OSCILLATOR .................................................... 32,768 cycles per sec.
ACCURACY .................................................................................. -10 /+20 sec. per mo.
THERMAL OPERATING MIN............................................................................ 0ºC (32ºF)
THERMAL OPERATING MAX....................................................................... 50ºC (122ºF)
WATER RESISTANCE................................ 10 bar; equivalent to depth of 100m / 330ft
BATTERY .................................................................. Silver oxide: No. 395, SR 927 SW
BATTERY ENDURANCE .................................................................... Approx. 48 months
COMPOSITION
CASE BODY ............................................................................................ Stainless steel
CASE STRUCTURE ..................................................Carbon reinforced impact bumpers
CASE BACK ............................................................................................ Stainless steel
MANUFACTURING ................................ Impact forged, high-precision CNC machined
CRYSTAL.............................................................. Sapphire with anti-reflective coating
CROWN...................................................................... Double seal for water resistance
STAINLESS STEEL BRACELET MODEL
BRACELET COMPOSITION................................................Impact forged stainless steel
KINETICS ................................Carbon fiber reinforced self-lubricating thrust washers
CLOSURE ............................Stainless steel deployment clasp w/ dual pusher release
UNOBTAINIUM®RUBBER STRAP MODEL
STRAP COMPOSITION ......................................................Oakley Unobtainium®rubber
ATTACHMENT................................................................Stainless steel attachment link
CLOSURE ............................Stainless steel deployment clasp w/ dual pusher release
14 CRANKCASE INSTRUCTION MANUAL
Crankcase Manual_ENG 10/1/07 11:56 AM Page 14

SAFEGUARDING
WATER EXPOSURE
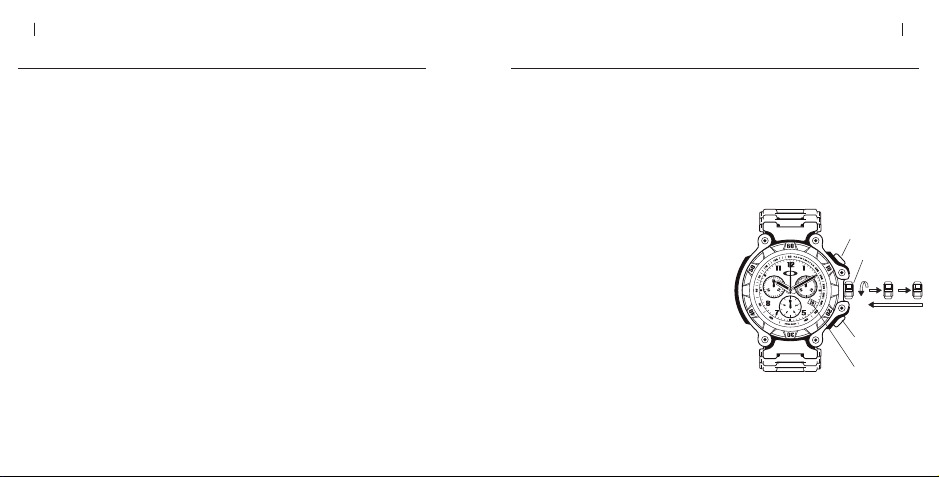
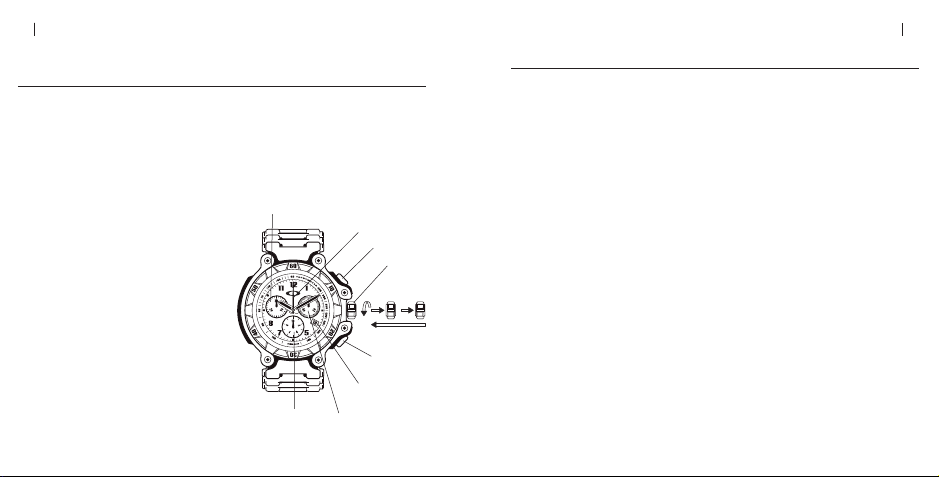
Prior to exposing the timepiece to water, ensure the crown is pushed fully down
against the case then turn the crown clockwise to tighten the water seal. Rated
at 10-bar hydrophobic, the timepiece may be worn during bathing, swimming and
shallow diving. It is not designed for scuba or saturation diving. Do not pull out
the crown or use the buttons if the timepiece is wet. If used in seawater, rinse
the timepiece with fresh water and dry completely.
TEMPERATURE
For precision timekeeping, normal operating temperature is 0°C to 50°C (32°F to 122°F).
MAGNETISM
Strong magnetic fields can have an adverse affect on the timepiece. Keep it away
from magnetic objects.
CHEMICALS
The timepiece may become discolored or damaged if exposed to cosmetic spray,
detergents, adhesives, solvents, or paints.
SHOCK WAVE
Although the timepiece resists shock damage, impact against a hard surface may
cause damage to the movement or crystal.
PERIODIC MAINTENANCE
To ensure that the case, crown, crystal seal, and gasket remain resistant to water
exposure, it is recommended that the timepiece be inspected once every 2 to 3
years by an Authorized Oakley Service Center.
CRANKCASE INSTRUCTION MANUAL 17
16 CRANKCASE INSTRUCTION MANUAL
OAKLEY WARRANTY POLICY
All authentic Oakley timekeeping instruments are warranted against
manufacturer’s defects for two full years from the date of purchase. Coverage is
valid only with proof of purchase from an Authorized Oakley Timepiece Dealer.
IMPORTANT
This limited warranty does not cover the crystal, strap/band/bracelet, or
attachments. The deterioration of leather components is not covered, nor are
scratches to the case caused by use, nor is moisture damage if the timepiece is
a non-hydrophobic model, nor is damage caused by natural disaster such as fire,
flood, or earthquake. We reserve the right to relinquish all responsibility under
this guarantee for repair of damage when misuse or abuse is evident, including
defects related to tampering or servicing done by agents other than Authorized
Oakley Service Facilities. This warranty does not affect specific legal rights of
the consumer.
To qualify for service under the above guarantee, valid proof of purchase —
which clearly shows the purchase date and the name of the Authorized Oakley
Timepiece Dealer — must be presented if a repair claim is made during the
warranty period.
Crankcase Manual_ENG 10/1/07 11:56 AM Page 16

OAKLEY WARRANTY POLICY
REGISTRATION
The cutting-edge technology within each Oakley timepiece serves as validation of
its authenticity. By registering your timepiece via mail or online at
www.oakley.com, you provide further credentials by allowing us to document
your purchase.
HOW TO MAKE A WARRANTY CLAIM
Within the United States, telephone our global headquarters at 1 (800) 403-7449
with your purchase information. Customers outside the United States should
contact their local Authorized Oakley Timepiece Dealer or visit the Oakley
website at www.oakley.com for the number of the nearest Oakley distributor.
Swiss Movement
Swiss Made
CRANKCASE INSTRUCTION MANUAL 19
18 CRANKCASE INSTRUCTION MANUAL
HOW TO MAKE A WARRANTY CLAIM
Oakley Global Headquarters, USA: 1 (800) 403-7449
Oakley Africa: +27 41 501 0200
Oakley Brasil Ltda.: 0800-770-7822 ou 0xx11-4197-9999 (Grande São Paulo e celular)
Oakley Canada: 1-877-625-5396
Oakley Europe: Belgium: 0800 10 464 • Danmark: 800 10 631 • España: 900 993 385
• Finland: 0 800 11 33 80 • France: 0 800 037 619 • Nederland: 0800 022 9086
• Island: 800 83 82 • Italia: 800 343 467 • Luxemburg: 800 22 957
• Norge: 800 11 268 • Portugal: 800 833 011 • Sverige: 020 795 467
Oakley GMBH: Germany, Austria and Poland: +49-89-99650-4181
Oakley Japan: 0120 009 146
Oakley México: 52) 55 59503643
Oakley South Pacific (Australia): 1 800 637 001
Oakley South Pacific (New Zealand): 0800 696 255
Oakley UK: 01462 475400 Eire customers: 00 353 4439557
Crankcase Manual_ENG 10/1/07 11:56 AM Page 18
Table of contents
Other Oakley Watch manuals

Oakley
Oakley OAKLEY GEARBOX User manual

Oakley
Oakley WARRANT User manual

Oakley
Oakley kill switch User manual

Oakley
Oakley JUDGE II User manual

Oakley
Oakley D1 User manual

Oakley
Oakley Hollow Point User manual

Oakley
Oakley DETONATOR User manual

Oakley
Oakley Jury II User manual

Oakley
Oakley D2 User manual

Oakley
Oakley Jury II User manual

Oakley
Oakley Crush User manual

Oakley
Oakley Holeshot 3 Hand User manual

Oakley
Oakley Bullet User manual

Oakley
Oakley Chronograph User manual

Oakley
Oakley Full Metal Jacket User manual

Oakley
Oakley Saddleback User manual

Oakley
Oakley D2 User manual

Oakley
Oakley HOLESHOT User manual

Oakley
Oakley DOUBLE TAP User manual

Oakley
Oakley OAKLEY TRANSFER CASE User manual