Oce CS9265 User manual

Océ CS9265
Océ CS9290
Installation Guide
Low Solvent

CS9200 Low Solvent series printers
2AP-40301 – Rev. 2.0 – 02/05/2008

CS9200 Low Solvent series printers
3AP-40301 – Rev. 2.0 – 02/05/2008
COPYRIGHT NOTICE
COPYRIGHT ©2008 Océ-Technologies B.V. All rights reserved.
Océ reserves the right to modify the information contained in this manual at any time without prior notice.
This document may not be reproduced by any means, in whole or in part, without written permission of the
copyright owner.
This document is furnished to support the Océ CS9200 Low Solvent series Printer. In consideration of the
furnishing of the information contained in this document, the party to whom it is given, assumes its custody
and control and agrees to the following:
The information herein contained is given in confidence, and any part thereof shall not be copied or
reproduced without written consent of Océ-Technologies B.V.
This document or the contents herein under no circumstances shall be used in the manufacture or
reproduction of the article shown and the delivery of this document shall not constitute any right or license to
do so.
May 2008
Published: Océ-Technologies B.V.
St. Urbanusweg 43
Venlo, The Netherlands,
P.O. Box 101, NL 5900 MA Venlo

CS9200 Low Solvent series printers
4AP-40301 – Rev. 2.0 – 02/05/2008

CS9200 Low Solvent series printers
5AP-40301 – Rev. 2.0 – 02/05/2008
Table of contents
1Installation environment......................................................................................................... 9
1.1 Installation environment requirements ....................................................................................... 9
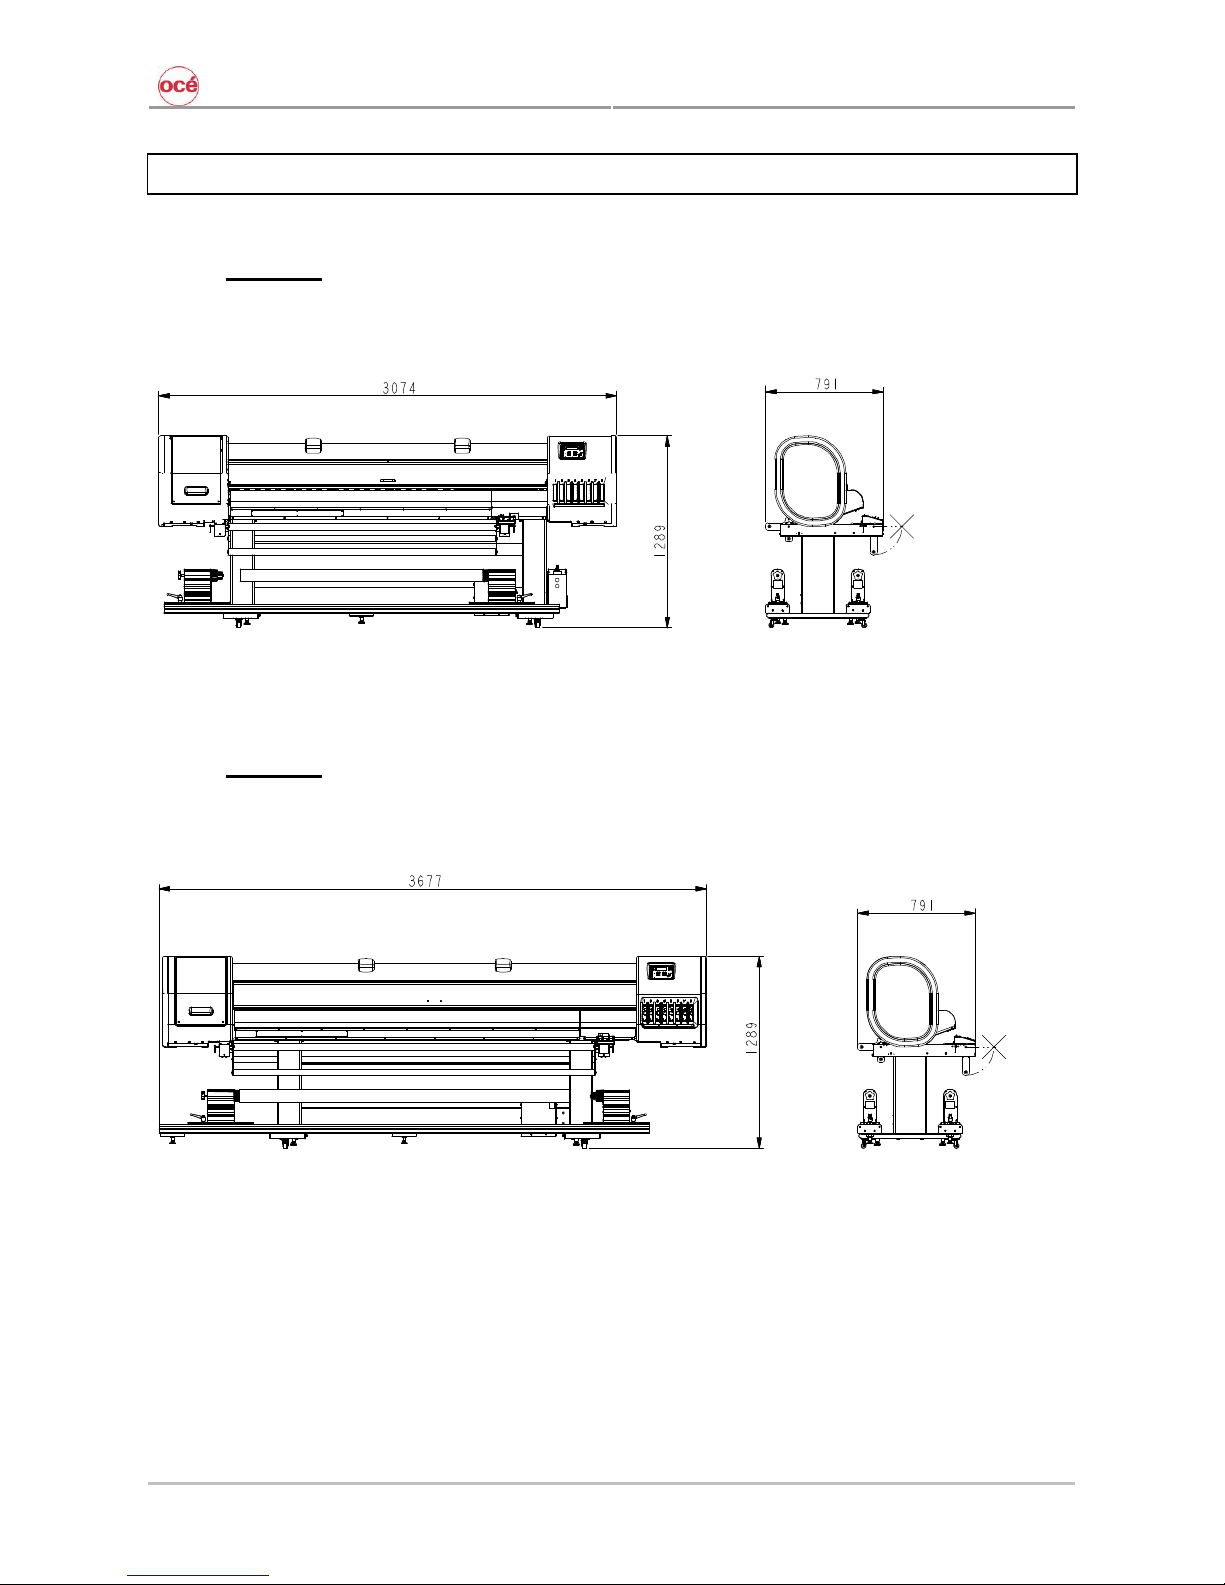
1.2 Dimensions.............................................................................................................................. 10
1.3 Required Space....................................................................................................................... 11
2Verification of packaged items ............................................................................................ 13
2.1 Contents unit box..................................................................................................................... 14
2.2 Contents Printer stand box ......................................................................................................14
2.3 Contents installation kit............................................................................................................ 15
2.4 Contents starter kit .................................................................................................................. 16
2.5 Contents Unwinder/Winder 100............................................................................................... 19
3Unpacking procedure ........................................................................................................... 21
3.1 Unpack the printer ................................................................................................................... 21
3.2 Unpack the stand..................................................................................................................... 24
4Assembling the unit.............................................................................................................. 25
4.1 Assembling the stand .............................................................................................................. 25
4.2 Installing the printer on the stand.............................................................................................26
4.3 Remove protective materials. .................................................................................................. 28
4.4 Levelling the printer ................................................................................................................. 29
4.5 Install the Unwinder/Winder 100.............................................................................................. 31
4.6 Install the waste bottle............................................................................................................. 32
5Connecting the cables.......................................................................................................... 33
5.1 Connecting the foot switch....................................................................................................... 33
5.2 Connecting the power cable .................................................................................................... 34
5.3 Connecting the printer to the PC ............................................................................................. 36
6Loading ink for first time......................................................................................................41
6.1 Parts needed ........................................................................................................................... 41
6.2 First ink load procedure ........................................................................................................... 42
7Loading media....................................................................................................................... 47
7.1 Loading roll media ................................................................................................................... 47
7.2 Loading sheet media ............................................................................................................... 47
8Head adjustments verification............................................................................................. 49
8.1 Head Slant Check.................................................................................................................... 50
8.2 Front and Back........................................................................................................................ 51
8.3 Bi-Directional ........................................................................................................................... 52
8.4 Uni-Directional......................................................................................................................... 55
8.5 Micro Shift 1/720” for FAST modes.......................................................................................... 56
9Test printing .......................................................................................................................... 59
10 Periodical Maintenance cycles ............................................................................................ 61
10.1 Done by the end user .............................................................................................................. 61
10.2 Done by an Authorized Technician.......................................................................................... 62
Feedback sheet first ink load procedure............................................................................................... 63

CS9200 Low Solvent series printers
6AP-40301 – Rev. 2.0 – 02/05/2008
Step-by-step plan
1. Check installation environment ►Refer to chapter 1
2. Unpack the printer, stand and boxes ►Refer to chapter 3
3. Check in-the-box configuration ►Refer to chapter 2
4. Assemble the printer / winder ►Refer to chapter 4
5. Connect the cables ►Refer to chapter 5
6. Load ink ►Refer to chapter 6
7. Load media ►Refer to chapter 7
8. Verify head adjustment ►Refer to chapter 8
9. Make Test Print ►Refer to chapter 9
10. Get to know the periodical maintenance ►Refer to chapter 10

CS9200 Low Solvent series printers
7AP-40301 – Rev. 2.0 – 02/05/2008
Introduction
After reading this manual, an authorized service technician will be able to install Océ’s CS9265/CS9290
smoothly.
The complete installation procedure, from unpacking until sending a test file, is described in detail. Please
read this document carefully to know what to do during the installation at the site.
Caution
•NO PART OF THIS PRODUCT OR MANUAL MAY BE REPRODUCED,COPIED OR TRANSMITTED IN ANY FORM OR BY
ANY MEANS,EXCEPT FOR PERSONAL USE,WITHOUT PERMISSION OF OCÉ TECHNOLOGIES.
•THE PRODUCT AND THE CONTENTS OF THIS MANUAL MAY BE CHANGED WITHOUT PRIOR NOTIFICATION.
•OCÉ TECHNOLOGIES HAS MADE THE BEST EFFORTS TO KEEP THIS PUBLICATION FREE FROM ERRORS.IF YOU
FIND ANY UNCERTAINTIES OR MISPRINTS,PLEASE CONTACT US OR THE SHOP WHERE YOU BOUGHT THIS
PRODUCT.
•OCÉ TECHNOLOGIES SHALL NOT BE LIABLE FOR ANY DAMAGES OR TROUBLES RESULTING FROM THE USE OF
THIS PRODUCT OR THIS MANUAL.
Safety terms in this manual are categorized into following three types, depending on the degree of the risk
(or the scale of accident)
Safety Terms Details
WARNING Must be followed carefully to avoid death or serious bodily injury.
CAUTION Must be observed to avoid bodily injury (moderately or lightly) or damage to your product
NOTES Contains important information and useful tips on the operation of your product

CS9200 Low Solvent series printers
8AP-40301 – Rev. 2.0 – 02/05/2008

CS9200 Low Solvent series printers
9AP-40301 – Rev. 2.0 – 02/05/2008
1 INSTALLATION ENVIRONMENT
It is very important that the installation environment fulfils following conditions to obtain stable print quality.
1.1 INSTALLATION ENVIRONMENT REQUIREMENTS
Choose a place for printer installation following the requirements in the table below.
65” model 23,5 m² or larger (please refer to chapter “Required Space”)Area
90” model 25,7 m² or larger (please refer to chapter “Required Space”)
Floor loading capability 2940Pa (300kg/m²) or more
65” 90”
Voltage AC 100-120V
AC 220-240V
AC 100-120V
AC 220-240V
Frequency 60/50Hz 60/50Hz
Electrical
Capacity AC100V-120V : 11 A
AC220V-240V : 5.5 A
AC100V-120V : 12 A
AC220V-240V : 6 A
In order to protect the printer for over currents, short circuits and earth faults, the building
installation should be equipped with an automatic breaker double pole of 20 A and an earth
leakage switch of 300 mA.
Recommended
working
environment
Temperature: 23°C
Humidity: 55%, without condensation
Operational
conditions for low
solvent ink
Temperature: 20°C - 30°C
Humidity: 40% to 65%, without condensation
Rate of change Temperature: No more than 2°C per hour
Humidity: No more than 5% per hour
Ambient
conditions
Storage and
transport conditions
Temperature: 4°C to 50°C
Humidity: 40 to 80%, without condensation (When ink has been
discharged.)
NOTES
•AVOID THE FOLLOWING TEMPERATURE AND HUMIDITY CONDITIONS.OTHERWISE,PRINTED IMAGES MAY
APPEAR DIFFERENTLY FROM WHAT YOU EXPECT:
οP
LACES WHERE SUDDEN CHANGES IN TEMPERATURE AND HUMIDITY ARE EXPECTED,EVEN THOUGH
THE CONDITION IS WITHIN THE RANGE WRITTEN ABOVE.
οP
LACES WHERE DIRECT SUNLIGHT OR EXCESSIVE LIGHTING ARE EXPERIENCED.
οP
LACES WHERE AIR CONDITIONERS BLOW DIRECTLY.
•OCÉ RECOMMENDS THAT THE PRINTER IS INSTALLED IN A PLACE WHERE AIR CONDITIONING CAN BE ADJUSTED
EASILY.
•I
F THE RECOMMENDED WORKING ENVIRONMENT CANNOT BE MET AND OUTPUT QUALITY ISSUES ARISE,THE
BEST APPROACH TO MINIMISE THE EFFECTS IN THIS CASE IS TO REDUCE THE OUTPUT SPEED.IN SUCH A CASE,
WE RECOMMEND SWITCHING FROM 360X360 DPI TO 540 X 720 DPI OR TO 720X720 DPI.

CS9200 Low Solvent series printers
10 AP-40301 – Rev. 2.0 – 02/05/2008
1.2 DIMENSIONS
1.2.1 CS9265
1.2.2 CS9290

CS9200 Low Solvent series printers
11 AP-40301 – Rev. 2.0 – 02/05/2008
1.3 REQUIRED SPACE
1.3.1 Necessary free space
a= 1,5 m
b= 1,5 m
c= 2,5 m
d= 0,6 m
e= 1,3 m
Distance cand dare interchangeable. Just ensure to have at one side of the printer at least 2,5 m. This to
be sure that you can pass with a roll of media.
1.3.2 Required area
For the CS9265 series
Width x depth = (0.6 m + 3,074 m + 2,5 m) x (1,5 m + 0,791 m + 1,5 m)
= 6,174 m x 3,791 m
= 23,4 m²
For the CS9290 series
Width x depth = (0.6 m + 3,677 m + 2,5 m) x (1,5 m + 0,791 m + 1,5 m)
= 6,777 m x 3,791 m
= 25,7 m²

CS9200 Low Solvent series printers
12 AP-40301 – Rev. 2.0 – 02/05/2008

CS9200 Low Solvent series printers
13 AP-40301 – Rev. 2.0 – 02/05/2008
2 VERIFICATION OF PACKAGED ITEMS
After unpacking the packaging box, inspect if the printer is not damaged and verify that all necessary parts
are present.
NOTES
THE CONTENTS OF THE PACKAGES MAY BE DIFFERENT DEPENDING ON THE MARKET WHERE THEY ARE USED.
CONTACT YOUR LOCAL OCÉ REPRESENTATIVE OR DISTRIBUTOR FOR DETAILS.
IF ANY PART IS MISSING OR BROKEN,CONTACT EITHER OF THE FOLLOWING:
•T
HE SHOP WHERE YOU BOUGHT YOUR PRINTER.
•Y
OUR LOCAL OCÉ REPRESENTATIVE
The unit contains following boxes:
1
2
3
4
5
Nr Description
1 Unit
2 Printer stand
3 Buffer with Installation kit inside
4 Starter kit
5 Unwinder/Winder 100

CS9200 Low Solvent series printers
14 AP-40301 – Rev. 2.0 – 02/05/2008
2.1 CONTENTS UNIT BOX
2.2 CONTENTS PRINTER STAND BOX
12
Nr Description Qty
1 Stay 1
2 Foot 2

CS9200 Low Solvent series printers
15 AP-40301 – Rev. 2.0 – 02/05/2008
2.3 CONTENTS INSTALLATION KIT
13 14 15 16 17
1 2 3 4 5 6 7 8 9 10 11 12
Nr Description Qty
1 Screwdriver Philips P2 1
2 Hexagon wrench 4 mm 1
3 Hexagon wrench 5 mm 1
4 Plain washer M6 16
5 Spring washer M6 16
6 Hexagon bolt M6x30 8
7 Hexagon bolt M6x16 8
8 Cable clamp 2
9
SCREWSET
Tube clamp (not used) 3
10 Spacer 0,3 mm 5
11 Spacer 0,5 mm 5
12 Spacer 1,0 mm 5
13 Power cable 1
14 Media retainers (attached to machine) 2
15 Foot switch 1
16 APS bracket 1
17 Waste bottle assembly 1

CS9200 Low Solvent series printers
16 AP-40301 – Rev. 2.0 – 02/05/2008
2.4 CONTENTS STARTER KIT
1
2
3
4
5
6
Nr Description Qty
1 Starter kit 1
2 Commercial kit 1
3 User and good shape kit 1
4 + 5 + 6 Ink starter set 1
2.4.1 Commercial kit
1 2 3 4 5
Nr Description Qty
1 User’s Guide CS9200 Low Solvent series printer 1
2 CD with all manual in digital version 1
3 Machine type label CS9265 and CS9290 1
4 Maintenance label 1
5 How to obtain impeccable printing quality with the WAVE stitching technology 1

CS9200 Low Solvent series printers
17 AP-40301 – Rev. 2.0 – 02/05/2008
2.4.2 User and good shape kit
Order number: 29801288
Kit content:
Nr Description Qty
1 Sponge plate 6
2 Wipers 24
3 Spitting box sponge 12
4 Cleaning Liquid 250 ml 3
5 Instruction sheet 1
6 Good shape kit 1
▼
▼
▼
* Good shape kit order number: 29801287
* Good shape kit content:
Nr Description Qty
1 Gloves 300
2 Pipette 60
3 Swabs 150
4 Polyknit wiper 300

CS9200 Low Solvent series printers
18 AP-40301 – Rev. 2.0 – 02/05/2008
2.4.3 Océ IJC920 HS Low Solvent Setup Cleaning
Nr Description Qty Part number
1 Océ IJC920 HS Low Solvent Setup Cleaning 8 29952256
2.4.4 Océ IJC920 HS Low Solvent Cleaning
Nr Description Qty Part number
1 Océ IJC920 HS Low Solvent Cleaning 8 29952255
2.4.5 Océ IJC920 HS Low Solvent ink
Nr Description Qty Part number
1 Océ IJC920 HS Low Solvent ink - Black 2 29952237
2 Océ IJC920 HS Low Solvent ink - Yellow 2 29952238
3 Océ IJC920 HS Low Solvent ink - Cyan 2 29952239
4 Océ IJC920 HS Low Solvent ink - Magenta 2 29952240
NOTES
PLEASE REFER TO INSTALLATION GUIDE TO KNOW HOW TO LOAD INK PROPERLY.

CS9200 Low Solvent series printers
19 AP-40301 – Rev. 2.0 – 02/05/2008
2.5 CONTENTS UNWINDER/WINDER 100
Notes
PLEASE REFER TO THE USER’S GUIDE OF THE UNWINDER WINDER 100 FOR THE COMPLETE IN-THE-BOX
CONFIGURATION.

CS9200 Low Solvent series printers
20 AP-40301 – Rev. 2.0 – 02/05/2008
This manual suits for next models
1
Table of contents
Other Oce Printer manuals

Oce
Oce VarioPrint i Series User manual

Oce
Oce Arizona 440 GT User manual

Oce
Oce Arizona 6160 XTS User manual

Oce
Oce PlotWave 300 User manual

Oce
Oce CS9360 User manual

Oce
Oce Arizona 600 User manual

Oce
Oce Arizona 250 GT User manual

Oce
Oce VarioStream 8000 User manual

Oce
Oce CS171 User manual

Oce
Oce VarioLink 6022 User manual

Oce
Oce VarioPrint 4110 User manual

Oce
Oce PlotWave 900 User manual

Oce
Oce ColorWave 600 User manual

Oce
Oce LightJet 430 Operating instructions

Oce
Oce Arizona 550 GT User manual

Oce
Oce OP30C User manual

Oce
Oce VarioLink 5022 User manual

Oce
Oce TDS400 User manual

Oce
Oce TDS100 User manual

Oce
Oce PlotWave 340 User manual