Orient OrientStar DIVER'S WATCH 200m User manual

MECHANICAL WATCH
AUTOMATIC & HAND WINDING MECHANISM
DIVER’S WATCH 200m
INSTRUCTION MANUAL
BEDIEUNGSANLEITUNG
MODE D’EMPLOI
MANUALE DI ISTRUZIONI
MANUAL DE INSTRUCCIONES
EMAM90

1
ENGLISH
ENGLISH
MECHANICAL WATCH
AUTOMATIC & HAND WINDING MECHANISM
DIVER’S WATCH 200m
INSTRUCTION MANUAL
Thank you for choosing our product. To ensure prolonged use and optimum
performance, please read this instruction manual carefully and familiarize
your-self with the terms of the guarantee.
Please keep this Instruction Manual handy for future reference.
SAFETY PRECAUTIONS
Make absolutely sure to observe the demarcated contents indicated below to
prevent any possible physical danger and property damage to you as well as
other people concerned.
... A demarcation with this symbol represents the contents
assuming possibility for death or serious injury
when the product is used in any manner different from
given instructions.
... A demarcation with this symbol represents the contents
assuming possibility of causing human injury or
material damage only when a product is used in any
manner different from given instructions.
WARNING
!
CAUTION
!

2
ENGLISH
IN HANDLING THE WATCH
(1) Precautions when diving
WARNING
!
Watches with “DIVER’S 200m” or “DIVER’S WATCH 200m” marked on its
dial or case back are designed to be able to be used when scuba diving
(air diving, water depth of up to 200m).
• This watch is not designed for saturation diving. Do not use this watch
when saturation diving.
• Do not use this watch in water depths of 200m or deeper.
• The diver’s watch is an auxiliary instrument mainly used for displaying
the elapsed time. Ensure that you have acquired the necessary
experience and skills to dive safely before diving, and be sure to use
specialized diving equipment such as the diving computer.
CAUTION
!
[Precautions before diving]
Make sure to do the following before you dive.
• Check that the mainspring is fully wound.
• Make sure the watch shows the correct time.
• Make sure that the rotating bezel is set to the correct time. Also, make
sure that the rotating bezel is not too loose, too tight or rotating in the
opposite direction.
• Check that the screwed-down type crown is securely tightened.
• Make sure that there are no cracks or chips in the glass.
• Make sure that the watchband is not about to tear, and check that
there are no problems with its joints (spring bar, buckle, clasp, etc.).
If there are any problems, do not use the watch when diving.
CAUTION
!
[Precautions during diving]
• Do not operate the crown while in the water.

3
ENGLISH
• The rotating bezel may be hard to operate under water due to water
pressure.
• The elapsed time indicated by the rotating bezel is to be taken as a
rough estimate.
• Do not subject the watch to shocks, such as banging on rocks.
CAUTION
!
[Precautions after diving]
• To remove salt water from the case or bracelet/strap, first make sure
the crown is securely tightened. Then, rinse it with fresh water to
prevent rusting.
• Do not use chemical agents to rinse the watch or soak the watch.
(2) Shock
1Be sure not to carry the watch when you engage in
strenuous sports, whereas playing such light sports as golf,
etc., will not adversely influence the watch.
2Avoid a violent shock such as dropping the watch on the
floor.
(3) Magnetism
1If the watch is left at a location with strong magnetism for an extended
period of time, the components may be magnetized, resulting in
malfunction. Be careful.
2The watch may temporarily speed up or slow down when exposed to
magnetism. Precision is restored when placed away from magnetism. In
such a case, reset the time.
(4) Vibration
The watch may lose precision if subjected to strong
vibrations such as from riding motorcycles, using
jackhammers, chain saws, etc.
(5) Temperature
In environments below and above normal temperatures (5°C-35°C), the
watch may malfunction and stop.

4
ENGLISH
CAUTION
!
Do not use the watch at high temperatures, such as in a sauna. The
watch may heat and cause burns.
(6) Chemicals, Gases, etc.
Utmost caution must be exercised when coming into contact with gases,
mercury, chemicals (paint thinner, gasoline, various solvents, detergents
containing such components, adhesives, paint, drugs, perfumes,
cosmetics, etc.), and so forth. Such may cause discoloration of the
watchcase, watchband, and dial face. Discoloration, deformation, and
damage to various resin-based component parts may also occur.
(7) About accessory parts
CAUTION
!
Do not attempt to disassemble or modify the watch.
WARNING
!
Store the bracelet/strap pin and other small parts out of the reach of
children.
If any small parts are swallowed, immediately contact a doctor.
(8) Allergic reactions
CAUTION
!
If you develop a skin rash or your skin becomes abnormally irritated due
to contact with the watch or strap, stop wearing the watch immediately
and consult a doctor.

5
ENGLISH
(9) About “luminous light”
This watch has luminous light on the hands and dial.
The luminous light is a safe paint that stores sunlight and artificial light
without using any radioactive material, and emits that light in a dark
setting. As the paint discharges the stored light, it will become dimmer
over time. The amount of light emitted and the time that light is emitted
depends on various factors when the light is stored, such as the shape
of the glass, the thickness of the paint, surrounding brightness level, the
distance from the watch to the light source, and the light absorption level.
Please note that when not enough light energy is stored, the watch may
emit weak light or emit light for only a short time.
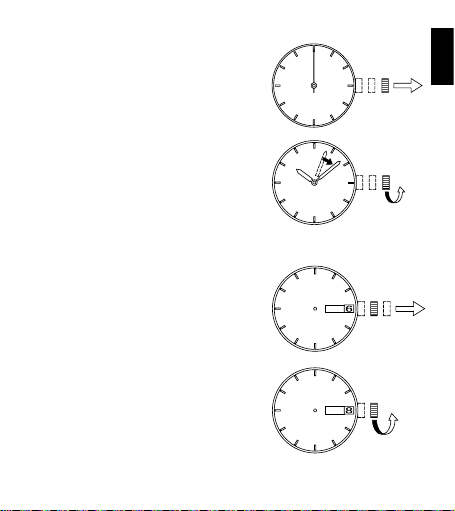
◆HOW TO IDENTIFY THE CALIBER NUMBER
Check the caliber number by referring to the model number of your watch or
the case code on the watch’s case back.
1. Searching by the model number
Check the 13 digit model number on the guarantee supplied with your watch.
You can also see the number on the product tag put on the watch. Its fourth
and fifth digits indicate the caliber number of your watch.
(Ex.) R¨-XXXXXXXXXX
2. Searching by the case code
Check the case code on the case back of
your watch.
It has displayed as XXXX-XXXX.
The first three digits indicate the caliber
number.
(In the example, F6D is the caliber number.)
* The place of case code may vary and its letter size may be small and
difficult to see depending on the characteristics of watches.
* The pictures and illustrations on this manual may differ from the actual
appearance of your watch but the function and operation procedures are
the same.
Case code

6
ENGLISH
SPECIFICATIONS
Caliber
Number
of jewels
Date Day of
week
Second
hand halt
mechanism
Running time Remark1*
AA F69 22 ○ ○ ○ More than 40 hours 8:00P.M.-4:00A.M.
AC F67 22 ○–○More than 40 hours 8:00P.M.-4:00A.M.
AU F6N 22 ○–○More than 50 hours 8:00P.M.-2:00A.M.
(1) Vibrations: 21,600 vibrations/1 hour
(2) Daily accuracy: +25 sec. to -15 sec.
(3) Drive system: Mainspring winding (Hand-winding)
(4) Shock-proof bearings to protect the balance with hairspring from shocks.
The stated daily accuracy is in the following conditions:
• After 24 hours at room temperature with the mainspring wound fully and
the dial facing up.
• Due to the characteristics of the automatic winding watch, the time may
deviate from the stated “daily accuracy” depending on the following
conditions: amount of time the watch is worn each day, position of the
watch, movement of your arm, winding condition of the mainspring.
• Determine the deviation from not just a day but a period of about a week.
Product specifications may change without notice, for improvement.
CAUTION
!
* Avoid setting the date during the time periods listed in “Remark1” above
since the calendar changes during this time. If the date is set during this
time period, the date may not change or the watch may malfunction. Be
sure to move the hour and minute hands away from this time period when
setting the date.

7
ENGLISH
NAMES AND FUNCTIONS OF INDIVIDUAL COMPONENT PARTS
A: Hour hand
E:
Date 1. Normal position
B: Minute hand F: Crown 2. First click: Calendar setting
C: Second hand G: Dial 3. Second click: Time setting
D:
Day of the week H: Power reserve indicator hand
<AA(F69)> <AC(F67)>
<AU(F6N)>
* The position of the crown, date indicator, or day of the week window may
be different, depending on the model.
MON
G
A
B
D
C
E
F
12
3
G
A
B
C
E
F
123
E
A
H
C
B
F
G
12 3

8
ENGLISH
AUTOMATIC WINDING MECHANISM
(1) The mainspring is wound by natural movements of your
arm when wearing the watch on your wrist.
(2) If your watch stops, swing the watch back and forth ten
or more times to re-start the second hand. After it starts
moving, set the date and time.
(3) If it is not wound enough, the watch may lose accuracy.
In order to maintain the watch’s accuracy, we recommend
wearing the watch at least 8 hours a day.
HAND WINDING MECHANISM
(1) The mainspring can be wound up by hand.
(2) To wind the spring, ensure that the crown is in its normal position and
slowly turn it clockwise.
Turning the crown counterclockwise will have no effect.
(3) When the watch is in the stopped state, the spring can be wound
sufficiently by rotating the crown approximately 30 times. Since the crown
will rotate even when winding is complete, wind the watch using the
above number of turns as a guide.
SCREWED-DOWN CROWN
The crown can be locked (fixed) by screwing it into the case. Locking the
crown can prevent accidental operations and improve the watch’s waterproof
performance.
Operate this type of watch as follows:
(1) Before setting the date and time, first turn the crown counterclockwise to
loosen the screw lock.
(2) After setting the date and time, turn the crown clockwise while pressing
in, until it stops turning to securely tighten the screw.

9
ENGLISH
HOW TO SET THE TIME & CALENDAR [AA(F69)]
(1) Pull out the crown to the second click
when the second hand reaches the 12
o’clock position.
(The second hand stops.)
(2) Turn the crown counterclockwise and
set the current time.
*When setting the time, first bring the
hand back slightly earlier than the
actual time and then move it forward
to the actual time.
*For the watch with a calendar, make
sure that you set either a.m. or p.m.
without fail. The date changes at
[twelve o’clock midnight].
(3) Pull the crown out to the first click.
*The crown on this watch can be
pulled out to either of two clicks.
(4) Turn the crown counterclockwise, and
set the date to that for the current day.
Turn
counterclockwise
SAT
Turn
counterclockwise
SAT

10
ENGLISH
(5) Turn the crown clockwise to set the
day of the week to the current day.
*This watch has a bilingual day of the
week function.
Turn the crown to select the desired
language.
The display languages differ
depending on the model.
** Correcting the date at the end of the month
The date will have to be corrected for months that have 30 days, or those
that have less than 30 days. After the date switches over to the first day of
the succeeding month, set the date to the [First (1)].
(6) Push the crown back to the normal
position.
HOW TO SET THE TIME & CALENDAR [AC(F67)]
(1) Pull out the crown to the second click
when the second hand reaches the 12
o’clock position.
(The second hand stops.)
Turn clockwise
MON
MON

11
ENGLISH
(2) Turn the crown counterclockwise and
set the current time.
*When setting the time, first bring the
hand back slightly earlier than the
actual time and then move it forward
to the actual time.
*For the watch with a calendar, make
sure that you set either a.m. or p.m.
without fail. The date changes at
[twelve o’clock midnight].
(3) Pull the crown out to the first click.
*The crown on this watch can be
pulled out to either of two clicks.
(4) Turn the crown counterclockwise, and
set the date to that for the current
day.
** Correcting the date at the end of the
month
The date will have to be corrected for
months that have 30 days, or those that
have less than 30 days. After the date
switches over to the first day of the
succeeding month, set the date to the
[First (1)].
Turn
counterclockwise
Turn
counterclockwise

12
ENGLISH
(5) Push the crown back to the normal
position.
HOW TO SET THE TIME & CALENDAR[AU(F6N)]
(1) Pull out the crown to the second click
when the second hand reaches the
12 o’clock position. (The second hand
stops.)
(2) Turn the crown counterclockwise and
set the current time.
*When setting the time, first bring the
hand back slightly earlier than the
actual time and then move it forward
to the actual time.
*For the watch with a calendar, make
sure that you set either a.m. or p.m.
without fail. The date changes at
[twelve o’clock midnight].
Turn
counterclockwise

13
ENGLISH
(3) Pull the crown out to the first click.
*The crown on this watch can be
pulled out to either of two clicks.
(4) Turn the crown clockwise, and set the
date to that for the current day.
** Correcting the date at the end of the
month
The date will have to be corrected for
months that have 30 days, or those that
have less than 30 days. After the date
switches over to the first day of the
succeeding month, set the date to the
[First (1)].
(5) Push the crown back to the normal
position.
Turn clockwise

14
ENGLISH
◆POWER RESERVE INDICATOR
The power reserve indicator shows
how much the watch is wound,
allowing you to see how much lon-
ger the watch will run at a glance.
The time pointed to by the power
reserve indicator hand is the re-
maining time.
When the power reserve indicator
hand indicates the 50 or F mark,
the mainspring is fully wound.
* The remaining time shown is only an approximation. The time shown may
be dierent from actual remaining time.
This product is also equipped with an automatic winding function. When it is
worn on the wrist, the movement of the arm will wind the mainspring.
The amount that the mainspring is wound will depend on the movement of
the arm.
If you do not wind, the power reserve indicator hand will move toward zero
as time passes.
Power reserve
indicator hand

15
ENGLISH
USING THE ROTATING BEZEL
Please use the included rotating bezel properly.
Turn the ring by pointing the
mark to
the minute-hand. While certain time goes
by, you can measure the elapsed time
from the distance between minute-hand
and figures on the rotating bezel. You can
also set the
mark as a desired time to
remind you how long time is still remain
for an appointment.
You cannot turn the ring reversely since
it comes with a protection mechanism for
preventing wrong operation by force or
shock. Figures on the ring could also help
you to read the current time easily.
* Depending on design, anti-reversely and 1 minute “click” sound
mechanism on rotating bezel does not apply to some models.
* The elapsed time indicated by the rotating bezel is to be taken as a rough
estimate.
Rotating bezel
E
l
a
p
s
e
d
T
i
m
e
Rotation
direction of
the bezel

16
ENGLISH
HOW TO USE THE INTERNAL ROTATING INDICATOR RING
Please notice that some models come with an internal rotating indicator ring,
which should be used properly.
Turn the crown for the internal rotating indicator ring to set the - mark to
the position of the minute hand.
The position of the internal rotating indicator ring to which the minute hand is
pointing after some time has elapsed indicates the elapsed time.
Setting the mark to the desired time also allows you to know the remaining
time.
- mark
Crown for the internal rotating indicator
E
l
a
p
s
e
d
T
i
m
e
The above figure shows that 10 minutes have elapsed since 10:08.
* The positions of the crown and the appearance of the internal rotating
indicator ring may differ depending on the model.

17
ENGLISH
ADJUSTING THE WATCHBAND LENGTH WITH THE DIVERS’
EXTENSION CLASP
The metal band with a divers’ extension clasp allows you to easily adjust the
band length of the watch to wear it over a wet suit or in other similar situa-
tions. The procedure is as follows.
Regular
6 o’clock side 12 o’clock side
1Safety cover
Open the safety cover.
2Push button
Upper clasp
Press the push button to lift
the upper clasp.
3
Safety cover
Return the safety cover.
4
Extender
Open the extender.
(When the extender opens, it will make a
click sound)

18
ENGLISH
5Hook
Release the hook.
6
The watchband can be extended by
the length of the extender.
7
Close the upper clasp.
8
Close the safety cover.
Lengthened
To shorten the watchband to its original
length, carry out the procedure in reverse.

19
DEUTSCH
DEUTSCH
MECHANISCHE UHR
AUTOMATISCHER UND HANDAUFZIEHMECHANISMUS
DIVER’S WATCH 200m
BEDIENUNGSANLEITUNG
Wir danken Ihnen für den Kauf unseres Erzeugnisses. Bitte lesen Sie diese
Bedienungsanleitung sorgfältig durch und befolgen Sie die Anweisungen, um
dieses Produkt lange Zeit und mit optimaler Leistung verwenden zu können.
Bitte bewahren Sie diese Bedienungsanleitung für spätere Bezugnahme gut auf.
SICHERHEITSMASSNAHMEN
Um zu verhindern, dass Sie oder andere Personen sich verletzen
oder Sachschäden entstehen, lesen Sie die Anweisungen, die mit den
nachfolgenden Symbolen gekennzeichnet sind, sorgfältig durch und befolgen
diese.
!
WARNUNG ... Die Missachtung dieser Anweisung kann zum Tod
oder zu schweren Verletzungen führen.
!
ACHTUNG ... Die Missachtung dieser Anweisung kann zu
Verletzungen oder Schäden an der Uhr führen.
Table of contents
Languages:
Other Orient Watch manuals

Orient
Orient ES 46C User manual

Orient
Orient RA-KV0403S User manual

Orient
Orient EW 46F User manual

Orient
Orient FTD10002B0 User manual

Orient
Orient DA 40R User manual

Orient
Orient TZ(KFE) User manual

Orient
Orient TT(KFB) User manual

Orient
Orient GNA User manual

Orient
Orient UY (KTA) User manual

Orient
Orient KFA (TD) User manual

Orient
Orient SDH00001 User manual

Orient
Orient SY(KFF) User manual

Orient
Orient DD (48C) User manual

Orient
Orient TX(VS75) User manual

Orient
Orient 32A00 User manual

Orient
Orient CFA02001B User manual

Orient
Orient ST(KUD) User manual

Orient
Orient cem65001b User manual

Orient
Orient BF J50 User manual

Orient
Orient UT (H4A) User manual