Orient UB8A002B Series User manual

1
ENGLISH
ENGLISH
ANALOGUE QUARTZ WATCH
INSTRUCTION MANUAL
Thank you for choosing our product. To ensure prolonged use and optimum
performance, please read this instruction manual carefully and familiarize
your-self with the terms of the guarantee.
Please keep this Instruction Manual handy for future reference.
SAFETY PRECAUTIONS
Make absolutely sure to observe the demarcated contents indicated below to
prevent any possible physical danger and property damage to you as well as
other people concerned.
... A demarcation with this symbol represents the contents
assuming imminent danger for death or serious injury
when the product is used in any manner different from
given instructions.
... A demarcation with this symbol represents the contents
assuming possibility for death or serious injury
when the product is used in any manner different from
given instructions.
... A demarcation with this symbol represents the contents
assuming possibility of causing human injury or
material damage only when a product is used in any
manner different from given instructions.
DANGER
!
WARNING
!
CAUTION
!

2
ENGLISH
IN HANDLING THE WATCH
(1) Water-resistance
Conditions
of use
Type
Underwater
operation of
crown and
operation
of crown
with drops
of water
on it
Exposure
to small
amounts
of water
(face-wash-
ing, rain,
etc.)
Water sports
(swimming,
etc.),
frequent
contact with
water (car-
washing,
etc.)
Skin diving
(air tanks
are not
used)
Scuba
diving
(air tanks
are used)
Mixed-gas
Diving
(using
helium
gas)
Non water resistant
Without
WATER
RESISTANT
(WATER
RESIST)
××××××
Water
resistant
watches
Water
resistant for
daily life
WATER
RESISTANT
(WATER
RESIST) ×××××
Reinforced
water
resistance
for daily
life I
WATER
RESISTANT
(WATER
RESIST)
50m (5bar)
× ×××
Reinforced
water
resistance
for daily
life II
WATER
RESISTANT
(WATER
RESIST)
100m (10bar)
200m (20bar)
×× ×
Diver’s
watches
Diver’s
watch for Air
Diving
AIR DIVER’S
100m / 150m
200m ××
Diver’s
watch for
Mixed-gas
Diving
He-GAS
DIVER’S
200m / 300m /...
×
* It is recommended that you use the watch correctly following the above-mentioned scope of usage
after ascertaining water resistance precautions marked on the dial or caseback.

3
ENGLISH
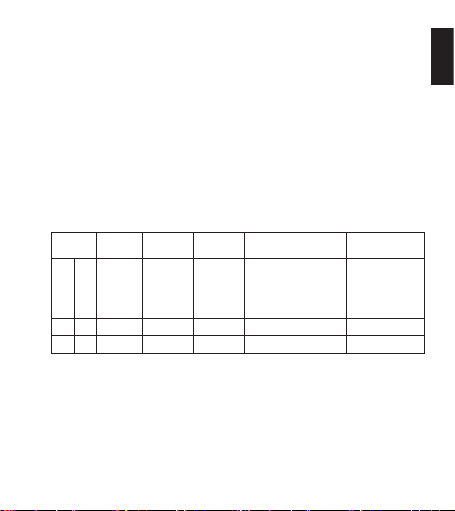
1A watch with water resistance for daily life 30m (3 bar) can be used during
face-washing, etc. but cannot be used in an environment in which it will be
submerged in water.
2A watch with reinforced water resistance for daily life I 50m (5 bar) can be
used while swimming, etc. but cannot be used during any type of diving
including skin diving.
3A watch with reinforced water resistance for daily life II 100m or 200m (10
or 20 bar) can be used while skin diving, but cannot be used while scuba
diving using oxygen tanks or saturation diving using helium gas, etc.
4Keep the crown pushed in at all times (in the normal position) while using
the watch. If the crown is the screwed-down type, check that it is securely
screwed down.
5Do not operate the crown underwater, or while the watch is wet. Water
may enter the interior of the watch and defeat the water resistance.
6If your watch is non-water resistant, beware of splashes of water (during
face washing, rain, etc.) and sweat. If the watch becomes wet from water
or sweat, wipe the moisture off with a dry, soft cloth.
7Even with a water resistant watch for everyday use, avoid directing strong
jets of mains water onto the watch. Water pressure above the limit can
apply, which may defeat the water resistance.
8With a water resistant watch for everyday use, rinse sea water off the case
after exposure, then wipe it thoroughly to avoid corrosion and other effects.
9The interior of the watch contains some amount of moisture, which may
cause fogging on the inside of the glass when the outside air is cooler than
the internal temperature of the watch. If the fogging is temporary it causes
no harm inside the watch, but if prolonged, or if water enters the watch,
consult your place of purchase and do not leave the problem untreated.
CAUTION
!

4
ENGLISH
(2) Handling the Battery
1If a button battery or coin battery is ingested, it may cause chemical burns
or perforation of mucous membrane even in a short period of time, and in
the worst-case scenario, may result in death. Never leave button batteries
or coin batteries within the reach of infants or young children.
If a button battery or coin battery is ingested, or there is a possibility
that one was ingested, it must be removed at once. Please treat as an
emergency situation and contact a doctor immediately.
2Do not remove the battery from the watch. Contact the place of purchase
of the watch or your nearest ORIENT authorized service center for
assistance when wanting to remove the battery.
3The battery used in this watch is not a rechargeable battery, so it cannot be
recharged and used again. Do not attempt to charge the battery as doing
so could cause it to overheat or explode.
4A skin rash or other symptom may develop if leaking battery fluid comes
into contact with skin. Do not leave depleted batteries sitting around for
long periods of time.
(3) Replacing the Battery
1Depleted batteries that are left sitting in the watch for long periods of time
may begin to leak battery acid, which could lead to malfunction. Be sure to
replace depleted batteries as soon as possible.
2Replace the watch battery only with the specified battery type.
3Battery replacement requires special-purpose tools, techniques, etc.
Reversing the polarities when inserting the battery may cause the battery
to overheat or explode. Contact the place of purchase or your nearest
ORIENT authorized service center for assistance when wanting to replace
the battery.
DANGER
!
WARNING
!
CAUTION
!

5
ENGLISH
4The watch comes equipped with a battery end of life indicator.
If the small second hand begins to advance two tick marks for every
movement, it means that the battery is nearing the end of its life and will
need to be replaced.
Contact the place of purchase or your nearest ORIENT authorized service
center immediately for assistance with battery replacement.
(4) Shock
1Be sure not to carry the watch when you engage in strenuous sports,
whereas playing such light sports as golf, etc., will not adversely influence
the watch.
2Avoid a violent shock such as dropping the watch on the floor.
(5) Magnetism
1If the watch is left at a location with strong magnetism
for an extended period of time, the components may be
magnetized, resulting in malfunction. Be careful.
2The watch may temporarily speed up or slow down when
exposed to magnetism. Precision is restored when placed
away from magnetism. In such a case, reset the time.
(6) Vibration
The watch may lose precision if subjected to strong vibrations such as
from riding motorcycles, using jackhammers, chain saws, etc.
(7) Temperature
In the environment below and above the normal temperatures <5°C to
35°C>, the watch may malfunction and stop.
CAUTION
!
Do not use the watch at high temperatures, such as in a
sauna. The watch may heat and cause burns.

6
ENGLISH
(8) Chemicals, Gases, etc.
Utmost caution must be exercised when coming into contact with gases,
mercury, chemicals (paint thinner, gasoline, various solvents, detergents
containing such components, adhesives, paint, drugs, perfumes,
cosmetics, etc.), and so forth. Such may cause discoloration of the
watchcase, watchband, and dial face. Discoloration, deformation, and
damage to various resin-based component parts may also occur.
(9) About accessory parts
CAUTION
!
Do not attempt to disassemble or modify the watch.
WARNING
!
Store the bracelet/strap pin and other small parts out of the reach of
children.
If any small parts are swallowed, immediately contact a doctor.
(10)Allergic reactions
CAUTION
!
If you develop a skin rash or your skin becomes abnormally irritated due to
contact with the watch or strap, stop wearing the watch immediately and
consult a doctor.

7
ENGLISH
(11) About “luminous light”
Some models have luminous light on the hands and dial.
The luminous light is a safe paint that stores sunlight and artificial light
without using any radioactive material, and emits that light in a dark
setting. As the paint discharges the stored light, it will become dimmer
over time. The amount of light emitted and the time that light is emitted
depends on various factors when the light is stored, such as the shape
of the glass, the thickness of the paint, surrounding brightness level, the
distance from the watch to the light source, and the light absorption level.
Please note that when not enough light energy is stored, the watch may
emit weak light or emit light for only a short time.
(12)Water resistant watchband
Some models employ leather and nylon bands on which a special
treatment to resist perspiration and water absorption have been applied.
Please understand that the water resisting effect of this watchband can be
lost depending on the period and conditions of use.

8
ENGLISH
HOW TO IDENTIFY THE CALIBER NUMBER
Check the caliber number by referring to the model number of your watch or
the case code on the watch’s case back.
1. Searching by 10-digit model number
Check the 10-digit model number on the guarantee supplied with your watch.
You can also see the number on the product tag put on the watch. Its second
and third digits indicate the caliber number of your watch.
Example: If the model number is “UB8A002B”, the caliber number is
“UB”.
2. Searching by the case code
See the case code on the case back of your watch.
A: If the case code is 6 digits, the first two digits indicate the caliber number.
B: If the case code is 8 or 9 digits, the first three digits indicate the movement
number. Search the caliber number corresponding to the movement number
referring to the correspondence table.
Example A Example B
Case code Case code

9
ENGLISH
Example A : When the case code is “UB8A-Q0”, the caliber number is “UB”.
Example B : When the case code is “HM50A7B-4”, the movement number
is “HM5”. The caliber number corresponding the number will
be found “UB” on the table.
* The place of case code may vary and its letter size may be small and
difficult to see depending on the characteristics of watches.
* The pictures and illustrations on this manual may differ from the actual
appearance of your watch but the function and operation procedures are
the same.
SPECIFICATIONS
(1) Crystal oscillator frequency: 32,768 Hz (Hz = Oscillations per second)
(2) Drive method: Step motor
<2-hands type>
Caliber Wrist-Worn
Accuracy
Operating
Temperature
Range
Reset Switch Battery Battery Life
(with new battery)
BF J50 ±15sec. -10°C to +60°C ○SR512SW
(MAXELL,SEIZAIKEN)
1 piece
Approx. 2 years
RB J90 ±20sec. -5°C to +50°C ○SR521SW (SEIZAIKEN)
1 piece
Approx. 3 years
Some models, 2 years
UA HM0 ±20sec. -5°C to +50°C ○SR516SW (SEIZAIKEN)
1 piece Approx. 3 years

10
ENGLISH
<3-hands type>
Caliber Wrist-Worn
Accuracy
Operating
Temperature
Range
Additional Functions
Battery Battery Life
(with new battery)
Reset
Switch
Second
Hand
Control
Battery
End of Life
Indicator
QB HY5 ±20sec. -5°C to +50°C ○ ○ -
SR621SW
(SEIZAIKEN)
1 piece
Approx. 3 years
QC RH5 ±20sec. -5°C to +50°C ○ ○ -
SR626SW
(MAXELL,
PANASONIC,
SONY)
1 piece
Approx. 4 years
RP H25 ±15sec. -10°C to +60°C ○ ○ ○ SR421SW
(MAXELL)
1 piece
Approx. 2 years
UB HM5 ±20sec. -5°C to +50°C ○ ○ -
SR521SW
(SEIZAIKEN)
1 piece
Approx. 2 years
< 2-hands type with Date Indicator >
Caliber Wrist-Worn
Accuracy
Operating
Temperature
Range
Additional Functions
Battery
Battery Life
(with new
battery)
Reset
Switch
Second
Hand
Control
Battery
End of Life
Indicator
Date
Forwarding
Device
GW JP6 ±20sec. -5°C to +50°C ○- - ○
SR920SW
(MAXELL,PA
NASONIC,S
ONY,SEIZAI
KEN)
1 piece
Approx. 3
years

11
ENGLISH
< 3-hands type with Date Indicator>
Caliber Wrist-Worn
Accuracy
Operating
Temperature
Range
Additional Functions
Battery
Battery Life
(with new
battery)
Reset
Switch
Second
Hand
Control
Battery
End of Life
Indicator
Date
Forwarding
Device
SQ LT7 ±20sec. -5°C to +50°C ○ ○ -○SR927SW
(SEIZAIKEN)
1 piece
Approx. 3
years
SZ HE7 ±20sec. -5°C to +50°C ○ ○ -○SR621SW
(SEIZAIKEN)
1 piece
Approx. 3
years
Some
models, 2
years
UN HT7 ±15sec. -10°C to +60°C ○ ○ ○ ○ SR920SW
(SEIZAIKEN)
1 piece
Approx. 5
years
WC KJ7 ±20sec -5°C to +50°C ○ ○ -○SR621SW
(SEIZAIKEN)
1 piece
Approx. 3
years
< 3-hans type with Date and Day of the week Indicator >
Caliber
Wrist-
Worn Ac-
curacy
Oper-
ating
Tem-
perature
Range
Additional Functions
Battery
Battery
Life
(with new
battery)
Reset
Switch
Second
Hand
Control
Battery
End
of Life
Indicator
Date
Forwarding
Device
Day of
the week
Forwarding
Device
UG HS9
±15sec.
Some
models,
±20sec.
-10°C to
+60°C
Some
models,
-5°C to
+50°C
○ ○ ○ ○ ○ SR920SW
(SEIZAIKEN)
1 piece
Approx. 5
years
Some
models, 3
years
UQ HE9 ±20sec. -5°C to
+50°C ○ ○ -○ ○ SR621SW
(SEIZAIKEN)
1 piece
Approx. 3
years
Some
models, 2
years
* The above specifications are subject to change without notice for
improvement.

12
ENGLISH
NAMES AND FUNCTIONS OF INDIVIDUAL COMPONENT
PARTS
A: Hour hand E: Dial
B: Minute hand F: Date
C: Second hand G: Day of the week
D: Crown
<2 or 3-hands type>
* Some models may not have second hands.
D
C
B
A
E

13
ENGLISH
<2 or 3-hands type with Date Indicator>
* Some models may not have second hands.
D
C
B
A
E
F
<3-hans type with Date and Day of the week Indicator>
D
B
A
E
F
G
C
* The position of the crown, date or day of the week indicator etc. may vary
on some models.
㻭
㻮
㻲
㻤
㻯
㻜
㻱
D

14
ENGLISH
MODELS WITH SCREWED-DOWN CROWN
Depending on the model, you may not be able to pull the crown out without
unscrewing it (models with screwed-down crown).
Operate this type of watch as follows:
(1) Before setting the time or calendar, first turn the crown to the left to
loosen the screw lock.
(2) After setting the time or calendar, turn the crown to the right while
pressing in, until it stops turning to securely tighten the screw.
HOW TO SET THE TIME [2 or 3-hands type]
(1) Pull out the crown when the second
hand is at the 12 o’clock position.
The second hand stops on the spot.
* If your watch has only two hands, pull out
the crown any time because it does not
have the second hand.
(2) Turn the crown to set the time.
When setting the time, first advance it 4
to 5 minutes ahead of the current time,
and then turn it back to the exact time.
(3) Push the crown back in to the normal
position.
Turn Clockwise
Turn
Counterclockwise

15
ENGLISH
HOW TO SET THE TIME [With Date and Day of the week
Indicator]
(1) Pull out the crown to the second click
when the second hand is at the 12
o’clock position.
The second hand stops on the spot.
(2) Turn the crown to set the time.
When setting the time, first advance
it 4 to 5 minutes ahead of the current
time, and then turn it back to the exact
time.
(3) Push the crown back in to the normal
position.
Turn
Counterclockwise
Turn Clockwise

16
ENGLISH
HOW TO SET THE CALENDAR
CAUTION
!
* Do not set the date during the time period noted below because the date is
changing.
Watch with Date Indicator
SQ 9:00 p.m. to 4:00 a.m.
Others 8:00 p.m. to 2:00 a.m.
Watch with Date and Day of the week Indicator 8:00 p.m. to 5:00 a.m.
If date is set during this time period, the date may not change properly on
subsequent days.
* Avoid this time period when setting the date.
(1) Pull the crown out to the first click. The
crown on this watch can be pulled out to
the first and second clicks.
(2) Turn the crown to adjust the date and day of the week.
*On models with separate date indicators, the tens digit will increase by
one whenever the ones digit changes from 9 to 0.
*For the crown turning directions, see the table below.
*Some watches may have crowns that rotate in the direction opposite
that shown in the table below.

17
ENGLISH
Date Correction Day of the week
Correction
Watch with Date Indicator
SQ Turn counterclockwise
Others Turn clockwise
Watch with Date and Day of the week Indicator Turn counterclockwise Turn clockwise
* The day of the week can be displayed in
two languages (only one language may
be available depending on the product
specifications).
Select your desired language.
(3) Press the crown back in to the normal
position.
* About date correction at month’s end:
Date correction is necessary for months with
30 days or less. In this case, set the date
to the [1st day] on the first day of the next
month.
* The position of the crown, date or day of
the week indicator may vary on some models.
Turn
Counterclockwise
Turn Clockwise

18
ENGLISH
HOW TO USE THE ROTATING INDICATOR BEZEL
Please notice that some models come with a
rotating indicator bezel, which should be used
properly.
Turn the bezel by pointing the
mark to the
minute-hand. While certain time goes by,
you can measure the elapsed time from the
distance between minute-hand and figures
on the rotating indicator bezel. You can also
set the
mark as a desired time to remind
you how long time is still remain for an
appointment.
You cannot turn the bezel reversely since
it comes with a protection mechanism for
preventing wrong operation by force or shock.
Figures on the bezel could also help you to
read the current time easily.
* Depending on design, anti-reversely and 1 minute “click” sound
mechanism on rotating indicator bezel does not apply to some models.
Rotating bezel
E
l
a
p
s
e
d
T
i
m
e
The above shows
that 20 minutes have
elapsed from 10:10.

19
ESPAÑOL
ESPAÑOL
RELOJ CRONÓGRAFO ANALÓGICO
MANUAL DE INSTRUCCIONES
Gracias por adquirir un producto de nuestra compañía. Lea cuidadosamente
este manual de instrucciones para familiarizarse con la operación y los
términos de la garantía.
Guarde este manual a mano para futuras consultas.
PRECAUCIONES DE SEGURIDAD
Asegúrese absolutamente de observar los contenidos demarcados indicados
abajo para evitar de antemano ocasionar daños materiales, o personales a
usted u otras personas involucradas.
!
PELIGRO
...Un contenido demarcado con este símbolo indica la
posibilidad de ocasionar peligro de muerte inminente
o de sufrir lesiones graves si el producto se utiliza de un
modo distinto a como se especifica en las instrucciones
suministradas.
!
ADVERTENCIA
...Un contenido demarcado con este símbolo indica
peligro de muertte o de sufrir graves daños
personales si el producto no es usado como se
especifica en las instrucciones suministradas.
!
PRECAUCIÓN ...Un contenido demarcado con este símbolo indica
la posibilidad de ocasionar solamente daños
personales o materiales si el producto no es usado
como se especifica en las instrucciones suministradas.

20
ESPAÑOL
ACERCA DEL MANEJO DEL RELOJ
(1) Resistencia al agua
Condiciones
de uso
Tipo
Operación
de la corona
bajo el agua
con gotas
de agua
sobre ella
Exposición
a pequeñas
cantidades
de agua
(lavarse
las manos,
lluvia,
etc.)
Deportes
acuáticos
(natación,
etc.), contac-
to frecuente
con agua
(lavado de
autos, etc.)
Buceo sin
botellas de
aire
(no se
utilizan
tanques de
aire)
Buceo con
botellas de
aire
(se utilizan
tanques de
aire)
Buceo
con aire
mixto (con
helio)
No resistente al agua
Sin WATER
RESISTANT
(WATER
RESIST) ××××××
Relojes
resis-
tentes al
agua
Resistente
al agua para
uso diario
normal
Con WATER
RESISTANT
(WATER
RESIST) ×××××
Resistente
al agua
reforzado
para uso
diario
normal I
Con WATER
RESISTANT
(WATER
RESIST)
50 m (5 bar)
× ×××
Resistente
al agua
reforzado
para uso
diario
normal II
Con WATER
RESISTANT
(WATER
RESIST)
100 m (10 bar)
200 m (20 bar)
×× ×
Relojes
para
bucea-
dores
Reloj para
buceo con
botellas
de aire
AIR DIVER’S
100 m / 150 m
200 m
××
Reloj para
buceo con
gas mixto
He-GAS
DIVER
’S
200 m / 300 m /...
×
* Se recomienda utilizar el reloj correctamente siguiendo las indicaciones descritas arriba después de
haber confirmado el tipo de resistencia al agua, marcado en la esfera del reloj o en la tapa posterior
de la caja del reloj.
Table of contents
Languages:
Other Orient Watch manuals

Orient
Orient EMAM80 User manual

Orient
Orient WE (KL7) User manual

Orient
Orient DB 46A User manual

Orient
Orient KFB TT User manual

Orient
Orient EW 46F User manual

Orient
Orient 32A00 User manual

Orient
Orient GNA User manual

Orient
Orient AA F69 User manual

Orient
Orient SY(KFF) User manual

Orient
Orient FFT00001W0 User manual

Orient
Orient TX(VS75) User manual

Orient
Orient TT(KFB) User manual

Orient
Orient BEM5L003 User manual

Orient
Orient UG1R002B User manual

Orient
Orient ES 46C User manual

Orient
Orient ST(KUD) User manual

Orient
Orient M14 User manual

Orient
Orient RA-KV0403S User manual

Orient
Orient SDH00001 User manual

Orient
Orient cem65001b User manual