Schulterorthese mit fester Abduktion bei 10° und Achselgürtel
KONFORMITÄTSERKLÄRUNG
Die ORTHOSERVICE AG erklärt, in seiner Funktion als Hersteller, in alleiniger Verantwortung, dass dieses
vorliegende Medizinprodukt der Klasse I angehört und gemäß den Anforderungen der EU-Verordnung 2017/745
(MDR) hergestellt wurde. Die vorliegende Anleitung wurde unter Anwendung der vorgenannten Verordnung
erstellt. Sie dient dazu, den ordnungsgemäßen und sicheren Gebrauch des Medizinprodukts zu gewährleisten.
WARENMARKEN DER MATERIALIEN
Velcro® ist eine eingetragene Warenmarke von Velcro Industries B.V.
VORSICHTSMASSNAHMEN FÜR DIE ANWENDUNG
Es wird empfohlen, dass der vom Produkt ausgeübte Druck nicht auf die Teile des Körpers einwirkt, die
Verletzungen, Schwellungen oder Tumeszenzen aufweisen. Es ist ratsam, das Produkt nicht zu fest anzuziehen,
um keine übermäßigen, lokalen Druckstellen zu erzeugen und keine Kompression der darunterliegenden
Nerven und/oder Blutgefäße auszulösen. Es ist ratsam, ein Kleidungsstück zu tragen, das den direkten Kontakt
mit der Haut vermeidet. Bei Bedenken zur Anwendung des Produkts bitte an einen Arzt, Physiotherapeuten
oder Orthopädietechniker wenden. Bitte sorgfältig das Innenetikett mit der Material-Zusammensetzung
des Produkts lesen. Es ist ratsam, das Produkt nicht in der Nähe von offenen Flammen oder starken
elektromagnetischen Feldern zu tragen. Nicht bei direktem Kontakt mit offenen Wunden auftragen.
ANWENDUNGSHINWEISE
Es ist ratsam, dass das Produkt, das für die unten aufgeführten spezischen Indikationen bestimmt ist,
von einem Arzt oder Physiotherapeuten verschrieben und von einem Orthopädietechniker entsprechend den
individuellen Bedürfnissen angepasst wird. Um die Wirksamkeit, Verträglichkeit und korrekte Funktionalität
zu gewährleisten, muss die Applikation mit größter Sorgfalt durchgeführt werden. Keinesfalls darf die
vom Arzt/Physiotherapeuten/Orthopädietechniker vorgenommene Einstellung verändert werden. Bei nicht
bestimmungsgemäßer Anwendung oder Einstellung erlischt die Haftung des Herstellers. Die Orthese
ist nur für den Gebrauch durch einen einzigen Patienten bestimmt, andernfalls übernimmt der Hersteller
keine Haftung gemäß der Verordnung für Medizinprodukte. Bei überempndlichen Personen kann es bei
direktem Hautkontakt zu Rötungen oder Reizungen kommen. Bei Auftreten von Schmerzen, Schwellungen,
Tumeszenzen oder anderen anormalen Reaktionen bitte sofort an den eigenen Arzt wenden und, in
besonders schwerwiegenden Fällen, die Tatsache dem Hersteller und der zuständige Behörde in eigenen
Land melden. Die orthopädische Wirksamkeit des Produktes ist nur dann gewährleistet, wenn alle seine
Komponenten verwendet werden.
AUSWAHL/GRÖSSEN
PFLEGE
Nicht bleichen Keine chemische Reinigung
Nicht bügeln Nicht im Trockner trocknen
Waschanweisung: Kissenbezug (nachdem das Innenpolster aus Schaumstoff her ausgenommen
wurde), Gurte sowie Nacken- und Achselpolster von Hand in handwarmem Wasser (max. 30°C) mit
neutraler Seife waschen; gründlich ausspülen. Abseits von Wärmequellen trocknen lassen.
Das Produkt und seine Bestandteile nach dem Gebrauch sachgerecht entsorgen.
ZWECKBESTIMMUNG
Die Schulterstützen TopIII-S 10°sind ausschließlich für die orthetische Versorgung des Schultergelenkes
und des Ellenbogengelenkes einzusetzen. Einsatzbereich ist die Schulter und der Ellenbogen.
MATERIALIEN
Kissenbezug: Polyester und Silberfäden; Innenpolster: Polyurethan-Schaumstoff;
Grundkörper: Polyurethan, Polyamid, Polyester; Klettverschluß: Polyamid.
INDIKATIONEN
• Postoperative Versorgung (Abduktion) nach operativen Eingriffen an der Rotatorenmanschette, Naht
des Labrum glenoidale, Kapselstabilisierung, operativen Eingriffen am Weichgewebe der Schulter
KONTRAINDIKATIONEN
Zur Zeit keine bekannt
EIGENSCHAFTEN
• Corpus aus hochdichtem Schaumstoff. In das Gewebe mit direktem Körperkontakt
sind Silberfäden eingewoben
• Polstermanschette zum Schutz des Halses
• Kissen mit Verstärkung an der Vorder- und Rückseite für optimale Stabilität
• Außenbezug und Manschetten aus angerautem Nylon für die Befestigung der Klettverschlüsse
• Armtragetuch aus atmungsaktivem Stoff
• Bänder mit Befestigungsschnallen und verstellbaren Klettverschlüssen
• Rehabilitationsball
• Schlaufe zur Stützung des Daumens
• Abduktion bei 10°
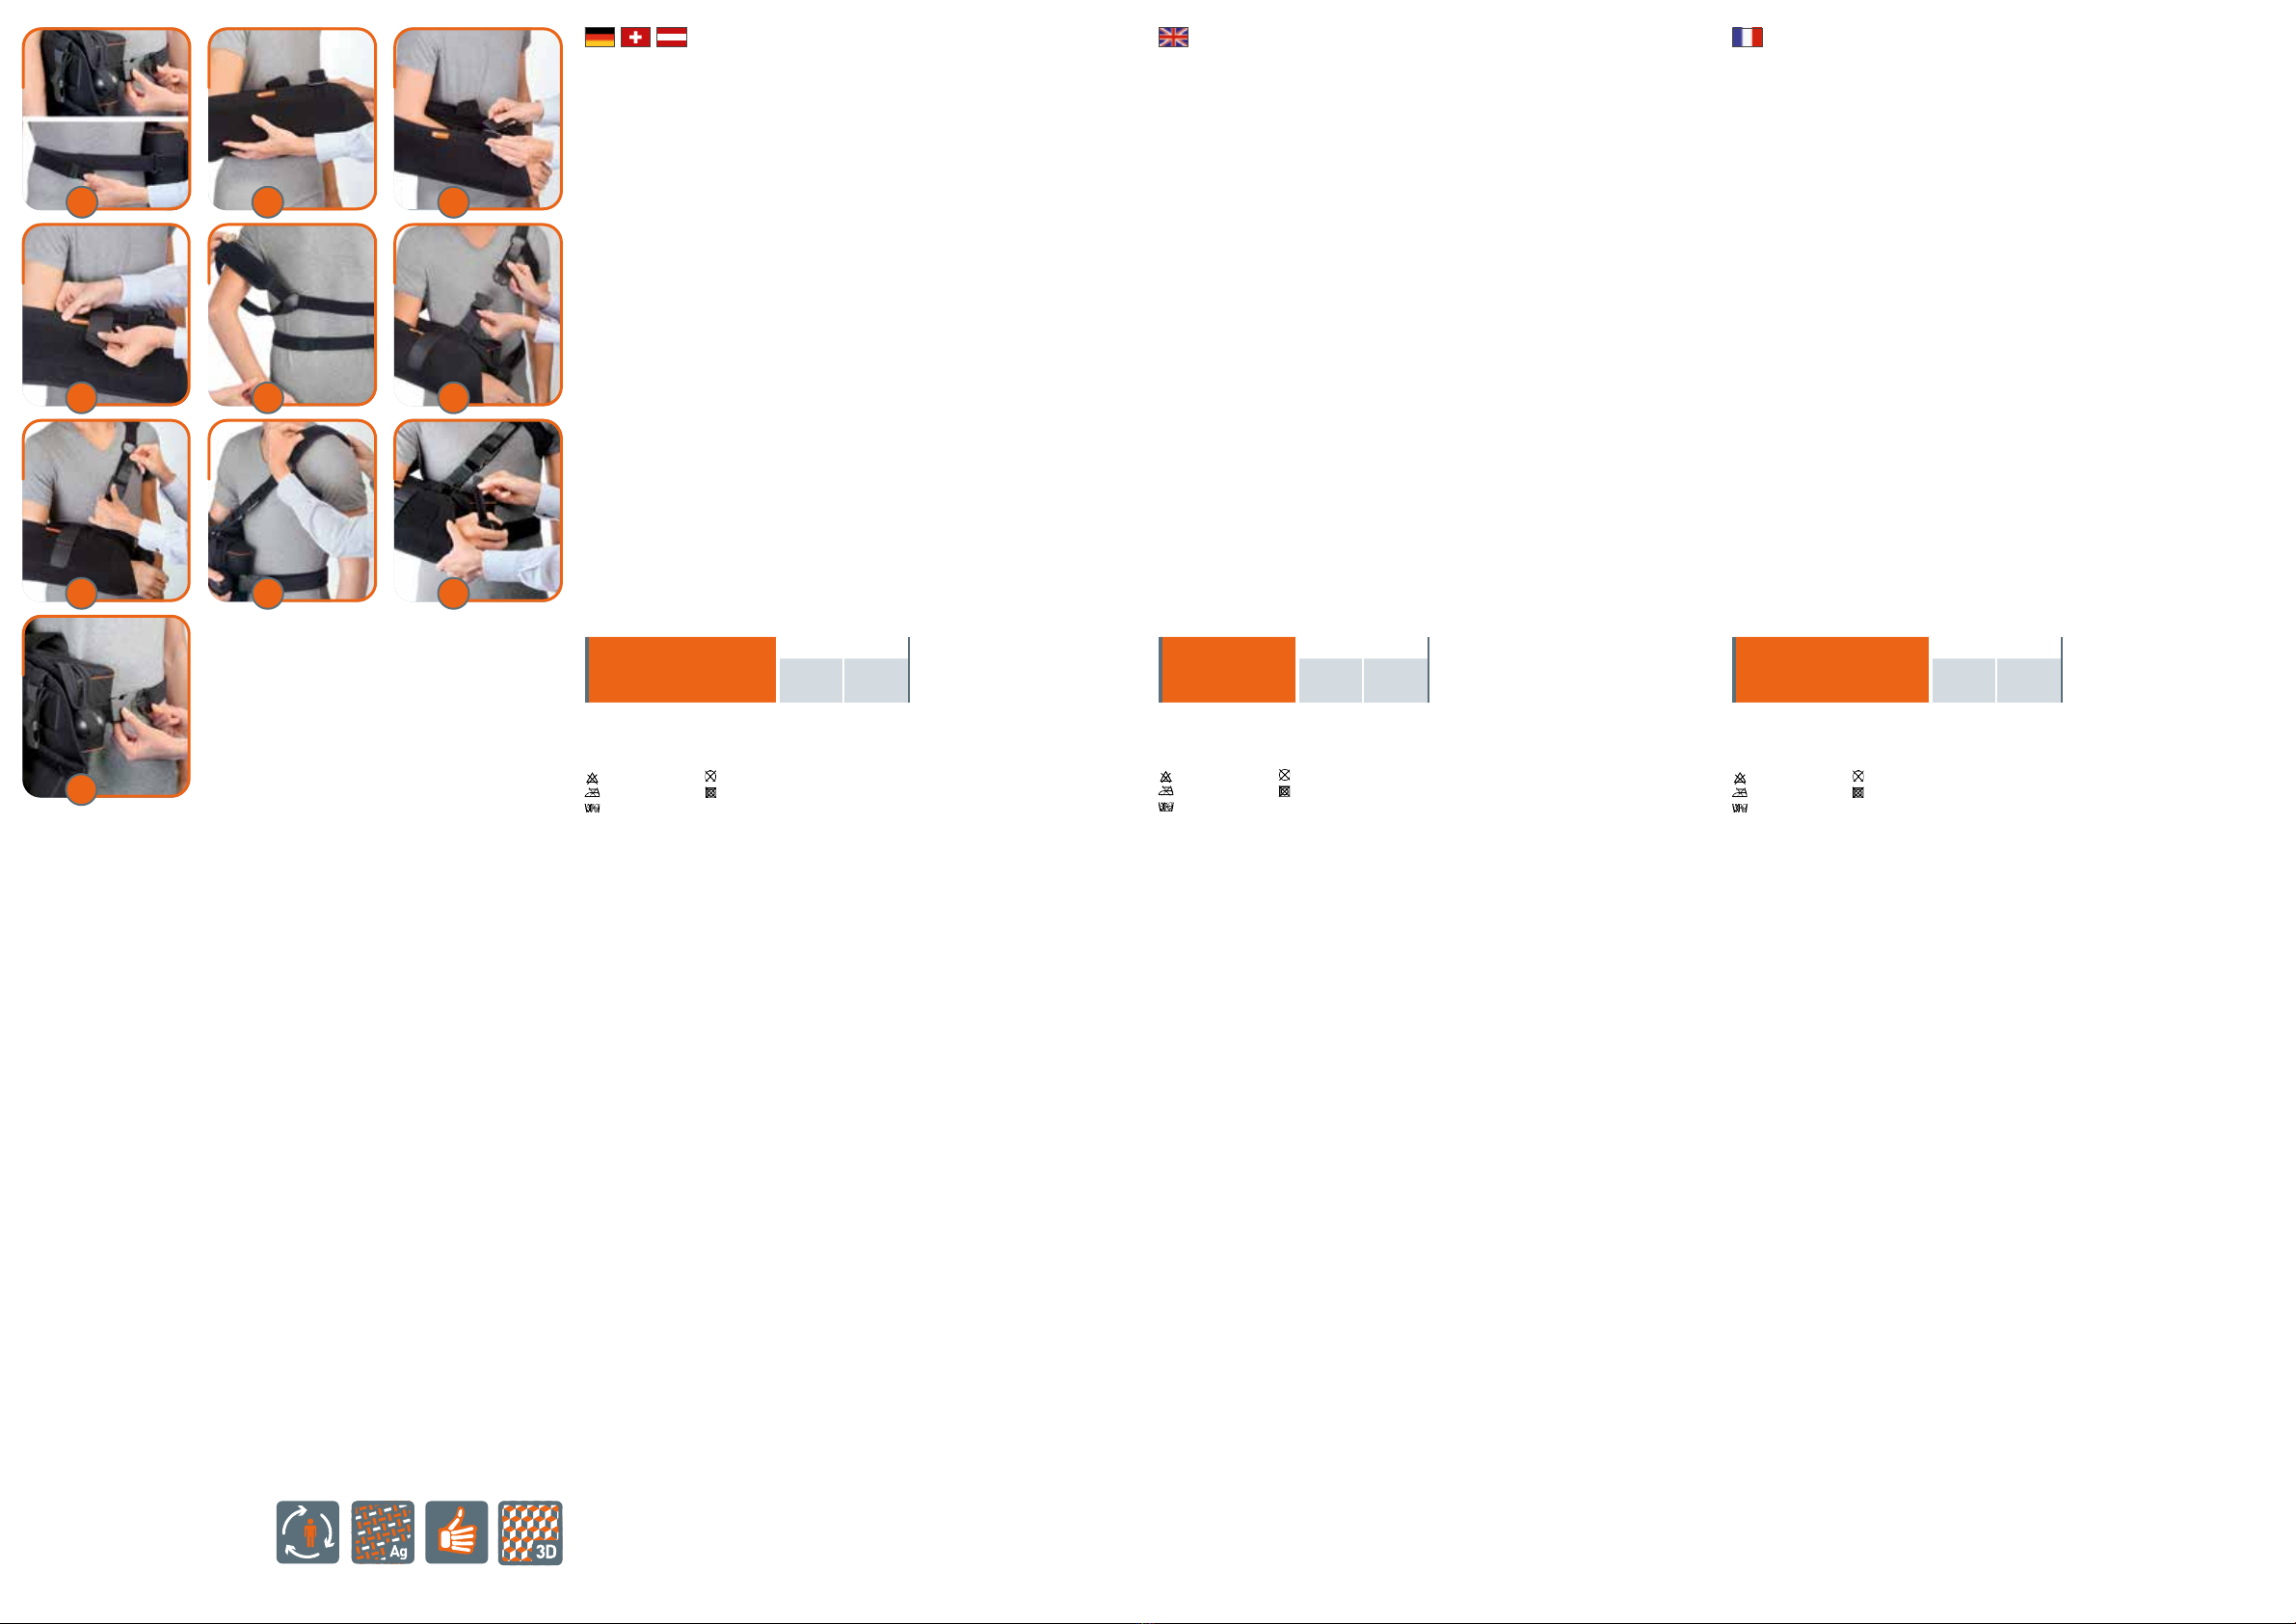
ANPASSEN / ANLEGEN
ERSTMALIGES ANLEGEN DURCH DEN ARZT/ORTHOPÄDIETECHNIKER
1 Bei Bedarf die Armschlinge vom Kissen lösen und mit dem Klettverschluss auf dem Kissen
befestigen, sodass die Orthese rechts- oder linksseitig liegt.
2 Das Kissen auf der Seite der zu xierenden Schulter seitlich anlegen, den Taillengurt mit dem
Steckschnallenverschluss schließen (Abb. A) und mit dem entsprechenden Klettverschluss spannen
(Abb. A). Sollte der Gurt zu lang sein, kann er gekürzt werden; dazu den Gurt auf die passende Länge
zuschneiden und das Y-förmige Klettverschlussende wieder befestigen.
3 Den Unterarm vorsichtig in die Armxierung einführen (Abb. B); anschließend die Armxierung mit den
jeweiligen Klettverschlüssen am Handgelenk (Abb. C) und am Unterarm (Abb. D) schließen.
4 Den der zu xierenden Schulter gegenüberliegenden Arm durch die vom Schulter- und Achselgurt
gebildete Schlaufe führen (Abb. E) und die Orthese mit dem Steckschnallenverschluss an der
Armxierung schließen (Abb. F).
5 Alle die gesunde Schulter betreffenden Gurte: Rücken-, Achsel-, Schulter- und Vordergurt mit den jeweiligen
Klettverschlüssen schließen (Abb. G). Sollten die Gurte zu lang sein, können sie gekürzt werden; dazu die
Gurte auf die passende Länge zuschneiden und das Y-förmige Klettverschlussende wieder befestigen.
6 Den Sitz von Achsel- und Nackenpolster kontrollieren; die Polster gegebenenf als neu positionieren (Abb. H).
7 Die Daumenstütze (und den Softball zur Rehabilitation) mit dem Klettverschluss am Kissen befestigen (Abb. I).
ANLEGEN FÜR DEN PATIENTEN
Die Konguration beibehalten, wie sie vom Arzt/Techniker eingestellt wurde. Zum Abnehmen der Orthese die
Armxierung öffnen und die Steckschnallen aushaken. Zum erneuten Anlegen der Orthese folgendermaßen vorgehen:
1 Das Kissen seitlich auf der Seite der zu xierenden Schulter anlegen; dann den Arm in die atmungsaktive
Armxierung legen.
2 Den Taillengurt mit dem Steckschnallenverschluss schließen (Abb. L).
3 Die Armxierung mit den jeweiligen Klettverschlüssen schließen und den Daumen in die
Daumenstütze einführen.
4 Den der zu xierenden Schulter gegenüberliegenden Arm durch die vom Schulter- und Achselgurt
gebildete Schlaufe führen (Abb. E); dann die Orthese mit dem Steckschnallenverschluss an der
Armxierung schließen (Abb. F).
Shoulder brace with immobilizer in xed abduction of 10°, underarm strap
DECLARATION OF CONFORMITY
As the manufacturer, ORTHOSERVICE AG declares, under its sole responsibility, that this is a class I
medical device that has been manufactured and assessed, according to the EU Regulation 2017/745
(MDR). These instructions have been drawn up in application of the aforementioned Regulation. They
are intended to ensure an adequate and safe use of the medcal device.
TRADEMARKS OF MATERIALS
Velcro® is a registered trademark of Velcro Industries B.V.
SAFETY PRECAUTIONS
We recommend that the pressure exerted by the device does not act on parts of the body with wounds,
swelling, or welts. It is advisable to not over tighten the device so as to avoid generating areas of
excessive local pressure or the compression of underlying nerves and/or blood vessels. Furthermore,
we recommend wearing a garment to avoid direct contact with the skin. If in doubt on how to apply the
device, contact a doctor, physiotherapist, or an orthopedic technician. Read the product composition
on the internal label carefully. We recommend to not wear the device in the proximity of free ames or
strong electromagneticelds. Do not apply in direct contact with open wounds.
WARNINGS
It is advisable that the device, designed for the specic indications as set out below, be prescribed by
a doctor or a physiotherapist and applied by an orthopedic technician, according to the specic needs
of the patient. To ensure effectiveness, tolerability, and proper functioning, the application must be
carried out with the utmost care. Never alter the adjustment made by the doctor/physiotherapist/ or
orthopedic technician.
The responsibilities of the manufacturer shall lapse in case of inappropriate use or adaptation.
The orthosis is made and to be used by only one patient.
Should the orthosis be inappropriately used, the manufacturer declines all responsibility, as provided
by the regulation for medical devices.In hypersensitive individuals, direct contact with the skin may
cause redness and irritation.
In case of pain, swelling, welts, or any other adverse reaction, contact your doctor immediately, and in
case of a particularly severe adverse event, report the incident to the manufacturer and the competent
authority of your country. The effectiveness of the orthopedic product is only guaranteed when all the
components are properly in use.
SELECTION/SIZE
MAINTENANCE
Do not bleach No chemical cleaning
Do not iron Do not tumble-dry
Washing instructions: Wash the cushion cover (after the foam inner padding has been removed),
belts and the neck and underarm padding by hand with warm water (at max. 30°C) and neutral soap;
rinse thoroughly. Dry away from heat sources.
Do not dispose of the product or any of its components into the environment.
INDICATIONS
• Post surgery (in abduction) to repair rotator cuff and soft tissue, glenoid labrum suture, capsular
stabilization
CONTRAINDICATIONS
Currently no known
CHARACTERISTICS AND MATERIALS
• High density foam rubber with gauze fabric cover (to perfectly manage Velcro®) and
fabric with silver ber in contact with the body
• Pad with front edge for an excellent stability
• External gauze nylon cover and sleeves with Velcro®fastening system
• Breathable arm pocket material
• Sleeve for neck protection
• Underarm strap to avoid neck pressure and increase rotatory stability
• Fixing straps with adjustable buckles with Velcro®fastening system
• Ball for rehabilitative purposes.
• Supporting strap for thumb
• Abduction of 10°
PUTTING ON THE APPLIANCE
ADAPTING FOR THE DOCTOR/TECHNICIAN
1 If necessary, remove the arm sling from the cushion and attach to the cushion using the Velcro®
fastener so that the orthotic lies to the left or the right-hand side.
2 Place the cushion laterally at the side to which the shoulder should be xed, close the waist belt
with the push-in buckle fastener (g. A) and tighten with the corresponding Velcro® fastener (g. A).
Should the belt be too long, then it can be shortened. To do this, cut the belt to the appropriate length
and re-attach the Y-shaped Velcro®fastener end.
3 Carefully insert the forearm into the arm xation (g. B); then close the arm xation with the
respective Velcro® fasteners at the wrist (g. C) and the forearm (g. D).
4 Insert the arm on the opposite side from the shoulder to be xed through the loop created by the
shoulder and underarm belts (g. E) and close the orthotic with the push-in buckle fastener on the
arm xation (g. F).
5 Close all the belts pertaining to the healthy shoulder with the respective Velcro® fasteners (g. G);
Back belt, underarm belt, shoulder belt and front belt. If the belt is too long, it can be shortened; to do
this, cut the belt to the appropriate length and re-attach the Y-shaped Velcro®fastener end.
6 Check the placement of the underarm and neck padding; re-position the padding if required (g. H).
7 Attach the thumb support (and the softball for rehabilitation) onto the cushion with the Velcro®
fastener (g. I).
PUTTING ON THE APPLIANCE FOR THE PATIENT
Retain the conguration as adjusted by the doctor/technician. In order to remove the orthotic, open the
arm xation and unhook the push-in buckle fasteners. To put the orthotic on again, proceed as follows:
1 Place the cushion laterally at the side on which the shoulder is to be xed; then place the arm into the
breathable arm xation.
2 Close the waist belt with the push-in buckle fastener (g. L).
3 Close the arm xation with the respective Velcro®fasteners and insert the thumb into the thumb support.
4 Insert the arm on the opposite side from the shoulder to be xed through the loop created by the shoulder
and underarm belts (g. E); Close the orthotic with the push-in buckle fastener on the arm xation (g. F).
Orthèse d’immobilisation de l‘épaule en abduction xe à 10° avec ceinture sous le bras
DÉCLARATION DE CONFORMITÉ
En qualité de fabricant, ORTHOSERVICE AG déclare sous sa responsabilité exclusive que ce produit
est un dispositif médical de Classe I et qu’il a été réalisé conformément aux conditions requises par le
Règlement UE 2017/745 (MDR). Ces instructions ont été rédigées en accord avec ledit règlement et ont
pour but de garantir l’utilisation correcte et sûre du dispositif médical.
MARQUES COMMERCIALES DES MATÉRIAUX
Velcro® est une marque enregistrée de Velcro Industries B.V
PRÉCAUTIONS D’UTILISATION
Veiller à ce que la pression exercée par le dispositif n’agisse pas sur les parties du corps présentant
des lésions, enures ou tuméfactions. Il est conseillé de ne pas trop serrer le produit, an de ne
générer aucune zone de pression locale excessive et d’éviter la compression des nerfs et/ou des
vaisseaux sanguins. Il est préférable de porter l’orthèse sur un vêtement, en évitant le contact direct
avec la peau. En cas de doute sur les modes d’application, contacter un médecin, un kinésithérapeute
ou un technicien orthopédiste. Lire attentivement la composition du produit sur l’étiquette située à
l’intérieur. Il est recommandé de ne pas porter le dispositif à proximité de ammes nues ou de champs
électromagnétiques puissants. Ne pas appliquer en contact direct avec des plaies ouvertes.
AVERTISSEMENTS
Le produit étant spéciquement conçu pour les indications reportées ci-dessous, il est conseillé de
l’utiliser sur prescription d’un médecin ou d’un kinésithérapeute et de le faire appliquer par un technicien
orthopédiste, conformément aux exigences individuelles. An de garantir son ecacité, sa capacité à
être toléré et son bon fonctionnement, le produit doit absolument être appliqué avec le plus grand soin.
Ne modier en aucun cas le réglage effectué par le médecin/kinésithérapeute/technicien orthopédiste.
En cas d’utilisation ou d’adaptation inappropriée, le fabricant ne sera pas tenu responsable. L’utilisation
de l’orthèse est prévue pour un seul patient à la fois; dans le cas contraire, le fabricant décline toute
responsabilité, conformément aux dispositions du règlement relatif aux dispositifs médicaux. Pour les
sujets hypersensibles, le contact direct avec la peau pourrait causer des rougeurs ou des irritations.
En cas d’apparition de douleurs, enures, tuméfactions ou en cas de toute autre réaction anormale,
s’adresser immédiatement à son médecin et, en cas de problème particulièrement grave, signaler le fait
au fabricant et à l’autorité compétente de son pays. L’ecacité orthopédique du produit n’est garantie
que lorsqu’il est utilisé avec tous ses composants.
SÉLECTION/TAILLES
ENTRETIEN
Ne pas blanchir Pas de nettoyage chimique
Ne pas repasser Ne pas sécher en séchoir
Instructions de lavage: laver la housse du coussin (après en avoir retiré le rembourrage en
mousse), les sangles et les protections du cou et de l’aisselle à la main avec de l’eau tiède (max.
30°C) et un savon neutre; rincer soigneusement. Laisser sécher à l’écart de sources de chaleur.
Le produit et ses composants doivent être éliminés en conformité avec les impératifs écologiques
INDICATIONS
• Traitement postopératoire (en abduction) après interventions chirurgicales sur la manchette de rotateur,
la suture du labrum glénoïdal, stabilisation de la capsule, interventions chirurgicales sur les tissus mous
CONTRE-INDICATIONS
Aucune connue à ce jour
CARACTÉRISTIQUES ET MATÉRIAUX
• Structure du coussin en caoutchouc mousse à haute densité.
Tissu à contact du corp tramé en bre d’argent.
• Coussin avec rebord antéropostérieur pour une stabilité optimale
• Manchon permettant de protéger le cou
• Revêtement et manchons en nylon lainé à l’extérieur pour xer les bandes Velcro®
• Poche de soutien du bras en matière respirante
• Sangles xées à l’aide de boucles et réglables avec du Velcro®
• Sangle de soutien du pouce
• Abduction réglable à 10° aux points de référence présents sur le coussin, pour une
application correcte de la poche de soutien du bras
ENFILAGE
ADAPTATION POUR LE MÉDECIN / L’ORTHOPÉDISTE - ORTHÉSISTE
1 S i nécessaire, détacher l’écharpe du coussin et la xer au coussin à l’aide de la fermeture Velcro®,
selon si l’orthèse se trouve du côté droit ou du côté gauche.
2 Disposer latéralement le coussin sur le côté de l’épaule à immobiliser, fermer la sangle abdominale
à l’aide de la fermeture à boucle (g. A) et la serrer à l’aide de la fermeture Velcro®correspondante
(g. A). Si la sangle est trop longue, elle peut être rétrécie ; pour ce faire, couper la sangle à la
longueur adéquate puis rexer l’extrémité à fermeture Velcro®en forme de Y.
3 Introduire avec précaution l’avant-bras dans le sac d’immobilisation du bras (g. B) ; ensuite, à l’aide
des fermetures Velcro®correspondantes, fermer le sec d’immobilisation du bras au niveau du poignet
(g. C) et de l’avant-bras (g. D).
4 Guider le bras opposé à l’épaule à immobiliser à travers la bride formée par le sangle d’épaule et
celle d’aisselle (Fig. E) et fermer l’orthèse à l’aide de la fermeture à boucle située au niveau du sac
d’immobilisation du bras (g. F).
5 Toutes les sangles concernant l’épaule en bonne santé : fermer les sangles du dos, d’aisselle,
d’épaule et avant à l’aide des fermetures Velcro® correspondantes (g. G). Si les sangles sont trop
longues, elles peuvent être rétrécies ; pour ce faire, couper les sangles à la longueur adéquate puis
rexer l’extrémité à fermeture Velcro®en forme de Y.
6 Contrôler la position des protections de l’aisselle et de la nuque ; repositionner les protections le
cas échéant (g. H).
7 Fixer le support du pouce (et la softball de rééducation) au coussin à l’aide de la fermeture Velcro® (g. I).
ENFILAGE POUR LE PATIENT
Conserver la conguration telle qu’elle a été mise en place par le médecin / l’orthopédiste-orthésiste.
Pour retirer l’orthèse, ouvrez le sac d’immobilisation du bras et décrochez la boucle. Pour enler à
nouveau l’orthèse, procédez comme suit:
1 Disposez latéralement le coussin sur le côté de l’épaule à immobiliser; placez ensuite le bras dans
le sac d’immobilisation thermoactif.
2 Fermer la sangle abdominale à l’aide de la fermeture à boucle (g. L).
3 Fermer le sac d’immobilisation du bras à l’aide des fermetures Velcro® correspondantes et
introduisez le pouce dans le support du pouce.
4 Guidez le bras opposé à l’épaule à immobiliser à travers la bride formée par le sangle d’épaule et
celle d’aisselle (g. E) et fermez l’orthèse à l’aide de la fermeture à boucle située au niveau du sac
d’immobilisation du bras (g. F).
BITTE DIE VORLIEGENDE ANLEITUNG SORGFÄLTIG LESEN UND AUFBEWAHREN PLEASE READ THESE INSTRUCTIONS CAREFULLY AND KEEP THEM LIRE ATTENTIVEMENT CES INSTRUCTIONS ET LES CONSERVER
BA
E
H
D
G
L
C
F
I
SILVER
FIBER
3D FABRIC
RADIO
LUCENT
Artikelnummer REF.E112 10°
Größen S L
Unterarmlänge cm* < 38 >39
*Gemessen vom Ellenbogen bis zum Ende der geschlossenen Faust
Farbe: schwarz - Beidseitig anwendbar
Code REF.E112 10°
Size S L
Forearm length cm* < 38 >39
*Measurement taken from elbow to end of closed st
Colour: black - Right or left
Code REF.E112 10°
Mesure S L
Long. avant-bras cm* < 38 >39
*Mesure prise en partant du coude jusqu’à l’extrémité du poing fermé
Couleur: noir - Droite ou gauche
SINGLE PATIENT
MULTIPLE USE
1


