Oursson MP6010PSD User manual

MP6010PSD
EN
RU
Instruction manual
Руководство по эксплуатации

2

3
B
С
4
4
5
5
10
11
12
13 14
15
19 16
17
18
6
7
1
1
8
9
2
2
A
3
3
220-240 V~
N
L

4
D
1
1
2
С
3 sec
3 sec

5
E
1
3
3
5
2
4
MAX
MIN
2 hours
1
2
3

6
• To set up the multicooker, choose a at, solid surface
that provides adequate ventilation. Do not cover the
device during operation. Do not place heat and steam
sensitive surfaces and devices above the device.
• Do not place the device next to magnets and do not
place magnets on the device, Pic. A.
• t is recommended to connect the multicooker to a
grounded socket, Pic. A.
• Do not use the device without a bowl installed
in it or with an empty bowl without water/food
inside.
• Do not use the bowl to heat food on gas, electric
stoves/ovens.
• Do not leave the working device unattended.
Keep children away from a working multicooker.
• Use a special plastic or wooden spoon to avoid
damaging the non-stick coating of the bowl, Pic. A.
• Handle the device cover with care to avoid damaging it.
• Be careful - during operation and at the end,
some surfaces of the multicooker may become
hot. Use oven gloves or oven mitts. Do not touch
the heating element during or immediately after
use.
• To avoid being burn from hot steam, do not lean
over the device while cooking or when opening
the lid of the multicooker, Pic. A.
• Frying and baking under pressure is prohibited.
• Regularly check the steam vent and pressure
relief valve for the steam outlet to make sure
they are not blocked. If the steam valve is
closed, the pressure builds up and escaping
steam may cause injury/burns.
• The use of the device is prohibited without an O-ring on
• If the power cord is damaged, it must be replaced by
a specialist from the authorized service center ( ASC
) OURSSON AG to avoid danger.
• Use only the tools, which are included in the product
set.
• When cleaning the appliance do not use abrasives
and organic cleaners (alcohol, gasoline, etc.). When
cleaning the device it is allowed to use a small
amount of neutral detergent.
When using electrical appliances should take the fol-
lowing precautions:
• Use the device according to the following instructions
manual.
• Install the device on a stable surface.
• Use only the tools, which are included in the product
set.
• To protect against risk of electrical shock do not
put the cord in water or other liquid. If for some
reason the water got into the unit, contact an au-
thorized service center (ASC) OURSSON AG.
• For power supply, use a power grid with proper char-
acteristics.
• Do not use the device in areas where the air can con-
tain vapors of ammable substances.
• Never attempt to open the device by yourself –
it could possibly be the reason of an electrical
shock can lead to product malfunction and will
invalidate the manufacturer’s warranty. For re-
pair and maintenance, contact only authorized
service centers meant for repair of products un-
der the trademark OURSSON.
• When moved from a cool to a warm place and vice
versa unpack it before use and wait 1-2 hours without
turning it on.
• In order to prevent electrical shock do not immerse
the entire product or the wires into the water.
• Be particularly careful and cautious when using the
device near children.
• Do not touch any hot parts, as this may cause injury.
• The power cord is specially made relatively short in
order to avoid the risk of injury.
• Do not allow the cord to hang over the sharp edge of
the table or touch hot surfaces.
• Do not connect this device to a grid which is over-
loaded with other appliances: it can lead to the fact
that the device will not function properly.
• Do not install the device near gas and electric stoves
and ovens.
• After use, make sure to disconnect the device from
the power grid.
• Keep the device from bumps, falls, vibration and oth-
er mechanical inuences.
• Make sure to disconnect the device from the power
grid before cleaning or changing accessories.
• Do not use the device outdoors.
• This appliance is not intended for use by persons (in-
cluding children) with reduced physical, sensory or
mental capabilities, or lack of experience and knowl-
edge. They can only use the device under the supervi-
sion of the person responsible for their safety, or after
instruction on the safe use of the device. Do not allow
children to play with the product.
• This product is intended only for use in the home.
Danger symbol
A reminder to user about high voltage.
Warning symbol
A reminder to user about the necessity of operating exactly according to the
instructions.
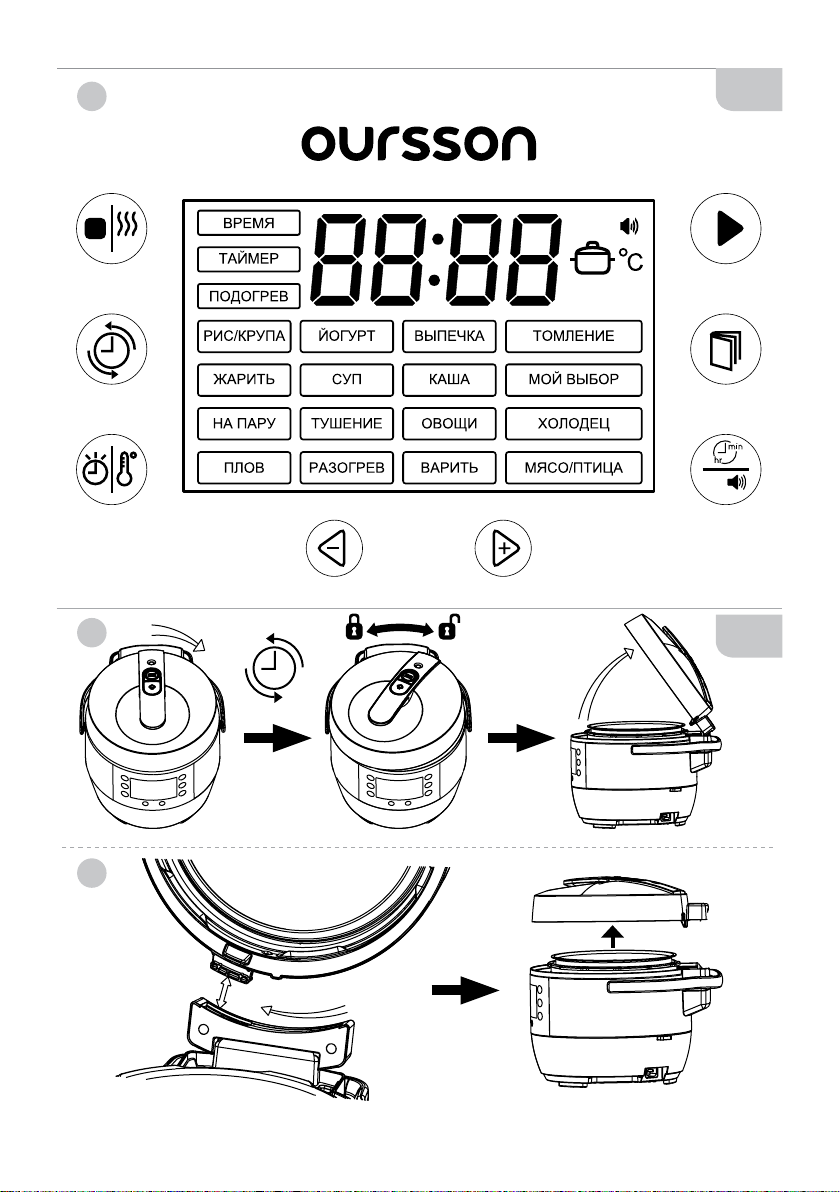
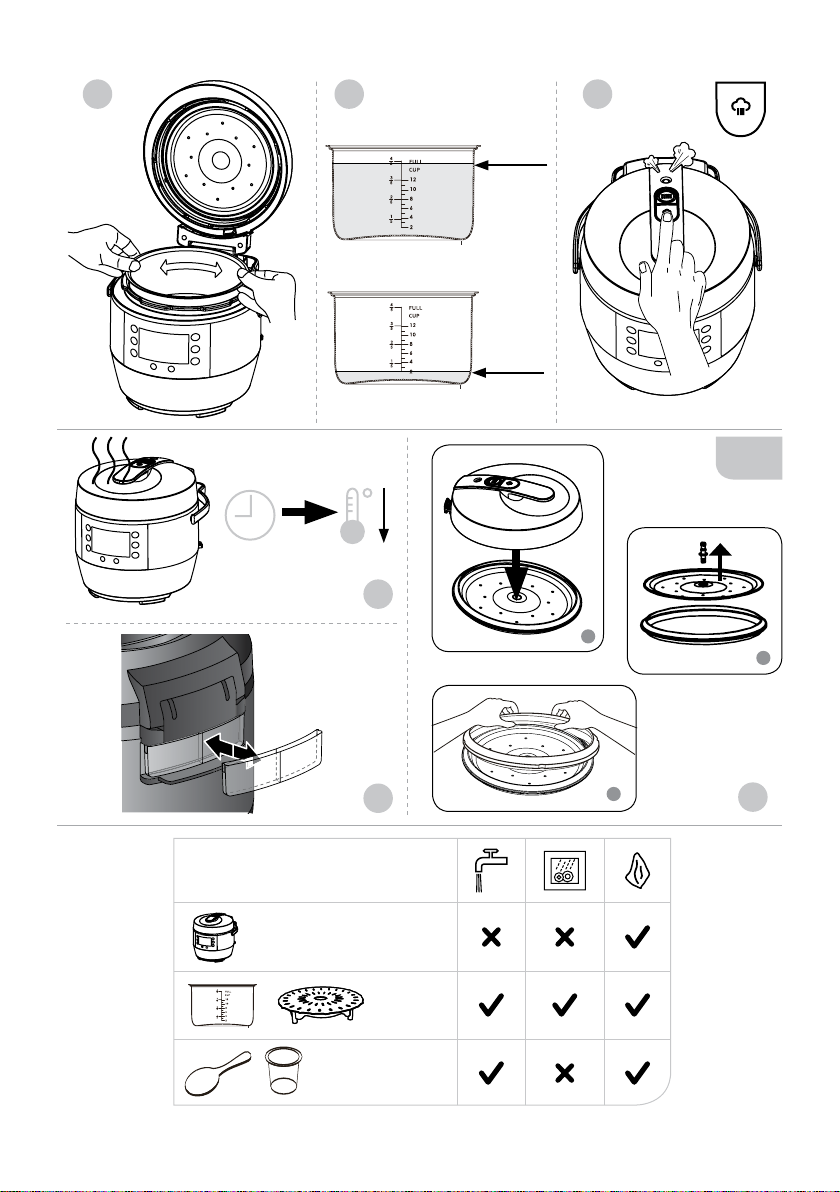
SAFETY INSTRUCTIONS, Fig. A EN
RECOMMENDATIONS
• Please read the instruction manual before using the
device. Keep the manual after reading for further use.
• All illustrations in this manual are schematic
representations of real objects, which may dier from
the actual images.
The operation of this device in any case
does not imply application of any force to
it, as this may damage the product due to
user fault.

7
Hours/minutes/sound button. Use the button
to adjust the hours or minutes. Press the button
once to set the required number of hours; press
the button again to set the minutes. Press and
hold the button for 3 seconds to mute/unmute
button press sounds.
Display, Pic. C-1
Button pressing sound indication
delayed start timer activation indication
indication of the cooking program operation
cooking time indication
cooking temperature indication
keep warm indication
indication of the selected cooking program
MODES
Using the button you can choose one of the cooking
programs: RICE/GRAPE, YOGURT, BAKE, SIMMER
, FRY, SOUP, PORRIDGE, MY CHOICE, STEAMING,
STEWING, VEGETABLES, KHOLODETS, PLOV,
HEATING, BOILING, MEAT / POULTRY.
Before rst use, wipe the body of the device and the
interior with a dry and soft cloth. Wash the cooking bowl,
measuring cup 3, stirring spoon 2, steaming rack 5
and all removable parts with warm water with the ad-
dition of dishwashing liquid. Dry all parts thoroughly.
Before assembling or disassembling the device, make
sure that the device is unplugged.
Order of operation, Pic. D:
1. Open the cover of the multicooker by turning the han-
dle of the lcover to the right up to the mark , Pic. D-1.
2. Place the ingredients into the cooking bowl according
to the recipe.
Make sure that there are no foreign objects be-
tween the heating element and the bowl and that
the outer surface of the bowl and the heating ele-
ment are dry and clean.
• Make sure the bowl is installed correctly and has a
good contact with the heating element. To do this,
carefully turn the bowl, Pic. D-3.
ELEMENTS OF DESIGN, Рiс. C
1
2
3
4
5
6
7
8
9
10
11
12
13
14
15
16
17
18
19
Control panel, display
Body
Non-stick bowl
Pin for xing the inner cover
Cover xing mechanism
Cover
Cover locking mechanism
Carrying handle
Removable condensate container (moisture trap)
Spoon holder
Power cable connector
High pressure indicator
Removable valve with steam vent
Pressure release button
Cover handle
Removable inner cover
Inner Cover Silicone O-Ring
Pressure meter
Silicone insert
UTILIZATION
Control panel, Pic. С-1
Stop / Keep Warm: Press and hold the button
for 3 seconds to cancel the program and enter
standby mode. In standby mode, press and hold
the key for 3 seconds to activate the keep warm
function.
Delayed start function button. This function is
not available for all cooking programs.
Cooking time/temperature. After selecting a
cooking program, press the button to change
the cooking time / temperature. This function is
not available for all programs.
use the buttons to select a cooking program, set
cooking time and temperature.
Start. Press and hold the button for 3 seconds
to start the cooking program. The hold is pro-
vided to avoid accidental pressing of the button.
Menu. Press the button to select the required
cooking program.
PRODUCT SET, РIС. В
Multicooker/pressure cooker ...............................1 pc.
Stirring spoon .....................................................1 pc.
Measuring cup .................................................... 1 pc.
Power cord .........................................................1 pc.
Steaming rack .................................................... 1 pc.
Instructions manual ................................................ 1 pc.
Warranty card ......................................................... 1 pc.
1
2
3
4
5
the cover; if the O-ring is damaged or blocked by food
debris. Use only the O-ring supplied with the device.
• Do not remove the bowl from the multicooker while
cooking.
3. Close the cover rmly and turn the knob to the mark
. Make sure the cover is fully locked and the steam
relief valve is installed and not blocked.
Do not use pressure cooking if the cover is
not fully locked.
4. Plug in the device. There will be a sound signal. The
multicooker will go into standby mode.
5. With the help of , button and , buttons,
select the required cooking program. The selected
program will ash. The display will show the cooking
time.
Do not ll the cooking bowl above the MAX
mark and below the MIN mark, Pic. D-4.

8
The multicooker will go into keep warm mode. To
turn o the mode, press and hold the button for
3 seconds.
11. Gently open the cover of the multicooker by turning
the handle of the cover to the right until the mark.
Use potholders or oven mitts to remove the bowl
from the multicooker.
Note:
Condensation may form during cooking. Empty it regu-
larly from the condensate container, Pic. E-2.
Keep warm mode.
At the end of the cooking process, the multicooker will
automatically switch to keeping warm. Keep warm mode
can be activated manually by pressing and holding the
button for 3 seconds in standby mode. To turn o
the mode, press the button again.
Notes:
• After 24 hours in keep warm mode, the multicooker
will automatically enter standby mode.
• Do not use the keep warm mode for a long time.
This can lead to overdrying or discoloration of the
nished dish.
Keep warm mode is not available for
YOGURT, FRY, VEGETABLES modes.
6. If you want to activate the delayed start timer, press
the button. The timer allows you to postpone the
start of cooking for a specied time. The display
shows the delayed start time of the program. Use
the buttons to set the desired delay time. If
necessary, use the button to set the hours and
minutes.
Do not use the TIMER function if the recipe
contains perishable food.
7. You can change the cooking time as well as the
temperature, if provided in the selected program.
To change cooking time press button one time,
and with the help of buttons set the required
time. To change the cooking temperature press
button a second time, and with the help of
buttons set the required temperature.
8. Press and hold button for 3 second to start the
cooking program. The hold is provided to avoid acci-
dental pressing of the button in view of the sensitive
control panel.
Notes:
• In pressureless cooking modes, the time counts
down immediately after the start of cooking.
• You can stop the cooking program at any time. To
do this, press and hold button for 3 seconds.
The device enters standby mode. The cover may be
locked if the pressure in the device is not released.
Press button to release the pressure.
9. After the cooking time has elapsed, the multicooker
will automatically release the steam pressure (for
pressure cooking modes). You can manually release
the steam pressure by pressing the button.
Take precautions to avoid scalding from hot
steam.
10. At the end of the cooking process, a beep will sound.
COOKING RECOMMENDATIONS
COOKING MODES
Using the steaming rack.
You can use an additional rack for steam cooking.
1. Open the cover of the multicooker by turning the
handle of the cover to the right up to the mark .
2. Pour the water into the bowl according to the recipe.
3. Place the rack inside the cooking bowl.
4. Place the required ingredients on the rack.
5. Close the cover by turning the knob to the mark.
6. Select the required program and start it by holding
the button for 3 seconds.
Mode Default cook-
ing time
Cooking time
adjustment
Timer setting Pressure
cooking
Approximate temper-
ature regime
RICE/GRAPE 15 min 5-25 min 1-24 h +115°C
YOGURT 8 h 6-10 h - - 38-40°C
BAKE 45 min 45-90 min 1-24 h - 140°C (can be ad-
justed 130-160°C)
SIMMER 4 h 1-8 h 1-24 h - From 65°up to 95°С
FRY 15 min 5 – 60 min - - 160°C
SOUP 30 min 10 – 60 min 1-24 h - 100°C
PORRIDGE 10 min 10 – 40 min 1 – 24 h - 90°C-98°C
MY CHOICE 40 min 5 – 120 min 1 – 24 h - 40-160°С
STEAMING 15 min 5 – 120 min 1 – 24 h +115°С
STEWING 30 min 20 – 120 min 1 – 24 h +115°С
VEGETABLES 10 min 5 – 25 min 1 – 24 h +115°С

9
KHOLODETS 30 min 30 – 180 min 1 – 24 h +115°С
PLOV 20 min 15 – 40 min 1 – 24 h +115°С
HEATING 2 min 2 – 15 min 1 – 24 h - 104°С
BOILING 10 min 10 – 60 min 1 – 24 h +115°С
MEAT/POULTRY 25 min 20 – 60 min 1 – 24 h +130°С-140°С
COOKING MODE FUNCTION
Mode Function Recipe example NOTE
RICE/GRAPE Loose porridge,
boiled rice for sushi
and rolls.
Brown loose rice: 1 measuring cup. brown rice;
2 measuring cups of water; spices, salt, butter or
oil to taste.
Preparation:
Sort out and rinse the rice. Fill with water and leave
for 10-12 hours. Pour water into the multicooker
and put rice. Set the RICE/GRAPE mode and the
time to 20 minutes. At the end of cooking, leave in
the “Keep Warm” mode for 10 minutes.
Cooking time is 20 minutes.
Suitable for round and
long grain rice, buck-
wheat, bulgur.
YOGURT Fermented milk
products (yogurts,
ker, fermented
baked milk, cottage
cheese, sour
cream, etc.)
Natural yogurt for 5 portions: 1 liter of milk, 3.5%
fat, 1 pack of OURSSON sourdough or 125 g of
fresh yogurt
Preparation:
Place a closed container with
milk mixture (from milk and sourdough) into the
multicooker bowl. Set the YOGURT mode. Chill the
nished yogurt.
Cooking time - 8 hours.
It is recommended to use
whole milk and fat milk,
from which yogurt is made
more tender.
BAKE Pies, cakes, bis-
cuits, casseroles,
etc.
Sponge cake for 8 servings:
2 cups granulated sugar, 5 eggs, 2 cups our, 10 g
butter and 20 g our for the bowl
Preparation:
Using a mixer, beat the eggs with
sugar, add our and knead the dough. Grease a
bowl with butter and our, put the dough and cook
in the BAKE program for 1 hour, place the cake on
the wire rack and chill for 8-10 hours.
Cooking time - 1 hour 20 minutes.
It is allowed to use baking
paper for the convenience
of removing the nished
dish.
SIMMER Baked/condensed
milk, meat dishes,
vegetables and
other slow cooking
Boiled pork:
pork 1.2 kg, olive oil 50 ml, garlic 3-5 cloves,
ground paprika, salt and black pepper to taste
Preparation:
Rinse llets and pat dry with paper towels. Use
a sharp knife to puncture the pulp and insert one
clove of garlic. If the cloves are large, cut them
into pieces. Pour oil over a piece of meat, rub with
a mixture of salt and spices. Place the llets in an
airtight container and marinate for 2-3 hours. Wrap
the meat in several layers of foil. Select SIMMER
for 3 hours. At the end of cooking, turn o the
multicooker and leave the meat to cool in it for
about 1 hour.
FRY Roast meats, poul-
try, vegetables, fried
potatoes, fritters,
chops, cutlets,
steaks, vegetable
fries for gravies and
soups, etc.
Roast turkey with vegetables for 4 servings:
800 g of turkey llet (breast), 200 g of sweet
pepper, 200 g of zucchini, 200 g of leeks, 200 g of
green beans, 50 g of olive oil, 15 g of salt, a pinch
of the mix “4 peppers” mill, 1 tsp. herbs mix
Preparation:
Place olive oil in a bowl, add all coarsely chopped
ingredients. Cook in the FRY program, stirring
occasionally, for 25-30 minutes.
Cooking time - 45 minutes.
Cook with the open cover,
stir occasionally.

10
SOUP Broths, dressing
soups, etc.
Chicken broth for 10 servings:
1 kg of chicken (broiler chicken) 20 g of salt, 2 bay
leaves, 150 g onion (1 pc.), 1 bunch of parsley,
water to the max
Preparation:
Place all broth ingredients in a bowl. Cook in the
SOUP program, pressure 2, cooking time - 25 min-
utes. Remove the onion and parsley. Separate the
chicken from the bones and serve with the broth.
Cooking time - 45 minutes.
PORRIDGE Milk porridge: millet,
rice, oat, etc.
Oatmeal with prunes:
1 cup oat akes, 2 cups milk, 1 cup water, 100g
prunes, 1 tsp. granulated sugar, a pinch of salt, 3
tbsp. butter
Preparation:
Soak the pitted prunes. Rinse oatmeal in cold
water. Place the oatmeal in a multicooker bowl.
Add water and milk, a pinch of salt and sugar (to
taste). Mix everything. Turn on the PORRIDGE
mode by choosing a time of 30 minutes. At the end
of cooking, add prunes and butter to the porridge.
Mix everything. Let the cooked porridge stay a little
under the cover for 10-15 min.
Cooking time - 40 minutes.
By changing the amount
of liquid and cereals, you
can change the viscosity
of the porridge.
MY CHOICE With this program, you can cook according to your own recipe, set the time and temperature
yourself.
STEAMING Various steamed
dishes
Steamed chicken (whole) for 4 servings:
1.25 kg chicken (broiler chicken), salt and pepper
(optional), 5 pcs. peppercorns, 1 bay leaf, 2 cups
of water
Preparation:
Place water, peppercorns, a bay leaf into the
i bowl, install the steaming rack, put the whole
chicken on it, grated with salt and pepper. Cook in
STEAMING mode, 40 minutes, pressure 4.
Cooking time - 50 minutes.
Use a steaming rack.
Calculation of water for
steam cooking approxi-
mately: for every 10-15
minutes of cooking –1
measuring cup of water.
STEWING Vegetable stew
(with or without
meat / poultry),
stews / poultry,
stued vegetables
(peppers / tomatoes
/ eggplant / zucchini
/ cabbage leaves),
meatballs, etc.
Beef stew with potatoes for 4 servings:
500 g of beef (pulp), 500 g of potatoes, 150 g of
sweet pepper, 200 g of carrots, 150 g of onions, 25
g of olive oil, 10 g of salt, 0.5 tsp. Mixtures mill “4
peppers”, 1 tsp. mixtures mill “Provencal herbs”
Preparation:
Fry the pieces of beef with nely chopped onions
in olive oil in the FRY program. Add the coarsely
chopped remaining ingredients to the bowl. Cook in
the STEWING program for 1 hour.
Cooking time - 1 hour 30 minutes.
VEGETABLES Various vegetables Frittata with leeks and asparagus, 12 servings:
leeks 300 g, asparagus 300 g, fresh champignons 150 g,
butter 50 g, salt 3 g; For egg lling: chicken eggs 12 pcs.,
Semi-hard cheese 200 g, spices, salt 5 g.
Preparation:
Cut the leeks into 1 cm thick slices and cut each sprig of
asparagus into 4 pieces. Cut o the stems of the cham-
pignons, use only the caps. Place butter in a multicooker
bowl, add onions, asparagus and mushrooms, salt.
Select the FRY mode by setting the time to 5 min. At the
beep, transfer the fried ingredients to a deep bowl. Cut a
sheet of parchment ~ 35x40 mm in size. Place the parch-
ment in the multicooker bowl. Place the fried ingredients on
top of the parchment. Use a mixer to mix all the egg lling
ingredients. Cover the toasted onions, asparagus and
mushrooms with egg lling.
Cook on VEGETABLES mode for 25 min. Pull the edges
of the parchment and carefully remove the frittata and
transfer the nished dish to a plate.

11
KHOLODETS Kholodets from
meat, poultry, etc.
Meat Terrine for 10 Servings:
1.5 kg of pork legs, 1 kg of beef on the bone, 1
onion, 1 parsley root, 2 carrots, 25 g of salt, 2 bay
leaves, 10 pcs. peas, water - to the maximum
mark. Plus: 5 sprigs of parsley, 3 cloves of garlic
Preparation:
Place all ingredients in a bowl whole and cook on
KHOLODETS mode for 8 hours. Separate the
meat from the bones, chop nely and mix with
nely chopped garlic. Place pieces of meat, sliced
carrots and parsley root in a rectangular mold and
cover with strained broth. Place the terrine in the
refrigerator overnight. Before serving, tip the dish
onto a at dish and garnish the terrine with parsley
leaves.
Cooking time - 9 hours.
Do not exceed the maxi-
mum bowl volume mark.
PLOV Plov, paella, risotto,
etc.
Plov with lamb for 12 servings:
Sunower oil 50 g, lamb (pulp) 1200 g, onions 3
pcs., Carrots 3 pcs., Garlic 6 cloves, round rice 3
measuring cups, salt 15 g, spices for plov 5 tsp,
barberry 12 pcs., water 3 measuring cups.
Preparation:
Chop the onion nely, grate the carrots on a coarse
grater, cut the lamb into pieces, squeeze the garlic
through a press. Pour olive oil on the bottom of
the bowl and put the prepared ingredients there,
add rice, salt, spices, water. Cook on PLOV mode,
cooking time 30 minutes. Stir the plov after the
sound signal. Arrange the plov on plates and serve.
Cooking time - 30 minutes.
HEATING Heating mode for
the nished dish
Use this mode to reheat ready meals.
BOILING Compotes, drinks,
pasta, sausages,
etc.
Dried fruit compote for 15 servings:
Compote mixture of dried fruits 1000 g, granulated
sugar 1.5 measuring cups., Water up to the MAX
level.
Preparation:
Place dried fruits and granulated sugar in a
multicooker bowl. Add water to the maximum mark.
Cook in BOILING mode, cooking time - 10 minutes.
Cool down the drink after the beep. Let the drink sit
a little. Pour the compote with fruits and berries into
glasses and serve.
MEAT/POUL-
TRY
Baked meat (piece),
boiled pork, shank,
poultry, cooked
whole or in pieces
(duck, chicken,
turkey, quail, hazel
grouse, etc.)
Boiled pork for 10 servings:
1.5 kg of meat, 2 tbsp. Mustard, 30 g soy sauce, 1
tsp. Ground chili, 5 cloves of garlic
Preparation:
Pierce a piece of meat with a knife several times,
rub it with soy sauce, pepper, crushed garlic,
mustard and place in a bowl. Cook in MEAT mode,
pressure 4, 1 hour on each side. If desired, brown
the crust in the FRY mode, frying the pork on all
sides for 3-5 minutes.
Cooking time - 2 hours 30 minutes.
It is recommended to
pre-marinate a piece of
meat or poultry.
CLEANING AND MAINTENANCE, PIC. E
Clean all the parts of the device immediately
after use.
• Before cleaning, unplug the device and let it cool. Pic.
Е-1.
• Wipe the body of the device with a damp cloth. Use a
dry and soft cloth to clean the control panel.
Never immerse the device in water because
of the danger of electric shock.
The recipes in the table are guidelines only and may
vary based on personal preference and ingredients.
Notes:
• It is not recommended to cook crustaceans/shellsh
with shells to avoid damaging the surface of the
bowl. Remove the shell before cooking.
• When cooking under pressure, the presence of
water or other liquid in the bowl must be at least 1/5
of the bowl volume.
• Do not use Pressure Cooking on ingredients such as
milk, cream, etc.

12
• Rinse the cooking bowl and steaming rack in warm
soapy water. They are dishwasher safe. The temper-
ature in the dishwasher must not exceed 60°С.
• Rinse the stirring spoon and measuring cup in warm
soapy water.
• Dry all parts thoroughly.
Note:
To get rid of the smell in the inner chamber of the mul-
ticooker, pour water (1 measuring cup) into the cook-
ing bowl and add a slice of lemon. Turn on STEAMING
mode for 3 minutes.
Cleaning the steam pressure reduction valve
Disconnect the steam vent valve carefully before clean-
ing. Disassemble the valve and wash in warm soapy
water. Rinse the valve and dry thoroughly. Reinstall the
valve.
To avoid damaging the device, do not use too
much physical force when removing and install-
ing the valve.
Note:
It is recommended to clean the steam valve and con-
densate container after each use of the device.
Cleaning the condensate container (moisture trap),
Pic. E-2.
• Carefully detach the condensate container and drain
the water. Wipe it dry and put it back in place.
Cleaning the device cover, Pic. E-3.
1. Open the cover of the multicooker by turning the
handle of the cover to the right up to the mark
, Pic. D-1. Carefully remove the cover by sliding it to
the left from the holder, Pic. D-2.
2. Detach the inner cover from the retaining clip, Pic.
E-3. Carefully remove the silicone O-ring from the
inner cover and the silicone insert from the center
hole, Pic. E-3. Rinse the inner cover, silicone ring
and silicone insert thoroughly in warm soapy water.
3. Dry and reinstall all parts.
Make sure that the inner cover is installed cor-
rectly, otherwise steam may escape unintended
during operation.
Note:
The life of the O-ring is limited and depends on how of-
ten you cook and service the device.
DISPOSAL
To protect the environment, do not dispose of your device
in regular trash cans. Dispose of in accordance with cur-
rent regulations.
Possible Problem Possible Cause Solutions
Device doesn’t turn on
1. The power cable is not
connected to the mains.
2. There is no voltage in the
power supply.
1. Make sure the power cable is plugged in.
2. Disconnect the device from the power supply and
wait until the voltage returns to normal.
The cover does not close
properly
Food stuck on the O-ring may be
preventing the lid from closing
properly.
Check the device for foreign objects and dirt.
The cover of the multi-
cooker does not open
• There may be overpressure
inside the device.
• Steam pressure relief
mechanism is not working
properly.
• Press the steam release button .
• Gently push the ball of the steam pressure
control mechanism down. If the problem persists,
call for service.
Liquid ows out from
under the cover of the
multicooker
The steam release mechanism
may be dirty.
Check the steam pressure release mechanism for
foreign debris.
The dish is not completely
cooked
1. Incorrect proportions of ingre-
dients and water.
2. Too many ingredients have
been loaded.
1. Follow the proportions of the ingredients
according to the recipes. Check the quality of
the ingredients. Extend the cooking time.
2. Do not ll the bowl above the MAX mark.
Steam or liquid comes out
between the cover and
the multicooker
1. The O-ring may be installed
incorrectly.
2. Too many ingredients/water
have been loaded in the bowl.
3. The cover is not closed
properly.
1. Unplug the multicooker immediately. Make sure the
O-ring on the cover is seated correctly, not dam-
aged, blocked by foreign objects or food debris.
If necessary, contact a service center to check or
replace the O-ring.
2. Do not ll the bowl above the MAX mark.
3. Close the cover as described above.
POSSIBLE PROBLEMS AND SOLUTIONS

13
SPECIFICATIONS
SPECIFICATIONS
Model MP6010PSD
Power consumption, W Max 1000
Rated voltage 220-240 V ~; 50 / 60Hz
Working bowl volume 6 liters
Transportation temperature from -25°C up to +35°C
Operation temperature from +5°C up to +35°C
Storing temperature from 0°C up to +35°C
Humidity Requirements for transportation, storing and
operation 15-75% (no condensation)
Protection class I
Device dimensions, mm (HxWxD) 312x370x307
Device weight, kg 4.65
*Products must be stored in dry, ventilated warehouses at a temperature not lower than – 25°С.
PRODUCT CERTIFICATION
For information on product certication, see http://www.oursson.com or ask seller for a copy.
Only a qualied specialist of an authorized service center OURSSON AG can repair the device.
SERVICING
Company OURSSON AG expresses great apprecia-
tion to you for choosing our products. We have done
everything possible so that this meets your needs, and
the quality corresponds to the best world standards.
If your OURSSON branded product will need mainte-
nance, please contact one of the authorized service
center (hereinafter – ASC). A complete list of ASC and
their exact addresses can be found on the website
www.oursson.com.
Warranty obligations OURSSON AG:
1. Warranty obligations OURSSON AG, provided ASC
OURSSON AG, apply only to models designed
OURSSON AG for the production or supply and
sale within the country where the warranty service
is provided, purchased in this country, certied for
compliance with the standards of this country, and
also marked the with ocial marks of conformity.
2. Warranty obligations OURSSON AG operate within
the law on protection of consumer rights and are reg-
ulated by the laws of the country in which they are
provided, and only when the product is used exclu-
sively for personal, family or household purposes.
Warranty obligations OURSSON AG shall not apply
to uses of goods for business purposes or in connec-
tion with the acquisition of goods to meet the needs
of enterprises, institutions and organizations.
3. OURSSON AG sets for its products the following
terms of use and warranty periods:
4. Warranty obligations OURSSON AG shall not apply to
the following products, if their replacement is assumed
and is not connected with disassembling products:
• Batteries.
• Cases, straps, cords for carrying, mounting acces-
sories, tools, documentation that came with the
product.
5. Warranty does not cover defects caused due to vi-
olations of the rules of consumer use, storage or
transportation of the goods, actions of third parties or
Product name
Terms
of use,
months
Warranty
Period,
months
Microwave ovens
breadmakers, induction hobs
Multicookers, kitchen
processors, electric kettles,
electric grills, hand blenders,
hand mixers, meat grinders,
blenders, toasters, airpots,
toasters, juicers, steamers,
coee makers, choppers,
freezers, refrigerators,
automatic coee machines
Kitchen scales
60 12

14
force majeure, including but not limited to the following
cases:
• If the defect was a result of careless handling, used
for other purposes, violations of conditions and
rules of operation set forth in the instruction man-
ual, including as a result of exposure to high or low
temperatures, high humidity or dust, traces of open-
ing the device independently and/ or self-repair,
mismatch state standards for power grids, getting
liquids, insects or other foreign objects, substances
inside the device, as well as long-term use of the
product in extreme operational modes.
• If the defect of the product was a result of unau-
thorized attempts to test the product or make any
changes in its construction or software programs,
including repair or maintenance in unauthorized
service centers.
• If the defect of the product was a result of use of
non-standard and/or low quality equipment, acces-
sories, spare parts, batteries.
• If the defect of the product is associated with
its use in conjunction with additional equipment
(accessories), other than additional equipment
recommended by OURSSON AG for use with this
product. OURSSON AG is not responsible for the
quality of the additional equipment (accessories)
manufactured by third parties, for the quality of its
products together with such equipment, as well as
the quality of the work of the additional equipment of
OURSSON AG together with the products of other
manufacturers.
6. Product defects detected during the lifetime of the
product are eliminated by the authorized service
centers (ASC). During the warranty period, elimination
of defects is free of charge with the presentation of the
original certicate of guarantee and documents that
conrm the fact and date of the contract of retail pur-
chase. In the absence of such documents, warranty
period is calculated from the date of manufacture of
goods. It should be taken into account:
• Setup and Installation (assembly, the connection,
etc.) of the product described in the documentation
attached to it, does not enter the scope of warranty
OURSSON AG and can be performed by the user
as well as the specialists of most authorized service
centers on a paid basis.
• Work upon maintenance of products (cleaning and
lubricating the moving parts, replacement of con-
sumables and supplies, etc.) are made on a paid
basis.
7. OURSSON AG is not responsible for any damage di-
rectly or indirectlycaused by their products to people,
pets, property, if it occurred as a result ofnon-obser-
vance of the rules and conditions of use, storage,
transportation or installation of the product, intentional
or negligent actions of consumer or third parties.
8. Under no circumstances, OURSSON AG is not
responsible for any special, incidental, indirect or con-
sequential loss or damage, including but not limited
to: lost prots, damages caused by interruptions in the
commercial, industrial or other activities, arising from
the use of or inability to use the product.
9. Due to continuous product improvement, design ele-
ments and some technical specications are subject
to change without prior notice from the manufacturer.
Using the product when after the terms of use (lifetime):
1. Lifetime set by OURSSON AG for this product applies
only when the product is used exclusively for personal,
family or household needs, as well as the consumer
observes the correct operation, storage and trans-
portation of products. Under thecondition of careful
handling of the product and compliance with the rules
of operation the actual life may exceed the lifetime set
by OURSSON AG.
2. At the end of the product lifetime, you should contact
an authorized service center for to conduct a preven-
tive maintenance of the product and determine the
suitabilityfor further use. Work on conducting a pre-
ventive maintenance of the products is also made in
service centers on paid basis.
3. OURSSON AG does not recommend the use of this
product after the end of its lifetime without its preven-
tive maintenance by the authorized service center,
since inthis case, the product can be dangerous to the
life, health or property of the consumer.
Product Recycling and Disposal
This appliance has been identied in accordance with the
European directive 2002/96/EG on Waste Electrical and
Electronic Equipment – WEEE.
After the expiration of the lifetime, the product cannot be
disposed with another household waste. Instead, it shall be
deposited in the appropriate recycling collection point for
electrical and electronic equipment for proper treatment and
disposal in accordance with federal or local law. By disposing
correctly this product, you will help to conserve natural re-
sources and preventing the product from damaging
the environment and human health. For more infor-
mation on the collection point and recycling of this
product, please contact your local municipal author-
ities or the enterprise for household waste disposal.
Date of manufacture
Each product has a unique serial number in the form of
alphanumeric row and is duplicated with a barcode that
contains the following information: name of the product
group, date of manufacture, serial number of the product.
Serial number is located on the rear of the product, on
the package and the warranty card.
The rst two letters-correspondence to the product
group (Multicooker/pressure – MP).
The rst two digits – year of manufacture.
The second two digits – month of manufacture.
The last two digits – serial number of product.
MP1910011234567
1 2 3 4

15
To avoid misunderstandings, we highly recommend you to read carefully the instruction manual and
the warranty obligations. Check the correctness of the warranty card. Warranty card is valid only if the
following are correctly and clearly stated: model, serial number, date of purchase, clear stamps, buyer’s
signature. The serial number and the model of the device must be the same as in the warranty card. If
these conditions are not fullled or the data specied in the warranty card was changed, the warranty
card is invalid.
OURSSON AG
Made in China
If you have questions or problems with OURSSON AG products – please contact us by e-mail:
This manual is under protection of international and EU copyright law. Any unauthorized use of the instructions, including
copying, printing and distribution, but not limited to, involves the application of the guilty person to civil liability and criminal
liability.
Contact information:
1. Manufacturer of goods - OURSSON AG (Orson AG) Rue du Grand-Chêne 5, 1003 Lausanne, Switzerland.
2. Certication information product available on the website www.oursson.com.

16
РЕКОМЕНДАЦИИ
• Перед использованием устройства вниматель-
но ознакомьтесь с руководством пользователя.
После чтения, пожалуйста, сохраните его для
использования в будущем.
• Все иллюстрации, приведенные в данной инструк-
ции, являются схематичными изображениями
реальных объектов, которые могут отличаться от
них.
ИНСТРУКЦИЯ ПО БЕЗОПАСНОСТИ, Рис. А RU
• По окончании использования отключите изделие
от сети.
• Оберегайте устройство от ударов, падений, вибра-
ций и иных механических воздействий.
• Обязательно отключайте устройство от сети перед
началом мойки.
• Не используйте изделие вне помещений.
• Этот прибор не предназначен для использования
людьми (включая детей) с ограниченными физи-
ческими, сенсорными или умственными способ-
ностями, или нехваткой опыта и знаний. Они могут
пользоваться прибором только под наблюдением
человека, ответственного за их безопасность, или
после инструктажа по безопасному использованию
прибора. Не позволяйте детям играть с изделием.
• Настоящее изделие предназначено только для ис-
пользования в быту.
• Не используйте при чистке прибора абразивные
материалы и органические чистящие средства
(спирт, бензин и т.д.). Для чистки корпуса прибора
допускается использование небольшого количества
нейтрального моющего средства.
При использовании электрических приборов следует
соблюдать следующие меры предосторожности:
• Используйте прибор согласно данному руководству
по эксплуатации.
• Устанавливайте прибор на устойчивую поверхность.
• Используйте только приспособления, входящие в
комплект устройства.
• Чтобы предотвратить риск пожара или удара
током, избегайте попадания в устройство
воды и эксплуатации устройства в условиях
высокой влажности. Если по каким-то причинам
вода попала внутрь устройства, обратитесь
в уполномоченный сервисный центр (УСЦ)
OURSSON AG.
• Для электропитания прибора используйте электро-
сеть с надлежащими характеристиками.
• Не используйте прибор в помещениях, где в воздухе
могут содержаться пары легковоспламеняющихся
веществ.
• Никогда самостоятельно не вскрывайте устрой-
ство – это может стать причиной поражения
электрическим током, привести к выходу
прибора из строя и аннулирует гарантийные
обязательства производителя. Для ремонта и
технического обслуживания обращайтесь толь-
ко в сервисные центры, уполномоченные для
ремонта изделий торговой марки OURSSON.
• При перемещении устройства из прохладного
помещения в теплое и наоборот распакуйте его
перед началом эксплуатации и подождите 1-2 часа,
не включая.
• В целях предотвращения поражения электро-
током не допускайте погружения проводов или
всего изделия в воду.
• Будьте особенно осторожны и внимательны, если
рядом с работающим прибором находятся дети.
• Не дотрагивайтесь до горячих поверхностей прибо-
ра, это может привести к травме.
• Шнур питания специально сделан относительно ко-
ротким во избежание риска получения травмы.
• Не допускайте свисания шнура через острый край
стола или его касания нагретых поверхностей.
• Не подключайте данный прибор к сети, перегружен-
ной другими электроприборами: это может привести
к тому, что прибор не будет функционировать долж-
ным образом.
• Не устанавливайте изделие вблизи газовых и элек-
трических плит, а также духовок.
• Не используйте прибор при поврежденном шнуре
питания, а также в случаях, если нарушена нор-
мальная работа изделия, если оно падало или было
повреждено каким-либо другим образом.
• При отключении изделия от сети держитесь только
за вилку, не тяните за провод – это может привести
к повреждению провода или розетки и вызвать ко-
роткое замыкание.
• Для установки мультиварки выберите ровную
твердую поверхность, которая обеспечивает
достаточное место для вентиляции. Не накры-
вайте прибор во время работы. Над прибором не
располагайте чувствительные к нагреву и пару
поверхности и приборы.
• Не располагайте прибор рядом с магнитами и не
помещайте магниты на прибор, Рис. А.
• Рекомендуется подключать мультиварку к сетевой
розетке, имеющей заземление, Рис. А.
• Запрещается использовать прибор без
установленной в него чаши или с пустой
чашей – без воды/продуктов внутри.
• Не используйте чашу для подогрева пищи на
газовых, электрических плитах/ в печах.
• Не оставляйте работающий прибор без
присмотра. Не позволяйте детям подходить к
работающей мультиварке.
Эксплуатация данного прибора ни в
коем случае не подразумевает приме-
нение к нему физической силы, так как
это может привести к поломке изделия
по вине пользователя.
Символ опасности
Напоминание пользователю о высоком напряжении.
Символ предупреждения
Напоминание пользователю о необходимости прове-
дения всех действий в соответствии с инструкцией.
Символ опасности ожога
Напоминание пользователю
о высокой температуре.

17
Символ опасности ожога
Напоминание пользователю
о высокой температуре.
ЭЛЕМЕНТЫ КОНСТРУКЦИИ, Рис. В
1
2
3
4
5
6
7
8
9
10
11
12
13
14
15
16
17
Панель управления, дисплей
Корпус
Чаша с антипригарным покрытием
Штырь для крепления внутренней крышки
Механизм крепления крышки
Крышка
Механизм блокировки крышки
Ручка для переноса
Съемный контейнер для конденсата
(влагосборник)
Держатель для ложки
Разъем для подключения кабеля питания
Индикатор повышенного давления
Съемный клапан с отверстием для сброса пара
Кнопка сброса давления
Ручка крышки
Съемная внутренняя крышка
Силиконовое уплотнительное кольцо внутренней
крышки
18
19
Датчик давления
Силиконовая вставка
ИСПОЛЬЗОВАНИЕ
Панель управления, Рис. С-1
Стоп/Поддержание тепла: Нажмите
кнопку и удерживайте ее в течение 3
секунд, чтобы отменить работу программы
и перейти в режим ожидания. В режиме
ожидания нажмите и удерживайте клавишу
в течение 3 секунд для включения функции
поддержания тепла.
Клавиша включения функции Отложенного
старта. Функция доступна не для всех
программ приготовления.
Время/Температура приготовления.
После выбора программы приготовления
нажмите клавишу, чтобы изменить время/
температуру приготовления. Данная
функция доступна не для всех программ.
используйте клавиши для выбора
программы приготовления, установки
времени и температуры приготовления.
Старт. Нажмите и удерживайте клавишу
в течение 3 секунд, чтобы запустить
программу приготовления. Удержание
предусмотрено во избежание случайного
нажатия клавиши.
Меню. Нажмите клавишу, чтобы выбрать
необходимую программу приготовления.
Часы/минуты/звук клавиш. Используйте
клавишу для корректировки часов или
минут. Нажмите клавишу один раз, чтобы
установить необходимое количество часов;
нажмите клавишу еще раз, чтобы установить
минуты. Нажмите и удерживайте клавишу
в течение 3 секунд, чтобы отключить/
включить звук нажатия клавиш.
Дисплей, Рис. С-1
индикация звука нажатия клавиш
индикация включения таймера
отложенного старта
индикация работы программы
приготовления
индикация времени приготовления
индикация температуры приготовления
индикация функции поддержания тепла
индикация выбранной программы
приготовления
РЕЖИМЫ
С помощью клавиши вы можете выбрать одну
из программ приготовления: РИС/КРУПА, ЙОГУРТ,
ВЫПЕЧКА, ТОМЛЕНИЕ, ЖАРИТЬ, СУП, КАША, МОЙ
ВЫБОР, НА ПАРУ, ТУШЕНИЕ, ОВОЩИ, ХОЛОДЕЦ,
ПЛОВ, РАЗОГРЕВ, ВАРИТЬ, МЯСО/ПТИЦА.
• Пользуйтесь специальной пластиковой или
деревянной ложкой во избежание повреждения
антипригарного покрытия чаши, Рис. А.
• Бережно обращайтесь с крышкой прибора, чтобы
ее не повредить.
• Будьте осторожны во время работы и по окон-
чании некоторые поверхности мультиварки
могут нагреваться. Используйте кухонные
рукавицы или прихватки. Не прикасайтесь
к нагревательному элементу во время или
сразу после использования.
• Во избежание ожога горячим паром не накло-
няйтесь над прибором во время приготовле-
ния или при открытии крышки мультиварки,
Рис. А.
• Жарить и выпекать под давлением запрещено.
• Регулярно проверяйте паровыпуск и
клапан снижения давления, предназначен-
ные для выхода пара, чтобы убедиться,
что они не заблокированы. Если паровой
клапан закрыт, давление увеличивается
и выходящий пар может стать причиной
травмы/ожогов.
• Использование прибора запрещено без уплот-
нительного кольца на крышке; в случае если
уплотнительное кольцо имеет повреждения или
оно заблокировано остатками пищи. Используйте
только уплотнительное кольцо, поставляемое в
комплекте с прибором.
КОМПЛЕКТАЦИЯ
Мультиварка/скороварка ................................... 1 шт.
Ложка для помешивания .................................. 1 шт.
Мерный стакан .................................................. 1 шт.
Шнур питания ..................................................... 1 шт.
Подставка для приготовления на пару ............ 1 шт.
Руководство по эксплуатации ............................... 1 шт.
Гарантийный талон ................................................ 1 шт.
1
2
3
4
5

18
один раз, и с помощью клавиш
установите необходимое время. Для изменения
температуры приготовления нажмите клавишу
второй раз, и с помощью клавиш
установите необходимую температуру.
8. Нажмите и удерживайте клавишу в
течение 3 секунд для запуска программы
приготовления. Удержание предусмотрено во
избежание случайного нажатия клавиши в виду
чувствительной панели управления.
Примечания:
• В режимах приготовления без давления отсчет
времени начинается сразу после начала
приготовления.
• Вы можете в любой момент остановить
программу приготовления. Для этого
необходимо нажать и удерживать клавишу
в течение 3 секунд. Прибор перейдет в режим
ожидания. Крышка может быть заблокирована,
если давление в приборе не сброшено. Нажмите
кнопку для сброса давления.
9. По истечении времени приготовления
мультиварка начнет автоматически сбрасывать
давление пара (для режимов приготовления
с давлением). Вы можете сбросить давление
пара вручную, нажав кнопку .
Соблюдайте меры предосторожности во
избежание ожога горячим паром.
10. По окончании процесса приготовления
прозвучит звуковой сигнал. Мультиварка
перейдет в режим подогрева. Для отключения
режима нажмите и удерживайте 3 секунды
клавишу .
11. Аккуратно откройте крышку мультиварки,
повернув ручку крышки направо до отметки .
Используйте прихватки или кухонные рукавицы,
чтобы извлечь чашу из мультиварки.
Примечание:
В процессе приготовления может образовываться
конденсат. Регулярно выливайте его из контейнера
для конденсата, Рис. Е-2.
Режим поддержания тепла.
По окончании процесса приготовления мультиварка
автоматически перейдет в режим поддержания
тепла. Режим поддержания тепла можно включить
вручную, в режиме ожидания нажав и удерживая
в течение 3 секунд клавишу . Для отключения
режима нажмите клавишу еще раз.
Примечания:
• По истечении 24 часов в режиме поддержания
тепла мультиварка автоматически перейдет в
режим ожидания.
• Не пользуйтесь режимом поддержания тепла
длительное время. Это может привести к
пересушиванию или изменению цвета готового
блюда.
Режим поддержания тепла недоступен
для режимов ЙОГУРТ, ЖАРИТЬ, ОВОЩИ.
Перед первым использованием протрите корпус
прибора и внутренние части сухой и мягкой
тканью. Чашу для приготовления, мерный стакан
3, ложку для перемешивания 2, подставку для
приготовления на пару 5 и все съемные детали
вымойте теплой водой с добавлением жидкости
для мытья посуды. Тщательно высушите все
детали. Перед сборкой или разборкой прибора
убедитесь, что прибор выключен из розетки.
Порядок действий, Рис. D:
1. Откройте крышку мультиварки, повернув ручку
крышки направо до отметки , Рис. D-1.
2. Поместите в чашу для приготовления
ингредиенты согласно рецепту.
Убедитесь, что между нагревательным
элементом и чашей нет посторонних
предметов, а внешняя поверхность чаши и
нагревательный элемент сухие и чистые.
• Удостоверьтесь, что чаша установлена правильно
и имеет хороший контакт с нагревательным
элементом. Для этого осторожно поверните чашу,
Рис. D-3
• Не доставайте чашу из мультиварки во время
работы.
3. Плотно закройте крышку и поверните ручку
до отметки . Убедитесь, что крышка
зафиксирована полностью, а клапан для сброса
пара установлен и не заблокирован.
Запрещается использовать режим
приготовления под давлением, если
крышка зафиксирована не полностью.
4. Подключите прибор к сети электропитания.
Раздастся звуковой сигнал. Мультиварка
перейдет в режиме ожидания.
5. С помощью клавиши , а также клавиш
, выберите необходимую программу
приготовления. Выбранная программа будет
мигать. На дисплее отобразится время
приготовления.
6. Если необходимо активировать таймер
отложенного старта, нажмите клавишу
. Таймер позволяет отложить начало
приготовления на заданное время. На
дисплее отобразится время отсрочки запуска
программы. С помощью клавиш
установите необходимое время отсрочки. При
необходимости воспользуйтесь клавишей ,
чтобы установить часы и минуты.
Не используйте функцию ТАЙМЕР, если в
состав рецепта входят скоропортящиеся
продукты.
7. Вы можете изменить время приготовления, а
также температуру, если это предусмотрено
в выбранной программе. Для изменения
времени приготовления нажмите клавишу
Не наполняйте чашу для приготовления
выше отметки MAX, а также меньше от-
метки MIN, Рис. D-4.

19
РЕКОМЕНДАЦИИ ПО ПРИГОТОВЛЕНИЮ
РЕЖИМЫ ПРИГОТОВЛЕНИЯ
НАЗНАЧЕНИЯ РЕЖИМОВ ПРИГОТОВЛЕНИЯ
Использование подставки для приготовления
на пару.
Для приготовления продуктов на пару можно
использовать дополнительную подставку.
1. Откройте крышку мультиварки, повернув ручку
крышки направо до отметки .
2. Налейте в чашу воду, согласно рецепту.
3. Установите подставку внутрь чаши для
приготовления.
4. Разместите необходимые ингредиенты на
подставке.
5. Закройте крышку, повернув ручку до отметки .
6. Выберите необходимую программу и запустите
ее, удерживая клавишу в течение 3 секунд.
Режим Время
приготовления
по умолчанию
Регулировка
времени
приготовления
Установка
таймера
Приготовление
под давлением
Примерный
температурный
режим
РИС/КРУПА 15 мин 5-25 мин 1-24 ч +115°C
ЙОГУРТ 8 ч 6-10 ч - - 38-40°C
ВЫПЕЧКА 45 мин 45-90 мин 1-24 ч - 140°C (можно
регулировать
130-160°C)
ТОМЛЕНИЕ 4 ч 1-8 ч 1-24 ч - От 65°до 95°С
ЖАРИТЬ 15 мин 5 – 60 мин - - 160°C
СУП 30 мин 10 – 60 мин 1-24 ч - 100°C
КАША 10 мин 10 – 40 мин 1 – 24 ч - 90°C-98°C
МОЙ ВЫБОР 40 мин 5 – 120 мин 1 – 24 ч - 40-160°С
НА ПАРУ 15 мин 5 – 120 мин 1 – 24 ч +115°С
ТУШЕНИЕ 30 мин 20 – 120 мин 1 – 24 ч +115°С
ОВОЩИ 10 мин 5 – 25 мин 1 – 24 ч +115°С
ХОЛОДЕЦ 30 мин 30 – 180 мин 1 – 24 ч +115°С
ПЛОВ 20 мин 15 – 40 мин 1 – 24 ч +115°С
РАЗОГРЕВ 2 мин 2 – 15 мин 1 – 24 ч - 104°С
ВАРИТЬ 10 мин 10 – 60 мин 1 – 24 ч +115°С
МЯСО/ПТИЦА 25 мин 20 – 60 мин 1 – 24 ч +130°С-140°С
Режим Назначение Пример рецепта Примечание
РИС/КРУПА Рассыпчатые
каши,
рис отварной для
суши и роллов.
Бурый рассыпчатый рис: 1 мерный ст.
бурого риса; 2 мерных ст. воды; пряности, соль,
сливочное или растительное масло по вкусу.
Приготовление:
Переберите и промойте рис. Залейте водой и
оставьте на 10-12 ч. В мультиварку залейте воду
и положите рис. Установите режим РИС/КРУПА
и время 20 минут. По окончании приготовления
оставьте в режиме «Подогрев» на 10 минут.
Время приготовления – 20 минут.
Подходит для
круглозерного и
длиннозерного риса,
гречки, булгура.
ЙОГУРТ Кисломолочные
продукты
(йогурты, кефир,
простокваша,
ряженка, творог,
сметана,
мацони и т.д.)
Йогурт натуральный на 5 порций: 1 л молока
3,5% жира, 1 упаковка закваски OURSSON или
125 г свежего йогурта
Приготовление:
Поместите закрытый крышкой контейнер с
молочной смесью (из молока и закваски) в
чашу мультиварки. Установите режим ЙОГУРТ.
Готовый йогурт охладите.
Время приготовления – 8 часов.
Рекомендуется
использовать цельное и
жирное молоко, из него
йогурт получается более
нежный.

20
ВЫПЕЧКА Пироги, торты,
бисквиты,
запеканки и т.д.
Бисквит на 8 порций:
2 чашки сахарного песка, 5 яиц, 2 чашки
муки, 10 г сливочного масла и 20 г муки для
обработки чаши
Приготовление:
Взбейте при помощи миксера в крепкую пену
яйца с сахаром, добавьте муку и замесите
тесто. Смажьте чашу маслом и посыпьте мукой,
переложите тесто и готовьте в программе
ВЫПЕЧКА, 1 час, переложите бисквит на
решётку и охладите в течение 8-10 часов.
Время приготовления – 1 час 20 минут.
Допускается
использование
пекарской бумаги
для удобства выемки
готового блюда.
ТОМЛЕНИЕ Топлёное/
сгущённое
молоко, блюда
из мяса, овощей
и другие блюда
медленного
приготовления
Буженина:
свинина 1,2 кг, оливковое масло 50 мл, чеснок
3-5 зубчиков, молотая паприка, соль и черный
перец по вкусу
Приготовление:
Промойте филе и просушите с помощью
бумажных полотенец. Острым ножом сделайте
проколы в мякоти и вложите по одному
зубчику чеснока. Если зубчики большие,
разрежьте их на части. Полейте кусок мяса
маслом, натрите смесью из соли и специй.
Поместите филе в герметичный контейнер и
оставьте промариноваться 2-3 часа. Заверните
мясо в несколько слоев фольги. Выберите
режим ТОМЛЕНИЕ на 3 часа. По окончании
приготовления выключите мультиварку и
оставьте мясо остывать в ней еще около 1 часа.
ЖАРИТЬ Жаркое из
мяса, птицы,
овощей, жареного
картофеля,
оладьи, отбивные,
котлеты,
бифштексы,
овощные зажарки
для подливок и
супов и т.д.
Жаркое из индейки с овощами на 4 порции:
800 г филе индейки (грудка), 200 г сладкого
перца, 200 г цукини, 200 г лука-порея, 200 г
стручковой фасоли, 50 г оливкового масла, 15 г
соли, щепотка смеси мельница «4 перца», 1 ч.л.
смеси пряных трав
Приготовление:
Поместите в чашу оливковое масло, добавьте
все ингредиенты, порезанные крупно. Готовьте
в программе ЖАРКОЕ, периодически поме-
шивая, в течение 25-30 минут.
Время приготовления – 45 минут.
Готовьте с открытой
крышкой,
Периодически
помешивайте.
СУП Бульоны,
заправочные супы
и т.д.
Куриный бульон на 10 порций:
1 кг курицы (цыплёнка бройлерного) 20 г соли,
2 лавровых листика, 150 г репчатого лука (1
шт.), 1 пучок петрушки, вода – до максимальной
отметки
Приготовление:
Поместите в чашу все ингредиенты для
бульона. Готовьте в программе СУП, давление
– 2, время – 25 минут. Достаньте луковицу и
петрушку. Отделите куриное мясо от костей и
подайте вместе с бульоном.
Время приготовления – 45 минут.
КАША Молочные каши:
пшённая, рисовая,
овсяная и т.п.
Овсяная каша с черносливом:
1 ст. хлопьев овсяных, 2 ст. молока, 1 ст. воды,
100г чернослива, 1 ч.л. сахарного песка,
щепотка соли, 3 ст.л. сливочного масла
Приготовление:
Замочите чернослив без косточки. Овсяные
хлопья (не экстра) промойте в холодной воде.
Поместите овсянку в чашу мультиварки.
Добавьте воду и молоко, щепотку соли и
сахар (см.по вкусу). Все перемешайте.
Включите режим КАША, выбрав время 30
минут. По окончании приготовления добавьте
в кашу чернослив и сливочное масло. Все
перемешайте. Дайте готовой каше немного
настояться под крышкой 10-15 мин.
Время приготовления – 40 минут.
Меняя количество
жидкости и крупы можно
менять вязкость каши.
Table of contents
Languages:
Other Oursson Kitchen Appliance manuals

Oursson
Oursson VS0434 User manual

Oursson
Oursson DH5000D User manual

Oursson
Oursson MG5000 User manual

Oursson
Oursson DH1300 User manual

Oursson
Oursson AG2603D User manual

Oursson
Oursson MS3031 User manual

Oursson
Oursson MP5010PSD User manual

Oursson
Oursson KM1010HSD User manual

Oursson
Oursson MO0703 User manual

Oursson
Oursson MF2005 User manual

Oursson
Oursson WM1203 User manual

Oursson
Oursson MF2005 User manual

Oursson
Oursson AG5002D User manual

Oursson
Oursson MF3500D User manual

Oursson
Oursson AG5001 User manual

Oursson
Oursson DM5210 User manual

Oursson
Oursson MF2005 User manual

Oursson
Oursson MD2041 User manual

Oursson
Oursson MP5015PSD Guide

Oursson
Oursson MP5021SD User manual