manuals.online logo
Brands
  1. Home
  2. •
  3. Brands
  4. •
  5. Overland Storage
  6. •
  7. Storage
  8. •
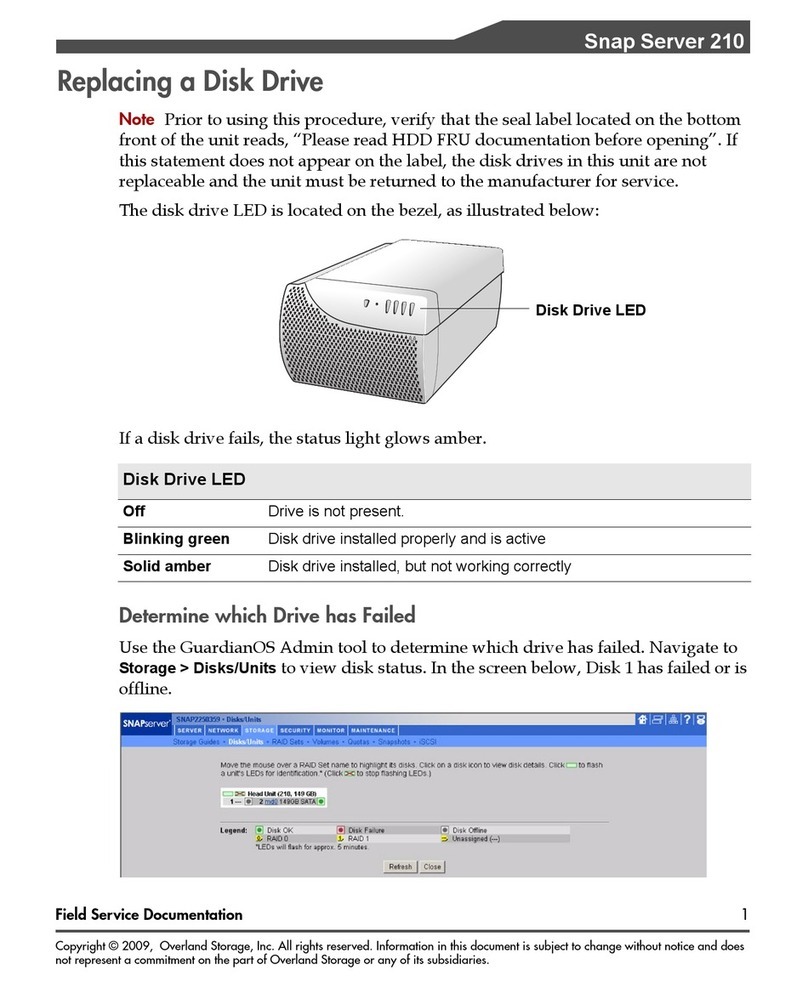
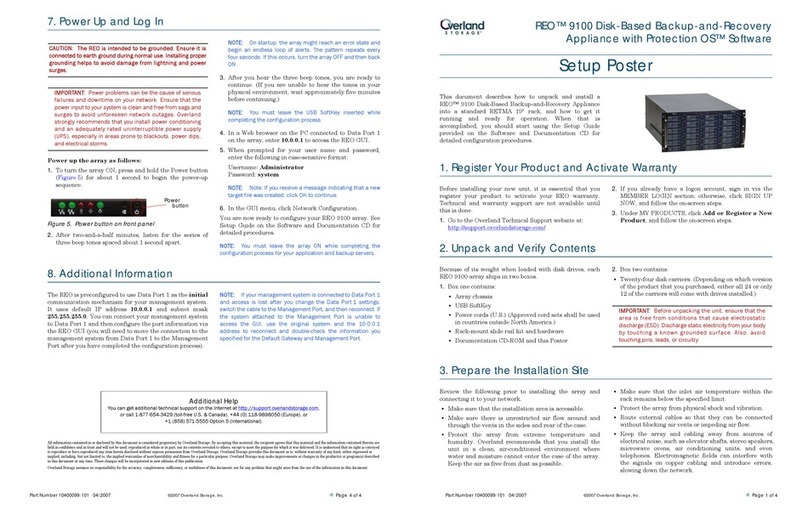
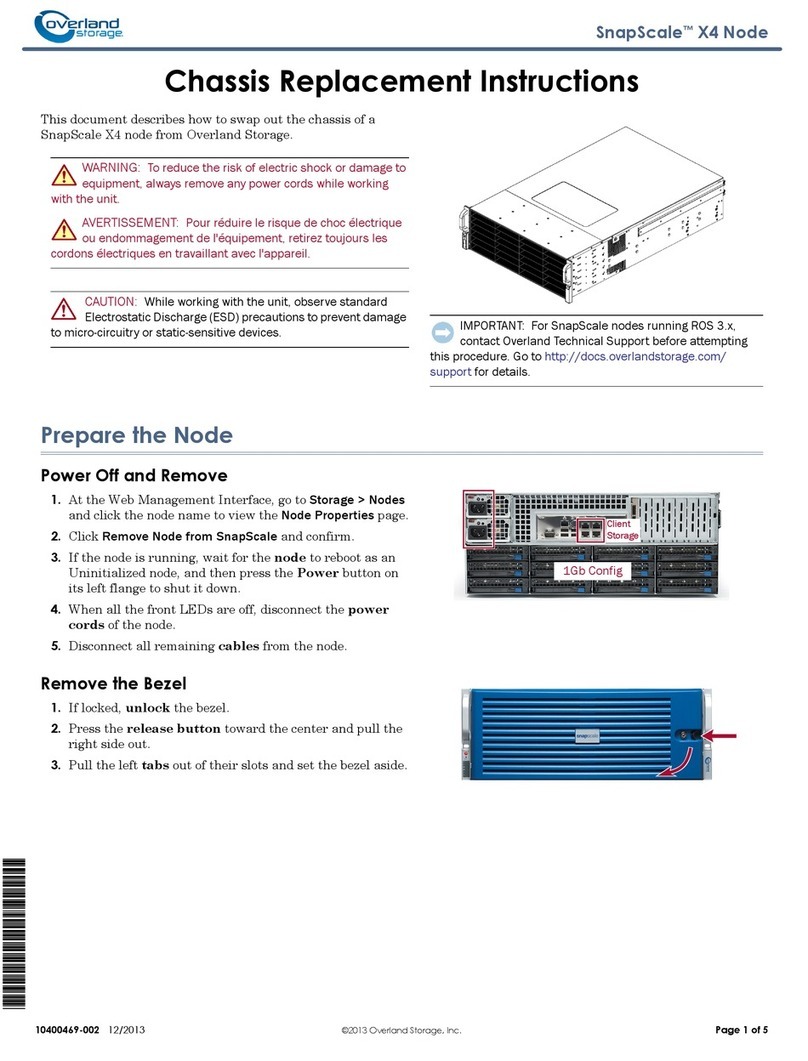
  9. Overland Storage NEO XL Series User manual

Overland Storage NEO XL Series User manual

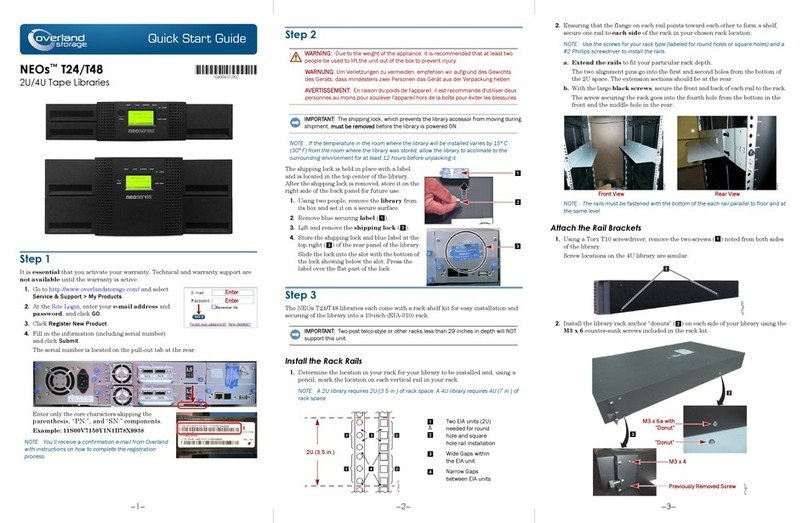
Quick Start Guide
–1– –2– –3–
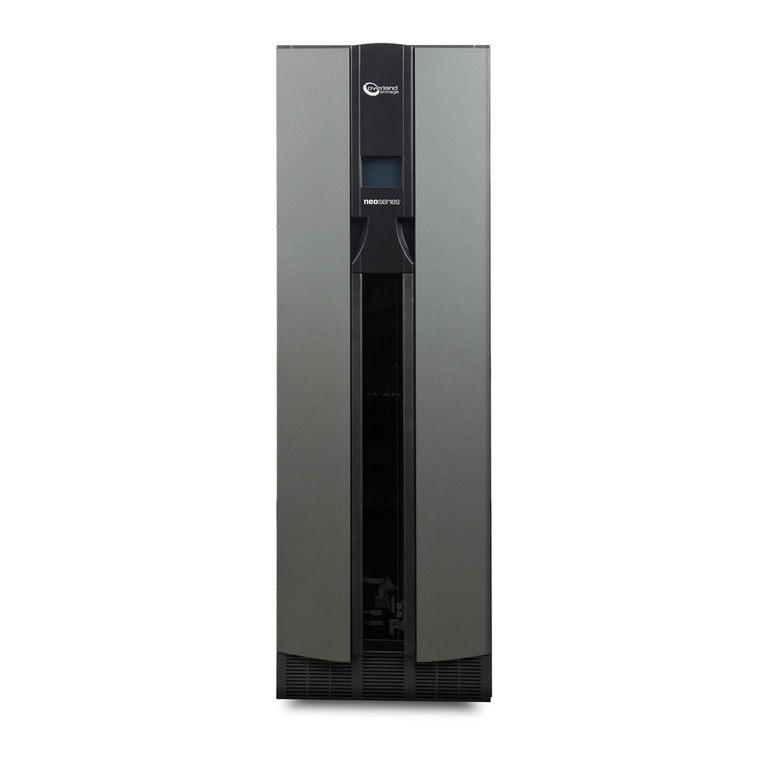
NEO®XL-Series
6U Tape Library Modules
Step 1
It is essential that you activate your warranty. Technical and warranty support are
not available until the warranty is active:
1. Go to http://www.overlandstorage.com/ and select
Service & Support > My Products
.
2. At the Site Login, enter your e-mail address and
password, and click
GO
.
3. Click
Register New Product
.
4. Fill in the information (including serial number)
and click
Submit
.
The serial number is located on the pull-out tab at the rear.
Enter only the core characters skipping the
parenthesis, “PN:”, and “SN:” components.
Example: 11S00V7150Y1N1B78X9938
NOTE: You’ll receive a confirmation e-mail from
Overland with instructions on how to complete the
registration process.
Enter
Enter
Step 2
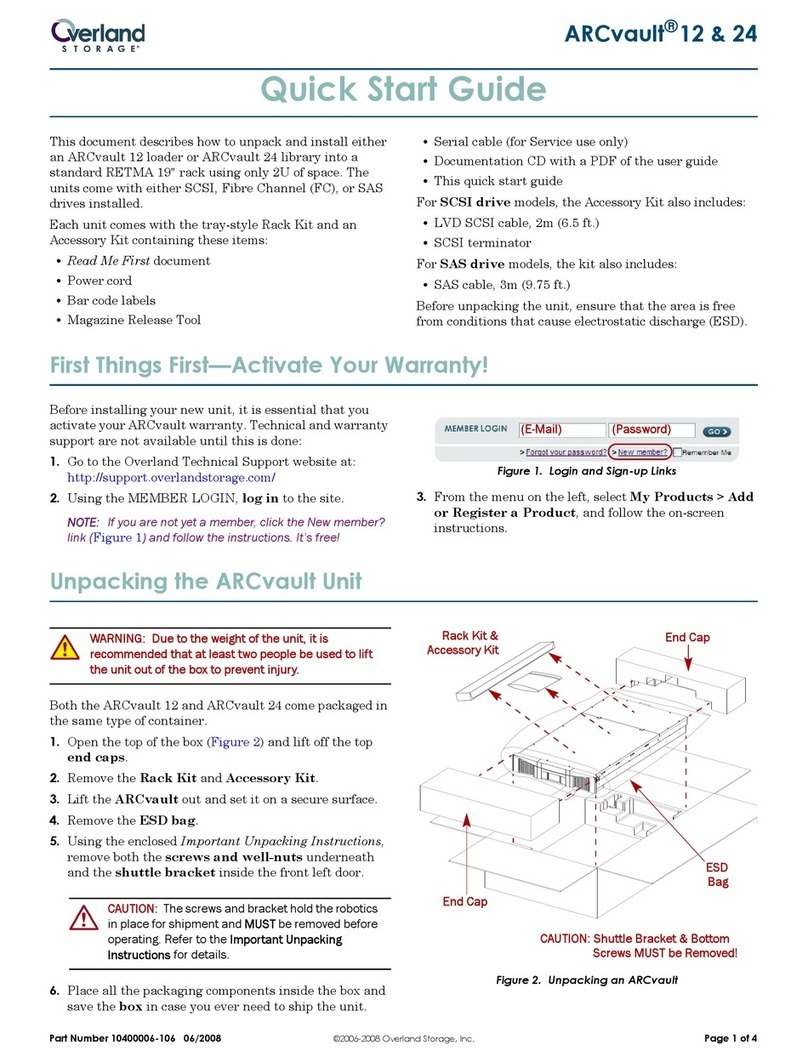
WARNING: Due to the weight of the appliance, it is recommended that at least two
people be used to lift the unit out of the box to prevent injury.
WARNUNG: Um Verletzungen zu vermeiden, empfehlen wir aufgrund des Gewichts
des Geräts, dass mindestens zwei Personen das Gerät aus der Verpackung heben.
AVERTISSEMENT: En raison du poids de l'appareil, il est recommande d'utiliser deux
personnes au moins pour soulever l'appareil hors de la boîte pour éviter les blessures.
NOTE: If the temperature in the room where the library will be installed varies by 15º C
(30º F) from the room where the library was stored, allow the library to acclimate to the
surrounding environment for at least 12 hours before unpacking it.
1. Using two people, remove the library from its box and set it on a secure surface.
2. Remove any packaging materials and tape.
Step 3
A NEOxl 80 tape library module comes with a rack kit for easy installation and
securing of the library into a 19-inch (EIA-310) rack.
IMPORTANT: Two-post telco-style or other racks less than 29 inches in depth will NOT
support this unit.
Install the Rack Rails
1. Determine the location in your rack for your library to be installed and, using a
pencil, mark the location on each vertical rail in your rack.
It is recommended to start at the lowest position of the rack for stability. The
bottom mark should be at the lowest narrow gap in that position.
NOTE: The library requires 6U (10.5 in.) of rack space.
2. From the front of the rack, insert the rack rails into the back and then front
vertical supports.
a. Position a rail according to the orientation information stamped on the rail.
6U (10.5 in.)
&
Each EIA unit (1U)
starts at a narrow
gap and has three
holes and two wide
gaps above it
Wide Gaps within
the EIA unit
Narrow Gaps
between EIA units
b. Rotate the front of the rail up while inserting the rear rail hanger into the
rear vertical support, and then lower the front of the rail until it is nearly level.
c. Extend the front of the rail until the hangers come through the holes in the
vertical support and the retention spring snaps into place.
d. Repeat Steps a–c the other rail.
NOTE: The rails must be fastened with the bottom of the each rail parallel to floor and at
the same level.
3. On the front of both rails in a square-hole lock, install a clip nut above the
mounting bracket as shown (1).
4. For increased stability, install the supplied retention inserts (3).
Insert the Library in Rack
WARNING: It is recommended that a mechanical lifter (or at least two people) be
used to raise and align the unit to prevent injury during installation. Use care when
inserting or removing a unit into or out of a rack to prevent the accidental tipping of
the rack, causing damage or personal injury.
WARNUNG: Um Verletzungen zu vermeiden, empfehlen wir zur Rack-Installation oder
-Deinstallation die Nutzung einer mechanischen Hebehilfe (oder mindestens zwei
Personen). Seien Sie vorsichtig bei der Rack-Installation oder -Entnahme, um ein
versehentliches Kippen des Racks zu vermeiden und das Rack nicht zu beschädigen
bzw. sich selbst zu verletzen.
AVERTISSEMENT: Afin d’éviter des blessures pendant l’installation, il est
recommande d’utiliser un monte-charge (ou au moins deux personnes) pour élever ou
aligner l’appareil. Faites attention lorsque vous insérez ou retirez l’appareil d’un
support, pour empêcher le déversement accidentel de la crémaillère causant des
dommages et des blessures.
1. Extend the middle rails until they lock into place.
2. Move the sliding assembly to the front of the middle rails.
3. Using the mechanical lifter, position the library in front of the rack, aligned with
the extended rails.
4. Slide the library onto the middle rails and into the rack until it stops.
5. Secure it to the rack with the captive screws on the front of the library.
*10400638-002*
10400638-002
–4– –5– –6–
http://support.overlandstorage.com
You can get additional technical support on the Internet at the Overland Storage Support web page, or
by contacting Overland Storage using the information found on the Contact Us page on our web site.
©2014-16 Overland Storage, Inc.
Step 4
WARNING: To reduce the risk of electric shock or damage to equipment, always
remove any power cords while working with the unit.
WARNUNG: Um das Risiko eines elektrischen Schlags oder Schäden am Gerät zu
vermeiden, ziehen Sie stets den Netzstecker, bevor Sie an der Einheit arbeiten.
AVERTISSEMENT: Pour réduire le risque de choc électrique ou endommagement de
l'équipement, retirez toujours les cordons électriques en travaillant avec l'appareil.
The NEO XL-Series libraries are expandable and accept add-on components to
enhance performance:
•The library modules come with one uninstalled tape drive. Additional tape drives
can also be installed. Always install the drives from the bottom up.
•Expansion library units can be added to the stack.
Once the library is secure in the rack, the additional items should then be installed
before hooking up the system. Follow the instructions enclosed with the add-on.
Step 5
Cable Attachment
CAUTION: It is recommended that you shut down and turn OFF the associated server.
Turn OFF all attached devices. Remove the power cables from the server and all
attached accessories. Failure to remove the power cords from these devices before
connecting the host interface cable could result in damage to the library.
All cabling, power connections, and cooling are located on the NEOxl rear panel.
1. Attach one end of the host interface cable to the library:
•For a Serial Attached SCSI (SAS) connected library, attach one end of the SAS
cable to Port A (top) SAS HBA on the SAS drive.
If you are using a SAS fanout/hydra cable, attach one mini-SAS connector into
the connector on each tape drive. The unused ends of the SAS fanout cable are
single channel and not suitable for use with disk arrays. Use the other ends to
connect tape drives, or coil and secure them to the rack to minimize stress on
the connectors.
•For a Fibre Channel (FC) library, attach one end of the fibre cable to Port A
(top) connector on the FC drive, removing the cap if necessary.
2. Attach the other end of the host interface cable as follows:
•For a SAS library, connect the host interface cable to the host HBA, using a
direct SFF-8088 connection. Unused SAS connectors do not need termination.
If you are using a SAS fanout/hydra cable, the end of the cable with only one
connector should be plugged into the HBA
•For a Fibre Channel library, connect the fibre cable to the host or to a switch.
SAS Tape Drive
FC Tape Drive
3. Plug the network Ethernet (management) cable into an Ethernet port (2) on
the rear panel of the library.
If the Ethernet connection is directly attached to a server or laptop, a crossover
Ethernet cable may be required.
NOTE: It is the customer's responsibility to supply the crossover cable if one is required.
4. For remote access, connect an Ethernet cable from the bottom Ethernet ports on
the library module controller to your network.
5. Plug the power cables into the power connectors on each module and into power
outlets.
NOTE: The library has dual redundant power supplies. To increase redundancy, plug each
power cord into a different AC power circuit.
Step 6
The library can be operated using either the Operator Control Panel (OCP) on the front
of the device or remotely using the Remote Management Unit (RMU) web interface.
Power On the Library for the First Time
1. Power ON the library by pressing the power button on the base module just
below the OCP; the green light illuminates.
When first powered ON, the library inventories the tape cartridges, checks the
firmware version on all modules, configures the tape drives, confirms the presence
of the existing modules, and searches for any new modules.
2. At the IP address warning that appears in the OCP, select a IP range from the
drop-down list that is not used by your network, and then press
Set and Proceed
.
Library will then reboot. After rebooting, the login screen appears in the OCP.
3. At the login prompt, choose
Administrator
(no password) and press
Login
.
The library displays a message indicating that the library has no default
partition.
4. Press
OK
and the library displays
Initial Configuration
default screen.
5. Press Next to start the Initial Configuration Wizard.
The wizard will guide you through configuring the time zone, date and time, and
network settings, setting the administrator password, and then start an initial
system test. You can skip items and stop the wizard at any time.
6. Once you have configured the network settings and set the administrator
password, run the wizard in the RMU to complete the remaining configurations.
7. Verify the host connection.
Label and Load Tape Cartridges
While the library will power on without cartridges, cartridges are needed before
performing data read and write operations, or any tests or operations that transfer
cartridges. Bar code labels are recommended in production environments to improve
inventory time in the library and ease cartridge handling processes outside the library.
• Using Mailslot Magazine for Loading – If the mail slot is enabled, you can use
it to load cartridges into the library. On the
Home
screen, tap
Open Mailslot
, open
the magazine access door, and then pull the mailslot out for loading.
• Using Bulk Loading Magazines for Loading – Extend one or more of the tape
magazines from the library for loading.
1. Load cartridges into the library by bulk using the magazines.
a. From the OCP or RMU, select the module and then select
Open Magazine
.
b. Open the magazine access door and pull out the magazine.
c. Load the tape cartridges into the magazine starting with the back of the
magazine, pushing the magazine in the library slightly as each bin is filled.
d. Push the magazine handle in slowly until the magazine release latch snaps
into place, locking it.
e. Repeat Steps a–d for each of the other magazines.
2. Verify that the library has the current firmware revision.
The library firmware revision is displayed in the top left corner of the OCP and
RMU screen. If necessary, update the library firmware from the OCP or RMU
using the
Maintenance > Software Upgrades > System Firmware
screen.
Step 7
User Guides
For detailed information on configuring your NEO XL-Series,
refer to the NEO XL-Series User Guide available online at:
http://docs.overlandstorage.com/neo
For additional information, visit the NEO Knowledge Base at:
https://community.sphere3d.com/community/
documentation/libraries
Warranty and Technical Support
For warranty and general technical support information, see
our Contact Us web page:
http://www.overlandstorage.com/company/contact-us/
index.aspx
For information on contacting Overland Technical Support, see
our Contact Support web page:
http://docs.overlandstorage.com/support

Other Overland Storage Storage manuals

Overland Storage LTO-5 User manual

Overland Storage

Overland Storage LTO-5 User manual

Overland Storage NEO 200S User manual

Overland Storage

Overland Storage NEO 200S User manual

Overland Storage SnapSAN S2000 User manual

Overland Storage

Overland Storage SnapSAN S2000 User manual

Overland Storage REO 4600 User manual

Overland Storage

Overland Storage REO 4600 User manual

Overland Storage NEO XL Series Manual

Overland Storage

Overland Storage NEO XL Series Manual

Overland Storage NEOxl 40 User manual

Overland Storage

Overland Storage NEOxl 40 User manual

Overland Storage LoaderXpress Guide

Overland Storage

Overland Storage LoaderXpress Guide

Overland Storage NEO 200S User manual

Overland Storage

Overland Storage NEO 200S User manual

Overland Storage NEOxl 40 User manual

Overland Storage

Overland Storage NEOxl 40 User manual

Overland Storage SnapScale X4 Node Guide

Overland Storage

Overland Storage SnapScale X4 Node Guide

Overland Storage SnapServer XSD 40 User manual

Overland Storage

Overland Storage SnapServer XSD 40 User manual

Overland Storage NEO Series User manual

Overland Storage

Overland Storage NEO Series User manual

Overland Storage SnapServer DX2 User manual

Overland Storage

Overland Storage SnapServer DX2 User manual

Overland Storage REO 9000 User manual

Overland Storage

Overland Storage REO 9000 User manual

Overland Storage NEO 8000 User manual

Overland Storage

Overland Storage NEO 8000 User manual

Overland Storage NEO 2000e User manual

Overland Storage

Overland Storage NEO 2000e User manual

Overland Storage NEOs StorageLoader User manual

Overland Storage

Overland Storage NEOs StorageLoader User manual

Overland Storage SnapServer XSR 120 User manual

Overland Storage

Overland Storage SnapServer XSR 120 User manual

Overland Storage SnapServer XSD 40 User manual

Overland Storage

Overland Storage SnapServer XSD 40 User manual

Overland Storage REO 4600 User manual

Overland Storage

Overland Storage REO 4600 User manual

Overland Storage NEO 8000E User manual

Overland Storage

Overland Storage NEO 8000E User manual

Overland Storage REO 9000 User manual

Overland Storage

Overland Storage REO 9000 User manual

Overland Storage NEO 4000e User manual

Overland Storage

Overland Storage NEO 4000e User manual

Overland Storage NEO 2000e User manual

Overland Storage

Overland Storage NEO 2000e User manual

Popular Storage manuals by other brands

Teac CD-W552PUK Quick installation guide

Teac

Teac CD-W552PUK Quick installation guide

IBM Travelstar 3LP Quick installation guide

IBM

IBM Travelstar 3LP Quick installation guide

Media Lan ME747AK-SI user manual

Media Lan

Media Lan ME747AK-SI user manual

HP XP7 user guide

HP

HP XP7 user guide

Western Digital My Book WDG1C7500 Specifications

Western Digital

Western Digital My Book WDG1C7500 Specifications

National Semiconductor LSE039R2 user manual

National Semiconductor

National Semiconductor LSE039R2 user manual

Fujitsu ETERNUS2000 100 Guide

Fujitsu

Fujitsu ETERNUS2000 100 Guide

Songmics OMC06 manual

Songmics

Songmics OMC06 manual

Freecom MOBILE DRIVE CLS datasheet

Freecom

Freecom MOBILE DRIVE CLS datasheet

Synology DiskStation DS419slim Hardware installation guide

Synology

Synology DiskStation DS419slim Hardware installation guide

ABSCO SHEDS 3030RS-PTX instruction manual

ABSCO SHEDS

ABSCO SHEDS 3030RS-PTX instruction manual

Dell PowerVault 750N Getting started

Dell

Dell PowerVault 750N Getting started

Toshiba FlashAir W-03 Series manual

Toshiba

Toshiba FlashAir W-03 Series manual

IBM EXP400 Type 1733 Hardware Maintenance Manual and Troubleshooting Guide

IBM

IBM EXP400 Type 1733 Hardware Maintenance Manual and Troubleshooting Guide

Micron Technology MT29F1G08ABB Technical note

Micron Technology

Micron Technology MT29F1G08ABB Technical note

Addonics Technologies External CipherChain manual

Addonics Technologies

Addonics Technologies External CipherChain manual

Western Digital SiliconEdge Blue Series Brochure & specs

Western Digital

Western Digital SiliconEdge Blue Series Brochure & specs

Vector Graphic 48K Dynamic Memory Board manual

Vector Graphic

Vector Graphic 48K Dynamic Memory Board manual

manuals.online logo
manuals.online logoBrands
  • About & Mission
  • Contact us
  • Privacy Policy
  • Terms and Conditions

Copyright 2025 Manuals.Online. All Rights Reserved.