PowerTraveller MINI-G User manual

MINI-G
RUGGED
HIGH TECH
5V TO 19V
CHARGER
USER GUIDE
YOU CAN: CHARGE NETBOOKS
SLR CAMERAS TABLETS GOPROS
SMARTPHONES GPS GAMES CONSOLE
SMARTWATCHES AND MORE

2
What’s in the box
Technical specications
Dimensions, capacity and output currents
mini-g diagram
LCD screen
Diagram descriptions
Using the mini-g
1. Turning on the mini-g
2. Recharging the mini-g
3. Charging devices via DC
4. Charging devices via USB
5. Permanent USB on mode
6. Permanent DC on mode
7. UPS feature
8. Daisy chain feature
9. Safety lock on feature
Frequently asked questions
Product disposal instructions
Safety features
3
4
5
6
7
8
10
10
10
11
11
11
12
12
12
13
14
14
INDEX

3
• mini-g portable charger
• 19V universal AC mains charger
• DC out cable
• Micro USB cable
• Connector tip pack
• Female 12V socket
IN THE BOX
ADDITIONAL EXTRAS AVAILABLE
• Gorilla-pad (converts the DC out port to USB 3A)
• solargorilla 10 Watt solar powered charger
• Y cable
• in-car charger
* If you require a tip that is not included, please
email support@powertraveller.com for help.

4
TECHNICAL SPECIFICATIONS
Parameters Description
Weight
Capacity
Cells
Dimensions
Battery type
Input
Output
Dual USB sockets
Working temperature
Storage temperature
323g
12,000mAh (44Wh)
2 x 6,000mAh
(L*W*H*) 190 x 110 x 18mm
Lithium Polymer rechargeable
DC 19V
2 x 5V USB, DC: 12V, 16V, 19V
Combined 3A
-20° to 40°C
-40 - 60°C

5
DIMENSIONS
CAPACITY & DC OUTPUT CURRENTS
Voltage mAh
5V USB
12V
16V
19V
8,800
3,600
Amp
2,750
2,300
3A*
3A
2.25A
1.9A
190mm
110mm
110mm
18mm
190mm
18mm
*split via 2 USB ports

6
MINI-G DIAGRAM
6
7
8
9
10
4
1
2 3
3
5

7
LCD SCREEN DIAGRAM
*
v
12
13
11
14

8
DIAGRAM DESCRIPTIONS
1. DC IN
Input from: 12-19V Max (1.5 - 4A)
DC 5.5 x 2.1mm
2. USB SOCKETS 1&2
Combined 3A
3. DC OUT
DC 4.7 x 1.7mm
12V, 16V, 19V
4. ON/OFF BUTTON
To turn the unit on or o, hold down the button for 3 seconds. The on/o button also enables the user to
select the correct output voltage to charge their device.
5. LCD SCREEN
The LCD screen shows the status of USB and DC output voltage settings and the battery level.
6. AC MAINS CHARGER
19V mains charger with 4 interchangeable heads for UK, Europe, US/China and Australia.
7. DC CABLE
4.7 x 1.75 to female 4.7 x 1.75mm

9
8. MICRO USB CABLE
USB to micro USB cable
9. LAPTOP TIP PACK
Selection of laptop tips.
10. FEMALE 12V SOCKET
In-car charger socket for SLR cameras or any other 12V electronic device.
11. USB SYMBOL
The USB symbol is permanently shown allowing simultaneous charging of USB and DC devices.
12. BATTERY ICON
When the battery icon ashes, this indicates that there is less than 10% power left in the mini-g. The
battery icon does not represent the amount of power left.
13. VOLTAGE SETTING
The dierent settings can be seen from this section of the screen. By tapping the on/o button (4), you
can scroll through the voltage settings.
14. LEVEL OF CHARGE
The level of charge remaining in your mini-g is shown by the vertical bars. A fully charged mini-g will be
denoted by six solid vertical bars. As the six bars decrease, available power decreases.

10
USING THE MINI-G
1. Turning on the mini-g
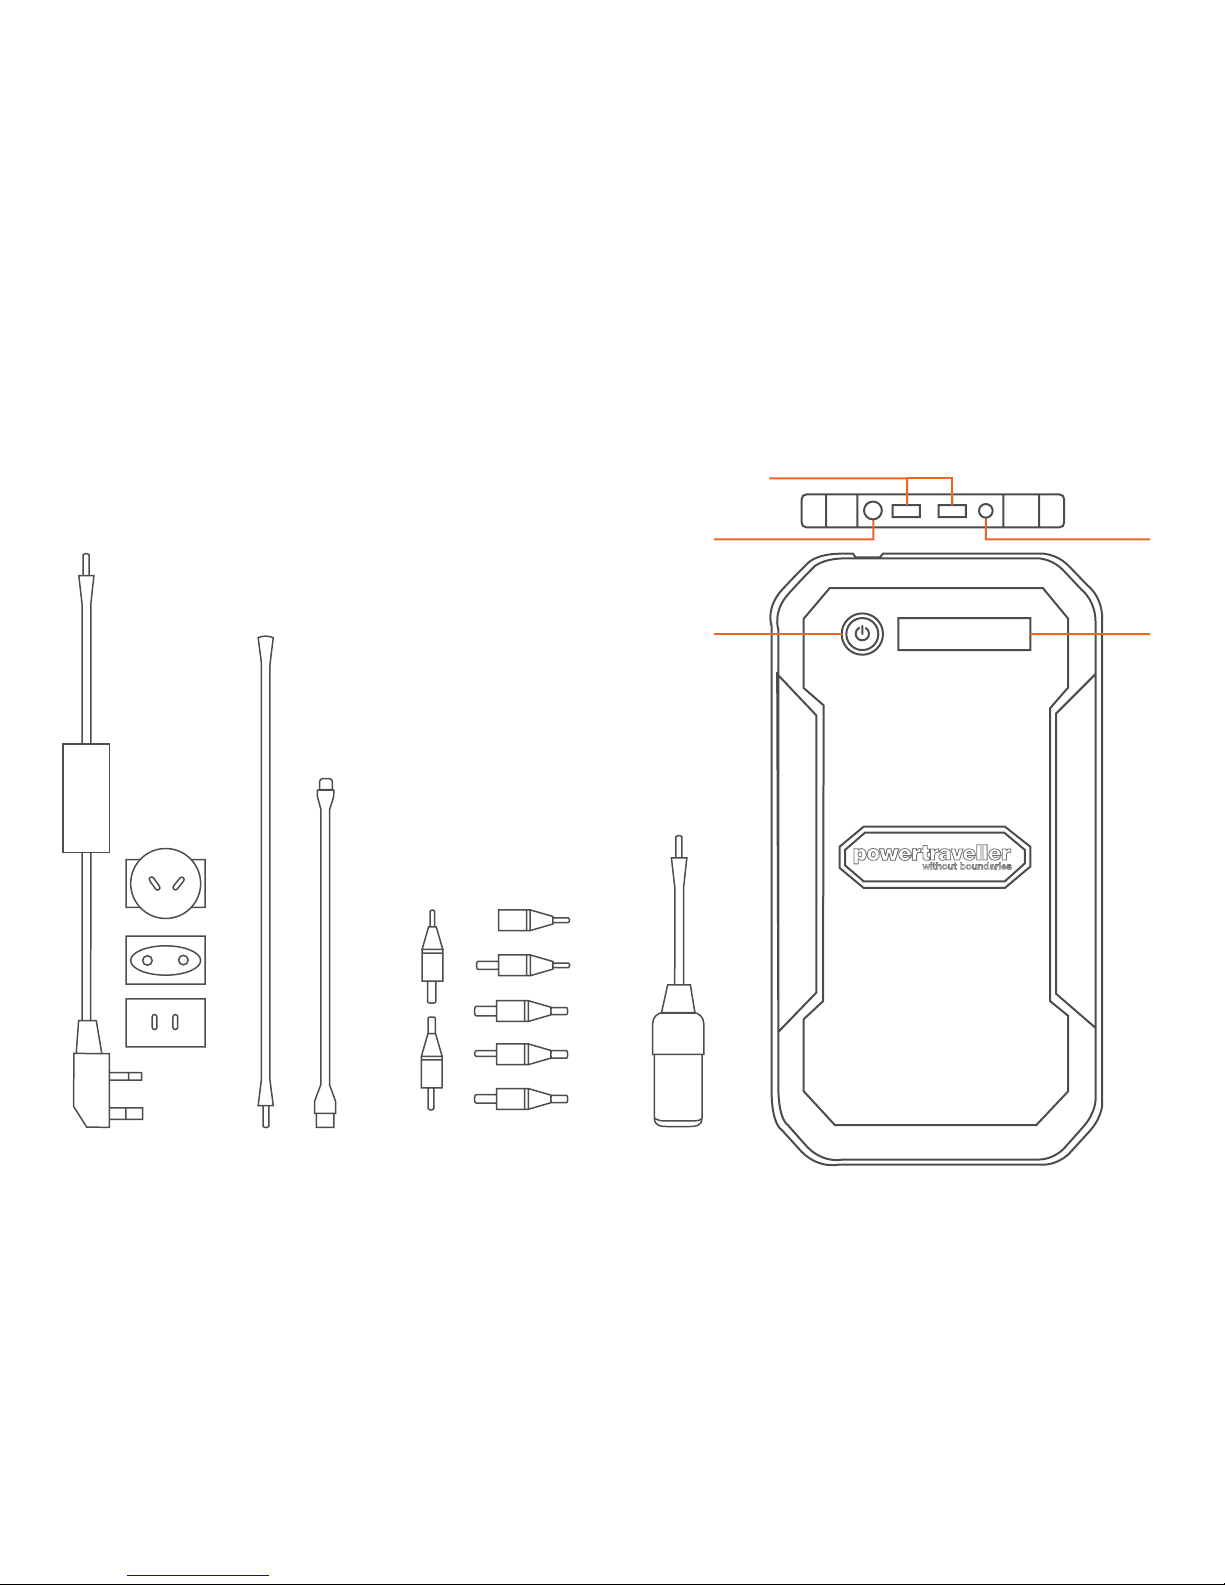
• To turn on the mini-g, hold down the on/o button (4) for 3 seconds. Repeat this to turn the unit o.
2. Recharging the mini-g
• You can recharge the mini-g via the universal AC mains charger supplied (6) with the appropriate plug
head into an electrical wall socket. Connect the DC end of the cable into the DC in port (1) on the
mini-g.
• The LCD screen (5) will illuminate and the vertical bars will increase as it is being charged.
• When the sixth vertical bar is no longer ashing, this means the mini-g is fully charged.
• Always disconnect the AC mains charger (6) when the mini-g is fully charged or not in use.
NOTE: Please only use the AC mains charger provided to charge the mini-g or ocial Powertraveller in-car charger
(available separately) Using a 3rd party AC mains charger may invalidate your warranty.
3. Charging devices via DC out port
• When connecting a device to the mini-g, for example a netbook, please check the netbook’s input
voltage. This can be found on the netbook’s AC/mains adaptor or the user guide supplied with your
netbook.
• Connect the DC cable (7) to the DC out port (3). Select the correct tip required from the tip pack (9).
• Select the required output voltage on the LCD screen (5). This is done by tapping the on/o button (4)
until the desired voltage is displayed on the LCD screen (5).
• When you nish charging/powering, turn o the mini-g by holding down the on/o button (4) for 3
seconds and disconnect the cable. The mini-g will turn itself o when the device connected is fully
charged.

11
4. Charging devices from mini-g via USB out port 2A
• Turn the mini-g on by holding down the on/o button (4) for 3 seconds.
• Select the micro USB to USB cable (8) or your devices’ own USB sync/charging cable.
• The mini-g will stop charging once the device is fully charged.
5. Permanent USB on mode (‘88’ setting)
• This feature is used if the USB device draws only a small amount of power.
• Disconnect all cables from the USB and DC out sockets.
• Turn the mini-g on by holding down the on/o button (4) for 3 seconds.
• Tap on/o button (4) until the ‘88’ function is shown on the LCD screen (5).
• The backlight will remain on while this feature is enabled.
• You may now connect your device to either of the USB ports (2).
• While this feature is in use, the DC out will output at 12V.
• You can simply press the on/o button (4) again to disable this feature.
6. Permanent DC on mode
• This feature is used if the DC device draws only a small amount of power.
• Turn the mini-g on by holding down the on/o button (4) for 3 seconds.
• Select the correct DC voltage for your device by tapping the on/o button (4) until desired voltage is
shown.
• Press the on/o button (4) twice in quick succession.
• The LCD screen will illuminate and on until the mini-g is manually turned o.

12
7. UPS feature
• Turn on the mini-g by holding down the on/o button (4) for 3 seconds.
• Tap the on/o button (4) until the 19V setting is show on the LCD screen (5).
• Connect the universal AC mains charger (6) to the mini-g and connect it to the electrical socket.
• If the power supply is interrupted, the mini-g will stay permanently on when on the 19V setting.
8. Daisy chain feature
• When using the 19V AC mains charger (6) to charge the mini-g, the DC out port (3) will be set at 19V.
This will enable you to charge your netbook for example and mini-g at the same time.
• While charging with the 19V AC mains charger (6), you are also able to charge USB devices
simultaneously.
9. Safety lock on feature
• When a device is connected and drawing enough power to be detected by the mini-g, the LCD screen
(5) will ash 3 times. The voltage setting will be locked on to avoid accidental voltage change when
charging a device. To change the voltage when the safety lock on feature is enabled, hold down the
on/o button (4) for 3 seconds and scroll through.

13
• Can I use the mini-g straight away without charging?
• What are connector tips?
Connector tips are attachments to make the mini-g compatible
with various devices.
• What if I can’t nd the right tip?
Please refer to www.powertraveller.com - tips/adaptors. These are
updated on a regular basis.
• Why does the mini-g auto shut down?
This can be for various reasons:
1. Device is fully charged.
2. The mini-g has run out of power and needs recharging.
3. A safety feature has been activated.
4. Your device is not drawing enough power from the mini-g.
• My mini-g shuts down when charging my USB device.
This may happen when your device is only drawing a very small
amount of power and is not being detected by the mini-g. Select
the ‘88’ setting on the LCD screen to lock the USB on. Refer to
page 12.
• Can I charge the mini-g via solar?
Yes, it is compatible with the 20V solargorilla (available separately).
FREQUENTLY ASKED QUESTIONS
• If I accidentally left my mini-g turned on with no device
attached, how long would it stay on for?
It will automatically turn o after 1 minute.
• My mini-g will not turn on. It shuts down when it still has
power left in it.
A safety feature may have been triggered. Connect the mini-g to
the AC electrical wall socket with the included AC mains charger
(6) for at least 10 seconds. This will reset the mini-g.
• I’ve attached a device and the LCD screen is ashing and the
mini-g shuts down.
This happens when the device attached is drawing too much
power from the mini-g. Try using a lower power consumption
setting on your device or charging with the device turned o.
• Can I use 2 or more mini-g’s to speed up the powering time of
my device?
Yes, from DC out (3) you can power from multiple mini-g chargers
with our Y or 4 way cable (available separately).
• The DC out port turns o when my device is not fully charged.
This may happen when your device is only drawing a very small
amount of power and is not being seen by mini-g. Select the
correct DC voltage for your device. Press the on/o button (4)
twice in quick succession. The LCD screen will illuminate and stay
on until the mini-g is manually turned o. Refer to Permanent DC
on mode on page 12.
Yes, the mini-g comes 30% pre-charged and is ready to use
straight out the box. However, we do recommend full charging
the mini-g within 7 days of receiving it, and at least once every 4
months thereafter.

14
• There’s a strange symbol on my screen.
When connected to solar, you will see this symbol on
the LCD screen (5). While in this mode the DC out will
not function. This is so the mini-g collects as much power as
possible from the solar panel.
• Can I simultanously charge from the DC out?
Yes, you can simultaneously charge and use a device at the same
time as long as the charging voltage in is the same as the charging
voltage out. The AC mains charger is 19V therefore the DC out will
be at 19V.
• Can I charge my 5V device and DC device at the same time?
Yes, you can simultaneously charge 5V devices when charging DC
devices as well.
• How long does it take to charge the mini-g?
Approximately 3-5 hours
• Can I charge the the mini-g from a USB port?
No, the mini-g cannot be charged via USB.
• Does the mini-g automatically recognise the voltage my device
requires?
No, you have to select the correct voltage before connecting and
turning your device on.
• Which voltage should I use to charge my smartphone?
Either USB port can charge your smartphone.
v
PRODUCT DISPOSAL CERTIFICATIONS
The symbol shown here and on the product means that the product is
classed as Electrical or Electronic Equipment and should not be disposed
with other household or commercial waste at the end of its working life.
The Waste of Electrical and Electronic Equipment (WEEE) Directive
(2002/96/EC) has been put in place to recycle products using best available
recovery and recycling techniques to minimise the impact on the
environment, treat any hazardous substances and avoid the increasing
landll.
Product disposal instructions for residential users
When you have no further use for it, please remove any batteries and
dispose of them and the product as per your local authority’s recycling
processes. For more information, please contact your local authority or the
retailer where the product was purchased.
Product disposal instructions for business users
Business users should contact their suppliers and check the terms and
conditions of the purchase contract and ensure that this product is not
mixed with other commercial waste for disposal.
• Voltage limitation protection
• Current limitation protection
• Short circuit limitation protection
• Anti-discharge limitation protection
• Over-charging limitation protection
• Overheating protection
• Power surge protection
• Drop tested: UN 38.3
SAFETY FEATURES
MINI-G AC TRANSFORMER

15
• Over-charging limitation protection
• Overheating protection
• Power surge protection
• Drop tested: UN 38.3
POWERTRAVELLER INTERNATIONAL LIMITED
4 Delta Park, Wilsom Road,
Alton, Hampshire
GU34 2QE, UK
t: +44 (0) 1420 542980
info@powertraveller.com
www.powertraveller.com
MINI-G
Table of contents
Other PowerTraveller Batteries Charger manuals

PowerTraveller
PowerTraveller SOLAR ADVENTURER II User manual

PowerTraveller
PowerTraveller Powergorilla User manual

PowerTraveller
PowerTraveller POWERMONKEY EXPLORER 2 User manual

PowerTraveller
PowerTraveller Powergorilla User manual

PowerTraveller
PowerTraveller POWERMONKEY EXPEDITION Operating and maintenance instructions

PowerTraveller
PowerTraveller SOLAR ADVENTURER User manual

PowerTraveller
PowerTraveller POWERCHIMP 4A User manual

PowerTraveller
PowerTraveller Powermonkey Extreme User manual

PowerTraveller
PowerTraveller EXTREME User manual

PowerTraveller
PowerTraveller Powergorilla User manual