PROTEOR DynaCity 1A510 User manual

1A51099-0818- Page 1/20
3- Montage (sans le patient):
Positionner, sous le pied, une cale correspondant à la hauteur du talon de la chaus-
sure. Fixer le connecteur pyramidal femelle sur le pied en positionnant son axe perpen-
diculairement au sol (fig. 1).
1A510
Notice d’utilisation
4- Alignement (avec le patient):
Positionner le pied de manière à faire passer la
ligne de charge au 1/3 postérieur du pied (fig. 2).
2
0
1
7
H Talon
Fig. 1
Axe du connecteur
1/3 2/3
Fig. 2
Genou en
extension
totale
Ligne de charge :
≈ 12mm en avant de
l’axe de la pyramide
à ±5mm
Centre de l’articulation
coxo-fémorale
Centre de l’articulation
du genou
Vue de face :
l’axe passe
entre le 1er et
le 2ème orteil
Axe vertical passant
par le centre de l’em-
boîture au niveau du
genou et de la pyra-
1- Description et fonctionnalité :
Le pied DynaCity est constitué des éléments principaux suivants :
Une lame carbone supérieure donnant au pied sa capacité à restituer l’énergie
Une lame carbone inférieure assurant un déroulé du pas continu et sans à-coup.
Une lame carbone intermédiaire permettant une bonne mise à plat
Les 3 lames sont fendues, permettant ainsi une bonne inversion - éversion à l’avant-pied.
Une enveloppe esthétique en polyuréthane (1A60020) transmettant les efforts mécaniques entre la chaussure
et la structure composite.
Une chaussette en fibres techniques limitant les bruits et usures de contact entre l’enveloppe esthétique et la
structure.
Un clip malléolaire assurant un bon assemblage avec la mousse esthétique.
L’ensemble de ces composants donne au pied un comportement très souple et dynamique.
2- Indications, poids maximum d’utilisation, éléments de
connexion :
Le pied DynaCity est destiné uniquement à l’appareillage
orthopédique du membre inférieur.
Il convient aux patients d’activité faible à modérée d’un poids
«total en charge » défini par le tableau ci-contre. La charge
maximale a été testée selon la norme ISO-22675.
Le pied DynaCity est prévu pour une hauteur de talon de
10mm.
Le pied est résistant à l’eau douce uniquement, moyennant
les préconisations du §8.
Il intègre une pyramide mâle permettant l’utilisation des connecteurs standards du marché, grâce auxquels il est pos-
sible de modifier la hauteur de talon de 0 à 20mm.
Guide de sélection de la catégorie *
Poids du patient (Kg)
Taille 45 à 59 60 à 74 75 à 90 91 à 107 108 à 125
22 1122NA
23 1122NA
24 1122NA
25 22334
26 22334
27 23344
28 23344
29 44455
30 44455
Hauteur de
Construction
Max : 130mm
Axe de la pyramide
* Les catégories ne sont pas des modules : le poids
seul ne sut pas à déterminer la catégorie, la taille de
pied intervient également.

1A51099-0818- Page 2/20
5- Finition: Pour éviter les bruits de frottement, remonter la chaussette jusqu’à l’embase de pyramide et l’immobiliser à
l’aide d’une ficelle fine par exemple.
Les clips malléolaires pour mousse esthétique présentés ci-dessous permettent un démontage simple et rapide du
pied par rapport à l’esthétique du mollet.
Mise en œuvre: Découper la mousse esthétique à la longueur souhaitée, positionner la mousse sur le pied et tracer le
contour de la malléole. A l’intérieur de la mousse, fraiser un espace adapté pour recevoir la pièce de connexion choisie
et la partie du pied dépassant de l’enveloppe, tout en conservant une épaisseur suffisante pour le collage. Clipper le
raccord dans l’esthétique en prenant soin de bien le positionner. Nettoyer les surfaces de contact avec de l’alcool iso-
propylique et coller le clip sur la mousse avec de la colle néoprène réf. XC090. Après séchage, finir la forme extérieure
selon la méthode habituelle.
Taille pied (cm) 22 à 25 26 à 27 28 à 30
Référence 1A40013 1A40014 1A40015
7- Maintenance :
L’enveloppe esthétique, la chaussette et le clip malléolaire sont les seuls éléments du pied pouvant nécessiter un rem-
placement (en cas d’usure par exemple).
Enveloppe esthétique :
Oter et remettre l’esthétique à l’aide du chausse-insert 1A40019.
Utiliser exclusivement le kit de rechange 1A60020-D22 incluant esthétique, chaussette et clip malléo-
laire.
Coté Taille en cm
1A40019
Remarques:
- Pour un alignement plus dynamique, on peut augmenter l’équin. Cela accroît la restitution d’énergie lors du
passage du pas.
- Si le passage sur l’avant-pied donne la sensation d’avoir un pied trop long, ou si l’appui du talon est trop souple, alors
il faut postérioriser le pied par rapport à l’emboîture.
- Si l’appui du talon paraît trop rigide, ou si au passage sur l’avant-pied le pied paraît trop court, il faut antérioriser le
pied par rapport à l’emboîture.
6- Durée de vie :
Ce composant a été testé conformément à la norme ISO22675, le test cyclique de 2 millions de cycles correspond à
une utilisation de 2 à 3 ans suivant l’activité du patient.
Il est conseillé de faire effectuer un contrôle annuel par un orthoprothésiste.
8- Conseils d’utilisation, d’entretien et de sécurité
Nettoyer l’enveloppe avec un chiffon ou une éponge légèrement humide.
Température d’utilisation : - 20°C / + 60°C.
Aucune opération d’entretien de type graissage, intervention sur la visserie ou autre n’est requise pour ce pied
hormis ce qui est indiqué au §7 et qui doit être effectué par l’orthoprothésiste
Une utilisation non adaptée du pied, par rapport aux préconisations de votre orthoprothésiste, peut provoquer
la dégradation d’éléments du pied (port de charges lourdes par exemple).
Si vous constatez un comportement anormal ou que vous sentez des modifications des caractéristiques de
votre pied, ou si le pied a reçu un choc important, consultez votre orthoprothésiste.
La présence de sable, de particules ou de corps étranger à l’intérieur du pied pourrait en modifier le comporte-
ment et l’endommager.
Après utilisation dans de l’eau ou dans un environnement très salissant :
Retirer l’enveloppe du pied et enlever la chaussette
Rincer abondamment le pied et les autres pièces à l’eau claire afin d’éliminer les particules (boue, sable…)
Sécher les différents éléments avant la remise en place de la chaussette et de l’enveloppe.

1A51099-0818- Page 3/20
9- Recyclage - Fin de vie
Les différents éléments du pied sont des déchets spéciaux, ils doivent donc être traités selon la législation en vigueur.
10- Information réglementaire pour la France.
Laboratoire d’essai
Rapport - Date Nbr points Déformaon Permanente (mm) Angle
Inversion / éversion Amplitude de exion sagiale
C.E.R.A.H
Rapport d’essai :
N° 16-162-B du 14 mars 2017
117,89 Talon : 1,36mm
Avant-pied : 0,81mm
Inversion : 6,39°
Eversion : 5,92°
Flexion plantaire : 8,11°
Flexion dorsale : 10,26°
PROTEOR
6 rue de la Redoute - 21850 Saint-Apollinaire - France
Tél. 33 (0) 3 80 78 42 10 - Fax 33 (0) 3 80 78 42 15
ht.orthopedie@proteor.com - www.proteor.com

1A51099-0818- Page 4/20

1A51099-0818- Page 5/20
3– Assembling (without the patient)
Place under the foot a wedge of the same height as the shoe heel. Fix the pyramid
receiver onto the foot, taking care that its axis be perpendicular to the ground (fig. 1).
1A510
Instructions for Use
4- Alignment (with the patient)
Place the foot so that the load line goes through
the posterior third of the foot (fig. 2).
2
0
1
7
H Heel
Fig. 1
Adapter axis
1/3 2/3
Fig. 2
1 - Description and functions
The DynaCity foot includes the following main components :
An upper carbon fiber blade that allows energy return.
A carbon fiber plantar blade that ensures a progressive and smooth step rollover.
An intermediate carbon fiber blade allowing to get flat foot very well.
The 3 blades are split to provide good inversion-eversion at forefoot.
A polyurethane foot shell (1A60020) which transmits the mechanical stresses between the shoe
and the composite structure.
A technical fiber sock limiting noises and wear and tear between the foot shell and the structure.
A malleolar clip that ensures a good assembly with the cosmetic foam.
Thanks to the combination of these components, the foot has a comfortable and flexible behaviour.
2- Indications, maximum weight and connecting compo-
nents
The Dynacity foot is designed exclusively for lower limb pros-
thesis.
It is appropriate for patients with low or moderate activity level
whose weight (carried load included) complies with the table
opposite. The maximum load has been tested according to
standard
ISO-22675.
The DynaCity foot is designed for a 10 mm heel height.
The foot is resistant to fresh water only, provided that the
recommendations of § 8 are respected.
It includes a male pyramid that allows the use of standard adapters. Thanks to these adapters, the heel height can be
modified from 0 to 20 mm.
Category Selection Guide
Patient weight (Kg)
Size 45 to 59 60 to 74 75 to 90 91 to 107 108 to125
22 1122NA
23 1122NA
24 1122NA
25 22334
26 22334
27 23344
28 23344
29 44455
30 44455
Maximum build
height : 130mm
Knee in full
extension
Load line :
≈ 12mm ahead of the
pyramid axis (±5mm)
Coxo femoral
joint centre
Knee joint centre
Front view : the
axis goes bet-
ween the 1st and
the 2nd toes
Vertical axis going through
the socket centre, the
knee and the pyramid
Pyramid axis
* Categories are not modules : not only the paent
weight, but also the foot size must be taken into
account to determine the category.

1A51099-0818- Page 6/20
5 – Finishing : To avoid rubbing noises, pull the sock up to the basis of the pyramid and fix it with a fine string for
example.
The malleolar clips shown in the following table ensure connection to the cosmetic shin foam and allow to remove the
foot easily and rapidly.
Installation : Cut the cosme- tic foam to the desired length, position the foam on the foot and draw the
malleolus contour. Inside the foam mill a space that will receive the selected connecting part and the foot part protru-
ding from the shell, and at the same time take care that thickness be sufficient to allow for sticking. Position the malleo-
lar clip carefully and clip it into the cosmetic foam. Clean contact surfaces with isopropyl alcohol and stick the malleolar
clip on the foam with XC090 neoprene glue. After drying, finish the outer shape as usually.
Foot size (cm) 22 to 25 26 to 27 28 to 30
Product Nr 1A40013 1A40014 1A40015
Notes:
- Increasing equinus provides a more dynamic alignment. It increases energy return at step completion.
- If the foot seems too long during transfer to the forefoot or if heel support is too flexible, you have to position the foot
behind the socket.
- If heel support seems to hard, or if the foot seems too short during transfer to the forefoot, you have to position the
foot ahead of the socket.
6– Product life :
This component has been tested in accordance with standard ISO 22675, the cyclical test of 2 million cycles
corresponds to a use of 2 to 3 years depending on the patient activity.
An annual check of the knee by a CPO is recommended.
7- Maintenance :
The foot shell, the sock and the malleolar clip are the only foot components that may need to be replaced (if worn out,
lost, …)
Foot shell :
The foot shell can be removed and installed again using 1A40019 shoe-horn.
Use exclusively the spare kit 1A60020-D22 including the shell, the sock and the malleolar clip.
Side Size in cm
1A40019
8– Advice for use, maintenance and safety
Clean the foot shell with a slightly damp cloth or sponge.
Use temperature : - 20°C / + 60°C.
No maintenance operation such as lubrication, work on the screws or other parts is required for this foot
except for the operations indicated in §7 that must be performed by the CPO.
A use of the foot that does not adhere to your CPO’s recommendations can damage foot components
(carrying heavy loads for example).
In case of an abnormal behaviour of your foot, or if you feel changes in your foot features, or if the foot
sustained a hard shock, contact your CPO.
The presence of sand, particles or any foreign body inside the foot could alter its behaviour and damage it.
After use in water or in a very dusty environment :
Remove the foot shell and take off the sock.
Rinse the foot and the other parts thoroughly with clear water to eliminate particles (mud, sand, …).
Dry the different items before replacing the sock and the shell.

1A51099-0818- Page 7/20
Tesng laboratory
Reports—Dates
Nr of points
Permanent
deformaon
(mm)
Inversion / Eversion
angle Sagial exion amplitude
C.E.R.A.H
Test reports :
N° 16-162-B of March 14th, 2017
117,89
Heel : 1,36 mm
Forefoot : 0,81mm
Inversion : 6,39°
Eversion : 5,92°
Plantar exion : 8,11°
Dorsiexion : 10,26°
10– Regulatory information for France
9– Recycling
The different items of the foot are special wastes and must be recycled according to the laws in force.
PROTEOR
6 rue de la Redoute - 21850 Saint-Apollinaire - France
Tél. 33 (0) 3 80 78 42 10 - Fax 33 (0) 3 80 78 42 15
ht.orthopedie@proteor.com - www.proteor.com

1A51099-0818- Page 8/20

1A51099-0818- Page 9/20
1A510
Bedienungsanleitung
4– Aufbau (mit dem Patienten)
Den Fuß so positionieren, dass die Belastungslinie durch die
hintere Dritte des Fußes läuft (Abb. 2)
2
0
1
7
Abb. 1
Achse des Adapters
1/3 2/3
Abb. 2
1– Beschreibung und Funktionsweise
Der DynaCity Fuß besteht aus den folgenden Hauptteilen :
Eine obere Karbonfeder, die für Energierückgewinnung sorgt.
Eine untere Karbonfeder, die ein kontinuierliches und progressives
Abrollen des Schrittes sichert.
Eine Zwischen-Kabonfeder, die eine gute Abflachung des Fußes ermöglicht.
Die 3 Feder sind geteilt, was eine gute Inversion/Eversion am Vorfuß sichert.
Eine Fußkosmetik aus Polyurethan (1A60020) : sie überträgt die mechanischen Beanspruchungen zwischen die
Schuhe und die Verbundstruktur.
Eine Socke aus technischen Fasern : sie reduziert Geräusche und die Reibung zwischen die Fußkosmetik und
die Verbundstruktur.
Die Kosmetikanschlußkappe : sie sorgt für die gute Verbindung zum Kosmetik-Schaumstoff.
Dank dieser Komponente hat der Fuß ein komfortables und flexibles Verhalten.
2- Indikationen, maximales Gewicht, Verbindungs-
komponente
Der Fuß DynaCity soll nur für die prothetische Versorgung der
unteren Extremität verwendet werden.
Er ist für Patienten mit geringer oder moderater Aktivität
geeignet, wenn ihr Gewicht (inklusive der getragenen Last) der
folgenden Tabelle entspricht. Die maximale Belastung wurde
nach dem Norm ISO-22675 gestestet.
Der Fuß DynaCity ist für eine Absatzhöhe von 10 mm
entwickelt worden.
Der Fuß ist Frischwasserbeständig, vorausgesetzt
die Empfehlungen des §8 erfüllt sind.
Dank seiner männlichen Pyramide kann der Fuß mit allen Standard-Adapter verwendet
werden. Diese Adapter ermöglichen es, die Absatzhöhe von 0 bis zu 20 mm einzustellen.
Hinweise für die Auswahl der Kategorie*
Patientengewicht(Kg)
Gröβe45 zu 59 60 zu 74 75 zu 90 91 zu 107 108 zu125
22 1122NA**
23 1122NA**
24 1122NA**
25 22334
26 22334
27 23344
28 23344
29 44455
30 44455
Maximale
Bauhöhe :
130mm
3- Montage (ohne Patient)
Einen Keil unter dem Fuß einsetzen, dessen Höhe der Absatzhöhe der Schuhe
entspricht. Der weibliche Pyramidadapter an dem Fuß fixieren, und dabei darauf
achten, dass die Achse senkrecht durch den Adapter läuft (Abb. 1).
H = Absatzhöhe
von 0 bis 20mm
Mittelpunkt des
Hüftgelenkes
Mittelpunkt des
Kniegelenkes
Belastungslinie :
≈ 12mm vor die
Achse der Pyramide
(±5mm)
Achse der Pyramide
Knie in
voller
Extension
Senkrechte Achse, die
durch den Mittelpunkt des
Schaftes, das Knie und die
Pyramide läuft
Vorderansicht : die
Achse läuft zwischen
die 1. und 2. Zehen
**NA = nicht anwendbar
* Kategorien sind keine Module: die Kategorie ist nicht
durch das Paentengewicht allein, sondern auch durch
die Fußgröße besmmt.

1A51099-0818- Page 10/20
Hinweise :
- Bei Erhöhung des Spitzfußes wird das Aufbau dynamischer, und dadurch wird eine höhere Energierückgewinnung
beim Schrittwechsel erreicht.
- Falls man beim Übergang zur Vorfußbelastung den Eindruck hat, dass der Fuß zu lang ist, oder falls die Fersen-
Unterstützung zu flexibel ist, sollte der Fuß im Bezug zum Prothesenschaft nach hinten verschoben werden.
- Falls die Fersen-Unterstützung zu steif ist, oder falls man beim Übergang zur Vorfußbelastung den Eindruck hat, dass
der Fuß zu kurz ist, sollte der Fuß im Bezug zum Prothesenschaft nach vorne verschoben werden.
5– Fertigstellung: Zur Vermeidung von Reibungsgeräusche, die Socke bis zur Basis der Pyramide ziehen, und z.B.
mit einer feinen Schnur fixieren.
Die Kosmetikanschlußkappe, die unten angegeben sind, sorgen für die Verbindung zum Kosmetik-Schaumstoff und
ermöglichen einen leichten und schnellen Ausbau des Fußes.
Einsetzen: Die Schaumkosmetik auf die gewünschte Länge schneiden und auf dem Fuß positionieren, dann die Kontur
des Malleolus anzeichnen. In der Schaum einen Raum fräsen, der den ausgewählten Verbindungsteil und den aus der
Hülle überschreitenden Fußteil aufnehmen wird. Vorsicht : die Dicke soll ausreichend bleiben, um Kleben zu
ermöglichen. Die Kosmetikanschlußkappe gut positionieren und in der Kosmetik klippen. Die Kontaktflächen mit
Isopropylalkohol reinigen, und die Kosmetikanschlußkappe an der Schaum mit Neopren Klebstoff XC090 kleben. Nach
Fußgröße (cm) 22 zu 25 26 zu 27 28 zu 30
Produkt Nr 1A40013 1A40014 1A40015
6– Lebensdauer
Dieses Teil wurde gemäß Standard ISO22675 getestet ; das Zyklentest mit 2 Millionen Zyklen entspricht eine
Verwendung von 2 bis 3 Jahren je nach der Patientenaktivität.
Eine jährliche Überprüfung von einem Orthopädie-Techniker ist empfohlen.
7– Wartung :
Die Fußkosmetik, die Socke und die Kosmetikanschlußkappe sind die einzige Komponente des
Fußes, die ersetzt werden können (wegen Verschleiß, Verlust, …).
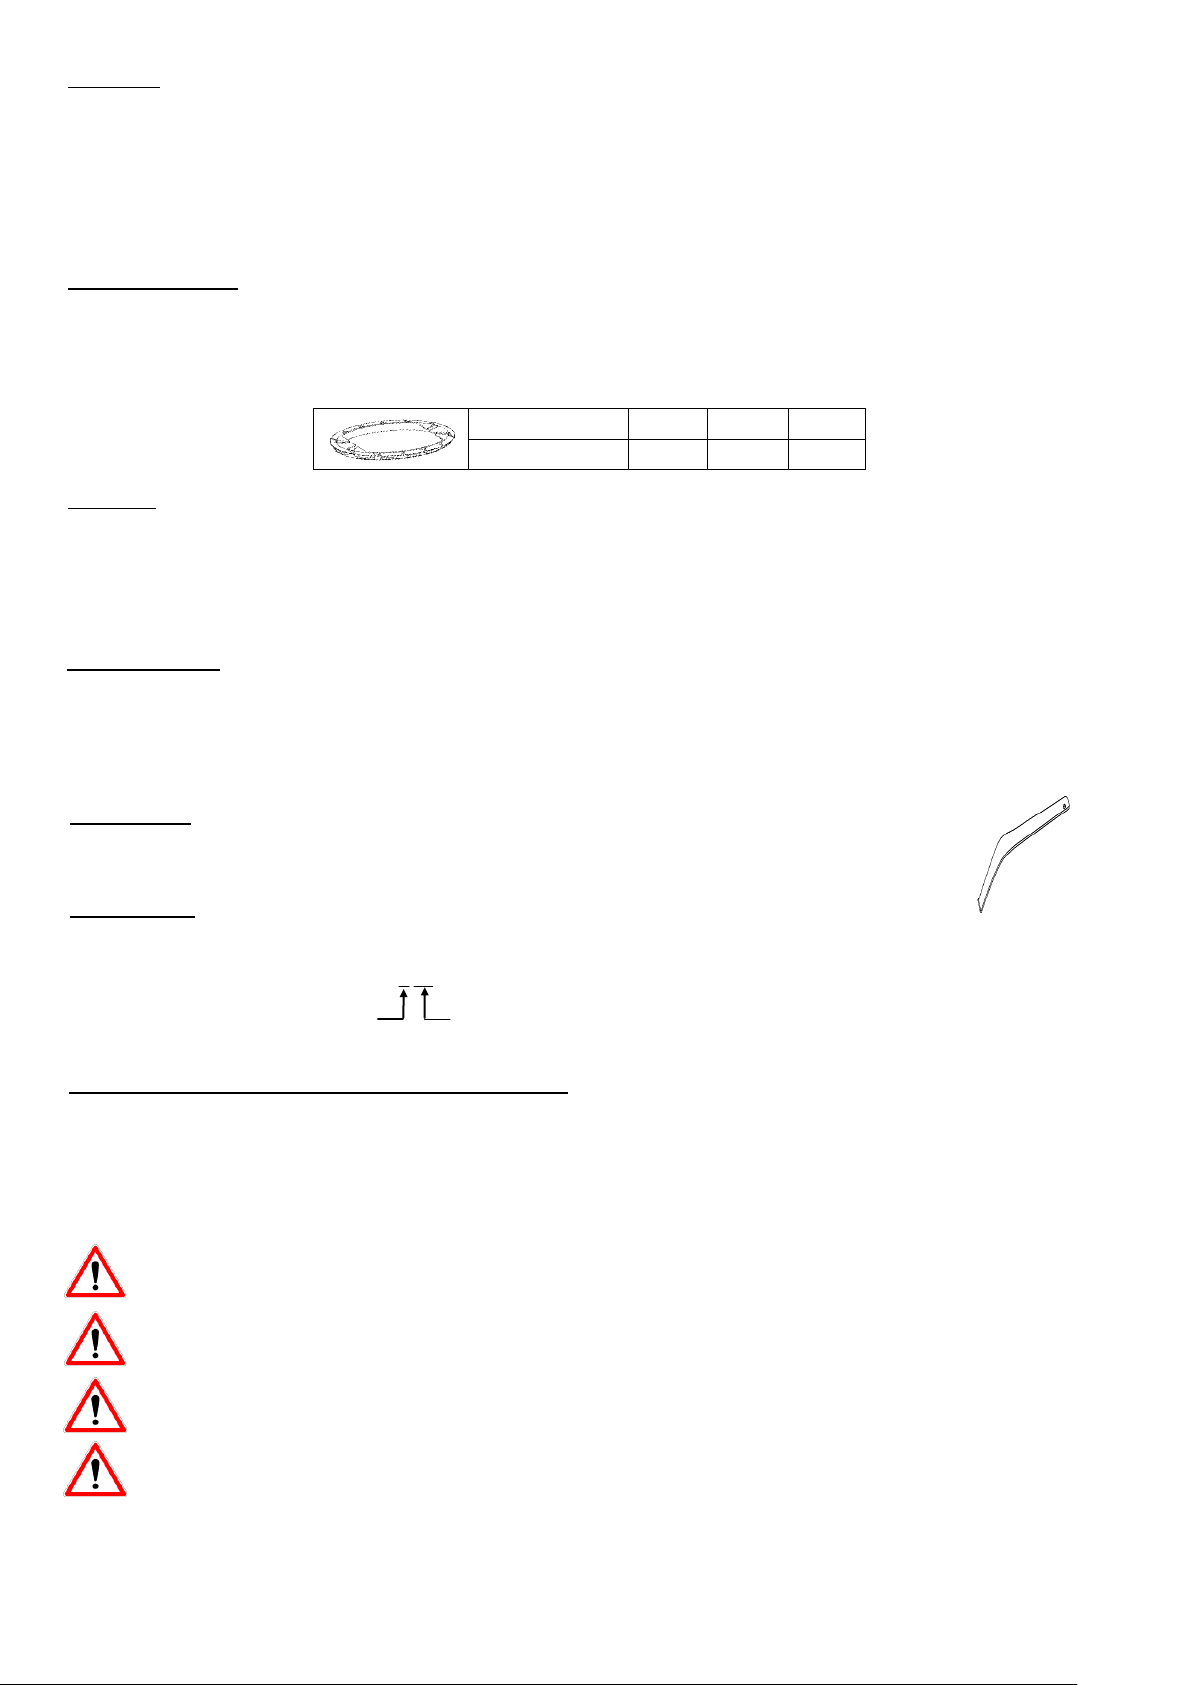
Fuβkosmetik :
Die Fußkosmetik kann mittels der Schuhlöffel 1A40019 entnommen und angezogen werden.
Nur der Austauschbausatz 1A60020-D22 (Fuβkosmetik, Socke und Kosmetikanschluβkappe) soll verwendet werden.
Seite Gröβe in cm
1A40019
8– Verwendung-, Wartung– und Sicherheitshinweise
Die Fußkosmetik mit einem feuchten Lappen oder Schwamm reinigen.
Verwendungstemperatur : -20°C / + 60°C.
Keine Wartung wie Schmieren, Eingriff an den Schrauben oder an einem anderen Teil, ist für diesen Fuß
benötigt, abgesehen von der Wartung der § 7, die durch den Orthopädie-Techniker durchgeführt werden soll.
Eine Verwendung des Fußes, die den Empfehlungen Ihres Orthopädie-Technikers nicht entspricht
(z.B. Tragen von schweren Lasten), kann zur Beschädigung der Fußpassteile führen.
Falls Sie ein anormales Verhalten des Fußes oder Veränderungen in den Eigenschaften des Fußes bemerken,
oder falls der Fuß einem starken Stoß versetzt wird, sollen Sie sofort Ihren Orthopädie-Techniker aufsuchen.
Die Anwesenheit von Sand, Partikel oder Fremdkörper in dem Fuß könnte das Fußverhalten ändern und
Schaden ursachen.
Nach der Verwendung des Fußes im Wasser or in einer sehr schmutzigen Umgebung :
Die Fußkosmetik entnehmen und die Socke ausziehen
Der Fuß und die andere Teile mit klarem Wasser gründlich spülen, um die Partikel (Schlamm, Sand ...) zu entfernen
Die Komponente trocknen, und dann die Socke und die Fußkosmetik wiedereinsetzen.

1A51099-0818- Page 11/20
Testlabor
Bericht—Datum
Punkte Anhaltende
Verformung (mm) Inversion-, Eversionswinkel Amplitude der sagialen
Flexion
C.E.R.A.H
Testbericht :
N° 16-162-B vom 13.03.2017
117,89
Ferse : 1,36mm
Vorfuβ : 0,81mm
Inversion : 6,39°
Eversion : 5,92°
Plantarexion : 8,11°
Dorsalexion : 10,26°
11– Gesetzliche Informationen für Frankreich
10– Wiederverwertung
Die verschiedenen Komponente des Fußes sind besondere Abfälle und sollen laut der gültigen Gesetze behandelt
werden.
PROTEOR
6 rue de la Redoute - 21850 Saint-Apollinaire - France
Tél. 33 (0) 3 80 78 42 10 - Fax 33 (0) 3 80 78 42 15
ht.orthopedie@proteor.com - www.proteor.com

1A51099-0818- Page 12/20

1A51099-0818- Page 13/20
Fig. 1
H
Eje del conector
1A510
Instrucciones de uso
2
0
1
7
Fig. 2
Altura de
construcción
Max : 130mm
1- Descripción y funcionalidad
El pie DynaCity está formado por los siguientes elementos principales:
Una lámina de carbono superior que ofrece al pie su capacidad de restituir la
energía
Una lámina de carbono inferior que asegura un desarrollo del paso continuado y sin
interrupciones.
Una lámina de carbono intermedia que permite una correcta pisada
Las tres láminas tienen perforaciones que permiten una inversión - eversión del
antepié adecuada
Una pala estética de poliuretano (1A60020) que transmite los esfuerzos mecánicos entre el calzado y la
estructura de compuesto.
Una media de fibra técnica que limita los chasquidos y el desgaste del contacto
entre la pala estética y la estructura.
Un clip maleolar que asegura un buen montaje con la espuma estética.
El conjunto de estos compuestos le da al pie un
comportamiento cómodo y flexible.
2- Indicaciones, peso máximo de uso, elementos de
conexión:
El pie DynaCity está destinado únicamente para dispositivos
ortopédicos de miembros inferiores.
Apto para pacientes con actividad de ligera a moderada, de
un peso «total en carga» definido en la siguiente tabla. La
carga máxima cumple con la normativa ISO-22675
El pie DynaCity está diseñado para una altura de talón de
10 mm.
El pie es resistente al agua dulce, siempre que se sigan las recomendaciones del §8.
Incorpora una pirámide macho que permite el uso de otros conectores estándares del mercado, que hacen que sea
posible modificar la altura del talón de 0 a 20 mm.
Guia de selección del categoría*
Peso del patient en Kg
Tamaño 45 a 59 60 a 74 75 a 90 91 a 107 108 a 125
22 1122NA**
23 1122NA**
24 1122NA**
25 22334
26 22334
27 23344
28 23344
29 44455
30 44455
3- Montaje (sin el paciente):
Coloque bajo el pie una traba correspondiente a la altura del talón del calzado. Fije
el conector piramidal hembra al pie colocando el eje de forma perpendicular al suelo (fig. 1).
4- Alineamiento (con el paciente):
Coloque el pie de forma que haga pasar la línea
de carga sobre el 1/3 posterior del pie (fig. 2).
1/3 2/3
Rodilla en
extensión
total
Línea de carga:
≈ 12 mm por delante
de Eje de la pirámide
a ± 5 mm
Centro de la articula-
ción coxofemoral
Centro de la articula-
ción de la rodilla
Vista frontal: el eje
pasa entre el primer y
el segundo dedo del
pie
Eje de la pirámide
Eje vertical que pasa por el
centro del encaje a nivel de
la rodilla y de la pirámide
*Las categorías no son módulos: el peso no
basta para determinar la categoría; también hay
que tener en cuenta el tamaño del pie.
**N/A : no aplicable.

1A51099-0818- Page 14/20
5- Acabado: Para evitar los chasquidos del roce, suba la media hasta la base de la pirámide e inmovilícela con ayuda
de un cordel fino, por ejemplo.
Los clips maleolares para espuma estética presentados a continuación permiten un desmontaje sencillo y rápido del
pie en relación a la estética de la pantorrilla.
Aplicación: Recortar la espuma estética a la longitud deseada, colocar la espuma sobre el pie y trazar el contorno del
maléolo. En el interior de la espuma, avellanar un espacio adaptado para albergar la pieza de conexión escogida y la
parte del pie que sobresale de la pala. Conservar un grosor suficiente para el pegado. Fije el empalme en la estética
colocándolo correctamente. Limpie las superficies de contacto con alcohol isopropílico y pegue el clip en la espuma
con cola de neopreno ref. XC090. Una vez seco, termine la forma exterior según el método habitual.
Notas:
- Para un alineamiento más dinámico, se puede aumentar el equino. Esto aumenta la restitución de energía durante la
ejecución del paso.
- Si el paso en el antepié da la sensación de tener un pie demasiado largo, o si el apoyo del talón es demasiado flexi-
ble, hay que retrasar el pié en relación al encaje.
- Si el apoyo del talón parece demasiado rígido, o si durante el paso en el antepié el pié parece demasiado corto, hay
que adelantar el pie en relación al encaje.
6- Vida útil:
Este compuesto se ha probado según la norma ISO 22675, la prueba cíclica de 2 millones de ciclos correspondiente a
un uso de 2 a 3 años siguiendo la actividad del paciente.
Se recomienda que un ortoprotésico realice un control anual.
Tamaño del pie (cm) 22 a 25 26 a 27 28 a 30
Referencia 1A40013 1A40014 1A40015
7- Mantenimiento:
La pala estética, la media y el clip maleolar son los únicos elementos del pie que pueden requerir una sustitución (en
caso de desgaste, pérdida...).
Pala estética:
Retirar y volver a poner la estética mediante el calzador 1A40019.
Utilizar solamente el kit de repuesto 1A60020-D22 que incluye estética, media y clip maleolar.
Lateral Talla en cm
1A40019
8- Consejos de uso, de mantenimiento y de seguridad
Limpiar la pala con un trapo o una esponja ligeramente húmeda.
Temperatura de uso: - 20° C / 60° C.
Para este pie no es necesario ningún tipo de operación de mantenimiento de tipo lubricación, apriete de
tornillos u otras, excepto lo que se indica en el §7 y que debe ser realizado por el ortoprotésico.
Un uso no adaptado del pie según las recomendaciones de su ortoprotésico puede provocar la degradación
de elementos del pie (transporte de cargas pesadas, por ejemplo).
Si aprecia un comportamiento anormal o cambios en las características de su pie, o si el pie sufre un
impacto importante, consulte con su ortoprotésico.
La presencia de arena, partículas o cuerpos extraños en el interior del pie podría modificar su
comportamiento y dañarlo.
Después del uso en agua o en un entorno con mucha suciedad
Retirar la pala del pie y retirar la media
Enjuague abundantemente el pie y las otras piezas con agua clara para eliminar partículas (barro, arena...)
Secar los distintos elementos antes de volver a colocar la media y la pala.

1A51099-0818- Page 15/20
Laboratorio de pruebas
Informe - Fecha
Puntos NBR Deformación permanente (mm)
Ángulo
inversión / eversión
Amplitud de exión sagital
C.E.R.A.H
Informe de prueba:
N.° 16-162-B de 14 marzo 2017
117,89
Talón: 1,36 mm
Antepié: 0,81 mm
Inversión: 6,39°
Eversión: 5,92°
Flexión plantar: 8,11°
Flexión dorsal: 10,26°
10- Información reglamentaria en Francia
9- Reciclaje - Final de vida útil
Los diferentes elementos del pie son desechos especiales, y por tanto deben tratarse según la legislación vigente.
PROTEOR
6 rue de la Redoute - 21850 Saint-Apollinaire - France
Tél. 33 (0) 3 80 78 42 10 - Fax 33 (0) 3 80 78 42 15
ht.orthopedie@proteor.com - www.proteor.com

1A51099-0818- Page 16/20

1A51099-0818- Page 17/20
1A510
NÁVOD K POUŽITÍ
2
0
1
7
Obr. 2
4 – Nastavení (s pacientem):
Nastavte chodidlo tak, aby zátěžná osa procházela v 1/3 posteriorní
částí chodidla (obr. 2).
1/3 2/3
Koleno je v
plné extenzi
Zátěžná osa:
≈ 12mm vpřed osou
pyramidy až ±5mm
Střed kloubu coxo-
femorální kosti
Střed kolenního
kloubu
Pohled zepředu:
osa procházející mezi
1.a 2.prstem
Osa pyramidy
Svislá osa prochází středem
pahylového lůžka na úrovni
kolena a středem pyramidy Výška kons-
trukce
Max : 130mm
1 – Popis a funkčnost:
Chodidlo DynaCity se skládá z následujících hlavních částí:
Horní karbonová lamela dávající chodidlu schopnost uchovávat a znovu vydávat
energii.
Spodní karbonová lamela zajišťující plynulý odval a bez otřesu.
Střední karbonová lamela umožňuje lepší stabilitu na rovném terénu.
Tyto tři lamely jsou od sebe oddělené, umožňující inverzi - everzi přední části
chodidla.
Kosmetický polyuretanový kryt (1A60020) přenášející mechanické síly mezi botou a kompozitní strukturou
chodidla.
Ponožka z technických vláken omezující vznikající hluk a opotřebení mezi kosmetickým krytím a kompozitní
strukturou.
Spojovací destička (maleolární klips) zajišťující dobrý spoj s kosmetickou pěnou.
Všechny tyto komponenty dávají chodidlu pohodlné a pružné chování.
2 – Indikace, maximální nosnost použití, spojovací díly:
Chodidlo DynaCity je určeno pouze pro ortopedické přístroje
dolních končetin.
Je vhodné pro mírně aktivní pacienty s celkovou hmotností,
včetně nošeného břemene, definovanou dle vedlejší tabulky.
Maximální povolená nosnost byla testována v souladu s
normou ISO-22675.
Chodidlo DynaCity je určeno pro podpatek s výškou 10 mm.
Chodidlo je odolné pouze vůči sladké vodě na základě
doporučení dle §8.
Zahrnuje samčí pyramidu umožňující použití standardních konektorů na trhu, díky kterým
lze změnit výšku podpatku od 0 do 20mm.
Průvodce pro výběr vhodné kategorie*
Hmotnost pacienta (Kg)
Velikost 45 až 59 60 až 74 75 až 90 91 až 107 108 až 125
22 1122NA**
23 1122NA**
24 1122NA**
25 22334
26 22334
27 23344
28 23344
29 44455
30 44455
3 – Montáž (bez pacienta):
Umístěte pod chodidlem klín odpovídající výšce podpatku obuvi. Namontujte nad
chodidlo samcovou pyramidu a nastavte jeho osu tak, aby byla kolmá k podložce (obr. 1).
Obr. 1
Osa konektoru
H podpatku
*Kategorie nejsou moduly: samotná hmotnost
nestačí k určení kategorie, velikost chodidla má
také vliv
**NA = neaplikovatelné

1A51099-0818- Page 18/20
8 – Doporučené pokyny pro používání, údržbu a bezpečnost:
Čistěte krytí hadříkem nebo lehce zvlhčenou houbou.
Teplota použití: - 20°C / + 60°C
Neprovádějte žádné zásahy do tohoto chodidla typu mazání, zásahu na šrouby anebo jiné, které nejsou
potřebné kromě těch zásahů, které jsou uvedeny v §7 a které musí být prováděny ortoprotetikem.
Nevhodné používání chodidla, které není v souladu s doporučením daného ortoprotetika, může způsobit
degradaci prvků chodidla ( např., zvedání těžkých břemen).
Pokud zjistíte abnormální chování chodidla nebo pocítíte změny v charakteristikách vašeho chodidla, nebo
jestli chodidlo utrpělo silný náraz, navštivte vašeho ortoprotetika.
Přítomnost písku, jiných částic nebo cizího tělesa uvnitř chodidla může změnit chování chodidla a poškodit jej.
Po použití ve vodě nebo ve velmi špinavém prostředí:
Sundejte obal chodidla a odstraňte ponožku
Opláchněte chodidlo a ostatní jeho části čistou vodou, aby se odstranily nežádoucí částice (bláto, písek ..
Před nasazením obalu chodidla a ponožky osušte důkladně všechny jeho části.
Poznámky:
- Pro dynamičtější nastavení můžeme zvětšit úhel chodidla v dorzální flexi. Tím zvětšíme akumulovanou energii při
odvalu kroku.
- Pokud přechod na přední část chodidla dává pacientovi pocit delší nohy, nebo pokud nášlap na patu je velmi měkký,
potom se musí chodidlo vůči lůžku posteriorizovat.
- Pokud je nášlap na patu příliš tvrdý nebo pokud přechod na přední část chodidla dává pacientovi pocit kratší nohy,
potom se musí chodidlo vůči lůžku anteriorizovat.
5 – Dokončení: Pro omezení hluku z tření navlečte znovu ponožku až k základu pyramidy a uvažte ji např. tenkým
provázkem.
Maleolární klipsy (spojovací destičky) pro kosmetické pěny představené níže, umožňují lehce a rychle odpojovat
chodidla od kosmetického lýtka.
Výroba/provedení: Odstřihněte pěnu kosmetického krytí na potřebnou délku a umístěte ji na chodidlo. Poté obkreslete
konturu maleoly (spojovací destičky). Do pěny vytvořte za pomocí frézování prostor odpovídající velikosti spojovacího
dílu a části chodidla přesahující kosmetické krytí chodidla a to vše se zachováním dostatečné tloušťky pěny pro lepení.
Zacvakejte a dobře umístěte spojovací destičku do kosmetiky, vyčistěte spojovací plochy isopropylovým alkoholem a
zalepte spojovací destičku neoprenovým lepidlem s kódem XC090. Po vytvrdnutí dokončete externí tvar dle obvyklého
postupu.
Velikost ch. (cm) 22 až 25 26 až 27 28 až 30
Kód 1A40013 1A40014 1A40015
6 – Životnost:
Tento komponent byl testován podle normy ISO22675, zátěžový test 2 milionů cyklů představuje možnost použití na 2
až 3 roky podle aktivity pacienta.
Jednou ročně se doporučuje kontrola ortoprotetikem.
7 – Údržba:
Kosmetické krytí, ponožku a maleolární klips (spojovací destičku) jsou jediné díly chodidla, které lze vyměnit (v případě
opotřebení, ztráty, …).
Estetické krytí:
Přezouvejte a převlékejte estetiku pomocí nazouvací lžičky 1A40019.
Používejte exkluzivně náhradní sadu 1A60020-D22 obsahující estetický kryt, ponožku a maleolární
spojovací destičku.
1A40019
Strana Velikost v cm

1A51099-0818- Page 19/20
Zkušební laboratoř
Zpráva - Datum
Počet bodů Trvalá deformace (mm)
Úhel
Inverze / Everze
Amplituda sagitální exe
C.E.R.A.H
Zpráva o zkoušce:
N° 16-162-B z 14.03.2017
117,89
Podpatek: 1,36mm
Přední část: 0,81mm
Inverze : 6,39°
Everze : 5,92°
Plantární exe: 8,11°
Dorzální exe: 10,26°
10– Informace o předpisech pro Francii
9 – Recyklace - konec života
Jednotlivé části chodidla patří do zvláštního odpadu a musí být s nimi zacházeno v souladu s platným zákonem.
PROTEOR
6 rue de la Redoute - 21850 Saint-Apollinaire - France
Tél. 33 (0) 3 80 78 42 10 - Fax 33 (0) 3 80 78 42 15
ht.orthopedie@proteor.com - www.proteor.com

1A51099-0818- Page 20/20
Table of contents
Languages:
Other PROTEOR Medical Equipment manuals

PROTEOR
PROTEOR 1M102 User manual

PROTEOR
PROTEOR 1M115 User manual

PROTEOR
PROTEOR 1P650 KNEE Guide

PROTEOR
PROTEOR AGILIX F15 User manual

PROTEOR
PROTEOR MATIK 1P200 User manual

PROTEOR
PROTEOR 1M01 User manual

PROTEOR
PROTEOR FREEDOM QUATTRO User manual

PROTEOR
PROTEOR DYNADAPT F10 User manual

PROTEOR
PROTEOR FREEDOM QUATTRO User manual

PROTEOR
PROTEOR Plie 3 MPC Knee User manual
Popular Medical Equipment manuals by other brands

Ambu
Ambu AuraOnce Instructions for use

Drive Medical
Drive Medical Bed Assist Handle installation instructions

Blatchford
Blatchford KX06 Instructions for use

inhealth
inhealth Blom-Singer Indwelling TEP Occluder Instructions for use

ZONARE
ZONARE Z.ONE Service manual

Vitalograph
Vitalograph Micro instructions