PURE HIGHWAY 300DI User manual

Installation Manual
Highway 300Di

2
Highway 300Di Installation Manual v1.1
Kit List
The following items are included in the Highway 300Di kit as standard:
• Highway 300Di Controller
• Highway 300Di Main Unit
• Highway 300Di Controller bracket with captive cable
• Highway 300Di Controller mount with adjustable angle
• Wiring loom with ISO connectors
• USB extension lead
• 2 x 3.5mm to 3.5mm jack audio cable
• Coaxial FM aerial loop through cable
• Active aerial removal tool
• Self adhesive controller bracket mounting pad
• Self adhesive L-Band antenna strip
• Glass cleaner wipe x 2
• Active aerial receiver (with captive cable)
• Active aerial transmitter (with grounding tail attached)
• Active aerial transmitter self adhesive mounting plinth
• Clear self-adhesive paint protector label for the magnetic grounding tail
• Flexible aerial mast
• Owner’s manual
• Product registration card
Considerations before starting
Minimum vehicle requirements
• Fitted audio system including aux-in or FM aerial connection.
• Standard 12V power system - not suitable for 24V systems.
Recommended for best results
• Steel roof (for supplied PURE active aerial).
• Windscreen without heat reflective metallic coating, tinting or built-in heating elements.
• Check that the latest version of software is installed. To find out which version your unit has
installed: Press the button, Select Settings > Software update.
Visit http://support.pure.com to see if there is a later software version available. Download
the file and copy it to a USB stick. For instructions on how to install a software update see
page 14 of the Owner’s manual.
Aerial positioning
• Check cable length and choose an area outside the swept area of the windscreen wipers.
• If the car has a heat-reflective windscreen there may be a special clear area designed for RF
devices - if not in a suitable position for the aerial you may have to consider mounting on
rear windscreen or other static glass areas.
• Consider whether use of the optional internal film aerial may be better/preferred if supplied
version not suitable.
Main unit positioning
Consider length of controller cable and USB/aux audio extension and possible routing, whether
access required to unit after fitting and distance from aerial and suitable power connection (avoid
using safety critical power circuits such as airbag/ABS system etc).
Controller positioning
• Consider usability and visibility from driving seat, possible mounting points/brackets, cable
length and routing to main unit.
• Decide on connection to head unit - aux in or FM and whether FM pass-through is required.

3
Highway 300Di Installation Manual v1.1
Installation checklist
Before Installation
Review car and existing car audio installation and discuss options with the customer:
Decide on where to mount the main unit and controller:
• Check where the existing tuner is fitted (on some cars this may be in the boot) and consider
where the Highway main unit might be installed.
• Check and agree suitable locations for the USB extension cable (recommended for all
installs as used for iPod/MP3 player connection and software updates) and optional
auxilliary input (3.5 mm) cable.
• Check for auxiliary inputs on the existing audio system which might be used by Highway
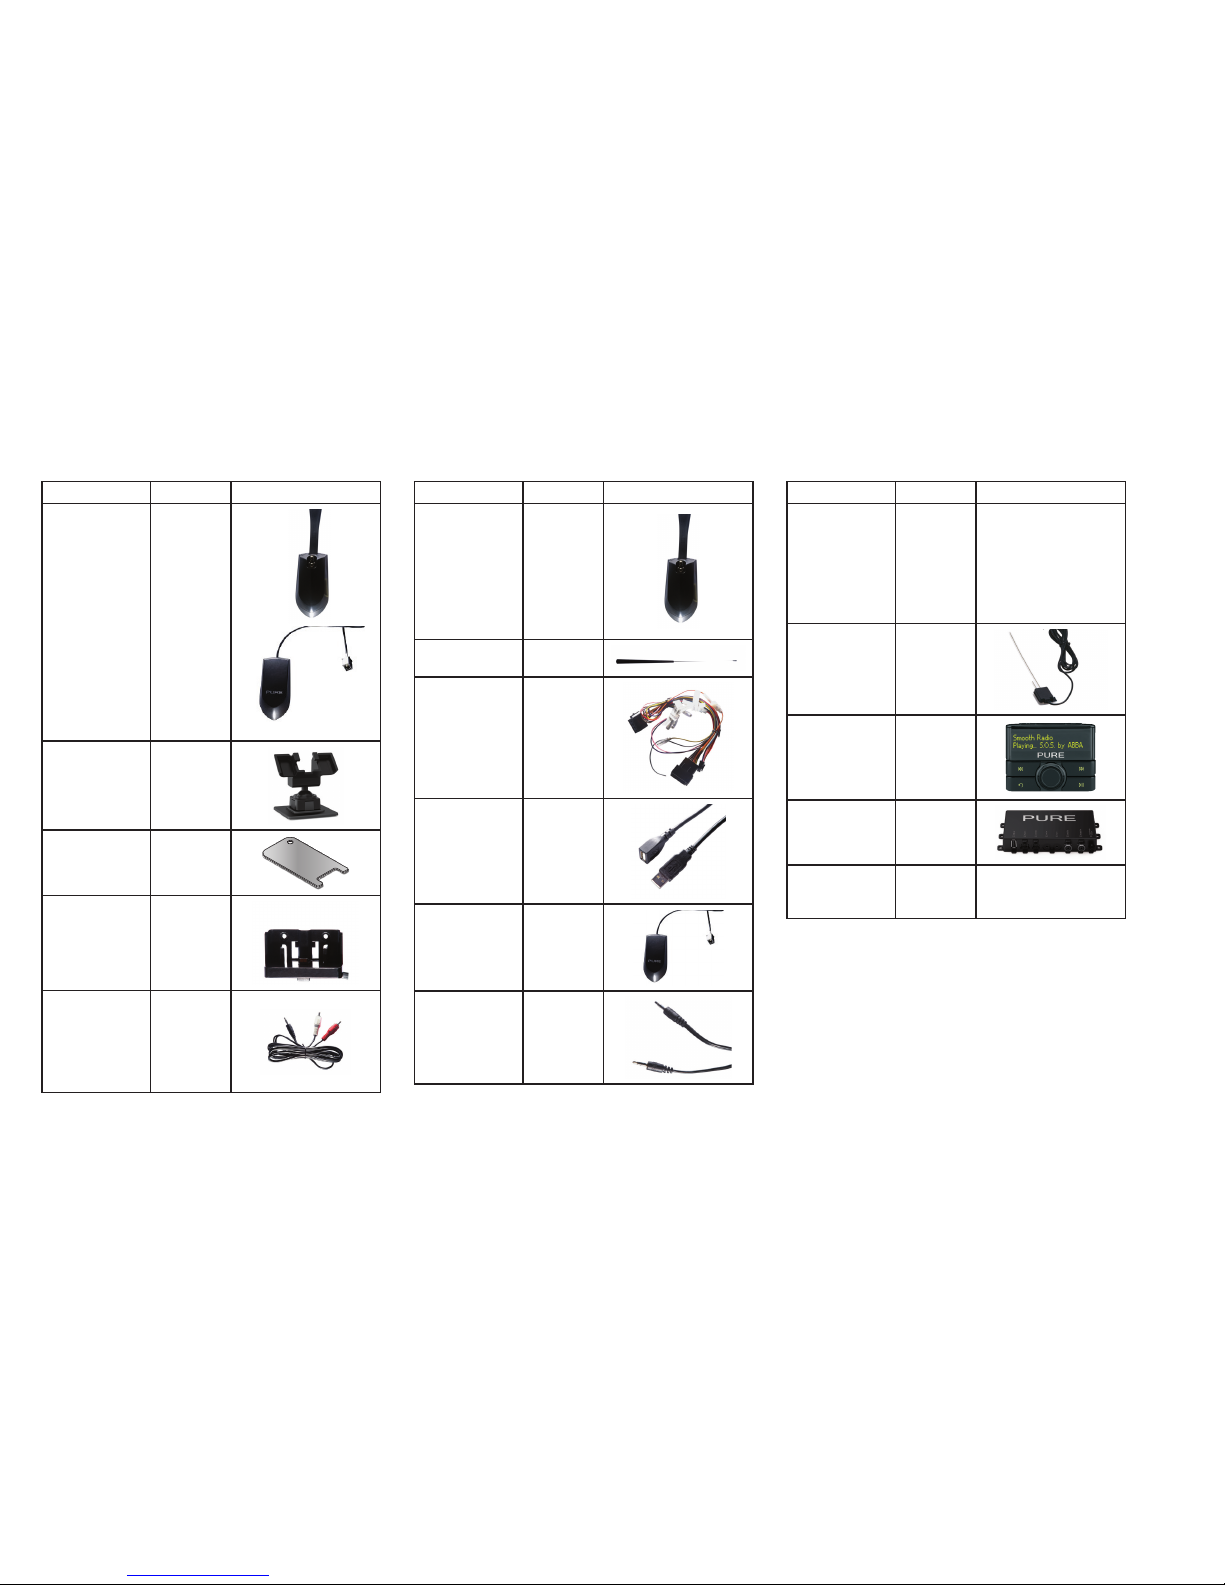
• Check that the supplied aerial cable will reach or use a suitable aerial extension (2.5m cable
available from Pure).
• Discuss controller placement with the customer - consider cable length to attach to
controller box and accessibility and visibility from the drivers seat.
Decide on which aerial type with the customer:
• Best – supplied external through-glass aerial – works best with steel roof for attaching
magenetic grounding tail and clear glass area (without metallic reflective film or heating wires
and clear of wipers). Can be fitted to front or rear screen. Check whether customer is likely
to travel in Italy or the Czech Republic or other areas that may require the L-band antenna
to be fitted.
• Good – optional internal film aerial – works best with clear glass area (without metallic
reflective film or heating wires). Can be fitted to vehicles with soft-top or other non magnetic
roof. Can be fitted to front or rear screen.
• Alternative – other aerial – magnetic roof mounted mast or factory fitted digital aerial.
Advise the customer of the types of installation available and recommend and agree the
approach to be taken:
• Best – where possible, connect Highway using an auxilliary input on the existing audio
system - gives best audio quality and enables existing traffic information and system muting
for navigation or phone systems to work as normal. Highway also provides an auxilliary
input so the customer can retain use of their auxilliary input.
• Good – connect Highway using the FM aerial input on the existing audio system and loop
through the FM aerial. Installer settings enable you to choose from 2 options: whether the
Highway signal effectively replaces all existing FM stations when switched on (FM pass-
through Disabled) which gives better quality but you lose Traffic data. Or, the Highway signal
appears alongside the existing stations on the FM waveband - audio not as clear but on
some audio systems you may retain traffic information and muting capability.
• Fair – no direct connections to Highway – signal is broadcast locally over the air and
received by the existing vehicle FM aerial and is found alongside existing FM stations.
During Installation
Make sure the USB extension is installed in a convenient location.
Make sure the 3.5mm auxilliary input cable is installed in a convenient location.
Adjust the FM transmit frequency if required (In Australia this should be set to 88.6 MHz) see
page 15 of the Owner’s manual.
If fitting the external aerial, once the internal part is fixed in place, fit the mounting plinth first on
the outside without the aerial body and mast fitted, warm the area if possible and press and hold
in place for at least a minute to allow the adhesive to work most effectively.
After Installation
Check that Highway is functioning as expected.
Once correct function of all connections has been checked, fasten connectors to the main unit
with cable ties as required and securely mount the main unit in place.
Route and tie any cables securely in place and replace any trim panels.
Select Restore defaults from the Settings menu to reset any changes made during testing. (See
page 15 of the Owner’s manual).
Update the software installed, if required, see page 2.
Hand over to the owner
Give them kit (Packaging, Owner’s manual, Registration card, Aerial removal tool).
Explain which installation method has been used and why.
Demo main functions including – Selecting digital stations, changing FM frequency used,
connecting an iPod/USB device/aux in.
Demo active aerial removal using the tool and how to unscrew the mast.

4
Highway 300Di Installation Manual v1.1
Wiring diagram
2
4
6
8
21
43
65
87
1
3
5
7
1
5
2
6
3
7
4
8
USB extension cable
(supplied)
Power loom
(supplied)
Highway 300Di controller
bracket (supplied)
Vehicle head unit
Head unit aux-in connection
cable (3.5mm to dual phono
or 3.5mm) †
Aux-in cable
(3.5mm supplied)
FM loop-through
cable (supplied) †
Existing vehicle FM
aerial †
Optional alternative Highway
300Di internal film aerial or
mag mount external aerial
Highway 300Di active
aerial with optional
L-band antenna strip
(supplied)
BISO connector pins
Pin Function Colour
1 Mute 1 (with crimp) White
2 Mute 2 (with crimp) Yellow
3 Mute 3 (with crimp) Blue
4 12V Switched ignition (with series fuse holder)*Orange
5 Not used Green
6 Cabin illumination Brown
7 12V Permanent battery supply (with series fuse holder)*Red
8 Ground Black
AHighway 300Di power connector pins
Pin Function Colour
1 Nav_Tel_Audio+ Purple
2 Nav_Phone_Mute Grey
3 Cabin illumination Brown
4 12V Permanent battery supply (with
series fuse holder)
Red
5 Nav_Tel_Audio_GND Pink
6 12V Switched ignition (with series fuse
holder)
Orange
7 Car mute (with crimp) Yellow
8 Ground Black
Fuse holders for
permanent 12V and
switched 12V.*
†If connected to car stereo aux-in then FM aerial connections to Highway 300Di are not required.
B
B
A
*On some vehicles switched and permanent live connections may be reversed.
Open the fuse holders and swap the connections round if required.
Mute

5
Highway 300Di Installation Manual v1.1
Fitting the active aerial
1. Decide where the aerial will be mounted
• Ensure it will not obscure the drivers view and will be outside the swept area of the
windscreen wipers.
• Make sure there is enough cable to reach to where you will mount the main unit.
• If the car has a heat-reflective windscreen there may be a special clear area designed for
RF devices – if not in a suitable position for the aerial you may have to consider mounting
on rear windscreen or using a different type of aerial.
2. Trial position the aerial
• Screw the aerial mast on and trial position the aerial,
using the magnetic grounding tail attached to the roof
to hold the unit in place as close to the roof as possible.
Avoid dragging the tail to prevent possible scratching.
• Line the aerial up so that it looks right and generally
follows the line of the airflow – stand a couple of metres
in front of the car to check the alignment.
• Check that it sits flat and evenly against the glass and is
not resting on any trim strips or seals around the glass.
• Do not remove the adhesive backing at this stage.
3. Attach the internal receiver
• If L-Band digital radio reception is required, fit the L-Band
antenna strip to the cutout in the baseplate as shown.
• From inside the car check that the entire baseplate is visible
and there is room for the L-band aerial strip (if fitted), line
up the aerial receiver part so it lines up with the external
transmitter and check that the aerial cable length is OK.
• Clean the area using the supplied cleaning wipe and dry
with a clean dry cloth.
• If possible, warm the area to help to improve adhesion.
• Remove the backing from the grey adhesive pad and
carefully stick the aerial receiver in place lined up with the
external transmitter. Press firmly and hold the unit in place
for at least a minute to ensure adhesion.
• If fitted, remove the backing from the L-Band antenna strip
and stick it down.
4. Attach the external transmitter
• From outside the car – lift the aerial transmitter unit from the car and separate the
transmitter and mast from the mounting plinth using the supplied removal tool.
• Clean an area of around 6 inches square on the
outside of the glass and roof using the supplied
cleaning wipe, while the area is wet from the wipe,
dry with a clean dry cloth.
• If possible, warm the area – this will help to improve
adhesion. It is recommended the aerial is installed in
ambient temperatures above zero degrees Celsius.
• Remove the backing from the grey adhesive pad
on the mounting plinth and carefully position it
directly over the internal receiver (without the aerial
transmitter and mast fitted (Diagram A).
Press firmly and hold in place for at least a minute to
ensure good adhesion.
Important Note
Make sure that the plinth is securely fastened to the
vehicle glass all the way round before proceeding.
• Put the front edge of the aerial transmitter and
mast into place on the mounting plinth and push
down firmly on the rear to click the aerial into place
(Diagram B).
• Adjust the angle of the aerial mast as required. More
vertical generally ensures better reception.
• Trim to shape and attach the clear protective film sticker
under where the tail magnet contacts the roof to
prevent scratching.
5. Route the cable
Route the aerial cable to position the connector to where
you will fit the main unit.
Diagram A
Diagram B
3. 4.
1. 2.

6
Highway 300Di Installation Manual v1.1
Fit cables and connections
Fit USB extension and aux in cables
Route the USB extension (used for MP3/iPod connection) and aux-in cable from e.g. the glove box,
to where you will fit the main unit, as required. Note that even if this cable is not required for use
with music devices, it is recommended that it is installed to enable easy access to the USB socket
for software updates.
Fit connections to the head unit
Slide out the head unit and connect aux-in cable from Highway or connect the FM pass-through
cable and reroute the existing FM aerial cable and the pass through cable to where you will fit the
main unit. Aerial adapters (Fakra/ISO/DIN) or extensions may be required.
Note If the Line out connection on Highway is used the FM transmit/pass through is disabled.
Connect the power loom
Connect the supplied loom to the vehicle’s system ensuring the Highway 300Di power connector is
positioned where you will fit the main unit.
Note The supplied loom provides a permanent live and ignition controlled live feed to Highway
but also offers other connections that may not be required. Ensure any unused wires are safely
taped up and securely tied.
Mount the controller
1. Run the cable for the controller from where you will fit the main unit to the desired mounting
position e.g. on the dashboard and mount the bracket as required – either using the supplied
sticky pad, swivel bracket or third party mounting bracket.
2. Once secure – click the controller onto the controller bracket making sure it is securely
mounted.
Connect all cables to the main unit
1. Connect all cables to the main unit and trial fit it in place.
2. Slide the head unit back into place.
Check operation/setup
1. As soon as the power is connected, Highway 300Di will switch on automatically, once it has
started up it will ask you to select a language.
2. Turn the Select knob to browse and press the knob to choose your preferred language.
3. An autotune will be performed to scan for digital stations and Highway will tune to a digital
station when complete.
4. Switch on the head unit and select the aux-in source or FM radio depending on fitting method.
5. Check all sources/connections work.
Installer settings
Installer settings are provided to enable the initial setup, to prevent unintentional changing these
appear in a hidden menu. To access the installer settings:
1. Press , , , , in quick succession.
2. Turn the Select knob to browse through the following options and press the Select knob to
choose one.
Aerial input source
Choose the required source depending on the type of aerial you are using:
Connector 8 (powered) Choose this if using the supplied active aerial. (Default)
Connector 8 (unpowered) Choose this if using an alternative unpowered digital aerial like a
film windscreen aerial or mag-mount type.
Connector 7 Choose this if using the existing car aerial.
Note Unless the existing car aerial is specifically designed for digital radio reception, performance
is likely to be very poor to unusable.
Autotune
Performs a scan for digital stations as per initial start-up.
FM pass-through
Choose from two FM pass-through connection options:
Disabled Highway 300Di output effectively replaces all FM stations when
Highway is switched on (Default).
Enabled Highway 300Di output is blended in to the FM waveband, alongside
normal broadcast FM stations.
Software upgrade
Use this option to update Highway 300Di’s software if you have an update available and loaded on
a USB stick. See the Owner’s manual for more details.
Factory reset
Use this option to reset all settings including the installer settings above to defaults.

7
Highway 300Di Installation Manual v1.1
Description Part no. Image
Complete Active
Aerial
VL-61726
(Contains
VL-61739 &
VL-61744)
Adjustable
Bracket
VL-61749
Aerial Removal
Tool
VL-61741
Controller
Bracket
(Includes cable
and adhesive
pad)
VL-61745
3.5 mm to dual
phono line out
cable (length
1.8m)
VL-61740
Description Part no. Image
External Antenna
Unit
(Includes
mounting plinth,
cleaning wipe
and removal
tool, excludes
aerial mast)
VL-61739
External Aerial
Mast
VL-61738
Installer’s Cable
Kit
(Includes power
loom and RF
lead)
VL-61748
USB Extension
Cable (length
1.1m)
VL-61746
Internal Aerial
Block
(Includes L-band
antenna and
cleaning wipe)
VL-61744
3.5 mm to 3.5
mm line out
cable (length
1.8m)
VL-61747
Description Part no. Image
Windscreen
adhesive x 2
(Includes
external &
internal adhesive
and cleaning
wipes)
VL-61752
No image available
Internal Only Film
Aerial
VL-61743
Controller VL-61750
Main unit VL-61751
Aerial extension
cable (length
2.5m)
VL-61791
No image available
Spare Parts
The following list of spares and accessories are available for Highway 300Di.

8
Highway 300Di Installation Manual v1.1
Trademarks
Highway 300Di, PURE, the PURE logo, Imagination Technologies, and the Imagination
Technologies logo are trademarks or registered trademarks of Imagination Technologies Limited.
iPhone, iPod and iPad are trademarks of Apple Inc., registered in the U.S. and other countries.
All other product names are trademarks of their respective companies. Version 1.1 2012.
Copyright
Copyright © 2012 Imagination Technologies Limited. All rights reserved. No part of this publication
may be copied or distributed, transmitted, transcribed, stored in a retrieval system, or translated
into any human or computer language, in any form or by any means, electronic, mechanical,
magnetic, manual or otherwise, or disclosed to third parties without the express written permission
of Imagination Technologies Limited.
Warranty information
Imagination Technologies Ltd. warrants to the end user that this product will be free from defects
in materials and workmanship in the course of normal use for a period of two years from the date
of purchase. This guarantee covers breakdowns due to manufacturing or design faults; it does
not apply in cases such as accidental damage, however caused, wear and tear, negligence,
adjustment, modification or repair not authorised by us. Should you have a problem with your unit
please contact your supplier or contact PURE Support at http://support.pure.com. If you need to
return your product please use the original packaging and include all parts and accessories. We
reserve the right to refuse incomplete or badly packaged returns.
Disclaimer
Imagination Technologies Limited makes no representation or warranties with respect to the
content of this document and specifically disclaims any implied warranties of merchantability or
fitness for any particular purpose. Further, Imagination Technologies Limited reserves the right to
revise this publication and to make changes in it from time to time without obligation of Imagination
Technologies Limited to notify any person or organization of such revisions or changes.

9
Highway 300Di Installation Manual v1.1
Australasia
PURE Australasia Pty Ltd
www.pure.com/au
http://support.pure.com/au
Deutschland
PURE
Karl-Marx Strasse 6,
64589 Stockstadt/Rhein
Germany
www.pure.com/de
http://support.pure.com/de
Schweiz
PURE - Vertrieb über:
TELANOR AG
Unterhaltungselektronik
Bachstrasse 42
4654 Lostorf
Schweiz/Switzerland
www.telanor.ch
info@telanor.ch
United Kingdom
PURE (headquarters)
Imagination Technologies Ltd.
Home Park Estate,
Kings Langley
Herts, WD4 8LZ
United Kingdom
www.pure.com
http://support.pure.com
Other manuals for HIGHWAY 300DI
4
Table of contents
Other PURE Radio manuals

PURE
PURE One Maxi User manual

PURE
PURE Marshall EVOKE-1S User manual

PURE
PURE EVOKE Flow User manual

PURE
PURE HIGHWAY 300DI User manual

PURE
PURE Pure flow User manual

PURE
PURE Tempus-1XT User manual

PURE
PURE Siesta S6 Specification sheet

PURE
PURE One User manual

PURE
PURE ONE CLASSIC User manual

PURE
PURE Siesta Home User manual

PURE
PURE Evoke 2S User manual

PURE
PURE elan dx20 User manual

PURE
PURE TEMPUS-1 User manual

PURE
PURE DRX-601EX User manual

PURE
PURE Pop Maxi with Bluetooth User manual

PURE
PURE TEMPUS-1 User manual

PURE
PURE Evoke User manual

PURE
PURE Evoke C-D4 User manual

PURE
PURE Avalon N5 User manual

PURE
PURE Evoke F4 User manual