R&G ECC0289R User manual

Page 1of 9ECC0289R
R&G
Unit 1, Shelley’s Lane, East Worldham, Alton, Hampshire, GU34 3AQ
Tel: +44 (0)1420 89007 Fax: +44 (0)1420 87301 www.rg-racing.com Email: info@rg-racing.com
FITTING INSTRUCTIONS FOR ECC0289R RHS CLUTCH & PULSE COVER
FOR BMW S1000RR ’19-
THIS KIT CONTAINS THE ITEMS PICTURED AND LABELLED BELOW.
DO NOT PROCEED UNTIL YOU ARE SURE ALL PARTS ARE PRESENT.
PLEASE NOTE THAT THE WAY THE KIT IS PACKED DOES NOT NECESSARILY REPRESENT THE WAY OF
MOUNTING TO THE BIKE
PLEASE NOTE THAT IN CASES WHERE KITS ARE PACKED WITH RUBBER WASHERS HOLDING THE COMPONENTS
ONTO THE BOLT –THE RUBBER WASHERS SHOULD BE THROWN AWAY!
THE PARTS SHOWN MAY BE REPRESENTATIVE ONLY (FOR CLARITY OF INSTRUCTIONS ONLY)
DIGITAL COPIES OF THESE INSTRUCTIONS ARE AVAILABLE TO DOWNLOAD FROM WWW.RG-RACING.COM
GENERAL TORQUE SETTINGS
M4 BOLT = 8Nm
M5 BOLT = 12Nm
M6 BOLT = 15Nm
M8 BOLT = 20Nm
M10 BOLT = 40Nm
TOOLS REQUIRED
T25 & T30 Torx Key/Socket
5mm A/F Allen Key/Socket
THIS KIT CONTAINS:
Item 1= 1x Clutch & Pulse Cover with
Spacers & Slider Fitted
(PC0289R)
Item 2 = 4x M6 x 45mm Stainless Steel
Cap-Head Bolts

Page 3of 9ECC0289R
R&G
Unit 1, Shelley’s Lane, East Worldham, Alton, Hampshire, GU34 3AQ
Picture 5
Please make sure the engine is cold before proceeding with the fitting of the R&G cover.
Remove the fairing bolts shown in pictures 1-3 using a T25 key/socket, then gently pull the fairing
back to give access to the engine case bolts.
Referring to the holes located on the R&G cover and shown in picture 5, remove the 4x relevant
engine case bolts using a T30 key/socket, as shown in picture 4.
Referring to picture 5 for orientation, carefully offer up the R&G cover to the engine and gently
slide it over. Ensure that the four bolt holes line up, and then push on as far as it will go.
Fit the 4x 45mm M6 bolts to the vacant holes on the cover, then, with a 5mm Allen key, tighten the
bolts equally so that they pull the cover into place. DO NOT FULLY TIGHTEN.
Finally use a torque wrench set at 10 Nm (7 Lb ft) to fully tighten.
Refit the fairing bolts as original.
It is suggested that you check the tightness of the mounting bolts on a regular basis i.e. when
cleaning, after the first heat cycle of the engine and then once a month.
NOTE for the cleaning of this product you should only use a soft polishing cloth and a mild general
cleaning agent.
AVOID HARMFUL CHEMICALS. IF IN DOUBT DO NOT USE AS THEY COULD ALTER THE
STRENGTH OF THE COVER.
R&G will accept no liability if the above procedure and torque settings are not followed.

Page 4of 9ECC0289R
R&G
Unit 1, Shelley’s Lane, East Worldham, Alton, Hampshire, GU34 3AQ
ISSUE 1 –29/07/2019 (FB)
CONSUMER NOTICE
The catalogue description and any exhibition of samples are only broad indications of the Products and R&G may make design
changes which do not diminish their performance or visual appeal and supplying them in such state shall conform to the order.
The Buyer acknowledges no representation or warranty (other than as to title) has been given or will apply to the Products other
than those in R&G’s order or confirmation and the Buyer confirms it has chosen the Products as being of merchantable quality
and suitable for its particular purposes. Where R&G fits the Products or undertakes other services it shall exercise reasonable
skill and care and rectify any fault free of charge unless the workmanship has been disturbed. The Buyer is responsible for
ensuring that the warranty on the motorcycle is not affected by the fitting of the Products. On return of any defective Products
R&G shall at its option either supply a replacement or refund the purchase money but shall not be liable if the Products have
been modified or used or maintained otherwise than in accordance with R&G’s or manufacturer’s instructions and good
engineering practice or if the defect arises from accident or neglect. Other than identified above and subject to R&G not limiting
its liability for causing death and personal injury, it shall not be liable for indirect or consequential loss and otherwise its liability
shall be limited to the amounts paid by the Buyer for the Products or the fitting or service concerned. These terms do not affect
the Buyer’s statutory rights.
R&G RACING RETURNS POLICY (NON-FAULTY GOODS)
Returns must be pre-authorised (if not pre-authorised the return will be rejected). Goods may only be returned direct to us if
they were purchased direct from us (customer must prove if necessary). Otherwise to be returned to original vendor. Goods
must be in re-sellable condition, in the opinion of R&G Racing. All returns are subject to a 25% restocking and handling fee (25%
of the gross value exc. P&P –at the prevailing price at time of purchase). The customer must pay any and all carriage charges.
No returns of discontinued products, unless within 14 days of purchase. This policy does not affect your statutory rights and does
not refer to faulty goods.

Page 5of 9ECC0289R
R&G
Unit 1, Shelley’s Lane, East Worldham, Alton, Hampshire, GU34 3AQ
NOTICE DE MONTAGE POUR ECC0289R
PROTECTION EMBRAYAGE CÔTÉ DROIT
POUR BMW S1000RR ’19-
LE KIT CONTIENT LES ARTICLES EXPOSES CI-DESSOUS,VERIFIER QUE TOUTES LES PIECES SOIENT PRESENTES
AVANT DE PROCEDER AU MONTAGE.
LA FAÇON DONT LE KIT EST EMBALLE NE CORRESPOND PAS FORCEMENT A LA FAÇON DE MONTER LES PIECES SUR
LA MOTO
NOTEZ QUE SI LES KITS SONT EMBALLES AVEC DES RONDELLES EN CAOUTCHOUC SERVANT A TENIR LES
COMPOSANTS,CES RONDELLES DOIVENT ETRE JETEES !
LES PARTIES PRESENTÉES PEUVENT ETRE UNIQUEMENT REPRESENTATIVES (POUR LA
CLARTE DES INSTRUCTIONS UNIQUEMENT)
Notice disponible au téléchargement sur WWW.RG-RACING.COM
GENERAL TORQUE SETTINGS
M4 BOULON = 8Nm
M5 BOULON = 12Nm
M6 BOULON = 15Nm
M8 BOULON = 20Nm
M10 BOULON = 40Nm
OUTILS REQUIS
Clés Torx T25 & T30
Clé Allen 5mm
CE KIT CONTIENT :
Article 1 = 1x Protection embrayage avec
entretoises & slider montés
(PC0289R)
Article 2 = 4x M6 x 45mm Boulons

Page 6of 9ECC0289R
R&G
Unit 1, Shelley’s Lane, East Worldham, Alton, Hampshire, GU34 3AQ
NOTICE DE MONTAGE
Assurez-vous que le moteur soit froid avant de commencer l’installation.
Retirez les boulons de carénage illustrés sur les photos 1 à 3 à l'aide d'une clé / douille T25, puis
tirez doucement le carénage vers l'arrière pour permettre l'accès aux boulons du carter moteur.
En vous référant aux trous situés sur le capot de la protection R&G et illustrés à la photo 5, retirez
les 4 boulons du carter moteur à l'aide d'une clé / douille T30, comme indiqué sur la photo 4.
En vous référant à la photo 5 pour vous orienter, posez avec précaution la protection R&G sur le
moteur et faites-le glisser doucement. Assurez-vous que les quatre trous de boulons soient alignés,
puis poussez aussi loin que possible.
Insérer les 4 boulons 45mm M6 dans les trous vacants de la protection, puis, à l'aide d'une clé
Allen de 5 mm, serrez les boulons de façon égale pour que la protection se mette en place. NE
SERREZ PAS COMPLÈTEMENT.
Enfin, utilisez une clé dynamométrique réglée à 10 Nm (7 lb-ft) pour serrer complètement.
Remonter les boulons de carénage comme à l’origine.
Il est conseillé de vérifier régulièrement le serrage des boulons de fixation, c’est-à-dire lors du
nettoyage, après le premier cycle de chauffage du moteur, puis une fois par mois.
NOTE : Pour le nettoyage de ce produit, vous ne devez utiliser qu'un chiffon doux et un détergent
doux.
ÉVITEZ LES PRODUITS CHIMIQUES NUISIBLES. EN CAS DE DOUTE, NE L'UTILISEZ PAS, IL PEUT
MODIFIER LA RÉSISTANCE DE LA PROTECTION.
R&G n'acceptera aucune responsabilité si la procédure ci-dessus et les réglages de couple ne sont
pas suivis.

Page 7of 9ECC0289R
R&G
Unit 1, Shelley’s Lane, East Worldham, Alton, Hampshire, GU34 3AQ
MONTAGEANLEITUNG FÜR ECC0289R ABDECKUNG RECHTE SEITE
(KUPPLUNG) - BMW S1000RR ’19-
ALLE KIT-TEILE SIND UNTEN ABGEBILDET UND GEKENNZEICHNET. ÜBERPRÜFEN SIE, DASS ALLE
TEILE VORHANDEN SIND, BEVOR SIE MIT DER MONTAGE BEGINNEN.
HINWEIS: DIE VERPACKUNG DER TEILE STELLT NICHT DIE REIHENFOLGE DER MONTAGE DAR.
HINWEIS FÜR KITS MIT PLASTIKUNTERLEGSCHEIBEN AN DEN SCHRAUBEN –DIESE
PLASTIKUNTERLEGSCHEIBEN WERDEN NICHT FÜR DEN EINBAU BENÖTIGT!
DIE UNTEN ABGEBILDETEN TEILE DIENEN LEDIGLICH ZUR ERKLÄRUNG
EINE DIGITALE VERSION DIESER MONTAGEANLEITUNG KANN AUF FOLGENDER SEITE HERUNTERGELADEN
WERDEN: WWW.RG-RACING.COM

Page 8of 9ECC0289R
R&G
Unit 1, Shelley’s Lane, East Worldham, Alton, Hampshire, GU34 3AQ
ALLGEMEINE ANZUGSDREHMOMENTE
M4 SCHRAUBE = 8Nm
M5 SCHRAUBE = 12Nm
M6 SCHRAUBE = 15Nm
M8 SCHRAUBE = 20Nm
M10 SCHRAUBE = 40Nm
SIE BENÖTIGEN FOLGENDES WERKZEUG
T25 & T30 Torx-Schlüssel
5mm Inbusschlüssel
INHALT DES KITS
Artikel 1 = Abdeckung für Kupplung mit
vormontierten Sturzpad
(PC0289R)
Artikel 2 = 3x M6 x 45mm Edelstahl-
Inbusschrauben
Abbildung 5

Page 9of 9ECC0289R
R&G
Unit 1, Shelley’s Lane, East Worldham, Alton, Hampshire, GU34 3AQ
Bitte achten Sie unbedingt darauf, dass der Motor kalt ist, bevor Sie mit der Montage der
R&G Abdeckung beginnen.
Entfernen Sie die Verkleidungsschrauben, die in den Abbildungen 1-3 abgebildet sind, mit einem
T25 Torx-Schlüssel, und ziehen Sie die Verkleidung zurück, um Zugang zu den Schrauben für das
Motorgehäuse zu ermöglichen.
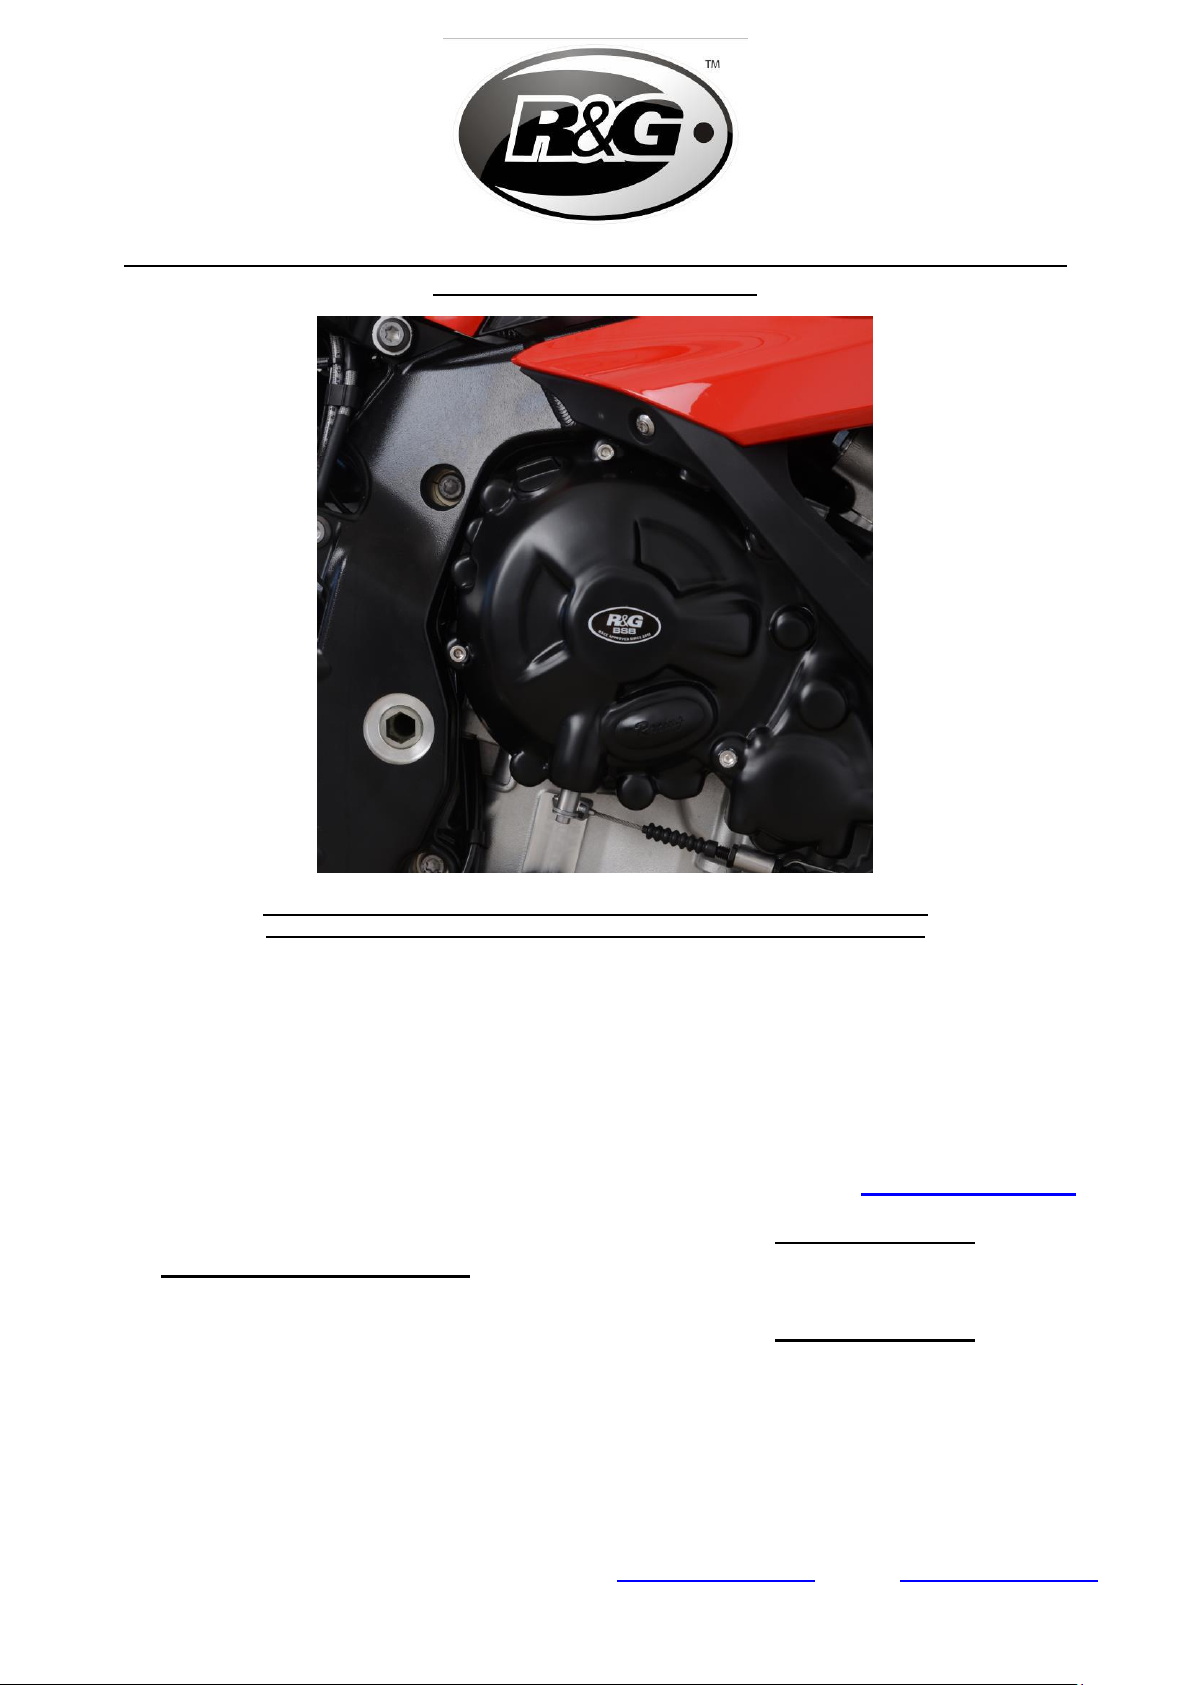
Entsprechend der Öffnungen in der R&G Abdeckung (siehe Abbildung 5), die 3x passenden
Schrauben für die Wasserpumpe mit einem T30 Schüssel entfernen–siehe Abbildung 4.
Mit Abbildung 5 als Referenz, vorsichtig die R&G Abdeckung an das Motorgehäuse ansetzen und
drüber schieben. Achten Sie darauf, dass die vier R&G Schrauben ausgerichtet sind, dann die
Abdeckung soweit wie möglich eindrücken.
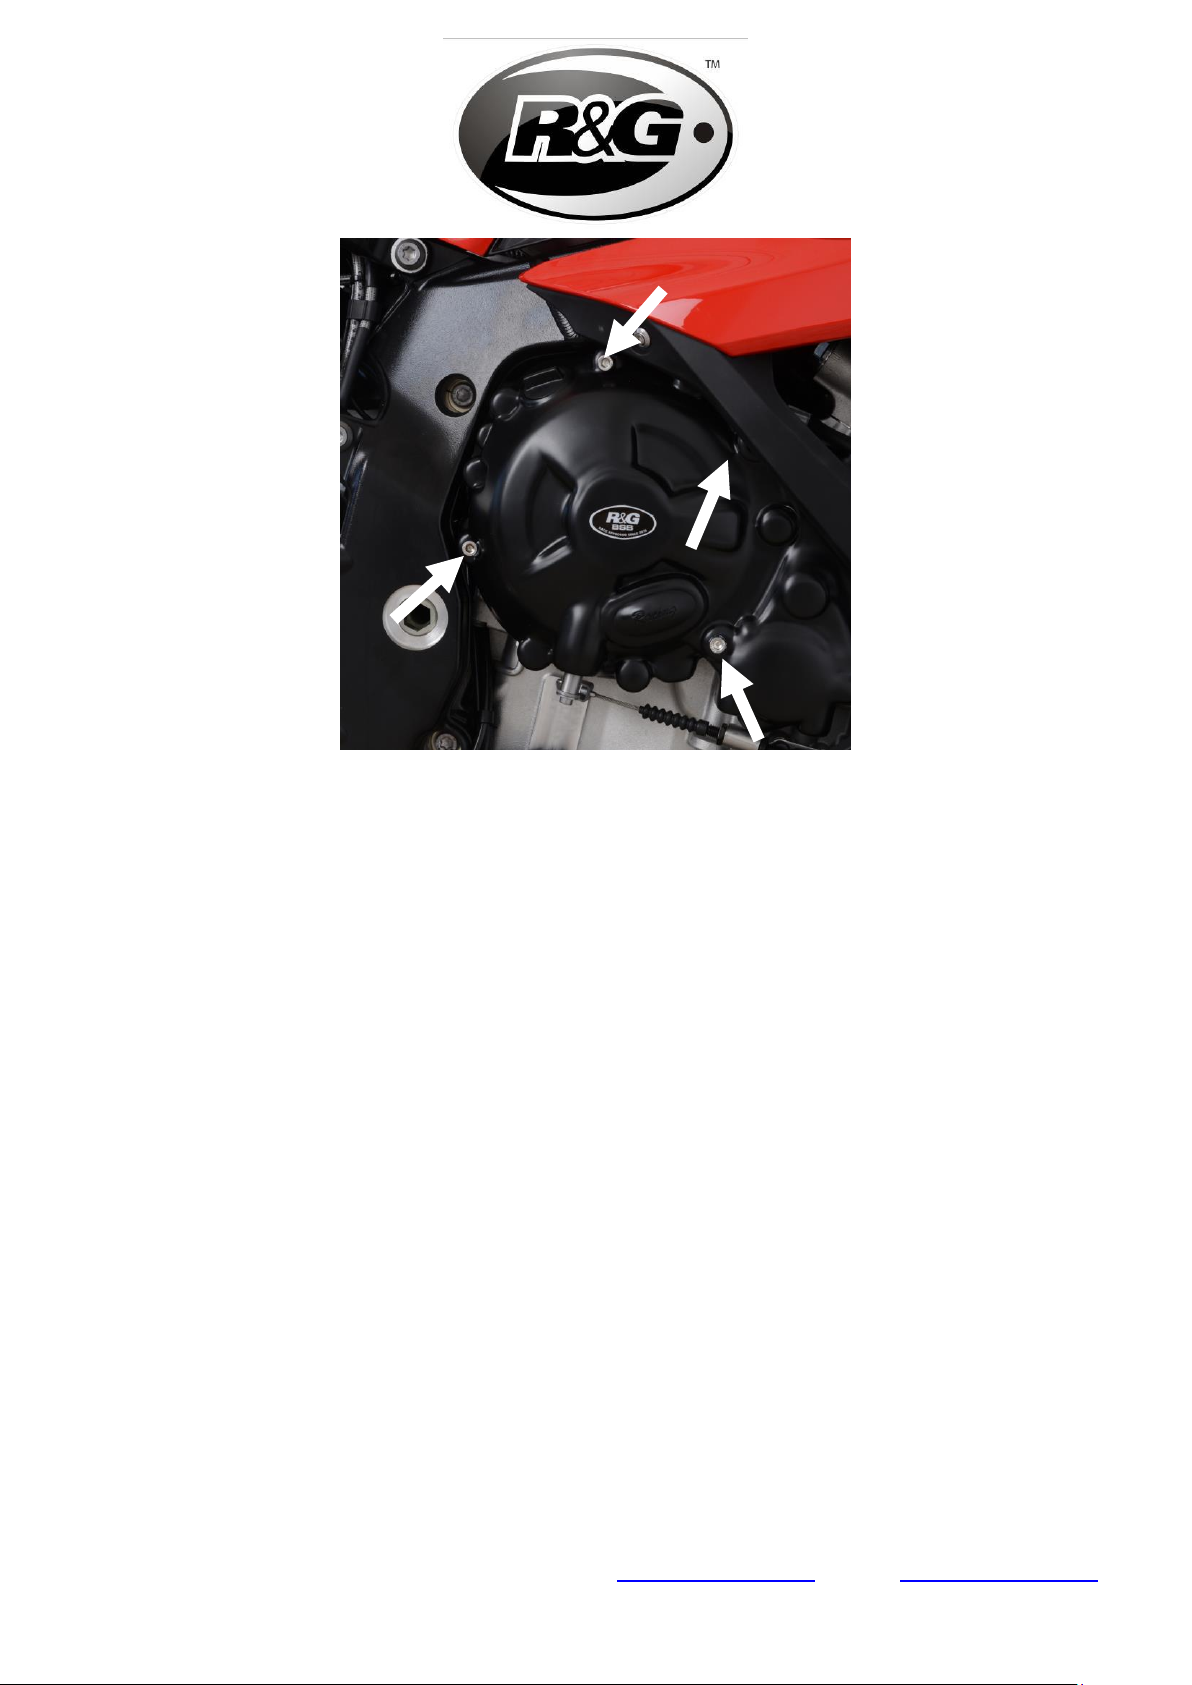
Montieren Sie die 4 x 45mm M6 Schrauben an den freien Öffnungen in der Abdeckung, dann die
Schrauben mit einem 5mm Inbusschlüssel gleichmäßig anziehen, sodass sie die Abdeckung in
Position ziehen. NICHT FESTZIEHEN.
Benutzen Sie einen Drehmomentschlüssel, der auf 10 N/m (7 Lb/ft) eingestellt ist, um die
Schrauben festzuziehen.
Montieren Sie die Verkleidungsschrauben wie ursprünglich wieder.
Es wird empfohlen, die Festigkeit der Montageschrauben nach dem ersten Warmlauf sowie in
regelmäßigen Abständen zu kontrollieren (d.h. nach dem ersten Warmlauf des Motors, dann einmal
im Monat).
HINWEIS: Bei der Reinigung dieses Produkts benutzen Sie nur ein weiches Poliertuch und ein
mildes Putzmittel.
VERMEIDEN SIE SCHÄDLICHE CHEMIKALIEN. IM ZWEIFELSFALL NICHT BENUTZEN, DA
SIE DIE FESTIGKEIT DER ABDECKUNG VERÄNDERN KÖNNEN.
R&G übernimmt keine Haftung, wenn die obengenannten Schritte nicht eingehalten werden
und/oder die angegebenen Anzugsdrehmomente nicht angewendet werden.
AUSGABE 1 –29/07/2019 (FB)
Table of contents
Other R&G Motorcycle Accessories manuals