R&G LP0264BK User manual

Page 1of 24 LP0264
R&G
Unit 1, Shelley’s Lane, East Worldham, Alton, Hampshire, GU34 3AQ
Tel: +44 (0)1420 89007 Fax: +44 (0)1420 87301 www.rg-racing.com Email: info@rg-racing.com
FITTING INSTRUCTIONS FOR LP0264BK LICENCE PLATE BRACKET
HONDA CB650R & CBR650R 2019-
THIS KIT CONTAINS THE ITEMS PICTURED AND LABELLED BELOW.
DO NOT PROCEED UNTIL YOU ARE SURE ALL PARTS ARE PRESENT.
Please note that the way the kit is packed does not necessarily represent the way of
mounting to the bike.
THE PARTS SHOWN MAY BE REPRESENTATIVE ONLY (FOR CLARITY OF INSTRUCTIONS ONLY).
Please note that in cases where kits are packed with rubber washers holding the
components onto the bolt –the rubber washers should be thrown away!
Digital copies of these instructions are available to download from www.rg-racing.com

Page 3of 24 LP0264
R&G
Unit 1, Shelley’s Lane, East Worldham, Alton, Hampshire, GU34 3AQ
Tel: +44 (0)1420 89007 Fax: +44 (0)1420 87301 www.rg-racing.com Email: info@rg-racing.com
LEGEND
ITEM 1 = TB0264 LICENCE PLATE MOUNTING BRACKET (WITH 4 x SPACERS INSTALLED)
ITEM 2 = LA0002 No PLATE LIGHT ASSEMBLY (INCLUDES SHROUD)
ITEM 3 = SMW0146 No PLATE LIGHT GUARD
ITEM 4 = M8x1.25x20mm LONG BUTTON HEAD BOLTS (4)
ITEM 5 = M8 WASHERS 16mm O/DIA (4)
ITEM 6 = I0049 INDICATOR ADAPTORS (4)
ITEM 7 = I0050 INDICATOR SPACERS (4)
ITEM 8 = IWC0002 MINI INDICATOR WIRING COVERS (2)
ITEM 9 = CON0009 CONNECTORS (FOR MINI INDICATORS & LICENCE PLATE ILLUMINATOR)
ITEM 10 = CABLE TIES (3)
ITEM 11 = 150mm length of heat-shrink (3)
ITEM 12 = SELF ADHESIVE CABLE CLIPS (4)
ITEM 13 = REFLECTOR
TOOLS REQUIRED
•Set of metric Allen keys to include 6mm and 8mm.
•Phillips head screwdriver
•8mm Spanner
•6mm socket and ratchet
•Small flat bladed screw driver
•Small amount of adhesive
MAXIMUM TORQUE SETTINGS
•M4 BOLT = 8Nm
•M5 BOLT = 12Nm
•M6 BOLT = 15Nm
•M8 BOLT = 20Nm
•M10 BOLT = 40Nm

Page 9of 24 LP0264
R&G
Unit 1, Shelley’s Lane, East Worldham, Alton, Hampshire, GU34 3AQ
Tel: +44 (0)1420 89007 Fax: +44 (0)1420 87301 www.rg-racing.com Email: info@rg-racing.com
FITTING INSTRUCTIONS
•Remove both seats, using the lock under the tail for the passenger seat. Then using a
5mm allen key, remove the 2 rider seat bolts as shown in pictures 1 and 2.
•Locate the OEM indicator and license plate illuminator connectors under the rider seat.
These come in a block and can be disconnected using a small flat bladed screwdriver to
lift the plastic tab to disconnect the 3 connections arrowed in picture 3.
•Remove the cable tie holding these 3 wires together on the LHS of the tail unit.
•Using an 8mm allen key, remove the 4 bolts that connect the OEM licence plate unit to
the bike (as shown in picture 4) and carefully lower this away from the bike while feeding
the 3 disconnected wires through the plastic opening on the LHS of the tail unit as
arrowed in picture 5, taking note of the wiring route.
If using OEM indicators:
If you are re-using the OEM Honda indicators these will need to be removed from the
OEM license plate unit following the steps here, if using Mini indicators, skip this section.
•Begin by locating and removing the 6 allen head screws found on the underside of the
OEM license plate unit as shown in picture 6.
•Remove the 4 cross-head screws located at the back of the unit as shown in pictures 7
and 8.
•After removing the fasteners detailed in the previous steps, the tail unit should easily
come apart by removing the back plate as in picture 9 and carefully separating the two
halves as shown in picture 10.
•Locate and remove the indicator securing bolt from the inside of the licence plate unit
using an 8mm spanner as shown in picture 11.
•Remove the securing plate on the back of the indicator as shown in picture 12 and put to
one side for use later.
•The indicator can now be carefully pulled out of the tail unit by squeezing the rubber to
release it from the mount.
•In the same fashion as removed, ensuring the LHS and RHS indicators are placed on the
correct side, place each indicator rubber through the correct mounts on the R&G tail
bracket (Item 1).
•Each indicator will need an indicator spacer (item 7) to secure the rubber, feed each
spacer over the wire and feed indicator rubber through the spacer so it locates against
the R&G tail bracket as arrowed in picture 13.
•Reassemble the indicator securing plate in the same way it was removed and fix in place
with the OEM 8mm hex bolt as shown in picture 14.
•Proceed to Licence plate illuminator fitting section.
If using R&G Mini indicators:
NOTE: 1 x set of RGR0002 resistors (available separately) may be required to achieve the
correct flash rate.
•Put the tail unit to one side and make sure it is stored safely so the bike can be returned
to standard if desired.

Page 10 of 24 LP0264
R&G
Unit 1, Shelley’s Lane, East Worldham, Alton, Hampshire, GU34 3AQ
Tel: +44 (0)1420 89007 Fax: +44 (0)1420 87301 www.rg-racing.com Email: info@rg-racing.com
•Fit one length of heat shrink (Item 11) over each pair of indicator wires and heat with a
hot air gun or hair dryer to neatly hold and protect the wires.
•To assemble your R&G tail tidy with mini indicators, you will need to use the indicator
adapter plates (item 6) included with the kit. Thread one spacer over the indicator wire
with the larger surface against the indicator body.
•Thread the wire and indicator spacer through one indicator mount on the tail bracket.
Thread the second indicator adapter plate over the exposed wire so both raised plastic
bosses sit into the tail bracket as shown in the assembly diagram on page 2.
•Sandwich the tail bracket with another indicator adapter, ensuring both raised faces sit
into the bracket mount, and secure in place using the locking nut provided with the
indicator. Do NOT overtighten.
•Thread one indicator wiring cover (item 8) over each pair of indicator wires (a small
amount of lubricant or washing up liquid will help with this)
•The assembly should resemble that shown in picture 15.
•Connect 2 x CON0009 (item 9) connectors to the corresponding wires of the R&G mini
indicators using the following colour code:
oBlack –Black
oYellow –Black
•If using RGR0002 Resistors they should be connected at this point using the colour chart
below:
oYellow –Yellow
oBlack –Black
Licence plate illuminator
•Once indicators are fitted, the licence plate illuminator (item 2) can be assembled and
fitted to the Tail bracket (item 1)
•The shroud provided should be fixed to the light using a small amount of superglue as
shown in picture 16, the purpose of this is to direct the light onto the plate once fitted.
•Fit one length of heat shrink (Item 11) over the red and black wires and heat gently with
a hot air gun or hairdryer to neatly hold and protect the wires.
•Place the threaded sections of the licence plate illuminator through the mount holes on
the rear of the tail bracket with the light side facing down.
•To protect the wires on the underside of the tail bracket, place the number plate light
guard over the exposed threads on the inside of the tail bracket with the flat section
facing downwards, as shown in picture 17.
•Using your ratchet and 6mm socket, fasten this assembly using the two washers and
nuts provided with the light assembly.
•Connect one of the provided CON0009 (item 9) wiring connectors to the corresponding
bullet connectors of the light.
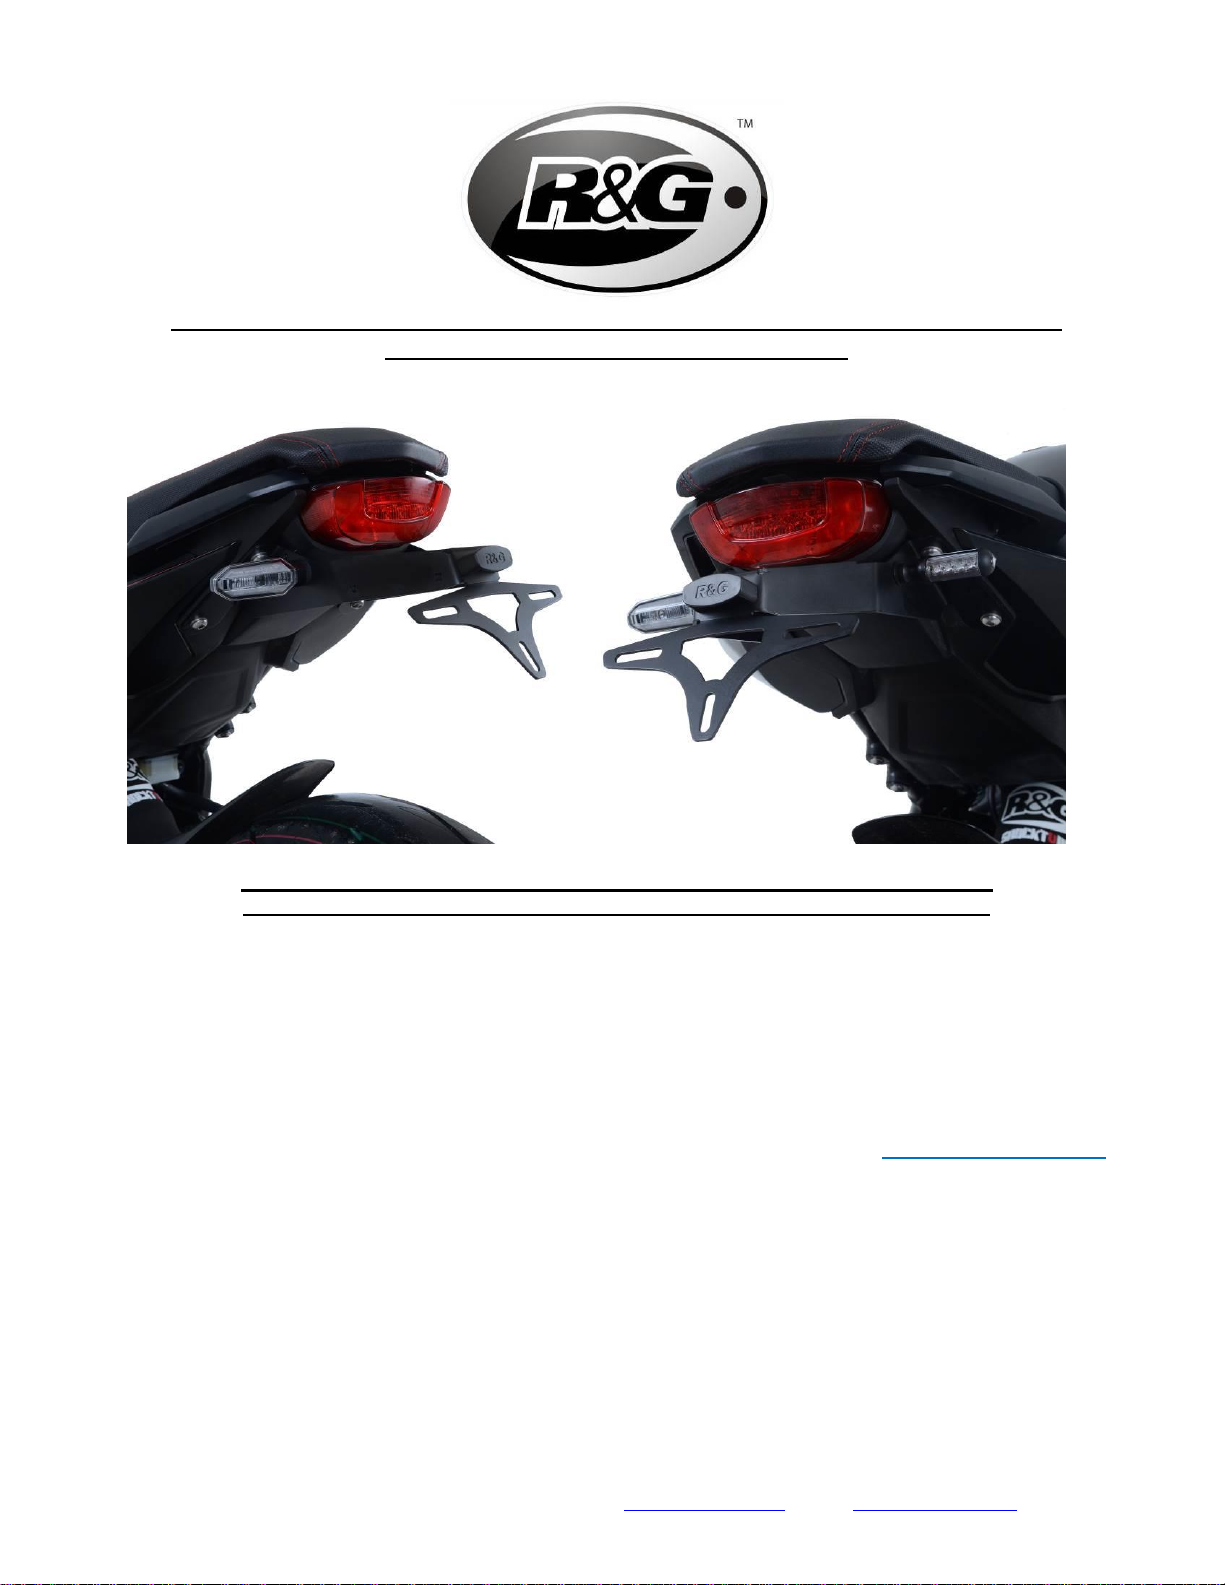
Fitting Assembly to bike
•The tail bracket is now ready to be offered up to the bike, first, thread the wires through
the opening in the LHS of the bike where the OEM wires were originally removed.
•Carefully lift the tail bracket assembly up to the 4 mounting holes on the underside of the
tail unit while pulling the wires into the space under the pillion seat.

Page 11 of 24 LP0264
R&G
Unit 1, Shelley’s Lane, East Worldham, Alton, Hampshire, GU34 3AQ
Tel: +44 (0)1420 89007 Fax: +44 (0)1420 87301 www.rg-racing.com Email: info@rg-racing.com
•Place the pre-fitted tail bracket spacers into the recesses left by the OEM unit and use
your 5mm allen key to affix to the bike using the 4 x M8 spacers (item 5) and 4 x 20mm
M8 Button head bolts (item 4) as shown in picture 18.
•After re-routing the wires as they were originally removed, re-connect the indicators and
number plate light to the original connectors on the main wiring loom. Ensuring the
correct indicator is connected to the corresponding side as in picture 19.
•At this point, turn on the ignition and check all lights function correctly, if lights fail to
illuminate, check connections. If indicators do not illuminate, swap the bullet connectors
round.
•Use cable ties (item 10) through the holes in the tail bracket to secure the indicator and
light wires and ensure this is neat and hidden from sight. You may wish to use the self-
adhesive cable clips (item 12) to aid this.
•Tidy the wiring on the inside of the bike using the OEM cable tie, ensure the wires do not
interfere with seat mounts.
•Check all bolts and screws are tightened to the correct torque.
•Re-attach both seats as they were removed
•Mount the licence plate (it may require drilling) to the rear of the bracket low enough so
that it does not cover the indicators.
•IMPORTANT: IF FITTING A FULL-SIZE LICENCE PLATE AND PLACING IT FAR
DOWN ON THE LICENCE PLATE HANGER, THERE IS A SMALL CHANCE OF THE
LICENCE PLATE HITTING THE BACK WHEEL UNDER HEAVY LOAD AND OVER
LARGE BUMPS IN THE ROAD. IT IS YOUR RESPONSIBILITY TO CHECK FOR THIS
POSSIBILITY AND TAKE AVOIDING ACTION. FAILURE TO CHECK THIS COULD
RESULT IN SERIOUS INJURY.
•Depending on local laws, attach enclosed reflector (item 13) in an appropriate location
•Retest the licence plate illuminator and all lights before riding.
ISSUE 1 18/03/19 (DM)
CONSUMER NOTICE
The catalogue description and any exhibition of samples are only broad indications of the Products and R&G may make
design changes which do not diminish their performance or visual appeal and supplying them in such state shall conform
to the order. The Buyer acknowledges no representation or warranty (other than as to title) has been given or will apply
to the Products other than those in R&G’s order or confirmation and the Buyer confirms it has chosen the Products as
being of merchantable quality and suitable for its particular purposes. Where R&G fits the Products or undertakes other
services it shall exercise reasonable skill and care and rectify any fault free of charge unless the workmanship has been
disturbed. The Buyer is responsible for ensuring that the warranty on the motorcycle is not affected by the fitting of the
Products. On return of any defective Products R&G shall at its option either supply a replacement or refund the purchase
money but shall not be liable if the Products have been modified or used or maintained otherwise than in accordance
with R&G’s or manufacturer’s instructions and good engineering practice or if the defect arises from accident or neglect.
Other than identified above and subject to R&G not limiting its liability for causing death and personal injury, it shall not
be liable for indirect or consequential loss and otherwise its liability shall be limited to the amounts paid by the Buyer for
the Products or the fitting or service concerned. These terms do not affect the Buyer’s statutory rights.
R&G RETURNS POLICY (NON-FAULTY GOODS)
Returns must be pre-authorised (if not pre-authorised the return will be rejected). Goods may only be returned direct to
us if they were purchased direct from us (customer must prove if necessary). Otherwise to be returned to original
vendor. Goods must be in re-sellable condition, in the opinion of R&G. All returns are subject to a 25% restocking and
handling fee (25% of the gross value exc. P&P –at the prevailing price at time of purchase). The customer must pay
any and all carriage charges. No returns of discontinued products, unless within 14 days of purchase. This policy does
not affect your statutory rights and does not refer to faulty goods.

Page 12 of 24 LP0264
R&G
Unit 1, Shelley’s Lane, East Worldham, Alton, Hampshire, GU34 3AQ
Tel: +44 (0)1420 89007 Fax: +44 (0)1420 87301 www.rg-racing.com Email: info@rg-racing.com
NOTICE DE MONTAGE POUR LP0264BK SUPPORT DE PLAQUE
HONDA CB650R & CBR650R 2019-
Le kit contient les articles exposés ci-dessous, vérifier que toutes les pièces soient
présentes avant de procéder au montage.
La façon dont le kit est emballé ne correspond pas forcément à la façon de monter les
pièces sur la moto.
TLES PARTIES PRESENTÉES PEUVENT ETRE UNIQUEMENT REPRESENTATIVES (POUR
LA CLARTÉ DES INSTRUCTIONS UNIQUEMENT).
Notez que si les kits sont emballés avec des rondelles en caoutchouc servant à tenir
les composants, ces rondelles doivent être jetées !
Notice disponible au téléchargement sur www.rg-racing.com

Page 14 of 24 LP0264
R&G
Unit 1, Shelley’s Lane, East Worldham, Alton, Hampshire, GU34 3AQ
Tel: +44 (0)1420 89007 Fax: +44 (0)1420 87301 www.rg-racing.com Email: info@rg-racing.com
LÉGENDE
ARTICLE 1 = TB0264 SUPPORT DE PLAQUE (AVEC 4 x ENTRETOISES INSTALLÉES)
ARTICLE 2 = LA0002 ASSEMBLAGE FEU DE PLAQUE (INCLUS PROTECTION)
ARTICLE 3 = SMW0146 PROTECTION FEU DE PLAQUE
ARTICLE 4 = M8x1.25x20mm BOULONS (4)
ARTICLE 5 = M8 RONDELLES 16mm (4)
ARTICLE 6 = I0049 ADAPTATEURS DE CLIGNOTANTS (4)
ARTICLE 7 = I0050 ENTRETOISES DE CLIGNOTANT (4)
ARTICLE 8 = IWC0002 CACHES FILS DE MINI CLIGNOTANT (2)
ARTICLE 9 = CON0009 CONNECTEURS (POUR MINI CLIGNOTANTS & FEU DE PLAQUE)
ARTICLE 10 = COLLIERS DE SERRAGE (3)
ARTICLE 11 = 150mm LONGUEUR DE MANCHON THERMO RÉTRACTABLE (3)
ARTICLE 12 = CLIPS CÂBLE AUTOCOLLANTS (4)
ARTICLE 13 = RÉFLECTEUR
OUTILS REQUIS
•Clés Allen 6mm et 8mm.
•Tournevis cruciforme
•Clé à molette 8mm
•Cliquet + douille 6mm
•Petit tournevis plat
•Un peu d’adhésif
VALEURS DE SERRAGES RECOMMANDÉES
•M4 BOULON = 8Nm
•M5 BOULON = 12Nm
•M6 BOULON = 15Nm
•M8 BOULON = 20Nm
•M10 BOULON = 40Nm
NOTICE DE MONTAGE
•Retirez les deux sièges en utilisant le verrou situé sous le support du siège passager.
Ensuite, en utilisant une clé Allen de 5 mm, retirez les 2 boulons de la selle du pilote
comme indiqué sur les photos 1 et 2.
•Placez les connecteurs de clignotant d’origine et du feu de plaque d'immatriculation sous
la selle du pilote. Ceux-ci viennent en bloc et peuvent être déconnectés à l'aide d'un petit
tournevis à lame plate permettant de soulever la languette en plastique afin de
déconnecter les 3 connexions fléchées sur la photo 3.
•Retirez l’attache de câble qui maintient ces 3 fils ensemble sur le support de plaque
gauche.

Page 15 of 24 LP0264
R&G
Unit 1, Shelley’s Lane, East Worldham, Alton, Hampshire, GU34 3AQ
Tel: +44 (0)1420 89007 Fax: +44 (0)1420 87301 www.rg-racing.com Email: info@rg-racing.com
•À l'aide d'une clé Allen de 8 mm, retirez les 4 boulons qui connectent l'unité de plaque
d'immatriculation d’origine à la moto (comme indiqué sur la photo 4) et éloignez-le de la
moto avec précaution, tout en passant les 3 fils déconnectés à travers l'ouverture en
plastique du support de plaque gauche, comme indiqué sur la photo 5, en prenant note
du chemin de câblage.
Si vous utilisez les clignotants d’origine :
Si vous réutilisez les clignotants d’origine, ils devront être enlevés du support de plaque
d’origine en suivant les étapes ci-dessous.
Si vous utilisez des mini clignotants, ne tenez pas compte de cette section.
•Commencez par localiser et retirer les 6 vis à tête hexagonale situées sous l’unité de la
plaque d'immatriculation d’origine, comme indiqué sur la photo 6.
•Retirez les 4 vis cruciformes situées à l’arrière de l’appareil, comme indiqué sur les
photos 7 et 8.
•Après avoir retiré les fixations détaillées dans les étapes précédentes, le bloc arrière doit
se séparer facilement en retirant la plaque arrière comme sur la photo 9 et en séparant
soigneusement les deux moitiés comme indiqué sur la photo 10.
•Localisez et enlevez le boulon fixant le clignotant de l'intérieur de l'unité de la plaque
d'immatriculation à l'aide d'une clé plate de 8 mm, comme indiqué sur la photo 11.
•Retirez la plaque de fixation au dos du clignotant, comme indiqué sur la photo 12 et
mettez-la de côté pour une utilisation ultérieure.
•Le clignotant peut maintenant être retiré avec précaution de l’arrière en pressant le
caoutchouc pour le dégager du support.
•De la même manière que lors du démontage, en veillant à ce que les clignotants côté
gauche et droit soient placés du bon côté, placez chaque caoutchouc de clignotant à
travers les supports appropriés sur le support R&G (Article 1).
•Chaque clignotant nécessite une entretoise (article 7) pour fixer le caoutchouc,
introduisez chaque entretoise par-dessus le fil puis introduisez-le caoutchouc de
clignotant à travers l'entretoise de manière à ce qu'il se positionne contre le support de
queue R&G comme indiqué sur la photo 13.
•Remontez la plaque de fixation du clignotant de la même manière que lors du
démontage, puis fixez-la avec le boulon d’origine 8 mm, comme indiqué sur la photo 14.
•Passez à la section de montage du feu de plaque d’immatriculation.
Si vous utilisez les mini clignotants R&G :
REMARQUE : 1 x jeu de résistances RGR0002 (disponible séparément) peut être nécessaire pour
obtenir le bon niveau d’éclairage.
•Placez l’unité de support de côté, et assurez-vous qu’elle soit correctement rangée de
manière à pouvoir la réutiliser si vous le souhaitez.
•Fixez une longueur de manchon thermo rétractable (article 11) sur chaque paire de fils
de clignotants, puis chauffez-la avec un pistolet à air chaud ou un sèche-cheveux pour
maintenir et protéger proprement les fils.
•Pour assembler votre support de plaque R&G avec les mini-clignotants, vous devez
utiliser les plaques d’adaptateur de clignotant (article 6) fournies avec le kit. Enfiler une

Page 16 of 24 LP0264
R&G
Unit 1, Shelley’s Lane, East Worldham, Alton, Hampshire, GU34 3AQ
Tel: +44 (0)1420 89007 Fax: +44 (0)1420 87301 www.rg-racing.com Email: info@rg-racing.com
entretoise sur le fil de clignotant avec la plus grande surface contre le corps de
clignotant.
•Faites passer le fil et l’entretoise de clignotant dans l’un des supports de clignotant situé
sur le support arrière. Passez la deuxième plaque d’adaptateur de clignotant sur le fil
dénudé, de manière à ce que les deux bossages en plastique surélevés se placent dans le
support arrière, comme indiqué sur le schéma de montage à la page 2.
•Serrez le support avec un autre adaptateur de clignotant, en veillant à ce que les deux
faces surélevées soient bien en place dans le support puis fixez-les à l'aide de l'écrou de
blocage fourni avec le clignotant. Ne pas trop serrer.
•Enfilez un couvercle de câblage de clignotant (article 8) sur chaque paire de fils
d’indicateur (une petite quantité de lubrifiant ou de liquide vaisselle facilitera cette
opération).
•L’ensemble devrait ressembler à celui illustré à la photo 15.
•Connectez 2 x connecteurs CON0009 (article 9) aux fils correspondants des mini-
clignotants R&G en utilisant le code de couleur suivant.
oNoir –Noir
oJaune –Noir
•Si vous utilisez des résistances RGR0002, connectez-les en utilisant les correspondances
de couleurs ci-dessous :
oJaune - Jaune
oNoir - Noir
Feu de plaque
•Une fois les clignotants installés, le feu de plaque d’immatriculation (article 2) peut être
assemblé et monté sur le support de queue (article 1).
•Le carénage fourni doit être fixé au feu en utilisant un peu de superglue, comme indiqué
sur la photo 16, dans le but d’orienter l’éclairage vers la plaque une fois installée.
•Fixer une longueur de manchon thermo rétractable (article 11) sur les fils rouge et noir
puis chauffer doucement avec un pistolet à air chaud ou un sèche-cheveux pour
maintenir et protéger les fils.
•Placez les sections filetées du feu de plaque d’immatriculation dans les trous de montage
à l’arrière du support arrière avec le côté allumé dirigé vers le bas.
•Pour protéger les fils situés sous le support de queue, placez le dispositif de protection de
la plaque d'immatriculation sur les filets apparents à l'intérieur du support de queue avec
la section plate dirigée vers le bas, comme indiqué sur la photo 17.
•Fixez cet assemblage à l’aide des deux rondelles et écrous fournis avec l’éclairage, en
utilisant une clé à cliquet et douille de 6mm.
•Connectez l’un des connecteurs de câblage CON0009 (article 9) fournis, aux connecteurs
de feu correspondant.
Installation sur la moto
•Le support de queue est maintenant prêt à être proposé sur la moto. Commencez par
passer les fils dans l'ouverture située dans la partie gauche de la moto, d’où les fils
d’origine ont été retirés.
•Soulevez avec précaution le support de queue jusqu’aux 4 trous de montage situés sous
la partie arrière tout en tirant les fils dans l’espace sous le siège passager.

Page 17 of 24 LP0264
R&G
Unit 1, Shelley’s Lane, East Worldham, Alton, Hampshire, GU34 3AQ
Tel: +44 (0)1420 89007 Fax: +44 (0)1420 87301 www.rg-racing.com Email: info@rg-racing.com
•Placez les entretoises de queue pré-montées dans les renfoncements laissés par l’unité
d’origine puis utilisez votre clé Allen de 5mm pour fixer sur la moto à l’aide des 4
entretoises M8 (article 5) et de 4 boulons M8 (article 4) montrés sur la photo 18.
•Après avoir réacheminé les câbles tels qu'ils ont été retirés à l'origine, reconnectez les
clignotants et l'éclairage de la plaque d'immatriculation aux connecteurs d'origine sur le
faisceau de câbles principal. Assurez-vous que le bon clignotant soit connecté au côté
correspondant, comme sur la photo 19.
•À ce stade, mettez le contact et vérifiez que toutes les feux fonctionnent correctement.
Si les lumières ne s'allument pas, vérifiez les connexions. Si les clignotants ne s'allument
pas, permutez les connecteurs.
•Utilisez des colliers de serrage (article 10) à travers les trous du support de queue pour
fixer les fils de clignotants et du feu et assurez-vous que ceux-ci sont bien rangés et
cachés. Vous pouvez utiliser les clips câbles autocollants (article 12) pour vous aider.
•Ranger le câblage à l'intérieur de la moto, à l'aide de l'attache-câble d’origine. Veiller à
ce que les câbles n'interfèrent pas avec les fixations de siège.
•Vérifiez que tous les boulons et les vis soient serrés au couple correct.
•Remontez les deux sièges comme ils ont été enlevés
•Montez la plaque d'immatriculation (cela peut nécessiter un perçage) à l'arrière du
support suffisamment bas pour ne pas couvrir les clignotants.
•IMPORTANT : Si vous installez une grosse plaque, il y a un risque que la plaque
entre en contact avec la roue arrière en cas de choc sur la route (bosse, grosse
charge etc..). Il est de votre responsabilité de vérifier que cela ne puisse pas se
produire. Ne pas effectuer ces vérifications peut entrainer des dommages ainsi
que des blessures graves pour le pilote.
•Selon les lois locales, attacher le réflecteur rouge (article 13) à l’endroit approprié.
•Retester le feu de plaque ainsi que l’ensemble des feux avant de prendre la route.
ISSUE 1 18/03/19 (DM)
CONSUMER NOTICE
The catalogue description and any exhibition of samples are only broad indications of the Products and R&G may make
design changes which do not diminish their performance or visual appeal and supplying them in such state shall conform
to the order. The Buyer acknowledges no representation or warranty (other than as to title) has been given or will apply
to the Products other than those in R&G’s order or confirmation and the Buyer confirms it has chosen the Products as
being of merchantable quality and suitable for its particular purposes. Where R&G fits the Products or undertakes other
services it shall exercise reasonable skill and care and rectify any fault free of charge unless the workmanship has been
disturbed. The Buyer is responsible for ensuring that the warranty on the motorcycle is not affected by the fitting of the
Products. On return of any defective Products R&G shall at its option either supply a replacement or refund the purchase
money but shall not be liable if the Products have been modified or used or maintained otherwise than in accordance
with R&G’s or manufacturer’s instructions and good engineering practice or if the defect arises from accident or neglect.
Other than identified above and subject to R&G not limiting its liability for causing death and personal injury, it shall not
be liable for indirect or consequential loss and otherwise its liability shall be limited to the amounts paid by the Buyer for
the Products or the fitting or service concerned. These terms do not affect the Buyer’s statutory rights.
R&G RETURNS POLICY (NON-FAULTY GOODS)
Returns must be pre-authorised (if not pre-authorised the return will be rejected). Goods may only be returned direct to
us if they were purchased direct from us (customer must prove if necessary). Otherwise to be returned to original
vendor. Goods must be in re-sellable condition, in the opinion of R&G. All returns are subject to a 25% restocking and
handling fee (25% of the gross value exc. P&P –at the prevailing price at time of purchase). The customer must pay
any and all carriage charges. No returns of discontinued products, unless within 14 days of purchase. This policy does
not affect your statutory rights and does not refer to faulty goods.

Page 18 of 24 LP0264
R&G
Unit 1, Shelley’s Lane, East Worldham, Alton, Hampshire, GU34 3AQ
Tel: +44 (0)1420 89007 Fax: +44 (0)1420 87301 www.rg-racing.com Email: info@rg-racing.com
MONTAGEANLEITUNG FÜR LP0264BK KENNZEICHENHALTER
HONDA CB650R & CBR650R 2019-
ALLE KIT-TEILE SIND UNTEN ABGEBILDET UND GEKENNZEICHNET. BEVOR SIE MIT
DER MONTAGE BEGINNEN, ÜBERPRÜFEN SIE, DASS ALLE TEILE VORHANDEN SIND.
Hinweis: Die Verpackung der Teile stellt nicht die Reihenfolge der Montage dar.
DIE UNTEN ABGEBILDETEN TEILE DIENEN LEDIGLICH ZUR ERKLÄRUNG
Hinweis für Kits mit Plastikunterlegscheiben an den Schrauben –Diese
Plastikunterlegscheiben werden nicht für den Einbau benötigt!
Eine digitale Version dieser Montageanleitung kann auf folgender Seite
heruntergeladen werden: www.rg-racing.com

Page 20 of 24 LP0264
R&G
Unit 1, Shelley’s Lane, East Worldham, Alton, Hampshire, GU34 3AQ
Tel: +44 (0)1420 89007 Fax: +44 (0)1420 87301 www.rg-racing.com Email: info@rg-racing.com
LIEFERUMFANG
ARTIKEL 1 = TB0264 KENNZEICHENHALTER (MIT 4 VORINSTALLIERTEN DISTANZHALTER)
ARTIKEL 2 = LA0002 KENNZEICHENBELEUCHTUNG (INKL. ABDECKUNG)
ARTIKEL 3 = SMW0146 SCHUTZ- KENNZEICHENHALTERLICHT
ARTIKEL 4 = M8x1,25x20mm INBUSSCHRAUBE (4)
ARTIKEL 5 = M8 UNTERLEGSCHEIBE 16mm O/DIA (4)
ARTIKEL 6 = I0049 BLINKER-ADAPTER (4)
ARTIKEL 7 = I0050 DISTANZHALTER BLINKER (4)
ARTIKEL 8 = IWC0002 ABDECKUNGEN FÜR VERKABELUNG DER MINIBLINKER (2)
ARTIKEL 9 = CON0009 VERBINDUNGEN (FÜR MINIBLINKER & KENNZEICHENBELEUCHTUNG)
ARTIKEL 10 = KABELBINDER (3)
ARTIKEL 11 = 150mm SCHRUMPFSCHLAUCH (3)
ARTIKEL 12 = SELBSTKLEBENDE KABELCLIPS (4)
ARTIKEL 13 = RÜCKSTRAHLER
SIE BENÖTIGEN FOLGENDES WERKZEUG
•Satz Inbusschlüssel inkl. 6mm und 8 mm
•Kreuzschlitzschraubendreher
•8mm Schraubenschlüssel
•6mm Steckschlüsselsatz
•kleinen Schraubendreher
•etwas Sekundenkleber
MAXIMALE ANZUGSDREHMOMENTE:
•M4 SCHRAUBE = 8Nm
•M5 SCHRAUBE = 12Nm
•M6 SCHRAUBE = 15Nm
•M8 SCHRAUBE = 20Nm
•M10 SCHRAUBE = 40Nm
This manual suits for next models
1
Table of contents
Languages:
Other R&G Motorcycle Accessories manuals