32
Razor Scooter Owner’s Manual + Safety Handbook
1. Scooter Parts and Components . . . . . . . . . . . . . . . . . . . . . .3
2. Unfolding the Razor for First-Time Use . . . . . . . . . . . . . . . . .4
3. Check Before Riding . . . . . . . . . . . . . . . . . . . . . . . . . . . . . .5
4. Wheels and bearings . . . . . . . . . . . . . . . . . . . . . . . . . . . . . .6
5. Cleaning your Razor . . . . . . . . . . . . . . . . . . . . . . . . . . . . . .6
6. How to Ride . . . . . . . . . . . . . . . . . . . . . . . . . . . . . . . . . . . .7
7. Razor Safety Tips . . . . . . . . . . . . . . . . . . . . . . . . . . . . . . . .7
8. Limited Warranty . . . . . . . . . . . . . . . . . . . . . . . . . . . . . . . . .8
AN IMPORTANT MESSAGE TO PARENTS: This manual contains important
safety information. For your child’s safety, it is your responsibility to review this information
with your child and make sure that your child understands all warnings, cautions,
instructions and safety topics. Razor USArecommends that you periodically review and
reinforce the information in this manual with younger riders and that you are required to
inspect and maintain your child’s scooter to insure their safety.
GENERAL WARNING: Scooter riding can be a hazardous activity. Scooters can,
and are intended to move and it is therefore possible to get into dangerous situations
and/or lose control and/or fall off. If such things occur you can be seriously injured or die.
LIKE ANY OTHER MOVING PRODUCT,USINGA SCOOTER CAN BE A DENGEROUS
ACTIVITYAND MAY RESULT IN INJURY OR DEATHEVEN WHEN USED WITH
PROPER SAFETY PRECAUTIONS. USE ATYOUR OWN RISK AND USE COMMON
SENSE.
•Always wear proper protective equipment, such as an ANSI, SNELL, CPSC or ASTM
approved helmet and elbow and kneepads. Long sleeve shirt, gloves, long pants,
shoes, and elbow and knee pads are mandatory. Wear athletic shoes (lace-up shoes
with rubber soles). Don’t ride barefoot or in sandals. Keep shoelaces out of the way of
wheels.
• Use the scooter only on flat, dry, level ground without loose debris, such as rocks or
gravel.
• Never use the scooter at dusk or night or in wet or icy conditions.
•Avoid water, speed bumps, sand, gravel and anything else that could cause your front
wheel to stop. When in doubt, avoid the bumps.
• Do not exceed 220 pounds (100 kilograms) total weight on the scooter.
• Do not allow children under age five (5) to use the scooter. Children under age eight (8)
should ride with adult supervision at all times. All children and preteens should ride with
adult guidance at all times.
• Never ride in traffic or on the street and watch your surroundings for pedestrians, bikes,
and skateboard and scooter riders. Use the scooter in areas free from fixed or moving
hazards, such as poles, curbs, hydrants, walls, parked automobiles and traffic.
FAILURE TO USECOMMONSENSE ANDHEED THEABOVE WARNINGS FURTHERINCREASES
RISKOF SERIOUS INJURY. USE AT YOUROWN RISK AND WITHAPPROPRIATE ANDSERIOUS
ATTENTION TO SAFEOPERATION. USECAUTION.
WARNING: ALWAYS INSPECT SCOOTER PRIOR TO RIDING. Properly
inspecting and maintaining your scooter can reduce the risk of injury. Always inspect your
scooter before riding and regularly maintain it.
WARNING: REGARDING USE OF NON-RAZOR PRODUCTS WITH YOUR
RAZOR SCOOTER. Your scooter has been built to Razor’s design specifications. All the
original equipment supplied at the time of sale were selected on the basis of their
compatibility with the frame, fork and all other parts. Certain after-market products may or
may not be compatible with your Razor scooter. Consult your retailer or call Razor prior to
modifying or replacing any component with a non-factory specified product.
WARNING: CHECK LOCAL LAWS REGARDING SCOOTER USE. Check local
laws and regulations to see where and how you may use your Razor scooter legally. In
many states and local areas scooter riders are required BY LAW to wear a helmet. Check
local laws and regulations regarding laws governing helmet use and scooter operation in
your area.
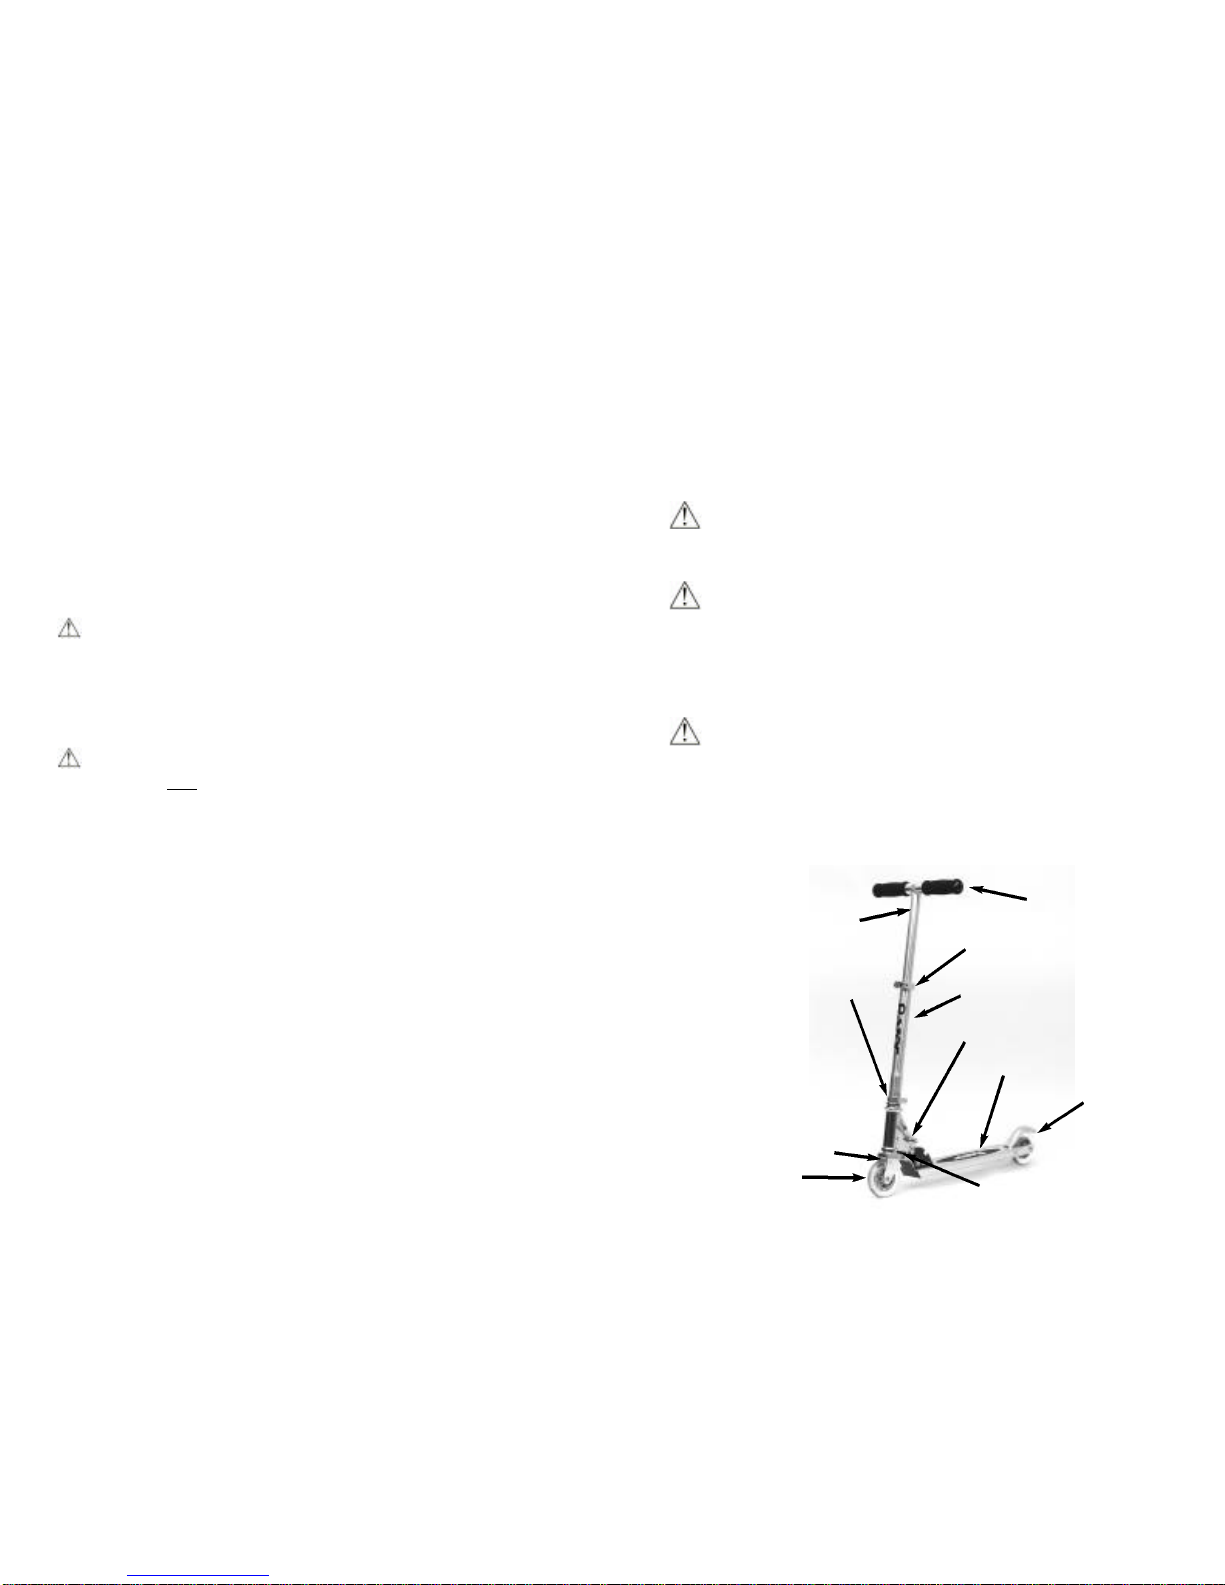
Handlebar
Grip
T-tube Steering tube quick-release
Steering tube/steering column
Collar clamp
Joint lever/pivoting mechanism
Front fork
Wheels steering column adjusting screw
Baseboard/deck
Rear fender/brake
1. Scooter Parts and Components