Retevis RA87 User manual

RA87
GMRS Mobile Radio
USER’S MANUAL

To customers.................................................................................
Main Features................................................................................
Radio Function..............................................................................
Preparations..................................................................................
Basic Operations..........................................................................
Menu Settings...............................................................................
Memory Channel...........................................................................
Scan...............................................................................................
CTCSS/DCS...................................................................................
Repeater Function and Form.......................................................
DTMF Function..............................................................................
2 TONE Signaling..........................................................................
MSK Signaling...............................................................................
Additional Function......................................................................
Reset Operation............................................................................
01
01
01
03
04
05
07
09
10
12
13
15
15
16
19
CONTENT

To customers
Thank you for using Retevis mobile radio. This product has a newly upgraded menu and adopts humanized design, making it easy to use. It
will meet your requirement with the compact size and reasonable price.
Main Features
Control and select various functions conveniently through the menu.
200 memory and Call channels; memory channel group management
Multiple easy and high-quality scan modes can be selected.
Compose simple repeater station
LCD display and adjustable backlight colors
Dual standby, dual frequency display
Programmable hand microphone function keys
Voice companding
260 CTCSS/DCS
AIN Identify code
DTMF encode and decode function
MSK signaling encode and decode
Same, different, reverse frequency setting
Wideband/Narrowband adjustment
APO protection when battery voltage is out of allowance range
Radio Function
Front Panel
List
1
2
3
4
5
6
7
8
9
10
11
Name
Volume Knob
Squelch Knob
Microphone (Hand Mic) Jack
Power on/off
CALL/TONE Key
VFO/M-V Key
MR/M、IN Key
LOW/REV Key
FUN/ -o Key
MHZ/SET Key
Coding Knob
Function
Adjust output volume. Clockwise rotate the knob to increase volume.
Before working, anticlockwise rotate the knob until the background noise
(the on the screen) disappears to improve the weak signal sensitivity.
Connect to the accessory RA87 hand mic.
Press for 1s to turn on/off the mobile radio.
Press the key to call out call channel.
Press the key to enter VFO mode.
Press the key to enter memory call out mode.
Continuously press the key to switch power.
Shortly press the key to look through the second function of keys. Press
the key for 1s to lock/unlock mobile radio keys.
Press the key to enter the MHz mode.
In VFO mode, choose operating frequency.
In memory call out mode, choose memory channel.
In menu mode, choose menu numbers.
When scanning, choose scan direction.
01

Back Panel
List
1
2
3
4
Name
Antenna Jack
13.8V DC cable
DATA socket
SP (Speaker) socket
Function
Connect to an external antenna
Connect to 13.8V DC, please use the power cable in package to connect
Use the programming cable to plug in the socket and connect to the PC to program the
mobile radio. Use the programming cable or clone/transfer cable to copy information or
communication transfer through connecting to the computer by the socket.
Connect to 3.5mm mono (dual cables) socket external speaker
Lists
1
2
3
4
5
6
7
8
9
10
11
12
13
14
15
16
17
18
19
Choose RF power levels
Appear when DCS/CTCSS function is activated.
Appear when 2TONE function is activated.
Appear when repeater station offset function is activated.
Display menu numbers, memory channel numbers and status.
Appear when data appearing in displayed memory channel.
Display frequency, menu setting, memory name and other information.
Appear when pressing the menu key.
Appear when narrowband frequency mode is chosen.
Appear when Reverse frequency function is activated.
Appear when scramble function is activated.
Appear when the voice companding function is activated.
Display the strength of transmission and reception signal.
Appear when Memory Channel Lock is activated.
The left of display is main frequency and the right is sub-frequency.
The right of display right is main frequency and the left is sub-frequency.
Appear when AIN identity code is correct
Appear when the transfer function is activated.
Appear when the key lock function is activated.
Display
02

Preparations
Mobile Radio Installation
List
1
2
3
4
5
6
7
8
Name
PTT Key
DWN/*Key
UP/# Key
CALL/A Key
VFO/B Key
MR/C Key
PF/D Key
DTMF Keyboard
Function
Press the key to transmit signals and release to receive signals.
Press the key to decrease operating frequency, memory channel numbers, menu numbers, etc.
Continuously press to repeat operations. For multi-choice functions, the key can switch different values.
Press microphone PTT key, then press DWN/* key to transmit.
Press the key to increase operating frequency, memory channel numbers, menu numbers, etc.
Continuously press the key to repeat operations. For multi-choice functions, the key can switch different
values. Press microphone PTT key, then press UP/# key to transmit.
The same as the Call key in front panel. If needs, program the key again. Press the microphone PTT key,
then press CALL/A key to transmit A. The key is PF4 and can be reprogrammed.
The same as the VFO key in front panel. If needs, program the key again. Press the microphone PTT key,
then press VFO/B key to transmit B. The key is PF3 and can be reprogrammed.
The same as the MR key in front panel. If needs, program the key again. Press the microphone PTT key,
then press MR/C key to transmit C. The key is PF2 and can be reprogrammed.
The default function is 1MHZ step. Use coding knob or microphone UP/DWN key to change operating
frequency with 1MHz. The mobile radio is dual standby, long press the key to switch main frequency and
sub-frequency. If needs, program the key again. Press the microphone PTT key, then press PF/D key to
transmit D. The key is PF1 and can be reprogrammed.
The keyboard has 16 keys, which are used in DTMF or directly input operating frequency or memory
channel numbers. DTMF also can be used to program memory channel name, power message or other
words.
1.Install mobile radio as following figure
1.Connect to the power and ensure the correctness. Connect the power cable to the lead accumulator (not take off the fuse wire from the
power cable.
Microphone
03

Basic Operations
Power On/Off
1.Press (power key) to turn on the mobile radio.
The mobile radio makes loud dual beeps. The screen displays power message for a moment, then displays frequency and other indicators.
To turn off the mobile radio, press (power key) for about 1s. When turning off the mobile radio, the mobile radio makes low-volume dual
sound, saves the current frequency and specifications, and calls out specifications next power on.
2.Connect the DC power cable to the power connector of mobile radio
3.Replace Fuse Wire: If the fuse wire is fusing, confirm the reason and problems, then replace fuse wire.
4.Antenna Connection: As the figure shown: connect the antenna connector and the mobile radio (Note: ensure the connection between
mobile radio and antenna is completed before transmitting).
5.Microphone Connection
Before voice communication, plug the microphone connector into the mobile radio base jack of front panel and press tightly. As shown in the
figure:
6.PC Programming Cable Connection
Connect the programming cable in the package to the PC through DATA socket and install the specific programming software to read and
write the mobile radio.
7.Use the CL-900 clone or transfer cable to connect two mobile radios (through DATA socket).
04
Antenna Connector
Antenna Antenna Feeder Connector

2. Rotate the coding knob to choose the needed menu. When changing menu numbers, the screen will display short introduction of each
menu and current specifications.
3. Press MHZ/SET key to equip with current selected menu numbers specifications.
4. Rotate the coding knob to choose the needed specification.
5. Press MHZ/SET key to save new settings, or press other keys to cancel.
6. Press any other key to exit the menu key, except MHZ/SET key.
Note:
In the following table, the items with * after the menu number are public menu items. As long as the main frequency setting changes, the
secondary frequency also changes.
To change the primary or secondary frequency, hold down the [MHZ/SET] key
Menu Name Setting Menu Number
Main Frequency and Sub-frequency Switch
Main frequency refers to the current operating and working channel. Sub-frequency refers to the receiving and monitor channel.
3 methods to switch main frequency and sub-frequency
1.When menu 14(ECHO) is set to "AUTO", the secondary frequency of the monitored signal automatically switches to the main frequency.
2. When menu 14(ECHO) is set as "MANU", when the secondary frequency monitors the signal, it has the same functions as the main
frequency within about 3 seconds, such as: it can carry out transmission scanning priority, etc.
3.Long press the MHZ/SET key to switch main frequency and sub-frequency.
For example, screen public area originally displays TX-L and displays TX-R after switching.
Volume Adjustment
Clockwise rotate the volume knob to increase the output volume and anticlockwise rotate the volume knob to decrease the output volume.
Squelch Adjustment
Clockwise rotate the squelch knob until the background noise (on the screen) disappears to improve weak signals sensitivity.
Transmitting
When transmitting, press the PTT key and away about 5cm from the microphone to normally speak. If main frequency at the left of screen, it
will display TX-L, at the right display TX-R. After speaking, release the PTT key.
Output Power Selection
1.Press FUN, MHZ/SET key in turn, then rotate the coding knob to choose menu number 6 (TXP).
2.Press MHZ/SET key and rotate the coding knob to choose H ( high power; default) or M, L3, L2 and L1.
3.Press MHZ/SET key to save settings, or press any other key to cancel.
4.Press any other key to exit the menu mode, except MHZ/SET key.
5.Continuously press LOW/REV key to switch power.
Note:
·Don’t transmit with high power for a long time, or it may cause that the mobile radio is over-heated and doesn't normally work.
·Continuously transmit may cause that the radiator is over-heated. In this occasion, don’t touch the radiator. When the mobile radio is
over-heated due to the high-temperature environment or continuous transmission, for protection circuit, the mobile radio may automatically
switch high output power to low output power.
·Power switch can be proceeded in the power switch allowance channel.
Frequency Selection
VFO Mode
VFO mode is a basic mode to change operating frequency. To enter VFO mode, press VFO key. Clockwise the coding knob to increase
frequency and anticlockwise the coding knob to decrease frequency. Microphone UP/DWN key can be used to adjust frequency.
·Press microphone UP/ DWN key to continuously up-regulate or down-regulate frequency.UP/ DWN
·MHz Mode
If the needed operating frequency is far away from the current frequency, use MHz tuning mode to adjust quickly.
1. When in VFO mode or call mode, press [MHZ/SET]·MHz digital blinking
2. Turn the encoding knob to select the desired MHz value
3. press any key to set the selected frequency and return to VFO mode
4. Use the coding knob or microphone (UP][DWN] key to continue adjusting the frequency as needed
Directly Input Frequency
1.Press VFO/B key. Directly input frequency must be in VFO mode.
2.Press the microphone PF/D key with Enter function, that is the microphone Enter key.
3.Press the number key 0 to 9 to input the needed frequency.
If only changes MHz numbers and keeps KHz numbers same, press the VFO/B key instead of the microphone Enter key.
The input assigned frequency will be confirmed when the microphone Enter key is pressed.
Menu Settings
Menu Visit
1.Press FUN, MHZ/SET key in turn to enter menu interface.
05

Menu Function List
Screen
Display
STP
C-CD
R-CD
T-CD
SFT
TXP
P.VFO
SQL
SQH
OFFSET
RELAY
SCAN
L.OUT
ECHO
M.NAME
MDF
APO
CK
HDL
TOT
BCL
P. ON. MSG
BP
BS
FMN
ENC
DTMF. MR
SPD
DT. H
PA
DT. L
DT. M
2TENC
2TDEC
2TRST
2TM
2TBP
MC. L
PF1
PF2
PF3
PF4
Menu
Number
1
2
3
4
5
6
7
8
9
10
11
12
13
14
15
16
17
18
19
20
21
22
23
24
25
26
27
28
29
30
31
32
33
34
35
36
37
38
39
40
41
42
Function
Frequency step size
Receive/Transmit CTCSS
/DCS signaling code
CTCSS/DCS
Transmit CTCSS/DCS
signaling code
Offset direction
RF Power
Programmable VFO
Squelch
Squelch delay time
Repeater frequency difference
Easy repeater station function
Scan restore method
Memory channel lock
Response mode
Memory name
Memory name/frequency display
Auto power off
CALL key
1750Hz tone tansmission
maintenance
TOT
Busy channel lockout
Power message
Beep
Beat frequency offset
Narrowband frequency
adjustment
Tuning control knob lock
Auto dial-up
DTMF transmission speed
DTMF transmit maintenance
DTMF pause time
DTMA key lock
DTMF monitor
2-TONE encode
2-TONE decode
2-TONE auto-reset time
2-TONE monitor
2-TONE beep
Microphone keys lock
Programmable Microphone key
Default
VHF:12.5KHz
UHF:25KHz
OFF
OFF
OFF
OFF
HIGH
UHF:400~480MHz
OFF
OFF
0~99.9875MHz
OFF
TO
OFF
MANU
--
MN
OFF
CALL
OFF
10
OFF
-
ON
OFF
OFF
OFF
-
FA
OFF
500
OFF
OFF
OFF
OFF
60
OFF
ON
OFF
MHZ
MR
VFO
CALL
Selection
5/6.25/12.5/15/20/25/30/50/100KHz
OFF/67.0~254.1Hz/023(N/1)~754(N/1)/OFF
OFF/67.0~254.1Hz/023(N/1)-754(N/)/OFF
OFF/67.0~254.1Hz/023(N/1)~754(N/I)/OFF
OFF/+/-
High/Low
UHF:400~480MHz
OFF/S0/S1/S21 S3/S4/S5/S6/S7
OFF/125/250/500msec
0~69.95MHz
ON/OFF
TO/CO/SE
ON/OFF
D-RX/S-RX
6 characters
MNFRQ
OFF/30/60/901120/180minutes
CALL/1750
ON/OFF
3/5/10 minutes
ON/OFF
6 characters
ON/OFF
ON/OFF
ON/OFF
ON/OFF
Up to 16 numbers
FA/SL
ON/OFF
100/250/500/750/1000/1500/2000msec
ON/OFF
ON/OFF
OFF/1-32
OFF/1-8
OFF/1-250s
ON/OFF
ON/OFF
ON/OFF
MONI/ENTER/1750/VFOMRM-
HZ/REV/SQLM-V/MIN/CIN/MENU/-
SHIFT/LOW/CONTR/LOCK/STEP
MONI/ENTER/1750/VFOMRM-
HZ/REV/SQLM-V/MIN/CIN/MENU/-
SHIFT/LOW/CONTR/LOCK/STEP
MONI/ENTER/1750/VFOMRM-
HZ/REV/SQLM-V/MIN/CIN/MENU/-
SHIFT/LOW/CONTR/LOCK/STEP
MONI/ENTER/1750/VFOMRM-
HZ/REV/SQLM-V/MIN/CIN/MENU/-
SHIFT/LOW/CONTR/LOCK/STEP
Reference
Page Number
38
28
28-29
29
16
9
42
37
37
16
23
27
26-27
36
20
20
36
17
17
43
38
41-42
37
36-37
41
40
32
33
31
33
33
31
35
35
-
-
-
43
10-41
40-41
40-41
40-41
06

Memory Channel
●Save simplex frequency or standard repeater station frequency.
1. Hold down [MHZ/SET] to set the main frequency
When TX-L is displayed, information about the main frequency is displayed on the left screen. When TX-R is displayed, information about
the main frequency is displayed on the right screen.
2.Press VFO key.
3.Rotate the coding knob to choose the needed frequency.
· Use the keyboard to directly input the needed frequency.
4.If saves standard repeater station frequency, please choose the following data:
· Frequency difference direction
· CTCSS/DCS/2TONE function
If saves simplex frequencies, choose other the related data (CTCSS or DCS set etc).
5.Press FUN key.
· If channel included the data, the symbol appears, and memory channel numbers appear and flash.
6.Rotate the coding knob or microphone UP/DWN key to choose the memory channel with the saved data.
7.Press MR key to save data in channel.
Save Non-standard Frequency Difference Repeater Station Frequency
1. Follow steps 1 to 6 of the storage simplex or standard relay station frequency. Store the required reception frequency and related data
2.Rotate the coding knob or press microphone UP/DWN key to choose the needed transmitting frequency.
3.Press FUN key.
4. Turn code short or press microphone [UP][DWN] key to select the pre-programmed receiving memory channel in which to store data.
5.Press MR key for (1s), and transmitting frequency is saved into the memory channel.
Note:
· Call out non-standard deviation frequency memory channel. "Ten" and "one" appear on the screen.
·Check transmitting frequency, first press FUN key, then press REV key.
·Non-standard frequency difference memory channel doesn’t save transmitting frequency difference status and reverse frequency status.
Call Out Memory Channel
Use tuning control knob
1.Press MR key to enter memory call-out mode (final used memory channel is called out).
2.Rotate the coding knob to choose the needed memory channel (empty memory channel can’t be called out, press VFO key to restore
VFO mode).
Use microphone keyboard
1.Press MR to enter memory call-out mode.
2.Press microphone key with Enter function.
3.Use microphone keyboard to input channel numbers.
·For the channel number as one-digital number, first input 0 or press Enter key after inputting channel number.
·For the channel number as two-digital number, directly input channel numbers.
Note:
· Unable to call out the empty memory channel, the intercom will beep incorrectly.
·After calling out the memory channel, data can be altered, such as narrowband, CTCSS or DCS, etc. However, once the other channel or
VFO mode is selected, settings will be deleted. To save these data forever, rewrite the channel content.
Delete Memory Channel
Screen
Display
L.LIG
WF.CLR
RX.CLR
TX.CLR
CONTR
K.LIG
CPD
SR
ANI
PTTID
RESET
MSKM
MSKBP
MSKGP
MSKRT
1DSOR
UN MUTE
TEND
TV OL
TA1L
Menu
Number
43
44
45
46
47
48
49
50
51
52
53
54
55
56
57
58
59
60
61
62
Function
Display backlight lights up
method
Standby backlight color
Receive backlight color
Transmit backlight color
LCD contrast adjustment
Key light lights up method
Compandor setting
Scramble frequency setting
ANI function
ID code
Reset selection
MSK monitor
MSK beep
MSK call group
MSK reset time
PTT ID type
Speaker turn on
Roger beep
Roger beep volume
End tone elimination code
Selection
AUTO/OFF/ON
1/2/3/4/5/6/7/8
1/2/3/4/5/6/7/8
1/2/3/4/5/6/7/8
0/1/2/3
OFF/ON/AUTO
ON/OFF
OFF/USER/3450/3400/3300/
3200/3100/3000Hz
ON/OFF
OFF/BOT/EOT/BOTH
VFO/FULL
OFF#/#ON
OFF#/#ON
oFF#/#1#/#2#/ ... /#10
oFF#/#1M#/#2M#/ ... /#10M
DTMF#/#MsK
Q#D#/#Q+o#/#Q.o
oFF#/#oN
1#/#2#/ ... /#25
oFF#/#oN
Default
ON
4
4
4
2
ON
OFF
OFF
OFF
VFO
VFO
ON
ON
OFF
10M
DTMF
QD
OFF
10
OFF
Reference
Page Number
38-39
39
39
39
39
-
43
44
34
-
45-46
36
36
36
36
36
44
45
45
-
07

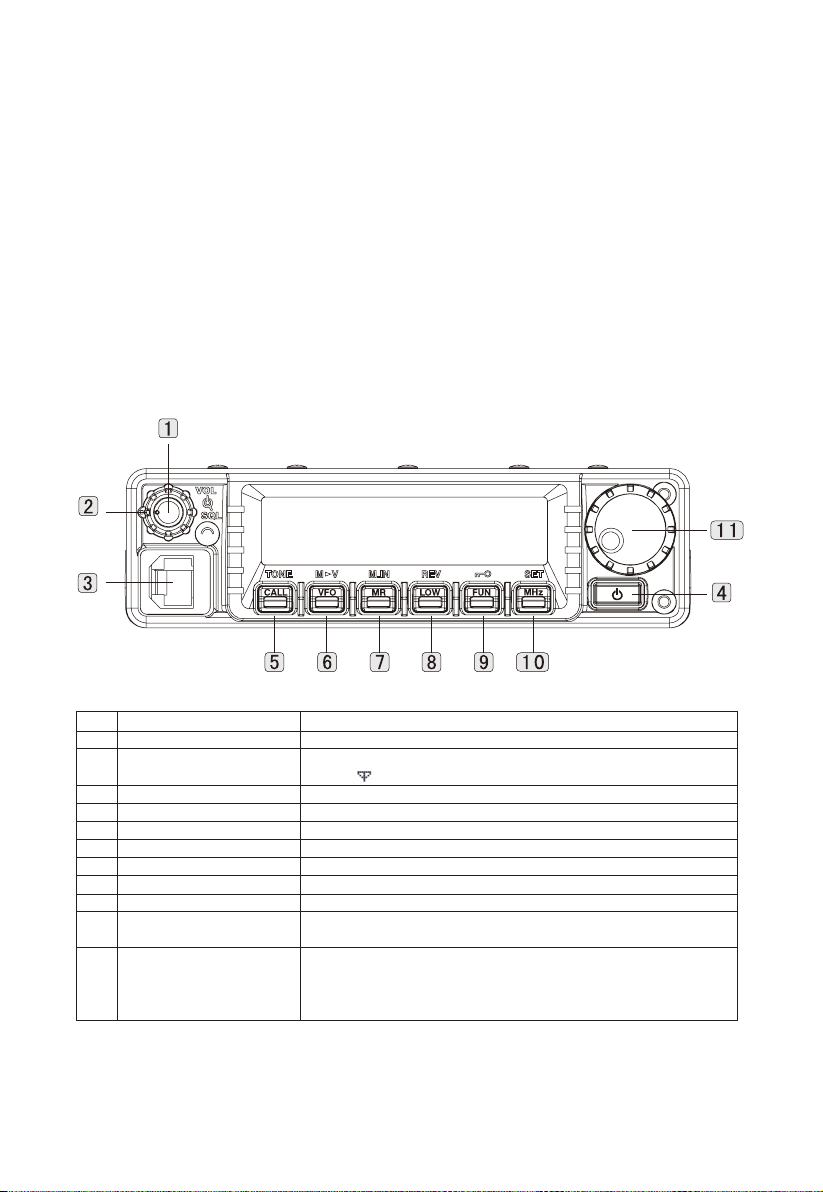
1.When TX-L displays, the left of screen displays the related information of main frequency; When TX-R displays, the right of screen
displays the related information of main frequency.
2.Call out memory channels that want to delete.
3.Press power key for (1s) to turn off the mobile radio.
4.Press MR and Power key. Screen will display requiring the deleted information.
5.Press MR key to delete channel data
Content of memory channel is deleted.
If wants to exit memory channel delete operation, press any other key, except MR key.
(Note: delete all memory channel contents, proceed fully reset function; in channel display mode, the channel can’t be deleted).
Name Memory Channel
1. Hold down [MHZ/SET] to set the main frequency. When TX-L is displayed, information about the main frequency is displayed on the left
screen. When TX-R is displayed, information about the main frequency is displayed on the right screen.
2.Press FUN and MHZ/SET key, then rotate the coding knob to choose menu number 15 (MNAME).
3.Press MHZ/SET key and screen appears flashing cursor.
4.Rotate the coding knob to choose the needed letters and digital characters.
Following letters and digital characters can be input: 0-9, A-Z,--, / and blank. In addition to the coding knob, microphone keyboard can be
used to input letters and digital characters.
5.Press MR key.
·Cursor moves to the next one.
·Press VFO key to move cursor to the former one. Press Fun key to delete characters of current cursor position.
6.Repeat step 4 and 5, up to input 6 characters.
7.Press MHZ/SET key to finish inputting.
·Press any key to cancel, except MR, VFO, FUN and MHZ/SET key.
·Finish inputting with the lack of 6 characters, press MHZ/SET key twice.
8.Press any other key to exit the menu mode, except MHZ/SET key.
After memory channel name is saved, it will replace the operating frequency to appear on the screen. If needed, the operating frequency
still can appear. Displaying the operating frequency but memory name, visit the menu number 16 (MDF) and choose FRQ (Frequency). The
menu switch two display modes: memory name (MN) and frequency display (FRQ).
Note:
Call channel can't be named.
The name for non-data memory channels can't be distributed.
The saved name can be rewritten by repeating step 1 to 8.
Memory channel data and the saved names will be deleted at the same time.
Memory Channel Transmission
Memory--- VFO Transmission
After searching frequency and the related data from memory call-out mode, these information can be copied to VFO. For example, when
the monitored frequency is close to the saved frequency in memory channel, the function can be activated.
1.Press MR key, then rotate the coding knob or press microphone UP/DWN key to call out the needed memory channel. You also can press
CALL key to choose call channel.
2.Press FUN, VFO key in turn to copy memory channel data to VFO.
Note:
In non-standard frequency difference channel, operations only copy receiving frequency to VFO (but transmitting frequency). To copy
transmitting frequency of non-standard frequency difference channel, press FUN and REV key before proceeding.
Channel----- Channel Transmission
Copy a memory channel information to the other channel. The function can be used to save immediately the changed frequency and the
related data in memory call out mode.
1.Press MR key, then rotate the coding knob or press microphone UP/DWN key to call out the needed memory channel.
2.Press FUN key.
3.Rotate the coding knob or press microphone UP/DWN key to choose memory channel that want to copy information.
4.Press MR key.
Call Channel
Whatever frequency the mobile radio is operating, the call channel can be called out immediately, such as setting the call channel as
emergency channel of the group. In this occasion, call channel can work with call scan function.
Note: differ from memory channel, call channel can’t be deleted.
Call Out Call Channel
Press CALL key to call out call channel.
Screen displays call channel frequency and C.
Press CALL key again to return former frequency.
Reprogramming Call Channel
1.Choose the needed frequency and the related data (CTCSS, DCS or frequency difference direction, etc)
· When programming call channel as non-standard frequency difference channel, choose receiving frequency firstly.
2.Press FUN key.
·Memory channel number appears and flashes.
3.Rotate the coding knob or press microphone UP/DWN key to choose call channel (C).
4.Press MR key.
·The selected frequency and the related data are saved to call channel.
·Save transmitting frequency differing from receiving frequency, proceed following steps:
5.Choose the needed transmitting frequency
6.Press FUN key.
7.Rotate the coding knob or press microphone UP/DWN key to choose call channel (C).
8.Press MR key for (1s).
·Different transmitting frequencies are saved to call channel.
08

Channel Display
In this mode, the mobile radio only displays memory channel numbers but frequencies ( If the memory name is saved, the memory name is
displayed).
1.When the mobile radio is off, press REV and Power key to turn on the mobile radio.
·The mobile radio displays memory channel numbers not frequencies.
2.Rotate the coding knob or press microphone UP/DWN key to choose the needed memory channel number.
In memory display mode, following functions can’t be activated.
·VFO mode
·VFO scan
·Call/VFO scan
·Scan direction
·Memory save
·Memory to VFO Transmission
·Memory to Memory Transmission
·Delete memory channel
·VFO reset
·Fully reset
·1MHz Step
·Selective call
·Auto-simplex check
·Menu mode
To restore normal operations, turn off the mobile radio and press REV key and Power key again.
Note: to enter channel display mode, data must be included in at least one memory channel.
Scan
Normal Scan
When operating the mobile radio in VFO mode, the mobile radio has two scan modes: band scan and programming scan.
Band Scan
The mobile radio scans the whole band of selected frequency. If the current VFO receiving frequency is out of programming scan frequency
range (following contents), the mobile radio will scan the whole frequency range of current VFO.
1.Press VFO key, then rotate the coding knob or press microphone UP/DWN key to choose a frequency that is out of programming scan
frequency range.
2.Press VFO key for (1s) to start band scan.
·Scan is started from the current frequency
3.Press any other key except FUN and Power key to stop band scan.
Note:
· Intercom scans the frequency range stored in menu Angstrom No.7 (P.V).
·If frequency is selected between L0/U0~L1/U1 in step 1, the mobile radio starts programming scan.
Programming Scan
Frequency scan range can be limited manually. The mobile radio has two pairs of memory channels---- L0/U0~L1/U1. You can set starting
frequency and finishing frequency. Programming scan monitors the range between the starting and finishing frequencies which are saved in
memory channel. Before proceeding programming scan, save the programming scan frequency range to a pair of memory channel
(L0/U0~L1/U1).
Save Programming Scan Frequency Range
1.Press VFO key and rotate the coding knob or press microphone UP/DWN key to choose the needed starting frequency.
2.Press FUN key.
·Memory channel number appears and flashes.
3.Rotate the coding knob or press microphone UP/DWN key to choose memory channel (L0~L1).
4.Press MR key to save starting frequency to memory channel.
5.Rotate the coding knob to choose the needed finishing frequency.
6.Press FUN key.
7.Rotate the coding knob or press microphone or press microphone UP/DWN key to choose corresponding memory channel ( U0~U1).
8.Press MR key to save finishing frequency to memory channel.
Proceed Programming Scan
1.Press VFO key and rotate the coding knob to choose a frequency between the L0/U0~L1/U1 of the memory channel.
2.Press VFO key for (1s) to start programming scan from current frequency.
3.Press any key to stop programming scan, except FUN and Power key.
Note:
·When detecting the signal, the mobile radio stops scanning.
·If over 2 pairs of programming scan channels are saved and frequency range overlaps, scan will start from the smaller memory channel
number.
·To proceed programming scan, L channel must be lower than U channel. Otherwise, the mobile radio will start band scan.
Memory Scan
Memory scan monitors the memory channel that saved frequency.
All Channel Scan
The mobile radio scans all memory channels that saved frequencies.
1.Press MR key for (1s).
·Scan starts from the last memory channel number to each channel number (default).
·To skip the needed channel during scanning, rotate the coding knob quickly.
·To reverse scan direction, rotate the coding knob or press microphone UP/DWN key.
09

2.Press any key to stop all channel scan, except FUN and Power key.
Note:
· In addition to memory channel with special functions, there must be two or more mobile radio memory channels included data.
Call Scan
You can monitor the call channel and the current operating frequency in turn.
1.Choose the monitored frequency (In VFO or memory call-out mode)
·In VFO mode, rotate the coding knob or press microphone UP/DWN key to choose the needed frequency.
·In memory call-out mode, rotate the coding knob or press microphone UP/DWN key to choose the monitored memory channel.
2.Press CALL key for (1s) to start call scan.
·The mobile radio monitors the call channel and the selected VFO frequency or memory channel.
3.Press any key except FUN and Power key to stop call scan.
Note:
CALL key function must be equipped with CALL (menu number 18) before using call scan. Otherwise, the mobile radio will transmit 1750Hz
tone. Call scan still can be proceeded even the called out memory channel is locked.
Memory Channel Lock
Channel numbers that not want to be monitored can be locked during scanning memory channel or group.
1.Press MR key, then rotate the coding knob or press microphone UP/DWN key to choose the locked memory channel.
2.Press FUN and MHZ/SET key, then rotate the coding knob to choose menu number 13 (L.OUT).
3.Press MHZ/SET key and rotate the coding knob to choose ON or OFF (default).
4.Press MHZ/SET key to save settings, or press any other key to cancel.
5.Press any other key to exit menu mode, except MHZ/SET key.
·When symbol appears under the memory channel number, the channel is locked.
6.To unlock memory channel, repeat the step 1~5 and choose OFF in step 3.
· symbol disappears.
Note:
·Programming scan channel (L0/U0~L1/U1) and the call channels can’t be locked.
·Call scan can be proceeded between the call channel and the memory channel, even the memory channel is locked.
Scan Restoration Method
The mobile radio will stop scanning when detecting the frequency or the memory channel signal. The mobile radio will continue or stop to
scan according to restoration methods you choose.
·Time Operating Mode (Default)
The mobile radio stays for about 5s on the busy frequency ( or memory channel). The mobile radio will continue to scan, even the signal still
exists.
·Carrier Operating Mode
The mobile radio stays on the busy frequency ( or memory channel) until the signal disappears. There has for 2s delay between the signal
disappears and the scan restores.
·Search Mode
The mobile radio moves to the frequency or the memory channel that signal exists, and stops.
Change Scan Restoration Method
1.Press FUN, MHZ/SET key in turn, then rotate the coding knob to choose menu number 12 (SCAN).
2.Press MHZ/SET key and rotate the coding knob to choose TO (time operating: default), CO (carrier operating), or SE (search) mode.
3.Press MHZ/SET key to save new settings, or press any other key to cancel.
4.Press any other key to exist menu mode, except MHZ/SET key.
Note: to pause scan and monitor weak signals, press the microphone PF key with MONI function. Press MONI key again to restore scan.
CTCSS/DCS
CTCSS/DCS Set Receiving and Transmitting CTCSS/DCS
1.Press FUN, MHZ/SET key in turn, then rotate the coding knob or press microphone UP/DWN key to choose menu number 2 (C-CD).
2.Press MHZ/SET key and rotate the coding knob to choose the needed CTCSS/DCS signaling code.
•Press CALL/TONE key to switch signaling code.
3.Press MHZ/SET key to save new settings, or press any other key to cancel.
4.Press any other key to exist menu mode, except MHZ/SET key.
Set Receiving CTCSS/DCS Signaling Code
1.Press FUN, MHZ/SET key in turn, then rotate the coding knob or press microphone UP/DWN key to choose menu number 3 (R-CD).
2.Press MHZ/SET key and rotate the coding knob to choose the needed CTCSS/DCS signaling code.
•Press CALL/TONE key to switch signaling code.
3.Press MHZ/SET key to save new settings, or press any other key to cancel.
4.Press any other key to exist menu mode, except MHZ/SET key.
Set Transmitting Signal Code
1.Press FUN, MHZ/SET key in turn, then rotate the coding knob or press microphone UP/DWN key to choose menu number 4 (T-CD).
2.Press MHZ/SET key and rotate the coding knob to choose the needed CTCSS/DCS signaling code.
•Press CALL/TONE key to switch signaling code.
3.Press MHZ/SET key to save new settings, or press any other key to cancel.
4.Press any other key to exist menu mode, except MHZ/SET key.
Note: when setting CTCSS/DCS signaling code in step 2, press CALL/TONE key to switch signaling code types, as following shown:
OFF CTCSS DCSN DCS I OFF
When setting DCS signaling code, the screen displays DCS; When setting CTCSS signaling code, the screen displays CT.
10

CTCSS/DCS
CTCSS
Menu Function List
CH NO.
1
2
3
4
5
6
7
8
9
10
11
12
13
14
15
16
17
18
19
20
21
22
23
24
25
26
27
28
29
30
TX Frequency(MHz)
462.5625
462.5875
462.6125
462.6375
462.6625
462.6875
462.7125
/
/
/
/
/
/
/
462.5500
462.5750
462.6000
462.6250
462.6500
462.6750
462.7000
462.7250
467.5500
467.5750
467.6000
467.6250
467.6500
467.6750
467.7000
467.7250
RX Frequency(MHz)
462.5625
462.5875
462.6125
462.6375
462.6625
462.6875
462.7125
467.5625
467.5875
467.6125
467.6375
467.6625
467.6875
467.7125
462.5500
462.5750
462.6000
462.6250
462.6500
462.6750
462.7000
462.7250
462.5500
462.5750
462.6000
462.6250
462.6500
462.6750
462.7000
462.7250
Power
Low
Low
Low
Low
Low
Low
Low
Low
Low
Low
Low
Low
Low
Low
High
High
High
High
High
High
High
High
High
High
High
High
High
High
High
High
Code(Hz)
67.0
118.8
127.3
131.8
136.5
141.3
146.2
D243N
D032N
D047N
D051N
D053N
D065N
D116N
123.0
D743I
D332I
127.3
D243I
D606N
D731I
136.5
-
-
-
-
-
-
-
-
1
2
3
4
5
6
7
8
9
10
11
12
13
14
15
16
17
18
19
20
21
22
23
24
25
26
27
28
67.0
69.3
71.9
74.4
77.0
79.7
82.5
85.4
88.5
91.5
94.8
97.4
100.0
103.5
107.2
110.9
114.8
118.8
123.0
127.3
131.8
136.5
141.3
146.2
151.4
156.7
159.8
162.2
29
30
31
32
33
34
35
36
37
38
39
40
41
42
43
44
45
46
47
48
49
50
51
52
53
54
55
56
165.5
167.9
171.3
173.8
177.3
179.9
183.5
186.2
189.9
192.8
196.6
199.5
203.5
206.5
210.7
218.1
225.7
229.1
233.6
241.8
250.3
254.1
DCS-N
1
2
3
4
5
6
7
8
9
10
11
12
22
23
24
25
26
27
28
29
30
31
32
33
D023N
D025N
D026N
D031N
D032N
D036N
D043N
D047N
D051N
D053N
D054N
D065N
D131N
D132N
D134N
D143N
D145N
D152N
D155N
D156N
D162N
D165N
D172N
D174N
43
44
45
46
47
48
49
50
51
52
53
54
64
65
66
67
68
69
70
71
72
73
74
75
85
86
87
88
89
90
91
92
93
94
95
96
D251N
D252N
D255N
D261N
D263N
D265N
D266N
D271N
D274N
D306N
D311N
D315N
D445N
D446N
D452N
D454N
D455N
D462N
D464N
D465N
D466N
D503N
D506N
D516N
D532N
D546N
D565N
D606N
D612N
D624N
D627N
D631N
D632N
D645N
D654N
D662N
11

DCS-I
13
14
15
16
17
18
19
20
21
34
35
36
37
38
39
40
41
42
D071N
D072N
D073N
D074N
D114N
D115N
D116N
D122N
D125N
D205N
D212N
D223N
D225N
D226N
D243N
D244N
D245N
D246N
55
56
57
58
59
60
61
62
63
76
77
78
79
80
81
82
83
84
97
98
99
100
101
102
103
104
105
D325N
D331N
D332N
D343N
D346N
D351N
D356N
D364N
D365N
D523N
D526N
D465N
D466N
D503N
D506N
D516N
D523N
D526N
D664N
D703N
D712N
D723N
D731N
D732N
D734N
D743N
D754N
106
107
108
109
110
111
112
113
114
115
116
117
118
119
120
121
122
123
124
125
126
127
128
129
130
131
132
133
134
135
136
137
138
139
140
141
142
143
144
145
146
147
D023I
D025I
D026I
D031I
D032I
D036I
D043I
D047I
D051I
D053I
D054I
D065I
D071I
D072I
D073I
D074I
D114I
D115I
D116I
D122I
D125I
D131I
D132I
D134I
D143I
D145I
D152I
D155I
D156I
D162I
D165I
D172I
D174I
D205I
D212I
D223I
D225I
D226I
D243I
D244I
D245I
D246I
148
149
150
151
152
153
154
155
156
157
158
159
160
161
162
163
164
165
166
167
168
169
170
171
172
173
174
175
176
177
178
179
180
181
182
183
184
185
186
187
188
189
190
191
192
193
194
195
196
197
198
199
200
201
202
203
204
205
206
207
208
209
210
D251I
D252I
D255I
D261I
D263I
D265I
D266I
D271I
D274I
D306I
D311I
D315I
D325I
D331I
D332I
D343I
D346I
D351I
D356I
D364I
D365I
D445N
D446N
D452N
D454N
D455N
D462N
D464N
D465N
D466N
D503N
D506N
D516N
D462I
D464I
D465I
D466I
D503I
D506I
D516I
D523I
D526I
D532I
D546I
D565I
D606I
D612I
D624I
D627I
D631I
D632I
D645I
D654I
D662I
D664I
D703I
D712I
D723I
D731I
D732I
D734I
D743I
D754I
CTCSS and DCS Signaling Code Scan
1.Press FUN, MHZ/SET key in turn, then rotate the coding knob to choose menu number 3 (R-CD).
2. Press [MHZ/SET] and then [CALL/TONE] to switch the signaling code type. Press [MHZ/SET] to determine the type.
3.Press MHZ/SET key for (1s) to start CTCSS/DCS signaling code scan.
•When scanning, the point after R-CD flashes.
•To reverse scan direction, rotate the coding knob or press microphone UP/DWN key.
•Press any key to exit function.
•When recognizing CTCSS/DCS signaling code, the signaling code appears and flashes.
4.Press MHZ/SET key to program the recognized signaling code to replace current CTCSS/DCS signaling code. Press any other key to exit
CTCSS/DCS signaling code scan.
•Rotate the coding knob or press microphone UP/DWN key to restore scan when the recognized signaling code flashes.
5.Press any other key to exit menu mode, except MHZ/SET key.
Note:
・When proceeding CTCSS/DCS signaling code scan, CTCSS/DCS function is automatically activated, (even current signaling code doesn’t
set CTCSS/DCS).
・In the process of scanning, the received signal can be monitored with the speaker.
・If the signal is not detected, CTCSS/DCS signaling code scan doesn’t scan.
Repeater Function and Form
1. Hold down [MHZ/SET] to set the main frequency.
• When the TX-L is displayed, the main frequency information is displayed on the left screen
• When the TX-R is displayed, information about the main frequency is displayed on the right screen
2.Choose receiving frequency
3.Choose frequency difference direction
4.Choose frequency difference
5.Choose CTCSS/DCS signaling code (If needs)
Program Frequency Difference
Firstly, choose downward frequency of amateur radio repeater station. The methods as described in choose frequency difference.
Choose frequency difference direction
Choose transmitting frequency higher or lower receiving frequency.
1.Press FUN, MHZ/SET key in turn, then rotate the coding knob to choose menu number 5 (SFT).
2.Press MHZ/SET key and rotate the coding knob to choose + or -.
3.Press MHZ/SET key to save settings, or press any other key to cancel.
4.Press any other key to exit menu mode, except MHZ/SET key.
12

• When + or - appears over the frequency, it is indicates that frequency difference direction is selected.
If frequency difference transmitting frequency is out of allowance range, the transmitting can’t be proceeded. In this occasion, adjust
receiving frequency to make the transmitting frequency within the band frequency range, or change frequency difference direction.
Choose Frequency Difference
To access a repeater station with non-standard frequency difference between receiving and transmitting frequencies, change default
frequency difference (most repeater stations use). The default frequency difference in the UHF frequency band is 5.0 MHz.
1.Press FUN, MHZ/SET key in turn, then rotate the coding knob to choose menu number 10 (OFFSET).
2.Press [MHZ/SET], and then turn the encoding knob to select the appropriate difference frequency.
• Optional difference frequency ranges from 0.00MHz to 99.9875MHz with step size of 50KHz.
3.Press MHZ/SET key to save settings, or press any other key to cancel.
4.Press any other key to exit menu mode, except MHZ/SET key.
Choose CTCSS/DCS Signaling Code
Transmitting 1750HZ
Change CALL key settings
1.Press FUN, MHZ/SET key in turn, then rotate the coding knob to choose menu number 18 (CK).
2.Press MHZ/SET key and rotate the coding knob to choose CALL or 1750.
3.Press MHZ/SET key to save settings, or press any other key to cancel.
4.Press any other key to exit menu mode, except MHZ/SET key.
Some repeater station needs the mobile radio to receive a section of continuous signal after transmitting 1750Hz tone. The mobile radio can
remain transmitting mode for 2s after transmitting 1750Hz tone.
1.Press FUN, MHZ/SET key in turn, then rotate the coding knob to choose menu number 19 (HLD).
2.Press MHZ/SET key and rotate the coding knob to choose ON or OFF (default).
3.Press MHZ/SET key to save settings, or press any other key to cancel.
4.Press any other key to exit menu mode, except MHZ/SET key.
Reverse Frequency Function
Exchange Transmitting and Receiving Frequency
Press FUN, REV key in turn to turn on (off) reverse frequency function.
•The screen displays R when the function is activated.
Repeater Station Installation
1.Connect two mobile radios with clone/ transfer cable ( through DATA socket).
2.Two mobile radios are connected to the 50Ω antenna compile with transmitting impedance.
3.Connect DC power.
Repeater Menu Setting
To achieve repeater function, transfer functions of two mobile radios need to be turned on.
1.Press FUN, MHZ/SET key in turn, then rotate the coding knob to choose menu number 11 (RELAY).
2.Press MHZ/SET key and rotate the coding knob to switch the function to ON.
• The clone cable must be plugged and the function is activated. The function is automatically deactivated and there is a beep when
unplugging the cable.
• Connect the antenna completely before the function is activated.
3.Press MHZ/SET key to save settings, or press other key to exit.
Frequency Difference Program Procedure
1.Choose receiving frequency (The frequency aims at transmitting frequency through the mobile radio in the repeater station).
2.Choose frequency difference direction (The direction aims at opposite frequency difference direction through the mobile radio in the
repeater station).
3.Choose frequency frequency (If it is needed to be as non-standard repeater station).
4.Choose CTCSS/DCS signaling code (If needs).
Note:
• Transmitting and receiving channels transfer function will be achieved after programming the frequency difference of the mobile radio. If
the other transmitting and receiving channels need to be scanned, program the frequency difference of the mobile radio of the other mobile
radio.
• The channel is the same frequency of transmit-receive must set frequency difference to transfer; Different frequencies can directly transfer.
DTMF Function
Manual Dial-up
Keys on the microphone keyboard can be used as DTMF key, included complement keys (A, B, C, D). Operate as following steps to
proceed manual dial-up.
1.Press the microphone PTT key to transmit.
2.Press keys on the keyboard in order to transmit DTMF tone when transmitting. That is to transmit corresponding DTMF tone.
13

• When DTMF transmission maintenance function is activated, transmission mode can remain without pressing microphone PTT key
continuously. However, transmission mode only remains for 2s after pressing the key. If no any operations, the mobile radio will stop
transmitting.
DTMF Monitor
DTMF tone from the speaker can’t be heard when pressing microphone DTMF key. But if needed, the DTMF tone can be monitored.
1.Press FUN, MHZ/SET key in turn, then rotate the coding knob to choose menu number 32 (DT.M).
2.Press MHZ/SET key and rotate the coding knob to choose ON or OFF (default).
3.Press MHZ/SET key to save settings, or press any other key to cancel.
4.Press any other key to exit menu mode, except MHZ/SET key.
DTMF Transmission Maintenance
When the function is activated, the mobile radio will remain transmission mode for 2s. You can release microphone PTT key when
transmitting DTMF tone.
1.Press FUN, MHZ/SET key in turn, then rotate the coding knob to choose menu number 29 (DT.H).
2.Press MHZ/SET key and rotate the coding knob to choose ON or OFF (default).
3.Press MHZ/SET key to save settings, or press any other key to cancel.
4.Press any other key to exit menu mode, except MHZ/SET key.
Auto Dial-up
Use 10 specific DTMF memory channels to save DTMF numbers instead of remembering a long string of numbers.
Save DTMF Numbers in Memory Channel
1.Press FUN, MHZ/SET key in turn, then rotate the coding knob to choose menu number 27 (DTMF.MR).
2.Press MHZ/SET key and rotate the coding knob to choose the needed DTMF memory channel number (0 to 9). Also, microphone
UP/DWN key can be used to choose DTMF memory channel.
3.Press MHZ/SET key.
• DTMF code is input and the first number appears on the screen and flashes.
4.Rotate the coding knob to choose DTMF codes.
• Use microphone keyboard to input DTMF codes is also available, and it only needs to press the corresponding DTMF codes on the
keyboard.
• * is replaced with E and # is replaced with F on the screen.
5.Press MR key to choose DTMF codes and move the cursor to the next one.
• Press VFO key to move the cursor the former one. Press FUN key to delete bits of the current cursor position.
6.Repeat step 4 and 5, up to input 16 bits.
7.Press MHZ/SET key to finish inputting.
• Press any key to cancel input, except MR, VFO, FUN and MHZ/SET key.
• Finish inputting with the lack of 16 characters, press MHZ/SET key twice.
8.Press any other key to exit menu mode, except MHZ/SET key.
Check the Saved DTMF Numbers
1.Press FUN, MHZ/SET key in turn, then rotate the coding knob to choose menu number 27 (DTMF.MR).
2.Press MHZ/SET key and rotate the coding knob to choose the needed DTMF memory channel number (0 to 9) . Also, microphone
UP/DWN key can be used to choose DTMF memory channel.
3.Press REV key.
• Numbers that saved in the channel is rolling display on the screen and the speaker comes out DTMF tone (not transmitting DTMF tone).
4.Press any other key to exit menu mode, except REV and MHZ/SET key.
Transmitting the Saved DTMF Numbers
1.Press microphone PTT and microphone PF/D key.
2.Release microphone PF/D key (continue to press microphone PTT key), then press keys (from 0 to 9) to transmit DTMF numbers saved
in the channel.
• To transmit D tone, press microphone PF/D key again.
• Numbers that saved in the channel is rolling display on the screen and the speaker comes out DTMF tone. (If the menu number 32 (DT.M)
is set as OFF, DTMF tone is not come out).
• Frequency is displayed on the screen again after transmitting.
3.Release microphone PTT key.
Note:
• If empty DTMF memory channel is selected and MHZ/SET key is pressed, frequency will be restored to display on the screen.
• In step 2, if the coding knob is rotated or microphone UP/DWN key is pressed, DTMF memory channel can be previewed.
Adjust DTMF Tone Transmission Speed
1.Press FUN, MHZ/SET key in turn, then rotate the coding knob to choose menu number 28 (SPD).
2.Press MHZ/SET key and rotate the coding knob to choose FA (Fast Speed) or SL (Slow Speed).
• FA tone continuous time is 50msec and SL is 100msec.
3.Press MHZ/SET key to save settings, or press any other key to cancel.
4.Press any other key to exit menu mode, except MHZ/SET key.
Adjust Pause Duration Time
Change pause duration time saved in memory channel (void). Default setting is 50msec.
1.Press FUN, MHZ/SET key in turn, then rotate the coding knob to choose menu number 30 (PA).
2.Press MHZ/SET key and rotate the coding knob to choose 100, 250, 500 (default), 750, 1000, 1500 or 2000msec.
Frequency(Hz)
697
770
852
941
1209
1
4
7
*
1336
2
5
8
0
1477
3
6
9
#
1633
A
B
C
D
14

3.Press MHZ/SET key to save settings, or press any other key to cancel.
DTMF Lock
When you want to forbid using keyboard to avoid DTMF transmission, DTMF lock function can be activated.
1.Press FUN, MHZ/SET key in turn, then rotate the coding knob to choose menu number31 (DT.L).
2.Press MHZ/SET key and rotate the coding knob to choose ON or OFF (default).
3.Press MHZ/SET key to save settings, or press any other key to cancel.
4.Press any other key to exit menu mode, except MHZ/SET key.
When the function is activated, DTMF tone can’t be sent through the keyboard. DTMF memory transmission also is banned.
ANI Identity Code
The ID code is composed of 3 to 10 numbers. The mobile radio will make a prompt when receiving matched codes.
1.Press FUN, MHZ/SET key in turn, then rotate the coding knob to choose menu number 51 (ANI).
2.Press MHZ/SET key and rotate the coding knob to choose ON or OFF (default).
3.Press MHZ/SET key to save settings, or press any other key to cancel.
4.Press any other key to exit menu mode, except MHZ/SET key.
Remote Kill/Activate
The function can remote turn on/off the receiving and transmitting function by transmitting remote kill codes.
Remote kill code is composed of 1-10 DTMF codes and can be set through programming. When the mobile radio with remote kill codes
receive the code, the mobile radio enters remote kill mode. After receiving activate codes (kill code + #), the mobile radio restores normal
working mode. Turn on/off the function can be set by programming (OFF: default).
Two remote kill ways can be set by PC software:
• Ban transmitting
• Ban transmitting and receiving
2 TONE Signaling
Tone A frequency: the frequency of the first tone in 2 TONE.
Tone B frequency: the frequency of the second tone in 2 TONE.
Tone A duration time: Transmission duration time of the first tone in 2 TONE.
Tone B duration time: Transmission duration time of the second tone in 2 TONE.
2 TONE interval time:The interval time between the end of the first tone and the beginning of the second tone.
Long tone A duration time: The first tone duration time of a tone (Only set the first tone, the second one is void), referring to the transmission
duration time of the first tone in 2 TONE.
1.Press FUN, MHZ/SET key in turn, then rotate the coding knob to choose menu number 33 (2 TENC).
2.Press MHZ/SET key and rotate the coding knob to choose 2 TONE code group numbers, OFF (default), 1~32.
3.Press MHZ/SET key to save settings, or press any other key to cancel.
4.Press any other key to exit menu mode, except MHZ/SET key.
2 TONE Decoding
Compound method: choose compound methods to use 2 tone decoding, can be divided A-B, A-C, A-D, B-A, B-C, B-D, C-A, C-B, C-D, D-A,
D-B, D-C, long A, long B, long C and OFF.
·Respond method: the respond method of the mobile radio after receiving matched 2 TONE calling.
1.Press FUN, MHZ/SET key in turn, then rotate the coding knob to choose menu number 34 (2 TDEC).
2.Press MHZ/SET key and rotate the coding knob to choose 2 TONE decoding group numbers, OFF (default), 1~8.
3.Press MHZ/SET key to save settings, or press any other key to cancel.
4.Press any other key to exit menu mode, except MHZ/SET key.
MSK Signaling
Use MSK signaling to proceed the call between mobile radios. The mobile radio ID code and objective mobile radio MSK ID code need to
be set in advance. MSK ID code is 16 decimal data and up to 4 bits, the range is 0~FFFF.
MSK encoding
● PTT ID Type
To use MSK signaling to call other mobile radios, PTT ID type should choose MSK.
1.Press FUN, MHZ/SET key in turn, then rotate the coding knob to choose menu number 58 (IDSOR).
2.Press MHZ/SET key and rotate the coding knob to choose PTT ID type, DTMF (default), MSK.
3.Press MHZ/SET key to save settings, or press any other key to cancel.
4.Press any other key to exit menu mode, except MHZ/SET key.
● MSK Prompt Sound Monitor
When sending signaling code, the mobile radio speaker will have a prompt when the function is activated.
1.Press FUN, MHZ/SET key in turn, then rotate the coding knob to choose menu number 54 (MSKM).
2.Press MHZ/SET key and rotate the coding knob to choose ON or OFF (default).
3.Press MHZ/SET key to save settings, or press any other key to cancel.
4.Press any other key to exit menu mode, except MHZ/SET key.
● MSK Roger Beep
When the function is activated, the mobile radio will make a beep to prompt MSK signaling has sent after sending.
1.Press FUN, MHZ/SET key in turn, then rotate the coding knob to choose menu number 55 (MSKBP).
2.Press MHZ/SET key and rotate the coding knob to choose ON or OFF (default).
3.Press MHZ/SET key to save settings, or press any other key to cancel.
4.Press any other key to exit menu mode, except MHZ/SET key.
MSK Call List
You can choose MSK call numbers you want through MSK call list. Each call number corresponds to a targeted mobile radio MSK ID
number. You can input the MSK ID number you want to set through the MSK call list of the PC programming software.
15

1.Press FUN, MHZ/SET key in turn, then rotate the coding knob to choose menu number 56 (MSKGP).
2.Press MHZ/SET key and rotate the coding knob to choose wanted call number, OFF (default) or 1~10.
3.Press MHZ/SET key to save settings, or press any other key to cancel.
4.Press any other key to exit menu mode, except MHZ/SET key.
Note: MSK pre-carrier time: interval time is from pressing PTT key to MSK starts to send carrier, and can be set through PC programming
software.
● MSK Decoding
● MSK ID Number Setting
Input the mobile radio MSK ID number through ID setting of the MSK setting in the PC programming software.
● MSK Reset Time
MSK reset time refers to remain time length after MSK encoding is right, such as setting 10M refers to remaining the correct status in 10
minutes after MSK encoding is right. Proper MSK reset time can be selected as needed.
1.Press FUN, MHZ/SET key in turn, then rotate the coding knob to choose menu number 57 (MSKRT).
2.Press MHZ/SET key and rotate the coding knob to choose wanted call number, OFF (default) or 1M~10M (Minute).
3.Press MHZ/SET key to save settings, or press any other key to cancel.
4.Press any other key to exit menu mode, except MHZ/SET key.
Additional Function
Respond Method
1.Press FUN, MHZ/SET key in turn, then rotate the coding knob to choose menu number 14 (ECHO).
2. Press [MHZ/SET], then turn the encoding knob to select "D-RX" or "S-RX".
3.Press MHZ/SET key to save settings, or press any other key to cancel.
4.Press any other key to exit menu mode, except MHZ/SET key.
APO (Auto Power Off)
If don’t press keys or adjust control knobs in the selected time, the mobile radio will auto power off. The mobile radio will make several-sec-
ond warning beep before power off 1 minute and APO symbol flashes. Selective APO time: OFF, 30, 60, 90, 120, or 180 minutes.
1.Press FUN, MHZ/SET key in turn, then rotate the coding knob to choose menu number 17 (APO).
2.Press MHZ/SET key and rotate the coding knob to choose APO time, OFF (default), 30, 60, 90, 120, or 180 minutes.
3.Press MHZ/SET key to save settings, or press any other key to cancel.
4.Press any other key to exit menu mode, except MHZ/SET key.
Note:
• APO still timing even the mobile radio is scanning.
• APO timer starts timing when keys are not pressed, control knob is not adjusted and PC control orders are not detected.
S-meter Squelch
If S-meter squelch function is activated, squelch of the mobile radio will be activated only when received signal intensity higher or equal to
S-meter setting. It avoids constantly resetting squelch when receiving weak stations.
1.Press FUN, MHZ/SET key in turn, then rotate the coding knob to choose menu number 8 (SQL).
2.Press MHZ/SET key and rotate the coding knob to choose S-meter level, OFF (default), S0, S1, S2, S3, S4, S5, S6, S7.
• If S0-S7 any level is selected, squelch knob is no longer working.
3.Press MHZ/SET key to save settings, or press any other key to cancel.
4.Press any other key to exit menu mode, except MHZ/SET key.
Squelch Delay Time
When S-meter squelch function is used, time span from the received signal disappearing to the squelch being turned off needs to be
adjusted.
1.Press FUN, MHZ/SET key in turn, then rotate the coding knob to choose menu number 9 (SQH).
2.Press MHZ/SET key and rotate the coding knob to choose OFF (default), 125, 250 or 500msec.
3.Press MHZ/SET key to save settings, or press any other key to cancel.
4.Press any other key to exit menu mode, except MHZ/SET key.
Beep Function
Beep function checks the input, wrong prompting and fault. Suggest turning on the function to check wrong operations and fault. But if
wants to turn off the function
1.Press FUN, MHZ/SET key in turn, then rotate the coding knob to choose menu number 23 (BP).
2.Press MHZ/SET key and rotate the coding knob to choose OFF.
3.Press MHZ/SET key to save settings, or press any other key to cancel.
4.Press any other key to exit menu mode, except MHZ/SET key.
The mobile radio will make following warning beep sound even the beep function is turned off.
• APO warning beep
• TOT warning beep
Busy Channel Lockout
With this function, it can avoid transmitting on the used channel or frequency by others. When the function is turned on, if the channel or
frequency is used by others, press PTT key and the mobile radio will make a wrong beep sound and doesn’t transmit.
1.Press FUN, MHZ/SET key in turn, then rotate the coding knob to choose menu number 21 (BCL).
2.Press MHZ/SET key and rotate the coding knob to choose ON or OFF (default).
3.Press MHZ/SET key to save settings, or press any other key to cancel.
4.Press any other key to exit menu mode, except MHZ/SET key.
Frequency Step Size
When using coding knob or microphone UP/DWN key to choose receiving frequency, frequency step size must be chosen correctly.
Change Frequency Step Size
1.In VFO mode, press FUN, MHZ/SET key in turn, then rotate the coding knob to choose menu number 1 (STP).
16

2.Press MHZ/SET key and rotate the coding knob to choose the needed frequency step size.
3.Press MHZ/SET key to save settings, or press any other key to cancel.
4.Press any key to exit menu mode, except MHZ/SET key.
Note: if an unmatched frequency step size with current operating frequency is changed, the mobile radio will automatically adjust operating
frequency to match with the new frequency step size.
Display Backlight Light Up Method
1.Press FUN, MHZ/SET key in turn, then rotate the coding knob to choose menu number 43 (LLIG).
2.Press MHZ/SET key and rotate the coding knob to choose AUTO, ON (default) or OFF.
Note: when using auto backlight, as soon as pressing front panel or microphone keys, display backlight lights up and remains for 5s.
• Coding control knob also can be locked. To continuously use coding control knob when the lock function is turned on, choose menu
number 26 (ENC) and choose ON.
• When the lock function is turned on, the mobile radio can’t be reset.
• The mobile radio’s operating mode can’t be switched through pressing (Power) + any key.
• Microphone PF key can be normally operated even the lock function is turned on.
Activate Coding Control Knob
1.Press FUN, MHZ/SET key in turn, then rotate the coding knob to choose menu number 26 (ENC).
2.Press MHZ/SET key and rotate the coding knob to choose ON or OFF (default).
3.Press MHZ/SET key to save settings, or press any other key to cancel.
4.Press any other key to exit menu mode, except MHZ/SET key.
Microphone PF Key
Many mobile radio settings can be set without using mobile radio keys or control knob. Microphone PF/D, MR/C, VFO/B and CALL/A can be
set as different mobile radio functions.
Default function of the microphone keys:
Microphone PF1 (PF/D) key: 1MHz step
Microphone PF2 (MR/C) key: memory call out
Microphone PF3 (VFO/B) key: VFO choice
Microphone PF4 (CALL/A) key: Call channel choice
Note: Menu number 38 (MC.L) must be set to "OFF" to program microphone keys
1.Press FUN, MHZ/SET key in turn, then rotate the coding knob to choose one of the menu numbers 26 -42 (PF1-PF4).
2.Press MHZ/SET key and rotate the coding knob to choose programmable functions.
3.Press MHZ/SET key to save settings, or press other key to cancel.
4.Press any key to exit menu mode, except MHZ/SET key.
Backlight Color Setting
Backlight color indicates mobile radio working status. Three kinds of backlight color working status can be set in advance: standby,
transmitting and receiving.
1.Press FUN, MHZ/SET key in turn, then rotate the coding knob to choose menu number 44 (WF.CLR), 45 (RX.CLR) and 46 (TX.CLR), and
set each status.
2.Press MHZ/SET key and rotate the coding knob to choose color kinds: 1, 2, 3, 4 (default), 5, 6, 7 and 8.
3.Press MHZ/SET key to save settings, or press other key to cancel.
4.Press any key to exit menu mode, except MHZ/SET key.
LCD Contrast Adjustment
1.Press FUN, MHZ/SET key in turn, then rotate the coding knob to choose menu number 47 (CONTR).
2.Press MHZ/SET key and rotate the coding knob to choose LCD contrast level: 0, 1, 2 (default) and 3.
3.Press MHZ/SET key to save settings, or press other key to cancel.
4.Press any key to exit menu mode, except MHZ/SET key.
Lock Function
Lock function can ban most keys to avoid activating one function accidentally.
1.Press FUN key for (1s).
♦ When the function is turned on, the screen displays .
• Following keys can’t be locked
(Power), FUN for (1s), Volume knob, PTT and microphone keyboard
2.Press FUN key for (1s) again to unlock keys.
Programmable Function
MONI: Monitor function on/off
ENTER: Input frequency or memory channel number through keyboard
1750: Transmit 1750Hz
VFO: Enter VFO mode
MR: Enter MR (memory call out) mode
CALL: Choose call channel
MHz: Enter 1MHz step mode
REV (Reverse frequency): Reverse frequency function on/off
SQL (Squelch): Enter squelch mode
M-V: Memory channel to VFO transmission
M.IN: Memory channel
C.IN: Memory call channel
MENU: Enter menu mode
SHIFT (Offset) : Offset function on/off
LOW: Choose transmitting power
LOCK: Lock function on/off (must press for 1s)
STEP (Step) : Choose frequency step size
Note: in addition to entering menu mode and choosing PF1-PF4, functions can be set by pressing the programmed PF key and turning on
the mobile radio. When programming PF key with the later method, rotate the coding control knob or press microphone UP/DWN key to
choose functions. Press any other key to exit menu mode, except MHZ/SET key.
17

Power Message
When turning on the mobile radio, power message is displayed and can be changed (up to 6 characters).
1.Press FUN, MHZ/SET key in turn, then rotate the coding knob to choose menu number 22 (P.ON.MSG).
2.Press MHZ/SET key and the screen displays power message and input cursor.
3.Rotate the coding control knob to choose bits.
• Following alphabet and number bits can be input: 0~9, A~Z, -- (dash), / ( slash) and blank.
• In addition to coding control knob, bits can be input with microphone keyboard.
4.Press MR key to move cursor to the next one.
• Press VFO key to move cursor to the former one. Press FUN key to delete characters of current cursor position.
5.Repeat step 3 and 4, up to input 6 characters.
6.Press MHZ/SET key to finish setting and save power message.
7.Press any other key to exit menu mode, except MHZ/SET and FUN key.
Note: if power message is not set, screen will display mobile radio battery voltage when the mobile radio is turned on.
Programmable VFO
To limit operating frequency within one frequency range, program higher and lower frequencies for VFO specifications. For example, lower
frequency chooses 462MHz and higher frequency chooses 468MHz. Adjustment range is from 462.000MHz to 462.000MHz.
1.In VFO mode, press FUN, MHZ/SET key in turn, then rotate the coding control knob to choose menu number 7 (PVFO).
• Screen displays the current programmable frequency range of the frequency band.
2.Press MHZ/SET key and rotate the coding knob to choose lower frequency (MHz).
3.Press MHZ/SET key and rotate the coding knob to choose higher frequency (MHz).
4.Press MHZ/SET key to save settings, or press any other key to cancel.
5.Press any other key to exit menu mode, except MHZ/SET key.
Note:
• ≤100KHz frequencies can’t be programmed.
• Higher frequency can’t lower than chosen lower frequency.
TOT
1.Press FUN, MHZ/SET key in turn, then rotate the coding knob to choose menu number 20 (TOT).
2.Press MHZ/SET key and rotate the coding knob to choose 3, 5 or 10 minutes (default).
3.Press MHZ/SET key to save settings, or press any other key to cancel.
4.Press any other key to exit menu mode, except MHZ/SET key.
Note: the mobile radio will make a warning beep sound even the menu number is set as OFF.
Microphone Keyboard Lock
Microphone Keyboard Lock bans microphone PF key and avoids changing mobile radio operations for accidentally pressing keys.
1.Press FUN, MHZ/SET key in turn, then rotate the coding knob to choose menu number 38 ( MC.L).
2.Press MHZ/SET key and rotate the coding knob to choose ON or OFF (default).
3.Press MHZ/SET key to save settings, or press any other key to cancel.
4.Press any other key to exit menu mode, except MHZ/SET key.
Voice Companding
Voice companding function can be turned on to reduce noise and improve voice quality.
1.Press FUN, MHZ/SET key in turn, then rotate the coding knob to choose menu number 49 (CPD).
2.Press MHZ/SET key and rotate the coding knob to choose ON or OFF (default).
• One mobile radio’s voice companding is turned on, the other needs to be turned on to ensure sound quality.
3.Press MHZ/SET key to save settings, or press any other key to cancel.
4.Press any other key to exit menu mode, except MHZ/SET key.
Scramble Voice Encryption
Five encryption items can be selected, you can define them to ensure private communication.
1.Press FUN, MHZ/SET key in turn, then rotate the coding control knob to choose menu number 50 (SR).
2.Press MHZ/SET key and rotate the coding knob to choose OFF (default), USER (define), 3450, 3400, 3300, 3200, 3100, or 3000Hz.
• Private communication between two mobile radios, specifications need to be set the same to ensure normal communication.
3.Press MHZ/SET key to save settings, or press any other key to cancel.
4.Press any other key to exit menu mode, except MHZ/SET key.
Speaker Turn On (SP unmute)
Speaker will be turned on when the mobile radio receives communication signaling. Opening conditions can be chosen.
1.Press FUN, MHZ/SET key in turn, then rotate the coding knob to choose menu number 59 (UNMUTE).
2.Press MHZ/SET key and rotate the coding knob to choose PTT ID types: QD (default), Q+0 or Q-0.
QD: Speaker will be turned on as soon as CTCSS/DCS signaling is right.
Q+0: Both the CTCSS\DCS signaling and the optional signaling (DTMF or MSK signaling) must be correct to turn on the horn.
Q-0: Turn on the horn whenever one of the CTCSS\DCS signaling, optional signaling (DTMF or MSK signaling) is correct
3.Press MHZ/SET key to save settings, or press any other key to cancel.
4.Press any other key to exit menu mode, except MHZ/SET key.
Roger Beep
The mobile radio will make a finishing prompt after transmitting when the function is turned on. Prompt will send to receiver to inform
receiver the communication ends.
Roger Beep ON/OFF
1.Press FUN, MHZ/SET key in turn, then rotate the coding knob to choose menu number 60 (TEND).
2.Press MHZ/SET key and rotate the coding knob to choose ON or OFF (default).
3.Press MHZ/SET key to save settings, or press any other key to cancel.
4.Press any other key to exit menu mode, except MHZ/SET key.
Roger Beep Volume Setting
Roger beep volume can be selected according to your need.
18
Other manuals for RA87
1
Table of contents
Other Retevis Radio manuals

Retevis
Retevis RA25 User manual

Retevis
Retevis RT86 User manual

Retevis
Retevis RT98 User manual

Retevis
Retevis NR30 User manual

Retevis
Retevis RT72 User manual

Retevis
Retevis RT99 User manual

Retevis
Retevis RT69 User manual

Retevis
Retevis RA86 User manual

Retevis
Retevis radio series User manual

Retevis
Retevis RB28 User manual