RST meteoscan 937PRO User manual

professional wireless
Internet weather statiom
meteoscan 937PRO
RST01937
Operation Manual
GB
www.barometer.ru
RST01937Manual 25.10.2017 11:57 Страница 1

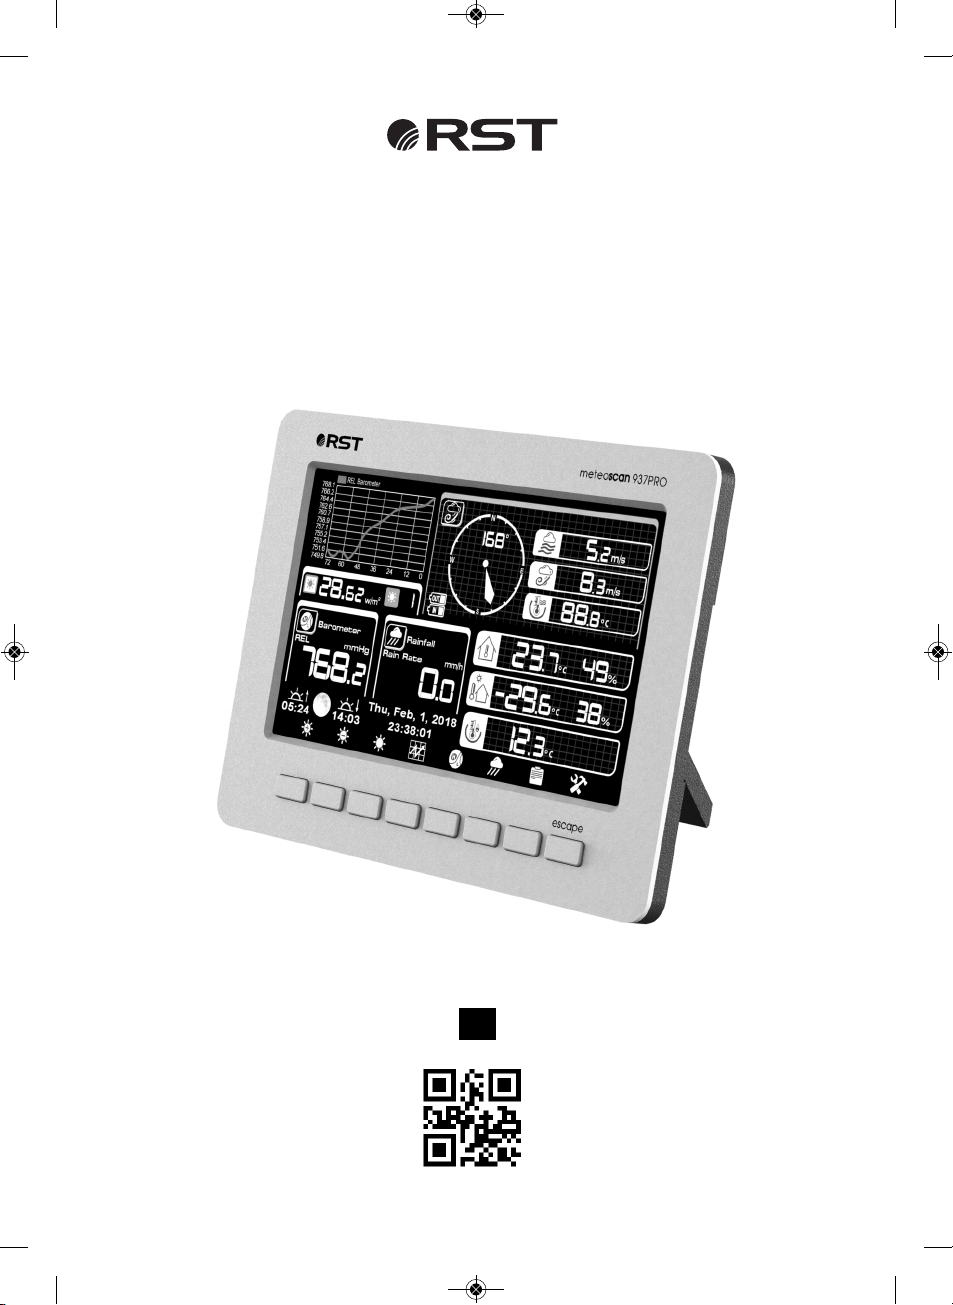
page 2 RST01937 meteostanciya
OVE VIEW .......................................................................................................................................3
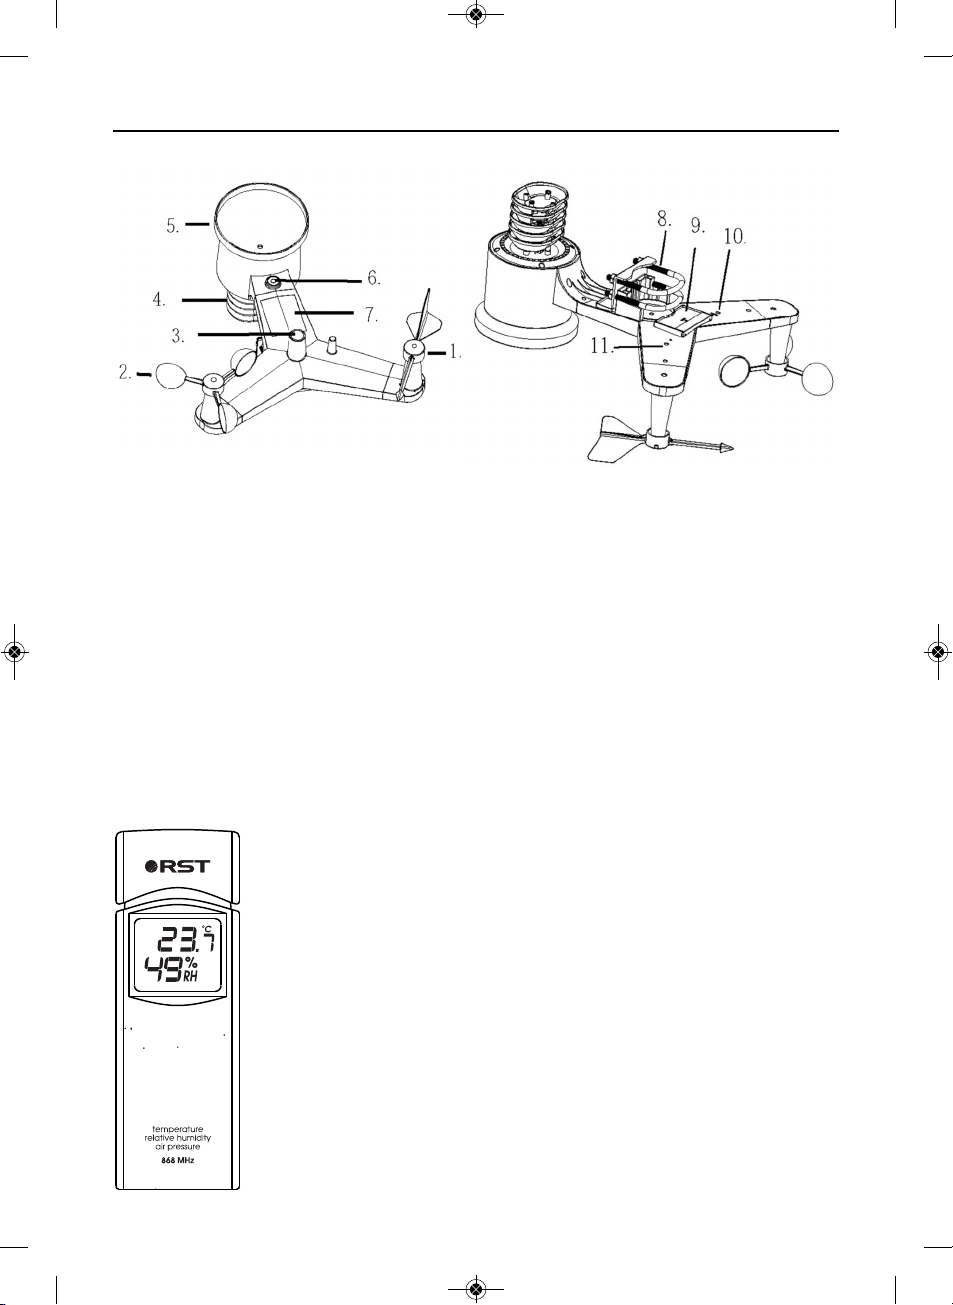
Outdoor sensor:..............................................................................................................................3
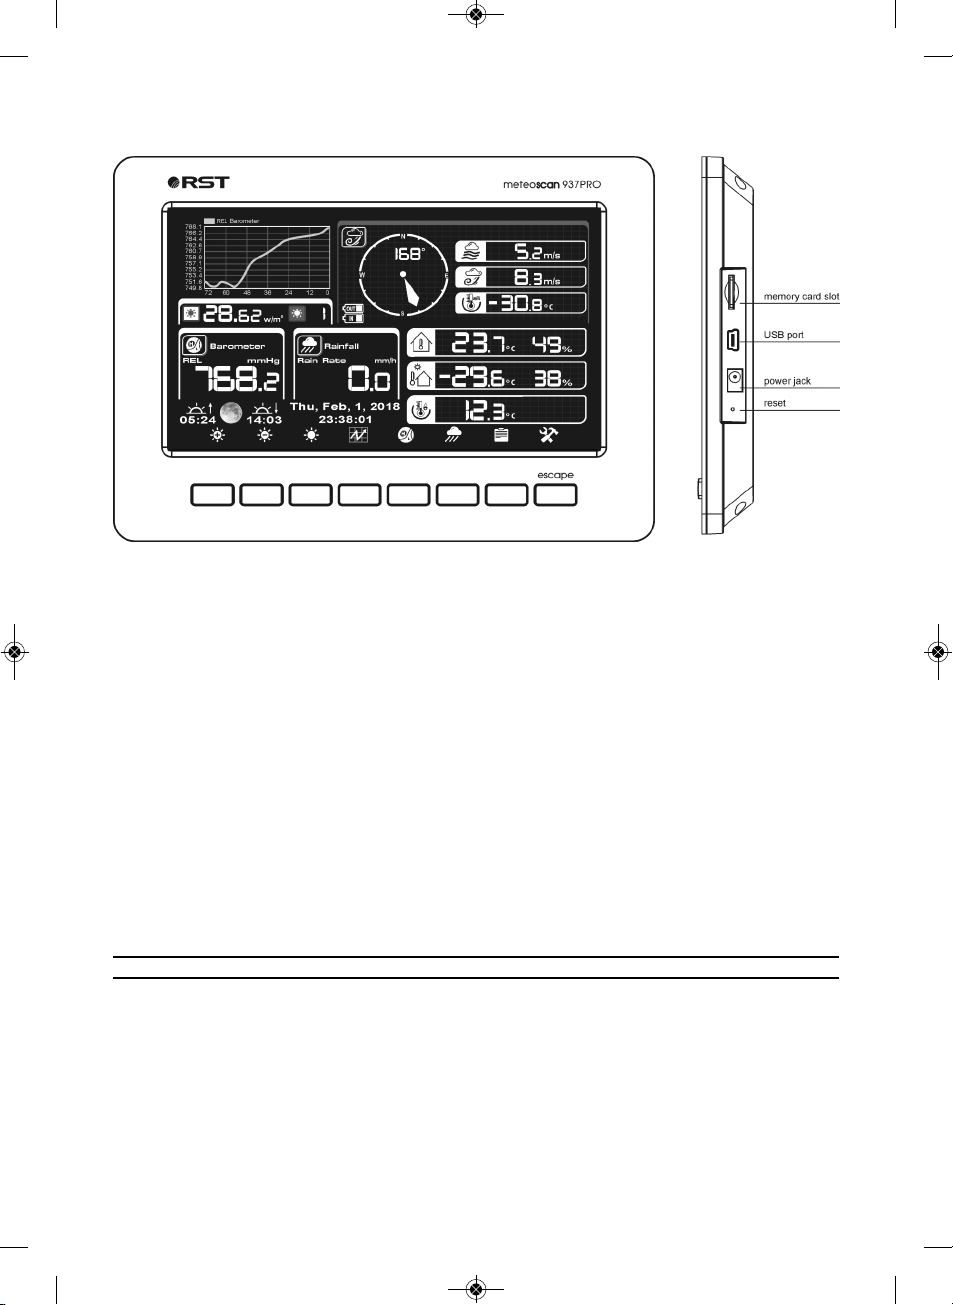
Display unit......................................................................................................................................4
Contents .........................................................................................................................................4
ntroduction ....................................................................................................................................4
Installation ......................................................................................................................................3
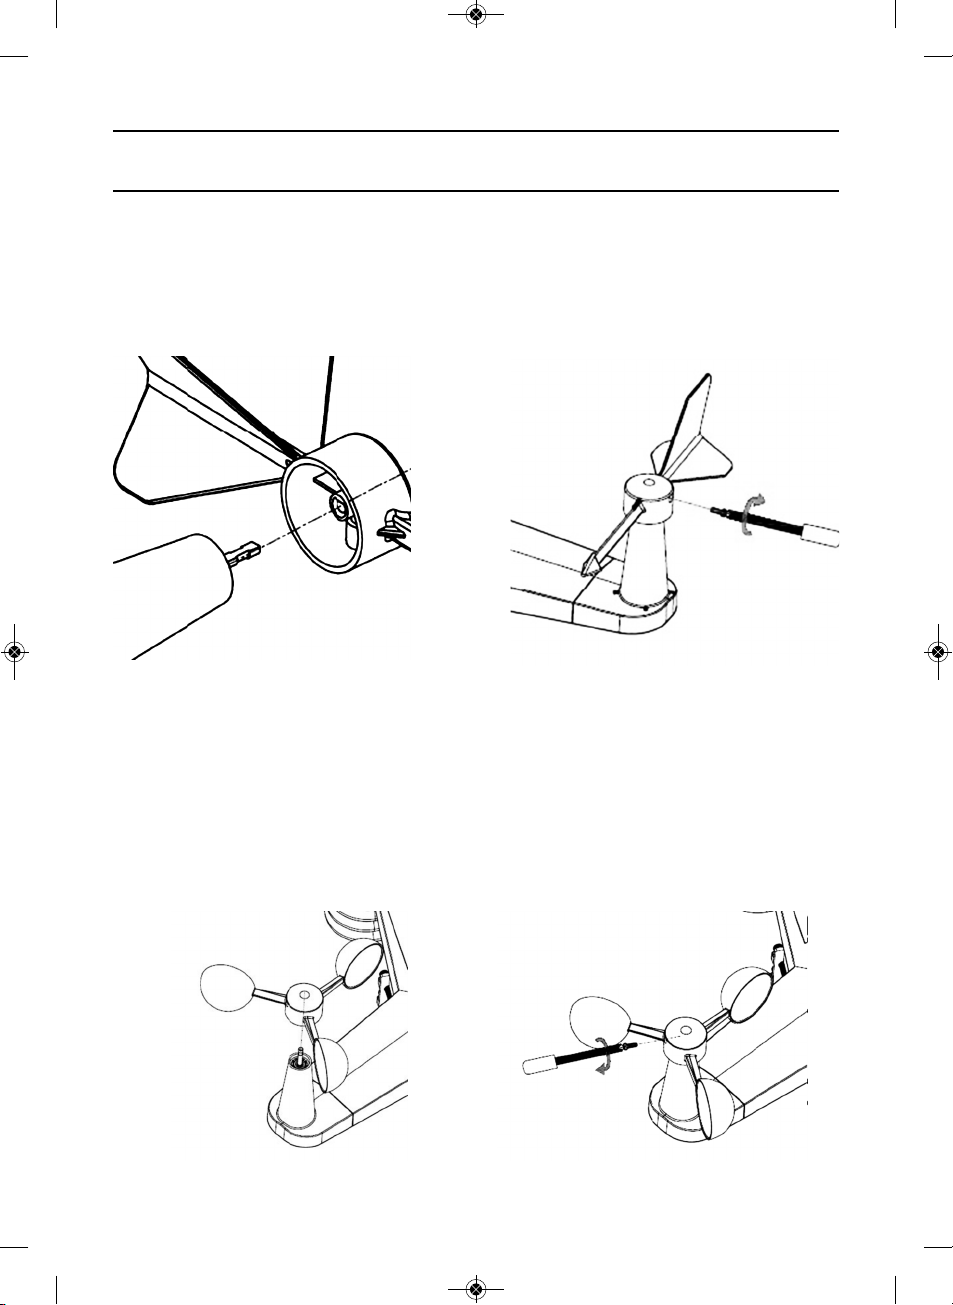
1. nstall wind vane.........................................................................................................................5
2. nstall wind speed.......................................................................................................................5
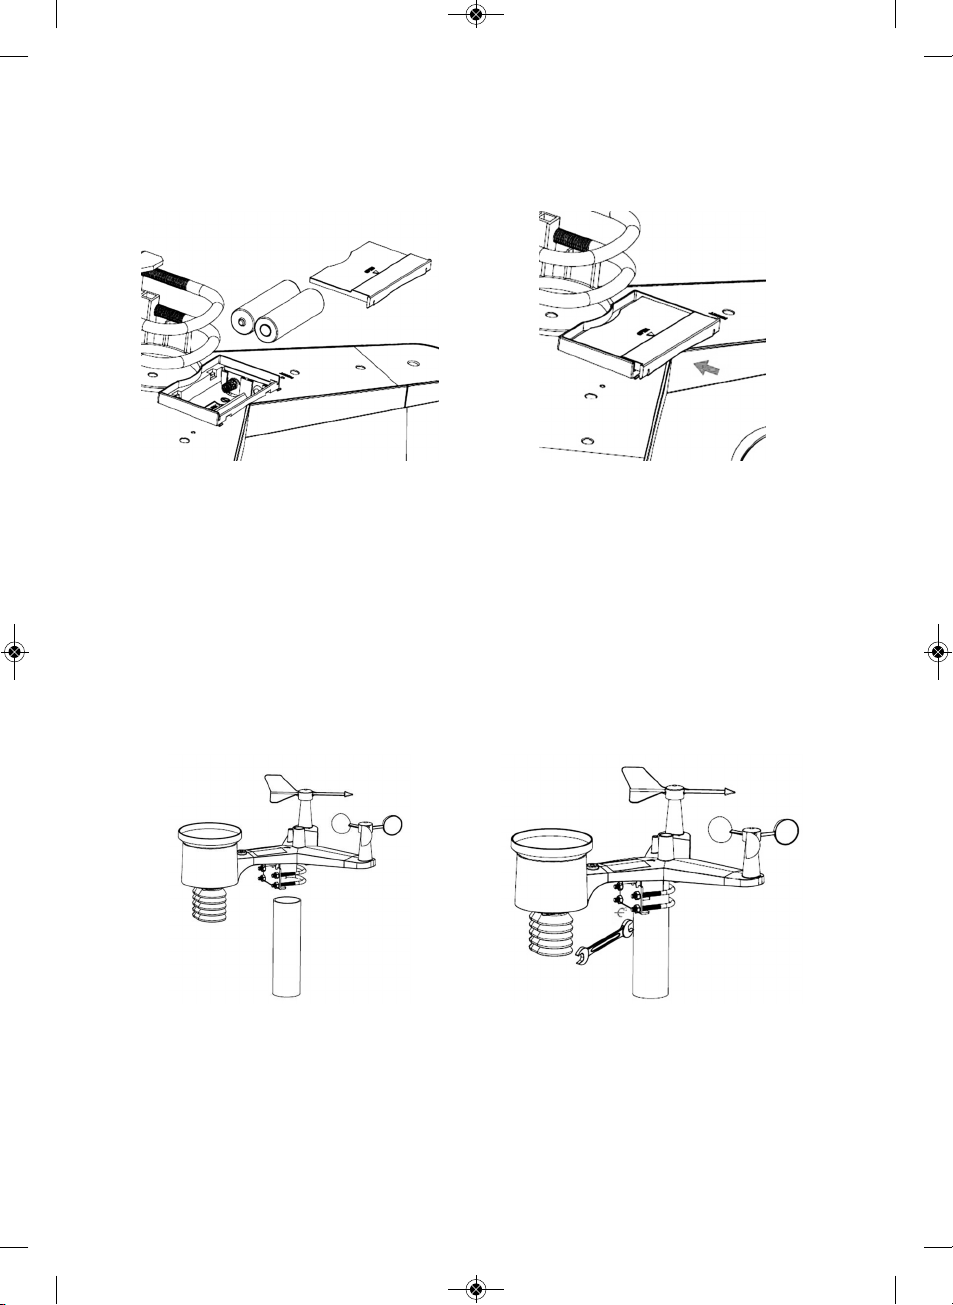
3. nstall Batteries ............................................................................................................................6
3. Mount outdoor sensor ...............................................................................................................6
5 Reset Button and Transmitter LED ..............................................................................................6
Best Practices for Wireless Communication ................................................................................7
ndoor sensor ..................................................................................................................................8
nitial Display Console Set Up........................................................................................................8
Program Mode ...............................................................................................................................9
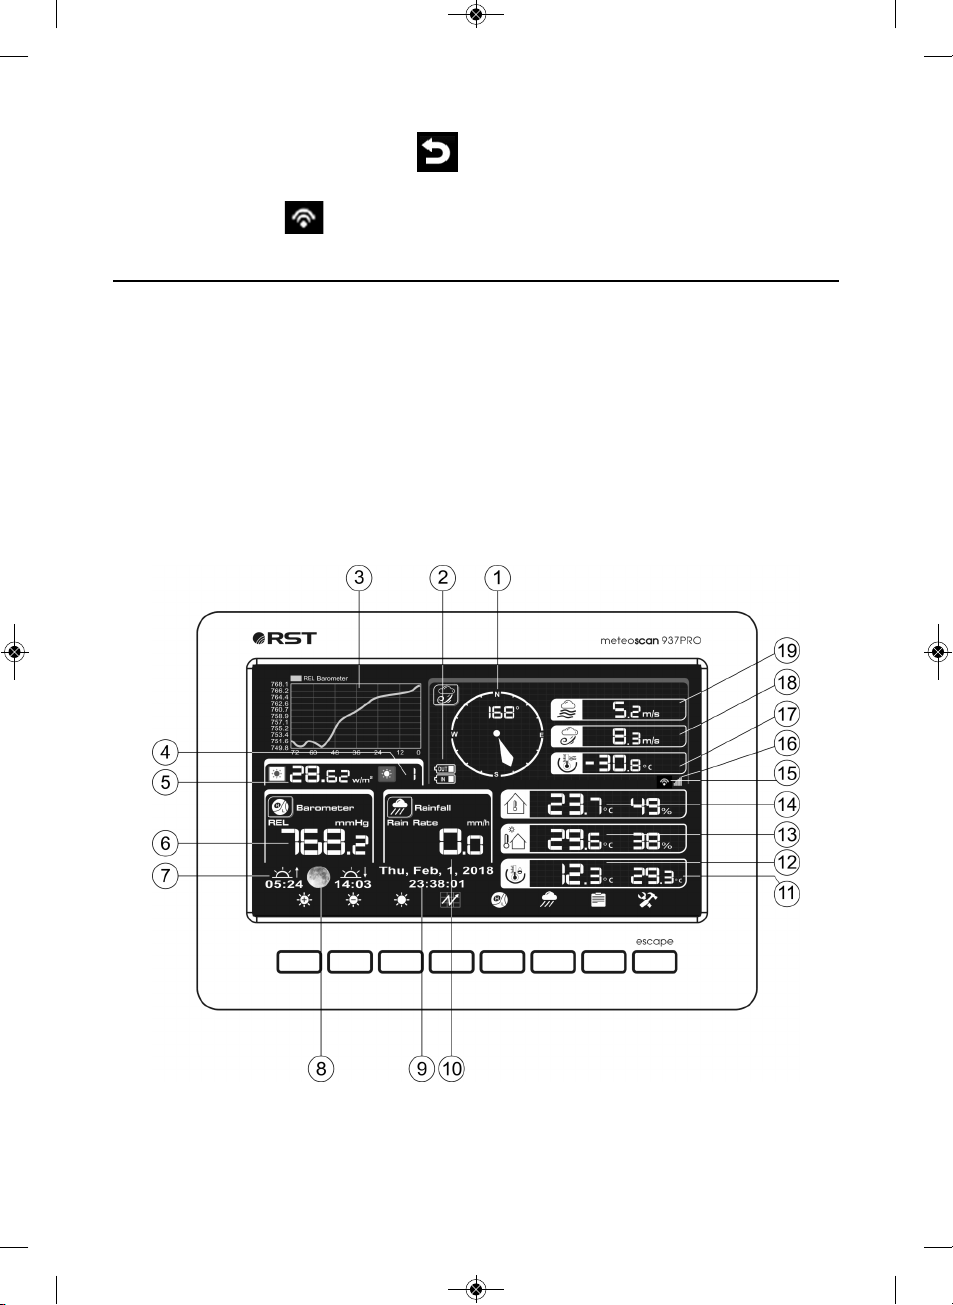
1. Normal display Mode ................................................................................................................9
2. History Mode...............................................................................................................................10
3. Setting Mode ..............................................................................................................................11
3.1 Menu Setting Mode .................................................................................................................15
3.2 Alarm Setting Mode.................................................................................................................24
3.3 Calibration Mode.....................................................................................................................25
3.4 Factory reset.............................................................................................................................28
Maintenance ................................................................................................................................. 31
Troubleshooting Guide ..................................................................................................................32
Specifications.................................................................................................................................34
RST01937Manual 25.10.2017 11:57 Страница 2

RST01937 meteostanciya page 3
Overview
Outdoor sensor
1. Wind Vane
2. Wind Speed Sensor
3. Solar panel
3. Battery compartment
5. LED Indicator: light on for 4s if the unit power up. Then the LED will flash once every 16
seconds (the sensor transmission update period).
6. Reset button
7. Thermo-hygro sensor
8. Calibration screw
9. UV sensor
10. Light sensor
11. Rain collector
12. Bubble level
Indoor sensor
RST01937Manual 25.10.2017 11:57 Страница 3

page 4 RST01937 meteostanciya
Display unit
Note:
The USB port in the console of weather station is only for software update, not for data
communication.
Contents
The weather station consists of the following parts:
1 Display Console
1 Y shape outdoor sensor
(Thermo-hygrometer / Rain Gauge / Wind Speed Sensor /Transmitter)
1 Wind Vane
1 Indoor sensor
1 5V DC adaptor
1 Stainless Steel Tube (D32*H200mm)
1 U style Stainless Steel Loop
1 User manual
Introduction
Thank you for your purchase this Wireless Wi i Weather Station. The outdoor sensor is solar
powered and sends data to the console via a low-power radio. It allows you to upload your
weather data to weather website: www.wunderground.com which you can share it with your
friend.
This manual will guide you step-by-step through setting up your device. Use this manual
to become familiar with your professional weather station, and save it for future reference.
RST01937Manual 25.10.2017 11:57 Страница 4

RST01937 meteostanciya page 5
Feature
Installation
Before placing and installing all components of the weather station at there final desti-
nation, please set up the weather station with all parts being nearby for testing the correct
function.
1. Install wind vane
Push the wind vane into the shaft. as shown in figure 1. Tighten the set screw with as
shown in figure 2. Make sure the wind vane spin freely.
figure 1 figure 2
There are four alphabet letter of “N”,”E”,”S”and “W” around the wind direction, repre-
senting for the direction of North, East, South and West. Wind direction sensor has to be ad-
justed so that the directions on the sensor are matching with your real location. Permanent
wind direction error will be introduced when the wind direction sensor is not positioned cor-
rectly during installation.
2. Install wind speed
Push the wind speed into the shaft. as shown in figure 3.
Tighten the set screw with as shown in figure 5. Make sure the wind speed spin freely.
figure 4 figure 5
RST01937Manual 25.10.2017 11:57 Страница 5

page 6 RST01937 meteostanciya
3. Install Batteries
Insert 2XAA batteries in the battery compartment. The LED indicator on the back of the
transmitter will turn on for four seconds and normally flash once every 16 seconds (the sensor
transmission update period).
figure 6 figure 7
Note: If no LED light up or is lighted permanently, make sure the battery is inserted the
correct way or a proper reset is happened. Do not install the batteries backwards. You can
permanently damage the outdoor sensor
Note: We recommend lithium batteries for cold weather climates, but alkaline batteries
are sufficient for most climates. We do not recommend rechargeable batteries. They have
lower voltages, do not operate well at wide temperature ranges, and do not last as long,
resulting in poorer reception.
3. Mount outdoor sensor
Reference 8&9. The mounting assembly includes two U-Bolts and a bracket that tightens
around a 1 to 2” diameter pole (not included) using the four U-Bolt nuts.
figure 8 figure 9
Use the bubble level beside the rain sensor as a guide to verify that sensors are level.
5. Reset Button and ransmitter LED
In the event the sensor array is not transmitting, reset the sensor array.
With an open ended paperclip, press and hold the RESE BU ON for three seconds to
completely discharge the voltage.
RST01937Manual 25.10.2017 11:57 Страница 6

Take out the batteries and wait one minute, while covering the solar panel to drain the
voltage.
Put batteries back in and resynchronize with console by powering down and up the con-
sole with the sensor array about 3 meter away.
figure 10
Best Practices for Wireless Communication
Note: To insure proper communication, mount the remote sensor(s) upright on a vertical
surface, such as a wall. Do not lay the sensor flat.
Wireless communication is susceptible to interference, distance, walls and metal barriers.
We recommend the following best practices for trouble free wireless communication.
1. Electro-Magnetic Interference (EMI). Keep the console several feet away from com-
puter monitors and TVs.
2. Radio Frequency Interference (RFI). If you have other 868 MHz devices and com-
munication is intermittent, try turning off these other devices for troubleshooting purposes.
You may need to relocate the transmitters or receivers to avoid intermittent communication.
3. Line of Sight Rating. This device is rated at 300 feet line of sight (no interference,
barriers or walls) but typically you will get 100 feet maximum under most real-world installa-
tions, which include passing through barriers or walls.
3. Metal Barriers. Radio frequency will not pass through metal barriers such as alu-
minum siding. If you have metal siding, align the remote and console through a window to
get a clear line of sight.
The following is a table of reception loss vs. the transmission medium. Each “wall” or ob-
struction decreases the transmission range by the factor shown below.
Medium RF Signal Strength Reduction
Glass (untreated) 5-15%
Plastics 10-15%
Wood 10-40%
Brick 10-40%
Concrete 40-80%
Metal 90-100%
RST01937 meteostanciya page 7
RST01937Manual 25.10.2017 11:57 Страница 7

page 8 RST01937 meteostanciya
Indoor sensor
Remove the battery door on the back of the sensor with a Philips
screwdriver (there is only one screw, at the bottom of the unit). Insert
two AAA batteries as shown in igure 11 (we recommend lithium bat-
teries for cold weather climates, but alkaline batteries are sufficient for
most climates).
Replace the battery door and set screw. Note that the tempera-
ture, humidity and pressure will be displayed on the LCD display. Look-
ing at the back of the unit from left to right, the polarity is (-) (+) for
the top battery and (+) (-) for the bottom battery.
igure 11
Initial Display Console Set Up
Connect the power adapter to power up the display console.
The display console starts to register the transmitter and receiver the weather data from
transmitter. The interface as below:
RST01937Manual 25.10.2017 11:57 Страница 8

RST01937 meteostanciya page 9
Then it start to scan the Wi- i network, if it didn’t found the available Wi- i it will shows”
not find any AP (Access Point)”. Press key to return to normal display mode. Only after
connect to WLAN you can upload the data to weather website. If the data upload to server
successfully, the icon will show on beneath the wind chill.
Program Mode
1. Normal display Mode
Note: sunrise/sunset and moon phase feature is only available in firmware Version 2.0.0
or greater.
1. Wind direction
2. Low battery indicator
3. Weather orecast / rel. pressure
graph / In & Outdoor temperature graph /
In & Outdoor humidity graph
3. UV index
5. Light
6. Barometric Pressure
7. sunrise/sunset
8. moon phase
9. Time and date
10. Rainfall
11. Heat index
12. Dew point
13. Outdoor Temperature &Humidity
13. Indoor Temperature &Humidity
15. Internet Connectivity
16. Wi i Connectivity
17. Wind chill
18. Gust
19. Wind speed
RST01937Manual 25.10.2017 11:57 Страница 9

page 10 RST01937 meteostanciya
Each icon in the display matches a black keys on plastic case. Please press the keys for
operation.
2. History Mode
While in normal display, press the key to enter History Mode. You can select the
below sub-mode by pressing the key.
Icon Description
Brightness control key
Press this key to enhance the brightness
Brightness control key
Press this key to decrease the brightness
Backlight on/off key
Press this key to on/off the backlight
Graph display key
Press this key to choose between Weather orecast,rel. pressure graph, in & out-
door temperature graph and in & outdoor humidity graph
Pressure display key
Press this key to choose the display between Absolute pressure and Relative pres-
sure.
Rain key
Press this key to Shift the display between Rain Rate, Rain Day, Rain Week, Rain
Month, and Rain Year.
History key
Press this key to enter History Mode
Setting key
Press this key to enter Setting Mode
RST01937Manual 25.10.2017 11:57 Страница 10

RST01937 meteostanciya page 11
2.1 MAX/MIN Mode
While in normal display, press the key once to enter MAX/MIN Mode.
Icon Description
Select key
Press this key to select the unit or scrolls the value
Select key
Press this key to select the unit or scrolls the value.
Left key
Press this key to select the set value.
Right key
Press this key to select the set value.
Up arrow key
Press this key to change the activated option field
Down arrow key
Press this key to change the activated option field
Return key
Press this key to return to previous mode
Enter key
While select the weather MAX/MIN record, press this key to popup Message
Box”Are you sure to clear the Max/Min?”Press key or key to select
YES or NO. Press the key or key to confirm the selection.
RST01937Manual 25.10.2017 11:57 Страница 11

RST01937 meteostanciya page 12
2 .2 History Record Mode
While in normal display, press the key twice to enter History Record Mode.
Icon Description
File Select key
Press this key to enter the file selection mode
Page Select key
Press this key to enter the page selection mode.
Scroll left key
Press this key to view the left of the scrollable area.
Scroll right key
Press this key to view the right of the scrollable area.
Page up key
Press this key to scroll up the page you are viewing
Page down key
Press this key to scroll down the page you are viewing
History key
Press this key to select the sub-Mode
Return key
Press this key to return to previous mode
RST01937Manual 25.10.2017 11:57 Страница 12

RST01937 meteostanciya page 13
While in History Record Mode, press key to enter the file selection mode:
Press or key to select the history file of annual data. Press key to delete
the selected file. Press key to exit and open the selected file. Press key to return
to History record Mode.
While in History Record Mode, press the key to enter the page selection mode:
Press or key to select a digit in a number, press key or key to
change the number. Press or to change the activated option field and press
or key to confirm.
RST01937Manual 25.10.2017 11:57 Страница 13

page 14 RST01937 meteostanciya
2.3 History graph mode
While in normal display, press the key twice to enter History graph Mode.
Icon Description
Zoom In key
Zoom Out key
Scroll left key
Press this key to view the left of the scrollable area.
Scroll right key
Press this key to view the right of the scrollable area.
Select file key
Press this key to enter the file selection mode
Page down key
Press this key to scroll down the page you are viewing
History key
Press this key to select the sub-Mode
Return key
Press this key to return to previous mode
RST01937Manual 25.10.2017 11:57 Страница 14

RST01937 meteostanciya page 15
3.Setting Mode
While in normal display, press the key to enter Setting Mode. You can select the
below sub-mode by pressing the key
3.1 Menu Setting Mode
Icon Description
Select key
Press this key to select the unit or scrolls the value
Select key
Press this key to select the unit or scrolls the value.
Left key
Press this key to select the set value.
Right key
Press this key to select the set value.
Up arrow key
Press this key to change the activated option field
Down arrow key
Press this key to change the activated option field
Set key
Press this key to select the Setting sub-Mode
Return key
Press this key to return to previous mode
RST01937Manual 25.10.2017 11:57 Страница 15

page 16 RST01937 meteostanciya
3.1.1. Date and ime setting
While in Menu Setting Mode, press key to select Date and Time Setup field, press
or key to enter Date and Time Setup mode:
1) ime setting (hour/minute/second)
Press key to select time setting field, the hour digit turn red, press the or
key to change the hour setting. Press to set the minute, the minute digit turn red, press
the or key to change the minute setting. Press to set the second, the second
digit turn red, press the or key to change the second setting
2) Date setting
Press key to select Date setting field, the day digit turn red, press the or
key to change the day setting. Press to set the month, the month digit turn red, press
the or key to change the month setting. Press to set the year, the year
digit turn red, press the or key to change the year setting
3) ime zone setting
Press key to select Time zone setting field, press the or key to change
the time zone setting. Press key to select Update field, press the or key to
update the time immediately.
RST01937Manual 25.10.2017 11:57 Страница 16

RST01937 meteostanciya page 17
4) DS setting
If the state that were in the Time Zone observe DST, the option of “automatically adjust
clock for Daylight Saving Change” will show on beneath the Time Zone setting. Press the
or key to select this option..
5) Internet time server
The default server is time.nist.gov. Press to popup the keyboard for you to type
in the new server
6) Automatically synchronize with an internet time server
Press the or key to select
3.1.2 ime Format setting (H:mm:ss / h:mm:ss AM / AM h:mm:ss, default H:mm:ss)
3.1.3 Date Format setting
(MM-DD-YY, DD-MM –YY or YY- MM-DD format, default DD-MM-YYYY)
3.1.4 emperature unit setting (°C/o, default °C)
3.1.5 Barometric unit (hPa / inHg / mmhg, default hPa)
3.1.6 Wind speed unit (km/h, m/s, bft, mph, knots default: m/s)
3.1.7 Rainfall unit (mm, inch, default: mm)
3.1.8 Solar Rad. unit (lux, fc, w/㎡)
3.1.9 Rainfall display(Rain Rate, Rain Day, Rain Week, Rain Month, Rain Year)
Rain Rate: it forecast the rain per hour base on the recently 10 minute’s rainfall. or ex-
ample: the rainfall of recent 10 minutes is 12mm, the rain/hour is 12mm*6=72mm/h.
Note: The rain per day is reset to zero at 0:00hr every day. The rain per week is reset to
zero at 0:00hr every Sunday, per month is reset to zero at 0:00hr every first day of the month.
The reset of the rain per year refer to rainfall season section
3.1.10 Graph time (12/24/48/72 hour, default 72hour)
RST01937Manual 25.10.2017 11:57 Страница 17

page 18 RST01937 meteostanciya
3.1.11 Backlight setting
While in Menu Setting Mode, press key to select Backlight Setup field, press
or key to enter backlight Setup mode:
Automatic control backlight: select this option, the backlight will auto turn on and off accord-
ing the set time
Turn on the backlight: set the time of turn on backlight
Turn off the backlisth: set the time of turn off backlight
Automatic brightness adjustment: select this option, the brightness will change according to
the light intensity measured from outdoor sensor
Maximum brightness: set the maximum brightness while it is the highest light intensity
Minimum brightness: set the minimum brightness while it is the weakest light intensity
Icon Description
Select key
Press this key to select the unit or scrolls the value
Select key
Press this key to select the unit or scrolls the value.
Left key
Press this key to select the set value.
Right key
Press this key to select the set value.
Up arrow key
Press this key to change the activated option field
Down arrow key
Press this key to change the activated option field
Return key
Press this key to return to previous mode
RST01937Manual 25.10.2017 11:57 Страница 18

RST01937 meteostanciya page 19
If the auto backlight turn-on time has been set, you can press key to turn off the
backlight within the turn on time. Backlight will turn on aприрост automatically at next turn
on time. You can press any key to turn on the backlight for 60 s within the turn off time
3.1.12 Longitude_Latitude setting
While in Menu Setting Mode, press key to select Longitude_Latitude Setup field,
press or key to enter Longitude_Latitude Setup mode:
The sunrise/sunset times will be calculating automatically base on the Longitude and Lat-
itude.
3.1.13 Barometric display(Absolutely, Relative)
3.1.14 Weather threshold (2-4, default 3)
It’s pressure sensitivity setting for weather forecasting. When the pressure rises over weather
threshold in past 12 hours the weather upgrades (like from partly cloudy to sunny). When the
pressure drops over weather threshold in past 12 hours the weather degrades (like from cloudy
to raining). or areas that experience frequent changes in air pressure requires a higher level
setting compared to an area where the air pressure is stagnant. or example if 4 is selected,
then there must be a fall or rise in air pressure of at least 4hPa needed to change the weather
forecast icons.
3.1.15 Storm threshold (3-9, default 4)
Similar to the general pressure sensitivity setting it is possible to adjust the storm threshold
sensitivity form 3-9 (default 4). When there is a fall over storm threshold within 3 hours, the
storm icon will appear.
RST01937Manual 25.10.2017 11:57 Страница 19

page 20 RST01937 meteostanciya
3.1.16 Current weather
The five weather icons are Sunny, Partly Cloudy, Cloudy, Rainy and Storm.
Sunny Partly Cloudy Cloudy Rainy Storm
3.1.17 Rainfall season (default: January)
Rainfall season influence the annual rainfall maximum, minimum and total value. When
one month was selected, the annual rainfall and annual max/min rainfall were zero clearing
at 0:00 of the first day of the selected month,
3.1.18 Storing Interval (1-240minutes)
3.1.19 Weather Server
Press or key to enter Weather Server set up mode, type in the Station ID and
password to upload the data.
The console is configured to send real-time data to wunderground.com® so there is no
need to adjust the Server, Server type, and upload type. Enter the Station ID and Password
from wunderground.com®. Enter your Station ID and password obtained from wunder-
ground.com®.
RST01937Manual 25.10.2017 11:57 Страница 20
This manual suits for next models
1
Table of contents
Languages:
Other RST Weather Station manuals

RST
RST METEO PROJECTION 705 User manual

RST
RST meteolight Q776 User manual

RST
RST meteoscan 938PRO User manual

RST
RST IQ888 User manual

RST
RST IQ735 User manual

RST
RST meteolight 02879 User manual

RST
RST RST02711 Series User manual

RST
RST METEO PROJECTION 703 User manual

RST
RST RST02557 User manual

RST
RST METEO PROJECTION 705 User manual