manuals.online logo
Brands
  1. Home
  2. •
  3. Brands
  4. •
  5. Safety 1st
  6. •
  7. Lock
  8. •
  9. Safety 1st 48206 User manual

Safety 1st 48206 User manual

Other Safety 1st Lock manuals

Safety 1st HS129 User manual

Safety 1st

Safety 1st HS129 User manual

Safety 1st HS247 User manual

Safety 1st

Safety 1st HS247 User manual

Safety 1st HS291 User manual

Safety 1st

Safety 1st HS291 User manual

Safety 1st OutSmart SECRET BUTTON User manual

Safety 1st

Safety 1st OutSmart SECRET BUTTON User manual

Safety 1st OutSmart HS289 User manual

Safety 1st

Safety 1st OutSmart HS289 User manual

Safety 1st OutSmart HS288 User manual

Safety 1st

Safety 1st OutSmart HS288 User manual

Safety 1st OUTSMART User manual

Safety 1st

Safety 1st OUTSMART User manual

Safety 1st OutSmart HS271 User manual

Safety 1st

Safety 1st OutSmart HS271 User manual

Safety 1st 33110039 User manual

Safety 1st

Safety 1st 33110039 User manual

Safety 1st HS247 User manual

Safety 1st

Safety 1st HS247 User manual

Safety 1st OutSmart HS361 User manual

Safety 1st

Safety 1st OutSmart HS361 User manual

Safety 1st 48448 User manual

Safety 1st

Safety 1st 48448 User manual

Safety 1st OutSmart HS270 User manual

Safety 1st

Safety 1st OutSmart HS270 User manual

Safety 1st HS130 User manual

Safety 1st

Safety 1st HS130 User manual

Safety 1st 33110038 User manual

Safety 1st

Safety 1st 33110038 User manual

Safety 1st 48517 User manual

Safety 1st

Safety 1st 48517 User manual

Safety 1st HS129 User manual

Safety 1st

Safety 1st HS129 User manual

Safety 1st HS294 User manual

Safety 1st

Safety 1st HS294 User manual

Safety 1st HS162 User manual

Safety 1st

Safety 1st HS162 User manual

Safety 1st OUTSMART 3202007000 User manual

Safety 1st

Safety 1st OUTSMART 3202007000 User manual

Safety 1st 3202001400 User manual

Safety 1st

Safety 1st 3202001400 User manual

Popular Lock manuals by other brands

Magic 105 manual

Magic

Magic 105 manual

Gantner GAT NET.Lock 7020 System Installation, configuration & operation

Gantner

Gantner GAT NET.Lock 7020 System Installation, configuration & operation

Dorma Studio Classic Installation instruction

Dorma

Dorma Studio Classic Installation instruction

Securam ECSL-601 quick start guide

Securam

Securam ECSL-601 quick start guide

Sudhaus 3003 operating manual

Sudhaus

Sudhaus 3003 operating manual

Pado FDS-10 user manual

Pado

Pado FDS-10 user manual

Esco systeQ Series installation instructions

Esco

Esco systeQ Series installation instructions

COMPX National D8951 instruction sheet

COMPX

COMPX National D8951 instruction sheet

secureo Key Box instruction manual

secureo

secureo Key Box instruction manual

Stock Loks C8713 instruction sheet

Stock Loks

Stock Loks C8713 instruction sheet

COMPX 1T-058 Information

COMPX

COMPX 1T-058 Information

Auslock T11 user manual

Auslock

Auslock T11 user manual

Stealth SAFES ShadowVault Instructions & Troubleshooting

Stealth SAFES

Stealth SAFES ShadowVault Instructions & Troubleshooting

Knox KeySecure 5 Admin & user guide

Knox

Knox KeySecure 5 Admin & user guide

Kwikset 48334/01 Quick installation guide

Kwikset

Kwikset 48334/01 Quick installation guide

Metra Electronics Door Access Terminal Combo Technical manual

Metra Electronics

Metra Electronics Door Access Terminal Combo Technical manual

Kilitronik miniK10m operating manual

Kilitronik

Kilitronik miniK10m operating manual

Ingersoll-Rand SCHLAGE Everest Service manual

Ingersoll-Rand

Ingersoll-Rand SCHLAGE Everest Service manual

manuals.online logo
manuals.online logoBrands
  • About & Mission
  • Contact us
  • Privacy Policy
  • Terms and Conditions

Copyright 2025 Manuals.Online. All Rights Reserved.

BEFORE YOU BEGIN:
•Read all instructions before installing.
•Keep these instructions for future use.
•Remove all contents from packaging and discard box, and/or poly bags.
•Lay out and identify all parts.
•Do not return this product to the place of purchase. If any parts are
missing, email consumer@djgusa.com, call Consumer Relations at
(800) 544-1108, or fax at (800) 207-8182. You can also visit our website
atwww.safety1st.com. Have the model number ready (48206) and date
code (manufacturedate) located on package.
ANTES DE COMENZAR:
•Read all instructions before installing.
•Guarde estas instrucciones para su uso futuro.
•Retire todo el contenido del embalaje y deseche la caja y/o las bolsas de polietileno.
•Despliegue e identifique todas las piezas.
•No devuelva este producto al lugar donde lo compró. Si falta alguna pieza,
envíe un correo electrónico a consumer@djgusa.com, llame al Departamento
de Relaciones con el Consumidor al (800) 544-1108, o envíe un fax al
(800) 207-8182. También puede visitar nuestro sitio web en
www.safety1st.com. Tenga a mano el número de modelo (48206) y el
código de fecha (fecha de fabricación), indicados en el paquete.
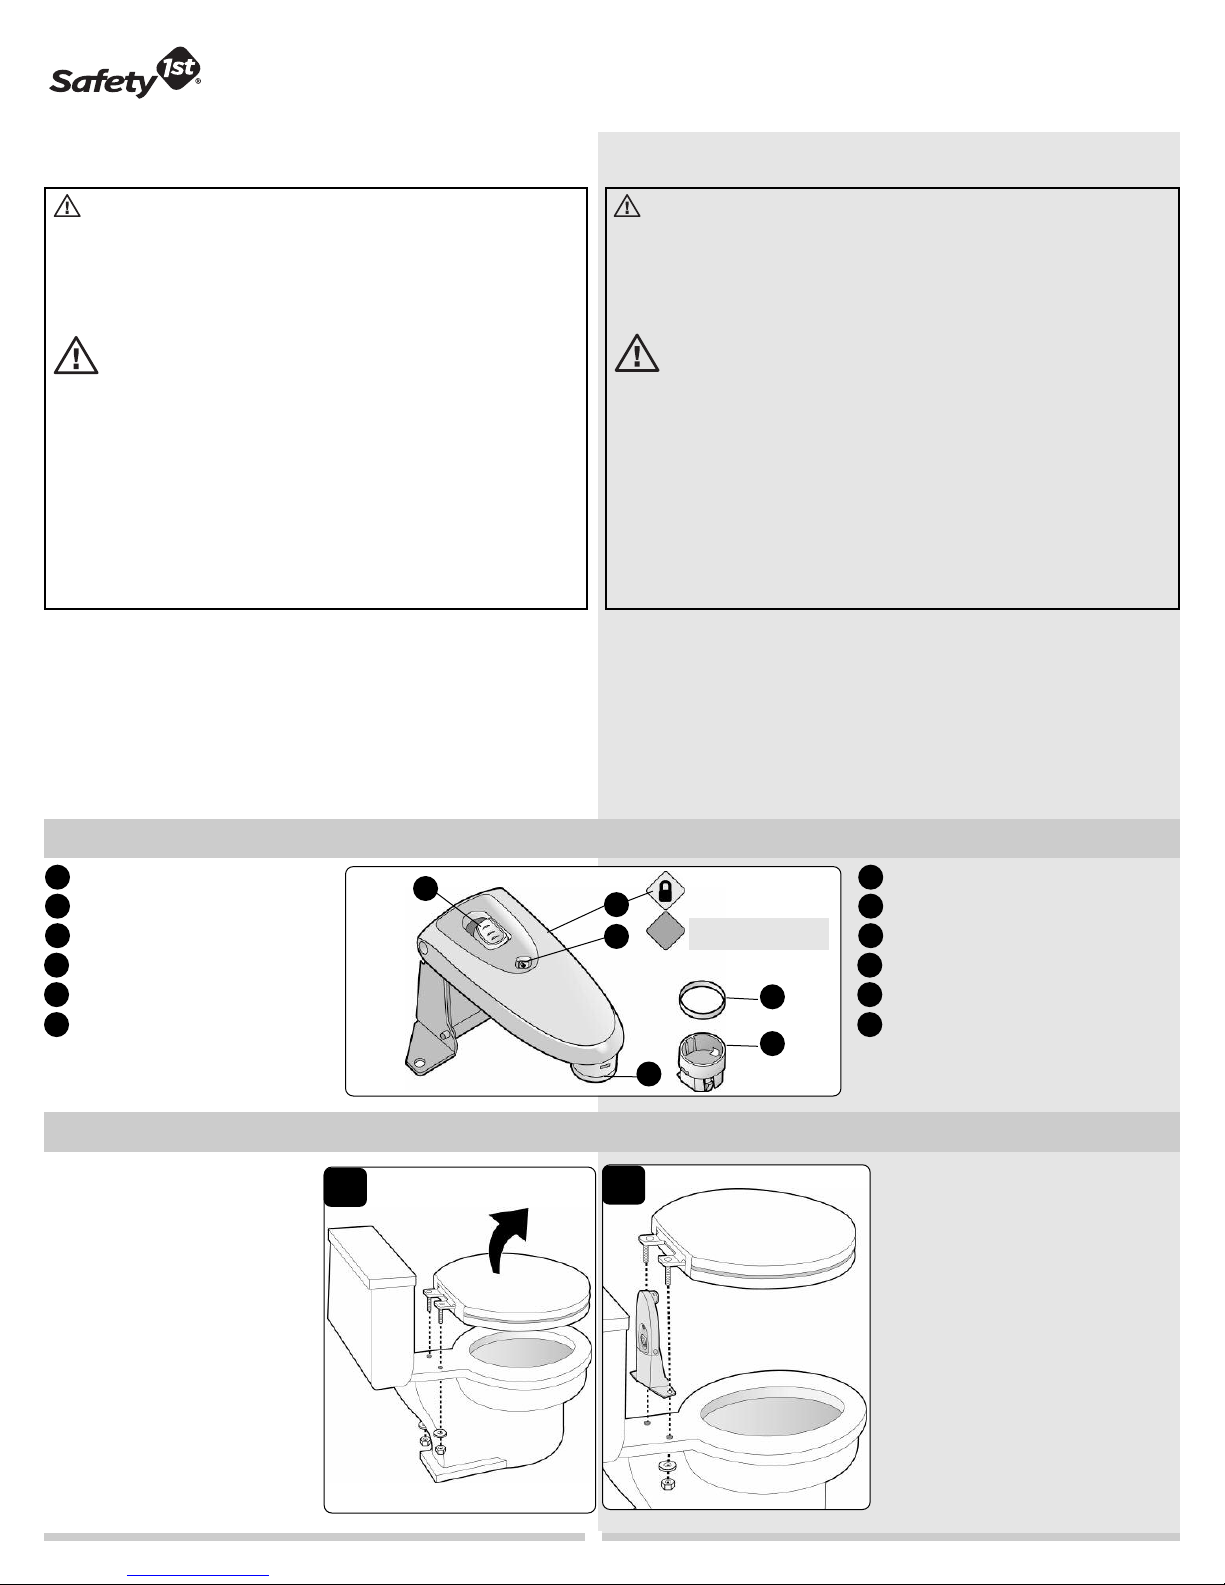
1
A
B
CC
A
Sliding lock button
Locking arm
SecureTechTM indicator
Rubber foot assembly
1/4” Spacer (0.64 cm)
1/2” Spacer (1.3 cm) (2 included)
D
CAUTION:
• These products are not toys. Do not allow children to play with
them. When not in use, keep out of reach of children.
• This product is only a deterrent. It is not a substitute for proper
adult supervision. Discontinue use when child becomes old
enough to defeat it.
©2008 Dorel Juvenile Group. All Rights Reserved.
www.djgusa.com (800) 544-1108 www.safety1st.com Made in CHINA. Hecho en CHINA.
Styles and colors may vary. Los estilos y los colores pueden variar.
Distributed by (distribuido por) Dorel Juvenile Group, Inc., 2525 State St., Columbus, IN 47201-7494
Dorel Distribution Canada, 873 Hodge, St. Laurent, QC H4N 2B1
06/10/08 4358-4566
PRECAUCIÓN:
• Este producto no es un juguete. No permita que los niños jueguen con
él. Cuando no lo utilice, manténgalo fuera del alcance de los niños.
• Este producto es sólo un elemento disuasivo. El mismo no reemplaza
lasupervisión adecuada por parte de un adulto. Deje de usar la traba
cuando el niño sea suficientemente grande como para destrabarla.
Toilet Lock
48206
User Guide
Traba para inodoro
48206
Guía del Usuario
Parts & Features Lista de piezas y características
D
WARNING:
• ADULT ASSEMBLY REQUIRED. KEEP SMALL PARTS
AWAY FROM CHILDREN DURING ASSEMBLY.
• NEVER LEAVE CHILD UNATTENDED IN BATHROOM.
• This product is for use on “hard” toilet lid and seat
assemblies only. It is not intended for use on soft or
padded lids or seats.
• When properly installed, the toilet lid should lift no
more than 0.5” (1 cm).
AVISO:
• REQUIERE ENSAMBLADO POR PARTE DE UN ADULTO.
MANTENGA LAS PIEZAS PEQUEÑAS FUERA DEL
ALCANCE DE LOS NIÑOS DURANTE EL ENSAMBLADO.
• NUNCA DEJE AL NIÑO SIN ATENCIÓN EN EL BAÑO.
• Este producto es para utilizar únicamente con conjuntos
de asiento y tapa “duros”. No debe usarse con tapas y
asientos blandos o acolchados.
• Una vez instalada correctamente, la tapa del asiento no
debe levantarse más de 0.5 pulg. (1 cm).
ToInstall Para instalar
1
NOTE: Toilet seats and hardware
vary. Followthe instructions that
came with your particular toilet
seat style.Atypical design is
shown.
1
Remove caps to locate bolt
heads underneath. Locate two
nuts under toilet and hold
them steady with pliers while
using a screwdriver to loosen
the bolts (Figure 1).Remove
the toilet seat.
2
Align the toilet lock to the
holes in toilet as shown (Figure
2).Position the toilet seat
through the holes in the toilet
seat lock. Continued on next
page.
B
2
EE
FF
Green = Locked
Red = Unlocked
Verde = Trabada
Rojo = Destrabada
A
B
C
Botón de traba deslizante
Brazo de cierre
Indicador SecureTech™
Conjunto de patas de hule
Espaciador de 1/4 pulg. (0.64 cm)
Espaciador de 1/2 pulg. (1.3 cm) (se
incluyen dos)
D
E
F
NOTA: Los asientos de baño y los
elementos de ferretería varían. Siga
las instrucciones que vienen con el
estilo de su asiento de baño. Se
muestra un diseño típico.
1
Retire las tapas para localizar las
cabezas de los pernos ubicados
debajo. Localice las dos tuercas
bajo el asiento y sosténgalas
firmemente con pinzas mientras
afloja los pernos con un
destornillador (Figura 1).Retire el
asiento.
2
Alinee la traba con los orificios
del inodoro, como se muestra
(Figura 2).Coloque el asiento a
través de los orificios de la traba.
Continúa en la página siguiente.
1
2
Wipe clean with bleach or bathroom sanitizer.
ToClean Para limpiar
To Use Cómo utilizar
1
1
Dual action unlocking:
Push button back,
then press button down.
While button is pressed, lift
toilet lid (Figure 1).Locking arm
will pivot up.
2
After you lower the lid, push the
locking arm down until it clicks
and the SecureTechTM symbol
turns green. Test lid to ensure it
is locked.
2
1
2
To Install Para instalar (continuación)
2Continued: To secure
hardware from step 1,
handtighten the nuts, then hold
each nut with pliers and tighten
each bolt head another quarter-
turn. Do not overtighten the
bolts or you could crack the
porcelain on your toilet. If your
toilet seat has plastic bolt
covers, snap them into position.
3
To determine if you need to
add spacers, first push the toilet
seat lock down onto the seat lid
until it clicks (Figure 3).If the
rubber foot is in contact with
the seat lid, you do not need
spacers. If there is a space,
place the spacers (included)
next to the gap and visually
measure the gap (Figure 3a).
Determine if you need the 1 4”
spacer, the 1/2” spacer or both.
Push button back and down,
then lift the locking arm. Pop
off the rubber foot assembly
with a small flat head
screwdriver. Snap the spacers
on as needed, then replacethe
rubber foot (Figure3b). Test to
ensure the rubber foot touching
the seat cover and that the
locking arm is locked.
NOTE: When using the 1/4”
spacer, install it first.
3a
3
3b
1/2” Spacers with Tabs
Espaciadores de 1/2 pulg.
con lengüetas
1/4” Spacer
Espaciador de 1/4 pulg.
Rubber Foot Assembly
Conjunto de patas de
hule
2
Dual action unlocking:
Doble acción destrabar:
0.25" (.64 cm)
0.5" (1.3 cm)
0.75" (1.9 cm)
Limpie con blanqueador o limpiador de baños.
Must touch seat lid.
Debe estar en
contacto con la tapa.
Combinations: Combinaciones:
0.25"
(.64 cm)
0.5"
(1.3 cm)
1
Doble acción paradestrabar:
Presione el botón hacia atrás
yluego hacia abajo.Mientras
presiona el botón, levante la tapa
del asiento(Figura1).El brazo de
cierre girará hacia arriba.
2
Luego de bajar la tapa, empuje el
brazo de cierre hasta que encaje
en posición y el símbolo de
SecureTech™ se vea de color
verde. Pruebe la tapa para
asegurarse de que esté trabada.
2
1
2Continuación: Para asegurar los
elementos de ferretería del paso 1,
ajuste las tuercas con la mano y
luego sosténgalas con una pinza
para ajustar los pernos otro cuarto
de vuelta. No ajuste los pernos
excesivamente, porque podría
fisurar la porcelana del inodoro.
Si las cubiertas de los pernos del
asiento son de plástico, trábelas
en posición.
3
Para determinar si necesita agregar
espaciadores, empuje la traba sobre
la tapa del asiento hasta que encaje
con un clic (Figura 3).Si la pata de
hule está en contacto con la tapa del
asiento, no necesita espaciadores. Si
hay un espacio, coloque los
espaciadores (incluidos) junto al
espacio y mídalo visualmente (Figura
3a).Determine si necesita el
espaciador de 1/4 pulg. o el de 1/2
pulg., o ambos. Presione el botón
hacia atrás y hacia abajo, y levante el
brazo de cierre. Retire el conjunto de
patas de hule con un destornillador
de punta plana. Coloque los
espaciadores necesarios y luego
instale la pata de hule (Figura 3b).
Pruebe la traba para asegurase de
que la pata de hule esté en contacto
con la tapa del asiento y que el brazo
de cierre esté trabado.
NOTA: Si utiliza el espaciador de 1/4
pulg., instálelo primero.