manuals.online logo
Brands
  1. Home
  2. •
  3. Brands
  4. •
  5. Safety 1st
  6. •
  7. Lock
  8. •
  9. Safety 1st HS162 User manual

Safety 1st HS162 User manual

ANTES DE COMENZAR:
• Lea todas las instrucciones antes de instalar.
• Guarde estas instrucciones para su uso futuro.
• Retire todo el contenido del embalaje y deseche la caja y/o las bolsas de
polietileno.
• Despliegue e identifique todas las piezas.
• No devuelva este producto al lugar donde lo compró. Si falta alguna pieza,
envíe un correo electrónico a consumer@djgusa.com, llame al Departamento de
Relaciones con el Consumidor al (800) 544-1108, o envíe un fax al
(800) 207-8182. También puede visitar nuestro sitio web en www.safety1st.com.
Tenga a mano el número de modelo (HS162) y el código de fecha (fecha de
fabricación), que se encuentran indicados en el paquete.
•
No se recomienda el uso de herramientas eléctricas para la instalación de tornillos.
HERRAMIENTAS NECESARIAS:
• Destornillador Phillips
A
B
C
A
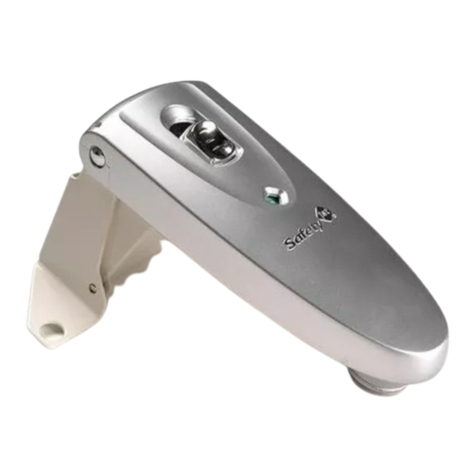
Metal Mounting Plate
Housing
Actuating Tabs
Inner Walls
Screws (3)
D
E
©2012 Cosco Management, Inc. All Rights Reserved. Todos derechos reservados.
www.djgusa.com (800) 544-1108 www.safety1st.com
Made in CHINA. Hecho en CHINA. Styles and colors may vary. Los estilos y los colores pueden variar.
Distributed by (distribuido por) Dorel Juvenile Group, Inc., 2525 State St., Columbus, IN 47201-7494
Dorel Distribution Canada, 873 Hodge, St. Laurent, QC H4N 2B1
11/27/12 4358-6134A
Deadbolt Lock
HS162
User Guide
Cerrojo de bloqueo
HS162
Guía del Usuario
Parts & Terms Used Piezas y términos utilizados
E
BEFORE YOU BEGIN:
• Read all instructions before installing.
• Keep these instructions for future use.
• Remove all contents from packaging and discard box, and/or poly bags.
• Lay out and identify all parts.
• Do not return this product to the place of purchase. If any parts are
missing, email consumer@djgusa.com, call Consumer Relations at
(800) 544-1108, or fax at (800) 207-8182. You can also visit our website
at www.safety1st.com.Have the model number ready (HS162) and date
code (manufacture date) located on package.
• P
ower tools are not recommended for screw installation.
TOOLS NEEDED:
• Phillips head screwdriver
B
CAUTION:
• This product is only a deterrent. It is not a substitute for
proper adult supervision. Discontinue use when child
becomes old enough to defeat it.
• Check for security after installation. Avoid letting children
see how you operate child safety devices. Watching you
disengage a lock, latch or cover could enable them to learn
sooner how to defeat it.
• Visitors may not be familiar with this product. Ensure
that all adults and older children present can operate the
Deadbolt Lock before engaging it.
• Product will not work as designed without the housing.
If the housing is lost or damaged, you must replace this
product before using it again.
• Fire Codes vary. Check with your local fire marshal to ensure
that the Deadbolt Lock is permitted by local regulations.
• For indoor home use only.
PRECAUCIÓN:
• Este producto es sólo un elemento disuasivo. El mismo no
reemplaza la supervisión adecuada por parte de un adulto. Deje
de usar la traba cuando el niño sea suficientemente grande
como para destrabarla.
• Verifique por seguridad después de la instalación. Evite que los
niños vean cómo se operan los dispositivos de seguridad para
niños. Si los niños ven cómo usted libera una traba, un pes-
tillo o una cubierta, podrían aprender más rápido la manera
de inutilizar cualquier tipo de dispositivo de seguridad.
• Es posible que las visitas no estén familiarizadas con este pro-
ducto. Asegúrese de que todos los adultos y niños mayores pre-
sentes sepan manejar el cerrojo de bloqueo antes de colocarlo.
• El producto no funcionará según lo previsto sin la cubierta.
Si la cubierta se pierde o daña, usted debe reemplazar este
producto antes de volver a utilizarlo.
• Los Códigos sobre incendios varían. Consulte al jefe de bomberos
local si las regulaciones locales permiten utilizar el cerrojo de bloqueo.
• Para uso doméstico únicamente en interiores.
WARNING:
• ADULT ASSEMBLY REQUIRED. KEEP SMALL PARTS
AWAY FROM CHILDREN DURING ASSEMBLY.
AVISO:
• REQUIERE ENSAMBLADO POR PARTE DE UN ADULTO.
MANTENGA LAS PIEZAS PEQUEÑAS FUERA DEL ALCANCE
DE LOS NIÑOS DURANTE EL ENSAMBLADO.
A
B
C
Placa de montaje de metal
Cubierta
Lengüetas accionadoras
Paredes internas
Tornillos (3)
D
E
1
C
D
To Use Cómo utilizar
To Remove Para quitar
To Clean Para limpiar
2 Slide metal mounting plate
downward behind existing
hardware with top hole at
12 o’clock position. Center
deadbolt inside the circle
on the metal mounting
plate.
2 Deslice la placa de montaje de
metal hacia abajo detrás de la
pieza metálica ya existente con
el orificio superior ubicado en la
posición de las agujas de un reloj
marcando las 12 en punto. Centre
el cerrojo de bloqueo dentro del
círculo sobre la pieza de montaje
de metal.
3
4 4a
5
1
1 2
1 Press both actuating tabs
inward to grasp deadbolt
lever and turn to open or
lock door.
Remove three screws, and remove the housing. Loosen the deadbolt
hardware and slide the mounting plate upward to remove. Tighten the
deadbolt hardware.
Wipe clean. Keep lock dry.
Quite los tres tornillos y después quite la cubierta. Afloje la pieza
metálica del cerrojo de bloqueo y deslice la placa de montaje hacia arriba
para quitarla. Ajuste la pieza metálica del cerrojo de bloqueo.
Limpie con un paño. Mantenga la traba seca.
1 Loosen existing deadbolt
hardware 3-4 turns; just
enough to slide the metal
plate behind the hardware.
NOTE: If the deadbolt lock
has a decorative cover
covering the screws it must
first be removed per the
manufacturer’s instructions.
1 Afloje la pieza metálica del cerrojo
de bloqueo ya existente con 3-4
vueltas; lo suficiente para deslizar
la placa metálica por detrás de
dicha pieza metálica.
NOTA: Si la traba para cerrojo
de bloqueo tiene una cubierta
decorativa que cubre los tornillos,
primero quite la cubierta siguiendo
las indicaciones del fabricante.
3 Tighten deadbolt hardware.
Lock and unlock deadbolt
to ensure it functions the
same way it did before the
metal plate was installed.
NOTE: If a decorative cover
was removed in step 1 it
should be replaced before
step 4.
3 Ajuste la pieza metálica del
cerrojo de bloqueo. Trabe y
destrabe el cerrojo de bloqueo
para verificar que funcione de la
misma manera que lo hacía antes
de colocar la placa de metal.
NOTA: Si una cubierta decorativa
se eliminó en el paso 1 debe ser
sustituido antes del paso 4.
4 Place housing over metal
mounting plate with logo
at the bottom and turn
counterclockwise to line
up screw holes (Figure 4).
Screw housing to mounting
plate.
5 TEST THE DEADBOLT
LOCK BEFORE USE.
If deadbolt lock lever hits
an inner wall, (Figure 5),
remove housing and move
the metal mounting Plate
until the deadbolt lock
lever clears the inner walls.
Continue through steps 3-5.
4 Coloque la cubierta sobre la placa
de montaje de metal con el logotipo
en la parte inferior y gire en sentido
contrario a las agujas del reloj
para alinear los orificios para los
tornillos (Figura 4). Atornille la
cubierta a la placa de montaje.
5 PRUEBE LA TRABA PARA
CERROJO DE BLOQUEO
ANTES DE USAR. Si la
palanca del cerrojo de bloqueo
toca la paredes internas, (Figura 5),
quite la cubierta y mueva la placa
de montaje de metal hasta que
la palanca del cerrojo de bloqueo
deje de tocar las paredes internas.
Siga los pasos 3 a 5.
To Install Para instalar
1 Presione ambas lengüetas
accionadoras para agarrar la
palanca del cerrojo de bloqueo y
gire para abrir o trabar la puerta.
2
Decorative Cover
Turn to line up screw holes
Cubierta decorativa
Gire para alinear los orificios para los tornillos
Inner walls
Paredes
internas

Other Safety 1st Lock manuals

Safety 1st OutSmart HS289 User manual

Safety 1st

Safety 1st OutSmart HS289 User manual

Safety 1st 48448 User manual

Safety 1st

Safety 1st 48448 User manual

Safety 1st 33110039 User manual

Safety 1st

Safety 1st 33110039 User manual

Safety 1st HS247 User manual

Safety 1st

Safety 1st HS247 User manual

Safety 1st OutSmart HS361 User manual

Safety 1st

Safety 1st OutSmart HS361 User manual

Safety 1st 48206 User manual

Safety 1st

Safety 1st 48206 User manual

Safety 1st OutSmart HS270 User manual

Safety 1st

Safety 1st OutSmart HS270 User manual

Safety 1st HS130 User manual

Safety 1st

Safety 1st HS130 User manual

Safety 1st 3202001400 User manual

Safety 1st

Safety 1st 3202001400 User manual

Safety 1st OutSmart HS271 User manual

Safety 1st

Safety 1st OutSmart HS271 User manual

Safety 1st HS247 User manual

Safety 1st

Safety 1st HS247 User manual

Safety 1st 33110038 User manual

Safety 1st

Safety 1st 33110038 User manual

Safety 1st HS294 User manual

Safety 1st

Safety 1st HS294 User manual

Safety 1st OutSmart HS288 User manual

Safety 1st

Safety 1st OutSmart HS288 User manual

Safety 1st OutSmart SECRET BUTTON User manual

Safety 1st

Safety 1st OutSmart SECRET BUTTON User manual

Safety 1st HS129 User manual

Safety 1st

Safety 1st HS129 User manual

Safety 1st OUTSMART 3202007000 User manual

Safety 1st

Safety 1st OUTSMART 3202007000 User manual

Safety 1st OUTSMART User manual

Safety 1st

Safety 1st OUTSMART User manual

Safety 1st HS291 User manual

Safety 1st

Safety 1st HS291 User manual

Safety 1st 48517 User manual

Safety 1st

Safety 1st 48517 User manual

Safety 1st HS129 User manual

Safety 1st

Safety 1st HS129 User manual

Popular Lock manuals by other brands

Winkhaus STV AV2 operating manual

Winkhaus STV

Winkhaus STV AV2 operating manual

ARMAC MARTIN Small Digbeth Latch instructions

ARMAC MARTIN

ARMAC MARTIN Small Digbeth Latch instructions

Safelock Systems dormakaba LA GARD 700 Basic User operating instructions

Safelock Systems

Safelock Systems dormakaba LA GARD 700 Basic User operating instructions

Gianni Industries EB-400 specification

Gianni Industries

Gianni Industries EB-400 specification

COMPX C8065 Dimensional drawing

COMPX

COMPX C8065 Dimensional drawing

Westinghouse RTS Series Installation and operational manual

Westinghouse

Westinghouse RTS Series Installation and operational manual

sellmore SOLO instructions

sellmore

sellmore SOLO instructions

Schlage AD-400 user guide

Schlage

Schlage AD-400 user guide

Phoenix Solar operating instructions

Phoenix

Phoenix Solar operating instructions

Eaton IZMY Series Instruction leaflet

Eaton

Eaton IZMY Series Instruction leaflet

Ojmar Nexo NLX1 instruction manual

Ojmar

Ojmar Nexo NLX1 instruction manual

vds Basic installation manual

vds

vds Basic installation manual

Ideal Security Decibel Ultra HD SL3001 quick start guide

Ideal Security

Ideal Security Decibel Ultra HD SL3001 quick start guide

Motormate Mercury 10-201 installation instructions

Motormate

Motormate Mercury 10-201 installation instructions

Ojmar NEXO NL1 Installation and assembly

Ojmar

Ojmar NEXO NL1 Installation and assembly

Renkforce 754389 operating instructions

Renkforce

Renkforce 754389 operating instructions

Targus DEFCON TL manual

Targus

Targus DEFCON TL manual

Schlage BE365 user guide

Schlage

Schlage BE365 user guide

manuals.online logo
manuals.online logoBrands
  • About & Mission
  • Contact us
  • Privacy Policy
  • Terms and Conditions

Copyright 2025 Manuals.Online. All Rights Reserved.