manuals.online logo
Brands
  1. Home
  2. •
  3. Brands
  4. •
  5. Safety 1st
  6. •
  7. Lock
  8. •
  9. Safety 1st 48448 User manual

Safety 1st 48448 User manual

BEFORE YOU BEGIN:
• Read all instructions before installing.
• Keep these instructions for future use.
• Clean door surface with warm soapy water, rinse with clear
water and dry.
• Remove all contents from packaging and discard box, and/or
poly bags.
• Do not return this product to the place of purchase. If any
parts are missing, email consumer@djgusa.com, call Consumer
Relations at (800) 544-1108, or fax at (800) 207-8182. You can
also visit our website at www.safety1st.com. Have the model
number ready (48448) and date code (manufacture date)
located on package.
• If your lever handle is facing the opposite direction than
shown, install the lock in the opposite direction.
ANTES DE COMENZAR:
• Lea todas las instrucciones antes de instalar.
• Guarde estas instrucciones para su uso futuro.
• Limpie la superficie de la puerta con agua jabonosa tibia,
enjuague con agua limpia y seque.
• Retire todo el contenido del embalaje y deseche la caja y/o las
bolsas de polietileno.
• No devuelva este producto al lugar donde lo compró. Si falta
alguna pieza, envíe un correo electrónico a consumer@djgusa.
com, llame al Departamento de Relaciones con el Consumidor
al (800) 544-1108, o envíe un fax al (800) 207-8182. También
puede visitar nuestro sitio web en www.safety1st.com. Tenga a
mano el número de modelo (48448) y el código de fecha (fecha
de fabricación), indicados en el paquete.
• Si la traba para manija se encuentra en dirección opuesta a la
indicada, instale la traba en la dirección opuesta.
1
Botón de traba deslizante
Indicadores de traba SecureTech™
Abertura de la traba para la manija
Adhesivo (en la parte posterior)
A
B
C
C
B
Sliding lock button
SecureTechTM lock indicators
Lever handle opening
Adhesive (on back)
D
A
B
C
D
©2013 Cosco Management, Inc. All Rights Reserved. Todos derechos reservados.
www.djgusa.com (800) 544-1108 www.safety1st.com
Made in CHINA. Hecho en CHINA. Styles and colors may vary. Los estilos y los colores pueden variar.
Distributed by (distribuido por) Dorel Juvenile Group, Inc., 2525 State St., Columbus, IN 47201-7494
Dorel Distribution Canada, 873 Hodge, St. Laurent, QC H4N 2B1
02/27/13 4358-4567B
Lever Handle Lock
48448
User Guide
Traba para manija
48448
Guía del Usuario
Parts & Features Lista de piezas y características
D
A
CAUTION:
• This product is not a toy. Do not allow children to play with it.
When not in use, keep out of reach of children.
• This product is only a deterrent. It is not a substitute for proper
adult supervision. Discontinue use when child becomes old
enough to defeat it.
• When lock is activated you cannot open the door from the
opposite side of the lock.
PRECAUCIÓN:
• Este producto no es un juguete. No permita que los niños jueguen con
él. Cuando no lo utilice, manténgalo fuera del alcance de los niños.
• Este producto es sólo un elemento disuasivo. El mismo no reemplaza
la supervisión adecuada por parte de un adulto. Deje de usar la traba
cuando el niño sea suficientemente grande como para destrabarla.
• Cuando la traba está activada, no es posible abrir la puerta del
lado opuesto.
WARNING:
• ADULT ASSEMBLY REQUIRED. KEEP SMALL PARTS
AWAY FROM CHILDREN DURING ASSEMBLY.
• For indoor use only.
AVISO:
• REQUIERE ENSAMBLADO POR PARTE DE UN ADULTO.
MANTENGA LAS PIEZAS PEQUEÑAS FUERA DEL
ALCANCE DE LOS NIÑOS DURANTE EL ENSAMBLADO.
• Solo para uso en interiores.
Green = Locked
Red = Unlocked
Verde = Trabada
Rojo = Destrabada
NOTE: The “C” opening may be
installed to the right or left,
depending on your door.
NOTA: La abertura de la traba en
“C” puede instalarse a la derecha
o a la izquierda, según el tipo de
puerta.
Centered
Centrada
2
TO LOCK: Press and slide lock to the
green, locked position
(Figure 1)
.
TO UNLOCK AND OPEN DOOR: Press
and slide lock to the red, unlocked
position
(Figure 1a). Rotate door handle.
Once door is opened, handle will spring
back but will need to be relocked.
PARA TRABAR: Oprima y deslice
la traba hasta la posición de traba,
indicada por el color verde (Figura 1).
PARA DESTRABAR Y ABRIR LA
PUERTA: Oprima y deslice la traba
hasta la posición de destraba, indicada
por el color rojo (Figura 1a).
Gire la manija de la puerta. Una vez que la
puerta esté abierta, la manija volverá a su
posición original, pero luego deberá volver
a ser trabada.
To Use Cómo utilizar
Wipe clean. Keep lock dry.
Limpie con un paño. Mantenga la traba seca.
To Clean Para limpiar
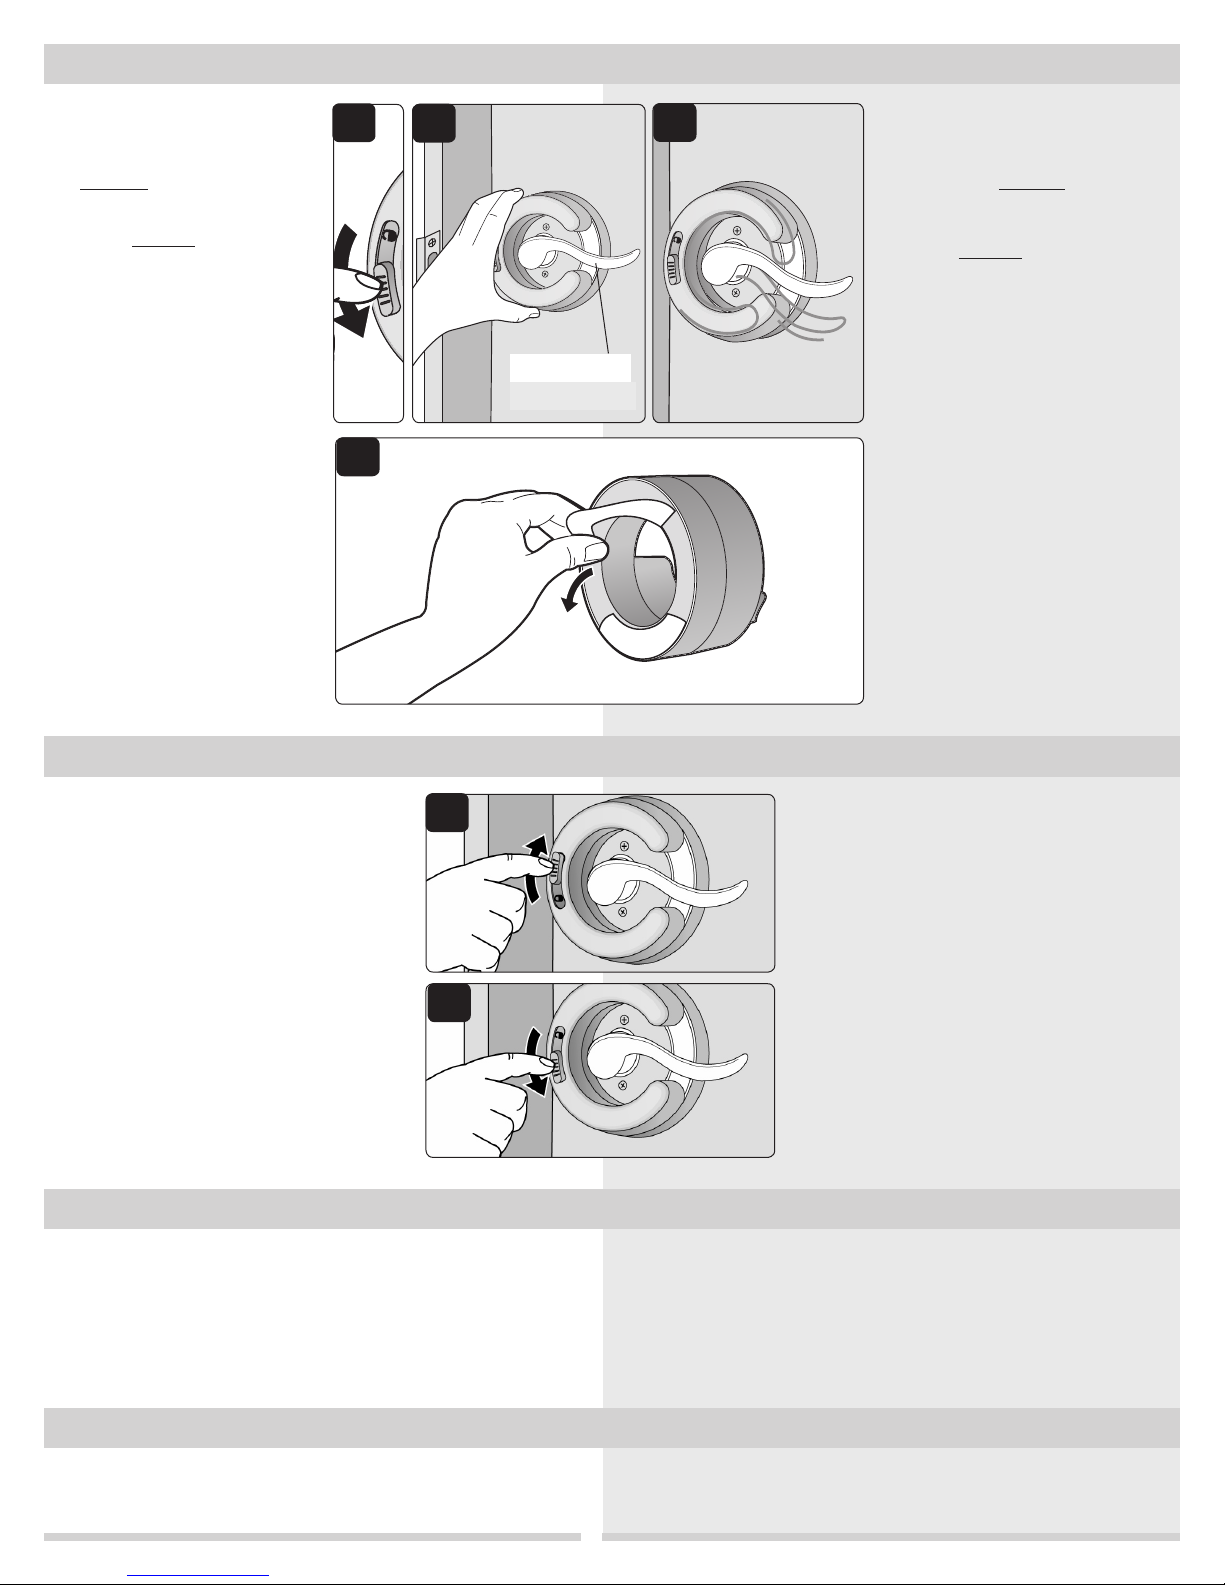
To Install Para instalar
4
NOTE: Do not remove paper backing
from adhesive until step 5.
1 Press and slide button to red,
unlocked position
(Figure 1).
2
Position “C” shape with the lever
handle centered in the opening
as shown (Figure 2). Hold lock in
position and close the door.
NOTE: If the lock hits your door
jamb, discontinue installation and
return the lock.
3
Continue to hold lock in position
and check to see if the lever
handle can easily move up and/or
down to open your door (Figure
3). NOTE: Lock will rotate when
handle touches lock.
4 Clean the area around the lever
handle with alcohol and let dry
completely.
5 Remove paper backing from
adhesive
(Figure 4). Ensure the
lever lock is centered, then press
firmly to adhere adhesive. Allow
adhesive to cure 24 hours before
use. Test lock to be sure it is
firmly in place.
2
13
1
1a
If you need to remove the lock permanently, do not pry it off
to avoid scratching the door. Instead, use string or dental floss
and pull it behind the lock. Put a few drops of liquid dish soap
on the edge of adhesive to help glide floss through. This will
break the adhesive seal. Peel off the remaining adhesive by
hand.
To Remove Para retirar
NOTA: No retire el papel protector del
adhesivo hasta el paso 5.
1 Oprima y deslice el botón hasta la
posición de destraba, indicada por
el color rojo (Figura 1).
2
Coloque la traba en “C” con la
manija centrada en la abertura, como
se muestra (Figura 2). Mantenga la
traba en la posición correcta y cierre
la puerta.
NOTA: Si la traba toca el marco de
la puerta, interrumpa la instalación y
devuelva la traba.
3
Sin dejar de mantener la traba en la
posición correcta, verifique si la manija
se puede mover fácilmente hacia
arriba y hacia abajo para abrir la puerta
(Figura 3). NOTA: Cuando la manija
toca la traba, esta última gira.
4 Limpie el área alrededor de la manija
con alcohol y deje que se seque bien.
5 Retire el papel protector del adhesivo
(Figura 4). Asegúrese de que la
traba esté centrada y luego presione
firmemente para adherir el adhesivo.
Antes de utilizarla, espere 24 horas
para que el adhesivo se seque. Pruebe
la traba para comprobar que esté
colocada firmemente en su lugar.
Si necesita quitar la traba en forma permanente, no la arranque,
para evitar rayar la puerta. En lugar de ello, use una cuerda o
hilo dental y colóquelo detrás de la traba. Coloque unas gotas
de jabón líquido para platos en el borde del adhesivo para
ayudar a deslizar el hilo dental. Esto permitirá separar el sello
adhesivo. Retire el adhesivo restante con la mano.

Other Safety 1st Lock manuals

Safety 1st 33110038 User manual

Safety 1st

Safety 1st 33110038 User manual

Safety 1st HS129 User manual

Safety 1st

Safety 1st HS129 User manual

Safety 1st 3202001400 User manual

Safety 1st

Safety 1st 3202001400 User manual

Safety 1st HS129 User manual

Safety 1st

Safety 1st HS129 User manual

Safety 1st OutSmart HS270 User manual

Safety 1st

Safety 1st OutSmart HS270 User manual

Safety 1st HS247 User manual

Safety 1st

Safety 1st HS247 User manual

Safety 1st HS294 User manual

Safety 1st

Safety 1st HS294 User manual

Safety 1st HS247 User manual

Safety 1st

Safety 1st HS247 User manual

Safety 1st OutSmart SECRET BUTTON User manual

Safety 1st

Safety 1st OutSmart SECRET BUTTON User manual

Safety 1st 33110039 User manual

Safety 1st

Safety 1st 33110039 User manual

Safety 1st OUTSMART 3202007000 User manual

Safety 1st

Safety 1st OUTSMART 3202007000 User manual

Safety 1st 48517 User manual

Safety 1st

Safety 1st 48517 User manual

Safety 1st HS162 User manual

Safety 1st

Safety 1st HS162 User manual

Safety 1st OutSmart HS271 User manual

Safety 1st

Safety 1st OutSmart HS271 User manual

Safety 1st OutSmart HS289 User manual

Safety 1st

Safety 1st OutSmart HS289 User manual

Safety 1st OutSmart HS288 User manual

Safety 1st

Safety 1st OutSmart HS288 User manual

Safety 1st 48206 User manual

Safety 1st

Safety 1st 48206 User manual

Safety 1st OutSmart HS361 User manual

Safety 1st

Safety 1st OutSmart HS361 User manual

Safety 1st HS291 User manual

Safety 1st

Safety 1st HS291 User manual

Safety 1st OUTSMART User manual

Safety 1st

Safety 1st OUTSMART User manual

Safety 1st HS130 User manual

Safety 1st

Safety 1st HS130 User manual

Popular Lock manuals by other brands

U-tec Ultraloq UL3 user manual

U-tec

U-tec Ultraloq UL3 user manual

Vemus Kilitronik miniK 10 operating manual

Vemus

Vemus Kilitronik miniK 10 operating manual

Lockwood ASSA ABLOY Induro installation instructions

Lockwood

Lockwood ASSA ABLOY Induro installation instructions

AmazonBasics TravelSentry B07SZ7732P manual

AmazonBasics

AmazonBasics TravelSentry B07SZ7732P manual

Ezviz LT70 manual

Ezviz

Ezviz LT70 manual

CDVI V3SR1248 quick start guide

CDVI

CDVI V3SR1248 quick start guide

alpro AL110 instructions

alpro

alpro AL110 instructions

DMG SmartKEY installation manual

DMG

DMG SmartKEY installation manual

StarTech.com LTLOCKKEY manual

StarTech.com

StarTech.com LTLOCKKEY manual

Schlage BE365 user guide

Schlage

Schlage BE365 user guide

Assa Abloy eCLIQ manual

Assa Abloy

Assa Abloy eCLIQ manual

Chubbsafes Primus Quick user guide

Chubbsafes

Chubbsafes Primus Quick user guide

alpro EB501-22 instructions

alpro

alpro EB501-22 instructions

Hafele ER5000 installation guide

Hafele

Hafele ER5000 installation guide

Numeris Versa Product guide

Numeris

Numeris Versa Product guide

Hafele Axis 231.98.330 operating instructions

Hafele

Hafele Axis 231.98.330 operating instructions

Salto Node installation guide

Salto

Salto Node installation guide

COMPX C8701 Dimensional drawing

COMPX

COMPX C8701 Dimensional drawing

manuals.online logo
manuals.online logoBrands
  • About & Mission
  • Contact us
  • Privacy Policy
  • Terms and Conditions

Copyright 2025 Manuals.Online. All Rights Reserved.