manuals.online logo
Brands
  1. Home
  2. •
  3. Brands
  4. •
  5. Sanhua
  6. •
  7. Control Unit
  8. •
  9. Sanhua SBV Series User manual

Sanhua SBV Series User manual

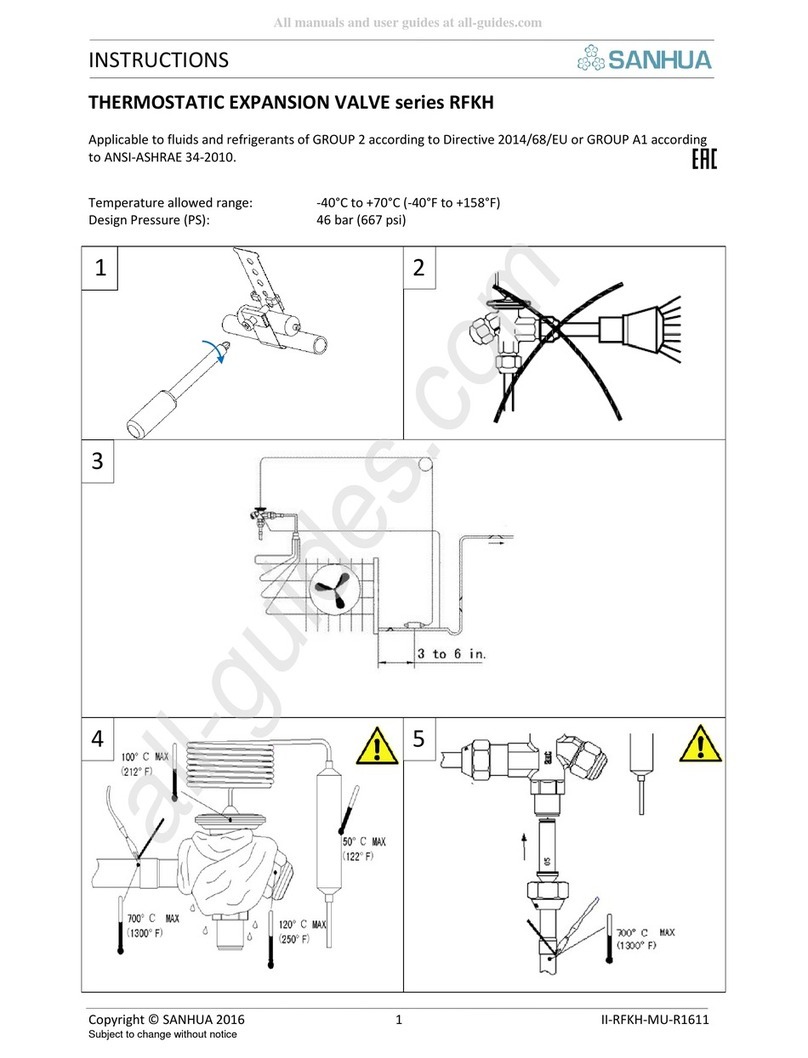
INSTRUCTIONS
Copyright © SANHUA 2014 1 II-SBV-MU-R1407
Subject to change without notice
BALL VALVE series SBV
Applic ble to fluids nd refriger nts of GROUP 2* or GROUP A1(**)
* ccording to Directive 97/23/CE (29 M y 1997) / ** ccording to ANSI-ASHRAE 34-2010
Temper ture llowed r nge (TS): -40°C to +120°C (-40°F to +248°F)
Design Pressure (PS): 45,0 b r (653 psi)
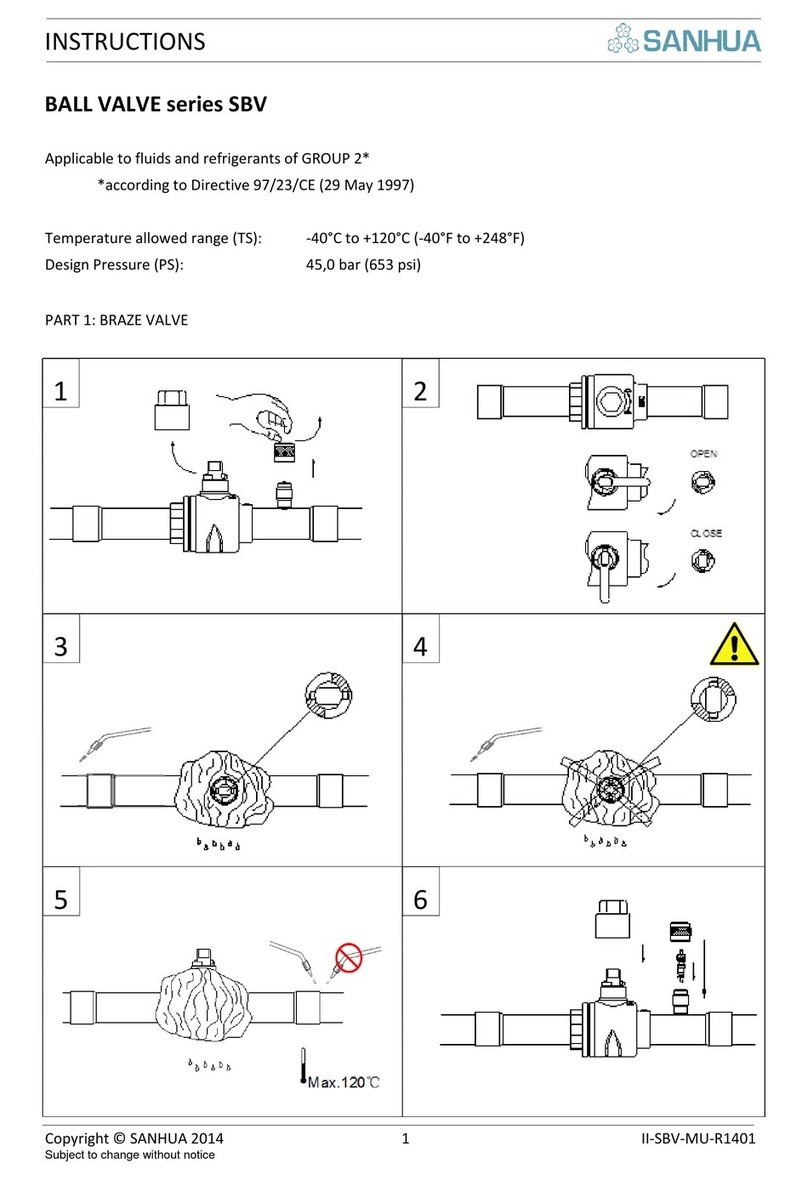
PART 1: BRAZE VALVE
4
3
2
1
6
5
INSTRUCTIONS
Copyright © SANHUA 2014 2 II-SBV-MU-R1407
Subject to change without notice
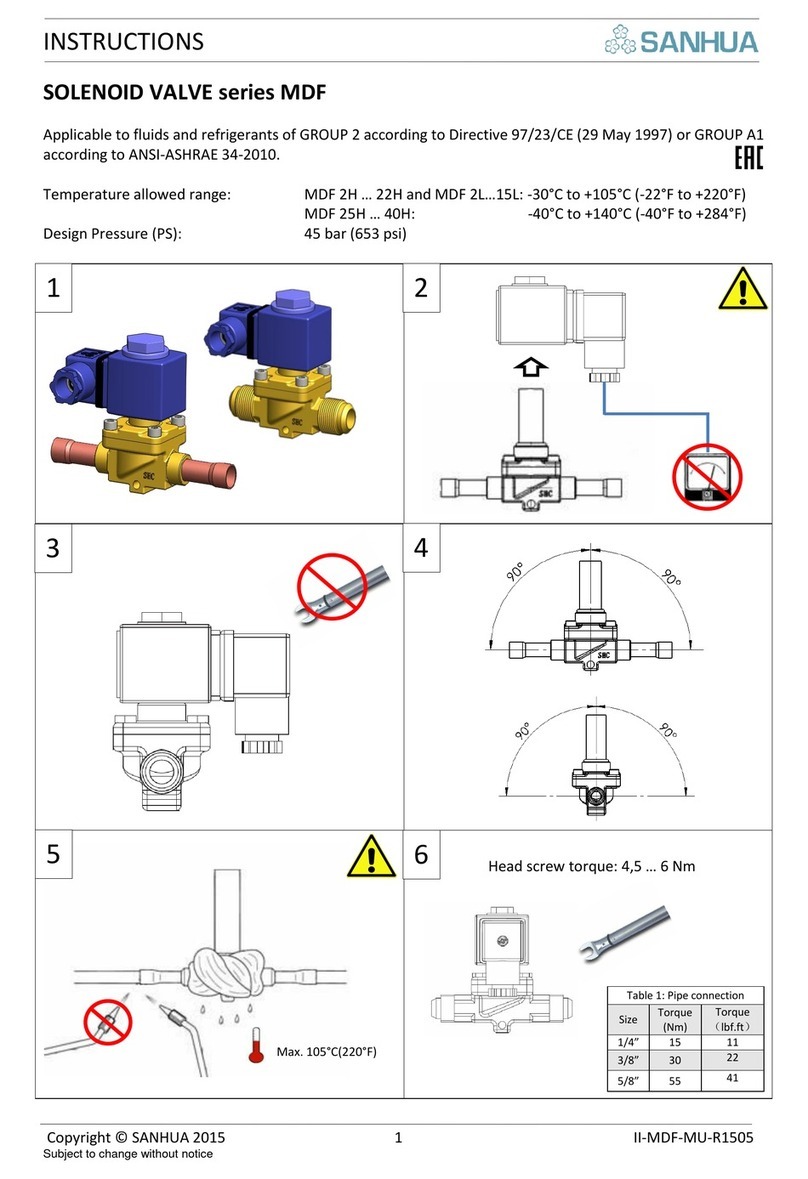
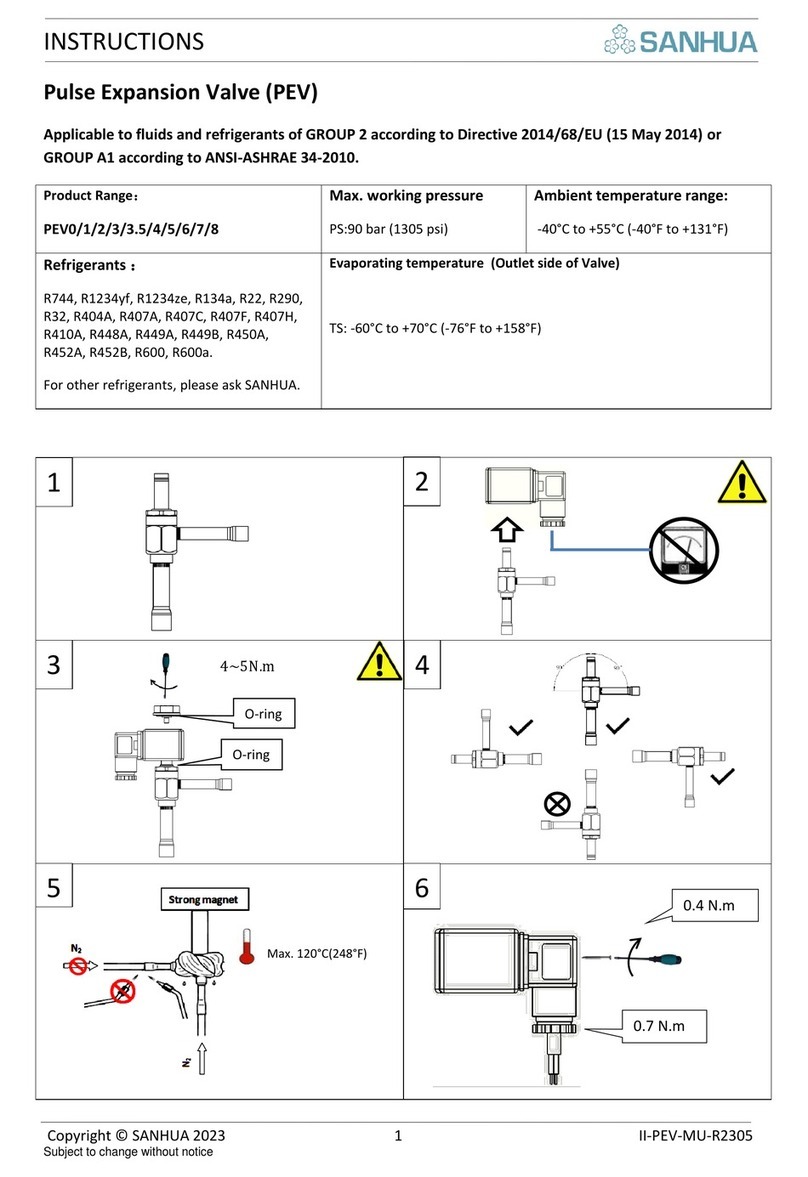
PART 2: OPEN / CLOSE VALVE
8
10
12
7
9
11
**
*
13
OPEN POSITION CLOSED POSITION
INSTRUCTIONS
Copyright © SANHUA 2014 3 II-SBV-MU-R1407
Subject to change without notice
ACTION English Fr nç is Deutsch It li no Esp ñol
中文
1
Remove c p
nd ccess c p
(if present)
Dévisser les embouts
protége nt le c rré de
m nœuvre et l prise de
ch rge (si présente).
Spindel bdeckung und
Deckel des Füllventils
(f lls vorh nden)
bnehmen
Rimuovere il t ppo
e il c ppuccio dell
v lvol di c rico (se
presente)
S c r el c bez l
de l válvul y el
de l conexión
p r m nómetro
(si tiene)
拧开阀帽并放
好,以免遗失
(如果有)
2
Move the stem
to OPEN
position
M nœuvrer l
tige
c rrée sur l position
OPEN (ouvert).
Die Spindel in OPEN
(offen) Position
drehen.
Muovere lo stelo
dell v lvol sull
posizione OPEN
( perto)
Mover el eje l
posición OPEN
( bierto)
旋转阀杆到开阀
位置
3
Br ze the v lve
using specific
lloy (SilFos 15).
Use wet r g
on v lve in
open position
during the
br zing process
Br ser les tubes de
connection en utilis nt
un lli ge spécifique
(type SilFos 15). Pl cer
un chiffon mouillé sur le
corps de v nne en
position ouverte
pend nt le br s ge.
Einlöten d
es Ventils
unter Verwendung
spezieller Legierung
(SilFos 15). Während
des Lötvorg ngs d s
Ventil in offen Position
mit n ssem L ppen
umwickeln.
Br s re l v lvol
us ndo un leg
specific (SilFos 15).
Us re uno str ccio
b gn to sull
v lvol in posizione
pert dur nte il
processo di
br s tur .
Sold r l válvul
us ndo un
le ción
específic (SilFos
15). Poner un
p ño húmedo
sobre l válvul
en posición
biert dur nte el
proceso de
sold dur .
用特殊合金焊接
(Sil-Fos 15),
焊接
过 中用湿布覆
盖在开阀位置
4
ATTENTION:
don’t br ze
with v lve in
CLOSE position
ATTENTION: Ne p s
br ser l v nne en
position CLOSE (fermé)
ACHTUNG: Ventil
nicht in geschlossen
Position löten.
ATTENZIONE: non
br s re con l
v lvol in posizione
CLOSE
ATENCION: no
sold r con l
válvul en
posición CLOSE
(cierr )
注意:阀处于关
闭状态时不要焊
接
5
Br ze using the
shown torch
position
Br ser en utilis nt l
position de torche
recomm ndée sur le
schém .
Löten mit Brenner in
der gezeigten Position
.
Br s re us ndo l
torci come
mostr to.
Sold r us ndo l
ll m como se
muestr .
在图示位置进行
焊接
6
Inst ll c p nd
ccess c p (if
present)
Repl cer les embouts
protége nt le c rré de
m nœuvre et l prise de
ch rge (si présente)
Spindel bdeckung und
Deckel des Füllventils
(f lls vorh nden)
montieren
Inst ll re il t ppo e
il c ppuccio dell
v lvol di c rico (se
presente)
Inst l r los
c bez les de l
válvul y de l
conexión p r
m nómetro (si
tiene).
安装好阀帽(如
果有)
7
Remove c p
Retirer l’embout du
c rré de m nœuvre.
Spindel bdeckung
bnehmen
Rimuovere il t ppo
S c r el c bez l
移除阀帽
8
Move the stem
in OPEN or
CLOSE direction
M nœuvre l tige c rrée
sur l position OPEN
(ouvert) ou CLOSE
(fermé).
Spindel in OPEN oder
CLOSE Position
drehen.
Muovere lo stelo
dell v lvol sull
posizione OPEN or
CLOSE
Mover el eje de l
válvul en l
dirección OPEN o
CLOSE
将阀杆转到关或
开的位置
9
Tighten
m nu lly the
c p
Serrer m nuellement
l’embout de protection
Spindel bdeckung von
H nd befestigen.
Serr re
m nu lmente il
t ppo
Coloc r el c bez l
y cerr r
m nu lmente
手动拧紧阀帽
10
Tighten c p
using torque
wrench
respecting the
m ximum
torque v lue
(t b.1) *
Serrer l’embout à l’ ide
d’une clef
dyn mométrique selon
le couple préconisé
(t b.1) *
Spindel bdeckung mit
Schlüssel unter
Be chtung des
Drehmoments in
T b.1* nziehen.
Serr re il t ppo con
un chi ve
din mometric ,
rispett ndo i v lori
m ssimi di coppi
(t b.1) *
Ajust r el c bez l
con un ll ve
ingles ,
respet ndo los
v lores máximos
de P r de juste
en l T bl 1*
用扳手拧紧阀
帽,最大扭矩参
照表
1
11
Check the stem
position: it must
be only in:
FULLY OPEN or
FULLY CLOSED
position.
Contrôler l position du
c rré de m nœuvre: il
ne doit être qu’en
position complètement
ouvert ou
complètement fermé
Position der Spindel
kontrollieren: Sie
muss in VOLL OFFEN
oder in VOLL
GESCHLOSSEN
Position sein.
Controll re l
posizione dello stelo
che deve essere
solo: TUTTO
APERTO o TUTTO
CHIUSO
Comprob r l
posición del eje
que deber est r
sol mente: TODO
ABIERTO o TODO
CERRADO
检查阀杆位置:
必须是全开或者
全闭状态
12
Move the stem
respecting the
m ximum
torque v lue
(t b.1) **
M nœuvrer l tige
c rrée en respect nt les
couples préconisés
(t b.1) **
Spindel unter
Be chtung des m x.
Drehmoments in
T b.1** drehen.
Muovere lo stelo
rispett ndo i v lori
m ssimi di coppi
(t b.1) **
Mover el eje
respet ndo los
v lores máximos
del P r de juste
de l t bl 1**
参照表
1
扭矩转
动阀杆
TABLE 1 - VALVE SIZE (mm)
6
10
12
15
16
18
22
28
35
42
54
64
80
89
105
108
Torque v lue for c p*
13,5 ~ 20Nm
M x Torque v lue for stem**
≤7 ≤15 ≤30 ≤40
INSTRUCTIONS
Copyright © SANHUA 2014 4 II-SBV-MU-R1407
Subject to change without notice
13
P
le se follow
below steps to
dd the nti-
rot tion device
Suivez les instructions ci
-
dessous pour inst ller le
dispositif nti-rot tion
Folgen Sie den
Anweisungen, um die
Anti-Rot tion-Gerät
inst llieren
Seguire le seguenti
istruzioni per
l’inst ll zione del
dispositivo nti-
rot zione
Sig l s
instrucciones p r
inst l r el
dispositivo nti-
rot ción
增加阀帽止动圈
请参照以下步骤
13
Select the right
model of the
nti-rot tion
device b sed on
the b ll v lve
size
Sélectionner le bon
modèle de b gue nti-
rot tion en fonction de
l t ille de l v nne
Ausw hl des Anti
-
Rot tions-B uteils
entsprechend der
vorliegenden
Ventilgröße
vornehmen.
Selezion re il
modello corretto di
dispositivo nti
rot zione in b se
ll t gli di
rubinetto sfer .
Seleccion r el
modelo correcto
de dispositivo nti
rot ción en b se
l t m ño de l
válvul de bol .
根据球阀尺寸选
择合适的防转止
动圈
13b
Remove the c p
Retirer l’embout du
c rré de m nœuvre.
Spindel bdeckung
bnehmen
Rimuovere il t ppo
S c r el c bez l
移除阀帽
13c
Pl ce
the stop
ring on the
stem s shown
in the picture:
Open position
or Closed
Position
Pl cer l b gue nti
-
rot tion sur le c rré de
m nœuvre comme
illustré sur le schém :
Position ouverte ou
fermée
Anti
-
Rot tions
-
B uteil
wie uf dem Bild
gezeigt uf der Spindel
positionieren:
Offene oder
geschlossene Position
Posizion re l’ nello
di b ttut sullo stelo
come mostr to in
figur : Posizione
Apert e Posizione
Chius
Posicion r el
bulón de cierre en
el eje como se
muestr en l
figur : Posición
Abiert y Posición
Cerr d .
将止动圈放置在
阀杆上,阀杆处
于开或者关的位
置
13d
Tighten
m nu lly the
new c p
present in the
nti-rot tion kit
substituting the
old one.
Serrer m nuellement le
nouvel embout fourni
d ns le kit nti-rot tion
et jeter l’ ncien embout.
Neue Spindel b
-
deckung us dem
Anti-Rot tions-
B us tz m nuell
festziehen. Diese
Spindel bdeckung
ersetzt die lte
Abdeckung.
Serr re
m nu lmente il
nuovo t ppo
presente nel kit nti
rot zione
sostituendo il
vecchio.
Apret r
m nu lmente el
nuevo t pón
presente en el kit
nti rot ción,
sustituyendo l
ntiguo t pón.
用有防转装置的
新阀帽替换旧阀
帽,并手动拧紧
13e
Tighten the c p
using torque
wrench
respecting the
m ximum
torque v lue
(t b.1) *
Serrer l’embout à l’ ide
d’une clef
dyn mométrique selon
le couple préconisé
(t b.1) *
Spindel bdeckung
mit
Schlüssel unter
Be chtung des
Drehmoments in
T b.1* nziehen.
Serr re il t ppo con
un chi ve
din mometric ,
rispett ndo i v lori
m ssimi di coppi
(t b.1) *
Ajust r el c bez l
con un ll ve
ingles ,
respet ndo los
v lores máximos
de P r de juste
en l T bl 1*
用扳手拧紧阀
帽,最大扭矩参
照表
1

This manual suits for next models

1

Other Sanhua Control Unit manuals

Sanhua RFGD Series User manual

Sanhua

Sanhua RFGD Series User manual

Sanhua RFKA Series User manual

Sanhua

Sanhua RFKA Series User manual

Sanhua RFGB Series User manual

Sanhua

Sanhua RFGB Series User manual

Sanhua RFKA Series User manual

Sanhua

Sanhua RFKA Series User manual

Sanhua TXV Series Manual

Sanhua

Sanhua TXV Series Manual

Sanhua RFKH Series User manual

Sanhua

Sanhua RFKH Series User manual

Sanhua RFGB Series User manual

Sanhua

Sanhua RFGB Series User manual

Sanhua DPF Series User manual

Sanhua

Sanhua DPF Series User manual

Sanhua VPF Series User manual

Sanhua

Sanhua VPF Series User manual

Sanhua SBV Series User manual

Sanhua

Sanhua SBV Series User manual

Sanhua RFKA Series User manual

Sanhua

Sanhua RFKA Series User manual

Sanhua RFKH series User manual

Sanhua

Sanhua RFKH series User manual

Sanhua RFGD Series User manual

Sanhua

Sanhua RFGD Series User manual

Sanhua RFGB Series User manual

Sanhua

Sanhua RFGB Series User manual

Sanhua MDF Series User manual

Sanhua

Sanhua MDF Series User manual

Sanhua SBV Series User manual

Sanhua

Sanhua SBV Series User manual

Sanhua LPF Series User manual

Sanhua

Sanhua LPF Series User manual

Sanhua PS01 Series User manual

Sanhua

Sanhua PS01 Series User manual

Sanhua RFGD Series User manual

Sanhua

Sanhua RFGD Series User manual

Sanhua PEV0 User manual

Sanhua

Sanhua PEV0 User manual

Sanhua RFKH Series User manual

Sanhua

Sanhua RFKH Series User manual

Sanhua MDF Series User manual

Sanhua

Sanhua MDF Series User manual

Sanhua DPF-R Series User manual

Sanhua

Sanhua DPF-R Series User manual
Sanhua LPF Series User manual

Sanhua

Sanhua LPF Series User manual
Popular Control Unit manuals by other brands

Wincor Nixdorf CCDM Service manual

Wincor Nixdorf

Wincor Nixdorf CCDM Service manual

Festo VIFB5 Series Brief description

Festo

Festo VIFB5 Series Brief description

ICP DAS USA WP-5231 quick start

ICP DAS USA

ICP DAS USA WP-5231 quick start

Zennio GetFace IP Assembly instructions

Zennio

Zennio GetFace IP Assembly instructions

Dantel 46019 Installation & operation manual

Dantel

Dantel 46019 Installation & operation manual

V2 CITY4-EVO manual

V2

V2 CITY4-EVO manual

BENDIX TR-2 Service data

BENDIX

BENDIX TR-2 Service data

WURM Frigolink FVB110B Product information

WURM

WURM Frigolink FVB110B Product information

Pentair Hydromatic Novus 4000 Installation and service manual

Pentair

Pentair Hydromatic Novus 4000 Installation and service manual

Duemmegi Domino DFWEB quick start guide

Duemmegi

Duemmegi Domino DFWEB quick start guide

Teleco TVPLA868AC2 manual

Teleco

Teleco TVPLA868AC2 manual

Bandini Industrie GiBiDi CL200 Instructions for installations

Bandini Industrie

Bandini Industrie GiBiDi CL200 Instructions for installations

Isel IBC 10 user manual

Isel

Isel IBC 10 user manual

H3C PSR650B-12A2-F user manual

H3C

H3C PSR650B-12A2-F user manual

BHI NEDSP1068-PCBA manual

BHI

BHI NEDSP1068-PCBA manual

SCINTEX SFV24VSVO user guide

SCINTEX

SCINTEX SFV24VSVO user guide

Flomatic CYCLE GARD I C152E installation instructions

Flomatic

Flomatic CYCLE GARD I C152E installation instructions

Leister DSE operating instructions

Leister

Leister DSE operating instructions

manuals.online logo
manuals.online logoBrands
  • About & Mission
  • Contact us
  • Privacy Policy
  • Terms and Conditions

Copyright 2025 Manuals.Online. All Rights Reserved.