Savaria Vuelift Mini User manual

Vuelift
Mini
Residential
Elevator
Owner’s
Manual

FOR OWNER’S RECORDS
Customer Name:
Installing Dealer:
Dealer’s Telephone Number:
Date Installed:
Serial/Job Number:
IMPORTANT
Ensure that only an authorized Savaria Dealer installs and services the Vuelift
Mini Residential Elevator. Under no circumstances is anyone other than a dealer
with Savaria training and authorization to install, adjust, service or modify any
mechanical or electrical device on this equipment. Failure to follow this warning
can result in safety system compromises or defeat; this can result in serious
injury or death. Savaria accepts no liability for property damage, warranty
claims or personal injury, including death, in this circumstance.
Passenger safety is the result of countless details in the equipment’s design,
manufacture, and installation. After installation, reliable operation and
continual safe operation requires regular service and inspection at least twice
per year, or more frequently where usage, environment, or local jurisdiction
requires. As the Owner, you are responsible for ensuring that regular service
and inspections occur in a timely manner.
Refer to this manual for specications, operating instructions and
maintenance of the Vuelift Mini Residential Elevator.
Upon completion of installation, the dealer must provide you with the
following information and ensure it is recorded in this manual. In addition,
either the dealer or you must keep any service and/or maintenance records in
the Maintenance Record section of this manual.
WARRANTY
Ensure your Savaria Dealer provides you with a copy of the manufacturer’s
limited parts warranty and documentation relating to any Dealer
labour warranty.

3
81375-A-OM-EN Vuelift Mini Owner’s Manual
TABLE OF CONTENTS
TO ENSURE SAFE OPERATION . . . . . . . . . . . . . . . . . . . . . . . . . . . . . . . . . . . . . . . . . . . . . .5
Intended Use . . . . . . . . . . . . . . . . . . . . . . . . . . . . . . . . . . . . . . . . . . . . . . . . . . . . . .5
Owner’s Obligation . . . . . . . . . . . . . . . . . . . . . . . . . . . . . . . . . . . . . . . . . . . . . . . .6
Modifications. . . . . . . . . . . . . . . . . . . . . . . . . . . . . . . . . . . . . . . . . . . . . . . . . . . . . .7
Dismantling and Disposal . . . . . . . . . . . . . . . . . . . . . . . . . . . . . . . . . . . . . . . . . .7
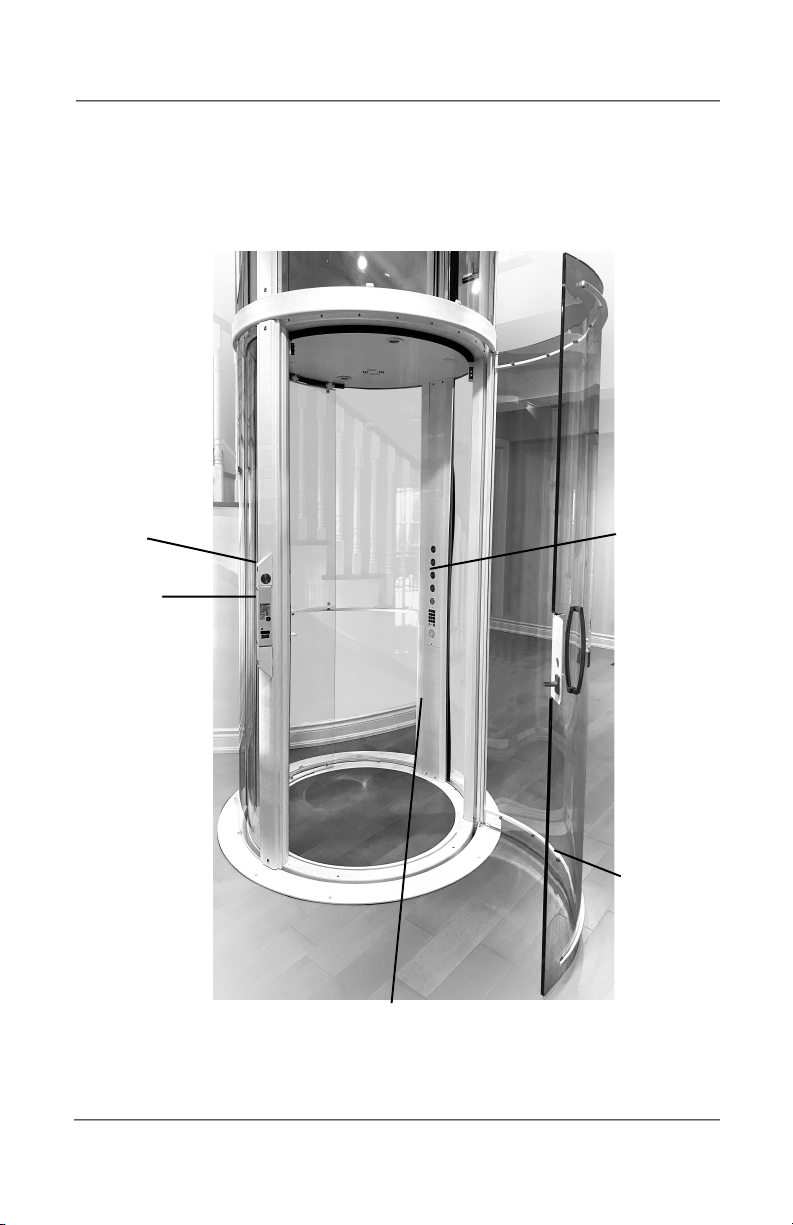
1. DESCRIPTION . . . . . . . . . . . . . . . . . . . . . . . . . . . . . . . . . . . . . . . . . . . . . . . . . . . . . . . . . . .8
2. GENERAL SPECIFICATIONS . . . . . . . . . . . . . . . . . . . . . . . . . . . . . . . . . . . . . . . . . . . . . .9
3. OPERATION . . . . . . . . . . . . . . . . . . . . . . . . . . . . . . . . . . . . . . . . . . . . . . . . . . . . . . . . . . . .11
4. SAFETY FEATURES . . . . . . . . . . . . . . . . . . . . . . . . . . . . . . . . . . . . . . . . . . . . . . . . . . . . .12
Safety Brakes . . . . . . . . . . . . . . . . . . . . . . . . . . . . . . . . . . . . . . . . . . . . . . . . . . . .12
Emergency Stop . . . . . . . . . . . . . . . . . . . . . . . . . . . . . . . . . . . . . . . . . . . . . . . .12
Emergency Operation . . . . . . . . . . . . . . . . . . . . . . . . . . . . . . . . . . . . . . . . . . . .12
Battery Lowering System . . . . . . . . . . . . . . . . . . . . . . . . . . . . . . . . . . . . .12
Manual Lowering Device . . . . . . . . . . . . . . . . . . . . . . . . . . . . . . . . . . . .13
5. CLEANING . . . . . . . . . . . . . . . . . . . . . . . . . . . . . . . . . . . . . . . . . . . . . . . . . . . . . . . . . . . . .14
Washing (Acrylic Panels) . . . . . . . . . . . . . . . . . . . . . . . . . . . . . . . . . . . . . . . . .14
Dusting (Acrylic Panels) . . . . . . . . . . . . . . . . . . . . . . . . . . . . . . . . . . . . . . . . . .14
Polishing (Acrylic Panels) . . . . . . . . . . . . . . . . . . . . . . . . . . . . . . . . . . . . . . . .14
Neutralizing Static Electricity (Acrylic Panels) . . . . . . . . . . . . . . . . . . . . .15
Cleaners . . . . . . . . . . . . . . . . . . . . . . . . . . . . . . . . . . . . . . . . . . . . . . . . . . . . . . . .15
6. DIAGNOSTICS . . . . . . . . . . . . . . . . . . . . . . . . . . . . . . . . . . . . . . . . . . . . . . . . . . . . . . . . .16
7. MAINTENANCE . . . . . . . . . . . . . . . . . . . . . . . . . . . . . . . . . . . . . . . . . . . . . . . . . . . . . . . .17
Maintenance Procedures . . . . . . . . . . . . . . . . . . . . . . . . . . . . . . . . . . . . . . . .17
Maintenance Schedule . . . . . . . . . . . . . . . . . . . . . . . . . . . . . . . . . . . . . . . . . .22

THIS PAGE WAS LEFT INTENTIONALLY BLANK

5
81375-A-OM-EN Vuelift Mini Owner’s Manual
TO ENSURE SAFE OPERATION
To ensure safe operation of this equipment, pay careful attention to the
important notes below.
• Read this manual carefully before using the equipment.
• To prevent accidents, adhere strictly to the instructions and keep clear of
moving parts at all times.
• Be aware of any hazards, such as hall doors, car doors, emergency stops,
or timers, especially for small children.
• Follow instructions on all equipment labels at all times. Replace any
damaged labels immediately.
• Ensure that only qualified personnel perform maintenance and service on
the unit.
• When replacing parts, be sure that only genuine Savaria parts are used.
• This unit is intended for use by a mature person who understands its
proper operation as set out in this manual.
• Prior to operation, make sure that:
• All doors and gates are locked and secure.
• All areas in and around the lift are clear of any obstructions.
• All lights are functioning properly.
• Test your keys and emergency stop button every month.
Intended Use
Do not use the Vuelift Mini to transport goods or freight.
At no time should children under the age of 16
use the elevator/lift while unsupervised.
Failure to follow this instruction could result in
damage to the equipment and could
potentially cause serious personal injury. Using
the Vuelift Mini to transport freight voids the
warranty.

6
Vuelift Mini Owner’s Manual 81375-A-OM-EN
Use handrail when operating the lift.
Never use the lift when not in complete tested and working condition.
Never use the lift in case of fire.
Owner’s Obligation
The lift owner is responsible for keeping the Vuelift Mini in proper operating
condition.
Operate your Vuelift Mini on a regular basis and check that everything is
working normally. Routine preventive maintenance will ensure the Vuelift Mini
is running properly and help avoid expensive break downs and repairs.
Do not operate the Vuelift Mini if it has been damaged. If you hear unusual
noises or feel vibrations contact Savaria or your local authorized representative.
At no time should the lift be operated while
contacting any surface other than the handrail
or control panel.
At no time should the lift be operated during
assembling, testing, modifying, dismantling or
any foreseeable breakdowns. Failure to follow
this instruction can lead to serious injuries and
the risk of death due to faulty operation of the
Vuelift Mini.
Do not use the Vuelift for fire-fighting or
evacuation in case of fire. Failure to follow this
instruction can lead to serious injuries and the
risk of death due to faulty operation of the
Vuelift Mini.
Only let service technicians certified by Savaria
service your Vuelift Mini!
Consequently, there is a danger for
unauthorized technicians of sustaining serious
injuries, including death.

7
81375-A-OM-EN Vuelift Mini Owner’s Manual
Modification
Dismantling and Disposal
Danger due to unauthorized modifications!
Never perform unauthorized modifications on
your Vuelift Mini. Modifications to your Vuelift
Mini may only be carried out following
consultation with written consent from Savaria
or a certified representative.
Only use original spare parts and accessories
approved by Savaria.
Unauthorized modifications to load bearing or
safety relevant components can lead to
life-threatening injuries.
If your Vuelift Mini is modified without
authorization, the warranty and product
liability are void.
Danger of serious injuries due to incorrect
dismantling!
Have dismantling carried out exclusively by a
service technician certified by Savaria.
Consult the manufacturer for subsequent
changes of location.
Unauthorized dismantling or change of
location is prohibited.
Errors in dismantling can lead to
life-threatening situations or cause
considerable damage to the property.

8
Vuelift Mini Owner’s Manual 81375-A-OM-EN
1. DESCRIPTION
Figure 1 shows the components of the Vuelift Mini Residential Elevator.
Figure 1
Hoistway
Car
operating
Hoistway
door lock
Hall call
button
Cab with manual
rotating sliding door
door
panel
(COP)

9
81375-A-OM-EN Vuelift Mini Owner’s Manual
2. GENERAL SPECIFICATIONS
Vuelift Mini Specifications
Applied code ASME 17.1/CSA B44 - Section 5.3
EN 81-41
Load capacity 500 lb (227 kg)
Maximum travel 50 ft (15.24 m); 55 ft (16.76 m) where a variance is
possible
Travel speed 30 ft/min (0.15 m/s)
Daily cycle
Normal: 40
Heavy: 80
Excessive: 150
Maximum starts in 1 hour on standard installation: 20
Maximum levels serviced 6
Minimum overhead 96 in (2.4 m)
Cab
Cab walls: Full clear acrylic or silica glass
Cab interior height: 77.75 in (1.97 m)
Cab weight (acrylic models): 550 lb (250 kg)
Cab weight (glass models): 1000 lb (455 kg)
Cab floor area: 8.25 sq ft (0.76 sq m)
Floor by others (in cab) 1/2 in (12.7 mm) maximum
Footprint 49.75 in (1.26 m) diameter
Acrylic and glass diameter 42.8 in (1.08 m)
Hoistway ring diameter 43.75 in (1.11 m)
Power supply 20A, 230-V, single-phase, 50/60 Hz
Cab lighting 15A, 115V, single-phase, 50/60 Hz
Suspension
Type: Galvanized aircraft cable (2 x 1/4” diameter)
Construction: IWRC 7 x 19 RHRL
Nominal strength: 7000 lb (3175 kg)
Weight of ropes: 0.243 lb/ft (3.616 g/cm)
Travel cable weight: 0.228 lb/ft (3.393 g/cm)

10
Vuelift Mini Owner’s Manual 81375-A-OM-EN
Drive train
Type: Winding drum
Motor: 1.77 HP (1.32 kW) @ 60 Hz with integrated brake
Motor control: Preprogrammed variable frequency
drive
Distance between
landings 93 in (2362 mm) minimum
Pit depth
Minimum: 3 in (76 mm); 4 in (102 mm) with buffer
springs (required if habitable space below)
Maximum: 12 in (305 mm)
Temperature operating
range
–10 °C to +40 °C (14 °F to 104 °F)
NOTE: For optimal running conditions, each landing of
the unit should be in a climate-controlled
environment.
Max. noise level At no time does the noise level of the lift exceed 70 db
during operation.
Safety features
Pit run/stop switch and car top run/stop switch
Emergency stop switch
Safety brakes
Overspeed
Manual lowering
Emergency battery back-up for cab lighting and
lowering
Options
Optional configurations: Type 2 cab
Optional colors:
• White (Texture White PX521W859)
• Silver (Texture Silver PX521S343)
• Custom powder-coat frame
Note that Black is the standard color (Texture Black
PX622N365)
Savaria Link remote monitoring
Pitless option with ramp
Sabbath service
Flood switch
Buffer springs for habitable space below
Buck boost transformer
Up to 6 stops; balcony attachment or thru-floor
configuration
Cab shipped disassembled
Landing door handle painted to match unit
Top header ring in sheet metal painted to match unit

11
81375-A-OM-EN Vuelift Mini Owner’s Manual
3. OPERATION
1Press the hall call button (Figure 2).
2When the hall call door unlocks, open the hoistway
door.
3Open the car door and enter the elevator.
4Close the hoistway door and then close the car door.
5Press a button on the Car Operating Panel (COP) to
select a floor.
6When you arrive at the
selected floor, open the car
door and exit the elevator.
7Close the car door and then
close the hoistway door.
Note that you can press the Alarm
button at any time in case of an
emergency.
Note that there is a keypad phone
located on the COP for use in an
emergency.
• To dial a phone number,
press the red ON/OFF
button on the keypad to
turn on the phone.
• Dial the phone number.
• Press the blue VOL key on
the keypad to raise or lower
the volume.
• Press the red ON/OFF
button on the keypad to
turn off the phone.
Figure 2
Figure 3
Floor buttons
Alarm button
Emergency phone
Speaker
Emergency Stop
Overload Sensor

12
Vuelift Mini Owner’s Manual 81375-A-OM-EN
4. SAFETY FEATURES
Overload Sensor
The overload sensor ensures that the lift can not be started when overloaded.
If the lift is overloaded the button shown in figure 4 will light up, an alarm will
sound and the car will not start.
Safety Brakes
The safety brakes (safeties) stop the lift in the event of cable failure.
During operation, cable tension keeps the brake up so the cam does not
interfere with the hoistway rails.
If a cable failure occurs, the brake mechanism comes down and the brake cam
stops movement of the lift.
Emergency Stop
Actuating the red STOP switch during travel will stop the elevator immediately
and activate the alarm. Pull the switch back to return the elevator to normal
operation.
Emergency Operation
Battery Lowering System:
If a power failure occurs, a battery lowering system will bring the Vuelift Mini to
the bottom level only at a rated speed of no faster then 0.05 m/s.
Figure 4

13
81375-A-OM-EN Vuelift Mini Owner’s Manual
When you stop at a lower landing open the door and exit the lift.
Manual Lowering Device:
If the battery fails while operating, there is a manual lowering device that can
be used to bring the Vuelift Mini to a lower landing level as described below.
1Turn off the main power disconnect.
2Remove the cover on the glass/acrylic in line with the motor brake at the
top landing.
3Insert the manual lowering tool (shown below) into the hole in the
glass/acrylic.
4Turn the manual lowering tool clockwise until the unit is at the desired
landing level.
5Make sure the floor of the cab is level with the landing.
6Use the special emergency key to manually open the landing door.
Do not re enter or attempt to use the lift until
building mains power has returned.
Always test the lift empty after a power failure
prior to riding the lift.
The manual lowering device is for emergency use
only. After use of any emergency function (access
key or manual lowering device), ensure that all
doors/gates are secure and locked. While the
emergency function is in use, DO NOT leave the
area unattended.
Figure 5

14
Vuelift Mini Owner’s Manual 81375-A-OM-EN
5. CLEANING
Clean acrylic panels with a mild soap and water solution or with acrylic
cleaner (see the list on the next page). A few precautions must be taken to
ensure a long operating life and to maintain the acrylic panel clarity on your
unit.
Clean glass panels using a normal glass cleaner such as Windex® or equivalent.
Washing (Acrylic Panels)
Wash the acrylic panels with a solution of mild soap or detergent and lukewarm
water. Use a clean soft cloth, applying only light pressure. Rinse with clean
water and dry by blotting with a damp cloth or chamois.
Dusting (Acrylic Panels)
Dust acrylic panels with a soft, damp cloth or chamois. Dry or gritty cloths may
cause surface scratches and create a static electric charge on the surface (refer
to the section on Neutralizing Static Electricity on the next page).
Polishing (Acrylic Panels)
Protect the acrylic panels and maintain their surface gloss by occasional
polishing with a good plastic cleaner and polish (refer to the section on
Cleaners for a list of acceptable cleaners and polishes).
Apply a thin, even coat with a soft clean cloth and polish slightly with cotton
flannel or a microfiber towel. Then wipe with a damp cloth to help eliminate
electrostatic charges that can attract dust particles.
Under no circumstances should you ever
attempt to remove panels for cleaning!
DO NOT use any cleaning product on acrylic that
contains ammonia or petroleum. This includes
Windex ® and most traditional glass cleaners.
DO NOT use window cleaning sprays, kitchen
scouring compounds or solvents such as acetone,
gasoline, benzene, alcohol, carbon tetrachloride,
or lacquer thinner. These can scratch the sheet’s
surface and/or weaken the sheet causing small
surface cracks called “crazing.”.

15
81375-A-OM-EN Vuelift Mini Owner’s Manual
Neutralizing Static Electricity (Acrylic Panels)
A static electrical charge can develop on the acrylic panels during handling and
processing. This is not unique to the acrylic panels, but is common to many
materials, particularly plastics.
When the paper or film masking is stripped off the acrylic sheet, a static charge
is created on the sheet surface. Static electricity attracts dust, chips, etc. floating
in the air or on nearby work surfaces and holds these contaminants tightly to
the surface. A compressed air gun will remove some of this surface dirt, but
much of it continues to cling to the sheet.
Several anti-static cleaners for plastics are also available which will reduce static
electricity and dust attraction. Wiping with a soft damp cloth or chamois is all
that is necessary to keep the acrylic panels dust-free between applications of
these cleaners.
Cleaners
Cleaners which MAY BE USED for acrylic panels:
• Plexus® (Anti-Static Cleaner)
• Novus® #1 Acrylic Cleaner and Polish
• ATM Mirage Glass and Acrylic Cleaner
• Zep® Commercial Glass Cleaner (must state for use on Plexiglas®)
• Plexi-Clean (Anti-Static Cleaner)
• Prist Aerospace Anti-Static Acrylic, Plastic & Glass Cleaner
• Cleaners which explicitly state “Safe for use with plastics and acrylic”
Cleaners which MAY NOT BE USED for acrylic panels:
• Windex® Glass Cleaner
• Sprayway Ammonia-Free Glass Cleaner
• Goo-Gone®
For glass panels, use a normal glass cleaner such as Windex® or equivalent.
These above lists are for reference only and are not comprehensive. If you have
any questions about the acceptability of a specific cleaner, please contact your
authorized dealer.
A de-ionizing tool can be used during installation
to eliminate a majority of the static electricity
(causes the dust to fall away).
Damage caused by inappropriate cleaners and
techniques is not covered under warranty.

16
Vuelift Mini Owner’s Manual 81375-A-OM-EN
6. DIAGNOSTICS
A warning beep is provided to alert the user to the fact that the car gate is in the
open position. It is necessary to close the car gate in order to respond to a call
to another floor. This beep will be heard any time the car gate is in the open
position AND a hall call is being pressed at a landing other than where the lift
resides. To resolve this issue, close the car gate and then proceed with calling
the lift to the desired floor.

17
81375-A-OM-EN Vuelift Mini Owner’s Manual
7. MAINTENANCE
The Vuelift Mini elevator is designed to require minimal maintenance.
A 6-month inspection of certain components is required to maintain the
Factory Warranty. The first required service of the drive train components
(motor/gearbox, drums, etc.) is after 2,000 operational hours (approximately
120,000 trips).
The items that need to be checked during the 6-month inspection are listed in
the Maintenance Schedule.
IMPORTANT: Please test the phone in your elevator during every maintenance.
If the phone is inactive, please shut down the elevator until the phone line is
active.
Maintenance Procedures
INSIDE CAR
Car Interior
• Examine the car interior for damage including the ceiling, handrails,
door panels, lighting and floor. Tighten all fasteners in the car panel
and replace as needed.
Car Controls and Panel
• Examine the condition of the car control panels and check the
operation of all lights. Replace all burnt out lights.
Leveling, Stopping, Acceleration and Deceleration
• Run the car to each floor in both directions to observe the leveling
accuracy, stopping, acceleration and deceleration. Adjust as needed.
Car Door Operation
• Observe the door for proper operation including smooth movement,
starts and stops, and alignment.
The 6-month inspection and all maintenance
procedures must be performed by a Qualified
Technician. Contact your Authorized Dealer.
Rail lubrication is NOT allowed for the Vuelift
hoistway or car rails.
Refer to the Maintenance Procedures for
descriptions of the items.

18
Vuelift Mini Owner’s Manual 81375-A-OM-EN
Ride Floor to Floor
• Run the car from floor to floor and observe for smooth travel and
unusual noises. Adjust or repair as needed.
Car Lights and Ventilation
• Verify proper operation of the car emergency light and ensure
adequate ventilation.
Restricted Opening Device Mechanism
• Examine the restricted opening device mechanism (if applicable) for
proper operation and adjust as needed.
OUTSIDE HOISTWAY
Hall Call Stations and Lights
• Examine the hall stations for condition and replace all burnt out lights.
Observe operation of the audible signal when the Emergency Stop is
activated.
Hoistway Doors
• Examine the door panel and clearance between the panel and
entrance frames. Examine proper interlock functionality and
operation. Adjust as needed.
Unlocking Device
• Examine the hoistway door unlocking device for damage. Repair or
adjust as needed.
MACHINE ROOM
Housekeeping
• Clean the machine room floor to prevent slipping and trip hazards, fire
hazards and contamination of the equipment. Ensure the machine
room is not being used for storage and inform the customer of any
violation.
Trash, Used Parts and Oil
• Ensure that all trash is discarded after maintenance is complete.
Controller and Motor Starter
• Examine the controller and motor starter for:
• Cleanliness
• Condition of contacts and remaining contact material
• Fuses for correct size and fit in holders and corrosion in fuse holder
• Relays for worn shunts and signs of overheating
• Evidence of overheating
TOP OF CAR
Stop Switch
• Verify the car will not run with the stop switch in the STOP position.

19
81375-A-OM-EN Vuelift Mini Owner’s Manual
Cleanliness
• Clean all debris from the car top.
Top Car Guide
• Examine car rail to hoistway rail conditions at the car top. Note any
abnormal wear patterns or changes in alignment.
Guide Rails
• Examine the car rails for loose fastenings and fit at all joints.
Traveling Cables
• Examine the traveling cables for wear, chafing, kinking and alignment.
Examine the attachment points for secure fastening and looseness.
Door Hangers, Locks, etc.
• Verify the interlock is functioning properly.
• With the door open, attempt to move the car using the hall call and
COP buttons.
• Observe the door closing for any roughness in bearings, inconsistent
operation, or misalignment.
Hoistway Cleaning
• Clean dirt and trash from all horizontal surfaces including the car and
entrance sills.
Other
• Observe any hoistway problems that should be addressed such as:
• Unauthorized equipment installed in the hoistway
• Damage to the hoistway enclosure which would affect its fire
resistance rating
• Evidence of intentional acts
• Any evidence of unauthorized people entering the hoistway
Examine the Ropes
• Examine the car ropes for equal tension, and visually inspect for any
frays or deformation of the ropes which would negatively impact their
strength.
Leaving the Car Top
• Clean up and dispose of debris properly. Return the car to normal
operation and the stop switch to the RUN position.
PIT OR RAMP AREA
Stop Switch
• Examine the operation and condition of the stop switch. Repair as
needed.
Cleaning
• Clean the pit. Examine the bottom level landing sill and clean as
needed.

20
Vuelift Mini Owner’s Manual 81375-A-OM-EN
Bottom Car Glides
• Examine car rail to hoistway rail conditions at the car bottom. Note any
abnormal wear patterns or changes in alignment.
Traveling Cables
• Examine the traveling cables for wear, chafing, kinking and alignment.
Examine the attachment points for secure fastening and looseness.
Leaving the Pit
• Remove all tools and verify operation of the elevator.
OVERSPEED
Overspeed belt
• Make sure the overspeed belt is in good condition and that it has no
frays or cuts. Check that the ends are secure.
Overspeed system
• Check for any signs of wear in the overspeed system. Remove any dust
or dirt from the belt and pulleys. Do not use harsh chemicals on the
overspeed components; use only mild detergents.
BRAKES
Verify proper operation of the safety brakes and the motor brake. Check with
full load every 12 months.
Other manuals for Vuelift Mini
1
Table of contents
Other Savaria Elevator manuals

Savaria
Savaria Eclipse User manual

Savaria
Savaria Orion Technical manual

Savaria
Savaria Vuelift Mini User manual

Savaria
Savaria Orion LU User manual

Savaria
Savaria Vuelift User manual

Savaria
Savaria Infinity User manual

Savaria
Savaria Orion User manual

Savaria
Savaria Infinity User manual

Savaria
Savaria Eclipse Gearless User manual

Savaria
Savaria Telecab17 User manual