Shark Nano User manual

SHARK NANO
OWNER’S MANUAL - MANUEL D’UTILISATION - BENUTZERHANDBUCH - LIBRETTO ISTRUZIONI - MANUAL DEL USUARIO
WARNING!
Carefully read, understand and follow the instructions
provided in this manual, and keep it in a safe place for
future reference. If you have any doubt whatsoever regarding
the use or care of your helmet, please see your retailer for
assistance or advice. Failure to follow the warnings and
instructions provided herein can result in the failure of the
helmet to protect you in an accident, resulting in a head
injury or death.
ATTENTION !
Veuillez lire avec attention, comprendre et suivre les
instructions fournies dans ce manuel, et veuillez le garder en
lieu sûr pour vous en servir ultérieurement. En cas de doute
concernant l’utilisation ou l’entretien du casque, veuillez
demander l’aide ou l’avis de votre revendeur. Tout non
respect des précautions et recommandations fournies dans
ce manuel peut entraîner une défaillance dans l’efficacité du
casque à vous protéger en cas d’accident, provoquant une
blessure grâve ou la mort.
WARNUNG!
Lesen Sie diese Anleitung aufmerksam durch und bewahren
Sie sie sorgfältig auf. Bei Fragen zur Verwendung oder Pflege
Ihres Helms wenden Sie sich an Ihren Einzelhändler. Falls Sie
die Warnungen und Hinweise dieser Anleitung nicht befolgen,
kann das die Schutzwirkung des Helms im Falle eines Unfalls
beeinträchtigen, was zu einer schweren oder tödlichen
Kopfverletzung führen kann.
ATTENZIONE!
Leggere con attenzione, capire e seguire le istruzioni fornite
in questo libretto e conservarlo in luogo sicuro per potersene
servire ulteriormente. In caso di dubbio riguardo l’utilizzo
o la manutenzione del casco, chiedere l’aiuto o l’avviso
del proprio rivenditore. Il non rispetto delle precauzioni e
raccomandazioni fornite in questo libretto può provocare
una mancanza dell’efficacità del casco a proteggere in caso
d’incidente, provocando una ferita grave o la morte.
ATENCIÓN!
Lea atentamente, siga las instrucciones de este manual y
guárdelo en lugar seguro para futuras referencias. Si tuviera
cualquier duda sobre la utilización o cuidado de su casco por
favor diríjase a su establecimiento habitual. No seguir los
avisos y consejos de utilización presentes en este manuscrito
podría disminuir la protección para la cual este casco esta
diseñado, pudiendo causar traumatismos craneales o incluso
la muerte en caso de accidente.
“This user’s manual and its images can not be considered as
contractual. SHARK reserves the right to improve the quality of pro-
duction. The images contained in this document are SHARK’s exclu-
sive property. Any reproduction is forbidden“.
“Ce manuel d’utilisation ainsi que les images contenues ne
peuvent être considérés comme contractuels. SHARK se réserve le
droit d’améliorer la qualité de la production. Les images contenues
dans ce document sont la propriété exclusive de SHARK.Toute repro-
duction est interdite“.
“Diese Bedienungsanleitung und seine Bilder sind nicht Vertrags-
bestandteil. SHARK behält sich das Recht vor, die Qualität der Herstel-
lung zu verbessern. Die in diesem Dokument enthaltenen Bilder sind der
alleinige Besitz von SHARK. Jede Vervielfältigung ist untersagt“.
“Questo manuale d’uso e le immagini in esso contenute non
possono essere considerati come contrattuali. SHARK si riserva il
diritto di ottimizzare la qualità della produzione. Le immagini ripor-
tate nel presente documento sono di proprietà esclusiva di SHARK.
Riproduzione vietata“.
“Este manual del usuario y sus imágenes no pueden ser conside-
rados como contractuales. SHARK se reserva el derecho de mejorar la
calidad de la producción. Las imágenes contenidas en este documento
son propiedad exclusiva de SHARK. Prohibida toda reproducción».

WARNINGS and INSTRUCTIONS
1. This helmet is for use only with motorcycles
ridden on the street or other paved surfaces.
Never use this helmet off road, on snowmobiles,
in automobiles, etc.
2. Always ride with care. Even though this helmet
meets or exceeds many of the world’s most
demanding standards for helmet production,
no helmet can protect the wearer from all
foreseeable high or low speed impacts. All
safety equipment have limits, and you could
still sustain a head injury in an accident even
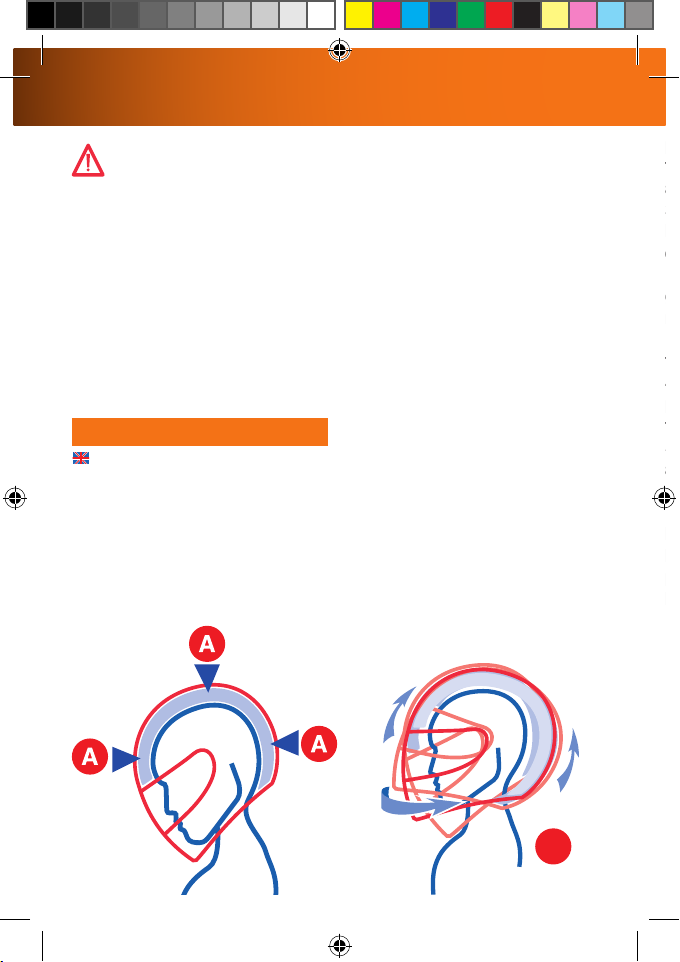
if you are wearing a helmet. However, for
maximum protection against death or permanent
impairment from a head injury, the helmet must
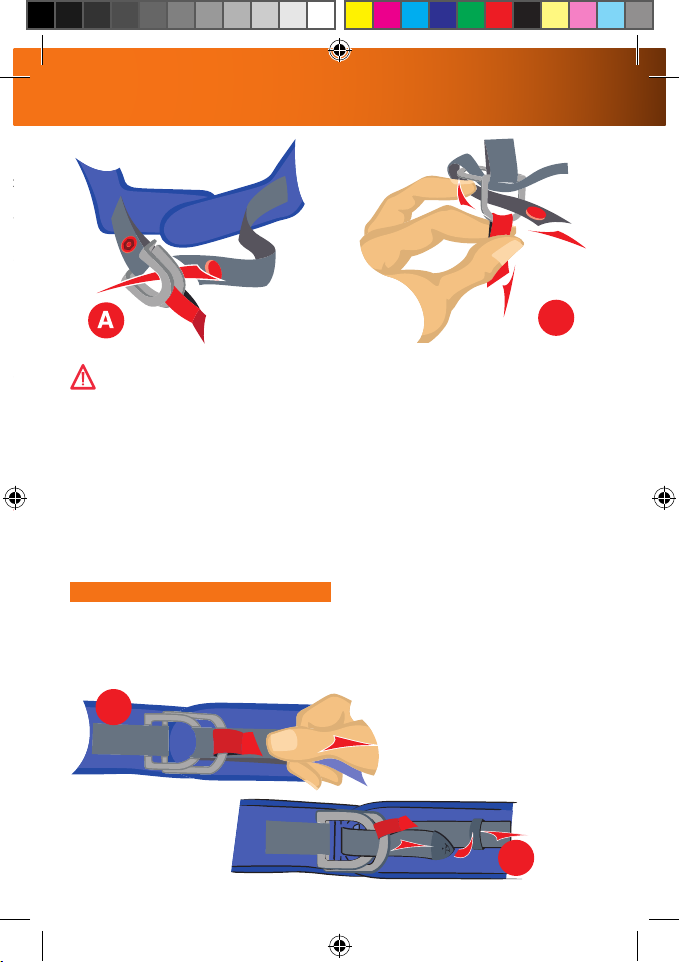
fit firmly on your head and the chinstrap must be
securely fastened as described in this manual.
3. The helmet is designed to absorb impact by
partial destruction of the shell and/or liner. This
damage may not be visible to you. Therefore,
if your helmet is subjected to any impact, even
if it is only dropped to the ground, the helmet
should be returned for inspection or replaced and
destroyed even if it is apparently undamaged.
If you have any doubts, and you are not sure
whether this rule applies, consult your dealer
before you use your helmet again.
4. A helmet, like all products, may wear out over
time depending on the conditions of use. Please
check your helmet every time you use it for
evidence of damage or wear. The helmet should
always fit snugly all around your head. If it is not
snug, it has become too big for you and should
be replaced. Never wear a damaged helmet. Even
if the helmet does not show any evidence of
damage or wear, we recommended the helmet to
be replaced five years after it is first purchased.
5. Make no modifications whatsoever to your
helmet. Never drill or cut any component of
the helmet. Modifications can significantly
weaken your helmet, thereby eliminating its
ability to protect you from an impact.
6. Handle your helmet carefully. Never sit on it or
drop it to the ground. Never ride with the helmet
hanging from any part of your motorcycle.
7. Never use petroleum or petroleum products,
chemicals or any other solvents to clean the
helmet, shell or visor. In addition, never expose
your helmet to the fumes of these solvents (for
example by leaving it on top of the fuel tank
cap on your motorcycle). Your helmet could be
seriously damaged by these agents, without this
damage being visible to you, thereby eliminating
its ability to protect you. Use only mild soap,
warm water, and a soft cloth to wipe your helmet
and visor clean.
8. Never apply any paint, stickers or adhesive
tape to any part of your shell or visor. They could
significantly weaken your helmet, without this
damage being visible to you, thereby eliminating
the helmet’s ability to protect you.
9 . You will experience some reduction in hearing,
peripheral vision and head movements while you
are wearing your helmet. Please ride accordingly.
10. Dry your helmet at room temperature. Never
subject it to heat in excess of 160°F/70°C,
which can occur if your helmet is stored in the
passenger compartment or trunk of a car.
11. If you ever have any comments or questions
about this helmet, please contact SHARK or your
nearest dealer.
No warranty or representation is made as
to this product’s ability to protect the user
from all foreseeable high or low speed impacts
or from any injury or death; The user of this
helmet recognizes and agrees that there are
risks inherent in motorcycle riding, including
but not limited to the risk that your helmet
cannot protect against all foreseeable high or
low speed impacts. By his/her purchase and use
of this helmet, the user expressly, voluntarily and
knowingly accepts and assumes these risks and
agrees to hold SHARK harmless to the fullest
extent permitted by law against any resulting
damages.
WARNING! for French trafc, the Highway
Code requires safety reectors (supplied
separately in a packet) to be tted in accordance
with the enclosed plan.
WARNING! The United-States have a specic
regulation, the helmets ECE approved only
cannot be used in these territories without the
complementary DOT FMVSS 218 approval.
2

2
3
4
6
7
11
2
3
4
6
7
55
6 A
6 B
6 A
6 B
XS 53/54
S 55/56
M 57/58
L 59/60
XL 61/62
6. Handle your helmet carefully. Never sit on it or
drop it to the ground. Never ride with the helmet
hanging from any part of your motorcycle.
7. Never use petroleum or petroleum products,
chemicals or any other solvents to clean the
helmet, shell or visor. In addition, never expose
your helmet to the fumes of these solvents (for
example by leaving it on top of the fuel tank
cap on your motorcycle). Your helmet could be
seriously damaged by these agents, without this
damage being visible to you, thereby eliminating
its ability to protect you. Use only mild soap,
warm water, and a soft cloth to wipe your helmet
and visor clean.
8. Never apply any paint, stickers or adhesive
tape to any part of your shell or visor. They could
significantly weaken your helmet, without this
damage being visible to you, thereby eliminating
the helmet’s ability to protect you.
9 . You will experience some reduction in hearing,
peripheral vision and head movements while you
are wearing your helmet. Please ride accordingly.
10. Dry your helmet at room temperature. Never
subject it to heat in excess of 160°F/70°C,
which can occur if your helmet is stored in the
passenger compartment or trunk of a car.
11. If you ever have any comments or questions
about this helmet, please contact SHARK or your
nearest dealer.
No warranty or representation is made as
to this product’s ability to protect the user
from all foreseeable high or low speed impacts
or from any injury or death; The user of this
helmet recognizes and agrees that there are
risks inherent in motorcycle riding, including
but not limited to the risk that your helmet
cannot protect against all foreseeable high or
low speed impacts. By his/her purchase and use
of this helmet, the user expressly, voluntarily and
knowingly accepts and assumes these risks and
agrees to hold SHARK harmless to the fullest
extent permitted by law against any resulting
damages.
• Anatomy of the helmet ............................................................................................. 3
• A helmet in your size ...........................................................................................4 - 5
• The chin strap .....................................................................................................6 - 7
• Advice for use .......................................................................................................... 8
• CHIN STRAP Micrometric buckle ............................................................................... 9
• Visor ....................................................................................................................... 10
• Sun visor .........................................................................................................11 - 12
• Textile parts .....................................................................................................13 - 14
• Easy Fit /Ventilations .............................................................................................. 16
• 5-Year warranty ...................................................................................................... 17
• Legal information ................................................................................................... 20
CONTENTS - ANATOMY OF THE HELMET
1) Goggles
2) Goggles strap
3) Upper airvent
4) Mask
5) Chin strap buckle:
5A Double-D buckle.
5B “Precise lock” buckle
6) Base seal
7) Visor seal
WARNING! for French trafc, the Highway
Code requires safety reectors (supplied
separately in a packet) to be tted in accordance
with the enclosed plan.
WARNING! The United-States have a specic
regulation, the helmets ECE approved only
cannot be used in these territories without the
complementary DOT FMVSS 218 approval.
WARNING! The helmet Shark Nano is
only approved in jet. The mask does
not protect the chin against the shocks.
3

B
CHOOSE YOUR SIZE
WARNING! No helmet can
protect the wearer from all
foreseeable high or low speed
impacts. However, for maximum
protection, the helmet must be
of proper t and the chin strap must be
securely fastened as described in this
manual. Failure to have a proper t and
to securely fasten the chin strap is dan-
gerous, as the helmet could come off
in an accident, resulting in severe head
injury or death.
CHOOSE YOUR SIZE
Each helmet is designed to corres-
pond to a head measurement (from for
XS up to XL). To measure your head
size, wrap a tape measure horizon-
tally around your head at a height of
approximately one inch (2.5cm) above
your eyebrows. If your head measure-
ment falls between two sizes, rst
try on the smaller helmet. However,
because of different head shapes, this
size reference can only be considered
as a guide. For maximum protection, it
is necessary to check that the helmet is
well suited for the shape of your head.
When trying a brand new helmet, make
sure that your head is pushed into the
helmet as far as possible, with the front
part just above your eyebrows, and
with the chin strap securely fastened
as described on the next page.
1. The helmet should feel very snug all
around your head and fairly tight on the
cheek pads. If not, it is too big for you;
select a smaller size.
See gure A.
2. With the chin strap properly faste-
ned, be sure that the helmet cannot
be moved excessively from side to
side or up and down.You should feel
the skin of your head and face being
CHOOSE YOUR SIZE
pulled as you move the helmet. If not,
the helmet is too big for you; select
a smaller size. See gure B.
3. Grasp the back of the helmet at the
base and attempt to pull the helmet
off your head. Next, push the hel-
met upwards from beneath the chin
guard. You should push and pull with
relatively signicant force. If the hel-
met starts to come off, the helmet is
too big for you; select a smaller size.
4. Bend your head forward as far as
possible. The chin guard must not
touch your chest. See gure C.
5. Bend your head backwards as far
as possible. The helmet shell must not
touch your back. See gure D.
Never wrap your hair inside the
helmet, or place anything in or on your
hair inside the helmet. Never insert
padding to modify the position of the
helmet on the head.
If you have any questions about pro-
4

CD
try on the smaller helmet. However,
because of different head shapes, this
size reference can only be considered
as a guide. For maximum protection, it
is necessary to check that the helmet is
well suited for the shape of your head.
When trying a brand new helmet, make
sure that your head is pushed into the
helmet as far as possible, with the front
part just above your eyebrows, and
with the chin strap securely fastened
as described on the next page.
1. The helmet should feel very snug all
around your head and fairly tight on the
cheek pads. If not, it is too big for you;
select a smaller size.
See gure A.
2. With the chin strap properly faste-
ned, be sure that the helmet cannot
be moved excessively from side to
side or up and down.You should feel
the skin of your head and face being
CHOOSE YOUR SIZE
pulled as you move the helmet. If not,
the helmet is too big for you; select
a smaller size. See gure B.
3. Grasp the back of the helmet at the
base and attempt to pull the helmet
off your head. Next, push the hel-
met upwards from beneath the chin
guard. You should push and pull with
relatively signicant force. If the hel-
met starts to come off, the helmet is
too big for you; select a smaller size.
4. Bend your head forward as far as
possible. The chin guard must not
touch your chest. See gure C.
5. Bend your head backwards as far
as possible. The helmet shell must not
touch your back. See gure D.
Never wrap your hair inside the
helmet, or place anything in or on your
hair inside the helmet. Never insert
padding to modify the position of the
helmet on the head.
If you have any questions about pro-
perly sizing your helmet, see your
retailer for assistance.
Each of these tests must be repeated
throughout the life of the helmet, as the
comfort padding may wear or change
over time. If, during the life of your
helmet, your helmet does not maintain
the correct t, you must replace the
helmet.
WARNING! Never lend your hel-
met to others without insuring
a proper t in accordance with these
instructions.
WARNING! If you cannot obtain
a proper t in accordance with
these instructions, DO NOT USE THE
HELMET. Select a different helmet size
or model.
5

ABC
DEF
CHIN STRAP
Depending on the various versions and the
country concerned, your Shark Nano is equipped
with a chin strap with a “Precise Lock” rapid
buckle with a snap lock or one with a double-D
ring. Proper use of the chin strap is critical for
proper performance of the helmet. Never alter
your chin strap in any way. For example, never
cut it or add holes, or apply buttons, studs or
other items to your chin strap. During the life of
your helmet, be sure that the chin strap never
suffers any type of abrasion or cut, and that its
total length does not change. If it does, replace
your helmet.
PRECISE LOCK
The “Precise Lock” snap lock system gives you
precise and accurate adjustment because of the
considerable length of its notched section.
However, it is essential on purchase to adapt
the length of the chin strap to your measure-
ments. Adjust the length of the strap using the
adjusting buckle (figs. A, B, C and D).
Choose your Shark Nano and attach the holding
system. When the “Precise Lock” is adjusted
to the medium position, the chin strap must
be correctly tensioned under the chin to hold
the helmet firmly without causing you any
discomfort or pain.
To fasten the chin strap, all you have to do is to
thread the tongue into its place on the buckle
until tension is perfect (fig. E). The tongue
connects and is automatically blocked.
To release the chin strap, you have to pull on
the lever (fig. F) and remove the tongue from the
buckle. Although the notched tongue enables
you to change the adjustment precisely on each
use, it is important to check frequently that the
adjustment of the strap length is correct.
WARNING! Never ride with the chin strap
loose or insufficiently tightened. Even
though the interior padding gives you the impres-
sion of being held, your helmet risks coming off
in a fall.
Never apply lubricating or acid products or grease
or solvents to the chin strap buckle parts.
CHIN STRAP
WARNING! Never use the strap loop to
secure your helmet to your head. In order to
be properly fastened, you must thread the strap
through the double-D-rings. Failure to properly
use the double-D-rings will cause your helmet
to become dislodged during an accident, leaving
your head completely unprotected and resulting in
severe head injury or death. Try to pull down on the
chin strap with your ngers. If the strap loosens
in any way, you have not properly tightened
DOUBLE-D RING
A - Slide the long part of the chin strap through
the two D rings, positioning the comfort pad
correctly between the chin strap and your neck.
B - Then bring the end of the chin strap
back through the lower of the two D rings
CHIN STRAP
6

B
C
D
Choose your Shark Nano and attach the holding
system. When the “Precise Lock” is adjusted
to the medium position, the chin strap must
be correctly tensioned under the chin to hold
the helmet firmly without causing you any
discomfort or pain.
To fasten the chin strap, all you have to do is to
thread the tongue into its place on the buckle
until tension is perfect (fig. E). The tongue
connects and is automatically blocked.
To release the chin strap, you have to pull on
the lever (fig. F) and remove the tongue from the
buckle. Although the notched tongue enables
you to change the adjustment precisely on each
use, it is important to check frequently that the
adjustment of the strap length is correct.
WARNING! Never ride with the chin strap
loose or insufficiently tightened. Even
though the interior padding gives you the impres-
sion of being held, your helmet risks coming off
in a fall.
Never apply lubricating or acid products or grease
or solvents to the chin strap buckle parts.
WARNING! Never use the strap loop to
secure your helmet to your head. In order to
be properly fastened, you must thread the strap
through the double-D-rings. Failure to properly
use the double-D-rings will cause your helmet
to become dislodged during an accident, leaving
your head completely unprotected and resulting in
severe head injury or death. Try to pull down on the
chin strap with your ngers. If the strap loosens
in any way, you have not properly tightened
the chin strap with the double-D rings.
Repeat the steps above. Never ride with the chin
strap loose, improperly fastened or improperly
positioned.
Even though the comfort padding gives you the
impression that the helmet is securely held in
place, it will come off in an accident, leaving your
head completely unprotected.
If you have any doubt concerning the fastening
system of your helmet, do not use the helmet.
Contact your dealer for assistance.
DOUBLE-D RING
A - Slide the long part of the chin strap through
the two D rings, positioning the comfort pad
correctly between the chin strap and your neck.
B - Then bring the end of the chin strap
back through the lower of the two D rings
as shown in the diagram.
C - Pull the strap until you feel resistance from
the strap and it is held in place under your chin
without being too tight, so that you have no
difficulty in breathing.
CHIN STRAP 7

6
A
B
7
C
D
E
6
A
B
PUTTING ON THE HELMET
Once the chin strap is released, you
have to take hold of the two sections
by the buckles and hold them slightly
apart to facilitate the passage of your
head. While carrying out this move-
ment, you are advised to keep the two
sections of the chin strap apart with
your thumbs so that they are properly
positioned.
Position the protective parts of the
chin strap buckle correctly and fasten
it in accordance with the recommen-
dations that are appropriate to the
versions and country.
Check that the tension and therefore
the positioning of the helmet are cor-
rect for all positions. If this is not the
case, you must continue to adjust
the length until you achieve the ideal
positioning.
REMOVING THE HELMET
Release the chin strap. Hold the two
sections slightly apart as for putting
the helmet on and remove the helmet.
WARNING! If you cannot
properly fasten your chin strap
or obtain the correct fit of your hel-
met on your head, DO NOT USE THE
HELMET! See your retailer for assis-
tance.
ADVICE FOR USE
CHIN STRAP MICROMETRIC BUCKLE
HOLDING SYSTEM
Depending on the various versions and the
country concerned, your SHARK Nano helmet
is equipped with a chin strap with a “Precise
Lock” rapid buckle with a snap lock.
The “Precise Lock” snap lock system gives you
precise and accurate adjustment because of
the considerable length of its notched section.
However, it is essential on purchase to adapt the
length of the chin strap to your measurements.
Adjust the length of the strap using the adjusting
buckle (Figs. A, B, C and D).
8

6
A
B
7
C
D
E
6
A
B
7
C
D
E
7
C
D
E
A
B
C
D
E
the positioning of the helmet are cor-
rect for all positions. If this is not the
case, you must continue to adjust
the length until you achieve the ideal
positioning.
REMOVING THE HELMET
Release the chin strap. Hold the two
sections slightly apart as for putting
the helmet on and remove the helmet.
WARNING! If you cannot
properly fasten your chin strap
or obtain the correct fit of your hel-
met on your head, DO NOT USE THE
HELMET! See your retailer for assis-
tance.
CHIN STRAP MICROMETRIC BUCKLE
HOLDING SYSTEM
Depending on the various versions and the
country concerned, your SHARK Nano helmet
is equipped with a chin strap with a “Precise
Lock” rapid buckle with a snap lock.
The “Precise Lock” snap lock system gives you
precise and accurate adjustment because of
the considerable length of its notched section.
However, it is essential on purchase to adapt the
length of the chin strap to your measurements.
Adjust the length of the strap using the adjusting
buckle (Figs. A, B, C and D).
Choose your SHARK Nano and attach the holding
system. When the “Precise Lock” is adjusted to
the medium position, the chin
strap must be correctly tensioned under the chin
to hold the helmet rmly without causing you any
discomfort or pain. To fasten the chin strap, all
you have to do is to thread the tongue into its
place on the buckle until tension is perfect (Fig.
B). The tongue connects and is automatically
blocked. To release the chin strap, you have to
pull on the lever and remove the tongue from the
buckle. Although the notched tongue enables you
to change the adjustment precisely on each use,
it is important to check frequently that the adjust-
ment of the strap length is correct.
WARNING: never ride with the chin strap
loose or insufficiently tightened. Even
though the interior padding gives you the
impression of being held, your helmet risks
coming off in a fall.
Never apply lubricating or acid products
or grease or solvents to the chin strap
buckle parts.
9

B
D
A
C
VISOR
HANDLING
To open the visor, pull it out on the left side,in order
to make it come out the locking pin.
Then raise the visor (fig. A).
To close, simply pull the visor down. It will lock
automatically (fig. B).
MAINTENANCE
For protection and improve its life, the outer sur-
face of your visor is anti-scratch treated.
When cleaning the screen, use lukewarm
water (below 40 degrees) and a soft
cloth (100% cotton and lint) to wipe
the screen. Neutral soap as “savon de
Marseille” can help you clean up.
WARNING! Never use any kind
washing windows (with alcohol or
other solvent type), these products can
damage the screen treatment.
Raise the visor in open position and remove by
taking it out of its holders by gently pulling forward
(fig. C).
Put back on by aligning the screen with holders
and pushing backward (fig. D).
WARNING! If your visor and/or sun shield no
longer provides you with clear visibility after
a period of service, you must immediately replace
it. Never ride if your sun shield is scratched, dirty,
foggy or with your vision obscured in any way,
always ride with perfect visibility.
WARNING! If you are not sure that you properly
replaced the visor, do not use the helmet. The visor
could suddenly and without warning become detached
from the helmet while riding, causing you to lose control of
your motorcycle, resulting in an accident, personal injury, or
death. Contact your retailer for any assistance or advice.
WARNING! Do not ride with an open
visor and do not try to open or adjust the
visor while riding. The visor could suddenly
and without warning become detached from
the helmet, leaving your eyes and face
unprotected. In addition, your head could
be pulled to the side, causing you to lose
control of your motorcycle. These events
could cause you to lose control of your
motorcycle, resulting in an accident, perso-
nal injury or death.
THE SUN SHIELD
The Shark Nano is equipped with sun shield
with external controls.
The lateral button operates the sun shield.
To use the sun shield, just turn this button.
To ensure its protection and lengthen its
lifespan, the external surface of the Shark
Nano sun shield has been coated with an
anti-scratch treatment.
To maintain and clean it, please follow the
same instructions as for the external surface
of the visor.
WARNING! This sun shield can be
used only in bright light conditions
and when you are not riding in an area
10

SUN VISOR
When cleaning the screen, use lukewarm
water (below 40 degrees) and a soft
cloth (100% cotton and lint) to wipe
the screen. Neutral soap as “savon de
Marseille” can help you clean up.
WARNING! Never use any kind
washing windows (with alcohol or
other solvent type), these products can
damage the screen treatment.
foggy or with your vision obscured in any way,
always ride with perfect visibility.
WARNING! If you are not sure that you properly
replaced the visor, do not use the helmet. The visor
could suddenly and without warning become detached
from the helmet while riding, causing you to lose control of
your motorcycle, resulting in an accident, personal injury, or
death. Contact your retailer for any assistance or advice.
WARNING! Do not ride with an open
visor and do not try to open or adjust the
visor while riding. The visor could suddenly
and without warning become detached from
the helmet, leaving your eyes and face
unprotected. In addition, your head could
be pulled to the side, causing you to lose
control of your motorcycle. These events
could cause you to lose control of your
motorcycle, resulting in an accident, perso-
nal injury or death.
THE SUN SHIELD
The Shark Nano is equipped with sun shield
with external controls.
The lateral button operates the sun shield.
To use the sun shield, just turn this button.
To ensure its protection and lengthen its
lifespan, the external surface of the Shark
Nano sun shield has been coated with an
anti-scratch treatment.
To maintain and clean it, please follow the
same instructions as for the external surface
of the visor.
WARNING! This sun shield can be
used only in bright light conditions
and when you are not riding in an area
in which you risk having a sudden
change in visibility or light conditions (a
tunnel, for example). In all situations of
reduced visibility, such as the beginning
or end of the day, at night, when it is raining
or foggy, etc. The sun shield must be kept
in the high (open) position so that your vision
is not impaired.
WARNING! If your sun shield no longer
provides you with clear visibility, you
must immediately replace it. Never ride if
your sun shield is scratched, dirty, foggy
or with your vision obscured in any way.
Always ride with perfect visibility.
WARNING! Even if the operation of the
sunshield is easy, only operate it when
YOU AND YOUR VEHICLE ARE STOPPED.
WARNING! NEVER ride with the sun
shield as eye protection. You must
always ride with the visor in the lowered
position.
WARNING! Do not try to raise, lower
or adjust your Sun Shield while riding.
You could lose control of your motorcycle,
resulting in an accident, personal injury or
death.
11

A
B
D
C
SUN VISOR
THE SUN SHIELD REMOVAL
- Move the sun shield to the lower position
- Pull the sun shield delicately downward
(Fig. A).
- Pull the sun shield forward, one side at
a time, to unclip it from the mounting points
in the helmet (Fig. B).
THE SUN SHIELD REPLACEMENT
Carry out the above operation in reverse
order:
- Move the handling button to the low
position.
- Push, at one side at a time, the sun shield
forward to clip it onto the mounting points
in the helmet (Fig. C).
- And then clip the sun shield back on by
lifting it slightly (Fig. D).
WARNING! If you are not sure that
you properly replaced the sun shield,
do not use the helmet. The sun shield
could suddenly and without warning
become detached from the helmet while
riding, causing you to lose control of
your motorcycle, resulting in an accident,
personal injury, or death. Contact your
retailer for any assistance or advice.
CLEANING THE INTERIOR
The interior textile parts are washable; it is
important to strictly follow the instructions
below to avoid damaging them:
The cheek pads and head section must be
hand washed in warm, soapy water (about
30°). Do not use aggressive detergents but
either a product for delicate materials in low
dilution or household soap.
It is essential to dry textile and foam parts
completely before reinstalling them in the
helmet. They must be air dried at room
temperature. Never use a clothes dryer or
other heat source. Never iron textile parts.
For parts with a leather appearance or
textiles attached to safety elements, use a
slightly damp sponge or cloth and household
soap and rinse with clean water. Do not
allow too much water to come into contact
with polystyrene parts.
You must insure that all interior parts are
perfectly dry before using the helmet.
WARNING! Damaged interior padding
will compromise the fit of your helmet on
your head and could allow the helmet to come
off your head in an accident, resulting in a head
injury or death.
12

TEXTILE PARTS
CLEANING THE INTERIOR
The interior textile parts are washable; it is
important to strictly follow the instructions
below to avoid damaging them:
The cheek pads and head section must be
hand washed in warm, soapy water (about
30°). Do not use aggressive detergents but
either a product for delicate materials in low
dilution or household soap.
It is essential to dry textile and foam parts
completely before reinstalling them in the
helmet. They must be air dried at room
temperature. Never use a clothes dryer or
other heat source. Never iron textile parts.
For parts with a leather appearance or
textiles attached to safety elements, use a
slightly damp sponge or cloth and household
soap and rinse with clean water. Do not
allow too much water to come into contact
with polystyrene parts.
You must insure that all interior parts are
perfectly dry before using the helmet.
WARNING! Damaged interior padding
will compromise the fit of your helmet on
your head and could allow the helmet to come
off your head in an accident, resulting in a head
injury or death.
THE TEXTILE PARTS
The textile and foam parts providing
comfort to the Shark Nano make it easy
for you to appreciate the performance of
your helmet to the full.
The parts in contact with the skin are
made in a fabric that is guaranteed to feel
pleasant, to absorb perspiration well and
to resist wear satisfactorily.
We treat surfaces to limit the risk of mould
and bacteria.
WARNING! Although they are
selected for their quality of resistance
and satisfactory wear, all the comfort
padding is subject to normal wear and
tear. The rate of wear and tear will depend
on use, care and maintenance, the length
of use and the degree of acidity of your
perspiration. Wear and tear of the comfort
padding will eventually change the fit of
your helmet on your head. If that occurs,
you must immediately replace the helmet or
padding. See your retailer for advice.
WARNING! Each time you put on your
helmet, check the fit as discussed in
“Choose your size“.
13

A
C
B
D
TEXTILE PARTS
TEXTILE PARTS
DISMANTLING THE INTERIOR.
- Turn your helmet over.
- Separate the two parts of the chin strap
- Take off the strap from its passer (fig. A).
- Unhook the velcro of the two cheek pads
(Fig. B) and slide them along the chin straps
to extract them.
- Remove the neck pad by holding one of its
sides. Pull out the end and then detach its
rear section (Fig. C).
- To complete the operation, unclip the front
of the head section, starting with one side
(Fig. D) and remove the head section.
WARNING! The interior padding is
critical to maintain the correct fit of
the helmet on your head. If you have any
doubt whatsoever regarding the removal or
replacement of the interior padding, DO NOT
USE YOUR HELMET. Contact your retailer
for assistance or advice. NEVER use your
helmet with any part of the interior padding
removed. The helmet will not protect you in
an accident.
REPLACING THE INTERIOR.
- Start the operation by sliding the plastic tabs
of the front of the head section in its housing
beginning with one side (Fig. A).
- Insert one end of the neck pad at the edge of
the helmet, and feed the remainder of the neck
pad beneath the edge of the helmet. Insert the
other edge of the neck pad at the other edge of
the helmet (Fig. B).
- Re-Engage the strap in its passers (fig. C).
- Then, hook the Velcro bands (Fig. D).
14

A
C
B
D
TEXTILE PARTS
WARNING! The interior padding is
critical to maintain the correct fit of
the helmet on your head. If you have any
doubt whatsoever regarding the removal or
replacement of the interior padding, DO NOT
USE YOUR HELMET. Contact your retailer
for assistance or advice. NEVER use your
helmet with any part of the interior padding
removed. The helmet will not protect you in
an accident.
REPLACING THE INTERIOR.
- Start the operation by sliding the plastic tabs
of the front of the head section in its housing
beginning with one side (Fig. A).
- Insert one end of the neck pad at the edge of
the helmet, and feed the remainder of the neck
pad beneath the edge of the helmet. Insert the
other edge of the neck pad at the other edge of
the helmet (Fig. B).
- Re-Engage the strap in its passers (fig. C).
- Then, hook the Velcro bands (Fig. D).
WARNING! The polystyrene lining and
interior padding are critical to properly
fit your helmet on your head. An improper fit
could cause your helmet to become dislodged
in an accident, leaving your head unprotected
and resulting in severe head injury or death. If
you are not sure that you properly replaced the
comfort padding, DO NOT USE YOUR HELMET.
Contact your retailer for assistance or advise.
15

OPEN CLOSE
EASYFIT • VENTILATIONS
EASY FIT
Your helmet Shark Nano has been designed
to provide additional comfort for eyeglasses
wearers with the EASY FIT SYSTEM.
The 2 cheeks are made in order to provide an
easiest passage to the glasses arms.
SYSTEM OF AERATION
Upper ventilation:
The upper air intake (Fig. A) allows air to
enter onto the upper part of the head and
thus renew the air in the head section. The
channels incorporated in the internal shock
absorbers facilitate the circulation of air
over the surface of the head.
The quality and design of the textile comfort
parts contribute to the proper distribution
of air. The position of the upper ventilation
system is designed to optimise the effec-
tiveness of its intake of air. Depending on
the type of your motorbike, the fairing may
reduce the effectiveness of this ventilation.
The ventilation is in the open position
when pushed backwards and closed when
pushed forwards (Fig. B).
WARNING! Do not open or close any
vents while operating your motorcycle.
You could lose control of your motorcycle,
resulting in an accident, personal injury or
death.
5-YEAR WARRANTY
You have recently purchased a SHARK helmet for
your safety and pleasure. It has been designed with
the greatest
care to satisfy your every requirement. For your safety,
and that of your passenger, you must respect all the
rules of prudence when using your two-wheeled
vehicle. The SHARK 5-YEAR warranty guarantees the
initial purchaser
that any possible manufacturing fault or material
defect will be covered by the SHARK warranty.
LIMITATIONS
If during the warranty period (5 years as from the
date of purchase), a problem covered by the war-
ranty were to arise, SHARK, through the intermediary
of its sales network, undertakes to repair or replace
any defective components, up to a maximum limit
which is the purchase value of the helmet. Any labour
costs are normally paid by the SHARK network, but
are submitted for approval prior to the work being
carried out. If the repair requires components to be
dispatched incurring transportation costs, the SHARK
network shall cover these costs up to a limit which is
the cost of transport by the national postal service at
the normal rate.
EXCLUSIONS
This warranty only covers problems related to mate-
rials or manufacturing. SHARK cannot be held liable
with regard to the product in the following cases :
Any damage following
1) a fall or accident
2) a technical modification made by the user or a third
party (glue, adhesives, paint, screws, etc.)
3) use of or contact with: harmful chemical products
(including methylated spirits on the visor treatments),
or an intense heat source
4) incorrect use: abnormal conditions (e.g. underwa-
ter), lack of maintenance or care
5) ageing due to normal wear of the inner fabrics or
foams, the appearance of the external parts, or the
visor (scratches, marks, etc.)
6) abnormal and prolonged exposure to ultra- violet
light, in particular for the decorative colours. In addi-
tion, SHARK cannot consider subjective considera-
tions related to use of the helmet as defects covered
by the warranty:
problems with comfort, size, noise or whistling, aero-
16

wearers with the EASY FIT SYSTEM.
The 2 cheeks are made in order to provide an
easiest passage to the glasses arms.
system is designed to optimise the effec-
tiveness of its intake of air. Depending on
the type of your motorbike, the fairing may
reduce the effectiveness of this ventilation.
The ventilation is in the open position
when pushed backwards and closed when
pushed forwards (Fig. B).
WARNING! Do not open or close any
vents while operating your motorcycle.
You could lose control of your motorcycle,
resulting in an accident, personal injury or
death.
5-YEAR WARRANTY
You have recently purchased a SHARK helmet for
your safety and pleasure. It has been designed with
the greatest
care to satisfy your every requirement. For your safety,
and that of your passenger, you must respect all the
rules of prudence when using your two-wheeled
vehicle. The SHARK 5-YEAR warranty guarantees the
initial purchaser
that any possible manufacturing fault or material
defect will be covered by the SHARK warranty.
LIMITATIONS
If during the warranty period (5 years as from the
date of purchase), a problem covered by the war-
ranty were to arise, SHARK, through the intermediary
of its sales network, undertakes to repair or replace
any defective components, up to a maximum limit
which is the purchase value of the helmet. Any labour
costs are normally paid by the SHARK network, but
are submitted for approval prior to the work being
carried out. If the repair requires components to be
dispatched incurring transportation costs, the SHARK
network shall cover these costs up to a limit which is
the cost of transport by the national postal service at
the normal rate.
EXCLUSIONS
This warranty only covers problems related to mate-
rials or manufacturing. SHARK cannot be held liable
with regard to the product in the following cases :
Any damage following
1) a fall or accident
2) a technical modification made by the user or a third
party (glue, adhesives, paint, screws, etc.)
3) use of or contact with: harmful chemical products
(including methylated spirits on the visor treatments),
or an intense heat source
4) incorrect use: abnormal conditions (e.g. underwa-
ter), lack of maintenance or care
5) ageing due to normal wear of the inner fabrics or
foams, the appearance of the external parts, or the
visor (scratches, marks, etc.)
6) abnormal and prolonged exposure to ultra- violet
light, in particular for the decorative colours. In addi-
tion, SHARK cannot consider subjective considera-
tions related to use of the helmet as defects covered
by the warranty:
problems with comfort, size, noise or whistling, aero-
dynamics, etc. SHARK cannot be held liable for the
temporary non-availability of the helmet while it is
being enhanced to satisfy the needs of its owner. In
all cases, the maximum warranty period is 5 years.
Replacement of a component during this period does
not prolong this period.
PROCEDURE
When the helmet is sold go to our website www.
sharkhelmets.com in order to activate your warranty.
All warranty
claims must be made to the SHARK dealer that sold
the helmet. For a warranty claim to be considered, the
purchaser must notify the dealer of the problem that
has arisen, and return the helmet that is the subject
of the claim, together with the warranty card filled out
when the helmet was purchased. This warranty does
not affect in any way the statutory rights of the pur-
chaser as stipulated by directive 1999/44CE. The ef-
fects of this specific and limited warranty shall come
to an end after a period of 5 years as from the date
of purchase. After this period, if you continue to use a
helmet regularly, we recommend that to benefit from
optimum protection and comfort you should replace
your helmet. This is because certain external factors
- general wear, certain impacts - could be prejudicial
to the safety characteristics of this essential piece of
protective equipment.
LIMIT
SHARK reserves the right to carry out work within the
terms of the warranty using replacement parts from
the most recent version compatible with the model
concerned, and is unable to guarantee perfect har-
monisation of
the paint or decorative elements associated with
specific production runs and/or limited editions. In
addition, the
natural deterioration of colours over a period of time
can cause mismatching in the adaptation of colours
of spare
parts. If SHARK is unable to carry out the repair for
technical reasons or because a component is not
available, SHARK undertakes to make the customer
an advantageous offer, taking account of the age of
the helmet, consisting in either an identical new hel-
met or an equivalent model manufactured at the time
of the repair, if the original
model is no longer available.
WARRANTY 17


19

LEGAL INFORMATION: this helmet was specically
designed for motorcycle use. It is not to be subjected to any
technical modication. In order to offer an adequate level
of protection, this helmet has to be properly adjusted and
securely tted. Any helmet which has been subjected to a
severe impact must be replaced.
CAUTION: Do not apply any paint, stickers, petrol or any
other solvent to this helmet.Only the visors, which have
been approved N° E11-050416 and marketed under
SHARK’s reference VZ140 or N° E11-050645 and marketed
under SHARK’s reference VZ130 can be used with SHARK
Micro.This visor is made of injected polycarbonate. To keep
the good optical quality of the visor and the coatings do not
use any solvent, petrol, abrasive paste or similar products
for cleaning.We advise to use a soft rag with cool water and
mild soap. Visors printed “DAYTIME USE ONLY” must not be
used at night or in poor visibility conditions.
MENTIONS LÉGALES :ce casque a été conçu pour une
utilisation moto. Aucune modication technique ne doit lui
être apportée. Pour assurer une protection sufsante, ce
casque doit être bien ajusté, correctement et solidement
attaché. Tout casque qui a été soumis à un choc est à
remplacer.
ATTENTION : n’appliquez sur ce casque ni autocollant, ni
peinture, ni essence, ni aucun autre solvant.Seul les écrans
homologué sous le N°E11-050416 commercialisé sous la
référence SHARK VZ140 ou N°E11-050645 commercialisé
sous la référence SHARK VZ130 doit être utilisé avec le
Nano. Cet écran est en polycarbonate injecté. Pour mainte-
nir la bonne qualité optique et éviter les problèmes d’abra-
sion, ne pas utiliser de produits à base d’alcool, de solvant,
d’essence, de pâte abrasive ou autres produits similaires
pour son nettoyage. Il est conseillé de tremper l’écran dans
de l’eau tiède savonneuse (savon de Marseille) et d’utiliser
seulement ensuite un chiffon doux pour son nettoyage. Les
écrans portant la mention “DAYTIME USE ONLY” (Utiliser
seulement le jour) ne se prêtent pas à une utilisation de
nuit ou dans des conditions de mauvaise visibilité.
RECHTLICHE HINWEISE : Dieser Helm wurde speziell
für den Gebrauch durch Motorradfahrer entwickelt. Die-
ser Helm unterliegt keiner technischen Änderung. Um ein
Mindestmaß an Sicher-heit zu gewährleisten, muss dieser
Helm entsprechend eingestellt und dann getragen werden.
Jeder Helm muss nach jeder stärkeren Kraftaufnahme
(Unfall) unbedingt ersetzt werden.
ACHTUNG : Verwenden Sie keinerlei Fremdlacke,Aufkleber,
Benzine oder irgendgeartete Lösungs-/Reinigungsmittel
auf diesem Helm. Nur das Visier, welches nach E11-050416
genehmigt und mit der SHARK-Referenz VZ140 registriert
wurde oder N°E11-050645 registriert wurd SHARK VZ130,
darf an dem SHARK Nano getragen werden. Dieses Visier
wurde aus gespritztem Polycarbonat hergesellt. Um die
gute optische Qualität des Visiers und der Beschichtungen
zu erhalten, benutzen Sie weder Lösungsmittel, Benzin,
Polierpaste noch ähnliche Produkte zum Reinigen. Wir
empfehlen ein weiches Tuch mit kaltem Wasser und mil-
dem Reinigungsmittel. Visiere mit der Aufschrift “DAYTIME
USE ONLY” dürfen nachts oder bei schlechter Sicht nicht
benutzt werden.
ANNOTAZIONI LEGALI:Questo casco è stato specica-
tamente progettato per uso motociclistico. Non deve essere
in alcun modo modicato. Al ne di offrire un adeguato
livello di protezione questo casco deve essere regolato in
modo sicuro e correttamente calzato. Tutti i caschi che
hanno subito un forte impatto devono essere sostituiti.
ATTENZIONE: non utilizzare vernice, adesivi, benzina o altri
solventi su questo casco. La visiera deve essere maneggia-
ta con cura. Solo le visiere omologate N°E11-050416 com-
mercializzate sotto il riferimento SHARK VZ140 o N°E11-
050645 commercializzate sotto il riferimento SHARK VZ130
devono essere utilizzate con il casco SHARK Nano. Questa
visiera è realizzata in policarbonato iniettato.
Per non compromettere la qualità e le condizioni di visibilità
garantite dalla visiera e dai suoi strati, si prega di non un
usare nessun solvente, benzina o pasta abrasiva durante il
processo di pulizia. Consigliamo l’uso di un panno bagnato
con acqua fredda e sapone neutro. Le visiere che portano
la dicitura “DAYTIME USE ONLY” non devono assolutamente
essere utilizzate durante le ore notturne o in condizioni di
scarsa visibilità.
MENCIONES LEGALES: este casco está especíca-
mente diseñado para su uso en motocicletas. No debe
sufrir ningún tipo de manipulación o modicación. Para
ofrecer la máxima protección, el casco debe estar correc-
tamente colocado, ajustado y cerrado.Todo casco que haya
sufrido un golpe de importancia debe ser sustituido.
ATENCIÓN: No aplicar pinturas, adhesivos, gasolinas ni
disolventes sobre el casco. Sólo pueden montarse en el
SHARK Micro las gafas homologadas NF EN 1938.
Para conservar su excelente calidad óptica y evitar los pro-
blemas por abrasión, no utilizar en su limpieza productos
a base de alcohol, disolventes o gasolina, ni pulimentos
abrasivos o similares. Se recomienda sumergir la pantalla
en agua tibia con jabón (Jabón de Marsella) y a continua-
ción usar un paño suave para su secado y limpieza. Las
pantallas con la inscripción “DAYTIME USE ONLY” no son
adecuadas para uso nocturno o en condiciones de baja
visibilidad, por su gran absorción de la luz.
Table of contents
Other Shark Motorcycle Accessories manuals

Shark
Shark SK User manual

Shark
Shark D-SKWAL 3 User manual

Shark
Shark S 800 User manual

Shark
Shark X-DRAK User manual

Shark
Shark RACE-R PRO GP 06 User manual

Shark
Shark Vancore 2 User manual

Shark
Shark Vantime User manual

Shark
Shark Spartan Carbon User manual

Shark
Shark SKWAL User manual

Shark
Shark SPARTAN RS User manual

Shark
Shark Vision-R User manual

Shark
Shark Evo-One User manual

Shark
Shark RSR2 User manual

Shark
Shark Evoline 3 Series User manual

Shark
Shark SX 2 User manual

Shark
Shark Raw User manual

Shark
Shark CITYCRUISER User manual

Shark
Shark Spartan GT Carbon User manual

Shark
Shark S 700 User manual

Shark
Shark Race-R PRO User manual