Sharp AL-1650 User manual

•GETTING STARTED
•MAKING COPIES
•STATUS INDICATORS
•GENERAL INFORMATION
2
16
32
42
DIGITAL LASER COPIER
OPERATION MANUAL
MODEL
AL-1650
Page

FOR YOUR PROTECTION...
To aid in reporting this compact copier in case of loss or theft, please record below the
model number and serial number located on the back of the unit. We also suggest you
record all the information listed and retain for future reference.
MODEL NUMBER SERIAL NUMBER
DATE OF PURCHASE
Dealer
Address City
State
Zip Telephone
Service Station
Address City
State Zip
Telephone
For location of the nearest Sharp Authorized Service, or to
obtain product literature, accessories, or supplies,
please call 1 - 800 - BE-SHARP
For customer assistance, please visit http://www.sharp-
usa.com on the World Wide Web or call 1-(630)378-3590.

1
GETTING STARTED STATUS INDICATORS
MAKING COPIES GENERAL INFORMATION
CONTENTS Page
GETTING STARTED
●CAUTIONS . . . . . . . . . . . . . . . . . . . . . . . . . . . . . . . . . . . . . . 2
●MAIN FEATURES . . . . . . . . . . . . . . . . . . . . . . . . . . . . . . . . 3
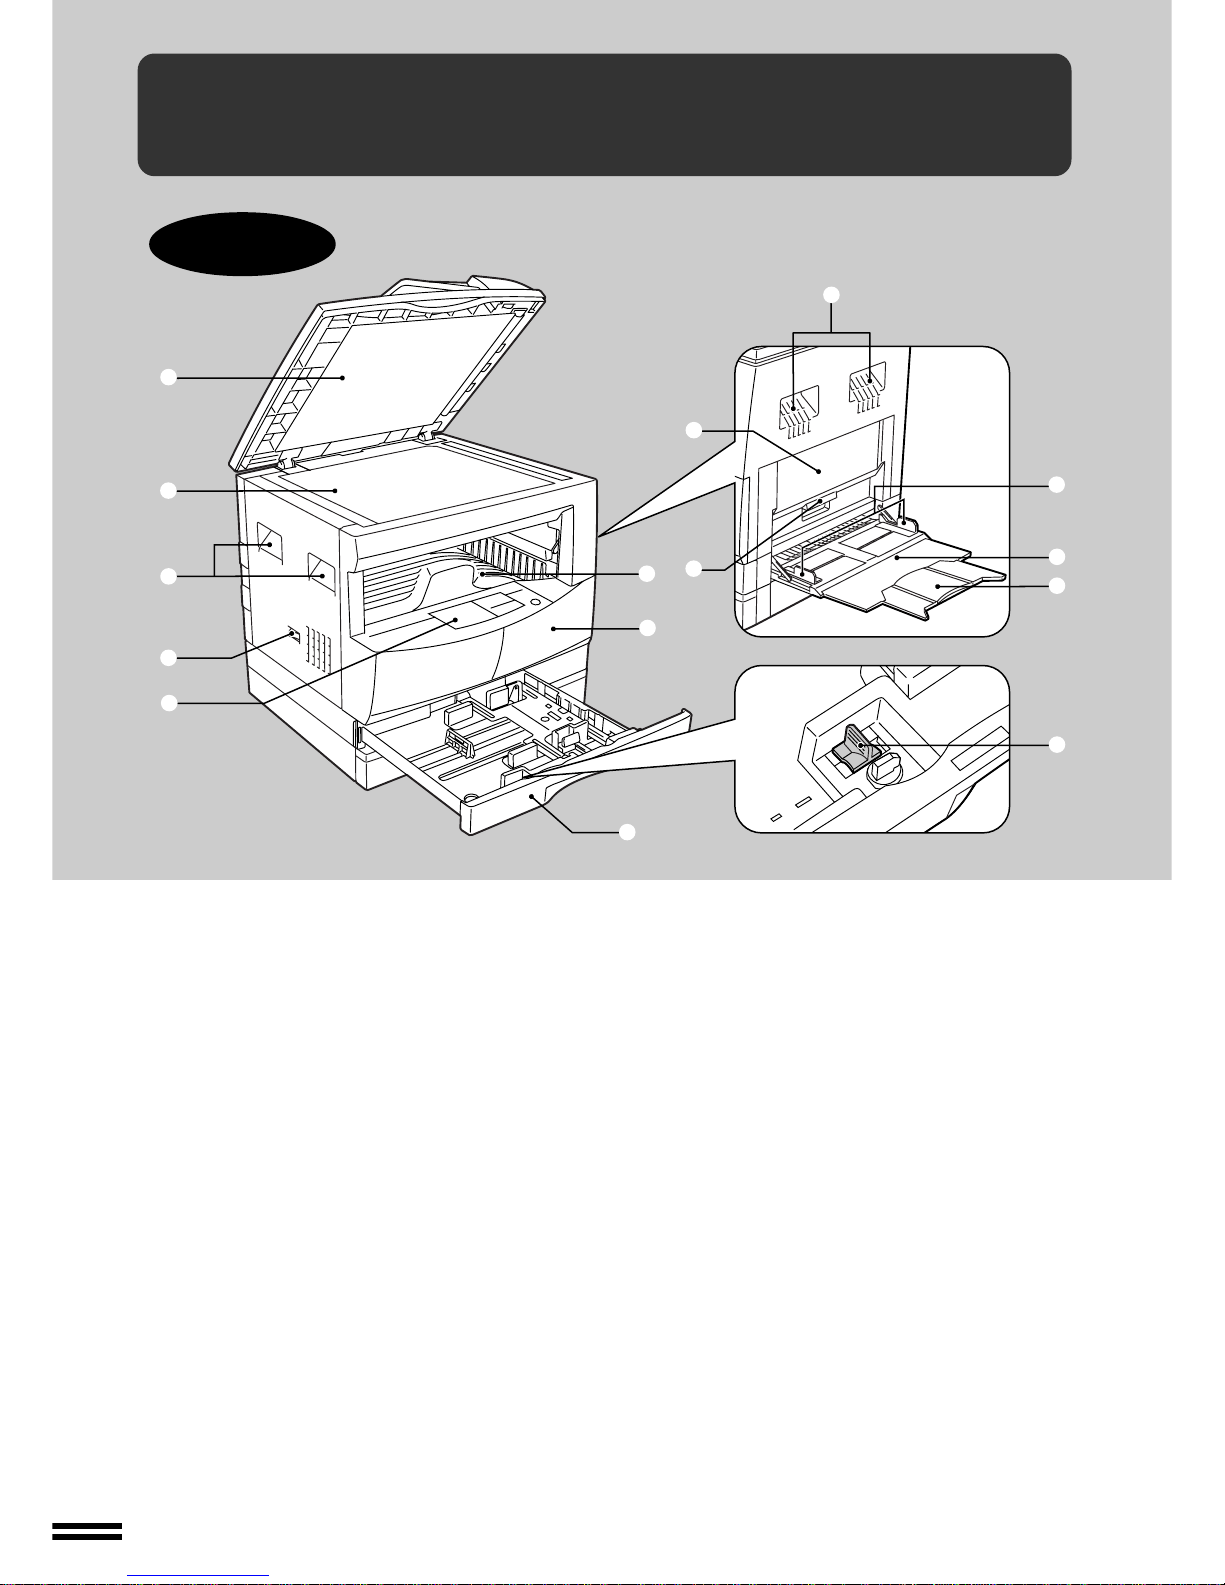
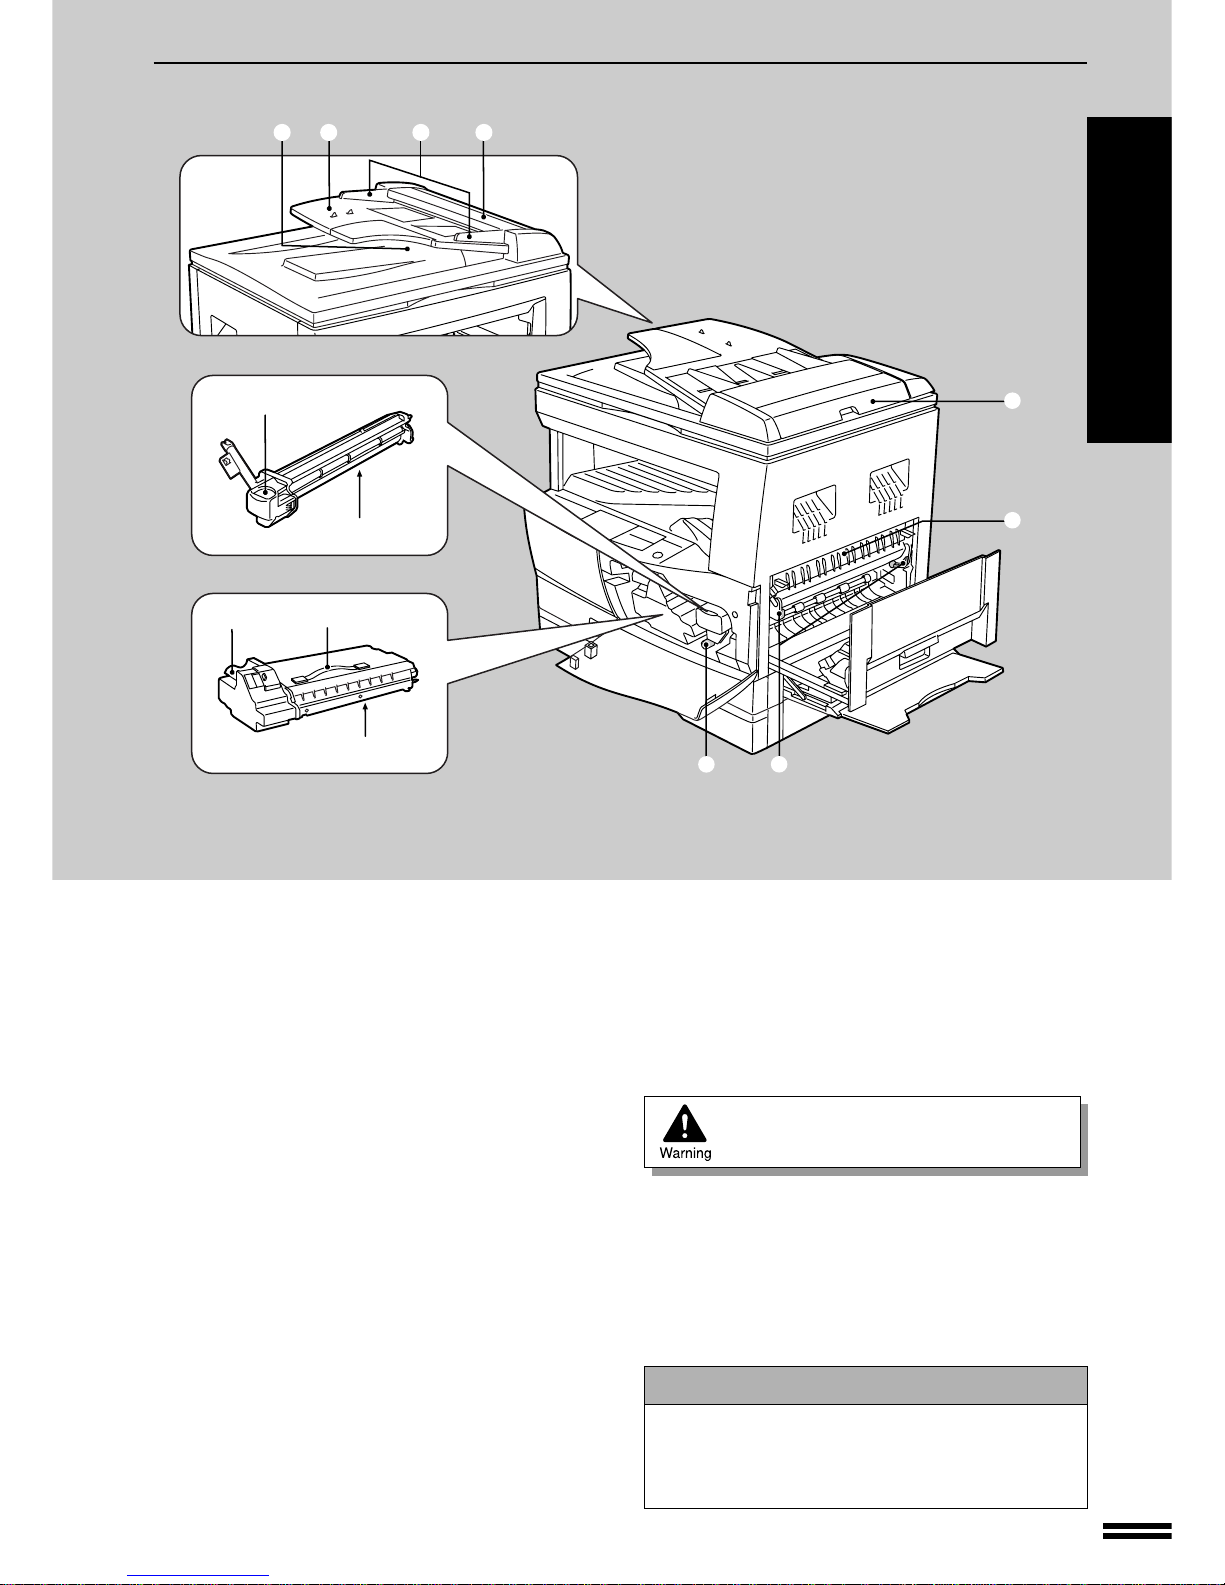
●PART NAMES AND FUNCTIONS . . . . . . . . . . . . . . . . . . . . 4
– Overall layout . . . . . . . . . . . . . . . . . . . . . . . . . . . . . . . . . . . . . . . 4
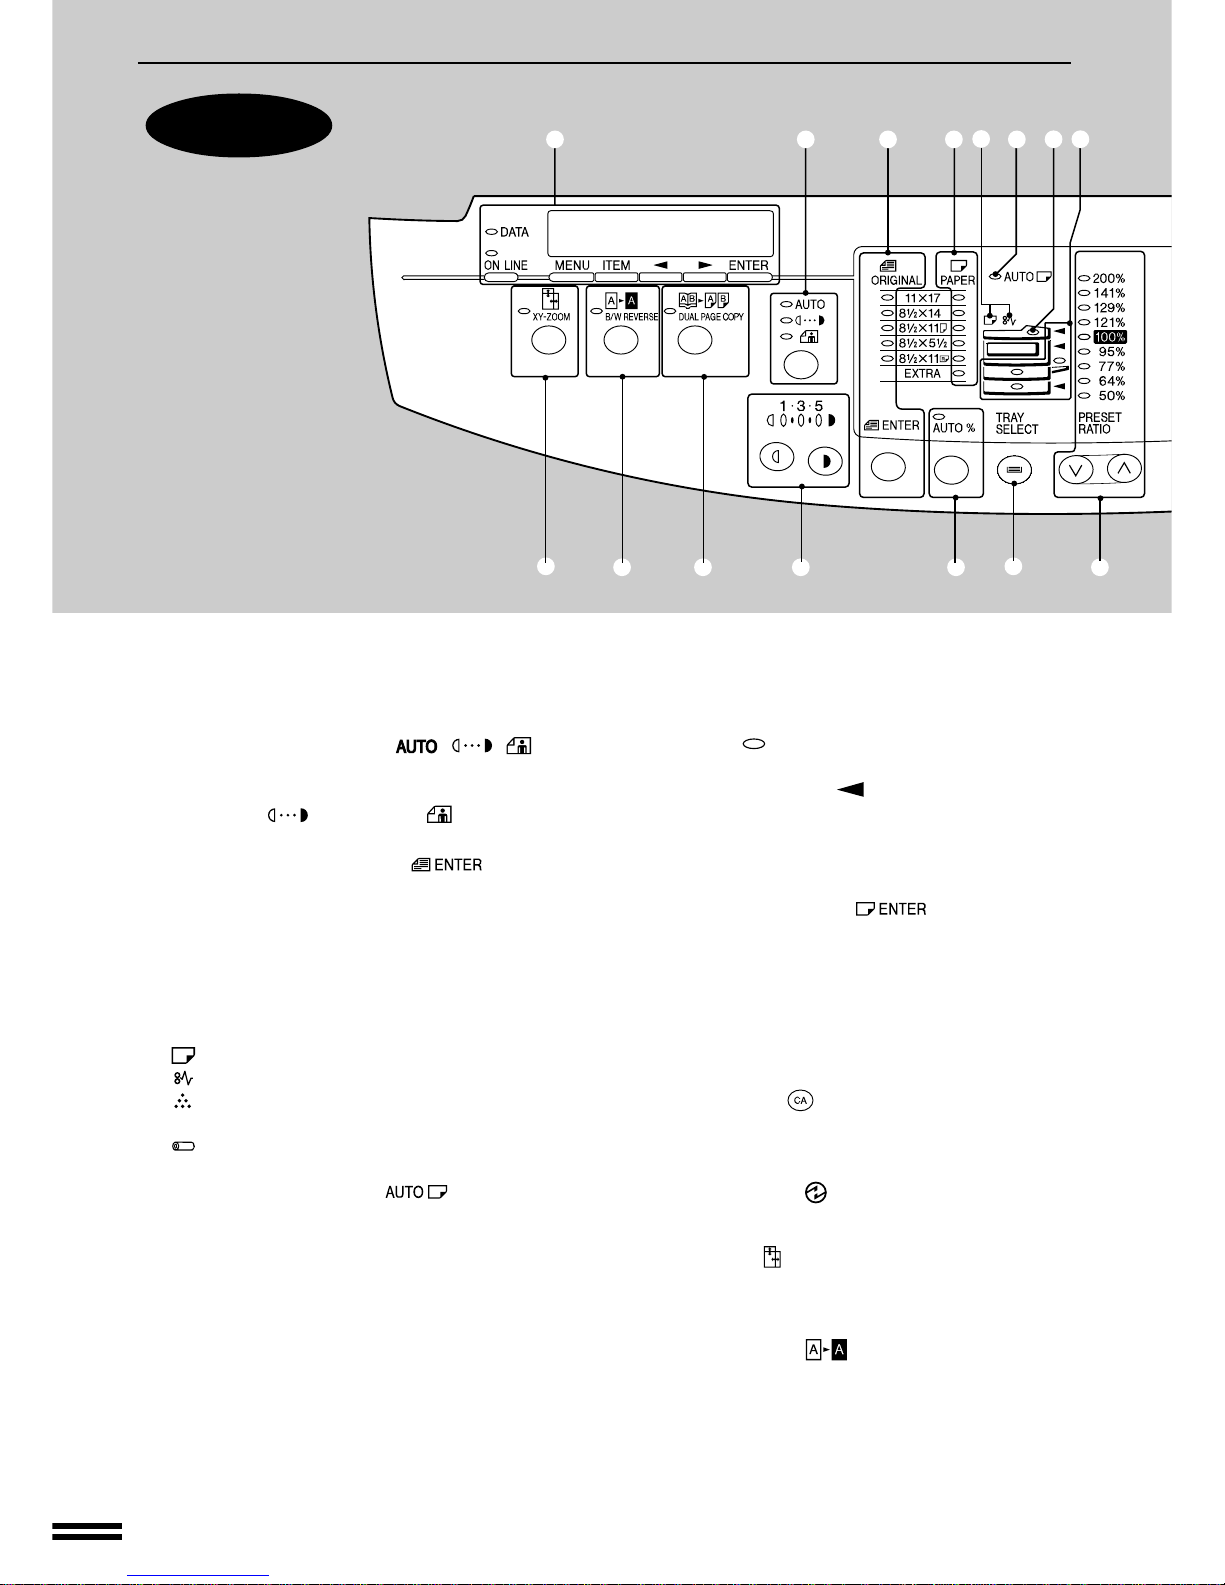
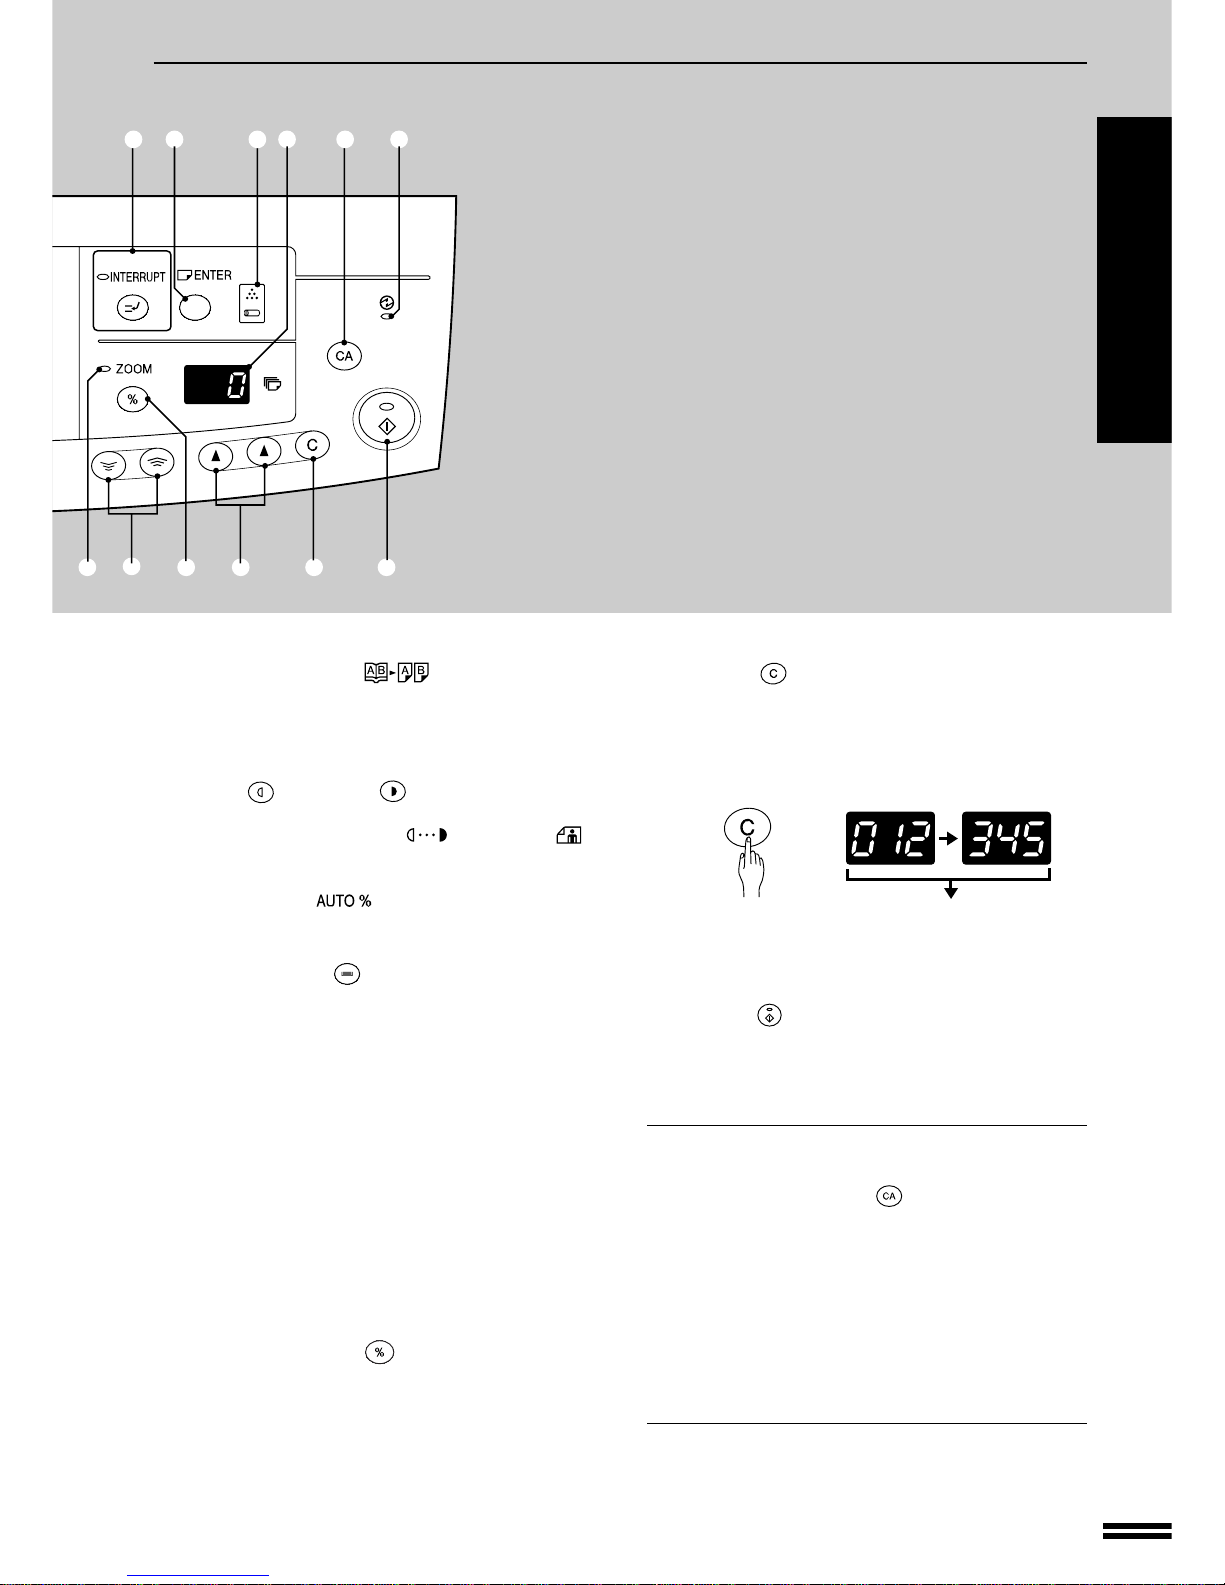
– Operation panel . . . . . . . . . . . . . . . . . . . . . . . . . . . . . . . . . . . . . 6
●COPIER INSTALLATION . . . . . . . . . . . . . . . . . . . . . . . . . . 8
●CAUTIONS ON HANDLING . . . . . . . . . . . . . . . . . . . . . . . . . 9
●CHECKING PACKED COMPONENTS
AND ACCESSORIES . . . . . . . . . . . . . . . . . . . . . . . . . . . . . 10
●SET-UP. . . . . . . . . . . . . . . . . . . . . . . . . . . . . . . . . . . . . . . . 11
●LOADING COPY PAPER . . . . . . . . . . . . . . . . . . . . . . 13
MAKING COPIES
●NORMAL COPYING. . . . . . . . . . . . . . . . . . . . . . . . . . . . . . 16
●REDUCTION/ENLARGEMENT/ZOOM . . . . . . . . . . . . . . . 20
●BYPASS FEED (special paper) . . . . . . . . . . . . . . . . . . . . 22
●TWO-SIDED COPYING . . . . . . . . . . . . . . . . . . . . . . . . . . . 24
●XY ZOOM . . . . . . . . . . . . . . . . . . . . . . . . . . . . . . . . . . . . . . 25
●B/W REVERSE . . . . . . . . . . . . . . . . . . . . . . . . . . . . . . . . . . 27
●DUAL PAGE COPY . . . . . . . . . . . . . . . . . . . . . . . . . . . . . . 28
●INTERRUPTING A COPY RUN . . . . . . . . . . . . . . . . . . . . . 29
●AUTOMATIC EXPOSURE ADJUSTMENT . . . . . . . . . . . . 30
●TONER SAVE MODE . . . . . . . . . . . . . . . . . . . . . . . . . . . . . 31
STATUS INDICATORS
●TD CARTRIDGE REPLACEMENT . . . . . . . . . . . . . . . 32
●DRUM CARTRIDGE REPLACEMENT . . . . . . . . . . . . 34
●MISFEED REMOVAL . . . . . . . . . . . . . . . . . . . . . . . . . 36
GENERAL INFORMATION
●USER PROGRAMS . . . . . . . . . . . . . . . . . . . . . . . . . . . . . . 42
●POWER SAVE MODES . . . . . . . . . . . . . . . . . . . . . . . . . . . 44
●USER MAINTENANCE . . . . . . . . . . . . . . . . . . . . . . . . . . . 46
●COPIER TROUBLE? . . . . . . . . . . . . . . . . . . . . . . . . . . . . . 48
●SUPPLIES . . . . . . . . . . . . . . . . . . . . . . . . . . . . . . . . . . . . . 50
– Types and sizes of copy paper . . . . . . . . . . . . . . . . . . . . . . . 50
– Supply part numbers . . . . . . . . . . . . . . . . . . . . . . . . . . . . . . 50
– Genuine supplies statement . . . . . . . . . . . . . . . . . . . . . . . . . 51
●MOVING INSTRUCTIONS . . . . . . . . . . . . . . . . . . . . . . . . . 52
●SPECIFICATIONS . . . . . . . . . . . . . . . . . . . . . . . . . . . . . . . 53
●INDEX . . . . . . . . . . . . . . . . . . . . . . . . . . . . . . . . . . . . . . . . . 55
INTRODUCTION
This copier has been designed to provide
convenient copying features in a minimum
amount of office space and with maximum
operational ease. To get full use of all copier
features, be sure to familiarize yourself with this
manual and the copier.
For quick reference during copier use, keep this
manual in a handy location.
This copier can be used as a laser
printer. However, this manual
describes only the copier features.
For description of the printer
features, see the printer manual.
Conventions used in this
manual
In this manual, the following icons are used to
provide the user with information pertinent to the
use of the copier.
Warns the user that injury to the user or
damage to the copier may result if the
contents of the warning are not properly
followed.
Cautions the user that damage to the copier
or one of its components may result if the
contents of the caution are not properly
followed.
Notes provide information relevant to the
copier regarding specifications, functions,
performance, operation and such, that may
be useful to the user.
Indicates a letter displayed in the copy
quantity display.

2
GETTING STARTED Cautions
CAUTIONS
Follow the cautions below when using this copier.
●The fusing area is hot. Exercise care in this area when removing misfed paper.
●Do not look directly at the light source. Doing so may damage your eyes.
●The socket-outlet shall be installed near the equipment and shall be easily accessible.
●Place the copier on a firm, level surface.
●Do not install the copier in a humid or dusty location.
●When the copier is not used for a long time, for example, during prolonged holidays, turn the
power switch off and remove the power cord from the outlet.
●When moving the copier, be sure to turn the power switch off and remove the power cord from
the outlet.
●Do not cover the copier with a dust cover, cloth or plastic film while the power is on. Doing so may
prevent heat dissipation, damaging the copier.
SAFETY PRECAUTIONS
ThisDigitalCopierisratedClass1andcomplieswith21 CFR1040.10and1040.11oftheCDRHstandards.This
meansthatthecopierdoesnotproducehazardous laserradiation.Foryoursafety,observetheprecautionsbelow.
●Do not remove the cabinet, operation panel or any other covers.
●The copier’s exterior covers contain several safety interlock switches. Do not bypass any safety interlock by
inserting wedges or other items into switch slots.
Use of controls or adjustments or performance of procedures other than those specified herein
may result in hazardous laser radiation exposure.

3
GETTING STARTED
MAIN FEATURES
➀High-speed laser copying
●First-copy time is only 7.2 seconds (except in a power save mode or immediately after power on).
●Copying speed is 16 copies/min., which adapts to business use, allowing improvement of working efficiency.
➁High-quality digital image
●High-quality copying at 600 dpi is performed.
●In addition to the automatic exposure mode, the manual exposure can be adjusted in five steps.
●The photo mode copying function allows clear copying of delicate halftone original images such as monochrome
photos and color photos. Photo mode is adjustable in five steps.
➂Substantial copying features
●Zoom copying from 50% to 200% in 1% increments can be performed.
●Continuous copying of maximum 99 sheets can also be performed.
●Useful special features such as the XY zoom, black and white reverse, and dual page copy are available.
●Toner save mode reduces toner consumption by approximately 10%.
√Scan once/ Print many
●The copier is equipped with a 1-page memory buffer. This memory allows the copier to scan an original 1 time only and
make up to 99 copies. This feature allows for improved workflow, reduced operating noise from the copier and reduced
wear and tear on the scanning mechanism, which provides for a higher reliability.
➄Printer feature
●This copier can be used as a laser printer.
≈Environmentally friendly design
●Paper output tray is housed in the copier for space saving.
●Preheat mode and auto power shut-off mode are provided to reduce power consumption.
This copier does not have an internal calendar or clock.
This copier will not be affected by the year 2000.
Main features

4
GETTING STARTED
PART NAMES AND FUNCTIONS
Overall layout
Part names and functions
qDocument feeder cover
Open to make copies from the original table.
wOriginal table
AlloriginalswhichcannotbecopiedfromtheSPFmust
be copied here.
eHandles
Use to move the copier.
rPower switch
Press to turn copier power on and off.
tOperation panel
All copier controls are located here for easy operation.
yPaper output tray
Finished copies are deposited in the paper output tray.
uFront cover
Open to remove misfeeds and for copier servicing.
iPaper tray
Each tray holds 250 sheets of copy paper.
oSide cover
Open to remove misfeeds and to service the copier.
!0 Side cover handle
Lift and pull to open the side cover.
!1 Bypass tray guides
Adjust to the width of the copy paper.
!2 Bypass tray
Special papers (including transparency film) and copy
paper can be fed from the bypass tray.
!3 Bypass tray extension
Pull out when feeding large paper such as 8-1/2" x 14"
and 11" x 17".
!4 Charger cleaner
Use to clean the transfer charger.
q
w
e
r
t
y
u
i
!0
o
e
!2
!1
!3
!4
GETTING STARTED

5
GETTING STARTED
PART NAMES AND FUNCTIONS
!5 SPF exit area
Finished originals are output here.
!6 Document feeder tray
Holds up to 30 originals.
!7 Original guides
Adjust to the size of the originals.
!8 Left feeding roller cover
Open to remove misfed originals.
!9 Drum cartridge handle
Hold to pull out the drum cartridge.
@0 Drum cartridge
Copy images are formed on the photoconductive drum.
@1 TD cartridge lock release lever
Use to unlock the TD cartridge.
@2 TD cartridge strap
Lift to remove the TD cartridge.
!9
@0
@1 @2
@3
@4 @5
@7
@6
!5 !6 !7 !8
Part names and functions
GETTING STARTED
@3 TD cartridge
Contains toner.
@4 Roller rotating knob
Turn to remove misfed paper.
@5 Fusing unit release levers
Lower to remove misfed paper.
The fusing unit is hot.
Take care in removing paper.
@6 Right feeding roller cover
Open to remove misfed originals.
@7 Paper guide
Open to remove misfed paper.
Accessories
Operation manual. . . . . . . . . . . . . . . . . . . . . . . 1
TD cartridge. . . . . . . . . . . . . . . . . . . . . . . . . . . 1
Charger cleaner . . . . . . . . . . . . . . . . . . . . . . . . 1

6
GETTING STARTED
Operation
panel
PART NAMES AND FUNCTIONS
Part names and functions
qOperation panel and keys for printer functions
See the printer manual.
wAUTO/MANUAL/PHOTO( / / )key
and indicators (p. 16)
Use to sequentially select the exposure modes: AUTO,
MANUAL ( ), or PHOTO ( ).
eORIGINAL SIZE ENTER ( ) key and
indicators (p. 18, 20)
Use to input the original size.
rPAPER SIZE indicators
Light up to show the selected copy paper size.
tAlarm indicators
: Paper required indicator (p.13)
: Misfeed indicator (p.36)
: TD cartridge replacement required indicator
(p.32)
: Drum replacement required indicator (p.34)
yAUTO PAPER SELECT ( ) indicator
Paper of the proper size will be automatically selected
depending on the original size and selected copy ratio
when this indicator is on.
uSPF indicator (p. 16)
Lights up when originals are set in the document feeder
tray.
iPaper feed location/misfeed location indica-
tors (p. 36)
The selected paper feed location is shown by a lit
indicator ( ).
The general location of misfed paper is shown by a
blinking red indicator ( ).
oINTERRUPT key and indicator (p. 29)
Interrupts a copy run.
!0 PAPER SIZE ENTER ( ) key (p. 15)
Use to set the paper size in a tray.
!1 Copy quantity display
Displays the specified copy quantity during the ready
condition and displays the copy countdown as copies
are made. Also see items @2 and @4.
!2 CLEAR ALL ( ) key
Clears all selected settings and returns the copier to the
initial settings.
!3 POWER SAVE ( ) indicator (p. 44)
Lights up when the copier is in the preheat mode.
!4 XY-ZOOM ( ) key and indicator (p. 25)
Use to change the horizontal and vertical copy ratios
independently.
!5 B/W REVERSE ( ) key and indicator (p. 27)
Press to reverse the black and white areas.
GETTING STARTED
q w e r tyi
u
!4 @0
!9
!8!7!6!5

7
GETTING STARTED
PART NAMES AND FUNCTIONS
Part names and functions
GETTING STARTED
ti !0 !1 !3!2
@6@5@4@3
@2
@1
!6 DUAL PAGE COPY ( ) key and indicator
(p. 28)
Use to make individual copies of two originals placed
side by side on the original table.
!7 Light( )anddark( )keysandindicators
(p. 17)
Useto adjusttheMANUAL ( )orPHOTO ( )
exposure level.
!8 AUTO IMAGE ( ) key and indicator (p. 20)
Press for automatic copy ratio selection.
!9 TRAY SELECT ( ) key (p. 16)
Use to manually select a paper tray.
@0 PRESET RATIO selector keys and indicators
(p. 21)
Useto sequentiallyselect presetreduction/enlargement
copyratios:50%,64%,77%,95%,100%,121%,129%,
141%, 200%.
@1 ZOOM indicator (p. 21)
Lights up when a zoom ratio is set.
@2 Zoom keys (p. 21)
Use to select any reduction or enlargement copy ratio
from 50% to 200% in 1% increments.
@3 Copy ratio display ( ) key (p. 21)
Pressand holddown duringstandby todisplay thecopy
ratio in the copy quantity display.
@4 Copy quantity keys
Use to select the desired copy quantity or to make user
program entries.
@5 CLEAR ( ) key
Clears the copy quantity display or terminates a copy
run.
Press during standby to display the total number of
copies made to date.
Press and hold down the key. 12,345sheets output
1st display 2nd display
Note: 11" x 17" size copies are counted as two
copies.
@6 START ( ) key and indicator
Copying is possible when the indicator is on.
Press to start copying.
Initial settings
The copier assumes the initial settings when it is first turned
on, when the CLEAR ALL ( ) key is pressed, or ap-
proximately one minute* after the last copy is made in any
mode.
●Copy ratio: 100%
●Exposure: Automatic
●Copy quantity: 0
●Paper feed station: Previously selected paper tray
* This time (auto clear time) can be changed. See page 42,
USER PROGRAMS.

8
GETTING STARTED
4" (10 cm)
Copier installation
COPIER INSTALLATION
Improper installation may damage the copier. Please note the following during
initial installation and whenever the copier is moved.
If the copier is moved from a cool place to a warm place, condensation may form inside the copier.
Operation in this condition will cause poor copy quality and malfunctions. Leave the copier at room
temperature for at least 2 hours before use.
Do not install your copier in areas that are:
●damp, humid, or very dusty
●exposed to direct sunlight
●poorly ventilated
●subject to extreme temperature or humidity changes, e.g., near an
air conditioner or heater.
The copier should be installed near an accessible power outlet
for easy connection.
Be sure to connect the power cord only to a power outlet that
meets the specified voltage and current requirements.
Also make certain the outlet is properly grounded.
Connect the copier to a power outlet which is not used
for other electric appliances. If a lighting fixture is
connected to the same outlet, the light may flicker.
Be sure to allow the required space around the machine for
servicing and proper ventilation.
Asmall amount of ozone is produced within the copier during operation. The emission level is insufficient
to cause any health hazard.
NOTE:
The present recommended long term exposure limit for ozone is 0.1 ppm (0.2 mg/m3) calculated as
an 8 hr. time-weighted average concentration.
However, since the small amount that is emitted may have an objectionable odor, it is advisable to
place the copier in a ventilated area.

9
GETTING STARTED
CAUTIONS ON HANDLING
Be careful in handling the copier as follows to maintain the performance of this
copier.
Donotdrop the copier,subjectitto shockorstrikeit against any
object.
Do not expose the drum cartridge to direct sunlight.
Doingsowilldamagethesurface(greenportion)ofthedrumcartridge,
causing poor copy quality.
StoresparesuppliessuchasdrumcartridgesandTDcartridges
in a dark place without removing from the package before use.
If they are exposed to direct sunlight, poor copies may result.
Do not touch the surface (green portion) of the drum cartridge.
Doing so will damage the surface of the cartridge, causing smudges
on copies.
Cautions on handling

10
GETTING STARTED
CHECKING PACKED COMPONENTS
AND ACCESSORIES
Openthecarton andcheck to ensurethat the followingcomponents and accessories
are included.
Copier
TD cartridge
Operation manual
Power cord
Drum cartridge
(installed in copier)
●If anything is not included or is damaged, contact our Technical Assistance Department at 1-
(630)378-3590.
●Save the carton and packing materials. These can be re-used for transporting the machine,
should it be necessary.
Unpacking
Besuretoliftbythehandlesonbothsidesofthecopierbytwopersonstounpack
the copier and carry it to the installation location.
Checking packed components and accessories

11
GETTING STARTED
SET-UP
1Remove all pieces of tape, then open the document
feeder cover and remove the protective material.
2Use a coin (or other suitable object) to remove the
screw.
Store the screw in the paper tray as described in step
6 because it must be used if the copier has to be
moved. (p. 52)
3Install the TD cartridge.
●For installation of the TD cartridge, see steps 1 and 2 and steps 4 to 7
of TD CARTRIDGE REPLACEMENT on pages 32 and 33.
4Gently lift and pull out the paper tray until it stops.
5Remove the pressure plate lock. Rotate the pressure
plate lock in the direction of the arrow to remove it while
pressing down the pressure plate of the paper tray.
Set-up

12
GETTING STARTED Set-up
SET-UP
Pressure
plate lock
Screw
6Store the pressure plate lock which has been removed
in step 5 and the screw which has been removed in step
2 in the front of the paper tray.
●To store the pressure plate lock, rotate the lock to fix it on the relevant
location.
●Follow steps 4 to 6 for both the upper and lower trays except for
storage of the screw.
7Ensure that the power switch of the copier is in the OFF
position. Plug the power cord into the nearest outlet.
Ifyouusethecopier in a country other thanthecountry
wherethecopierwaspurchased,youwillneedtomake
sure that your local power supply is compatible with
yourmodel. If youplug the copierinto an incompatible
power supply, irreparable damage to the copier will
result.
Only insert the power cord into a properly grounded
wall socket.
Do not use extension cords or power strips.
Connectthe copier toa power outletwhich is not used
for other electric appliances. If a lighting fixture is
connected to the same outlet, the light may flicker.
8Turn the power switch on.
9Load copy paper.
●When loading copy paper for the first time, be sure to turn the power
switch on in advance.
●For loading copy paper, see steps 2 to 4 of LOADING COPY PAPER
on page 13. To change the paper size from the factory default size, see
pages 14 and 15.
Power on

13
GETTING STARTED
1Gently lift and pull out the paper tray until it stops.
2Push the pressure plate down until it locks in place.
3Fan the copy paper and insert it into the tray. Make sure
the edges go under the corner hooks.
●If you change to a different size of copy paper, the tray must be
adjusted. See the next page.
●Set the paper along the guides.
●The tray holds up to 250 sheets of 21 lb. bond paper.
Do not load paper above the maximum height line.
4Push the paper tray firmly back into the copier.
Loading copy paper
Maximum height line
LOADING COPY PAPER
Tosave space,thiscopier hasbeen designedwith one(AL-1620) ortwo(AL-1621)
adjustable front-loading trays, which are easily opened for paper loading. For best
results, use only SHARP recommended paper. (See page 50.)
The paper required ( ) indicator will light up when there is no copy paper in the
selected paper feed station, or when the selected paper tray is not installed or is
improperly installed.
When the paper size is changed in a paper tray, the size of the
paper must be entered by steps 8 through 11 on page 15. If not,
the edges of copies may become smudged with toner. Also, the
AUTO PAPER SELECT and the AUTO IMAGE features will not
function properly.

14
GETTING STARTED
Changing the copy paper size in the tray
1Gently lift and pull out the paper tray until it stops.
2Push the pressure plate down until it locks in place.
3Squeeze the lock lever of the front guide and slide the
front guide to match the width of the paper.
4Move the left guide to the appropriate slot as marked on
the tray.
●When using 5-1/2" x 8-1/2" copy paper, load it into the upper paper
tray. If the lower tray is used, paper misfeeds may occur.
●When using 11" x 17" copy paper, store the left guide in the slot at the
left front of the paper tray.
5Load copy paper into the tray.
6Place the appropriate label to indicate the selected
paper size into the recess on the right front side of the
paper tray.
7Push the paper tray firmly back into the copier.
Loading copy paper
LOADING COPY PAPER
Front guide
Left guide

15
GETTING STARTED
8To set the selected paper size, press the PAPER SIZE
ENTER ( ) key.
●The selected paper feed location indicator will blink and the corre-
sponding paper size (which is currently set) indicator will light up
steadily. All other indicators will go out.
9Use the TRAY SELECT ( ) key to select the paper
tray of which the paper size has been changed.
●Each time the TRAY SELECT ( ) key is pressed, a paper tray
will be indicated with a blinking paper feed location indicator.
10
Use the ORIGINAL SIZE ENTER ( ) key to select
the paper size which is set.
●Each time the ORIGINAL SIZE ENTER ( ) key is pressed, a
paper size will be indicated with a paper size indicator.
11
Press the START ( ) key and then the PAPER SIZE
ENTER ( ) key.
●To change the paper size setting of the other tray, repeat steps 9 to 10
after pressing the START ( ) key.
LOADING COPY PAPER
Loading copy paper

16
MAKING COPIES
NORMAL COPYING
This copier has two document input stations — a single
pass feeder (SPF) for automatic document feeding and an
original table for manual handling of bound documents.
The SPF is designed to hold up to 30 originals measuring
from 5-1/2" x 8-1/2" to 11" x 17" and in the weight range of
15 to 24 lbs.
●Before loading originals into the SPF, be sure to remove
any staples or paper clips from them.
●Damaged or crumpled originals may misfeed in the SPF.
It is recommended that these originals be copied from the
original table.
●Special originals such as transparency film and tracing
paper should not be fed from the SPF, but should be
placed directly on the original table.
●Image loss (max. 5/32" (4 mm)) can occur at the leading
and trailing edges of the copies. Also image loss (max.
5/32" (4 mm) in total) can occur along the other edges of
the copies.
Using the SPF
1Turn the power switch on.
●It will take about 35 seconds for the copier to warm up.
However, you can make desired settings and press the START ( )
key during warm-up. Copying will start after warm-up.
●Ifthepower isalready on andall indicators exceptthe POWER SAVE
indicator are off, the copier is in the auto power shut-off mode. Press
the START key in this case. See page 45, POWER SAVE MODES.
2Ensure that no original is left on the original table.
3Adjust the original guides to the size of the originals.
4Set the originals face up in the document feeder tray.
●The SPF indicator will light up. If this indicator does not light up, the
originals are not properly set or the SPF is not properly closed.
●TheORIGINALSIZEindicatorforthedetectedoriginalsizewilllight
up, and the paper tray with the corresponding paper size will be
automatically selected if that paper size is available.
●The auto paper select function can be disabled using user program No.
8. If this function has been disabled, use the TRAY SELECT ( )
keytoselect thedesired papertray.See page42, USERPROGRAMS.
●Tocopyontoadifferentsizepaper,usetheTRAYSELECT( )key
to make the selection.
●The bypass tray cannot be automatically selected.
5Adjust the copy density.
●Thiscopierhasthreeexposuremodestochoosefrom—AUTOMATIC
(), MANUAL ( ), and PHOTO ( ).
●Automaticexposureisthestandardinitial settingforthiscopier.Inthis
mode, the characteristics of the original are “read” by the exposure
system and adjustments are automatically made. This optimizes the
contrast of the copied images by reducing the effect of colored or
shadedbackgroundareas.Seepage30toadjusttheautomaticexposure
level.
Normal copying
Power on

17
MAKING COPIES Normal copying
NORMAL COPYING
Units digit
Tens digit
●For manual copy density adjustment, press the AUTO/MANUAL/
PHOTO ( / / ) key to select MANUAL ( ) and
adjust with the light ( ) and dark ( ) keys as desired.
●For photographs, select PHOTO ( ) and then adjust with the light
( ) and dark ( ) keys as desired.
●There are 5 exposure steps indicated by 3 indicator lights. (The
indicators light up one or two at a time.)
Ifexposurelevel2isselected,thetwoleft-handmostindicatorsforthat
level will light up simultaneously. Also, if level 4 is selected, the two
right-handmost indicators for that level will light up simultaneously.
6Set the number of copies using the two copy quantity
( , ) keys.
●Presstheright copyquantity keytoset theunits digitfrom0 to9. This
key will not change the tens digit.
●Press the left copy quantity key to set the tens digit from 1 to 9.
●A single copy can be made with the initial setting, i.e., when “0” is
displayed.
●Press the CLEAR ( ) key to clear an entry if a mistake is made.
7Press the START ( ) key.
●The number in the copy quantity display will decrease by 1 each time
a copy is made.
●Press the CLEAR ( ) key to stop copying in the middle of a run.
Stream feeding mode
If the stream feeding mode has been enabled using user program No. 4,
theSPFindicatorwillcontinuetoblinkforapproximately5secondsafter
feedingofall originalsiscompleted.Whilethisindicatorisblinking,any
neworiginalsplacedintheSPFwillbefedandcopiedautomatically.See
page 42, USER PROGRAMS.

18
MAKING COPIES
Using the original table
1Turn the power switch on.
●It will take about 35 seconds for the copier to warm up. However, you
can make desired settings and press the START ( ) key during
warm-up. Copying will start after warm-up.
2Place an original face down on the original table, and
align it with the original size scale.
3Close the document feeder cover.
4Ensure that the copy paper size in the paper tray is the
same size as the original.
●UsetheORIGINALSIZEENTER( )keytoselecttheoriginal
size. Copy paper of the same size as the original will be automatically
selected.If desired,the otherpapertray canbe selectedbypressingthe
TRAY SELECT ( ) key.
●Ifnotraycontains therequiredpapersize,placetherequired paperinto
the bypass tray and use the TRAY SELECT ( ) key to select the
bypass tray.
●The bypass tray cannot be selected automatically.
5Adjust the copy density.
●Thiscopierhasthreeexposuremodestochoosefrom—AUTOMATIC
(), MANUAL ( ), and PHOTO ( ).
●Automaticexposureisthestandardinitial settingforthiscopier.Inthis
mode, the characteristics of the original are “read” by the exposure
system and adjustments are automatically made. This optimizes the
contrast of the copied images by reducing the effect of colored or
shadedbackgroundareas.Seepage30toadjusttheautomaticexposure
level.
●For manual copy density adjustment, press the AUTO/MANUAL/
PHOTO ( / / ) key to select MANUAL ( ) and
adjust with the light ( ) and dark ( ) keys as desired.
Normal copying
Power on
NORMAL COPYING
Table of contents
Other Sharp Copier manuals

Sharp
Sharp SF-2220 User manual

Sharp
Sharp AR-280 User manual

Sharp
Sharp AR-F152 User manual

Sharp
Sharp SF-2540 User manual

Sharp
Sharp AR-162 User manual

Sharp
Sharp AL-2050 Setup guide

Sharp
Sharp SF-2540 User manual

Sharp
Sharp AR-405 User manual

Sharp
Sharp AL-2020 Manual

Sharp
Sharp AR-M250 series Online Setup guide

Sharp
Sharp AR-C330 Key operators User manual

Sharp
Sharp AR-155 User manual

Sharp
Sharp AR-C330 Key operators User manual

Sharp
Sharp DM 2000 - B/W Laser Printer User manual

Sharp
Sharp AR-C260 User manual

Sharp
Sharp AR-280 User manual

Sharp
Sharp AL-800 User manual

Sharp
Sharp AR-121E User manual

Sharp
Sharp AR-RP6 User manual

Sharp
Sharp AL-1000 Series User manual