manuals.online logo
Brands
  1. Home
  2. •
  3. Brands
  4. •
  5. Siemens
  6. •
  7. Circuit Breaker
  8. •
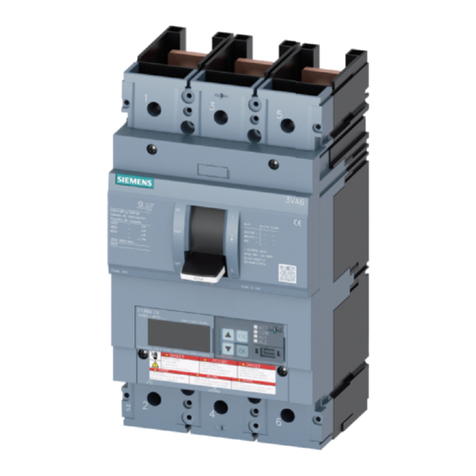
  9. Siemens TC1J6600 User manual

Siemens TC1J6600 User manual

Hazardous voltage.
Will cause death or serious injury.
Turn off and lock out all power supplying this
device before removing cover or device and while
cover is removed.
Replace the cover before power supplying this
device is turned on.
Devices: JD Frame Types- JXD2(-A), JD6(-A), JXD6(-A), HJD6(-A), HJXD6(-A),
HHJD6, HHJXD6, and CJD6(-A); LD Frame Types-LD6(-A), LXD6(-A),
HLD6 (-A), HLXD6 (-A), HHLD6, HHLXD6 and CLD6(-A) Circuit Breakers;
Types-JXD6(-A)ETI, CJD6(-A)ETI, LXD6(-A)ETI and CLD6(-A)ETI Motor
Circuit Interrupters; and Types-JXD2(-A), JXD6(-A), HJXD6, CJD6(-A),
LXD6(-A), HLXD6(-A), and CLD6(-A) Molded Case Switches.
Page 1 of 4
Pc. No. 77503A03
NOTE: This instruction outlines the recommended
installation procedure.
INTRODUCTION
The JD and LD Frame Circuit Breaker line includes types-
JXD2(-A), JD6(-A), JXD6(-A), HJD6(-A), HJXD6(-A), HHJD6,
HHJXD6, and CJD6(-A), LD6(-A), LXD6(-A), HLD6 (-A),
HLXD6 (-A), HHLD6, HHLXD6 and CLD6(-A) circuit
breakers; Types-JXD6(-A)ETI, CJD6(-A)ETI, LXD6(-A)ETI
and CLD6(-A)ETI Motor Circuit Interrupters; and Types-
JXD2(-A), JXD6(-A), HJXD6, CJD6(-A), LXD6(-A), HLXD6(-
A), and CLD6(-A) Molded Case Switches. These devices
are rated for operating voltages up to 600 VAC, 50/60 Hz
and 500 VDC.
INSTALLATION
JD and LD Frame devices are for use in individual
enclosures, panel boards, switchboards or other approved
equipment.
The installation procedure consists of inspecting, attaching
required accessories, mounting the device and connecting
and torquing the line and load wire connectors.
Mounting hardware and unmounted wire connectors (where
required) are available as separate catalog items.
Note: Trip unit and accessory installation should be com-
pleted before the device is mounted and connected. (See in-
stallation instructions supplied with trip unit and accessory
before proceeding).
Note: Motor circuit interrupters and molded case switches
are supplied as complete devices only.
Note: Molded case switches do not have a PUSH-TO-TRIP
button.
A. Turn off and lock out all power before installing or servicing.
B. Make sure that the device is suitable for the installation by com-
paring nameplate ratings with system requirements. Inspect the
device for completeness and check for any damage before mount-
ing.
SAFETY INSTRUCTIONS
Siemens Energy & Automation, Inc.
Bellefontaine, OH 43311 U.S.A.
Installation Instructions
Interruptores termomagnéticos Marco JD, Tipo- JXD2(-A), JD6(-A),
JXD6(-A), HJD6(-A), HJXD6(-A), HHJD6, HHJXD6, y CJD6(-A);
Marco LD, Tipo- LD6(-A), LXD6(-A), HLD6 (-A), HLXD6 (-A),
HHLD6, HHLXD6 y CLD6(-A); Interruptores Tipo JXD6(-A)ETI,
CJD6(-A)ETI, LXD6(-A)ETI y CLD6(-A); y Interruptores mobibles,
Tipo-JXD2(-A), JXD6(-A), HJXD6, CJD6(-A), LXD6(-A), HLXD6(-
A), y CLD6(-A).
Instructivo de Instalación y Operación
Peligro
Tensión peligrosa
Puede causar daños serio o la muerte.
Desenergice totalmente antes de instalar o
darle servicio.
Reemplace todas las barreras y cubiertas antes
de energizar el interruptor.
INSTRUCCIONES DE SEGURIDAD
Lea cuidadosamente este instructivo, con ello obtendrá la
completa seguridad en el uso de estos equipos para su montaje.
1 Información Técnica
Generalidades
La línea de interruptores termomagnéticos Tipo- JXD2(-A), JD6(-
A), JXD6(-A), HJD6(-A), HJXD6(-A), HHJD6, HHJXD6, y
CJD6(-A); Marco LD, Tipo- LD6(-A), LXD6(-A), HLD6 (-A),
HLXD6 (-A), HHLD6, HHLXD6 y CLD6(-A); Interruptores Tipo
JXD6(-A)ETI, CJD6(-A)ETI, LXD6(-A)ETI y CLD6(-A); y
Interruptores mobibles, Tipo-JXD2(-A), JXD6(-A), HJXD6,
CJD6(-A), LXD6(-A), HLXD6(-A), y CLD6(-A), para corrientes
nominales desde 300 hasta 400 A, son adecuados para operar en
tensiones hasta 600 V C.A. 50/60 Hz. La línea de interruptores
termomagnéticos LXD6, para corrientes nominales desde 500
hasta 600 A, son adecuados para operar en tensiones hasta 600 V
C.A. 50/60 Hz.
2 Instalación.
Los interruptores termomagnéticos JXD6 y LXD6, están previstos
para alojarse en gabinetes individuales, tableros de distribución,
tableros de maniobra y otros gabinetes aprobados.
El procedimiento para la instalación consiste de: inspección de
los accesorios requeridos, montaje del interruptor y conexión de
los conductores del lado de línea y de carga. Montaje de los
conectores para cable o solerás (Cuando se requieran).
La unidad de disparo y los accesorios de instalación, deben estar
completas antes que el interruptor sea instalado y conectado.
Cuando el interruptor es de unidad de disparo
intercambiable, esta se suministra junto con los accesorios
necesarios.
A. Desenergice totalmente antes de instalarlo o darle mantenimiento.
B. Asegúrese que el interruptor sea el adecuado para la protección
del circuito en el que se intercala, consultando las
especificaciones en la placa de características.
Installation Instructions
Peligro
Tensión peligrosa
Puede causar daños serio o la
muerte.
Desenergice totalmente antes de
instalar o darle servicio.
Reemplace todas las barreras y
cubiertas antes de energizar el
interruptor.
Instructivo de Instalación y Operación
Hazardous voltage.
Will cause death or serious
injury.
Turn off and lock out all power
supplying this device before
removing cover or device and while
cover is removed.
Replace the cover before power
supplying this device is turned on.
Page 2 of 4
Pc. No. 77503A03
Fig. 3
Fig. 2
C. Device must be in "Tripped" or "OFF" position prior to
mounting.
D. To mount the device perform the following steps:
1. For individual enclosures, panelboards and switch-
boards manufactured by Siemens Energy & Automation,
Inc., follow the instructions provided with this
equipment.
2. For those applications where mounting is on a flat sur-
face of the customers equipment, drill and tap mount-
ing bolt holes according to the drilling plan in Fig. 2.
NOTE: Additional holes marked “A” are required
for types CJD6(-A), CLD6(-A), CJD6(-A) ETI, CLD6(-A)
ETI and CJD6(-A), CLD6(-A) switches. For handle es-
cutcheon cut out plans, refer to Fig. 3.
3. If device contains internal accessories, make sure ter-
minals can be connected when the circuit breaker is
mounted.
4. Remove the line and load terminal shields (see Fig. 4)
by loosening the two terminal shield screws that at-
tach them to the line and load covers.
5. Position device on mounting surface.
6. Install mounting screws and washers. Tighten hard-
ware securely.
[MANIJA]
4.40 in.
9.75 in.
6.86 in.
2.50 in.
OF HANDLE
ESCUTCHEON
3.14 in.
1.57 in.
2.30 in.
1.50 in.
1.02 in.
3.00 in.
.300 in.[7.6 mm]
DIA. HOLE FOR
ACCESS TO
PUSH-TO-TRIP
C. Antes de instalar; asegúrese que la posición de la manija este
en la posición “tripped” disparado o en “OFF” fuera.
D. Para la instalación del interruptor favor de considerar lo
siguiente.
1. Seguir las instrucciones dadas con el suministro de este
equipo, para su instalación en tableros de distribución o
gabinetes recomendados por Siemens SA de CV.
2. Para aquellos casos donde el montaje es sobre una superficie
plana, perforar y roscar como indica la fig.2 y para el
escotillón de la manija cortar como indica la fig. 3.
3. Si el interruptor contiene accesorios, cerciórese que las
terminales puedan conectarse cuando el interruptor este
instalado.
4. Remover cubiertas terminales como indica fig. 4.
5. Colocar el interruptor sobre la superficie de montaje.
6. Colocar y apretar firmemente la tornillería y rondanas contra
la estructura de montaje.
.300Ø perforación
para el acceso al
botón de disparo
[247.6 mm]
[111.8 mm]
[63.5 mm]
[174.2 mm]
[79.8 mm]
[39.9 mm]
[190.5 mm]
[25.9 mm]
[38.1 mm]
[76.2 mm]
OF HANDLE
ESCUTCHEON
DRILL AND TAP
HOLE FOR M6
FASTENERS
(4 PLACES)
[PERFORAR]
1.25 in.
[31.7 mm]
“A” “A”
[MANIJA]
OF TRIP BUTTON
[boton de disparo]
OF HANDLE ESCUTCH-
EON
[de escotillon de manija]
OF HANDLE ESCUTCH-
EON
[de escotillon de manija]
Installation Instructions
Peligro
Tensión peligrosa
Puede causar daños serio o la
muerte.
Desenergice totalmente antes de
instalar o darle servicio.
Reemplace todas las barreras y
cubiertas antes de energizar el
interruptor.
Instructivo de Instalación y Operación
Hazardous voltage.
Will cause death or serious
injury.
Turn off and lock out all power
supplying this device before
removing cover or device and while
cover is removed.
Replace the cover before power
supplying this device is turned on.
Page 3 of 4
Pc. No. 77503A03
Catalog
Number
Wire
Range
Torque
Cable
Clamping
Screw
Connector
Mounting
Screw
in-lbs. N-m in-lbs. N-m
TC1J6600
TA1L6750
TC2J6500
TA2J6500
CCL600
3/0-500 kcmil. Cu Only
500-600 kcmil. Cu
500-750 kcmil. Al
3/0-500 kcmil. Cu Only
3/0-500 kcmil. Cu
4/0-500 kcmil. Al
(See Instructions)
500
500
500
300
300
300
56.49
56.49
56.49
33.89
33.89
33.89
228
228
228
132
132
132
25.76
25.76
25.76
14.91
14.91
14.91
TABLE 1.
7. After mounting the device, line and load terminals and
accessory terminals should be connected.
8. After the device is installed, check all mounting hard-
ware for secureness. Check wire connectors for cor-
rect torque requirements. Torque values for line and
load connectors are provided on the device nameplate
and in TABLE 1.
9. Replace line and load terminal shields and tighten
screws securely.
7. Sólo después de instalado el interruptor, debe conectarse la
línea de alimentación, la salida a la carga y los accesorios.
8. Después de que el interruptor esté instalado, revise todos
los elementos de conexión. Revise los conectores de cables y
observe el adecuado par de apriete, los de la línea y de la
carga, indicado en la placa de características del
interruptor.(Vea table 1)
9. Reponer cubiertas terminales.
Installation Instructions
Peligro
Tensión peligrosa
Puede causar daños serio o la
muerte.
Desenergice totalmente antes de
instalar o darle servicio.
Reemplace todas las barreras y
cubiertas antes de energizar el
interruptor.
Instructivo de Instalación y Operación
Manufactured Under One or More of the Following U.S.
Patents: 4,260,861; 4,266,209; 4,300,030; 4,458,224.
Fig. 4
LINE TERMINAL SHIELD
LOAD TERMINAL SHIELD
ON
OFF
TRIPPED
RESET
[Terminal de linea]
[connectado]
[disparo]
[fuera]
[Terminal de carga]
MANUAL OPERATION
Manual operation of the device is controlled by the circuit
breaker handle and the PUSH-TO-TRIP button. The device
handle has three indicating positions, two of which are molded
into the handle to indicate ON and OFF. The third position
indicates a TRIP position and is between the ON and OFF
positions. (See Fig. 4)
A. Device Reset
After tripping, the device is reset by moving the device
handle to the reset position and then moving the handle
to the ON position.
NOTE: In the event of a thermal trip, the circuit breaker
cannot be reset until the thermal element cools.
B. PUSH-TO-TRIP Button
The PUSH-TO-TRIP button checks the tripping function
and is used to manually exercise the operating mechanism.
INSPECTION AND FIELD TESTING
JD and LD Frame devices are designed to provide years of
maintenance free service. The following procedure outlines
how to inspect and test a circuit breaker in service.
Inspection
NOTE: Do not spray or allow any petroleum based chemi-
cals, solvents or paints to contact the molded parts or name-
plates.
Circuit breakers in service should be inspected periodically,
as outlined in NEMA AB2.
National Electrical Manufactures Association
2101 L Street, N.W. Suite 300
Washington, D.C. 20037
3 Operación manual.
La operación de cierre y apertura del interruptor se efectúa por
medio de la manija y con el botón pulsador se logra un disparo de
prueba. La manija del interruptor tiene 3 posiciones, 2 de las
cuales están moldeadas dentro de la manija del interruptor e
indican “ON” conectado y “OFF”desconectado, la posición “trip”
disparo se encuentra entre la posición “ON” y “OFF” ver fig. 4.
A. Restablecer. Después de un disparo “tripping” el interruptor
debe ser restablecido, accionando la manija totalmente hacia
abajo, llevando después la manija hacia la posición de conectado
“ON”.
Nota: En el caso de un disparo por sobrecarga (térmico) no podrá
serrestablecido, sino hasta que se enfríen los elementos térmicos.
B. Botón pulsador, para disparar púlsese el botón de disparo
“trip” para verificar la función de disparo y del mecanismo de
operación.
NOTA: No use aerosoles, ni permita que derivados químicos del
petróleo, solventes o pinturas, se pongan en contacto con las
conexiones eléctricas dentro o fuera del interruptor.
Hazardous voltage.
Will cause death or serious
injury.
Turn off and lock out all power
supplying this device before
removing cover or device and while
cover is removed.
Replace the cover before power
supplying this device is turned on.
Page 4 of 4
Pc. No. 77503A03
© Siemens Energy & Automation, Inc. 1993
HANDLE
PUSH TO
TRIP BUTTON
[Manija]
[Botón de
disparo]
[restablecer]

This manual suits for next models

4

Other Siemens Circuit Breaker manuals

Siemens SENTRON User manual

Siemens

Siemens SENTRON User manual

Siemens PD6 Owner's manual

Siemens

Siemens PD6 Owner's manual

Siemens JXD2 Owner's manual

Siemens

Siemens JXD2 Owner's manual

Siemens 3VT9100-8CB30 User manual

Siemens

Siemens 3VT9100-8CB30 User manual

Siemens 3WX3641-0JB00 User manual

Siemens

Siemens 3WX3641-0JB00 User manual

Siemens Sentron 3VA9157-0PK1 Series User manual

Siemens

Siemens Sentron 3VA9157-0PK1 Series User manual

Siemens SDV7-AR User manual

Siemens

Siemens SDV7-AR User manual

Siemens 5SV1 User manual

Siemens

Siemens 5SV1 User manual

Siemens 3RV1 Series User manual

Siemens

Siemens 3RV1 Series User manual

Siemens PCBMRC3 User manual

Siemens

Siemens PCBMRC3 User manual

Siemens 3WN6 User manual

Siemens

Siemens 3WN6 User manual

Siemens SDV6 User manual

Siemens

Siemens SDV6 User manual

Siemens SENTRON 3WL10 User manual

Siemens

Siemens SENTRON 3WL10 User manual

Siemens 3AH6 User manual

Siemens

Siemens 3AH6 User manual

Siemens GMI Series Owner's manual

Siemens

Siemens GMI Series Owner's manual

Siemens 3WN6 User manual

Siemens

Siemens 3WN6 User manual

Siemens 3VL7710 6 Series User manual

Siemens

Siemens 3VL7710 6 Series User manual

Siemens 3VT9200-4WN00 User manual

Siemens

Siemens 3VT9200-4WN00 User manual

Siemens SION 3AE6113-0 User manual

Siemens

Siemens SION 3AE6113-0 User manual

Siemens Fusesaver User manual

Siemens

Siemens Fusesaver User manual

Siemens 3AP2-FI Manual

Siemens

Siemens 3AP2-FI Manual

Siemens 3RV1.5 User manual

Siemens

Siemens 3RV1.5 User manual

Siemens RL Series User manual

Siemens

Siemens RL Series User manual

Siemens TSLN3M User manual

Siemens

Siemens TSLN3M User manual

Popular Circuit Breaker manuals by other brands

Green Brook PowerBreaker J62-Y Installation & operating instructions

Green Brook

Green Brook PowerBreaker J62-Y Installation & operating instructions

Noark Ex9M3 manual

Noark

Noark Ex9M3 manual

GE SPST012 quick start guide

GE

GE SPST012 quick start guide

OEZ LMB Series Instructions for use

OEZ

OEZ LMB Series Instructions for use

Eaton P5-125/Z Instruction leaflet

Eaton

Eaton P5-125/Z Instruction leaflet

Eaton Cutler-Hammer VCP-W Instructions for installation, operation and maintenance

Eaton

Eaton Cutler-Hammer VCP-W Instructions for installation, operation and maintenance

Eaton NZM1 XFI U Series Instruction leaflet

Eaton

Eaton NZM1 XFI U Series Instruction leaflet

Eaton FRCdM-Type B Instruction leaflet

Eaton

Eaton FRCdM-Type B Instruction leaflet

DCC Specialties PSXX-AR Series manual

DCC Specialties

DCC Specialties PSXX-AR Series manual

HUYU H8M Series Installation and operation instruction

HUYU

HUYU H8M Series Installation and operation instruction

ABB Tmax RC221 instructions

ABB

ABB Tmax RC221 instructions

Allis-Chalmers LA-1600 instructions

Allis-Chalmers

Allis-Chalmers LA-1600 instructions

Allen-Bradley 140G-BML Installation instruction

Allen-Bradley

Allen-Bradley 140G-BML Installation instruction

Eaton Power Defense PDG2 Instruction leaflet

Eaton

Eaton Power Defense PDG2 Instruction leaflet

GE EntelliGuard G Installation, operation and maintenance manual

GE

GE EntelliGuard G Installation, operation and maintenance manual

CHINT NM1 Series User instruction

CHINT

CHINT NM1 Series User instruction

GE AM-13.8-500-5A instructions

GE

GE AM-13.8-500-5A instructions

Schrack BESD Series operating instructions

Schrack

Schrack BESD Series operating instructions

manuals.online logo
manuals.online logoBrands
  • About & Mission
  • Contact us
  • Privacy Policy
  • Terms and Conditions

Copyright 2025 Manuals.Online. All Rights Reserved.