Skymsen HS-98 User manual

INSTRUCTIONS MANUAL
MANUAL DE INSTRUCCIONES
STAINLESS STEEL MEAT MINCER, MOUTH 98
MOLINO MEZCLADOR DE CARNE EN ACERO INOXIDABLE, BOCAL 98
MODEL/MODELO
HS-98

2
SUMMARY
1. Introducon ...................................................................................... 3
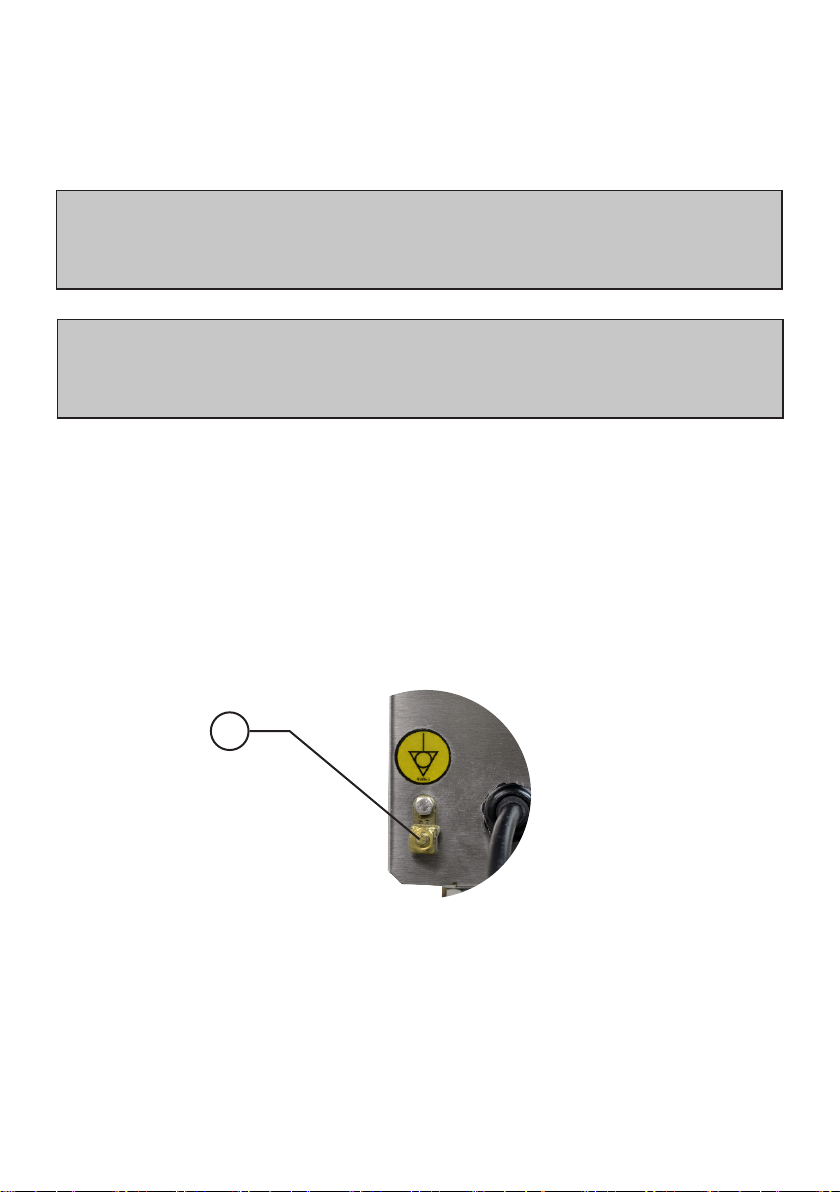
1.1 Safety .................................................................................................................... 3
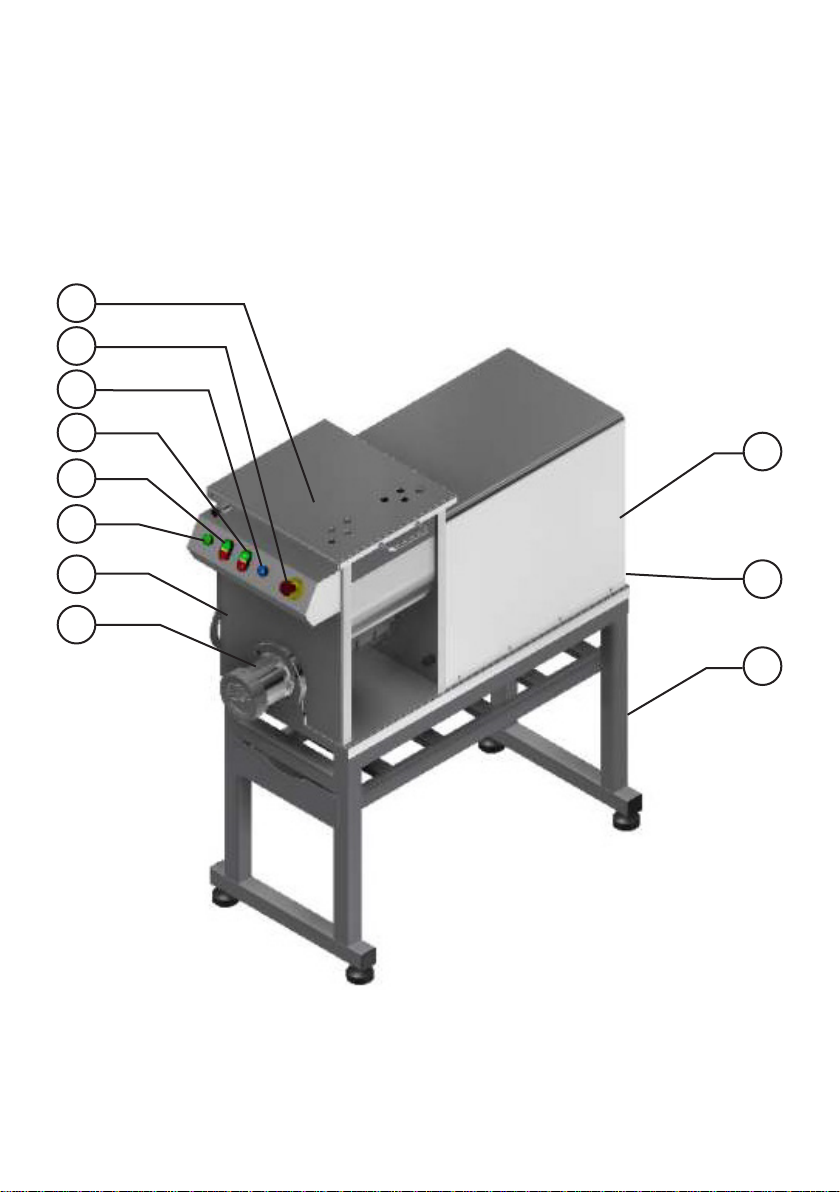
1.2 Main Components ................................................................................................. 5
1.3 Technical Characteriscs ........................................................................................ 6
2. Installaon and Pre Operaon ...........................................................6
2.1 Installaon ............................................................................................................ 6
2.2 Pre Operaon ........................................................................................................ 8
3. Operaon .......................................................................................... 8
3.1 Starng the operaon............................................................................................ 8
3.2 Operaon Procedure ............................................................................................. 9
3.3 Safety System ....................................................................................................... 9
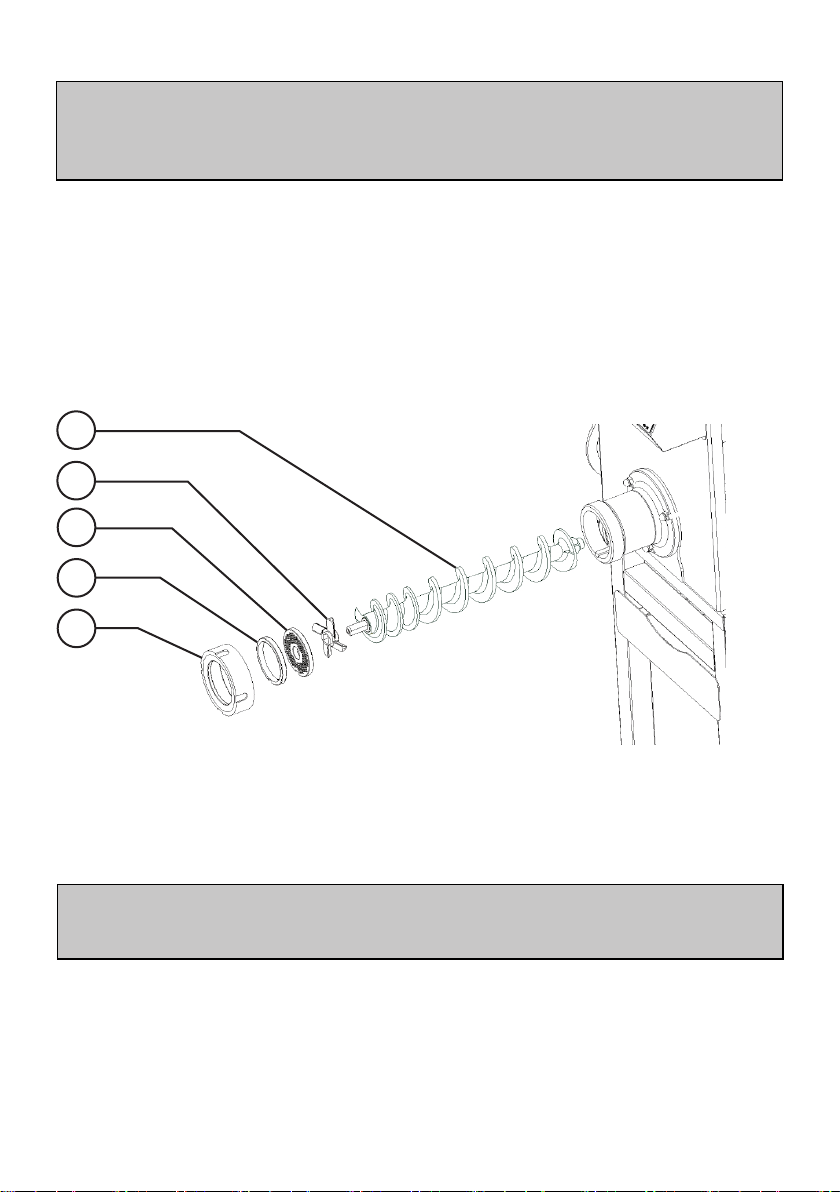
3.4 Assembling of the mouth internal components.....................................................10
3.5 Cleaning and Sanizang ......................................................................................10
3.6 Cauons with Stainless Steels ...............................................................................11
4. General Safety Noons.................................................................... 12
4.1 Basic Operaon Pracce .......................................................................................13
4.2 Cauon and observaons before Turning on the Appliance...................................13
4.3 Roune Inspecons ..............................................................................................14
4.4 Operaon .............................................................................................................14
4.5 Aer nishing the work ........................................................................................15
4.6 Maintenance ........................................................................................................15
4.7 Advice ..................................................................................................................15
5. Analysis and Problems Solving......................................................... 16
5.1 Problem, causes and soluons..............................................................................16
5.2 Sharpening of Knives ............................................................................................16
6. Observed Standards......................................................................... 18
7. Maintenance ................................................................................... 18
8. Electric Diagram ............................................................................. 20
220V Triphase 60Hz ............................................................................. 20
380V Triphase 60Hz ............................................................................ 22

3
1. Introducon
1.1 Safety
This equipment is suitable to grind meat without bones and defrosted and if not correctly
used it may be potenally DANGEREOUS. Maintenance, cleaning or any other service is to
be done by a qualied person with the machine unplugged.
To avoid accidents, injuries and damages to the equipment, follow the below instrucons.
1.1.1 Read the instrucons carefully.
1.1.2 To avoid the risk of electric shock and damage to the equipment never use the
equipment with wet clothes or wet feet, nor on a wet oor, never dip the equipment or
spray water or any other liquid on it.
1.1.3 Any equipment must always be watched, especially when children might be near.
1.1.4 Unplug the equipment from electric network when not in use, before to clean it,
before to place or remove any accessory, during maintenance or any other kind of service.
1.1.5 Do not use any equipment having a damaged cord or plug. Make sure the cord not
to lean on a table edge, nor to touch a hot surface.
1.1.6 When the appliance falls, is damaged or does not switch on it necessary to take it
to a Technical Assistance to be checked, repaired or adjusted.
1.1.7 The use of non-recommended accessories by Skymsem may cause injuries to the
personnel.
1.1.8 Keep your hands or any tool away from the parts in movement to avoid corporal
injures or equipment damage.
1.1.9 Never wear clothes with wide sleeves during operaon.
1.1.10 Before turning on the appliance, make sure that all the internal components are
correctly assembled as shown in Picture 04.
1.1.11 This appliance has been developed for commercial operaon. It must be used in
restaurants, fast foods, hospitals, bakeries, butchers, etc.
It is not recommended to use it when:
- The producon process is connuous
- the workplace has a corrosive or explosive atmosphere, or contaminated with vapor,
dust or gas.

4
IMPORTANT
To provide safety to the user, this appliance is equipped with a safety system to
prevent an involuntary trigger or the appliance aer any possible power outage.
IMPORTANT
Make sure the cord is in perfect working condions, if not, change it for one in
accordance to the local safety standards . Such change shall be made by qualied
professional following the local safety standards.
IMPORTANT
This equipment shall not be used by children or any person with reduced physical
or mental capacity, lack of experience or knowledge, unless they are under
supervision or have received from the person responsible for safety, proper
instrucons on how to use the equipment.
IMPORTANT
Keep this equipment out of the reach of children.
IMPORTANT
In case of emergency, unplug the appliance from wall electrical outlet immediately.
IMPORTANT
Never wash the appliance with direct intense water jets.
IMPORTANT
Perforated disks with oval shape with bigger diameter than the original must not
be used.

5
1.2 Main Components
All components are made with carefully selected materials for each funcon, in accordance
to Skymsen experience.
The Nozzle No. 08 (Picture 01) and the rotang screw No. 01 (Picture 03) are manufactured
with stainless steel 304. The crosshead and the discs are built with steel to guarantee the
cung for a longer me.
PICTURE 01
01 – Top Cover
02 – Emergency Buon
03 – Reset Buon
04 – On/O Grinder Switch
05 – On/O Mincer Switch
06 – Pulsate Switch
07 – Magazine
08 – Mouth
09 – Rack
10 – Master Switch
11 – Cabinet
04
02
05
11
03
09
06
07
01
08
10

6
1.3 Technical Characteriscs
2. Installaon and Pre Operaon
2.1 Installaon
2.1.1 Appliance posioning
Recommended area for installaon.
CHART 01
CHARACTERISTICS UNITY HS-98
Avarage Producon kg/h up to 700
Tension V 220/380
Frequency Hz 60
Power W 2570
Height mm 680
Width mm 520
Depth mm 1200
Net Weight kg 140
Gross Weight kg 160
900mm
450mm
Área para
instalação
FRENTE
1800 mm
1000 mm
2.1.2 Power Installaon
This appliance is supplied with a power cable in which is na industrial plug is aached. For
the electrical installaon an industrial built in outlet or a Surface mounted socket, that
must follow installed following the local standards.
In the table below some plugs and outlets are indicated according to the purchased
appliance:
Model HS-98 HS-98
Feeding Three phase eletric power Three phase electric power
Voltage 220V 380V
Industrial plug 3P + T 16A 220V 3P + T 16A 380V
FRONTINSTALLATION
AREA

7
IMPORTANT
Make sure that the voltage of the power cord where the equipment will be
installed is compable with the voltage on the label of the power cord.
IMPORTANT
The bonding must be done by qualied personnel and must follow local safety
standards.
It must be installed to guarantee that there is no potenal dierence among dierent
equipment connected to the power grid, so that it is possible to diminish the risks of
electrical shock.
The equipment must be installed in their own connecon to the equipotenal bonding
system.
PICTURE 02
01
Note: Skymsen uses and indicates WEG and Steck industrial plugs and outlets.
The electrical grounding for electrical installaons is mandatory. Check if all the plugs are
connected before acvang the appliance.

8
2.2 Pre Operaon
Before using the appliance, all the parts that are in contact with the product being
processed must washed with water and neutral soap. (Read item 3.5 Cleaning)
Remove Nº05 ( Picture 04) and then the internal components pulling them out.
Wash the components with water and soap
IMPORTANT
When assembling the internal components of the nozzle, not to ghten the
handwheel no. 05 (Picture 03). Doing that you may avoid stucking or breaking
internal components.
Make sure that the equipment is rmly in the place.
3. Operaon
3.1 Starng the operaon
IMPORTANT
Turn o the equipment when you wish to remove the internal grindder
components.The appliance is silent. Do not leave utensils as: knifes, hooks, or
similar utensils inside the equipment.
Make sure that the assembling of the components is in the correct sequence.
The starng is made as described below:
1 – Plug the equipment in the electric power socket;
2 – Turn on the master switch number 10 (Picture 01), placed in the back part of the
Cabinet No. 11 (Picture 01);
3 – Check if the Top Cover no. 01 is closed and locked
5 – Unlock the emergency buon no. 02 (Picture 01) – Press Reset No. 03 (Picture 01);
6 – Press the on switch / Turn o to the posioning “I” turning on the equipment.
7 – The machine has pulsate switch and a footswitch pedal, paralleled turned on, that can
be started one or the other turning on the gridding system in pulses.

9
IMPORTANT
Never use any strange tools to the machine operaon as cutleries, cables, etc.The
product being processed must be feed inside the appliance, that will only start
working when completely locked.
3.2 Operaon Procedure
The appliance is equipped with a pan used as a container to put 30 kg of minced meat
with maximum size of 80x80x80 mm. the appliance has to motors, one for mixing and the
other to grind the meat. Each of this motors has an independent starng, that is they work
together or separate. To operate the appliance, the top cover must been open, the meat
to be processed must be put inside and then close and lock the cover. Aer this procedure,
with the appliance connected to the power grid, and the internal components assembled,
the operaon can be started.
3.3 Safety System
This appliance has a safety system that prevents it to restart automacally when power is
reestablished aer a temporary disconnecon.
IMPORTANT
This appliance has a safety system to guarantee the integrity of the operator. The
appliance operaon must be done as indicated in the item “Operaon’ of the
manual. Other procedures to operate this appliance are not safe. In such condion,
the appliance should not be used.

10
PICTURE 03
IMPORTANT
Observe the posion of the internal components of the mouth, not to have the
inversion of it, because if this happens, irreparable damage may occur.
01 – Worm
02 - Knife
03 - Plate 5mm (oponals 3mm e 8mm)
04 – Ring
05 – Locking Ring
3.4 Assembling of the mouth internal components
To maintain the assembling and disassembling of the internal components:
1 – Put the Screw no. 0 1 perfec tly se ated in the tens ionin g mechani sm
2 - Put the Knife Nº02. Observe the counterclockwise cut.
3 – Put Plate 5mm (Oponals 3mm e 8mm) Nº03;
4 – Put Ring Nº04;
5 – Thread the Locking Ring Nº05
05
04
03
02
01
3.5 Cleaning and Sanizang
IMPORTANT
Always unplug the machine before cleaning.
The appliance must be totally clean and sanized:
- Before being used for the rst me;
- Before every day operaon;
- When it has not been used for a long me;
- Before operang it aer a long period of inacvity

11
The following components can be removed for the cleaning:
- Knife, Ring, Locking Ring and Handwheel (according to Picture 03).
Wash all the parts with warm water and neutral soap
3.6 Cauons with Stainless Steels
The Stainless Steel may present rust signs, which ARE ALWAYS CAUSED BY EXTERNAL
AGENTS, especially when the cleaning or sanizaon is not constant and appropriate.
The Stainless Steel resistance towards corrosion is mainly due to the presence of chrome,
which in contact with oxygen allows the formaon of a very thin protecve coat. This
protecve coat is formed through the whole surface of the steel, blocking the acon of
external corrosive agents.
When the protecve coat is broken, the corrosion process begins, being possible to avoid
it by means of constant and adequate cleaning.
Cleaning must always be done immediately aer using the equipment. For purpose, use
water, neutral soap or detergent, and clean the equipment with a so cloth or a nylon
sponge. Then rinse it with plain running water, and dry immediately with a so cloth, this
way avoiding humidity on surfaces and especially on gaps.
The rinsing and drying processes are extremely important to prevent stains and corrosion
from arising
IMPORTANT
Do not use water jet directly to the appliance.
IMPORTANT
Sanize the container.
IMPORTANT
Acid soluons, salty soluons, disinfectants and some sterilizing soluons
(hypochlorites, tetravalent ammonia salts, iodine compounds, nitric acid and
others), must be AVOIDED, once it cannot remain for long in contact with the
stainless steel.

12
These substances aack the stainless steel due to the CHLORINE on its composion,
causing corrosion spots (ping).
Even detergents used in domesc cleaning must not remain in contact with the stainless
steel longer than the necessary, being mandatory to remove it with plain water and then
dry the surface completely.
Use of abrasives:
Sponges or steel wools and carbon steel brushes, besides scratching the surface
and compromising the stainless steel protecon, leave parcles that rust and react
contaminang the stainless steel. That is why such products must not be used for cleaning
and sanizaon. Scrapings made with sharp instruments or similar must also be avoided.
Main substances that cause stainless steel corrosion:
Dust, grease, acid soluons such as vinegar, fruit juices, etc., saltern soluons (brine),
blood, detergents (except for the neutral ones), common steel parcles, residue of sponges
or common steel wool, and also other abrasives.
4. General Safety Noons
IMPORTANT
If any item from the GENERAL SAFETY NOTIONS secon is not applicable to your
product, please disregard it.
The following safety instrucons are addressed to both the operator of the machine as well
as the person in charge of maintenance. The machine has to be delivered only in perfect
condions of use by the Distributor to the user. The user shall operate the machine only
aer being well acquainted with the safety procedures described in the present manual.
READ THIS MANUAL CAREFULLY
IMPORTANT
The following safety instrucons are addressed to both the operator of the
machine as well as the person in charge of maintenance. The machine has to
be delivered only in perfect condions of use by the Distributor to the user. The
user shall operate the machine only aer being well acquainted with the safety
procedures described in the present manual.
READ THIS MANUAL CAREFULLY.

13
4.1 Basic Operaon Pracce
4.1.1 Dangerous parts
Some areas of the electric device have parts that are connected or have parts connected
to high voltage. These parts when touched may cause severe electrical chocks or even be
fatal.
Never touch switches such as buons, turning keys and knobs with your hands wearing wet
clothes and/or wet shoes. By not following these instrucons operator could be exposed
to severe electrical shocks or even to a fatal situaon.
4.1.2 Warnings
The operator has to be well familiar with the posion of ON/OFF Switch to make sure the
Switch is easy to be reached when necessary. Before any kind of maintenance, physically
remove plug from the socket.
Provide space for a comfortable operaon thus avoiding accidents. Water or oil spilled on
the oor will turn it slippery and dangerous.
Make sure the oor is clean and dry.
If any work is to be made by two or more persons, coordinaon signs will have to be given
for each operaon step. Every step of the operaon shall be taken only if a sign has been
made and responded.
4.1.3 Advices
In case of power shortage, immediately turn the machine OFF. Use recommended or
equivalent lubricants, oils or greases.
Avoid mechanical shocks as they may cause failures or malfuncon.
Avoid penetraon of water, dirt or dust into mechanical or electrical components of the
machine.
Do not modify original characteriscs of the machine.
Do not remove, tear o or maculate any labels aached to the machine. If any labels have
been removed or is no longer legible contact your nearest Authorized Technical Assistance
for replacement).
4.2 Cauon and observaons before Turning on the Appliance
IMPORTANT
Carefully read ALL INSTRUCTIONS of this manual before turning the machine
ON. Be sure to be familiar with the set and that you have well understood all
informaon contained in this manual. If you have any queson contact Skymsen or
the closest Authorized Technical Assistance.

14
4.2.1 Danger
An electric cable or electric wire with damaged jacket or bad insulaon could cause
electrical chocks as well as electrical leak. Before use check condions of all wires and
cables.
4.2.2 Advices
Be sure ALL INSTRUCTIONS in this manual have been thoroughly understood. Every
funcon and operaonal procedure have to be very clear to the operator. Contact your
nearest Dealer for further quesons. Any manual command (switch, buon or lever) shall
be given only aer being sure it is the correct one.
4.2.8 Precauons
The electric cable has to be compable with the power required by the machine. Cables
that touch the oor or are close to the machine need to be protected against short circuits
Oil reservoir has to be full up to the required level as indicated. Chqeck the level and add
oil when necessary.
4.3 Roune Inspecons
4.3.1 Advice
When checking the tension of the belts or chains, DO NOT introduce your ngers between
the belts and the pulleys and nor between the chain and the gears.
4.3.2 Precauons
Check if motors and sliding or turning parts of the machine produce abnormal noises.
Check the tension of the belts and chains and replace the set when belt or chain show
signs of being worn out. When checking tensions of belts or chain, DO NOT introduce your
ngers between belts and pulleys, nor between the chains and gears. Check protecons
and safety devices to make sure they are working properly
4.4 Operaon
4.4.1 Advices
Do not work with long hair that may touch any part of the appliance, because they may
cause serious accidents. Tie them up and to the back, cover it with a scarf.
Only trained and qualied users can operate the appliance.
NEVER operate the appliance without any safety equipment.

15
4.5 Aer nishing the work
4.5.1 Precauons
Always turn the machine o by removing the plug from the socket before cleaning the
m a c h i n e . N e v e r c l e a n t h e m a c h i n e u n l e s s i t h a s c o m e t o a c o m p l e t e s t o p .
Put all components back to their funconal posions before turning it on aga
in.
Do not place your ngers in between belts and pulleys nor chains and gears.
Check uid levels.
4.6 Maintenance
4.6.1 Danger
Any maintenance with the machine in working situaon is dangerous. TURN IT OFF BY
PULLING THE PLUG OFF THE SOCKET DURING MAINTENANCE.
IMPORTANT
Always unplug the machine when emergency cases arise.
4.7 Advice
Electrical or mechanical maintenance must be done by qualied personal for such
operaon. Person in charge has to be sure that the machine is under TOTAL SAFETY
condions when working.

16
5. Analysis and Problems Solving
5.1 Problem, causes and soluons.
The appliances were designed to operate with the need of minimum maintenance but
the natural wearing caused by longer use of the equipment may occasionally cause some
malfuncons.
If any problem occurs with your equipment, the most common situaons are listed below
with recommended soluons.
Besides that, Skymsen has Authorized Technical Assistants that are happy to help. The List
of Authorized Technical Assistants can be checked in the website www.skymsen.com
5.2 Sharpening of Knives
For a good sharpening, make the equipment to work with less eort, and that is to increase
the useful of the components. Go to the Skymsen Authorized Technical Assistance to make
the correct sharpening.
5.2.1 Gear Box
The meat mincer is an appliance that works with a reducing box lubricated in oil.
To guarantee the useful life of the equipment for a longer me, verify in each 5000 hours
the oil level taking it to an Authorized Technical Assistance.
The oil quanty used in the meat mincer is 250 ml, and it is recommended the oil usage
UNITRON 140- CASTROL or similar oil with viscosity (SAE140, APIGL-4, ANP 1006).

17
CHART 02
PROBLEMS CAUSES SOLUTIONS
- The appliance doesn´t turn
on.
- Lack of power
- Broken or wornout gears
- Problem with the internal or
external electrical circuit.
- Check if the electricity is on.
- Call the Authorized Technical
Assistance (ATA).
- Call the Authorized Technical
Assistance (ATA).
- Burn smell and/or smoke. - Problem with the internal or
external electrical circuit.
- Call the Authorized Technical
Assistance (ATA).
- When the appliance is on
and meat is put inside, the
appliance doesnt´work or
Works in slower rotaon.
- Broken or wornout gears
- Problems with Eletric motor
- Call the Authorized Technical
Assistance (ATA).
- Damaged Eletric cable. - Failure on the product
transportaon.
- Call the Authorized Technical
Assistance (ATA).
- Strange noises. - Gears with deect - Call the Authorized Technical
Assistance (ATA).
- The processed meat comes
smashed.
- One of components is
missing or they are assembled
incorrectly.
- Check the assembling
sequence as shown in (Picture
03);
- Check the item 5.2.1 of this
manual.
- The mouth stops while
working
- Lack of power
- Problem with the internal or
external electrical circuit.
- Worn out or broken gears
- Check if machine is plugged
in and if there is power at
power supply source
- Call the Authorized Technical
Assistance (ATA).
- Call the Authorized Technical
Assistance (ATA).
* Oil leaking gear box. * Damaged seal. * Call the Authorized
Technical Assistance (ATA).

18
6. Observed Standards
ABNT NBR NM 60335-1
IEC 60335-2-64
NR-12 according to the order Nº 197, December, 2010
7. Maintenance
* It is considered MAINTENANCE the group of acons that aim to oer and grant
the perfect working condion of the equipment, enlarging its useful life, and general user
safety.
* Cleaning – Check item 5 Cleaning of this manual.
* Cords – Check if the cords are in good condion, without any damage and if all electrical
terminals are in good condion and without oxidaon.
* Contacts – Check the ON/OFF buon, Reset buon, electronic circuits and make sure
that all these components are working correctly and in good condion, and that the use of
the equipment is occurring in a normal way, without any inconvenient.
* Installaon – Check the installaon of Your Equipment as per the item
Installaon and Pre Operaon of this manual.
* Useful life of the equipment – 2 years for the use in a normal work shi.
Items to check and execute monthly:
• Check the electrical grid and installaon of the work place;
• Measure the amperage intake of the electric power supply;
• Measure the working current and compare it to the nominal current;
• Check the electrical terminal connecons of the Equipment to avoid contact
failures;
• Check for possible wearing or looseness in the electric motor sha;
- 2 – Items to check and execute every 3 months:
• Check the ON/OFF buon, Reset buon, electronic circuits for signs of overheang,
damaged insulaon or mechanical damage.
• Check for possible looseness in the assemblies and bearings
•Check the retainers, o’rings, v’rings and other seals

19
___________________________________________________________
___________________________________________________________
___________________________________________________________
___________________________________________________________
___________________________________________________________
___________________________________________________________
___________________________________________________________
___________________________________________________________
___________________________________________________________
___________________________________________________________
___________________________________________________________
___________________________________________________________
___________________________________________________________
___________________________________________________________
___________________________________________________________
___________________________________________________________
___________________________________________________________
___________________________________________________________
___________________________________________________________
___________________________________________________________
___________________________________________________________
___________________________________________________________
___________________________________________________________
___________________________________________________________
___________________________________________________________
___________________________________________________________
___________________________________________________________
___________________________________________________________
___________________________________________________________
___________________________________________________________
___________________________________________________________
___________________________________________________________
___________________________________________________________
___________________________________________________________
___________________________________________________________
___________________________________________________________
______________________________________________________

20
8. Electric Diagram
220V Triphase 60Hz
Table of contents
Languages:
Other Skymsen Kitchen Appliance manuals

Skymsen
Skymsen FC-350 User manual

Skymsen
Skymsen DB-06 User manual

Skymsen
Skymsen FC-350 User manual

Skymsen
Skymsen CMF-300 User manual

Skymsen
Skymsen CLM-300 User manual

Skymsen
Skymsen EX User manual

Skymsen
Skymsen Fleetwood FAT-120 User manual

Skymsen
Skymsen PS-22 User manual

Skymsen
Skymsen ESB-N User manual

Skymsen
Skymsen FLP-400A User manual

Skymsen
Skymsen ABSL User manual

Skymsen
Skymsen PSP-98M User manual

Skymsen
Skymsen DAL-06S User manual

Skymsen
Skymsen DC-08 User manual

Skymsen
Skymsen ABS-HD User manual

Skymsen
Skymsen ESB-N User manual

Skymsen
Skymsen JB35 User manual

Skymsen
Skymsen Fleetwood BPS-06 User manual

Skymsen
Skymsen ES-100 User manual

Skymsen
Skymsen TG User manual