Solo 305 A User manual

9 307 101 11/2016
de
en
fr
es
it
nl
305 A / 307 A // 305 B / 307 B
Originalbetriebsanleitung
Gebrauchsanweisung
Original instructions
Instruction manual
Notice originale
Instructions d'emploi
Manual original
Manual del usario
Istruzioni originali
Istruzioni d'impiego
Oorspronkelijke gebruiksaanwijzing
Gebruiksaanwijzing
Druckspritze
Cleaner
Pressure sprayer
Cleaner
Pulvérisateur à pression
préalable Cleaner
Pulverizador de previa
presión Cleaner
Pompa a pressione
manuale Cleaner
Druksproier
Cleaner
Achtung!
Lesen Sie vor der ersten Inbetrieb-
nahme diese Gebrauchsanweisung
gründlich durch und beachten Sie
unbedingt die Sicherheitsvorschriften!
Attention!
Read this instruction manual carefully
before first operation and strictly
observe the safety regulations!
Attention !
Lire attentivement le présent manuel
avant la première mise en service et
observer impérativement les consignes
de sécurité !
Atención!
¡Lea atentamente este manual de
empleo antes de la primera puesta en
funcionamiento y respete
imprescindiblemente las prescripciones
de seguridad!
Attenzione!
Prima della prima messa in funzione leggere a
fondo le presenti istruzioni per l'uso e osservare
assolutamente le norme di sicurezza!
Attentie!
Lees vóór de eerste inbedrijfstelling deze
handleiding zorgvuldig door en let absoluut
op de veiligheidsvoorschriften!

- 2 -
DEUTSCH
1 Spritzmitteltank
2 Flanschgehäuse
3 Pumpengriff
4 Sicherheitsventil
5 Handventil
6 Spritzrohr
7 Spritzdrüse
8 Trageriemen
9 Herstellungsmonat
10 Herstellungsjahr
ENGLISH
1 Spraying agent tank
2 Flange housing
3 Pump handle
4 Pressure relief valve
5 Shut-off valve
6 Spray tube
7 Spray nozzle
8 Carrying strap
9 Month of production
10 Year of production
FRANÇAIS
1 Réservoir
2 Couvercle
3 Poignée de pompe
4 Soupape de sécurité
5 Valve à gâchette
6 Lance
7 Gicleur
8 Sangle de portage
9 Mois de construction
10 Année de construction
ESPAÑOL
1 Depósito
2 Acoplamiento
3 Empuñadura de la
bomba
4 Válvula de seguridad
5 Grifo de cierre
6 Tubo de rociado
7 Tobera de rociado
8 Bandolera
9 Mes de construcción
10 Año de construcción
ITALIANO
1 Contenitore
2 Scocca flangiata
3 Impugnatura pompa
4 Valvola di sicurezza
5 Valvola manuale
6 Tubo spruzzatore
7 Ugello spruzzatore
8 Cinghia
9 Mese di costruzione
10 Anno di costruzione
NEDERLANDS
1 Sproeimiddelreservoir
2 Flensbehuizing
3 Pompgreep
4 Veiligheidsventiel
5 Handventiel
6 Sproeilans
7 Sproeidop
8 Draagriemen
9 Bouwmaand
10 Bouwjaar
Fig. 1

- 3 -
Fig. 2 Fig. 3
Fig. 7
Fig. 4 Fig. 5 Fig. 6
Fig. 8 Fig. 9

- DEUTSCH - Druckspritze Cleaner 305 A / 307 A // 305 B / 307 B
DEUTSCH 4
Gebrauchsanweisung
Originalbetriebsanleitung
Achtung!
Lesen Sie vor der ersten Inbetrieb-
nahme diese Gebrauchsanweisung gründlich
durch und beachten Sie unbedingt die
Sicherheitsvorschriften! Bewahren Sie die
Gebrauchsanweisung sicher und griffbereit auf.
Um die Funktion und die Leistungsfähigkeit dieses
Gerätes über lange Zeit zu erhalten, sollten Sie die
Betriebs- und Wartungsanweisungen genau
beachten.
Sollten Sie nach dem Studium dieser Gebrauchs-
anweisung noch weitergehende Fragen haben,
steht Ihnen Ihr SOLO-Händler gerne zur
Verfügung.
Verpackung und Entsorgung
Bewahren Sie die Originalverpackung zum Schutz
vor Transportschäden für den Fall eines Versandes
oder Transportes auf.
Wird das Verpackungsmaterial nicht mehr benötigt
ist es entsprechend den örtlichen Bestimmungen
ordnungsgemäß zu entsorgen.
Verpackungsmaterialien aus Kartonagen sind
Rohstoffe und somit wieder verwendungsfähig
oder können dem Rohstoffkreislauf zurückgeführt
werden.
Nach Ablauf der Betriebsfähigkeit ist das Gerät
entsprechend den örtlichen Bestimmungen
ordnungsgemäß zu entsorgen.
EG-Konformitätserklärung
die SOLO Kleinmotoren GmbH,
Stuttgarter Straße 41, 71069 Sindelfingen,
Deutschland erklärt, dass die Druckspritzen
Cleaner der Typen 305A, 305B, 307A und 307B -
ab Herstelldatum 07/2016 und folgenden - den
einschlägigen Bestimmungen der Richtlinie
2006/42/EG des europäischen Parlaments und des
Rates vom 17. Mai 2006 über Maschinen
entsprechen.
Sindelfingen, 01.07.2016
Wolfgang Emmerich, SOLO Kleinmotoren GmbH,
Stuttgarter Straße 41, D-71069 Sindelfingen
(Geschäftsführer und
Dokumentationsbevollmächtigter
Symbole
Folgende Symbole werden am Gerät und in dieser
Gebrauchsanweisung verwendet:
Gebrauchsanweisung gründlich lesen.
GEFAHR! Bei Nichtbeachten der
Gebrauchsanweisung kann es zu
lebensgefährlichen Verletzungen kommen.
Vorschriftsmäßige Schutzkleidung tragen.
Schutzhandschuhe tragen.
Gesichtsschutz tragen.
Atemschutzmaske tragen.
Kein offenes Feuer.
Mindestabstand zu anderen
Personen: 15 m
Im Interesse der ständigen Weiterentwicklung
unserer Geräte müssen wir uns Änderungen des
Lieferumfangs in Form, Technik und Ausstattung
vorbehalten.
Wir bitten auch um Verständnis, dass aus Angaben
und Abbildungen dieser Anleitung keine Ansprüche
abgeleitet werden können.

DEUTSCH 5
1 Sicherheitsvorschriften
1.1 Bestimmungsgemäßer Gebrauch /
Anwendungsbereiche
Die Druckspritze darf ausschließlich zum
Ausbringen der nachfolgend beschriebenen
Reinigungs- und Desinfektionsmittel (je nach
Modellreihe saure oder alkalische Mittel) sowie
zum Ausbringen von sauberem Wasser benützt
werden.
Die Druckspritzen der Modellreihe A
- Typ 305 A u. Typ 307 A (FKM Dichtungen)
eignen sich zum Ausbringen von sauren bis PH
neutralen Spritzmittel im PH-Bereich von 1 – 7:
Reinigungs- und Desinfektionsmitteln,
Öl- bzw. Chlor-Kohlenwasserstoff haltige
Mittel.
Die Druckspritzen der Modellreihe B
- Typ 305 B und Typ 307 B (EPDM Dichtungen)
eignen sich zum Ausbringen von PH neutralen bis
basischen Spritzmittel im PH-Bereich von 7 – 14:
basische bzw. alkalische Reinigungs-,
Desinfektions-, Pflegemitte und Laugen
Alkohol haltige Reinigungs- und
Desinfektionsmittel
Für beide Modellreihen gilt:
Die verwendeten Mittel müssen grundsätzlich
zum Ausbringen über Druckspritzen vom
Hersteller freigegeben sein.
Die Hinweise der Mittelhersteller sind unbedingt
zu beachten.
Unzulässige Anwendungen:
Für alle oben nicht genannten Zwecke, wie zum
Beispiel
- Sprühen von Lacken,
- Ausbringen von
* entzündlichen Flüssigkeiten,
* klebrige, rückstandbildende Mittel,
* Tenside
* Flüssigkeiten mit Temperaturen
über 40 C
* Mittel die nicht zum Ausbringen über
Druckspritzen vorgesehen sind
und zur
- Lagerung von Flüssigkeiten
darf die Druckspritze nicht verwendet werden!
Um dem Anwender in Verbindung mit dem
Spritzmittelhersteller die Prüfung der
Werkstoffbeständigkeit zu ermöglichen, geben
wir auf Anfrage die an der Druckspritze
verwendeten Werkstoffe bekannt.
1.2 Allgemeine Sicherheitshinweise
Lesen Sie diese Gebrauchsanweisung
vor der ersten Inbetriebnahme aufmerk-
sam durch und bewahren Sie sie sicher auf. Ver-
wenden Sie dieses Gerät mit besonderer Vorsicht.
Das Missachten der Sicherheitshinweise kann
lebensgefährlich sein. Halten Sie sich auch an die
Unfallverhütungsvorschriften der
Berufsgenossenschaften.
Wer die Sicherheits-, Gebrauchs- oder
Wartungshinweise missachtet, haftet auch für alle
dadurch verursachten Schäden und Folgeschäden.
Die Gebrauchsanweisung und die Hinweise des
Mittelherstellers müssen ständig am Einsatzort des
Gerätes verfügbar sein.
Sie ist von jeder Person zu lesen, die mit Arbeiten
mit und an dem Gerät (auch zur Wartung, Pflege
und Instandsetzung) beauftragt ist.
Halten Sie Personen und Tiere vom Arbeits-
bereich fern. Niemals in Richtung anderer
Personen, Tiere und Gegenstände, die
beschädigt werden können, spritzen. Der
Benutzer ist verantwortlich für Gefahren oder
Unfälle, die gegenüber anderen Personen und
deren Eigentum auftreten.
Dieses Gerät darf nur an Personen ausgeliehen
bzw. weitergeben werden, die mit diesem Typ,
seiner Bedienung und der Gebrauchsanweisung
vertraut sind. Geben Sie stets diese Gebrauchs-
anweisung mit.
Nehmen Sie keine Änderungen an bestehenden
Sicherheitseinrichtungen und Bedienteilen vor.
Das Gerät darf nur in betriebssicherem Zustand
benutzt werden. Es ist vor jeder Benutzung
gemäß Kap. 2.2 daraufhin zu überprüfen.
Beschädigte Teile unverzüglich ersetzen. Dafür
nur SOLO-Originalersatzteile verwenden. Bitte
beachten Sie, dass bei der Verwendung von
Nichtoriginalteilen eine Garantieleistung nicht
möglich ist.
Es dürfen nur Zubehör und Anbauteile
verwendet werden, die von uns geliefert und
ausdrücklich für den Anbau freigegeben sind.
Wenn das Gerät nicht benutzt wird, ist es so
sicher abzustellen, dass niemand gefährdet
wird. Das Gerät gemäß Kap. 5.3 zur Lagerung
vorbereiten. Unbefugten Zugang ausschließen.

DEUTSCH 6
1.3 Sicherer Umgang mit Spritzmitteln
Die Hinweise der Mittelhersteller sind unbedingt
zu beachten.
Die Kontamination der Umwelt, des
Wasserleitungsnetzes und/oder der Kanalisation
mit Spritzmittel und Reiniger ist auszuschließen!
Durch geeignete Vorgehensweisen und
Auffangbehälter ist sicherzustellen, dass beim
Mischen, Einfüllen, Anwenden, Entleeren,
Reinigen, Warten und Transport keine
Kontamination stattfindet. Verschüttetes
Spritzmittel sofort abwischen
Spritzmittel und Reiniger dürfen auf keinen Fall –
auch nicht durch Rücksog beim Befüllen – in das
Wasserleitungsnetz gelangen, der öffentlichen
Kanalisation zugeführt, auf Ödlandflächen
ausgebracht, natürlichen Gewässern zugeführt
oder dem Hausmüll beigegeben werden.
Spritzmittel und Reiniger bzw. die Reste von
Spritzmitteln und Reinigern immer in einem
geeigneten Behälter auffangen und bei den
Sammelstellen für Haushaltschemikalien
abgeben. Auskünfte zu Sammelstellen für
Haushaltschemikalien sind bei den kommunalen
Verwaltungsstellen zu erfragen.
Vermeiden Sie direkten Kontakt mit
Spritzmitteln. Bei Haut- oder Augenkontakt mit
gesundheitsgefährdenden Spritzmitteln
betroffene Körperteile sofort mit reichlich
sauberem Wasser ab- bzw. ausspülen, mit
Spritzmittel durchnässte Kleidung sofort
wechseln und umgehend einen Arzt aufsuchen.
Erlauben sie niemals Kindern oder Personen,
die mit dem Umgang mit Spritzmitteln nicht
vertraut sind, das Arbeiten mit Spritzmitteln.
Niemals unterschiedliche Spritzmittel in den
Spritzmitteltank einfüllen. Bei Wechsel des
Spritzmittels müssen der Spritzmitteltank und
alle spritzmittelführenden Teile gereinigt werden.
Die Druckspritze nach dem Reinigen des
Spritzmitteltanks und vor dem Einfüllen des
neuen Spritzmittels, erst mit klarem Wasser
betreiben, um Rückstände aus der Pumpe und
den Schläuchen auszuspülen. Eventuelle
chemische Reaktionen werden dadurch
vermieden.
Beim Arbeitsende das Gerät gemäß Kap. 5.3 zur
Lagerung vorbereiten, verbleibende Reste von
Spritzmittel können zur Beschädigung des
Gerätes führen. Besonderes Augenmerk gilt den
Verschleißteilen wie Düsen, Filter und
Dichtungen. Arbeitskleidung ablegen und
regelmäßig waschen, Gesicht und Hände
gründlich mit Wasser und Seife reinigen.
1.4 Arbeitskleidung /
Persönliche Schutzausrüstung (PSA)
Zweckentsprechende, vorschriftsmäßige
Schutzkleidung, die alle Körperteile vor Kon-
takt mit Spritzmittel schützt, ist zu tragen –
Schutzhandschuhe, Gesichtsschutz (z. B.
Schutzbrille), Fußschutz, Körperschutz (z. B.
Gummischürze), ggf. Atemschutz.
Tragen Sie Schutzhandschuhe mit
rutschfester Grifffläche.
Verwenden Sie einen Gesichtsschutz.
Bei der Verwendung von gefährlichem
Spritzmittel Atemschutzmaske verwenden.
Mit Spritzmittel durchnässte Arbeitskleidung
sofort wechseln.
Arbeitskleidung regelmäßig waschen.
1.5 Beim Gerätetransport
Um Beschädigungen zu vermeiden und unter
Berücksichtigung der möglichen Gefahren im
Straßenverkehr ist das Gerät beim Transport in
Fahrzeugen gegen Umkippen und gegen
Herumfliegen durch Festschnallen zu sichern.
Das Auslaufen von Spritzmittel ist
auszuschließen. Vor dem Transport das Gerät
ordnungsgemäß entleeren.
1.6 Vor und bei der Arbeit
Überprüfen Sie vor jedem Arbeitsbeginn das
komplette Gerät gemäß Kap. 2.2 auf betriebs-
sicheren Zustand. Das Gerät darf nur im
betriebssicheren Zustand verwendet werden.
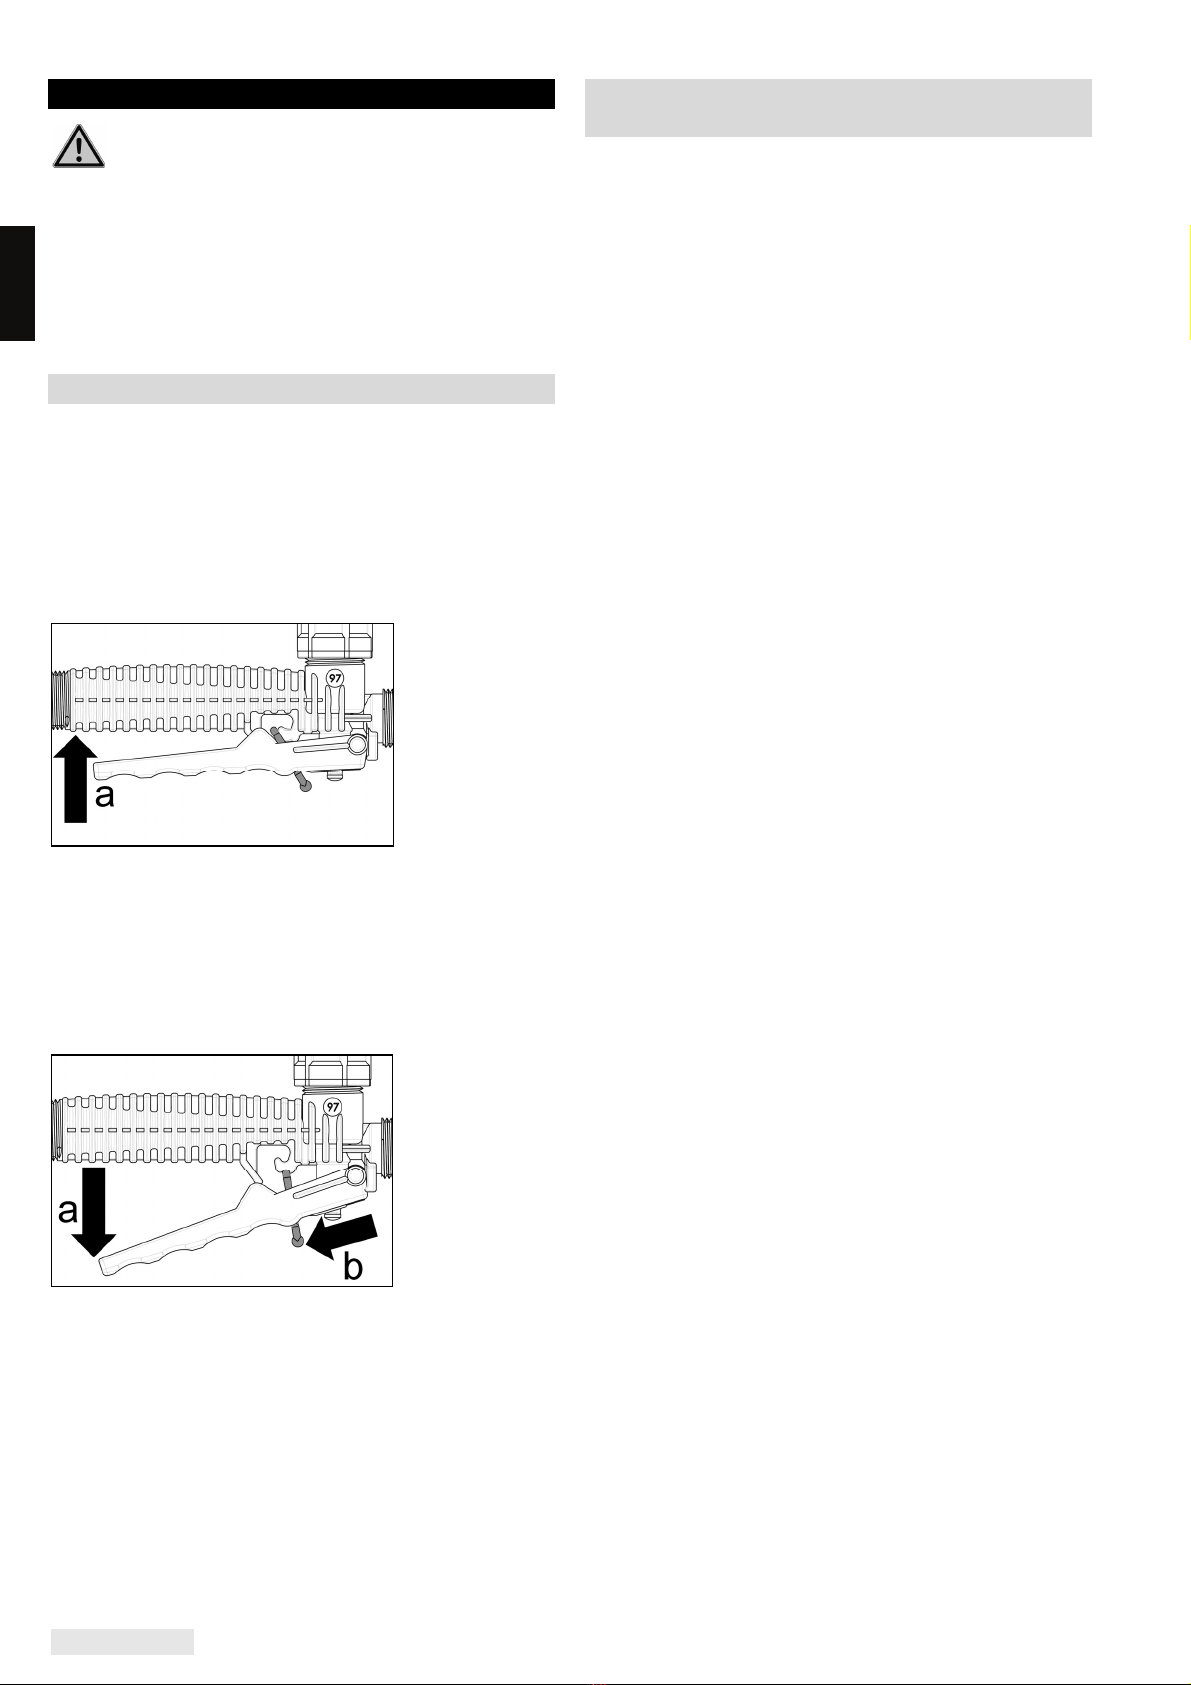
Achten Sie vor dem Pumpen darauf, dass das
Handventil (5) geschlossen ist. Richten Sie das
Spritzrohr (6) auf einen freien Bereich.
1.7 Bei Wartung, Reparatur und
Aufbewahrung
Führen Sie nur solche Wartungs- und
Reparaturarbeiten selbst aus, die in dieser
Gebrauchsanweisung beschrieben sind. Alle
anderen Arbeiten sind von einer autorisierten
Fachwerkstatt auszuführen.
Das Gerät darf nicht in der Nähe von
offenem Feuer gewartet, repariert oder
aufbewahrt werden.
Bei allen Reparaturen dürfen nur SOLO-
Originalersatzteile verwendet werden.
Am Gerät dürfen keine Änderungen
vorgenommen werden, da hierdurch die
Sicherheit beeinträchtigt werden kann und
Unfall- und Verletzungsgefahr besteht!

DEUTSCH 7
2 Arbeitsvorbereitung
2.1 Zusammenbau
Aus Versandgründen ist die Druckspritze noch
nicht komplett montiert. Das Gerät darf nur in
komplett zusammengebautem Zustand in Betrieb
genommen werden!
Montage des Spritzrohrs:
Setzen Sie die Überwurfmutter (Fig. 2, Pos. 11)
gerade an und schrauben Sie das Spritzrohr (6)
mit O-Ring (16x3 mm) werkzeuglos handfest am
Handventil (5) fest.
Außerhalb der Arbeit wird das Spritzrohr an der
Halteklemme am Pumpengriff befestigt. Dabei
muss die Spritzdüse nach oben zeigen (Fig. 1).
Als Standard-Spritzdüse wird werksseitig eine
Flachstrahldüse 90° PVDF montiert.
2.2 Überprüfen auf betriebssicheren Zustand
Vor jeder Anwendung ist die Druckspritze per
Sichtkontrolle zu überprüfen. Es dürfen keine Risse
am Behälter (1), an dem Flanschgehäuse (2), am
Spritzrohr (6) und am Düsenaufsatz (7) zu
erkennen sein.
Bei der Erstinbetriebnahme und bei
Wiederinbetriebnahme nach längerer Stillsetzung
sind nachfolgende Kontrollen zuerst mit klarem
Wasser durchzuführen. Während der Anwendung
der Druckspritze ist die ordnungsgemäße Funktion
grundsätzlich im Betrieb zu kontrollieren.
Nach dem ordnungsgemäßen Befüllen und
Wiederverschließen der Druckspritze die Funktion
von Pumpe und des Sicherheitsventils (4)
überprüfen.
Dazu über die Pumpe Druck aufbauen. Beim
Betätigen des Sicherheitsventils (4) muss deutlich
hörbar der Druck wieder entweichen (Fig. 3).
Beim Betätigen des Sicherheitsventils muss
das Gerät immer senkrecht stehen. Achtung:
Gesichtsnähe vermeiden!
Zur Kontrolle der Dichtigkeit auch bei unter Druck
stehendem Behälter wieder über die Pumpe Druck
aufbauen und das gesamte Gerät inspizieren. Vor
dem Betätigen des Handventils darf, auch bei unter
Druck stehendem Behälter, nirgends Flüssigkeiten
austreten.
Während der Anwendung die Funktion des
Handventils kontrollieren. Beim Loslassen des
Handventils muss der Spritzvorgang unterbrochen
werden und es darf keine Flüssigkeit mehr
austreten.
Bei Unregelmäßigkeiten, erkennbaren Beschädi-
gungen, Undichtheiten oder eingeschränkter
Funktionstüchtigkeit beginnen Sie nicht mit der
Arbeit, sondern machen Sie das Gerät umgehend
über das Sicherheitsventil (4) drucklos (Fig. 3) und
lassen Sie es von einer Fachwerkstatt überprüfen.
3 Spritzmittel ansetzen und
Spritzmitteltank befüllen
Beachten Sie beim Umgang mit Spritzmittel
unbedingt die Sicherheitsvorschriften dieser
Gebrauchsanweisung (besonders Kap. 1.3) und die
Hinweise des Spritzmittelherstellers.
Vor dem Öffnen des Spritzmitteltanks ist das Gerät
durch Ziehen am Sicherheitsventil (4) drucklos zu
machen (Fig. 3)! Beim Ziehen am Sicherheitsventil
muss das Gerät immer senkrecht stehen.
Achtung: Gesichtsnähe vermeiden!
Spritzmittelmenge:
Spritzmittel nach den Vorschriften der
Spritzmittelhersteller ansetzen.
Menge nach dem tatsächlichen Bedarf wählen.
Spritzmitteltank befüllen:
Zum Einfüllen der Spritzflüssigkeit muss die
Pumpe herausgeschraubt werden. Schieben Sie
dazu den Pumpengriff (3) nach unten und drehen
Sie ihn nach links (gegen den Uhrzeigersinn). Die
Pumpe gegen den Uhrzeigersinn
herausschrauben. Kein Werkzeug verwenden!
Auf der Seite des Spritzmitteltanks (6) sind
Markierungen für das Füllvolumen angebracht.
Befüllen Sie den Tank maximal bis zur obersten
Markierung (maximale Füllmenge).
Maximale Füllmenge: Typ 305: 5 Liter
Typ 307: 7 Liter
Nach dem Befüllen die Pumpeinheit wieder im
Uhrzeigersinn werkzeuglos fest verschrauben,
damit kein Spritzmittel austreten kann.

DEUTSCH 8
4 Anwendung der Druckspritze
Beachten Sie bei der Anwendung der
Druckspritze die Sicherheitsvorschriften.
Kontrollieren Sie vor jedem Arbeitsbeginn die
gesamte Druckspritze gemäß Kap. 2.2 auf
betriebssicheren Zustand.
Die Druckspritze kann auch am Pumpengriff (3)
getragen werden, wenn dieser ganz nach unten
geschoben und nach rechts eingerastet ist.
4.1 Spritzen
Zum Pumpen lösen Sie den Griff (3) durch entspre-
chende Drehung aus der Rasterung.
Pumpen Sie bis der Betriebsdruck im
Spritzmitteltank erreicht ist. Überdruck entweicht
selbstständig durch das Sicherheitsventil (4).
Das Spritzrohr am Handventil in der Hand halten.
Zum Spritzen das Handventil (5) betätigen (a).
Durch Loslassen des Handventils wird der
Spritzvorgang unterbrochen.
Gegen unbeabsichtigtes Spritzen kann das
Handventil in Ruheposition mit der blauen
Klammer blockiert werden. Dazu den Bedienhebel
leicht abspreizen (a) und die Klammer
einrasten (b).
4.2 Restmenge des Spritzmittels /
Beenden des Spritzvorgangs
Sobald beim Spritzen mit der Druckspritze Luft mit
aus der Düse austritt (Nebelschwaden entstehen),
ist der Spritzvorgang zu beenden. Im
Spritzmitteltank befindet sich dann noch eine
Restmenge von weniger als 200 ml. Wenn Sie kein
weiteres Spritzmittel nachfüllen wollen und das
Spritzen beenden wollen, sammeln und entsorgen
Sie die Restmenge nach geltenden Gesetzen und
Vorschriften. Beachten Sie die Angaben des
Spritzmittelherstellers.
Beim Arbeitsende das Gerät gemäß Kap. 5.3 zur
Lagerung vorbereiten, Gesicht und Hände gründ-
lich mit Wasser und Seife reinigen, Arbeitskleidung
ablegen und regelmäßig waschen.

DEUTSCH 9
5 Wartung, Reinigung und Aufbewahrung
5.1 Deckeldichtung fetten
Fig. 10:
Um den Spritzmitteltank
abzudichten muss die
Deckeldichtung (10) immer
gut mit Silikonfett gefettet
werden.
5.2 Dichtring des Pumpenkolbens fetten
Bei Schwergängigkeit der Pumpe ist der Dichtring
(Fig. 7, Pos. 12, Bestell-Nr.
Modellreihe A: 00 62 149
Modellreihe B: 00 62 369)
am Pumpen-Kolben mit Silikonfett einzufetten oder
gegebenenfalls zu ersetzen.
Demontage der Pumpe und fetten des Dichtrings:
Fig. 4: Druckloses und leeres Gerät sicher auf
ebenen Boden stellen. Wenn die Pumpe ganz auf
den Spritzmitteltank geschraubt ist, dann genau
1-2 Umdrehungen lockern.
Fig. 5: Den Pumpengriff mit beiden Händen fest
nach unten drücken bis sich die Pumpe mit
deutlichem Klick aus dem blauen Flanschgehäuse
löst. Das blaue Flanschgehäuse vom Gerät
abdrehen und die Pumpe aus dem Spritzmitteltank
entnehmen.
Fig. 6: Mit einem Schraubendreher die beiden
schwarzen Flansch-Halbkreise vom Pumpen-
Zylinder abhebeln. Jetzt kann der Pumpen-Kolben
aus dem Pumpen-Zylinder gezogen werden.
Fig. 7: Nun kann der Dichtring (12) mit Silikonfett
gefettet werden oder bei Beschädigung durch
einen neuen ersetzt werden.
Zusammenbau:
Fig. 8: Das blaue Flanschgehäuse lagerichtig auf
den Pumpen-Kolben positionieren.
Pumpen-Kolben in den Pumpen-Zylinder schieben.
Die beiden schwarzen Flansch-Halbkreise fest auf
den Pumpen-Zylinder drücken bis diese mit
deutlichem Klick einrasten.
Fig. 9: Den Pumpen-Zylinder sicher auf ebenen
Boden stellen. Das blaue Flanschgehäuse
passgenau ansetzen und mit beiden Händen fest
auf den Pumpen-Zylinder drücken bis dieses mit
deutlichem Klick einrasten.
5.3 Spritzmitteltank entleeren und
spritzmittelführende Teile reinigen
Vor dem Öffnen des Spritzmitteltanks und vor dem
Demontieren des Düsenaufsatzes ist das Gerät
durch Ziehen am Sicherheitsventil (4) drucklos zu
machen (Fig. 3)! Beim Ziehen am Sicherheitsventil
muss das Gerät immer senkrecht stehen.
Achtung: Gesichtsnähe vermeiden!
Die Druckspritze täglich nach Gebrauch entleeren.
Sammeln und entsorgen Sie die Restmenge des
Spritzmittels nach geltenden Gesetzen und
Vorschriften. Beachten Sie die Angaben des
Spritzmittelherstellers. Den Spritzmitteltank und
alle spritzmittelführenden Teile mit sauberem
Wasser gut durchspülen. Die Druckspritze noch
einmal mit klarem Wasser betreiben.
Spritzmitteltank nach dem Reinigen im geöffneten
Zustand trocknen lassen.
Ca. jeweils nach 50 Einsätzen oder falls das
Spritzbild ungleichmäßig ist bzw. deutlich weniger
Spritzmittel austritt, ist die Spritzdüse wie folgt zu
reinigen:
Spritzdüse reinigen:
Düsenaufsatz mit sauberem Wasser abspülen.
Düsenaufsatz auseinanderschrauben (Fig. 2).
O-Ringe und Spritzdüse mit sauberem Wasser
und weicher Bürste reinigen. Spritzdüse nicht
mit dem Mund ausblasen! Düsen nicht mit
harten Gegenständen reinigen!
Einzelteile des Düsenaufsatzes wieder
zusammenschrauben.
5.4 Stilllegung und Aufbewahrung
Das Gerät gemäß Kap. 5.3 zur Lagerung
vorbereiten.
Bewahren Sie das Gerät geschützt vor Sonnenlicht
an einem trockenen, frostfreien und sicheren Ort
im geöffneten Zustand bei einer
Umgebungstemperatur bis max. 35 C auf.
Es dürfen keine offenen Feuerstellen oder
dergleichen in der Nähe sein.
Unbefugte Benutzung – besonders durch Kinder –
ausschließen.

DEUTSCH 10
6 Technische Daten
Modell 305 A 305 B 307 A 307 B
Spritzmitteltank: Volumen ("Total Vol.") l
Max. Füllmenge ("max. Vol.") l
ca. 7,5
ca. 5,0
ca. 9,0
ca. 7,0
Restmenge,
die das Gerät nicht mehr ordnungsgemäß ausbringt ml
< 200
Maximal zulässiger Betriebsdruck bar 3,0
Zulässige Betriebstemperatur °C 0–40
Behälterwerkstoff Polethylen
Spritzrohr Länge mm 500
Druckschlauch: Länge mm 1.500
Dichtungsmaterial
geeignet für Spritzmittel im PH-Bereich
FKM
1 - 7
EPDM
7 - 14
FKM
1 - 7
EPDM
7 - 14
Maximale Ausbringmenge bei 3 bar l/min 0,8
Standard-Spritzdüse Flachstrahldüse 90° PVDF
Gewicht (betriebsfertig): Ohne Spritzmittel ("net weight") kg
Mit max. Füllmenge kg
2,6
7,6
2,8
9,8
Abmessungen (ohne Spritzrohr und Druckschlauch):
Höhe / Breite / Tiefe mm
450 / 200 / 200
520 / 200 / 200
7 Verschleißteile
Verschiedene Bauteile unterliegen
gebrauchsbedingtem Verschleiß bzw. einer
normalen Abnutzung und müssen ggf. rechtzeitig
ersetzt werden.
Nachstehende Verschleißteile unterliegen nicht der
Herstellergarantie:
Alle mit Spritzmittel in Berührung kommenden
Gummiteile
Spritzdüse
Filter
Dichtungen
8 Garantie
Wir garantieren eine einwandfreie Qualität und
übernehmen die Kosten für eine Nachbesserung
durch Auswechseln der schadhaften Teile im Falle
von Material- oder Herstellungsfehlern, die
innerhalb der Garantiezeit nach dem Verkaufstag
auftreten.
Bitte beachten Sie, dass in einigen Ländern
spezifische Garantiebedingungen gültig sind.
Fragen Sie im Zweifelsfall Ihren Verkäufer. Er ist
als Verkäufer des Produktes für die Garantie
verantwortlich.
Wir bitten um Ihr Verständnis, dass für folgende
Schadensursachen keine Garantie übernommen
werden kann:
Nichtbeachtung der Gebrauchsanweisung.
Unterlassung von notwendigen Wartungs- und
Reinigungsarbeiten.
Verschleiß durch normale Abnutzung
(insbesondere: Dichtungen, Membranen,
Manschetten, Düsen und Filter).
Verwendung nicht zugelassener
Arbeitswerkzeuge.
Gewaltanwendung, unsachgemäße Behandlung,
Missbrauch oder Unglücksfall.
Eingriffe nicht sachkundiger Personen oder
unsachgemäße Instandsetzungsversuche.
Eigenmächtige Veränderungen am Gerät.
Verwendung ungeeigneter Ersatzteile bzw.
Nichtoriginalteile, soweit diese den Schaden
verursachten.
Verwendung nicht zugelassener Mittel im
Spritzmitteltank.
Schäden, die auf Einsatzbedingungen aus dem
Vermietgeschäft zurückzuführen sind.
Reinigungs-, Pflege- und Einstellarbeiten werden
nicht als Garantieleistung anerkannt.
Jegliche Garantiearbeiten sind von einem unserer
autorisierten Fachhändler auszuführen.

- ENGLISH Pressure Sprayer Cleaner 305 A / 307 A // 305 B / 307 B
ENGLISH 4
Instruction manual
Original instructions
Caution!
Prior to operating the unit, please read
this instruction manual carefully, and most
importantly, observe all safety rules.
To ensure that your device will continue to work
properly and deliver optimum performance for
many years to come, ensure that you follow all
operating and maintenance instructions.
Your authorised SOLO dealer will be glad to assist
you with any questions.
Packaging and disposal
Please keep the original packaging in order to
protect the equipment against transport damage in
case you ever need to ship it or transport it.
If the packaging materials are no longer required
then they must be disposed of properly in
accordance with applicable local regulations.
Cardboard packaging materials are raw materials
which can be recycled or reused.
At the end of the equipment’s service life, please
make sure that you dispose of it properly in
accordance with the official directives and
regulations that apply in your area.
EC declaration of conformity
SOLO Kleinmotoren GmbH, Stuttgarter Straße 41,
71069 Sindelfingen, GERMANY declares that the
PRESSURE SPRAYERS CLEANER, types 305 A,
305 B, 307 A and 307 B – from date of
manufacture 07/2016 and following – comply with
the directive 2006/42/EC of the European
Parliament and of the Council of 17 May 2006 on
machinery
Sindelfingen, 01.07.2016,
Wolfgang Emmerich, SOLO Kleinmotoren GmbH,
Stuttgarter Straße 41, D-71069 Sindelfingen
(Director and authorized person to compile the
technical file)
Symbols
The following symbols are used in this instruction
manual and on the device itself:
Read the manual carefully.
DANGER! Failure to comply with the
instructions could cause accidents with
potentially life-threatening injuries.
Wear the prescribed protective clothing.
Wear protective gloves.
Wear face protection.
Wear breathing mask.
No naked flames.
Minimum distance to bystanders:
15 m (approx. 16 yards)
In the best interest of continued technological
progress we reserve the right to change the design
and configuration of any product without prior
notice.
For that reason, no claims can be accepted with
reference to text and illustrations in this manual.

ENGLISH 5
1 Safety regulations
1.1 Correct use / areas of application
Depending on model series, the pressure
sprayer must be used only to distribute the
following cleaning agents and disinfectants, or to
distribute clean water.
The pressure sprayers of the model series A
- Type 305 A and type 307 A
(sealing material FKM) are suitable for distribution
of acidic to pH-neutral spraying agents in the
pH-range from 1 – 7:
Cleaning agents and disinfectants,
Agents containing oil or chlorinated
hydrocarbon.
The pressure sprayers of model series B
- Type 305 B and type 307 B
(sealing material EPDM) are suitable for
distribution of pH-neutral to alkaline spraying
agents in the pH-range from 7 – 14:
Basic or alkaline disinfectants, cleaning and
care agents
Alcohol-containing cleaning agents and
disinfectants
The following applies to both model series:
The media used generally must be released for
application via pressure sprays by the
manufacturer.
Observe all instructions provided by the spraying
agent manufacturer.
The pressure sprayer must not be used for all
purposes not named above, such as
- spraying of paints
- distribution of
* flammable liquids
* sticky, residue-forming agents
* surfactants
* fluids with temperatures
above 40 C
* agents not intended for distribution by
pressure sprayers
and
- storage of fluids!
To enable the operator in connection with the
spraying agent manufacturer to check the
material resistance to certain chemicals, we will
provide details of the type of materials used for
the pressure sprayer.
1.2 General safety instructions
Please take the time to carefully read
through these operating instructions
before using the device for the first time and keep
them in a safe place thereafter. Always take great
care when using the device.
You can put your life at risk by failing to follow the
safety instructions.
It is also important to follow any relevant health
and safety regulations that apply to your place of
work.
Anyone who fails to follow the safety instructions,
operating instructions or maintenance instructions
will make themselves liable for any damage and
consequential damage caused as a result.
The operating instructions and the instructions
provided by the spraying agent manufacturer must
be kept available at all times wherever the device
is used or stored. They must be read by anyone
instructed to use the equipment or perform work
with or on the device (including servicing,
maintenance and repairs).
Keep persons and animals away from areas in
which you are working. Never spray in the
direction of other persons, animals or objects
that could be damaged as a result. The user is
responsible for any hazards or accidents
involving other persons and/or their property.
This equipment must only be hired out, lent or
passed on to persons who are familiar with this
type of equipment and its operation and who
have read the operating instructions. Always
ensure that you hand over the operating
instructions together with the device.
Never alter, change or modify any safety
equipment or operating controls.
Never use the device if any part of it is unsafe or
if it is not in an overall condition that makes it
safe to use. Before using the device always
check whether it is safe to use according to
section 2.2.
Immediately replace damaged parts. Only use
genuine SOLO replacement parts. Please note
that the use of non-genuine replacement parts
will invalidate your warranty.
Only use accessories and add-on parts that
have been supplied and specifically approved for
installation on the device by us.
When the device is not being used it should be
safely stored in a place where it will not
endanger the health and safety of others.
Prepare the device for storage according to
section 5.3. Ensure that the device is stored in a
safe place where unauthorised persons cannot
access it.

ENGLISH 6
1.3 Safe handling of spraying agents
Observe all instructions provided by the spraying
agent manufacturer.
Avoid contaminating the environment, the mains
water supply and/or public sewer systems with
spraying agent or cleaner!
Ensure to avoid contamination when mixing,
filling, using, draining, cleaning, servicing and
transporting by using adequate procedures and
suitable containers. Wipe off spilled spraying
agent at once.
Spraying agents and cleaners must never be
allowed to enter the mains water supply – not
even by back-suction when filling, public sewer
systems, sprayed onto wastelands, allowed to
drain into natural bodies of water or disposed of
together with normal domestic waste. This also
means that appropriate care must be taken
during filling to ensure that none of the spraying
agent is drawn back into water pipes. Spraying
agents and cleaners and any unused leftovers of
spraying agents and cleaners must always be
collected in a suitable container and disposed of
via approved facilities for household chemical
waste. Please contact your local authorities for
information about your nearest disposal facilities.
Avoid any direct contact with spraying agents.
In case of contact with health hazardous spray-
ing agents, immediately rinse the affected body
parts with plenty of clean water, immediately
change the clothing soaked with spraying agents
and immediately seek medical advice.
Never allow children or anybody who is not
familiar with handling this type of spraying agent
to handle the spraying agent.
Never fill more than one spraying agent into the
spraying agent tank. Clean the spraying agent
tank and all other spraying agent carrying parts
whenever the spraying agent is changed. To
flush out any residue from the pump and the
hose, run the pressure sprayer with clean water
after cleaning the spraying agent tank and
before the next spraying agent is filled in. This
will prevent the risk of any chemical reactions
taking place between the different substances.
When you have finished spraying, prepare the
device for storage according to section 5.3, any
unused spraying agent that is left over in the
device could cause corrosion and hence
damage the device. Special attention must be
paid to wearing parts like spray nozzles, filters
and seals. Take off your work clothing and
ensure that it is washed regularly, thoroughly
wash your face and hands with soap,.
1.4 Work clothing /
personal protection equipment (PPE)
Always wear suitable protective clothing in
accordance with the relevant regulations.
The clothing must protect all parts of your body
against contact with spraying agents and against
objects that are kicked up – i.e., protective gloves,
face protection (e.g., protective goggles),
protective footwear, body protection (e.g., rubber
apron), if required breathing protection.
Wear protective gloves with non-slip
palms.
Wear face protection against the spraying
agents.
Wear a respirator when using dangerous
spraying agents.
Immediately change any clothing that becomes
soaked with the spraying agent.
Wash the work clothing regularly.
1.5 Transportation of the device
To prevent damage and to eliminate potential
hazards for other road users, use secure lashing
equipment to secure the device and prevent it
from tipping over and falling when transporting it
on a vehicle.
Take appropriate measures to ensure that the
spraying agent cannot leak or spill. Empty the
device properly before transport.
1.6 Before and during work
Every time before you start using the device,
check the entire device to ensure it is safe to use
according to section 2.2. The device must only
be used in an operationally safe condition.
When starting to pump, ensure that the shut-off
valve (5) is closed. Point the spray tube (6)
towards a free area.
1.7 Maintenance, repairs and storage
Only perform maintenance work and repairs by
yourself if they are covered in these operating
instructions. All other work must be carried out by
an authorised workshop.
The device must not be serviced, repaired
or kept in the vicinity of naked flames.
All repairs must only be performed using SOLO
genuine replacement parts.
The device must not be altered in any way, as
this could adversely affect the safety of the
device and potentially cause an accident or
injury.

ENGLISH 7
2 Preparing the device for use
2.1 Assembly
The pressure sprayer is dismantled before it is
dispatched. It must be fully reassembled again
before it is used.
Installation of the spray tube:
Fasten the threaded collar (Fig. 2, pos. 11) on
straight and firmly screw the spray tube (6) with
O-ring (16x3 mm) hand-tight onto the shut-off
valve (5). Do not use any tools!
When your work is completed, the spray tube
should be fitted into the holding clamp at the pump
handle.
Please put the nozzle completely up (Fig. 1).
At the factory, a flat jet nozzle 90° PVDF is
assembled as the standard spray nozzle.
2.2 Checking for operationally safe condition
Before any use, the pressure sprayer must be
subjected to a visual inspection. There must be no
visible cracks at the tank (1), the flange
housing (2), the spray tube (6) and the nozzle
attachment (7).
The following inspections must be performed at
first commissioning and at recommissioning after
extended standstill. During use of the pressure
sprayer, proper function generally must be verified
in operation.
Check the function of pump and pressure relief
valve (4) after properly filling and re-closing of the
pressure sprayer.
For this, build up pressure across the pump. The
pressure must escape with a clearly audible sound
when you actuate the pressure relief valve (Fig. 3).
The device always must be vertical when the
pressure relief valve is actuated. Attention:
Keep it away from your face!
To verify tightness even with the tank pressurised,
build up pressure across the pump again and
inspect the entire device. No liquid must escape
before actuating the shut-off valve, even while the
tank is pressurised.
Check the function of the shut-off valve during
application. When releasing the shut-off valve,
spraying must stop and no liquid must escape
anymore.
In case of irregularities, recognisable damage,
leaks or limited function, do not start work but
depressurise the device at once using the pressure
relief valve (4) (Fig. 3) and have it inspected by a
specialist workshop.
3 Mixing spraying agents and
filling the spraying agent tank
When handling the spraying agents, always
follow the safety instructions of these
operating instructions (pay special attention to
section 1.3) and the information provided by the
manufacturer of the particular spraying agent.
Before opening the spraying agent tank,
depressurise the device by pulling on the pressure
relief valve (Fig. 3).
Before pulling on the pressure relief valve (4), the
device must always be in an upright position.
Attention: Keep the device away from your face!
Spraying agent volume:
Mix the spraying agents according to the
instructions provided by the manufacturer of the
spraying agent. Choose the appropriate volume
according to requirements.
Filling the spraying agent tank:
To fill the tank with spraying agent, remove the
pump by pushing the pump handle (3) down and
turning it to the left (counterclockwise). Unscrew
the pump by turning it counterclockwise. Do not
use any tools!
Fill level markings are applied to the side of the
spraying agent tank (1).
When filling up the tank, ensure that you do not fill
above the top marking (maximum fill volume).
Maximum fill volume: Model 301: 5 l [1.32 gal]
Model 302: 7 l [1.85 gal]
After filling, insert the pump again and refasten
firmly by turning the pump handle (3) clockwise to
prevent the spraying agent from escaping.

ENGLISH 8
4 Using the pressure sprayer
Ensure that you follow all of the safety
instructions when using the pressure
sprayer.
Every time you use the pressure sprayer, first
check it all over to ensure it is safe to use
according to section 2.2.
The pressure sprayer can also be carried by the
pump handle (3), if the pump handle is pressed
down completely, and it is turned to the right and
clicked into position.
4.1 Spraying
To pump, loosen the pump handle (3) by turning
out of the stop position. Pump the unit until the
operating pressure is reached in the spraying
agent tank. Excessive pressure escapes
automatically through the pressure relief valve (4).
Hold the spray tube at the shut-off valve in your
hand.
Start the spraying process by pressing the shut-off
valve (5) (a).
Releasing the shut-off valve stops the spray
process.
The blue clip can be used to secure the shut-off
valve in its rest position to prevent accidental
spraying. For this, pull the lever slightly away (a)
from the handle and lock the clip (b).
4.2 Residual spraying agents /
finishing spraying
Switch off the pump immediately when any air is
sucked in and sprayed out through the spray
nozzle. This is indicated by a mist being sprayed
from the nozzle. At this point the spraying agent
tank will still contain a residual amount of less than
10 ml [6.8 oz]. If you do not want to fill in any more
spraying agent and want to end spraying, collect
and dispose of the remaining amount according to
the applicable laws and provisions. Observe the
information from the spraying agent manufacturer.
When you finish working, prepare the device for
storage according to section 5.3, thoroughly wash
your face and hands with soap, take off your work
clothing and ensure that it is washed regularly.

ENGLISH 9
5 Maintenance, cleaning and storage
5.1 Greasing the cap gasket
Fig. 10:
For proper sealing of the
spraying agent tank, the
cap gasket (10) must be
well greased with silicone
grease.
5.2 Greasing the pump piston sealing ring
If the pump is hard to operate, the sealing ring of
the pump piston (Fig. 7, pos. 12, part no.
model series A: 00 62 149
model series B: 00 62 369)
should be greased with silicone grease or replaced
if necessary.
Disassembly of the pump and greasing the
sealing ring:
Fig. 4: Ensure the sprayer is empty and not
pressurised. Place sprayer securely on level
ground. If the pump is completely screwed onto the
tank, loosen the pump with 1–2 turns.
Fig. 5: Firmly hold the pump handle with both
hands and push downwards until the pump
releases from the flange housing with an audible
click. Unscrew the blue flange housing from the
sprayer and remove the pump from the tank.
Fig. 6: Use a screwdriver to lever both black flange
semi-circles from the pump cylinder. The pump
piston can now be pulled from the pump cylinder.
Fig. 7: The sealing ring (12) can now be re-greased
with silicone grease or replaced if damaged.
Assembly:
Fig. 8: Place the blue flange housing correctly on
the pump piston.
Push the pump piston into the pump cylinder.
Push both black flange semi-circles onto the pump
cylinder until they lock with an audible click.
Fig. 9: Place the pump cylinder securely on level
ground. Line up the blue flange housing in the
exact position and firmly push the red flange
housing down with both hands onto the pump
cylinder until the parts lock together with an audible
click.
5.3 Draining the spraying agent tank and
cleaning the spraying agent carrying
parts
Before opening the spraying agent tank and before
disassembling the nozzle attachment, depressurise
the device by pulling on the pressure relief valve
(Fig. 3).
Before pulling on the pressure relief valve (4), the
device must always be in an upright position.
Attention: Keep the device away from your face!
Empty the pressure sprayer after use every day.
Collect and dispose of the residual quantity of the
spraying agent according to the applicable law and
provisions. Observe the information from the
spraying medium manufacturer. Flush the spraying
agent tank and all spraying-agent-conducting parts
thoroughly with clean water. Operate the pressure
sprayer once more with clear water.
Let the spraying agent tank dry again in the open
condition after cleaning.
Clean the spraying nozzle as follows after every 50
uses, or if the spraying pattern grows uneven, or if
much less spraying agent then before is
dispensed:
Cleaning the spray nozzle:
Rinse the nozzle attachment with clean water.
Disassemble the nozzle attachment (Fig. 2).
Clean the O-rings and the spray nozzle with
clean water and a soft brush.
Never use your mouth to blow through the spray
nozzle! Never use hard objects to clean the
nozzles!
Reassemble the components of the nozzle
attachment (Fig. 2).
5.4 Taking the sprayer out of service and
putting it into storage
Prepare the device for storage according to
section 5.3. .
Store the device protected from sunlight in a
secure, dry and frost-free location under a
maximum ambient temperature of 35 °C [95 °F].
There must not be any open fires or similar
nearby.
Ensure that the unit cannot be used by
unauthorised persons, in particular children.

ENGLISH 10
6 Specification
Model ("Typ") 305 A 305 B 307 A 307 B
Spraying agent tank: Nominal volume ("Total Vol.")
Max. fill volume ("max. Vol.")
approx. 7.5 l
[1.98 gal]
approx. 5.0 l
[1.32 gal]
approx. 9.0 l
[2.38 gal]
approx. 7.0 l
[1.85 gal]
Residual volume not properly discharged by the device < 200 ml [6.8 oz]
Maximum permissible operating pressure 3.0 bar [43 psi]
Permissible operating temperature 0–40 °C [32–104 °F]
Tank material Polyethylene
Spray tube Length 500 mm [19.7"]
Pressure hose: Length 1,500 mm [59"]
Sealing material
suitable for spraying agents in the pH range
FKM
1 - 7
EPDM
7 - 14
FKM
1 - 7
EPDM
7 - 14
Maximum delivery at 3 bar [43 psi] 0.8 l/min [0.21 USgal/min]
Standard spray nozzle flat jet nozzle 90° PVDF
Weight (ready for operation): Tank empty ("net weight")
tank filled to max.
2.6 kg [5.7 lbs]
7.6 kg [16.8 lbs]
2.8 kg [6.2 lbs]
9.8 kg [21.6 lbs]
Dimensions (without spray tube and pressure hose): Height
Width
Depth
450 mm [17.7"]
200 mm [7.9"]
200 mm [7.9"]
520 mm [20.5"]
200 mm [7.9"]
200 mm [7.9"]
7 Wearing parts
Various parts are subject to application-specific
wear or to normal wear and must be replaced in
good time if necessary.
The following parts are subject to normal wear and
are not covered by the manufacturers guarantee:
All rubber parts that come into contact with the
spraying agent
Spray nozzle
Filters
Seals
8 Warranty
We warrant problem free quality and will cover the
cost of replacing parts which are found to be faulty
in material or show manufacturing defects within
the prescribed guarantee period after the date of
purchase.
Please note that specific guarantee conditions may
differ from country to country. When in doubt,
please ask the vendor of the goods. The vendor of
the product is responsible for guarantee
applications.
We hope you will understand that we cannot be
liable for damage resulting from these causes:
Non-compliance with operating instructions.
Neglecting required maintenance and repair
jobs.
Wear from normal use (particularly: gasket
seals, membranes, collars, spray nozzles and
filters).
Using non-approved tools.
Use of force, improper treatment, misuse and
accidents.
Attempted adjustments and repairs by non-
qualified persons.
Unauthorized modification or changes made to
the device.
Use of unsuitable spare parts or non-original
parts if such parts are the cause of the damage.
Use of non-approved media in the spraying
agent tank.
Damage caused by using the product in the hire
or rental industry.
Normal cleaning, adjustments or maintenance jobs
cannot be claimed as part of the guarantee.
All guarantee work must be carried out by one of
our authorised service centres.

- FRANÇAIS - Pulvérisateur à pression préalable Cleaner 305 A / 307 A // 305 B / 307 B
FRANÇAIS 4
Instructions d'emploi
Notice originale
Attention !
Lire attentivement le présent manuel
avant la première mise en service et observer
absolument les prescriptions de sécurité !
Pour conserver longtemps toutes les fonctions et
les performances de cet appareil, vous devriez
suivre les conseils d'usage et de maintenance à la
lettre.
Votre revendeur se tient à votre entière disposition
pour d'éventuelles autres questions.
Emballage et élimination
Conservez l'emballage d'origine pour protéger
contre les dommages éventuels résultant de l'envoi
ou du transport.
Si le matériau d'emballage n'est plus nécessaire, il
convient de l'éliminer dans le respect des
règlements locaux.
Les matériaux d'emballage en carton sont des
matières premières et de ce fait ils peuvent être
réutilisés ou être réintroduits dans le cycle des
matières premières.
En fin de vie de l'appareil, éliminez celui-ci dans le
respect des règlements locaux.
Déclaration de conformité CE
SOLO Kleinmotoren GmbH, Stuttgarter Straße 41,
71069 Sindelfingen, ALLEMAGNE, déclare que les
pulvérisateur à pression préalable Cleaner, types
305 A, 305 B, 307 A et 307 B – à partir de date de
construction 07/2016 - satisfont aux exigences de
directive 2006/42/CE du Parlement Européen et du
Conseil du 17°mai 2006 relative aux machines
Sindelfingen, le 01.07.2016,
Wolfgang Emmerich, SOLO Kleinmotoren GmbH,
Stuttgarter Straße 41, D-71069 Sindelfingen
(Directeur et personne autorisée à constituer le
dossier technique)
Symboles
Dans le mode d'emploi et sur l'appareil, on utilise
les symboles suivants :
Lisez attentivement les instructions
d'emploi.
DANGER! Le non-respect des instructions
peut entraîner des blessures pouvant
causer la mort.
Portez des vêtements de protection
prescrits.
Portez des gants de protection.
Portez une protection du visage.
Portez un masque respiratoire.
Pas de flamme.
Distance minimum par rapport à toute
personne : 15 m
En vue d'une amélioration continuelle de nos
produits, nous nous réservons le droit de modifier
le contenu de la livraison tant en ce qui concerne la
forme que la technologie et l'équipement.
Les données et illustrations contenues dans les
présentes instructions n'ouvrent aucun droit à des
prétentions quelconques, merci de votre
compréhension.

FRANÇAIS 5
1 Consignes de sécurité
1.1 Utilisation conforme /
domaines d'utilisation
Le pulvérisateur ne doit être utilisé selon la
gamme du modèle, que pour la projection des
produits de nettoyage et de désinfection décrit
ci-dessous ainsi que pour la projection de l’eau
propre.
Les pulvérisateurs de la gamme A
- de type 305 A et de type 307 A (Matériau des
joints FKM) sont adaptés pour la projection de
produit d’aspersion acide jusqu’à un PH neutre
dans la plage de PH de 1 à 7 :
produits détergents et désinfectants ;
Les produits contenant de l’huile et/ou des
hydrocarbures.
Les pulvérisateurs de la gamme B
- de type 305 B et de type 307 B (Matériau des
joints EPDM) sont adaptés pour la projection de
produits d’aspersion de PH neutre jusqu’à des
produits d’aspersion d’une solution basique dans la
plage de PH de 7 à 14 :
Les produits de nettoyage, de désinfection
et de soins basiques et/ou alcalins
Les produits de nettoyage et de
désinfection contenant de l‘alcool
Pour les deux gammes de modèles est valable :
En principe, les produits utilisés pour une
application à l'aide de pulvérisateurs sous
pression doivent être homologués par le
fabricant.
Respecter absolument les prescriptions du
fabricant du liquide d'aspersion.
Mauvais usage prévisible
Pour tous les usages non répertoriés ci-dessus,
comme par exemple
- la projection de vernis,
- la pulvérisation de
* liquides inflammables
* les produis collants et formant des
résidus,
* tensioactifs
* des liquides avec des températures
supérieures à 40 C
* Des moyens non prévus à être projetés au
moyen de pulvérisateurs et pour le
- stockage de liquides
le pulvérisateur ne doit pas être utilisé!
Afin que l'utilisateur puisse tester la compatibilité
des matériaux en collaboration avec le fabricant
des produits d'aspersion, nous communiquons,
sur demande, les matériaux employés pour la
fabrication du pulvérisateur à pression.
1.2 Conseils de sécurité généraux
Lisez attentivement ces instructions
d'emploi avant une première mise en
service et conservez-les précautionneusement.
Soyez particulièrement prudent dans l'emploi de
cet appareil.
Le non-respect de ces consignes de sécurité peut
représenter un danger de mort.
Reportez-vous aussi aux règlements de
prévention des coopératives professionnelles.
Qui n'observe pas les consignes de sécurité,
d'emploi et de maintenance, répond aussi des
dommages causés et de leurs suites.
Les instructions d'emploi doivent être en
permanence disponibles sur le lieu d'utilisation de
l'appareil.
Elles doivent être lues par toute personne chargée
de travailler sur et avec l'appareil (y-compris
maintenance, entretien et réparations).
Eloignez les personnes et les animaux du lieu
de travail. Ne jamais asperger en direction de
personnes, animaux ou objets pouvant être
endommagés. L'utilisateur est responsable des
dangers et des dommages advenus à l'encontre
de tierces personnes ou de leurs biens.
Cet appareil ne doit être prêté ou transmis qu'à
des personnes familiarisées avec ce type
d'appareil, son usage et ses consignes d'emploi.
Donnez-leur toujours ces consignes.
Ne procédez à aucune modification des pièces
et aménagements de sécurité existants.
N'utilisez cet appareil qu'en bon état de
fonctionnement. Le contrôler avant chaque
utilisation suivant chapitre 2.2.
Remplacez impérativement toutes pièces
endommagées. N'utilisez que les pièces
d'origine SOLO. Aucune prestation de garantie
ne sera possible en cas d'utilisation de pièces
non d'origine.
Vous ne devez employer que des accessoires et
des pièces d'origine SOLO, délivrées et
formellement prévues dans sa construction par
nous.
Quand l'appareil n'est pas utilisé, le ranger de
telle sorte qu'il ne nuise à personne. Préparer le
rangement de l'appareil suivant chapitre 5.3.
Interdire les accès non autorisés.

FRANÇAIS 6
1.3 Un contact sécurisé avec les produits
d'aspersion
Respecter absolument les prescriptions du
fabricant du liquide d'aspersion.
Éviter toute contamination de l'environnement,
de la tuyauterie et / ou de la canalisation avec
des agents d'aspersion et des produits de
nettoyage ! Exclure toute contamination durant
le mélange, le remplissage, l'application, la
vidange, le nettoyage, l'entretien et le transport
en observant les procédures adéquates et en
employant un récipient de collecte adéquat.
Nettoyez immédiatement le produit de
pulvérisation.
Les produits d'aspersion et les produits de
nettoyage ne doivent en aucun cas – pas même
par aspiration au remplissage – être déversés
dans la tuyauterie, être rejetés dans les
canalisations publiques, répandus sur les
surfaces en jachères, mélangés aux eaux
naturelles ou ajoutés aux ordures ménagères.
Les produits d'aspersion et de nettoyage (ou
leurs déchets) doivent toujours être recueillis
dans un réservoir approprié et remis au dépôt
des produits chimiques ménagers. Les
renseignements sur ces dépôts de produits
chimiques ménagers sont à demander aux
services administratifs communaux.
Evitez le contact direct avec les produits
d'aspersion. En cas de contact avec les produits
d'aspersion nocifs pour la santé, rincer les
parties du corps touchées immédiatement et
abondamment avec de l'eau propre, changer
immédiatement les vêtements trempés de
produit d'aspersion et consulter un médecin
immédiatement.
N'autorisez jamais des enfants ou des
personnes non familiarisées à la proximité de
produits d'aspersion, à travailler avec ces
mêmes produits.
Ne remplissez jamais le réservoir de produit de
pulvérisation avec des produits différents. En
cas de changement de produit, il est nécessaire
de nettoyer le réservoir à produit d'aspersion et
toutes les parties en contact avec le produit
d'aspersion. Après nettoyage du réservoir, mais
avant remplissage du nouveau produit, essayez
le gicleur avec de l'eau propre afin d'expulser les
résidus de la pompe et des tuyaux. Cela évitera
d'éventuelles réactions chimiques.
A la fin du travail, préparer le rangement de
l'appareil suivant chapitre 5.3, se laver le visage
et les mains à l'eau savonneuse, retirer les
vêtements de travail et les laver régulièrement.
Les restes de liquide d'aspersion peuvent
provoquer une certaine corrosion qui conduit à
une dégradation de l'appareil. Prêter une
attention particulière aux pièces d'usure comme
les gicleurs, les filtres et les joints.
1.4 Vêtements de travail / équipement de
protection personnel (EPP)
Le port de vêtements de protection
adéquats et conformes aux règlements est
obligatoire. Ils doivent protéger toutes les parties
du corps d'un contact avec les produits
d'aspersion et des objets violemment projetés –
des gants de protection, une protection du visage
(par exemple des lunettes de protection), des
protections des pieds, des protections corporelles
(par exemple un tablier en caoutchouc), et, le cas
échéant, un masque respiratoire.
Portez des gants de protection avec une
face antidérapante.
Utilisez une protection du visage.
Utilisez un masque respiratoire lors de
l’utilisation de produits de pulvérisation
dangereux.
En cas de vêtements de travail trempés de
produit d'aspersion, les changer immédiatement.
Lavez régulièrement les vêtements de travail.
1.5 Du transport de l'appareil
Pour éviter des dommages et tenir compte des
dangers possibles de la circulation, on doit
sécuriser l'appareil pour un transport en véhicule
contre les chutes et déplacements à l'aide de
courroies solides.
Prohiber tout écoulement de produit d'aspersion.
Videz correctement l’appareil avant de le
transporter.
1.6 Avant et pendant le travail
Avant de commencer le travail, contrôlez le bon
état de service de l'appareil entier suivant
chapitre 2.2. L’appareil ne doit être utilisé que
dans un état de fonctionnement sur.
Le bout de lance ne doit pas être dirigé vers
vous ou autres personnes, lorsque vous la
démontez.
1.7 De la maintenance, des réparations et
de l'entreposage
N'effectuez vous-même que les opérations de
maintenance ou les réparations décrites dans ce
mode d'emploi. Tous autres travaux sont à réaliser
par un atelier spécialisé autorisé.
L'appareil ne doit pas être entretenu, réparé ou
entreposé à proximité d'une flamme.
Pour toutes réparations, n'employer que
les pièces de rechange d'origine SOLO.
On ne doit procéder à aucune modification sur
l'appareil, ce qui pourrait nuire à la sécurité et
constituer un danger de blessure !
Other manuals for 305 A
3
This manual suits for next models
3
Table of contents
Languages:
Other Solo Paint Sprayer manuals
Popular Paint Sprayer manuals by other brands

Titan
Titan ELITE 4500 Service manual

Graymills
Graymills Tempest T-10 Operation and maintenance instructions

WALTHER PILOT
WALTHER PILOT PILOT WA XV operating instructions

Graco
Graco ULTRA PLUS+ 1500 instruction manual

KIRKLAND
KIRKLAND Orvin Mounted Single Sprayer Use and maintenance manual

Niagara
Niagara 58145 Owner's manual & safety instructions