manuals.online logo
Brands
  1. Home
  2. •
  3. Brands
  4. •
  5. Solo
  6. •
  7. Paint Sprayer
  8. •
  9. Solo 456 User manual

Solo 456 User manual

9 456 114 05/2011
de
en
fr
es
it
nl
456 / 457
Originalbetriebsanleitung
Gebrauchsanweisung
Original instructions
Instruction manual
Notice original
Instructions d'emploi
Manual original
Manual del usario
Istruzioni originali
Istruzioni d'impiego
Oorspronkelijke gebruiksaanwijzing
Gebruiksaanwijzing
Druckspritze
Pressure Sprayer
Pulvérisateur à pression
préable
Pulverizadora
de présion
Pompe ad
alta pressione
Drukspuit
Achtung!
Lesen Sie vor der ersten Inbetriebnahme diese
Gebrauchsanweisung gründlich durch und
beachten Sie unbedingt die
Sicherheitsvorschriften!
Attention!
Read this instruction manual carefully before first
operation and strictly observe the safety
regulations!
Attention!
Lire attentivement le présent manuel avant la
première mise en service et observer
impérativement les consignes de sécurité !
Atención!
¡Lea atentamente este manual de empleo antes
de la primera puesta en funcionamiento y
respete imprescindiblemente las
prescripciones de seguridad!
Attenzione!
Prima della prima messa in funzione leggere a
fondo le presenti istruzioni per l'uso e osservare
assolutamente le norme di sicurezza!
Attentie!
Lees vóór de eerste inbedrijfstelling deze
handleiding zorgvuldig door en let absoluut op
de veiligheidsvoorschriften!
DEUTSCH
1 Behälter
2 Flanschgehäuse
3 Pumpengriff
4 Sicherheitsventil
5 Handventil
6 Spritzrohr
7 Spritzdrüse
8 Trageriemen
ENGLISH
1 Container
2 Flange housing
3 Pump Handle
4 Safety valve
5 Shut-off valve
6 Spray tube
7 Spray nozzle
8 Carrying strap
FRANÇAIS
1 Réservoir
2 Couvercle
3 Poignée de pompe
4 Soupape de sécurité
5 Valve à gâchette
6 Lance
7 Buse
8 Sangle de portage
Fig. 1 ESPAÑOL
1 Depósito
2 Acoplamiento
3 Empuñadura de la
bomba
4 Valvulva de
seguridad
5 Grifo de cierre
6 Tubo atomizadora
7 Tobera atomizadora
8 Bandolera
ITALIANO
1 Contenitore
2 Scocca flangiata
3 Impugnatura pompa
4 Valvola di sicurezza
5 Valvola manuale
6 Tubo irrorazione
7 Ugello irrorazione
8 Cinghia
NEDERLANDS
1 Reservoir
2 Flensbehuizing
3 Pompgreep
4 Veiligheidsventiel
5 Hand ventiel
6 Spuitstok
7 Spuitdop
8 Draagriemen
Fig. 2 Fig. 3
Fig. 4 Fig. 5 Fig. 6
Fig. 7 Fig. 8 Fig. 9
- ENGLISH - Pressure Sprayer 456 / 457
ENGLISH 2
Instruction manual
Original instructions
1. Safety directives and general
instructions
Compliance with this safety manual is a
prerequisite for proper operation of the sprayer.
The pressure sprayer must be checked before
each use.
Prior to every use, ensure the proper functioning
of the safety valve (4).
This pressure sprayer is suitable for applying
approved liquid plant protection, insecticides,
and weed killing substances, as well as liquid
fertilizers that are available from authorized
dealers. We recommend using only plant
protection substances that are approved by the
German BBA (German Federal Biological
Institute).
Solvent-free window cleaners, car wax, and
conservation substances are also suitable for
cleaning and care in private households.
The sprayer must be cleaned when changing the
spray substance. This avoids possible chemical
reactions.
Do not use liquids over 40°C.
Due to bodily hazard, only the abovementioned
liquid substances may be applied with this
sprayer. Disinfectants and impregnation
substances may not be used.
Never leave the filled and /or pressurized
pressure sprayer unattended for longer periods.
For safety reasons, children, young people
under the age of 16, and persons that are not
familiar with these operating instructions, may
not use this pressure sprayer.
The pressure sprayer must be kept out of the
reach of children.
The user is responsible relative to third persons.
The pressure sprayer must be de-pressurized
before disassembly of any component, and
before opening the pump, by pulling on the
pressure valve (Fig 3)! Before pulling on the
pressure valve, the sprayer must always be in an
upright position. Attention: keep the sprayer
away from your face!
Do not expose the pressure sprayer to high
temperatures.
Malfunctions of any kind, such as, for example
leaks at the tank, spray pipe and tubing,
signs of damage, cracks, etc.,
other irregularities,
is the syringe immediately make pressure on the
safety valve. The sprayer must not be reused, but
must be checked by a qualified person.
The manufacturer was not aware of any harmful
effects on the product materials caused by plant
protection substances at the time the product was
manufactured.
2. Assembly
You will find the following parts in the packaging
Spray tube
Alternative nozzle set with associated gasket
1 pc. each symbolic label for
container content: herbicide,
fungicide and insecticide.
NOTE: Affix the appropriate label to
identify the container content.
PLEASE NOTE:
Never pour different agents at the
same time into the container.
Before using a different agent,
thoroughly clean out the container
and all parts in contact with the
spray agent, then flush with plenty
of water. We recommend the
SOLO horticultural equipment
cleaner in 500 ml bottles; part no.
49 00 600.
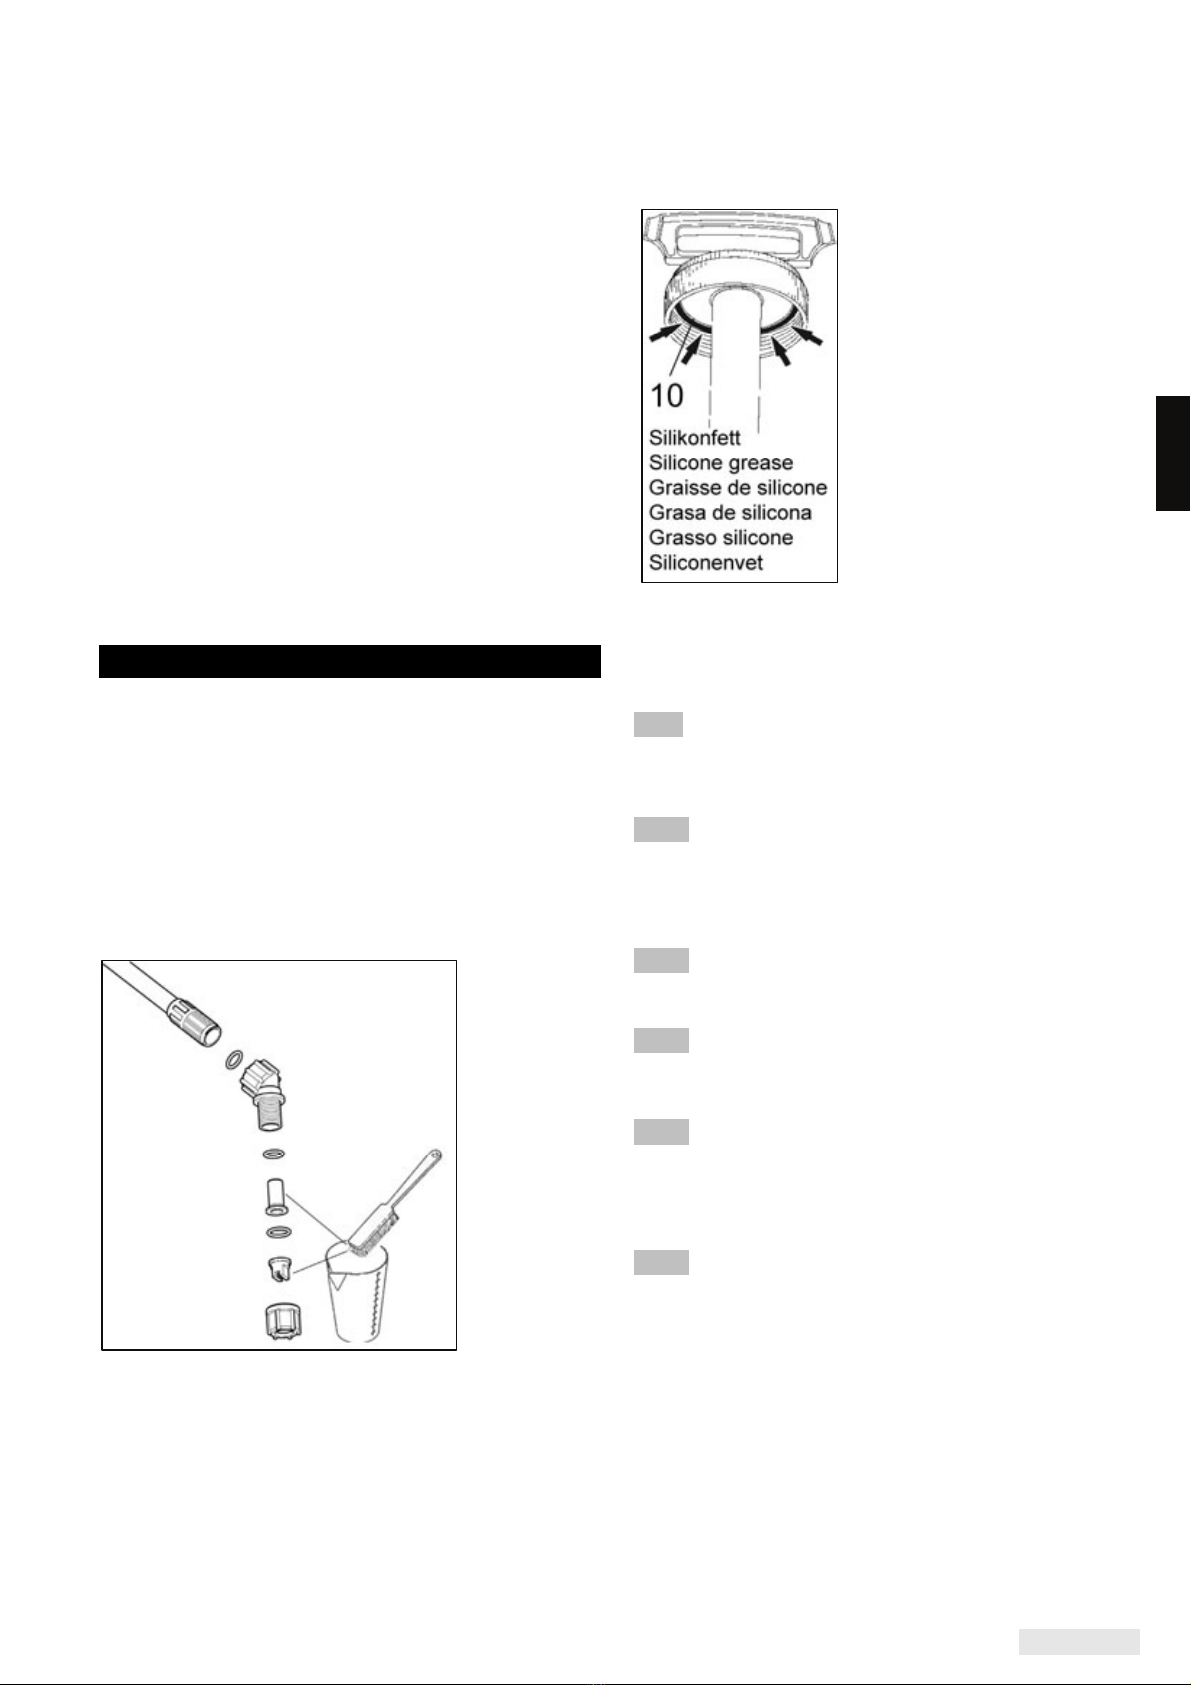
Firmly screw the spray tube with O-Ring (16x3
mm) onto the shut-off valve. In the process, -fasten
the threaded collar (Fig.2 pos 9) on straight and
firmly tighten it by hand – do not use force and do
not use any tools to firmly fasten the collar!
When your work is completed, the spray tube
should be fitted into the holding clamp. Please put
the nozzle completely up (Fig 1).
3. Placing in service
The pressure sprayer must be de-pressurized
before disassembling any component, and before
opening the pump, by pulling on the pressure valve
(Fig 3)! Before pulling on the pressure valve the
sprayer must always be in an upright position.
The pump must be removed to fill the spray liquid.
To do this, push the pump handle down and turn it
to the left (counterclockwise) until the handle clicks
into position. Unscrew pump by turning it counter
clockwise. Do not use any tools!
Fill the spray liquid to the fill mark maximum.
Model 456: 5,0 liters
Model 457: 7,0 liters
In this regard, follow the safety directives and
insure the correct dosing according to the
instructions provided by the manufacturer of the
spray substance!
Thoroughly mix the liquid, insert pump and refasten
firmly by turning clockwise. Firmly tighten by
turning pump handle clockwise until it clicks into
position.
ENGLISH 3
To pump, loosen the pump handle by turning out
of the stop position. Pump the unit until the
operating pressure is reached in the container.
Excessive pressure escapes automatically through
the safety valve. (4) Take the spray tube in your
hand and start the spray process by pressing the
shut-off valve. Releasing the shut-off valve stops
the spray process.
The shut-off valve can be blocked in the rest
position with the red clamp, to prevent unintended
spraying.
Alternativ spray nozzles see the accessory
overview on the original packaging.
The spray tube can be rotated in the shut-off valve
– after loosening the threaded collar – this is
useful for spraying under leaves.
The pressure sprayer can also be carried by the
pump handle, if the pump handle is pressed down
completely, and it is turned to the right and clicked
into position.
4. Cleaning, care and storage
After each use, release pressure, always keeping
the sprayer in vertical position. Empty the
container, carefully clean, and rinse well with clean
water. Do not empty residual quantities of spray
liquid into watercourses; rather dispose of them via
communal disposal systems.
For cleaning nozzle, spray tube, and shut-off
valve, operate the sprayer using clean water (add
dishwashing detergent if required).
Occasionally clean the filter and spray nozzle with
water and a soft brush. Never use your mouth to
blow through the spray nozzle!
Never use aggressive, acidcontaining, solvent-
containing cleaning substances (gasoline for
example).
Always empty the sprayer completely and store it
in a location that is dry, frost-free, and protected
from direct sunlight.
For proper sealing of tank,
cap gasket (10) must be well
greased with silicone grease.
If the pump is hard to operate, the sealing ring (Fig.
7 – Pos. 11) should be greased with silicone
grease or replaced if necessary. The pump has to
be disassembled as follows for this job:
Fig.4: Ensure the sprayer is empty and not
pressurized. Place sprayer securely on level
ground. When the pump is completely screwed
onto container, loosen pump with 1 – 2 turns.
Fig. 5: Firmly hold the pump handle with both
hands and push downwards until the pump
releases from the flange housing with an audible
click. Unscrew the red flange housing from the
sprayer and remove the pump from the container.
Fig. 6: Use a screwdriver to lever both black flange
semi-circles from the pump cylinder. The pump
piston can now be pulled from the pump cylinder.
Fig. 7: The sealing rig (11) can now be re-greased
with silicone grease or replaced if damaged.
Assembly:
Fig. 8: Place the red flange housing correctly on
the pump piston.
Push the pump piston into the pump cylinder. Push
both black flange semi-circles onto the pump
cylinder until they lock with an audible click.
Fig. 9: Place the pump cylinder securely on level
ground. Line up the red flange housing in the exact
position and firmly push the red flange housing
down with both hands onto the pump cylinder until
the parts lock together with an audible click.
Consult your dealer if you have questions.
ENGLISH 4
5. Technical data
Maximum fill volume 5.0 l (Model 456)
7.0 l (Model 457)
Permissable operating pressure 3 bar
Permissable operating temperature 0ºC bis 40ºC
6. Specification of nozzle tips
Specification Order-
No. Delivery
l/min Pressure
bar Angle Applications
Hollow Cone Tip 1 mm
orifice grey
*)
49 00 209 0.4
0.55 1.0
2.0 50° - 70° For treatment of shrubs,
bushes
Hollow Cone Jet 1,4
mm orifice black
**)
49 00 252 0.64
0.91
1.11
1.0
2.0
3.0
50° - 70°
Hollow Cone Jet
1,8mm orifice blue
**)
49 00 322 0.88
1.25
1.53
1.0
2.0
3.0
50° - 70°
No-Drift DT 1,0 yellow
**) 40 74 385 0.46
0.65
0.80
1.0
2.0
3.0
105° Mainly for herbicides at low
pressure
No-drift DT 1,0 red
**) 40 74 386 0.91
1.29
1.60
1.0
2.0
3.0
105°
Adjustable nozzle
brass
**)
49 00 206 0.44 - 1.10
0.55 - 1.45
0.66 - 1.75
1.0
2.0
3.0
Flat Spray Tip green
**) 40 74 504 0.39
0.49
0.60
1.0
2.0
3.0
80° Areal and row treatment
Flat Spray Tip yellow
**) 40 74 501 0.46
0.65
0.80
1.0
2.0
3.0
80°
Flat Spray Tip red
*) 40 74 263 0.92
1.31
1.60
1.0
2.0
3.0
110°
*) Standard equipment **) Accessories
ENGLISH 5
7. Workshop service, replacement parts and guarantee
Maintenance and repair:
Maintenance and repair of modern motorized devices, as well as their safety-relevant assemblies, require
qualified, specialized training and a workshop equipped with special tools and test devices.
Thus SOLO recommends that you have a specialized SOLO workshop carry out all work that is not
described in these operating instructions. Your SOLO specialist has the required training, experience, and
equipment at his disposal to provide you with the most cost-effective solution and can help you in many
ways with advice and service.
Replacement parts:
Dependable operation and the safety of your device also depend on the quality of the replacement parts
that you use. Use only original SOLO replacement parts.
Only original parts come from the production of the device and thus guarantee the highest possible
material quality, dimensional accuracy, function, and safety. Original replacement parts and accessory
parts are available from your dealer. He also maintains the requisite replacement part lists to determine
the required replacement part numbers, and he is constantly provided with information concerning detail
improvements and innovations in the replacement part offering.
Please note as well that guarantee performances from SOLO are not possible if parts other than SOLO
original parts are used.
Guarantee:
SOLO guarantees problem-free quality and will assume the costs for defect remediation by replacing the
defective parts in the case of material or manufacturing defects that occur within the guarantee period after
the date of purchase.
Please note that specific guarantee conditions apply in some countries. Ask your sales person if you have
any questions. As vendor of the products he is responsible for the guarantee.
We request your understanding that no guarantee can be assumed for damages due to the following:
• Non-compliance with the operating instructions.
• Neglecting required maintenance and repair work.
• Damages due to improper carburetor adjustment.
• Normal wear and tear.
• Obvious overload through persistently exceeding the upper performance limits.
• Using non-approved tools and cutting fixtures.
• Using non-approved cutting bar and chain lengths in the case of chain saws.
• The use of force, improper handling, misuse, or accident.
• Damages caused by overheating due to dirt build up on the ventilator casing.
• Intervention by non-specialized persons, or improper repair attempts.
• The use of unsuitable replacement parts or parts other than SOLO original parts to the extent that they
cause damage.
• Using unsuitable fuel or fuel that has been stored too long.
• Damages that can be traced to implementation conditions from the rental business.
Cleaning, care, and adjustment work are not recognized as guarantee performances. All guarantee work
must be carried out by a SOLO dealer.
In the best interest of continued technological progress we reserve the right to change the design and
configuration of any product without prior notice.
For that reason, no claims can be accepted with reference to text and illustrations in this manual.

Other manuals for 456

4

This manual suits for next models

1

Other Solo Paint Sprayer manuals

Solo 425 Comfort User manual

Solo

Solo 425 Comfort User manual

Solo 424 NOVA Installation and operation manual

Solo

Solo 424 NOVA Installation and operation manual

Solo CLEANline 301 A User manual

Solo

Solo CLEANline 301 A User manual

Solo 305 A User manual

Solo

Solo 305 A User manual

Solo 425 Comfort User manual

Solo

Solo 425 Comfort User manual

Solo 201 User manual

Solo

Solo 201 User manual

Solo 425 Classic Installation and operation manual

Solo

Solo 425 Classic Installation and operation manual

Solo 403 User manual

Solo

Solo 403 User manual

Solo 456 User manual

Solo

Solo 456 User manual

Solo 434 User manual

Solo

Solo 434 User manual

Solo 433 User manual

Solo

Solo 433 User manual

Solo 453 User manual

Solo

Solo 453 User manual

Solo 460 Li User manual

Solo

Solo 460 Li User manual

Solo 425 Classic User manual

Solo

Solo 425 Classic User manual

Solo 416 Li User manual

Solo

Solo 416 Li User manual

Solo 417 User manual

Solo

Solo 417 User manual

Solo 461 User manual

Solo

Solo 461 User manual

Solo CLEANLine 303 HD User manual

Solo

Solo CLEANLine 303 HD User manual

Solo 433 User manual

Solo

Solo 433 User manual

Solo CleanLine 303 A User manual

Solo

Solo CleanLine 303 A User manual

Solo 417Li User manual

Solo

Solo 417Li User manual

Solo 425-101 Installation and operation manual

Solo

Solo 425-101 Installation and operation manual

Solo 201 User manual

Solo

Solo 201 User manual

Solo CLEANLine 303 FA User manual

Solo

Solo CLEANLine 303 FA User manual

Popular Paint Sprayer manuals by other brands

Homeright CommandMax C800766 instruction manual

Homeright

Homeright CommandMax C800766 instruction manual

Magnum 243926 operating instructions

Magnum

Magnum 243926 operating instructions

DeVilbiss EGA-503 Service manual

DeVilbiss

DeVilbiss EGA-503 Service manual

Volpi v.black KOMFORT 12 Instructions for use

Volpi

Volpi v.black KOMFORT 12 Instructions for use

PROCRAFT PSE1100 manual

PROCRAFT

PROCRAFT PSE1100 manual

Central Pneumatic 69724 Owner's manual & safety instructions

Central Pneumatic

Central Pneumatic 69724 Owner's manual & safety instructions

Hudson 2204 manual

Hudson

Hudson 2204 manual

sunjoe 24V-GS-LTW Operator's manual

sunjoe

sunjoe 24V-GS-LTW Operator's manual

Foamit FG-10N-2 user manual

Foamit

Foamit FG-10N-2 user manual

EUROPRO MINIJET 80 user manual

EUROPRO

EUROPRO MINIJET 80 user manual

Gema OptiFlex 2 F Quick reference guide

Gema

Gema OptiFlex 2 F Quick reference guide

Emist TruElectrostatic EX-7000 Operation manual

Emist

Emist TruElectrostatic EX-7000 Operation manual

Foamit SP10.0L user manual

Foamit

Foamit SP10.0L user manual

Midwest Mid-Tech TASC 6000 Supplement

Midwest

Midwest Mid-Tech TASC 6000 Supplement

Greenleaf Workhorse PSE ATV 1502 Assembly / operation instructions / parts

Greenleaf

Greenleaf Workhorse PSE ATV 1502 Assembly / operation instructions / parts

Garten Meister 88 21 61 Original instruction manual

Garten Meister

Garten Meister 88 21 61 Original instruction manual

Healthmark 64-20810-00 Instructions for use

Healthmark

Healthmark 64-20810-00 Instructions for use

Power Fist 8059851 user manual

Power Fist

Power Fist 8059851 user manual

manuals.online logo
manuals.online logoBrands
  • About & Mission
  • Contact us
  • Privacy Policy
  • Terms and Conditions

Copyright 2025 Manuals.Online. All Rights Reserved.