GoHeat™ USB Powered Heating Pad
DANGER: TO REDUCE THE RISK OF BURNS, ELECTRIC
SHOCK AND FIRE, THIS PRODUCT MUST BE USED IN
ACCORDANCE WITH THE FOLLOWING INSTRUCTIONS:
1. READ ALL INSTRUCTIONS.
2. DO NOT USE WHILE SLEEPING OR ON SOMEONE WHO IS
SLEEPING.
3. DO NOT USE ON AN INFANT OR ON AN ANIMAL.
4. THIS PAD IS NOT TO BE USED ON OR BY AN INVALID,
SLEEPING, HELPLESS OR UNCONSCIOUS PERSON, A
PERSON WITH DIABETES, A PERSON WITH POOR BLOOD
CIRCULATION OR INSENSITIVITY TO HEAT, A PERSON
INCAPACITATED BY MEDICATION.
5. THIS APPLIANCE IS NOT TO BE USED ON OR BY
CHILDREN. CLOSE SUPERVISION IS NECESSARY WHEN
ANY APPLIANCE IS USED NEAR CHILDREN. CHILDREN
SHOULD NOT PLAY WITH THE APPLIANCE.
6. DO NOT USE ON AREAS OF INSENSITIVE SKIN.
7. BURNS CAN OCCUR REGARDLESS OF CONTROL
SETTING. CHECK SKIN UNDER PAD FREQUENTLY.
8. DO NOT USE IN AN OXYGEN ATMOSPHERE.
9. DO NOT USE PINS OR OTHER METALLIC MEANS TO
FASTEN THIS PAD IN PLACE.
10. DO NOT WRAP PAD TOO TIGHT AROUND THE BODY.
PAD SHOULD BE SNUG, BUT SHOULD NOT CUT OFF
CIRCULATION.
11. DO NOT WRAP PAD AROUND OR NEAR THE NECK TO
AVOID PERSONAL INJURY.
12. DO NOT SIT ON, AGAINST OR CRUSH PAD – AVOID
SHARP FOLDS. PLACE PAD ON TOP OF AND NOT UNDER
THE PART OF BODY NEEDING HEAT.
13. UNPLUG WHEN NOT IN USE. NEVER LEAVE APPLIANCE
UNATTENDED, ESPECIALLY IF CHILDREN ARE PRESENT.
14. NEVER PULL THIS PAD BY THE SUPPLY CORD. DO NOT
USE THE CORD AS A HANDLE. DO NOT PINCH CORD.
15. DO NOT TUCK IN, TRAP, FOLD, CROSS, PINCH OR WRAP
POWER BUTTON, POWER SOURCE, OR CORD WITHIN
HEATING PAD DURING USE.
16. USE CAUTION WITH STRAP END TO PREVENT FASTENING
TAB FROM DAMAGING CLOTHING OR OTHER PROPERTY.
17. DO NOT PLACE ANYTHING OVER THE HEATING PAD
WHILE IN USE OR PLUGGED IN, SUCH AS A TOWEL,
BLANKET, CLOTHING, OR ANY OTHER INSULATING
MATERIAL, AND NEVER ALLOW HEATING PAD TO WRAP
AROUND ITSELF.
18. CAREFULLY EXAMINE PAD, CORD, POWER BUTTON,
AND POWER SOURCE BEFORE EACH USE. DISCARD
THE PAD IF ANY SIGN OF DETERIORATION, WEAR OR
DAMAGE. DO NOT TAMPER WITH THIS PAD IN ANY WAY.
THERE ARE NO USER SERVICABLE PARTS. IF PAD DOES
NOT FUNCTION SATISFACTORILY, SEE WARRANTY FOR
CUSTOMER CONTACT INFORMATION.
NOTE:
1) FOR OPTIMAL HEATING PAD PERFORMANCE, USE
A USB POWER SOURCE THAT HAS 2A CURRENT
OUTPUT.
2) A POWER BANK BELOW 2A MAY NOT SUPPORT
THIS PRODUCT, AND THE PAD MAY SHUT DOWN.
CAUTION: USE ONLY WITH LISTED/CERTIFIED
INFORMATION TECHNOLOGY (COMPUTER) EQUIPMENT/
CERTIFIED ITE POWER SUPPLY/CLASS 2 POWER UNIT.
19. LOOP CORD LOOSELY WHEN STORING, TIGHT WRAPPING
MAY DAMAGE CORD AND INTERNAL PARTS. ALLOW TO
COOL BEFORE STORING, AND DO NOT CREASE PAD BY
PLACING ITEMS ON TOP OF IT. STORE IN THE ORIGINAL
PACKAGING, IN COOL, DARK, DRY PLACE.
20. WHEN NOT IN USE, DISCONNECT HEATING PAD FROM
THE USB POWER SOURCE BEFORE MAKING ANY
ADJUSTMENTS, CHANGING ACCESSORIES, OR STORING.
Models: 2100 & 2101
IMPORTANT SAFETY INSTRUCTIONS
DO NOT DESTROY
SUCH PREVENTATIVE SAFETY MEASURES REDUCE THE
RISK OF STARTING THE APPLIANCE ACCIDENTALLY.
21. DO NOT USE THIS PAD WITH LINIMENT, SALVE OR
OINTMENT PREPARATIONS. SKIN BURNS COULD RESULT.
22. THIS APPLIANCE IS NOT INTENDED FOR MEDICAL USE
IN HOSPITALS.
23. SAVE THESE INSTRUCTIONS.
HOUSEHOLD USE ONLY
www.sunbeam.com
1 YEAR LIMITED WARRANTY
Sunbeam Products, Inc. (“Sunbeam”) warrants that for a period of one (1) year from the date of
initial retail purchase, this product will be free from defects in material and workmanship, when
used in accordance with the instructions provided.
Sunbeam, at its option, will repair or replace this product or any component of the product found to
be defective during the warranty period.
Replacement will be made with a new or remanufactured product or component. If the product is no
longer available, replacement may be made with a similar product of equal or greater value. This is
your exclusive warranty. Do NOT attempt to repair or adjust any electrical or mechanical functions
on this product. Doing so will void this warranty.
This warranty is valid for the original retail purchaser from the date of initial retail purchase and is
not transferable. Keep the original sales receipt. Proof of purchase is required to obtain warranty
performance. Sunbeam dealers, service centers, or retail stores selling Sunbeam products do not
have the right to alter, modify or any way change the terms and conditions of this warranty.
This warranty does not cover normal wear of parts or damage resulting from any of the following:
negligent use or misuse of the product, use on improper voltage or current, use contrary to the
operating instructions, disassembly, repair or alteration by anyone other than Sunbeam or an
authorized Sunbeam service center. Further, the warranty does not cover: Acts of God, such as fire,
flood, hurricanes and tornadoes.
What are the limits on Sunbeam’s Liability?
Sunbeam shall not be liable for any incidental or consequential damages caused by the breach of
any express, implied or statutory warranty or condition. Except to the extent prohibited by applicable
law, any implied warranty or condition of merchantability or fitness for a particular purpose is
limited in duration to the duration of the above warranty. Sunbeam disclaims all other warranties,
conditions or representations, express, implied, statutory or otherwise. Sunbeam shall not be liable
for any damages of any kind resulting from the purchase, use or misuse of, or inability to use the
product including incidental, special, consequential or similar damages or loss of profits, or for
any breach of contract, fundamental or otherwise, or for any claim brought against purchaser by
any other party. Some provinces, states or jurisdictions do not allow the exclusion or limitation of
incidental or consequential damages or limitations on how long an implied warranty lasts, so the
above limitations or exclusion may not apply to you. This warranty gives you specific legal rights,
and you may also have other rights that vary from province to province, state to state or jurisdiction
to jurisdiction.
How to Obtain Warranty Service
If you have any question regarding this warranty or would like to obtain warranty service, please call
1-800-435-1250 and a convenient service center address will be provided to you.
This warranty is offered by Sunbeam Products, Inc., located at 2381 NW Executive Center Drive,
Boca Raton, FL 33431.
PLEASE DO NOT RETURN THIS PRODUCT TO THE ADDRESS ABOVE OR TO THE PLACE OF
PURCHASE.
©2021 Sunbeam Products, Inc.All rights reserved.
Printed in China. 2100-811_2101-811_20ESM1 GCDS-SUN1292382-LD P.N. ART0000869680
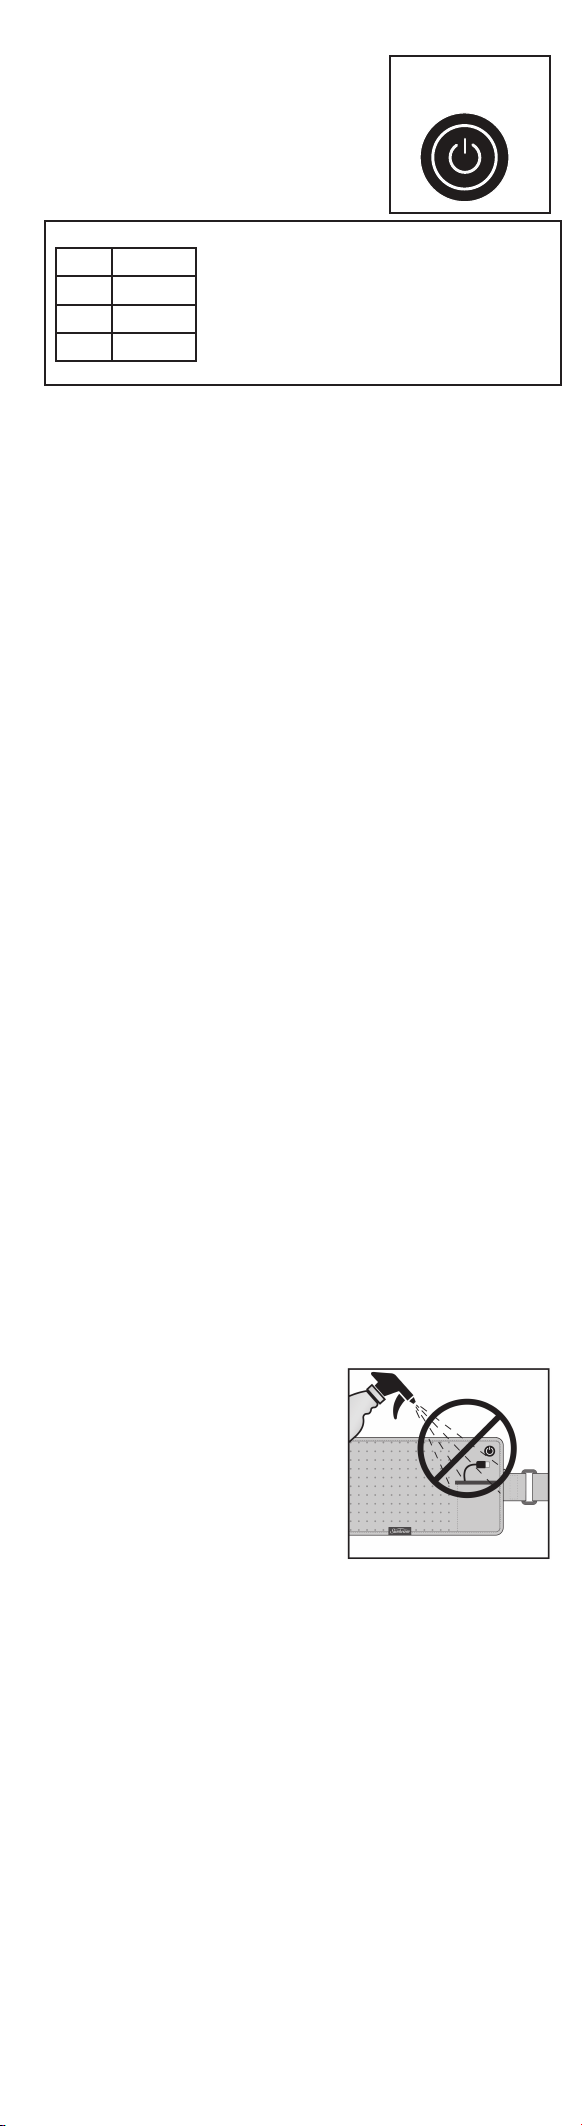
Select Heat Setting
1. Use the Power Button (Figure 3) to select a heat
setting by pressing the button consecutively
until the desired heat setting is reached.
2. The color of the LED light within the Power
Button will indicate if the unit is set to low,
medium, or high. (See Table 1 for heat setting
light meanings.) Recommended treatment time
is 20-30 minutes up to three times a day.
Table 1
Off No Color
Low Green
Med Orange
High Red
NOTE:
1) FOR OPTIMAL HEATING PAD PERFORMANCE, USE
A USB POWER SOURCE THAT HAS 2A CURRENT
OUTPUT.
2) A POWER BANK BELOW 2A MAY NOT SUPPORT
THIS PRODUCT, AND THE PAD MAY SHUT DOWN.
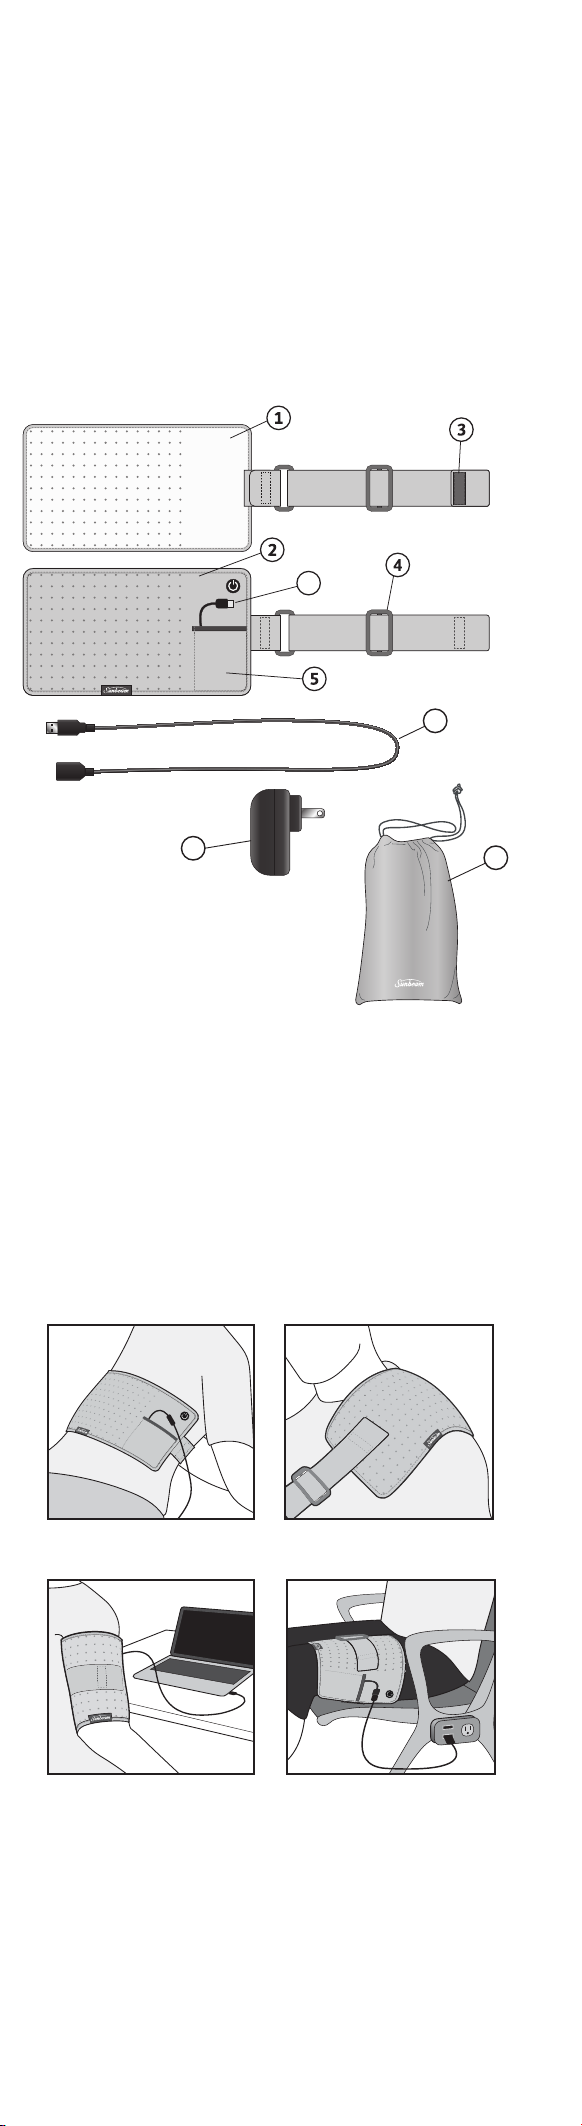
Apply Heating Pad
1. Ensure the heating pad is connected to the power source by securely
attaching the USB Cord to the USB port on the power source before using.
2. If using a power bank as a power source, place the unit into the
Integrated Pocket (Figure 1, Number 5) for convenient use.
3. For use cases where longer cord is needed, connect USB Extender
to USB Cord prior to connecting to power source.
4. Place the Body Side of the pad (Figure 1, Number 1) flat against the body.
5. Take the edge of the adjustable strap, wrap it around the area of the
body needing heat, and fasten directly to the Exterior Side (Figure 1,
Number 2) using the Fastening Tab (Figure 1, Number 3) on the end of
the strap. The Fastening Tab can attach to any part of the Exterior Side
fabric. (See Figure 2 for the best way to wrap each body part.)
Caution: Be careful not to overlap the heated area of the pad.
6. Once in place, tighten around the body by sliding the Strap Adjuster (Figure 1,
Number 4) for a comfortable and snug fit. Strap is removable if not needed.
7. To remove pad, detach the Fastening Tab by lifting the
end of the strap. Unwrap pad from body.
Auto-Off Feature
The Auto-Off feature is designed for convenience and to conserve energy by
automatically turning off after 2 hours of continuous use. Restart the unit by
pressing the Power Button and selecting desired heat setting.
After Use
1. Disconnect USB Cord or USB Extender from power source by unplugging from USB
port.
Note: If USB Extender was used, disconnect it from the USB Cord. Do not pull them
by their cords.
2. Neatly place the USB Extender into the Integrated Pocket with the USB Cord. With
the Body Side facing up, roll the pad from its short edge without the strap towards
its short edge with the strap. Then, secure the pad by wrapping the strap around it
and placing the Fastening Tab against the Exterior Side of the pad for neat storage.
Note: For Model 2101, place the Wall Adapter on the Body Side of the pad prior to
rolling and securing with the strap. Place the neatly rolled pad into the included
Storage Bag (Figure 1, Number 9).
3. Store all contents in cool, dry location between use.
CAUTION:
• DO NOT SIT ON, LEAN AGAINST, CRUSH OR FOLD PAD DURING USE.
• DO NOT OVERLAP THE PAD.
• DO NOT USE WHILE SLEEPING.
• SEE ADDITIONAL WARNINGS IN THE IMPORTANT SAFETY INSTRUCTIONS SECTION.
HOW TO USE YOUR HEATING PAD WITH MOIST HEAT THERAPY
You may find that moist heat therapy provides deep, penetrating pain relief. When using
moist heat therapy, you should protect furniture and clothing from becoming damp.
1. Dampen the Body Side of the heating pad
(Figure 1, Number 1) with water by patting
the surface with a wet sponge or cloth, or
use a spray bottle to apply a fine mist. Do
not thoroughly soak pad.
Note: Ensure pad is disconnected from
power source prior to dampening for moist
heat therapy.
2. Do not spray or dampen USB Cord, USB
Extender, Power Button, USB Wall Adapter,
or other power sources.
Caution: Failure to comply may result in product
failure and/or personal injury.
WASHING INSTRUCTIONS
DO NOT DRY CLEAN! DO NOT USE BLEACH! DO NOT USE
WRINGER! DO NOT IRON!
1. Disconnect USB Cord from power source and/or USB
Extender. DO NOT PULL BY THE CORD. DO NOT WASH
USB EXTENDER OR USB WALL ADAPTER (included
with Model 2101).
Note: Remove any power source that may have been
placed in the Integrated Pocket during use. Set it
aside, and DO NOT WASH it.
2. Tuck USB Cord into Integrated Pocket to protect it
during the wash cycle.
3. Machine wash pad in cold water on gentle cycle,
or hand wash. Tumble dry on low heat, and remove
promptly from dryer, or drape to air dry.
4. Ensure pad and USB Cord are completely dry prior to
use.
WHERE TO USE YOUR HEATING PAD
Heat increases blood flow to accelerate tissue healing. The GoHeat™ USB
Powered Heating Pad provides high-level heat and is compact for on-the-go use,
such as in the office, in the car, or anywhere with a USB port. Three heat settings
allow for customizable treatment, and the adjustable strap easily secures the pad
around areas you need relief the most, like the back, shoulders, arms, and legs.
Back
Arms Legs
Shoulders
Figure 2
HOW TO USE:
Connect to USB Power Source
1. Connect the USB Cord (Figure 1, Number 6) directly to a USB power source. For use
cases requiring a longer cord, attach the USB Extender (Figure 1, Number 7). Then
attach the USB Extender to the USB port on power source. The Power Button/Heat
Setting Indicator (Figure 3) will flash 3 times once power to the pad is established.
Note: Power source could be a USB port on a computer, power bank,
or wall adapter with a 2A output. Model 2101 comes with a USB Wall
Adapter (Figure 1, Number 8); other power sources not included.
2. If a wall adapter is used, connect USB Cord or USB Extender to the USB port
on the wall adapter. Plug wall adapter into a 120V AC electrical outlet.
Note: Only use pad with the USB Cord and Extender that came in the box.
For more information on service or product questions,
please visit www.sunbeam.com or contact customer
service at 1-800-435-1250.
TROUBLESHOOTING:
Problem Solutions
• No Heat
• No Power
• Verify tight connection between pad and USB outlet.
• Verify no physical damage to the cord, power button,
or pad.
• Pad not hot enough • Ensure the USB power source can provide a 2A current
output.
• Ensure that the body side of the pad is laying against
the body.
• Use the product on HIGH setting for maximum
heat.
• Heating pad does not
come On
• Ensure USB power source works correctly. In cases
where a power bank is used, verify that it is charged.
• If using with a power bank, verify that it can provide
a 2A current output. A power bank below 2A may not
support this product, and the pad may not come on.
• If failure continues, discontinue use of the
product, and see warranty information to contact
Sunbeam Customer Service.
• Pad has a Hot Spot
• Ensure the pad is not folded, bunched, or crushed
in any area.
• Pad was On but now
LED is off, and the pad
has no heat
Auto-Off feature is set to turn the unit off after 2 hours
of continuous use.
• To re-start unit, press the Power Button until
desired heat setting is reached.
Figure 4
Figure 1
Models: 2100 & 2101
1. Body Side (Lighter Colored Fabric)
2. Exterior Side (Darker Colored Fabric)
3. Fastening Tab
4. Strap Adjuster
5. Integrated Pocket for USB Power Source (power source not included for Model 2100)
6. USB Cord & Connector (Type A Connector)
7. USB Extender (Type A Connector)
For Model 2101 only:
8. USB Wall Adapter
9. Storage Bag
HEATING PAD COMPONENTS
Figure 3
Power Button/
Heat Setting Indicator
9
6
7
8
FCC COMPLIANT
The devices complies with part 15 of the FCC rules. Operation is subject to the following two
conditions: (1) This device may not cause harmful interference, and (2) this device must accept any
interference received, including interference that may cause undesired operation.
Note: This product has been tested and found to comply with the limits for a Class B digital device,
pursuant to part 15 of the FCC Rules. These limits are designed to provide reasonable protection
against harmful interference in a residential installation. This product generates, uses and can
radiate radio frequency energy and, if not installed and used in accordance with the instructions,
may cause harmful interference to radio communications. However, there is no guarantee that
interference will not occur in a particular installation. If this product does cause harmful interference
to radio or television reception, which can be determined by turning the product off and on, the user
is encouraged to try to correct the interference by one or more of the following measures: Reorient
or relocate the receiving antenna.
Increase the separation between the product and receiver.
Connect the product into an outlet on a circuit different from that to which the receiver is connected.
Consult the dealer or an experienced radio/TV technician for help.
Changes or modifications not expressly approved by the party responsible for compliance could void
the user’s authority to operate the equipment.
2100_2101_20ESM1.indd 1-2 11/23/20 11:06 AM