SUOMY SR-GP User manual

ITALIANO ENGLISH FRANÇAIS ESPAÑOL DEUTSCH
USER MANUAL

EN Warning
Features
Thank you for choosing SUOMY.
Designed and manufactured in compliance with the highest
qualitative standards specifically for motorcycle use, SR-GP is
certified by the most important Certification Bodies.
Suomy cannot be held responsible for direct or indirect damages
resulting from an incorrect use of the product and/or for using the
helmet in situations that go beyond the normal conditions of use
or the modalities indicated in this booklet.
Before using the helmet, carefully read this manual. Keep it at
hand for future reference.
For further information, contact your Distributor or Suomy.
Use this helmet in compliance with the instructions contained in
this manual. Compliance with these instructions will make your
helmet last longer and will assure maximum product performances.
Modifications and/or alterations to the helmet and/or any of its
components shall make the warranty void and may jeopardize the
safety requirements or make the product non-compliant with the
certification standards.
All the Suomy products are constantly subject to a continual
improvement process, that’s why Suomy reserves the right to make
changes, without prior notice, to the product object of this manual.
It is therefore not possible to exercise any rights on the basis of the
information, illustrations and descriptions contained in this manual.
SR-GP was developed and tested to assure, together with the
safety features, the best level of comfort and noise reduction
during ordinary conditions of use. However, the particular
configuration of the vehicle and/or the position of the rider or both
factors can entail situations that could not be foreseen during the
manufacturing of the product that may generate aerodynamic
rustles or hissing sounds. Suomy therefore, cannot be held
responsible if this should occur.
SR-GP is not designed to be used with earphones and/or similar
devices.
The internal shell can be totally removed. It is made in excellent
anallergic fabric with anti-bacteria treatment.
All the parts in contact with the face are easily washable.
Interchangeable side cheek pads, available in different sizes, as
accessories to assure the best fit for all head sizes.
The SR-GP ventilation system along with the particular shape
(Suomy patent) of the internal polystyrene shell, optimizes outside
and inside air flows, fed by five air intakes, which exploit the Venturi
effect thus optimizing internal ventilation.
The three extractors back air inlets release the air flows.
This assures a more uniform and continuous flow of air inside the
shell, which is also enhanced by the extraction grid on the back
part.
The strap has a D-ring retention system in anti-corrosive stainless
steel, and a button on the strap. The fastening stud is positioned in
a completely free and accessible area.
The stud is easy to lock and unlock even with gloves.
When the automatic button is fastened, the strap forms an eyehole
that can easily be used as «ring» to pull the tab and release the
D-ring fastening system.
20

EN
For maximum safety, SR-GP must fit tightly and be correctly and
securely fastened, so it cannot be taken off neither by pulling it
nor by rotating it around the head (see figure 1). If it is too big it
may slide down over the eyes or turn in a lateral direction due to
movement during riding, thus blocking visibility.
Do not use scarves or neck guards which could make the strap
slide and the helmet fly off in case of crash.
SR-GP was designed to be used with most of the eyeglasses on
the market. In any case check how the helmet fits with the glasses
before purchasing it.
The function of the helmet is to reduce stress on the user’s head
in case of crash; this happens through a partial destruction and/or
deformation of its components (mostly the external shell and the
internal polystyrene shell). In this way part of the energy generated
by the impact is absorbed by the components of the helmet, thus
reducing the vibrations on the user’s head, eliminating or limiting the
risk of traumas. The protection capacity of the helmet is not endless
and certain crashes may generate such high stress that even the
energy absorbed by the helmet is not enough to protect the user
from injuries: no helmet, even top quality helmets, can protect the
head against the forces generated by any type of crash.
General Rules
FIGURE 1
21

EN
The integrity of the shell and of the inside are essential to assure
maximum performances in terms of safety.
SR-GP was studied to absorb crashes through a partial destruction
of the shell or some of its parts that could be damaged after a crash
even if it is not readily visibly. If the helmet suffers further stress it
might not be able to offer the maximum level of protection.
Do not use a helmet that suffered severe blows even though the
damage is not readily visible; if the helmet is damaged it must
be replaced. It is extremely dangerous to modify the helmet by
sticking or gluing anything on it. Do not cut or punch the helmet’s
shell, do not insert screws or paint it.
Do not change the internal lining of the helmet, particularly never
cut or change the inside polystyrene padding: changes to the
shape of the internal polystyrene shell can affect the safety features
of the helmet.
Damaged visors may limit visibility especially at night and must be
immediately replaced with regularly certified visors according to
the certification regulations in force.
Do not apply paint and/or adhesives on the visor. Do not remove
homologation label from the visor.
Only use original Suomy accessories and spare parts or those
specifically indicated by Suomy for the specific model: this is the
only way to assure reliability, safety and compatibility with the helmet
used.
The use of non original components and/or accessories make the
warranty void (see warranty conditions on page 35) and can affect
the safety requirements.
Use
Maintenance
To clean the shell use water and mild soap; let the helmet dry
at room temperature, never expose it to heat.
Cleaning the helmet with solvents, petrol by-products or chemical
substances, the application of stickers or paint could affect the
structure of the shell, thus affecting the safety features, even if the
damage is not readily visible. Do not paint, or apply stickers, petrol
or other chemical solvents to this helmet.
To clean the internal lining, just hand wash at 30°C maximum,
exclusively using mild soap.
To clean the fixed internal lining use a damp cloth and mild soap.
The fabric lining, even if they are part of removable elements, must
not be soaked in water when they are applied to or paired with an
internal padding, either rigid or soft.
Dry the pieces at room temperature, away from sunlight and without
exposing them to heat.
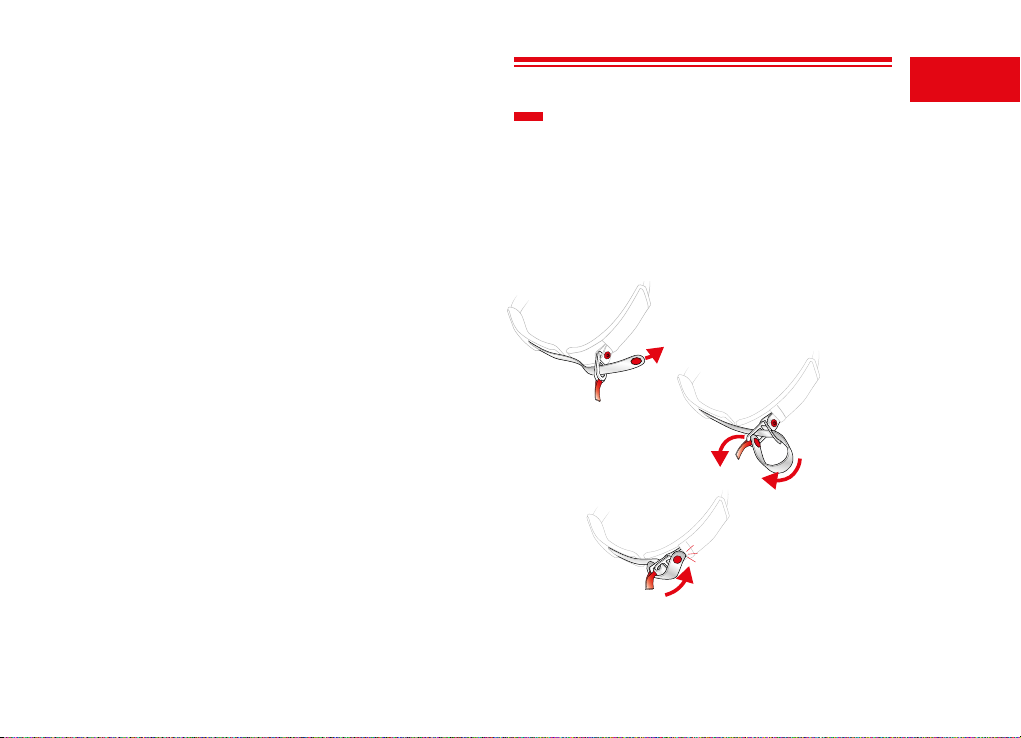
Periodically clean the «D-Rings» system with warm water and mild
soap. Do not use solvents or chemical detergents and do not
lubricate.
Clean the visor as follows:
1. Remove the visor from the helmet (see paragraph VISOR -
removal)
2. Rinse it with running warm water only on the outside.
3. Wash the visor with water and mild soap using a soft cloth to
remove the dirt.
4. Rinse with warm water.
5. Dry with a soft and delicate cloth
6. Put the visor back on the helmet (see paragraph VISOR –
Assembly)
Verify that the cloth used does not leave any traces that could stick
to the surface of the visor after washing. Do not use paper cloths to
clean and dry the visor.
Do not expose the visor to heat to dry.
Do not use particular detergents (prepared solutions, creams,
22

EN
RETENTION SYSTEM D-RING — Figure 2
IInsert the free end of the strap into the rings.
Pull until the strap fits tightly around the jaw.
After doing this, it should be impossible to slide out the helmet;
verify that, by taking it from the back edge and rotating it towards
the front, the helmet cannot be removed and that it remains well
fixed on your head.
If the helmet tends to come off or it moves freely on the head, pull
the strap tight until the right pressure is reached and repeat test.
If after repeating the test you are not able to efficiently tighten the
retention system, do not use the helmet.
Only after the strap has been adjusted tightly, fix the end part of the
strap by fastening it with the press stud on the tongue. (figure 2).
The only function of the press stud fitted on the chin strap is to
User's instructions
etc.) even if they are classified “specific for visors”, unless directly
marketed by Suomy.
During cleaning operations, handle the visor with care to avoid
damages to the anti-scratch coating. Never use solvents, alcohol,
fuels, thinning substances or abrasive powders; these materials
are aggressive and could affect the structural resistance of the
polycarbonate or scratch the surface of the visor with consequent
reduction in the mechanical and optical properties.
Some colorings are made with Fluo UV paints that could be subject
to the natural migration phenomenon with a drop in intensity. The
phenomenon could be enhanced when the helmet is exposed for
long periods to a particularly intense light. However, this does not
affect the performances and the quality of SR-GP
Suomy therefore, cannot be held responsible if this should occur.
FIGURE 2
23

EN
avoid fluttering of the end part while riding. The fact the press stud
is fastened is no guarantee that the helmet has been positioned and
closed correctly: the correct fastening of the strap must be verified
exclusively through the operations described in the previous
paragraphs.
To release the retention system, unfasten the press stud and pull the
tongue to loosen the closure. Slide out the end part of the strap from
the «D Rings ».
Use the unlocking tongue only to remove the helmet!
Never unlock while riding.
If the retention system does not work correctly, do not use the
helmet and contact Suomy authorized personnel only.
FRONT AIR INTAKE CHIN — A— Figure 3/4
The flow of incoming air in the front part of the helmet (chin)
may be regulated by adjusting the slide (A1) inside the air intake:
Slide down the cursor inside the chin to open the air intake, slide
up to close it.
CLOSE
OPEN
24
FIGURE 3
FIGURE 4
A1
BB1 C
D
S
S1
R
Q
A
N
O
Z
N

EN
REAR AIR EXTRACTORS — C— Figure 7
The innovative rear air intake has been designed to further improve
ventilation inside the helmet, using residual air flows that, again
thanks to the Venturi effect, are able to generate a depression in the
lower part of the helmet, in this way ensuring a substantial extraction
of the hot air inside it, consequently maintaining a comfortable
temperature.
SIDE AIR INTAKES — D— Figure 7
The fixed air intakes on the sides allow the extraction of air inside
the helmet through the Venturi effect. Their shape has been
designed to optimise this effect and therefore ensure a substantial
extraction of air while maintaining perfect aerodynamic efficiency.
The particular shape is also able to reduce turbulence to a
minimum and limit the possibility of the helmet shaking.
FRONT AIR INTAKE — B— Figure 5
The flow of incoming air in the front part of the helmet
may be regulated by adjusting the middle part of the air intake:
- Figure 5: Slide up the central cursor to close the air intake, slide
down to open it
FRONT SIDE AIR INTAKE — B1 — Figure 6
The air flow that enters from the side of the helmet can be regulated
by activating the cursor on the intake.
-Figure 6: move the cursor outwards to open the air intakes/Move the
cursor towards the middle of the helmet to close the air intakes.
CLOSE
CLOSE
OPEN
OPEN
25
FIGURE 5
FIGURE 6
B
B1B1
FIGURE 7
C
D

EN PADDING — E— F— G—
The inner padding, can be easily removed to be washed or
replaced.
Inner central padding: INNER SHELL — E— Figure 8
Assembly and disassembly
The inner shell (E) is fixed to the helmet through 4 press studs (F).
Removing the inner padding
Snap to open the press studs (F) and remove the inner shell (E).
Be very careful when removing the shell, press on the rigid part of
the stud and pull slightly towards the inside of the helmet without
damaging the press stud.
Caution: to avoid damages to the inner lining, before removing
the inner shell make sure that all the press studs have been
unhooked.
Assembly
Insert the shell (E) inside the helmet checking the assembly
direction. Fasten the press studs (F). After fixing the inner shell,
make sure the shell is correctly positioned inside the helmet
(polystyrene padding).
E
26
FIGURA 8
FF
FF

EN
Inner side padding: CHEEK PADS — G— Figure 9
Assembly and disassembly
Removing the pads — Figure 10
Grab the cheek pad (G) from the front part, push it towards the back
part of the helmet and then pull outwards until all the press studs
are unhooked.
Assembly — Figure 11
Turn upside down the cheek pads from the original position.
Insert the fixing hook (H) in the red hooking hole (I)
Put the back part of the cheek pad on the fixed part of the inner
lining. Verify that the fastening strap (L) is correctly inserted in the
appropriate seat (M). Push the cheek pad to the back part of the
helmet and hook the press studs.
Verify that the part was assembled correctly by checking that:
- the cheek pad is firmly locked in position
- the strap is completely free inside the hole and is not blocked
under the cheek pad during assembly.
Only the correct assembly of the cheek pad and the correct
positioning of the strap will assure the proper efficacy of the
retention system. During use, the locking lever must always be
fixed in lock position; if it cannot be locked correctly do not use
the helmet.
FIGURE 9
G
G
G
G
FIGURE 10
G
27
H
L
M
I
FIGURE 11

EN VISIOR— N—
The visor must be periodically cleaned and controlled. If the visor
is dirty and/or has bad scratches on the surface there could be
unusual light reflections or deviations, which may jeopardize safety.
Immediately replace the visor if there are these problems.
How to operate — Figure 12
The Visor has to be operated only by using the lifting lever.
Do not open it using other areas to avoid causing accidental
damages (scratches or lines) or dirtying the field of vision.
Opening the visor: push lightly the lifting lever outwards (O),
to unlock the tab from its seat (P) under the gasket and lift it up.
Closing the visor: to lock the visor in position, lower it until the tab
is blocked inside its seat (P) in the gasket.
There are two locking positions: intermediate and visor completely
open.The visor must be opened or closed completely up to the
lock position. The visor is correctly locked into position when it
clicks into its seat. To unlock the visor from the lock position just
follow the above procedure, lightly press during initial phase of the
movement until the visor is unlocked.
While riding the motorcycle the visor must never be left in the
intermediate positions; it must always be locked in the locking
positions.
N
N
O
P
O
FIGURE 12
28

EN
Visor closure and safety position:
To unlock the visor: Slide the lock to the left to release from safety position
FIGURE 12A
FIGURE 12B 29
First closing fit Slide the lock on the visor to the right to insert
the safety position

EN
Removing the visor — Figure 13
Open the visor until it is completely open.
Slide the lever (Q) and Keep it in tension (Q)
Remove the visor from its mechanism by rotating and at the same
time by pulling it outwards.
Repeat the operation on the opposite side.
Assembly — Figure 14
To assure the proper operation of the rotation system of the visor,
before fitting the visor back on, verify that all the parts (seats
on helmet, visor surface in contact with the moving parts) are
perfectly clean.
Open the visor completely. Position the visor on the mechanism so
that the rotation seat is inserted in the rotation ring.
1) Slide the lever (Q)
2) Press slightly to stick the hooks on the visor into the slots on the
rotation mechanisms
Repeat the operation on the opposite side.
After fitting the mechanism verify that the visor is tightly fixed to
the helmet, that it rotates freely and that it locks correctly into the
locking positions.
If this doesn’t happen and the rotation mechanism of the visor
doesn’t work correctly, do not use the helmet and contact Suomy
authorized personnel only.
FIGURE 14
30
1
2
Q
S
FIGURE13
1
Q
Q

EN
VISOR MECHANISM
Replacement — Figure 16
Removing the mechanism
After removing the visor as indicated in the paragraphs above,
loosen and remove the screws (R-S – S1); then remove the
mechanism from the shell.
Fitting the mechanism
The mechanisms are not interchangeable. Before proceeding it is
necessary to identify the correct assembly side;
Put the mechanism on the shell, insert the screws tightening them.
After fitting the parts verify that the mechanisms are positioned
correctly and tightly fixed to the shell. Then fit the visor and adjust
it as specified in the above paragraphs.
After fitting the mechanism verify that the visor is tightly fixed to
the helmet, that it rotates freely and that it locks correctly into the
locking positions.
If this doesn’t happen and the rotation mechanism of the visor
doesn’t work correctly, do not use the helmet and contact
authorized Suomy personnel only.
FIGURE 16
FIGURE 15
Adjustment — Figure 15
If after replacing the part, or after long use of the helmet, you
experience infiltration from the closed visor, it may be necessary to
adjust the mechanisms of the visor.
Lift the visor until it is completely open.
Remove the visor, as specified in the previous paragraph.
Loosen the two screw (R-S) without removing them and without
disassembling the mechanism.
Shift horizontally the whole mechanism and tighten the screws.
Repeat the operations on the opposite side by shifting the mechanism
on the same direction of the previous one.
Once finished, check if the visor can be easily closed and if it adheres
to the gasket.
31
R
R
S
S
S
S1

EN SETTING AIR FLOW – CHIN AIR INTAKE
1 Remove the cover by levering on the appropriate hole
located on the chin inside the helmet.
3 Refit the cover by plugging and pressing the hooking teeth in
the appropriate houses and make sure that the cover is completely
hooked to the chin.
2 remove the filter by using appropriate tweezers to increase the air
flow, then refit the cover as shown in the picture.
COVER
FILTER
HOOKING PLUG SEAT COVER HOOKS
32

EN
NOSE GUARD — Z— Figure 19/20
Removal — Figure 19
The nose cover is snapped into place between the cap and the inner
lining of the chin guard. To remove it, all you have to do is pull it
upwards.
Assembly — Figure 20
Place the nose cover in the middle of the visor’s opening, inserting
the tabs between the cap and the chin guard. Press with force on the
nose cover where the tabs are located until the lower edge of the
nose cover is fully adherent to the edge of the cap.
If this doesn’t happen and the nose guard does not adhere to the
edge of the shell or is not positioned correctly, do not use the
helmet and contact authorized Suomy personnel only.
FIGURE 19
FIGURE 20
Z
33

EN HYDRATION SYSTEM
1 Insert the pipe in the hydration system
2 Slide the pipe between the check pad and the
internal part of the helmet, following the trim at
the bottom.
Insert the pipe without the nozzle in its seat T on
the check pads, placed in the left bottom of the
helmet. Slide the pipe in its seat on the check pad
following the bottom trim T1.
3 Insert the pipe in its house T2.
Push it until it comes out of the appropriate exit hole
T3 and then insert the relative nozzle into the pipe.
T
T
T1
T2
T3
34

EN
WARRANTY
Conditions
The warranty is valid from the purchasing date of the product and
must be proven by the receipt (invoice, receipt or any document
that unequivocally identifies the purchasing date as for example,
payment through MAC card or credit card), issued by the person
selling the item.
The interventions carried out under warranty do not extend
the duration of the warranty which is still of two years from the
purchasing date.
The product must not have been modified and/or changed: the
presence of non-original accessories and/or any, even small,
changes to the product, entail the immediate cancellation of the
warranty terms and the release of any responsibilities on Suomy’s
behalf.
The warranty is void when:
• The product has been modified, poorly painted, decorated
with stickers
• Original parts have been replaced with other parts;
The Warranty does not cover damages resulting from:
• Incorrect use or non-compliant with the recommendations and
requirements indicated in this manual;
• Ordinary wear of the product;
• Repairs made by the customers or third parties or by personnel
not belonging to the Suomy Motosport S.r.l. Organization;
• Incorrect use of the product and/or use of the product in
situations that do not comply with the purposes the product has
been designed for or with the modalities indicated in this manual.
Validity
Suomy guarantees exclusively the helmet and its components for a
period of two years from the purchasing date as regards conformity
defects. Suomy undertakes to repair the defective product (or one of its
part) or to replace it (at Suomy Motosport S.r.l.’s discretion), with no extra
charge for the parts and the labor.
The warranty does not cover the alterations of the painted surfaces
resulting from natural wear and tear phenomena (effect of sunlight,
vapors, detergents, crashes, scratches).
35


SUOMY MOTOSPORT S.r.l.
Via Sant’Andrea, 20/A
22040 Lurago d’Erba (CO) Italia
info@suomy.com
www.suomy.com
05/2019 - ALL RIGHTS RESERVED
Other manuals for SR-GP
1
Table of contents
Other SUOMY Motorcycle Accessories manuals

SUOMY
SUOMY TIMELESS Instruction Manual

SUOMY
SUOMY Apex User manual

SUOMY
SUOMY 3LOGY User manual

SUOMY
SUOMY SCRAMBLER Instruction Manual

SUOMY
SUOMY TREK User manual

SUOMY
SUOMY GLIDER Instruction Manual

SUOMY
SUOMY MX Tourer User manual

SUOMY
SUOMY MrJump User manual

SUOMY
SUOMY NOMAD User manual

SUOMY
SUOMY City Tour User manual
Popular Motorcycle Accessories manuals by other brands

SW-Motech
SW-Motech SBL.23.017.10000/B Mounting instructions

Arnott
Arnott MC-2913 installation manual

Mustang
Mustang 13322 manual

SW-Motech
SW-Motech BC.WPB.00.002.20000 Mounting instructions

hepco & becker
hepco & becker 8003534 00 01 quick start guide

Cycle Protect
Cycle Protect The Liberator Installation & owner's manual