switel TF535 User manual

18
Comfort phone
TF535
Operating Instructions
Please read and observe the following information and keep the operating manual nearby for
future reference!
Safety information
Risk of explosion!
Only use the power adapter plugs supplied!
Only use batteries supplied or ones of the same type!
Always treat batteries with due care and attention and only use batteries as described.
Never use standard and rechargeable batteries together. Never use rechargeable batteries or
standard batteries with different capacities or charge statuses together. Never use standard or
rechargeable batteries which are damaged.
Risk of suffocation through small objects, packaging and protective foil!
Keep children away from the product and its packaging!
Risks to health and the environment from batteries!
Never open, damage or swallow batteries or allow them to pollute the environment. They could contain
toxic and ecologically harmful heavy metals.
Risk of hearing damage!
Avoid listening at full receiver volume.
Risk of property damage.
Prevent exposure to environmental influences, e.g. smoke, dust, vibration, chemicals, moisture, heat
and direct sunlight.
Only allow repairs to be completed by qualified personnel.
Contact your telephone network provider with regard to enabling supplementary services.
INTENDED USE
The telephone is suitable for telephoning within a public telephone network system. Any other use is
considered unintended use. Observe all local directives and regulations. Unauthorised modification or
reconstruction is not permitted. Under no circumstances open the device or complete any repair work
yourself.
PACKAGE CONTENTS
1 Base station, 1 Spiral cable, 1 Telephone connection cable, 1 AA battery, 1 Operating instruction
ENGLISH
WARNING!
CAUTION!
ATTENTION!

19
OPERATING ELEMENTS
1 Display
2 +/- Up/Down
3 SET
4 Call Duration / Stop Watch
5 Index for Speed Dial Numbers
6 Direct call keys
7 Two-touch dialling (+ keys 0-9)
8 Store Button
9 Mute Button
10 R-key (Flash)
11 Redial Button
12 Boost function (+35dB)
13 LED
14 Volume control receiver
15 Ringer tone Control
16 Ringer volume control

20
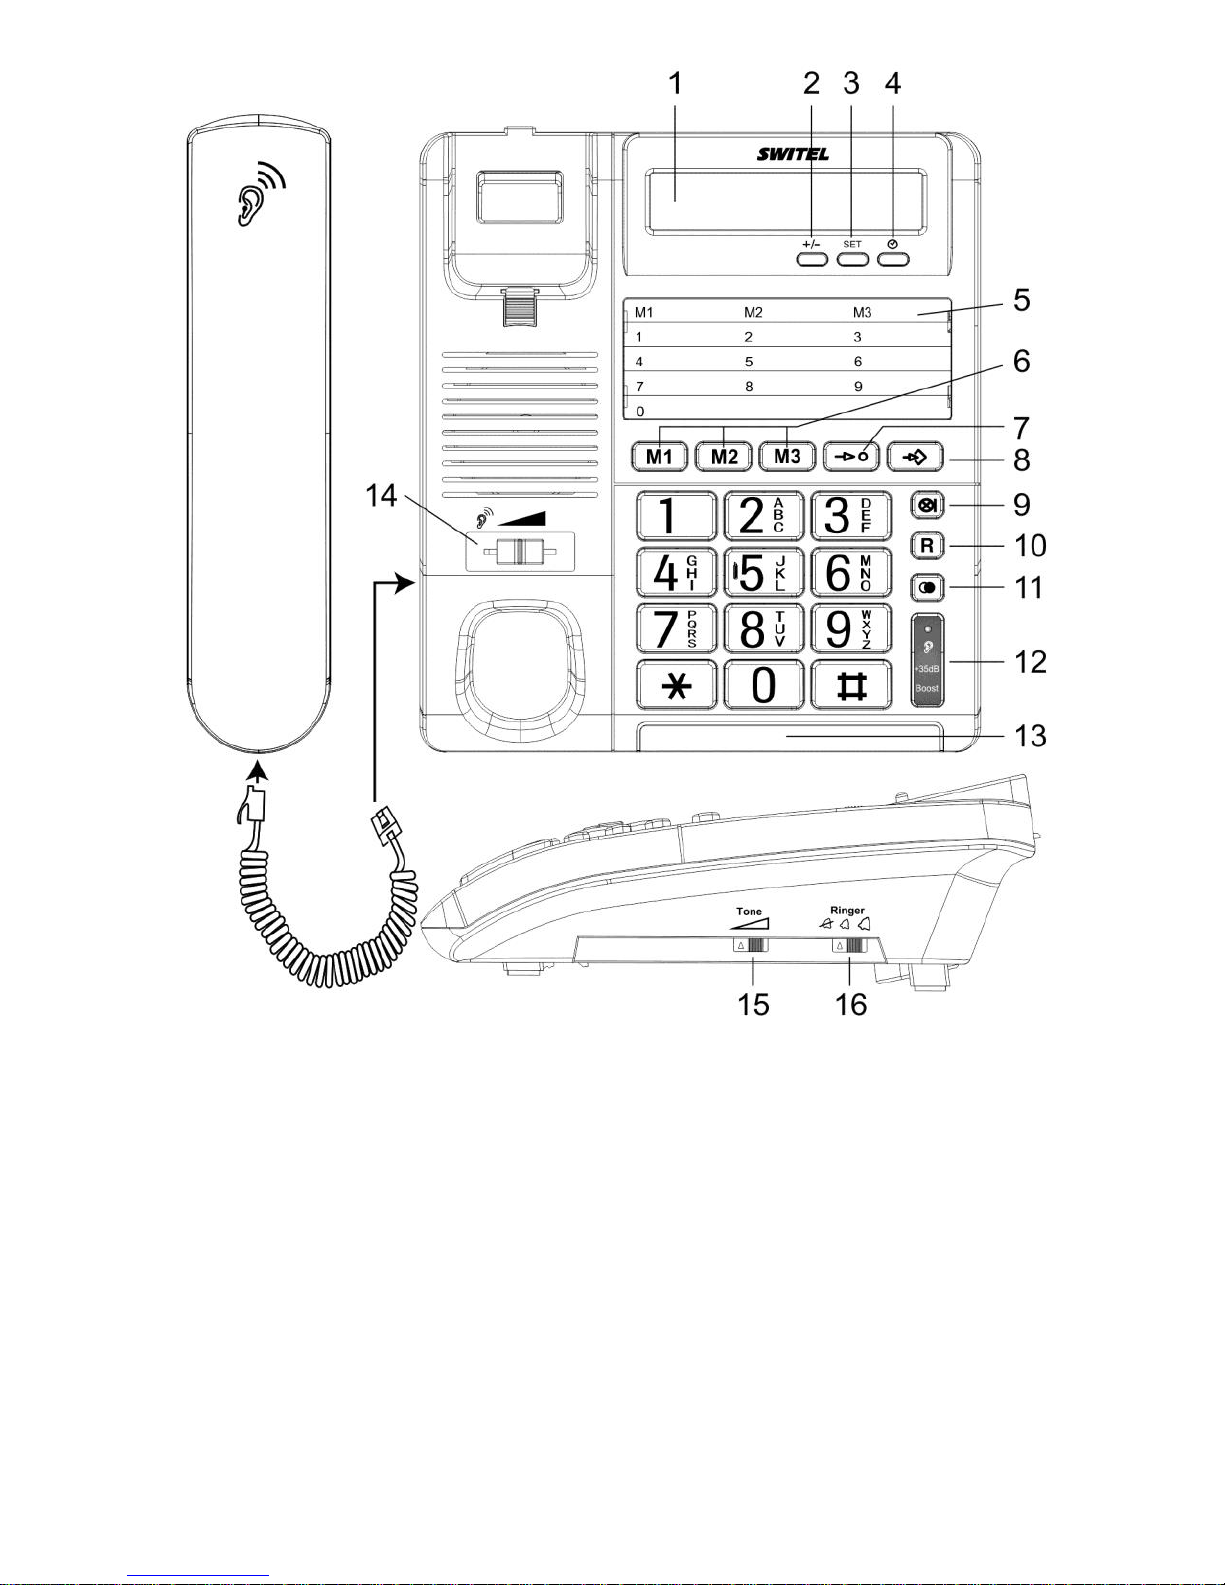
Connecting the handset
After unpacking your telephone, you must first
connect the telephone receiver to the base unit.
The spiral cable needed for this has two identical
connections so that there can be no confusion. First
take one end of the spiral cable and plug it into the
socket at the bottom of the receiver. Now plug the
other end into the socket on the left hand side of the
base unit.
Insert battery
Before connecting your new telephone to the
telephone network, the supplied battery should be
installed. Please always use a type AA 1.5V
alkaline battery. The battery is required for the
display and other features of the telephone. Before
installing or changing the battery make sure that the
telephone is not connected to the telephone
network. The battery compartment is to be found on
the underside of your telephone.
1. Open the battery compartment with a small
screwdriver or a pointed object.
2. Insert the battery. Ensure that the polarity is
correct. Push the "−" pole onto the small spring
and then press the "+" pole downwards.
3. Close the battery compartment.
Note: The battery must be changed when the
display is no longer visible. Disconnect the
telephone line cord before installing or replacing the
battery.
Hearing aid compatible
The telephone has a special circuit working on the
basis of induction for transmitting speech to hearing
aids. Please set your hearing aid to "T".
Setting the clock
The present time is shown in the display. To set the
clock, please proceed as follows:
1. Press the SET button (3) beneath the display
once. The hours figure in the display starts to
flash.
2. Press the +/− button (2) until you see the present
hour in the display.
3. Press the SET button again and the minutes
figure in the display starts to flash.
4. Enter the present number of minutes by
repeatedly pressing the +/-button.
5. The setting of the time is completed by pressing
the SET button.
OPERATION
Using the telephone
1. Lift the receiver and wait until you hear the
dialing tone.
2. Now dial the required telephone number. The
number dialed will be shown in the display. The
display shows a telephone number with a
maximum of 16 digits. If the number dialed is
longer, only the last 16 digits will be displayed.
3. To end the call, simply replace the receiver.
Receiving calls
As soon as you receive a call you will hear the
ringing tone and the visual call indicator will come
on at each ring. The call can now be accepted by
lifting the receiver.
Increasing the volume of the receiver
If the caller’s voice should ever be too quiet, you
can increase the volume of the receiver with the
slide switch (14) during the call.
NOTE: The changed volume setting is not saved
and must be increased again for the next call if
required.
Redial
If a connection that you have dialed is engaged or
you were unable to get through, simply replace the
receiver. The last number dialed remains stored in
the telephone automatically.
To use the redial facility, lift the receiver and press
the redial button (11).The stored redial number
will now be dialed.
Call duration display
After dialing the telephone number, the current call
duration in minutes and seconds will be shown in
the display after a few seconds.
You can also use the internal clock as a stopwatch.
To do this, press the button (4) with the receiver
on the hook or during a call. The time measurement
will be stopped using the same button . The
measured time will still be shown in the display for a
few seconds and the display then jumps back to
showing the present time.
Adjustable ringing tone
By means of the slide switches “Ringer”
(16) and “Tone” (15) on the right hand
side of your telephone you can choose the settings
to match your requirements. If at any time you do
not want to be disturbed, use the "OFF" setting.

21
Direct and speed dial numbers
You can store telephone numbers for direct dialing
on the red buttons M1, M2 and M3 (6). The direct
dial buttons are suitable for use as emergency call
buttons. An additional ten important numbers can
be stored as speed dial numbers.
Storing direct and speed dial numbers
1. Lift the handset.
2. Press the store button (8).
3. Enter the telephone number using the number
pad. The maximum length is 16 digits.
4. Press the store button again.
5. Now press the required direct dial button M1, M2
or M3 or a button on the number pad (0-9) to
save the telephone number.
6. Replace the handset.
NOTE: Press the button if you need to insert a
pause in the telephone number.
Storage locations already used are deleted
automatically when you store a new telephone
number in this location.
The numbers stored can be recorded on the index
(5) underneath the display. For this purpose, the
cover can be removed with a pointed object.
Dialing using the direct dial buttons
1. Lift the handset and wait for a dial tone.
2. Press the Memory Button M1-M3, the stored
telephone number will now be dialed.
Dialing using the speed dial buttons
1. Lift the handset and wait for a dial tone.
2. Press the speed dial button (7) and the
required storage location from 0 to 9 on the number
pad.
Recall
Press the recall button R(10) followed by the
extension number to transfer calls when connected
to a PBX (TBR only).
Access to additional network services can be
gained by using the recall button R, and #
Buttons. Contact your network operator for more
information.
Dialing and storing telephone numbers when
using private exchanges
NOTE: The pause function after an outside line
code described in this chapter is only required on
older private exchanges.
With some private exchanges, there is a short
pause between the code for the outside line
(usually 0 or 9) and the dialing tone. When dialing
manually and when dialing using the direct dial and
speed dial buttons, this pause can be entered along
with the number so that the following digits are not
dialed too quickly.
Entering the pause when dialing manually
Press the (11) button once between the
number for the outside line and the actual
telephone number. The pause will be shown by a
"P" in the display.
After connecting to an outside line your telephone
will wait for three seconds before dialing the actual
telephone number.
Storing the pause
When storing a number, simply press the button
(11) after the number for the outside line and
before the actual telephone number. The pause will
be shown by a "P" in the display. When dialing with
the direct dial or speed dial buttons a pause of
three seconds will automatically be inserted after
the number for the outside line.
Mute
While talking, press button (9), the other side
will not hear anything.
Amplification & Receiver volume control
The receiver volume can be boosted up to +35dB
max. during a conversation. Press the +35dB
button (12), and the Boost LED (13) will light.
You can increase the handset volume by turning
the volume slide switch (14, located
under the handset) to the required listening level.
You can turn off the boost function by pressing
the +35dB button at any time during your
conversation, the Boost LED will turn off and the
volume will return to normal level. When you
replace the handset to the cradle after the call, the
boost volume will be reset to normal automatically.
NOTE: Only press the +35dB boost Button if you
really need this additional amplification.
Warning: Setting your earpiece volume too high
can damage your hearing!!!

22
Service hotline
In the case of technical problems, contact our
Service hotline. Switzerland: Tel. 0900 00 1675
(national charges, Swisscom at time of going to
print: CHF 2.60/min). In the case of claims under
the terms of guarantee, contact your sales outlet.
Maintenance
Clean the surface of the housing with a soft, fluff-
free cloth. Do not use any cleaning agents or
solvents.
Guarantee
SWITEL equipment is produced and tested
according to the latest production methods. The
implementation of carefully chosen materials and
highly developed technologies ensure trouble-free
functioning and a long service life. The terms of
guarantee do not apply when a device malfunction
was caused by the mobile telecommunications
network operator/provider. The terms of guarantee
do not apply to the batteries or power packs used in
the products. The period of guarantee is 24 months
from the date of purchase. All deficiencies related to
material or manufacturing errors within the period of
guarantee will be redressed free of charge. Rights
to claims under the terms of guarantee are annulled
following tampering by the purchaser or third parties.
Damage caused as the result of improper handling
or operation, normal wear and tear, incorrect
positioning or storage, improper connection or
installation or Acts of God and other external
influences are excluded from the terms of
guarantee. In the case of complaints, we reserve
the right to repair defective parts, replace them or
replace the entire device. Replaced parts or devices
become our property. Rights to compensation in the
case of damage are excluded where there is no
evidence of intent or gross negligence by the
manufacturer. If your device does show signs of a
defect within the period of guarantee, please
contact the sales outlet where you purchased the
SWITEL device, producing the purchase receipt as
evidence. All claims under the terms of guarantee in
accordance with this agreement can only be
asserted at the sales outlet. No claims under the
terms of guarantee can be asserted after a period
of two years from the date of purchase and hand-
over of the product.
Disposal
In order to dispose of your device, take it
to a collection point provided by your local
public waste authorities (e.g. recycling
centre). According to the laws on the
disposal of electronic and electrical
devices, owners are obliged to dispose of
old electronic and electrical devices in a
separate waste container. The adjacent symbol
indicates that the device must not be disposed of in
normal domestic waste!
You are legally obliged to dispose of power packs
and batteries at the point of sale or in the
corresponding containers provided at collection
points by local public waste authorities. Disposal is
free of charge. The symbols indicate that the
batteries must not be disposed of in normal
domestic waste and that they must be brought to
collection points provided by local public waste
authorities. Packaging materials must be disposed
of according to local regulations.
Declaration of Conformity
This device fulfils the requirements stipulated in the
Directive 1999/5/EC on radio equipment and
telecommunications terminal equipment and the
mutual recognition of their conformity. Conformity
with the above mentioned directive is confirmed by
the CE mark on the device. To view the complete
Declaration of Conformity, please refer to the free
download available on our website
www.switel.com
Technical data (All rights reserved)
Feature
Value
TF535
W x H x D / Weight
180x205x86mm / 737g
Flash Time
100/300/600 mS
Display
7 segment display + 5x5 matrix
Table of contents
Other switel Telephone manuals

switel
switel DF150 Series User manual

switel
switel DC 60012 Combo User manual

switel
switel M 300 User manual

switel
switel TC 29 clip User manual

switel
switel TE18 User manual

switel
switel DE18X User manual

switel
switel T10 clip User manual

switel
switel DC 70x User manual

switel
switel T9 User manual

switel
switel POWERTEL TF 520 User manual

switel
switel CF 60 User manual

switel
switel TC 30 User manual

switel
switel DC55x User manual

switel
switel TC42 User manual

switel
switel TC 39 User manual

switel
switel DC631 User manual

switel
switel TC49S User manual

switel
switel T 36 clip User manual

switel
switel TC 37 CLI User manual

switel
switel Vita DCT 5007x Combo User manual